1
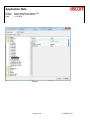
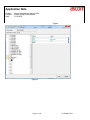
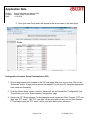
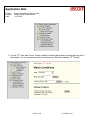
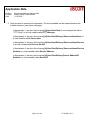
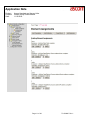
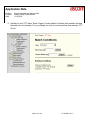
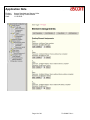
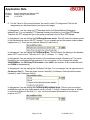
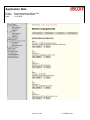
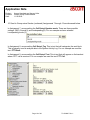
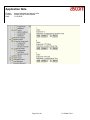
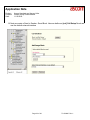
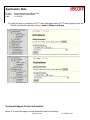
Product
Bulletin
Application
Note
Product:
Purpose:
Date:
Ascom Handsets and Ascom Unite
Instant Group Communicaton
11/15/2010
Configuring Push to Talk Using/Group Conferencing Ascom Handsets
& Ascom IGC (Instant Group Communicator).
This document outlines the necessary steps and guidelines to configure a system for Push to Talk
(PTT) application using Ascom’s handset and IGC. It is assumed that the user has already installed
the appropriate UNITE products, according to their respective installation guides and conferencing
equipment. (See Related Documents section)
Note that the IGC allows for initiation of group conferencing when Alarm and or Data is sent from the
Ascom handset.
The steps, screen shots, and command line syntax depicted throughout this document are based
upon d62 software version 3.0.15, IMS2 software version 2.72, and IGC software version (XGate)
3.00.
Equipment
D62 handsets
I62 handsets
IMS2
IGC
Software
3.0.15 or later
2.x
2.72 or later
3.00 or later
Handset Configuration
Device Manager Parameters
There are four ways that we can configure a handset to send a group PTT/Conference message. The
creation of a Soft-Key, the creation of a Hot Key, using the Service Menu, or through the use of the
Alarm button. All options will require the sending of data/number that will be used by UNITE to
establish a PTT conference. For the examples shown below, the data/number was chosen to be
“2222”, however the data/number is configurable.
Soft Key
Utilizing the Ascom Device Manager, we can first set the soft key to use. In this example we
chose the middle soft key and gave it a name of PTTIGC. The soft key must be point to a
service which will send the appropriate data/number. In this example we chose to use Service
1. See Figure 1. Service 1 is given a name (Example PTTIGC), a Type (Send Data) and the
data/number (2222 in this example). See Figure 2.
Page 1 of 26
TL-000045 Rev 1
Product
Bulletin
Application
Note
Product:
Purpose:
Date:
Ascom Handsets and Ascom Unite
Instant Group Communicaton
11/15/2010
Figure 1
Page 2 of 26
TL-000045 Rev 1
Product
Bulletin
Application
Note
Product:
Purpose:
Date:
Ascom Handsets and Ascom Unite
Instant Group Communicaton
11/15/2010
Figure
Figure 2
Page 3 of 26
TL-000045 Rev 1
Product
Bulletin
Application
Note
Product:
Purpose:
Date:
Ascom Handsets and Ascom Unite
Instant Group Communicaton
11/15/2010
Hot Key
Utilizing the Device Manager, we can set the Function to Execute a Service. In this example
we use Hot Key 0 and point it to Service 1. See figure 3 for Hot Key Configuration.
Figure 3
Page 4 of 26
TL-000045 Rev 1
Product
Bulletin
Application
Note
Product:
Purpose:
Date:
Ascom Handsets and Ascom Unite
Instant Group Communicaton
11/15/2010
Alarm (Handset License Dependent)
Utilizing the Device Manager, we set the Alarm data/number to have a value of “2222”. When a
'Personal Alarm' (two short presses on the alarm button) is sent, the Alarm data/number will be
sent to the IGC. See Figure 4 for Alarm button configuration example.
Page 5 of 26
TL-000045 Rev 1
Product
Bulletin
Application
Note
Product:
Purpose:
Date:
Ascom Handsets and Ascom Unite
Instant Group Communicaton
11/15/2010
Ascom UNITE Configuration
Configuration of IMS
1. Navigate to the IMS web interface (http://xxx.xx.xx.xx/admin)
2. If you are using a Soft Key, Hot Key, or Service Menu to generate the PTT functionality, make
sure the IMS Message Distribution for Mobile Data includes your IGC address. For this
example our IGC address is: 172.20.96.65/EventHandler.
3. If you are using the Alarm to generate the PTT functionality, make sure the IMS Message
Distribution for Alarm includes your IGC address. Again for this example our IGC address is:
172.20.96.65/EventHandler.
.
Page 6 of 26
TL-000045 Rev 1
Product
Bulletin
Application
Note
Product:
Purpose:
Date:
Ascom Handsets and Ascom Unite
Instant Group Communicaton
11/15/2010
Configuration of ACS
1. Navigate to the ACS web interface (http://xxx.xx.xx.xx)
2. When the ACS web page appears click on the “ESS Administration” button.
3. Next click on the “Group Handling” Tab.
4. Create a Group that includes the phone numbers you want called when an event occurs and
name the Group to match the Data field you set in your “Soft Key”, “Hot Key” or “Alarm”. For
this example we created a Group named “2222 Group” and the handsets in that group are
8716 and 3460.
Page 7 of 26
TL-000045 Rev 1
Product
Bulletin
Application
Note
Product:
Purpose:
Date:
Ascom Handsets and Ascom Unite
Instant Group Communicaton
11/15/2010
5. Save your new Group and it will appear in the list as shown in the next figure.
Configuration of Instant Group Communicator (IGC)
1. Open a web browser and navigate to the IGC web page (http://xxx.xxx.xxx.xxx) Click on the
“Advanced” button. A login pop-up window will appear. Log into the IGC using the appropriate
User name and Password.
2. From the “Basic Setup” screen, click the “Advanced” tab and choose the “Configuration” link.
This will take you to the “Event Handler Configuration” page
3. Create your PTT Event triggers. For this example we will create two Event Triggers: “PTT user
data” and “PTT alarm”. The “PTT user data” will be used with soft key, hot key, and Services
PTT activations and the “PTT alarm” will be used with alarm button activation.
Page 8 of 26
TL-000045 Rev 1
Product
Bulletin
Application
Note
Product:
Purpose:
Date:
Ascom Handsets and Ascom Unite
Instant Group Communicaton
11/15/2010
4. For the “PTT user data” Event. Create a Match Condition that matches the data that was set in
the handset. For our example we look for incoming User Data that matches “PTT Group”.
Page 9 of 26
TL-000045 Rev 1
Product
Bulletin
Application
Note
Product:
Purpose:
Date:
Ascom Handsets and Ascom Unite
Instant Group Communicaton
11/15/2010
5. Next we need to create five Assignments. The local variables can be named whatever the
installer chooses. (see figure next page)
In Assignment 1, we store the incoming [in]User Data/:Data (in our example this will be
“PTT Group”) in a local variable called PTT Message
In Assignment 2, we store the incoming [in]User Data/Delivery/:Source address/User in
a local variable called Source User
In Assignment 3, we store the incoming [in]User Data/Delivery/:Source address/Service
in a local variable called Source Service
In Assignment 4, we store the incoming [in]User Data/Delivery/:Source address/Service
Address in a local variable called Service Address
In Assignment 5, we store the incoming [in]User Data/Delivery/Source Address/IP
Address in a local variable called Source IP.
Page 10 of 26
TL-000045 Rev 1
Product
Bulletin
Application
Note
Product:
Purpose:
Date:
Ascom Handsets and Ascom Unite
Instant Group Communicaton
11/15/2010
Page 11 of 26
TL-000045 Rev 1
Product
Bulletin
Application
Note
Product:
Purpose:
Date:
Ascom Handsets and Ascom Unite
Instant Group Communicaton
11/15/2010
6. Similarly for the “PTT alarm” Event Trigger. Create a Match Condition that matches the data
that was set in the handset. For our example, we look for incoming Alarm that matches “PTT
Group”.
Page 12 of 26
TL-000045 Rev 1
Product
Bulletin
Application
Note
Product:
Purpose:
Date:
Ascom Handsets and Ascom Unite
Instant Group Communicaton
11/15/2010
7. Next we need to create five Assignments. The local variables can be named whatever the
installer chooses. (see figure next page)
In Assignment 1, we store the incoming [in]Alarm/:Data (in our example this will be “PTT
Group”) in a local variable called PTT Message.
In Assignment 2, we store the incoming [in]Alarm/Delivery/:Source address/User in a local
variable called Source User.
In Assignment 3, we store the incoming [in]Alarm/Delivery/:Source address/Service in a
local variable called Source Service.
In Assignment 4, we store the incoming [in]Alarm/Delivery/:Source address/Service
address in a local variable called Service Address.
In Assignment 5, we store the incoming [in]Alarm/Delivery/Source address/IP address in a
local variable called Source IP.
Page 13 of 26
TL-000045 Rev 1
Product
Bulletin
Application
Note
Product:
Purpose:
Date:
Ascom Handsets and Ascom Unite
Instant Group Communicaton
11/15/2010
Page 14 of 26
TL-000045 Rev 1
Product
Bulletin
Application
Note
Product:
Purpose:
Date:
Ascom Handsets and Ascom Unite
Instant Group Communicaton
11/15/2010
8. In order for the originator to function in PTT mode, they must receive the outgoing PTT
message. We must create two External Actions: the “Send to Sender” action will send the PTT
message to the handset that initiated the PTT request and the “Send to Group minus Sender”.
action will send the PTT message to the group. We also remove the sender from the group to
handle the case where the PTT request is being made by a member of the group. This will
prevent the sender from receiving a double message.
Page 15 of 26
TL-000045 Rev 1
Product
Bulletin
Application
Note
Product:
Purpose:
Date:
Ascom Handsets and Ascom Unite
Instant Group Communicaton
11/15/2010
9. For the “Send to Group minus Sender” we need to make 13 Assignments The first six
assignments are discussed below (see figure next page).
In Assignment 1 we are using our PTT Message as the Call Setup/Delivery/Destination
address/User. For our example PTT Message contains the Alarm or User Data PTT Group.
Therefore the PTT request will go to the group we defined in the ACS as PTT Group.
In Assignment 2 we are setting the Call Setup/:Answer mode. This will control the answer mode
of the handsets that receive the PTT request. For our example we set the answer mode to Auto
(appears as a 1), There are two choices: Manual (0) and Auto(1).
In Assignment 3 we are setting the Call Setup/:Beep. This will control the alerting in the handset,
when a PTT event occurs. The value is 0-7 (i.e. 0 = silence, 1 = 1 beep…etc).
In Assignment 4 we are placing the number of the conference bridge followed by a P for pause
followed by the conference bridge password, if one is required. (In our example we assign
4444P2588# as the Call Setup/:Call number. Here 4444 is the number of the conference bride
and 2588# is the password.)
In Assignment 5 we are setting the Call Setup/:Call type. For our example the call type was set to
Conference Call (2). There are three choices: Normal(0), Conference Call individual member
initiated(1), and Conference Call(2).
In Assignment 6 we are setting the Call Setup/:Microphone mode. There is only one setting
available through the drop down window, which is Push To Talk(0). However the user is allowed
to enter other digits into the field (1,2…etc), but this will cause the handsets to not function
properly for PTT.
Page 16 of 26
TL-000045 Rev 1
Product
Bulletin
Application
Note
Product:
Purpose:
Date:
Ascom Handsets and Ascom Unite
Instant Group Communicaton
11/15/2010
Page 17 of 26
TL-000045 Rev 1
Product
Bulletin
Application
Note
Product:
Purpose:
Date:
Ascom Handsets and Ascom Unite
Instant Group Communicaton
11/15/2010
10. Send to Group minus Sender (continued) Assignments 7 through 12 are discussed below.
In Assignment 7, we are setting the Call Setup/:Speaker mode. There are three possible
settings: Off(0), Normal(1),and Loudspeaking(2). For our example we have selected
Loudspeaking mode (2).
.
In Assignment 8, we are setting Call Setup/:Tag. This is text that will categorize the sent block.
This is primarily used to analyze data in the System Activity Log. For our example we used the
text: PTT Block.
In Assignment 9, we are setting the Call Setup/:Text. This is text that will appear on the handset
when a PTT call is received. For our example we used the text: PTT Call.
Page 18 of 26
TL-000045 Rev 1
Product
Bulletin
Application
Note
Product:
Purpose:
Date:
Ascom Handsets and Ascom Unite
Instant Group Communicaton
11/15/2010
11. Send to Group minus Sender (continued) Assignments 10 through 13 are discussed below.
These assignments are used to exclude the user that initiated the PTT call from the group call,
if they are a member of that group.
In Assignment 10, we are setting the Call Setup/Delivery/:Exclude address(1)/User to the value
of our local variable Source User. Earlier we stored the user that triggered the PTT call in this
variable.
In Assignment 11 we are setting the Call Setup/Delivery/:Exclude address(1)/Service to the
value of our local variable Source Service. Earlier we stored the source of the user that triggered
the PTT call in this variable.
In Assignment 12 we are setting the Call Setup/Delivery/:Exclude address(1)/Service address
to the value of our local variable Service Address. Earlier we stored the service address of the
user that triggered the PTT call in this variable.
In Assignment 13 we are setting the Call Setup/Delivery/:Exclude address(1)/IP address to the
value of our local variable Source IP. Earlier we stored the service IP address of the user that
triggered the PTT call in this variable.
Page 19 of 26
TL-000045 Rev 1
Product
Bulletin
Application
Note
Product:
Purpose:
Date:
Ascom Handsets and Ascom Unite
Instant Group Communicaton
11/15/2010
12. Next we create a Send to Group minus Sender - Send Block. Here we define an [out] Call
Setup/ block and use the default external interface
Page 20 of 26
TL-000045 Rev 1
Product
Bulletin
Application
Note
Product:
Purpose:
Date:
Ascom Handsets and Ascom Unite
Instant Group Communicaton
11/15/2010
13. Next we need to create our assignments in the Send to Sender external action.
The first assignment stores the user who generated the PTT event in the Call
Setup/Delivery/Destination/:Destination address/User. The remaining eight assignments are the
same as we did above in the Send to Group minus Sender external action. We do not need
assignments 10 through 13.
Page 21 of 26
TL-000045 Rev 1
Product
Bulletin
Application
Note
Product:
Purpose:
Date:
Ascom Handsets and Ascom Unite
Instant Group Communicaton
11/15/2010
Page 22 of 26
TL-000045 Rev 1
Product
Bulletin
Application
Note
Product:
Purpose:
Date:
Ascom Handsets and Ascom Unite
Instant Group Communicaton
11/15/2010
14. Next we create a Send to Sender - Send Block. Here we define an [out] Call Setup/ block and
use the default external interface
Page 23 of 26
TL-000045 Rev 1
Product
Bulletin
Application
Note
Product:
Purpose:
Date:
Ascom Handsets and Ascom Unite
Instant Group Communicaton
11/15/2010
15. Now that we have created our two actions we can create our Action Group. For our example
we have created the Action Group: Send to Sender and Group and in the group we included
both of our external actions: Send to Sender and Send to Group minus Sender
Page 24 of 26
TL-000045 Rev 1
Product
Bulletin
Application
Note
Product:
Purpose:
Date:
Ascom Handsets and Ascom Unite
Instant Group Communicaton
11/15/2010
16. Lastly we need to go back to our PTT User Data trigger and our PTT alarm trigger and set our
Default Activations to the Action Group: Send to Sender and Group.
Technical Support Contact Information
Ascom U.S. technical support can be obtained through the following:
Page 25 of 26
TL-000045 Rev 1
Product
Bulletin
Application
Note
Product:
Purpose:
Date:
Ascom Handsets and Ascom Unite
Instant Group Communicaton
11/15/2010
Phone: 1-877-71ASCOM or 1-877-712-7266
Email: [email protected]
Reference Documents
TD 92338GB
TD 92364GB
TD 92329GB
TD 92232GB
TD 92161GB
TD 92253GB
Installation and Operation Manual XGate (IGC)
User Manual Administration, XGate (IGC)
Programming Guide, Event Handler (IGC)
Installation Guide ELLISE2
Installation and Operation Manual Integrated Message Server (IMS)
Installation and Operation Manual for Enhanced System Services (ACS)
Page 26 of 26
TL-000045 Rev 1