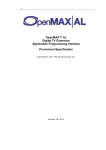
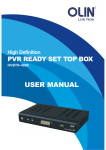
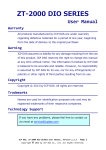
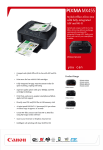
1
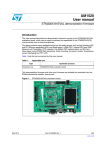
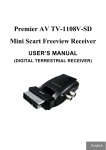
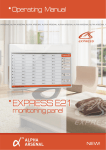
042701 (24")
1
60cm(24")
: 042701
60
042701 (23.6")
TM M4x8 3PCS
75
6
75
Step 1:
Place a soft, cushioned material
on top of a flat surface to prevent
damaging the LED LCD screen.
Then place the TV monitor
flat on top, with the screen
side facing down, and attach
the stand to the support
column with the three
supplied self-tapping screws,
as illustrated on the right.
Step 2:
Fasten the two supplied flat
head screws between the
support column and the
back cover,
as illustrated on the right.
1 2
3 4 5
6 7 8
1. Remote sensor.
2. Power indicator.
3. POWER : Turn the TV on or off.
4. SOURCE : Select the input signal.
5. MENU : Press to select the main menu.
6. CH- : TV channel down.
7. CH+: TV channel up.
8. VOL- : Volume down.
9. VOL+ : Volume up.
9
HEAD- PC
DC 12V PHONE AUDIO
IN
OUT
1
2
3
VGA
4
Y
Pb
5
Pr
USB
11
HDMI
10
ANT
9
COAX
1. DC 12V IN
2. HEADPHONE/audio out terminal.
3. PC AUDIO in terminal.
4. VGA input terminal.
5. YPBPR input terminal.
6. VIDEO input terminal.
7. AUDIO input terminal.
8. COAX digital output terminal.
9. TV antenna.
10. HDMI input terminal.
11. USB input terminal.
8
VIDEO
6
R - IN - L
7
HEAD- PC
DC 12V PHONE AUDIO
IN
OUT
HEAD- PC
DC 12V PHONE AUDIO
IN
OUT
VGA
VGA
Y
Y
Pb
Pb
Pr
Pr
VIDEO
VIDEO
R - IN - L
R - IN - L
HEAD- PC
DC 12V PHONE AUDIO
IN
OUT
COAX
ANT
VGA
HDMI
Y
USB
Pb
Pr
VIDEO
R - IN - L
HEAD- PC
DC 12V PHONE AUDIO
IN
OUT
COAX
ANT
VGA
HDMI
Y
USB
Pb
Pr
VIDEO
R - IN - L
:TTurn the TV on
o or off.
: Press
P
this buttton to mute or restore so
ound.
NICA
AM/A2: press this key to select the sterreo mode.
ASPECT: Press to adjust picture ratio.
PMODE: Select picture mode.
SMOD
DE: Select so
ound mode.
0-9: Select
S
and sw
witch to a channel using 0 - 9.
-/--: Switch
S
the prrogram digit.
: Switch back and front be
etween the current
c
and p
previous channels. Repeat
the program in MEDIA model
DISPL
LAY: Display TV information.
EJECT
T
:Press t o eject the DVD-disc in DVD mode
: Start to reco
ord (PVR Function).
(The USB drive is formatted when recording so make sure you do not have any
important files stored on it).
AUTO
O: Adjusts the picture automatically in PC
P mode.
PROG
GRAM : Selects the DVD program.
INTRO
O :Press this button to display
d
the Chapter time. (Used in models with a
DVD player only).
GOTO
O͵ Jump to a desired Chapter or Title.
(Used
d for model with
w
DVD player only).
AB : Select
S
the seg
gment to rep
peat.
RED, GREEN, YELL
LOW, BLUE: Used for different menu options.
SLEEP
P: Set the sleep timer.
SOUR
RCE: Press to change signal source.
ENTE
ER: Enter the selected optiion or executte the selecte
ed operation..
MENU
U: Press this button to en
nter the main
n menu for va
arious option
nal adjustable
e
settin
ng.
D (On-screen display).
EXIT: Exit the OSD
CH /CH : Chang
ge the chann
nel up and do
own.
SUBT
TITLE: Open
n or close sub
btitle.
T.SHIFT: Press th
he button to
o pause currrent DTV prrogram and start record
d
backg
ground. (Used
d for model with
w
DTV function only)
ANGL
LE : Select the
e angle. (Use
ed for modelss with DVD fu
unction only)
VOL /VOL : Adjjust the volume up/down.
HOLD
D: Freeze a multi-page
m
passage on scre
een in Teletex
xt mode.
Press to
t start playin
ng MEDIA, or to pause pla
ayback.
REVEAL:Preess this button to reveal th
he hidden infformation in Teletext
T
page
e. Press again
n to hide the information.
Press to
t rewind.
SIZE: Display
y the top, botttom or all off page to rea d easily in Te
eletext mode.
repeatedly
DVD
PC
SOURCE
SOURCE
turn
Press the MENU button to display the main menu.
Press /
50
50
1.
2.
3.
Press / button to select the option that you want to adjust in the PICTURE menu.
Press / button to adjust.
previous menu.
Picture Mode
Press
Press
/
/
button to select Picture Mode, then press the OK button to enter sub-menu.
You can change the value of contrast, brightness, color and sharpness when the picture is
in Personal mode. TIP: You can press the PMODE button on the remote control to change
the Picture Mode directly.
Brightness
Press
Press
/
/
button to select Brightness, then press the OK button to enter sub-menu.
button to adjust.
Contrast
Press
Press
/
/
button to select Contrast, then press the OK button to enter sub-menu.
button to adjust.
Sharpness
Press
/
button to select Sharpness, then press
/
button to adjust.
/
button to adjust.
Saturation
Press
/
button to select Saturation, then press
Hue
Use in compensating colour changes with the transmission in the NTSC system.
Colour Temp
Press
/
/
/
/
21
AdvancedSettings
NR(Noise Reduction)
Press / button to select NR(Noise Reduction), then press/ button to select.
(Available options: Off, Weak, Medium, Strong).
MPEG NR(Noise Reduction)
Press / button to select MPEG NR(Noise Reduction), then press
/ button to
select. (Available options: Off, Weak, Medium, Strong).
Dynamic Contrast
Press / button to select Dynamic Contrast, then press/ button to select.
(Available options: Off, Weak, Medium, Strong).
Press the MENU button to display the main menu.
Press /
1.
2.
3.
Press
Press
/
/
button to select the option that you want to adjust in the SOUND menu.
button to adjust.
menu.
Sound Mode
Press / button to select Sound Mode, then press OK button to enter sub-menu.
Press /
You can change the Treble and Bass setting when the sound setting is in Personal mode.
Treble
Press /
button to adjust.
/
Bass
Press /
to adjust.
button to select Bass, then press OK button to enter sub-menu. Press
/
button
Balance
Press / button to select Balance, then press the OK button to enter sub-menu. Press
button to adjust.
/
Surround Sound
Press
/
button to select Surround Sound, then press
/
EQ Setting
Press
/
button to select EQ Setting, then press the OK button to enter submenu.
AVL (Auto Volume Level)
Press
/
button to select AVL, then press Press
/
SPDIF
Press
/
/
Audio Description
Press
/
button to select Audio Description, then press the OK button to enter submenu.
Press the MENU button to display the main menu.
Press /
1.
2.
Press
Press
/
/
button to select the option that you want to adjust in the CHANNEL menu.
button to adjust.
previous menu.
Auto Scan
Press / button to select Auto Scan, then press the OK button to enter the sub-menu.
(The default password is 0000)
LCN
OFF
25
Manual Scan
Press
/
button to select Manual Scan, then press Ok button to enter the submenu.
Digital
Digital Manual Scan
Press
/
button to select Digital Manual Scan, then press the OK button to enter submenu.
Analog Manual Scan
Press
/
Channel Edit
Press
/
button to select Channel Edit, then press the OK button to enter submenu.
These three colored keys are the shortcut keys for programming
the channel list.
First press
/
to highlight the channel you want to delete or move or skip, then:
Press the RED button to delete the channel.
Press the GREEN button to skip the selected channel.
(Your TV set will skip the channel automatically when using CH+/- to view the channels.)
Press the BLUE button to set the channel to moving mode, then press / to move it to the
Signal Information
Press / button to select SignalInformation, then press the OK button to select the
detailed information about the signal. Only available when there is a DTVsignal.
29
Press the MENU button to display the main menu.
Press /
1.
2.
Press / button to select the option that you want to adjust in the LOCK menu.
(Default Password: 0000)
Press / button to adjust.
previous menu.
Enter Password
Press / button to select Enter Password, then press the OK button to make the
following 4
Enable (Password)
Press / button to select Enable, then Press /
Channel Locks, Parental Rating and Lock Keypad are available when Enable is on.
Channel Locks
Press
/
button to select Channel Loc
ks, then press the OK button to enter submenu.
Hotel Mode
Hotel Mode is a handy feature for use in shop displays or in situations where you want to
lock certain functions - for instance loc
Press
/
button to select Hotel Mode, then press the OK button to enter submenu.
New Password
Press
/
button to select New Password, then enter a 4 digit number you want to set as
Clear Lock
Press
/
button to select Clear Lock, then press
/
button to select.
NOTE: The default password is “0000” (Administrator password is “4711”).
Press MENU button to display the main menu.
Press /
Setup
OSD Language
Press
Press
/ button to select OSD Language, then press OK button to enter submenu.
/ / / button to select OSD language.
Auto Language
Press / button to select Auto Language, then press Ok button to enter submenu.
Press / / /
Language.
32
Subtitle
Press
/
button to s elect Subtitle,then press the OK button to enter submenu.
letext
Adj
Press /
In DTVsource,press
In ATVsource,press
Blue Screen
/
/
/
y available in DTV and ATVsources.
tton to enter submenu.
button to select Digital Teletext Language.
button to select Decoding Page Language.
button to select Blue Screen,then press
/
Mode Setting
Press
/
/
/
button to select the Mode Setting.
Time Setting
Press
/
button to s.elect time setting then press the ok button to enter the submenu.
HDMI CECControl
Press /
button to select HDMI CEC Control, then press the OK button to enter submenu.
HDMI CEC Control
l
Press / button to select HDMI CEC Control, then press
the following 3 options valid.
/
button to select ON to make
ARC (Audio Return Channel)
Press
/
then press
/
CECMenuControl
Press
/
button to select CECMenu Control, then press the OK button to enter submenu
When selecting this option,
V will display the Home Menu of the connected CEC equipment.
Option
When selecting this option, the V will display the Option menu of the connected CEC equipment.
Content
When selecting this option,
V will display the Disc menu of the connected CEC equipment.
Device Menu
Press / button to select the Device List, then pressthe OK button to enter the submenu.
This menu shows all of the compatible CECdevicesthat are connected to
You can refresh
the CEC device list by accessing this menu, or choose a CEC device from the list.
34
PVR Setting
Press / button to select PVR SETTING, then press the OK button to enter submenu to
check the USB.
FirstTimeSetup
Press / button to select First Time Setup, then press OK button to enter. (Default
Password is 0000).
Reset
Press / button to select Reset,
then press the OK button to enter.
Select “Yes” if you want to reset the
TV to the factory settings.
Software Update (USB)
Use / button to select this
option, then press the OK button to
update software using USB.
The EPG lets you access information on the broadcast programs on screen (eg schedules,
programmes, content descriptions etc.) as well as schedule recordings and reminders.
Press the EPG button on the remote control to display the following interface.
Pressthe BLUE
button to schedule a reminder for the selected programme on the
displayed on screen advising the channel is about to be changed.
Follow the on-screen instructionsto choose the noti ation frequency, change the channel, adjust
the start / end date and time if you wish.Press the OK button to return to the previous screen, or
press the EXIT button to leave the interface.
Pressthe REC
program list.
button to schedule the recording of the programme selected on the
USB DeviceSetup
per below.
The set up will format the USB device,therefore all of the data stored the on device
y recommend you save the content of your USB device to your PC
before starting con
ration.
Press MEN U button to access the PVR SETTINGS menu in
/ button and then press the OK button to select and access the DEVICE LIST interface.
Follow the next steps to format the USB device:
Use / button to select the disk partition that you wish to use for Recording and Timeshift
functions, and then press the RED
button to start formatting the selec ted partition.
Wait until the process ends and then pressthe EXIT button to exit the settings menu.The USB
device will be ready to start using the Recording and Timeshift functions.
Timeshift
pause a live broadcast and move backwards or
forwards in theTV transmission.
depend on the quality of the broadcasting and the free space on the USB device.
Pressthe PLAY button to start viewing the programme from the point it was paused, and use
the remote keys assigned to the playback mode to perform play functions such as fast forward,
rewind, pause, etc.
When watching aTV program inTimeshift mode, the following information will be displayed
on the screen:
The progress bar on top of the information window shows the elapsed time in Blue and
are
displayed below the progress bar.
switch to another channel.
38
Instant Recording
V)
input source.
start the Recording function pressREC button on the remote control and the unit will
start recording the current programme.The following information will be displayed at the
left upper side of the screen:
In this interface,the time already recorded and the total recording time available on
the USBdisk aredisplayed.
nish the Recording function, pressSTOP button, or
just switch to another channel.
Timer Recorder
Press the REC button to schedule the recording of the programme selected on the EPG
programmes list. Follow the on-screen instructions to choose the recording frequency, vary
the channel and adjust the start and end date and time if you wish. Press the MENU button to
return to the previous window, or press the EXIT button to exit the interface.
39
Playlist
Press the MENU button to access the PVR SETTINGS menu in the
bmenu, from this
menu you may play the recorded TVprograms, as well as access the scheduled recordings
list.
Press / buttons to choose the File Manager and press OK to access.Follow the on-screen
instructions to play the TVprograms stored. Press the MENU button to ret urn to the previous
menu, or pressthe EXIT button to exit the interface.
Press / buttons to choose Scheduled Record and pressOK to access.Use the /
buttons to choose a group and follow the on-screen instructions to schedule arecording.
Press the MENU button to reutrn to the previous menu, or press the EXIT button to exit
the interface.
/ YPbPr / PC
.1 PC Settings in the PICTURE menu can be adjusted when the PC Source is selected.
he Screen Mode in the PICTUREmenu and HDMI CECControl section of the Setup
menu is available when the HDMI Source is selected only.
2. Audio Description and Sou
settings in the dio Menu are available only
when the DTV source is selected.
3. There is no Channel menu available for the HDMI/AV/YPbPr/PC Sources.
4
Parantal Ratings and Channel Locks in the PARENTAL CONTROL menu are not
available for the HDMI/AV/YPbPr modes. Parental Ratings are not available for the
ATV source. PC mode also does not have a PARE
CONTROL menu.
5. Audio Languages, Subtit le & PVR Settings in the
menu are not available in
AV/PC mode. dio Languages, Subtit le, eletext & PVR Settings in the
Menu
are not available in HDMI/YPbPr sources.
Before selecting the USB menu, plug in the USB device, then press the SOURCE button to set
the input source to USB. Press / button to select the USB in the Source menu, then press
the OK button to enter.
Press / button to select the option you want to adjust in the main USB menu, then press
the OK button to select.
Photo
Press
/ button to select PHOTO in the main menu, then press the OK button to select.
Press / button to select USB drive you want to watch, then press the OK button to select.
Press /
Press the Exit button to go back to the previous menu.
Music
Press / button to select MUSIC in the main menu, then press the OK button to enter.
Press / button to select drive disk you want to watch, then press the OK button to enter.
Press /
Press the Exit button to go back to the previous menu.
When highlighting the option yo
Movie
Press / button to select MOVIE in the main menu, then press the OK button to enter.
Press / button to select drive disk you want to watch, then press the OK button to enter.
Press /
Press the Exit button to go back to the previous menu.
Text
Press
Press
Press
/
/
/
button to selectTEXT in the main menu, then press the OK button to enter.
button to select drive disk you want to watch, then press OK button to enter.
When highlighting the option yo
General
Audio
Preference
- - General Setup Page - -Panscan
Display
TV
OSD Language
Screen Saver
Last Memory
Wide
64::93
Eng
On
1
Gernal Setup
TV Display:
OSD Language:
Screen Saver:
Last Memory:
Set Tv Display Mode
General
General
Audio
Pre
lefeM
reanrcke
Preference
-- -- General
General Setup Page - TVTV
Display
k
OSD
OSD Language
Language
Screen
Screen Saver
Saver
Last
Last Memory
Memory
Set the TV display mode.
Set the OSD Language.
Set the screen saver.
Resume viewing from the last
position on the DVD.
Display
Wide
On
Eng
On
On
Set Last
AngleMemory
Mark State
Set
General
Audio
Preference
TV Display
Lt / Rt
Stereo
Ang
OSDLanguage
Screen Saver
Last Memory
Audio Setup
Downmix:
Set the downmix mode.
Set Downmix Mode
General
Audio
- - PreferencePage - TV Type
A
Subtitle
DiscMenu
Parental
Password
Default
Preference
udio
AUTO TSC
N
Eng
Eng
Set Tv Standard
General
General
Audio
-- -- PreferencePage - TV
ype
TV TT
ype
A
A
Subtitle
Subtitle
DiscMenu
DiscMenu
Parental
Parental
Password
Password
Default
Default
PAL
Eng
Eng
Preferred
Menu
Language
Load
Factory
Setting
TV Type:
Audio:
Subtitle:
DiscMenu:
Parental:
Password:
Select the audio language.
Select the subtitle language.
Select the disc menu language.
Set the parental control.
Change the password.
(Default is 0000)
Preference
Preference
udio
udio
English
French erman
G
Italian
Spanish
uguese
Port
Reset
Preference Setup
Default:
Load the factory settings.
Chapter
Title
All
O
%
52
53
54
042701
24”(60cm)
LED LCD
550x343x49.6mm
550x401x174mm
VESA 75 x 75
5 kg
55
56