1
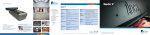
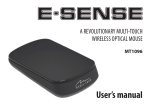
1. Safety Precautions
Safety Matters
Please refer to all safety precautions covered in this user manual
to prevent injury or damage.
This product contains a rechargeable lithium-ion battery. All safety
precautions should be taken into consideration when handling or
operating any type of device that is powered by a battery such as
this product. Do not drop, heat, crush & submerge this product in
water. Do not operate this device in extreme humidity, heat or cold
environments for long periods of time. Misuse of this device may
cause injury and will void the device’s warranty.
Attention to traffc safety
Do not operate or attempt to operate this device while
driving or operating any moving vehicle.
Aircraft Safety
Please do not operate or attempt to operate this device
while on board an aircraft. That may cause interference
with the aircrafts operations and communications devices.
Combustible Agents and Chemicals
Please turn the device off while around fuel or any
combustible agents or chemicals.
Turn off this device in the hospital
Please do not operate or attempt to operate this device in a
hospital. Doing so may cause interference with medical
operations and communications devices. As all wireless
devices, this product may interfere with implanted cardiac
pacemakers, hearing aids and other Medical implant
devices.
1
Interference
All wireless devices may be subject to interference
thus affecting the performance of this product
Replacement parts
Do not use any replacement parts other than
those provided or recommended by the
manufacturer
Do not look directly at or point the laser beam at eyes.
Doing so may cause permanent damage or blindness
to the eyes
2. Overview
This is a wonderful combo, 2.4GHz Wireless mini QWERTY
keyboard, Touch Pad & Laser Pointer combo, with USB interface
receiver.
This product consists not only of normal wireless keyboard keys,
but also of multimedia control keys and PC gaming control keys.
It has built-in programmable smart touch pad which can be used
in horizontal and vertical directions. It has charging indicator, RF
signal indicator and low-voltage indicator.
3. Introduction
Keyboard Layout Illustration
2
14
15
Keyboard Function Description Table
1.
RF Communication indicator
Charging indicator
Battery capacity indicator
2. Left Mouse Button
3. Right Mouse Button
4.5. Multimedia Control Keys
Fn+Esc=Lock Touch Pad(Click & Double Click)
Fn+F1=Mute
Fn+F2=Volume down
Fn+F3=Volume up
Fn+F4=Previous
Fn+F5=Play/Pause
Fn+F6=Next
3
Fn+F7=Internet
Fn+F8=Touchpad 90-degree flip
Fn+1=F9
Fn+2=F10
Fn+3=F11
Fn+4=F12
6. Touchpad
Fn+Touchpad= Mouse Scroll Function
7. Page Down: Fn+PgDn=End
8. Page Up: Fn+PgUp=Home
9. Fn+Enter=Bring up the Task Manager etcs
10. USB Charging Port
11. Fn+
=Touchpad DPI Adjustable Function(500DPI,1000DPI)
12. Power Switch
13. Laser Pointer
14. Laser Pointer Button
15. 2.4GHz Wireless Receiver
Touch Pad
The touchpad can be used in a horizontal or vertical position. To
switch between horizontal or vertical mode, hold the Fn key and
hit the F8 key.
Connecting the receiver
Slide the r eceiver out fr om the USB Receiver storage,
compar tment at the back of keyboar d, then insert Receiver into
a USB por t on computer /console. Once r eceiver is inserted
in USB por t, slide the power switch on the keyboard to the
“ ON” position located on the left side of the unit to establish
the connection.
Auto sleep and wake feature
The keyboard also features an auto sleep and auto wake mode.
If there is a long period of inactivity, the keyboard will automatically
go into a sleep mode. During the sleep mode, the user can wake
the unit up by pressing any key. Keyboard’s RF indicator will continue
to flash and will not power down.
4
Charging the battery
This device contains a built-in lithium-ion battery and is supplied
with a USB-A to Mini-B cable. Please connect one end of cable to
keyboard and other end of cable to USB port in order to charge
the battery. When the battery is low, the low-voltage light will flash
to warn the user. The unit will automatically turn off if the battery
has been depleted.
Note: Fully charge the unit before operating for the first time.
This device can be used when charging, but will extend the
charging time. During Charging, the charging indicator will show
red led light and will goes off when charging is complete.
Laser Pointer
Using the laser pointer only requires that the keyboard should be
turned on. Press the Laser Switch if you need to use the
laser pointer.
4. Appendix
Technical parameters
Specifcation
*
*
*
*
*
*
*
*
Measurements (L x W x H): 154mm x 62.5mm x 12mm
Weight (grams): 66g
Operational Range: up to 15 meters
Output power (db): +4db Max.
Operation voltage: 3.3V
Operation current: < 80mA
Charging current: < 300mA
Hibernation current: < 1mA
5
Suported Environment
* Windows 2000,Windows XP, Windows Vista, Windows CE,
Windows 7, Windows 8
* Linux(Debian-3.1, Redhat-9.0 Ubuntu-8.10 Fedora-7.0 tested)
* Microsoft Xbox 360
* Sony PS3
5. Maintenance
* Do not attempt to disassemble the device or replace
rechargeable battery. Doing so will void the warranty.
* The battery will discharge if stored for a long period of time
without usage.
* Use the specified USB charging cable. Disconnect the device
after the battery has been fully charged. Overcharging the battery
will shorten the life span of the battery.
* Do not expose the device in extreme heat or cold. Extreme
temperatures will cause the life span of the battery to shorten.
* Use only a damp cloth with mild soap to clean the device.
Solvents and other cleaning agents may cause damage to
the device.
Troubleshooting
Below are some basic troubleshooting guide for the device.
Please refer to the specific description which will help you resolve
some issues with the device.
6
Issue
Unit does not respond
Possible Issue
1. Low battery power.
2. Unit is not turned on.
Keyboard cannot
1. The receiver may not be
establish a connection
inserted correctly.
to the receiver
The mouse pointer
moves erratically and
/or unresponsive.
The unit does not
charge
Solution
1. Charge the device for at least
15 minutes.
2. Check if the switch seleced
to the “ON” position.
1. Disconnect and reconnect
the receiver to the USB Port.
1. Bring the unit closer to the
1. Device may not be within the
receiver.
operating range of the receiver.
2. Clean the touchpad with a
2. Dust or oil on the touchpad.
damp cloth.
1. Vertify if the device is
securely connected to the
charger
1. Check connections.
6. Packing List
This equipment package contains the following items:
Mini Wireless Keyboard
1 unit
Wireless USB receiver
1 unit
USB-A to Mini-B Charging Cable
1 unit
User Manual
1 unit
7