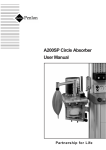
1
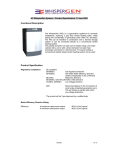
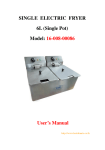
WHISPER TECH LTD
P.O.BOX 13-705
Christchurch
New Zealand
www.whispertech.co.nz
Service Bulletin
No.018
Evaporator Maintenance
Date of Issue: 15 May 2002
CAR: N/A
Applicable to WhisperGen Models
PPS16 12 MD - all serial no.
PPS16 24 MD - all serial no.
Reason for Change
Build up of carbon deposits in evaporator fuel galleries, resulting in poor burner performance or flame failure. Fault codes 58, 59, 60, 61, 62 and 64 may occur.
Action
With effect from Date of Issue
Carry out service procedure as required if burner problems occur.
Service Procedure
Requires removal and cleaning of fuel evaporator as detailed.
Parts Required:
Glow Plug Sealing Washer (PP40519)
Evaporator Assembly Gasket (WC 04407
Evaporator Mesh (WC 04406)
Tools Required:
Spanner 8mm
Spanner 11mm
Spanner 22mm (spark plug size)
Allen key 4mm
Long nose pliers
Torque wrench (5Nm and 20-25Nm)
Suitable metal scraper
Emery paper
1 of 3
Service Bulletin
No.018
Refer to User manual and heed all warnings, safety precautions and instructions related to removal of evaporator and associated parts
1.0 TO REMOVE EVAPORATOR
1.1
1.2
1.3
1.4
Stop WhisperGen and wait until STANDBY indicator on control panel illuminates
Set ENABLE STARTS mode to 0 to prevent unintentional starting
Turn Fuel Valve to OFF
Remove Enclosure Lid and wait for engine to cool
!
CAUTION - HOT SURFACES
Contact with some internal parts of WhisperGen may result in burns
Proceed with care
1.5 Remove glow plug (Refer to User Manual - Replacing Glow Plug)
1.6 Remove FID (Refer to User Manual - Replacing FID)
note - before removing FID measure installed height to aid in refitment
1.7 Remove fuel line at fitting on evaporator
1.8 Loosen the four screws holding evaporator to burner head
1.9 Lift evaporator out of burner
evaporator body
mesh
evaporator cap
EVAPORATOR ASSEMBLY
2 of 3
Service Bulletin
No.018
2.0 CLEAN EVAPORATOR
Dismantle Evaporator as follows:
2.1 Carefully prise evaporator cap from evaporator body.
2.2 Remove mesh from evaporator body with long nose pliers, this may be difficult.
due to carbon build and usually results in damaging mesh.
Clean Evaporator as follows:
2.3 Scrap carbon deposits from evaporator body and from inside of evaporator cap
with a suitable scraper. Ensure that all areas are clean including recesses in evaporator body.
2.4 When all deposits are removed finish cleaning with emery paper and rinse clean
with suitable solvent (Methylated spirits or similar).
Assemble Evaporator as follows:
2.5 Fit new mesh into recess in evaporator body, ensuring mesh is pushed fully down
and is a good fit with body
2.6 Fit Cap over the top of the mesh and press down firmly until evaporator body is
flush with end of cap
3.0 REFIT EVAPORATOR
3.1 Fit evaporator assembly into burner with new gasket, ensure fuel connection is in
correct orientation.
3.2 Apply anti-sieze compound sparingly to four retaining screws and refit - do not
tighten fully.
3.3 Fit fuel line to evaporator fitting ensure it is secure and no leakage occurs.
3.4 Fit FID, ensuring it slides freely into burner and tighten retaining clip.
3.5 Tighten evaporator retaining screws to 5Nm.
3.6 Plug FID wires (blue) back together.
3.7 Fit glow plug with new sealing washer and and torque to 20 - 25 Nm.
3.8 Attach glow plug wire (pink) securely.
3.9 Fit Enclosure Lid.
Before starting WhisperGen set ENABLE START mode back to original setting.
Turn fuel valve to ON.
WhisperGen may now be operated normally.
3 of 3