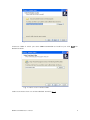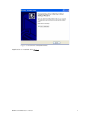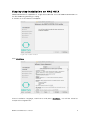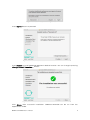
1
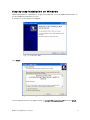
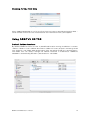
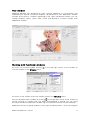
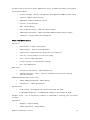
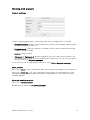
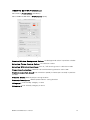
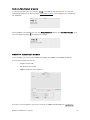
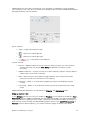
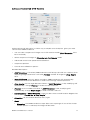
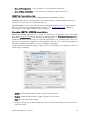
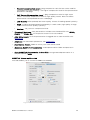
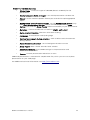
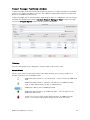
ORBITVU EDITOR V. 2.2
User's Manual
Contents
General information........................................................ 3
Requirements .................................................................................................................. 3
Introduction....................................................................................................................... 3
Legal notes........................................................................................................................ 4
Step by step installation on Windows .................... . . . . . 5
Step by step installation on MAC OS X ................. . . . . . . 8
Running for the first time...........................................................................................10
Using ORBITVU EDITOR................................................ 11
Default folder structure................................................................................................ 11
Main window.................................................................................................................... 12
Working with functional windows...........................................................................12
Main window menu....................................................................................................... 13
Working with projects.................................................................................................. 14
Project settings...............................................................................................................................14
Save project.....................................................................................................................................14
Open an existing project.............................................................................................................14
ORBITVU EDITOR Preferences.................................................................................15
Camera functional window......................................................................................... 15
ORBITVU functional window.....................................................................................15
Preview functional window........................................................................................19
Selection...........................................................................................................................................20
Animation Preview.........................................................................................................................21
Edit functional window............................................................................................... 22
Sequence functional window.................................................................................... 23
Detailed description.....................................................................................................................23
Advanced control options.........................................................................................................24
Exporting into 360º web optimized file format.................................................25
Flash & GIF animation functional window...........................................................26
ORBITVU Presentation tab........................................................................................................27
ORBITVU Viewer options tab...................................................................................................28
ORBITVU VIEWER Options......................................................................................................29
Project Manager functional window......................................................................30
Filtering.............................................................................................................................................30
You can filter projects by categories, creation date or by server state. ...............30
Server State....................................................................................................................................30
Server state informs if the presentation has been already sent to server and if
its is already created or not. Available states:...................................................................30
Uploading presentations to ORBITVU SUN........................................................................31
Other Notes.................................................................................................................... 32
Water mark......................................................................................................................................32
ORBITVU EDITOR User's Manual
2
General information
This manual applies to 2.2.1 software version
Document revision: 1.7
Release date 20.12.2011
Document code: 209.46 – 12/2011
Requirements
Operating system:
•
Microsoft Windows XP with Service Pack 2
•
Microsoft Windows Vista with Service Pack 2 and all latest updates installed
•
Microsoft Windows 7 32-bit and 64-bit (run in 32-bit compatibility mode)
•
MAC OS X 10.5 Leopard – Intel only
•
MAC OS X 10.6 Snow Leopard
•
MAC OS X 10.7 Lion
Minimal hardware Requirements: Intel Pentium 4 2GHz, AMD Athlon™ 64 2800+, 1 GB
RAM, 300MB HDD for software, 500GB for projects
Recommended hardware requirements: Intel Core i5 4-cores, >2GHz, 2GB RAM, 3000
HDD for software, SSD 500GB for projects
Digital still camera support:
Nikon and Canon DSLR cameras as specified on www.orbitvu.com web site.
Introduction
ORBITVU EDITOR application is a part of ORBITVU – a solution designed to make 360º
product photography easy. The system consists of:
•
ORBITVU device (for example ORBITVU HEAD/SPIDER) which allows you to rotate a
photographed object
•
ORBITVU EDITOR
•
ORBITVU VIEWER - Flash/HTML5 360º presentation player
•
ORBITVU SUN – server platform, which allows you to easily distribute 360º content
over Internet
ORBITVU EDITOR main features:
•
remote capture control of digital still camera
•
remote control of ORBITVU HARDWARE
•
batch editing of captured images (crop, levels, brightness, sharpness, saturation)
•
export of 360º zoom-able presentations in ORBITVU VIEWER file format,
ORBITVU EDITOR User's Manual
3
•
export of 360º animations to Adobe Flash or *.gif formats
•
export of 360º animations to *.avi, *wmf and *.mpg formats
•
360º presentations upload to ORBITVU SUN server
•
MAC OS X and Windows compatible
•
Image group move in sequence window
•
Image repeat functions added to sequence window toolbar
•
Mouse dragging in preview window rotates the object
Versions
ORBITVU EDITOR is available in to versions STANDARD and PRO. STANDARD version
is limited in functionality comparing with PRO version.
Legal notes
ORBITVU EDITOR is delivered with ORBITVU VIEWER BASIC licence.
ORBITVU EDITOR is copyrighted and its use requires a licence.
Ventis s.c. is the owner of the ORBITVU software.
Licence details can be found in licence.rtf file in application installation folder.
ORBITVU and ORBITVU logotype are registered trademarks of Ventis s.c.
Release notes
Changes from versions 2.1.2:
•
Background highlight in preview window
•
MAC OS X 10.7 Lion compatibility
•
Nikon D5100 compatibility
•
AVI, MPG export (still broken under OS X Lion)
•
Image group move in sequence window
•
Image repeat functions added to sequence window toolbar
•
Mouse dragging in preview window rotates the object
•
Color saturation in Edit window
•
Minor bugs & fixes
ORBITVU EDITOR User's Manual
4
Step by step installation on Windows
ORBITVU EDITOR is supplied as a single executable file. To install ORBITVU EDITOR run
the file ORBITVU_EDITOR_v2.2.exe.
A window as shown below will appear:
Fig. 1: Installation box
Click Next
Fig. 2: Licence agreement box
License agreement box will appear: Mark „I accept the agreement” and click Next.
ORBITVU EDITOR User's Manual
5
Fig. 3: Installation location box
Choose a folder in which you want ORBITVU EDITOR to install or just click Next for
default location.
Fig. 4: Menu start shortcut box
Select start menu short cut or leave default and click Next
ORBITVU EDITOR User's Manual
6
Fig. 5: Installation complete box
Application is installed. Click Finish.
ORBITVU EDITOR User's Manual
7
Step by step installation on MAC OS X
ORBITVU EDITOR is supplied as a single executable file. To install ORBITVU EDITOR run
the file ORBITVU_EDITOR_2.2.x.pkg.
A window as shown below will appear:
Fig. 6: Mac installer window
Click Continue
Fig. 7: Mac installer - license agreement
Chose installation language, read license and press Continue. You will be asked to
accept license agreement.
ORBITVU EDITOR User's Manual
8
Fig. 8: Mac installer - accept license agreement
Press Agree button to proceed.
Fig. 9: Mac installer - install location
Press Install to install ORBITVU EDITOR in default location. You can change it pressing
Change Install Location... button.
Fig. 10: Mac installation complete
Click Close after successful installation. ORBITVU EDITOR can be run from the
Applications folder.
ORBITVU EDITOR User's Manual
9
Running for the first time
Fig. 11: Registration
When ORBITVU EDITOR is run for the first time you have to provide registration data –
serial number and e-mail. You should receive this information from your supplier.
Using ORBITVU EDITOR
Default folder structure
By default ORBITVU stores its files in predefined location. During installation it creates
“orbitvu” folder in user's default Documents folder. All user's projects are being saved
into “projects” sub folder 360º presentation files are being saved into “presentations”
sub folder You can always change the default locations in Preferences. ORBITVU
VIEWER is automatically placed in “presentations” sub folder
Fig. 12: Orbitvu project folder structure
ORBITVU EDITOR User's Manual
10
Main window
ORBITVU EDITOR was designed for multi monitor operation. It's functionality was
separated into several “functional windows”. By default the main application window
includes all functional windows organized in left, right and bottom panels. You can
change windows layout, switch them on/off and de-attach to place outside main
application window.
Fig. 13: Main window
Working with functional windows
To switch off unused window clicking
uncheck window in the Window menu
in the top right corner of the window or
Fig. 14: Functional windows switching on/off
To switch on the window check the window name in the Window menu
You can de-attach each window by clicking
in the top right corner of the window or
just by clicking on window title (e.g. Edit) and dragging it around. You can move
functional window outside main window, e.g. to locate it on another monitor desktop.
Application will try to group windows in left, right or bottom panes – when you drag the
ORBITVU EDITOR User's Manual
11
window close to one of this areas, application will try to add the window to the group.
Functional windows:
•
Project manager – project management and upload to ORBITVU SUN server
•
Camera – digital camera control
•
ORBITVU – orbitvu hardware control
•
Preview – frame preview
•
Edit – batch editing
•
Flash & GIF Animation – 360º animations export
•
ORBITVU Presentation – 360º zoomable ORBITVU presentation export
•
Sequence – image sequence management
Main window menu
File menu:
•
New Project – create a new project
•
Open Project – open an existing project
•
Import Files – import files from filesystem into sequence
•
Save As – save a project as a new one (copy)
•
Save – save an opened project
•
Project Settings – change project settings
•
Exit – quit application
Edit menu:
•
Preferences (Windows) – editor preferences
•
Special Characters... (Mac) – MAC OS X default menu item for entering
special characters
ORBITVU EDITOR menu (Mac only):
•
About ORBITVU EDITOR – about dialog
•
Preferences... - editor preferences
Device menu:
•
Find Camera – find digital still camera connected with USB
•
Find ORBITVU Device – find ORBITVU hardware connected with USB
Window menu – list of functional windows as specified in Working with functional
windows
Help menu:
•
Register – register dialog
•
About (Windows) – about dialog
ORBITVU EDITOR User's Manual
12
Working with projects
Project settings
Fig. 15: Project settings dialog
Project Settings dialog pops – up automatically when the application is started.
•
Project location: folder in which project files will be saved: images captured from
camera, configuration files, etc.
•
Project name: name of the project. A folder with this name will be automatically
created in projects folder
•
Author: project author
•
Category 1, Category 2: project categories you can assign to each project. You
can define your category names in Application Preferences. You can use categories
to filter projects in Project manager
In any time you can change project settings in menu File → Project settings
Save project
Menu File → Save saves configuration files and changes to all images in the sequence.
Menu File → Save as... will show new project settings box. A new folder with a new
configuration file will be created. All images will be copied to a new location and all
changes applied.
Open an existing project
Menu File → Open project
Double click on project in Project manager
ORBITVU EDITOR User's Manual
13
ORBITVU EDITOR Preferences
Menu Edit → Preferences (Windows)
Menu ORBITVU EDITOR → Preferences (Mac)
Fig. 16: Editor preferences dialog
Preview Window Background Colour: set background colour in preview window
Selection Frame Custom Colour: set selection colour
Selection With Centring Cross: turn on / off centring cross in selection mode
Proportional selection: selection ratio while drawing selection with CTRL
Preview Animation Speed: set animation speed (in frames per second) in preview
window
Projects Space: default project saving location
Presentations Space: default presentations saving location
Category 1: user friendly category 1 name
Category 2: user friendly category 2 name
ORBITVU EDITOR User's Manual
14
Camera functional window
In camera window you can connect
to a digital still camera (list of currently
supported cameras can be found on www.orbitvu.com), connected to your computer
via USB port.
Fig. 17: Camera not connected
Once properly connected you can see Manufacturer details and Camera Name, and
you can release shutter
to capture an image.
Fig. 18: Camera connected
ORBITVU functional window
In the window you can control ORBITVU HEAD and ORBITVU SPIDER hardware.
The control window consist of:
•
Simple control tab
•
Advanced control tab
•
ORBITVU device control panel
Fig. 19: Orbitvu hardware control window
To use the control options you must connect to ORBITVU DEVICE first
ORBITVU EDITOR User's Manual
15
ORBITVU device must be connected to your computer via USB port. When properly
connected you will have all control options available and there will be ORBITVU DEVICE
description below connect button.
Fig. 20: ORBITVU hardware connected
Quick rotation:
•
Step – single step rotation angle
•
- rotate one step angle left
•
- rotate one step angle right
- stop rotation immediately
•
Shutter control:
•
Manual – ORBITVU device will not control camera shutter, you must release
shutter manually (set longer Pre Delay to be able to release shutter
manually)
•
ORBITVU Device – shutter connector on device panel (requires shutter release
cable to be connected to camera)
•
USB – release shutter and capture images directly from camera with USB
(camera must be connected to use this option)
•
Pre Delay – delay in seconds after stopping the device and before release
shutter
•
Post Delay – delay in seconds after releasing shutter and starting next step
angle
ORBITVU DEVICE operation was divided into Simple and Advanced tabs.
Simple Control Tab
In the Simple tab you just set the number of Frames in the sequence and press Take
Sequence button. ORBITVU DEVICE will calculate step angles and will automatically
rotate the device stopping at each angle, capturing the specified number of images (in
USB shutter control mode) and downloading them. When using ORBITVU Device or
Manual shutter release options, you need to import images manually into editor.
ORBITVU EDITOR User's Manual
16
Advanced Control Tab (PRO Version)
Fig. 21: Orbitvu hardware advanced control
Advanced control tab works in similar way to Simple control tab, but gives you more
control over ORBITVU device:
•
You can take a sequence of images not in full rotation mode (360º°Rotation must
be unchecked)
•
Take a sequence of images in Stepping or Continuous mode
•
Advanced control over speed and acceleration
•
Setup zero position
•
Control auto calibration options
Detailed description:
•
360º°Rotation: if checked, ORBITVU Device will always take full turn rotation when
capturing images otherwise it will take Frames number of images at Step Angle
each.
•
Auto Calibrate: with this option turned on ORBITVU device will automatically
compensate mechanical backlash in order to assure high rotation precision.
•
Step Angle: set the angle between frames. If 360º°Rotation is ON, modifying will
automatically change Frames in order to make a full turn.
•
Frames: set the number of frames. If 360º°Rotation is ON, modifying will
automatically change Step Angle in order to make a full turn.
•
Full Rotation: If 360º°Rotation is OFF this box shows overall rotation degree that
will be done (Frame No. x Step Angle ).
•
Direction: set the rotation direction left / right.
•
Mode:
•
Stepping: the ORBITVU device stops after each step angle. If one of the shutter
release options is selected, the image will be taken.
ORBITVU EDITOR User's Manual
17
•
Continuous: the ORBITVU device does not stop after each angle instead it
release shutter at each step angle. Shutter mode must be ORBITVU Device.
•
Speed: set ORBITVU device rotation speed
•
Accel: Angular acceleration of the ORBITVU device. The proper setting depends on
the mass and size of the photographed object. The heavier and less stable the object
is, the less value of this parameter is recommended.
•
Take sequence : start taking sequence of frames
•
Set zero / Go to zero: set the zero position of the ORBITVU Device or go back to
previously set zero position
•
Calibrate: trigger calibration manually
•
Get current position: read angular ORBITVU Device position
•
Current position: displays current angular position of ORBITVU Device
ORBITVU EDITOR User's Manual
18
Preview functional window
In preview window you can see in details the frame image selected in Sequence
window.
Fig. 22: Preview window
Cancel selection
Zoom to original
Fit to window
Zoom in
Zoom out
Selection (described below)
Selection area dialog box
Highlight background pixels
This function tries to detect fully black (RGB value: 0) or white (RGB value: 255)
background pixels and highlights them. Combined with black/white level can be
used to achieve perfect 100% black or white background.
Selection
This tool allows to select a rectangular part of a picture. The selection is placed on each
frame in the sequence. All frames can be cut at once to selection size. Pressing the
CTRL button (Windows, CMD in MAC) will cause keeping the selection proportions as
defined in Prefernces while changing it's size.
ORBITVU EDITOR User's Manual
19
Selection Menu
Fig. 23: Preview selection
There is a menu in the selection mode which will appear after pressing the right mouse
button (Windows) or CTRL + mouse button (Mac):
•
Selection colour - set selection colour
•
Helpers – add centring cross, selection ratio while using CTRL
•
Select all – select the whole image
•
Undo – take back last selection activity
Selection Area dialog
Fig. 24: Selection Area dialog
Allows numeric edition of current selection. It is possible to use the same cropping area
through different projects to maintain the same aspect ration – use copy and paste
icons.
ORBITVU EDITOR User's Manual
20
Animation Preview
Start rotation
Stop
Go to first frame
Go to previous frame
Go to next frame
Go to last frame
ORBITVU EDITOR User's Manual
21
Edit functional window
Allows to edit selected frame and apply changes to the whole sequence or just to
selected frames. All changes are immediately visible in the preview window.
Fig. 25: Editing window
•
Intensity histogram – displays selected frame intensity histogram
•
Brightness – change brightness level
•
White level – change range 0 – 255, a value will determine new point of white
level.
•
Black level – change range 0 – 255, a value will determine new point of black level
•
Saturation – change range -100 – 100, a value will determine new point of
saturation
•
Normalize – histogram normalization,
•
Sharpen – applies sharpen filter to the frame
•
Copy settings – save settings to clipboard
•
Paste settings – load settings from clipboard
•
Apply to Selected – apply changes to selected frames
•
Apply to All – apply changes to all frames
•
Reset – reset all changes
ORBITVU EDITOR User's Manual
22
Sequence functional window
Sequence window enables you to quickly navigate and mange fames in the sequence.
Fig. 26: Sequence window
Detailed description
Import images into sequence
Remove selected frame
Remove all frames
Make selected frame the first one
Rotate selected frame left
Rotate selected frame right
Rotate all frames left
Rotate all frames right
Crop images
Reload all frames
Connect to camera
Capture image from camera
Replace selected frame
Go to selected frame position
Go to selected frame position and replace the frame
Undo frame replacement
ORBITVU EDITOR User's Manual
23
Thumbnail size will allow you dynamically change thumbnails size in the window.
Advanced control options (PRO Version)
While taking sequence of images, there are advanced control options available, which
enable you to retake broken images in the sequence. This options are available in menu
after right clicking a frame in the sequence. After reloading the project, this options are
no longer available.
Fig. 27: Frame advanced control options
Detailed description:
•
Make First Frame - Make the frame the first one
•
Goto and Replace Frame – rotate ORBITVU Device to frame angle and
retake the image
•
Goto – rotate ORBITVU Device to frame angle
•
Replace Frame – retake the frame image
•
Undo – undo frame retake
ORBITVU EDITOR User's Manual
24
Exporting into 360º web optimized file format
The application allows you to create 360º product views in GIF or Adobe Flash (swf)
format. You can also export in ORBITVU VIEWER 360º zoom-able presentation format.
Comparison between file formats:
Feature
GIF
Animation
Flash
Animation
Compression level
LOW
HIGH
HIGH
Colours
8-bit
24-bi
24-bit/32-bit
Interactive (manual rotation)
NO
YES
YES
Zoom
NO
NO
YES
Web optimised
YES
YES
YES
File format
.gif
.swf
HTML + folder
with .jpg, xml
files
File size
~1M
~700K
~15MB
Effective web size weight (size loaded to
view by end user)
~1M
~700K
~800K
Advanced configuration options
NO
NO
YES
Safari iOS - iPad, iPhone, iPod compatible
YES
NO
YES
Requires viewer
NO
NO
YES
ORBITVU EDITOR User's Manual
ORBITVU
Presentation
25
Flash & GIF animation functional window
Exports in GIF, SWF, AVI or WMF file formats.
Fig. 28: Flash & GIF export window
Basic animation parameters:
• Width: animation window widht
• Height : animation window height
•
Quality: set the quality of animation. In case of *.swf files it sets jpeg compression
ratio. (Flash only)
•
Add Water mark: set if animation should be water marked.
•
Filename: image file to use for watermark
•
Alignment: water mark alignment
• Hide buttons: do not display manual/auto rotate buttons (Flash only)
• Speed: the speed of animation in frames per second
•
Frames seq. repeat: number of rotations when exporting to video file
•
Video codec: video codec to export to: MPEG-1 or Windows Media Video
• Rotation: select the rotation mode left / right / auto
• Flash menu title – set the title available in the menu shown after right mouse
button click in in flash animation (Flash only)
• Preview animation : generate animation and preview it the browser window
• Save Flash Animation – save animation in Shockwave Flash file format (SWF)
ORBITVU EDITOR User's Manual
26
•
Save Gif Animation – save animation in animated GIF file format
•
Save Video Animation – save animation in MPEG or WMV file format
ORBITVU Presentation tab
ORBITVU EDITOR always contains VIEWER BASIC and DEMO versions.
VIEWER BASIC allows to redistribute it with presentations without additional license
fees but it's full resolution is limited to 1024 px.
VIEWER DEMO is only to be used to preview 360 degree presentions in full resolution
but its resolution is not allowed. Please, contact us at [email protected] additional
information on available VIEWER licensing options
Generate ORBITVU VIEWER presentation
ORBITVU VIEWER presentation is made of number of configuration files and image
files. Because of this it will be located in a separate folder in Presentations Space as
defined in Preferences . After generating presentation, it is possible to save it to one
compressed file in .ovus format. To view the presentation you need a viewer, which can
be further customised in ORBITVU Viewer Options tab. For your convenience ORBITVU
EDITOR is supplied with DEMO version of ORBITVU VIEWER.
To generate presentation properly, make sure all of the images in the sequence have the
same height and width.
Fig. 29: ORBITVU presentation creation window
•
Width: maximal presentation width in pixels (at full zoom)
•
Height: maximal presentation height in pixels (at full zoom)
•
Max: get maximal width/height
•
Quality settings sets JPEG compression ratio / presentation quality for preview and
fullscreen levels:
ORBITVU EDITOR User's Manual
27
•
Preview compression level – jpeg compression ratio for low scales used for
initial 360º view downloading – use higher compression level for fast presentation
preload on web page
•
Full Screen Compression Level – jpeg compression ratio for high zoom
scales – use lower compression ratio for high quality zooms. Does not effect
presentation initial preload time on a web page.
•
Low Quality - fast preload, but lower quality. Choose if loading speed is priority.
•
High - medium preload speed. Good quality in small scales, high quality in large
scales. Choose when quality is priority.
•
Custom - set your own compression level.
•
Thumbnail Options: each presentation includes one thumbnail file. Set Width,
Height and Frame No. of the picture chosen for the thumbnail.
•
Add Water mark : set if the presentation is tagged with a water mark file. See:
Watermark
•
Aligment: set watermark placement. See: Watermark
•
Destination folder: folder to which your work will be saved
•
Generate ORBITVU Presentation : create presentation folder and preview in
Browser window
•
Save ORBITVU Presentation in One File: save generated presentation in a
compressed file *.ovus
ORBITVU Viewer options tab
This tab enables you to customise ORBITVU VIEWER.
Fig. 30: ORBITVU VIEWER parameters window
ORBITVU EDITOR User's Manual
28
ORBITVU VIEWER Options
•
Viewer type : choose the type of VIEWER (BASIC or DEMO) for the
presentation
•
Viewer window Width / Height : sets initial presentation window size
•
Speed : set the rotation speed in frames per second of the photographed
object
•
Background colour/ Frame colour : set the Background Colour (only
with Auto Background Colour feature turned OFF) and the Frame
Colour (only with the Draw Frame feature turned ON) of your presentation
•
Rotation : choose the direction of rotation (Right, Left, Auto )
•
Auto-rotate Direction: direction while auto rotating
•
Language: choose button tool tip language
•
Vertical movement during rotation : mark to allow vertical movement
during rotation
•
Auto Background Colour : set the background colour to Auto
•
Draw frame: draw a frame around viewer window
•
ORBITVU identity: show ORBITVU logo in the presentation and
information under menu
•
Teaser: controls presentation behaviour on start
ORBITVU presentation is created with sample HTML file, which you can use to place
presentation on your web page.
For additional technical information see http://www.orbitvu.info
ORBITVU EDITOR User's Manual
29
Project Manager functional window
Project manager facilitates finding and opening projects. To open a project just double
click it in the table view below. You can also upload created presentations of selected
projects to ORBITVU SUN server.
Project manager stores all information regarding projects in a database. You can always
recreate the database by clicking Update Project Manager View . Project manager
will rescan Project Space folder and recreate the database.
Fig. 31: Project manager window
Filtering
You can filter projects by categories, creation date or by server state.
Server State
Server state informs if the presentation has been already sent to server and if its is
already created or not. Available states:
ORBITVU presentation is not created yet - cannot send it to ORBITVU
SUN
ORBITVU presentation is created – can be sent to ORBITVU SUN,
click to open presentation locally in web browser
ORBITVU is being sent to ORBITVU SUN
ORBITVU presentation is on ORBITVU SUN – click to open link on
ORBITVU SUN server
There was an error while sending presentation to ORBITVU SUN
server – to see error description move mouse over the status
ORBITVU EDITOR User's Manual
30
Uploading presentations to ORBITVU SUN
Prior sending any presentation to ORBITVU SUN server you have to provide your user
account information: User Name and Password and ORBITVU SUN compatible web
server address (Host). You should receive basic ORBITVU SUN account with ORBITVU
solution purchase. Select any number of projects with status
or
- you can use
CTRL and SHIFT to select more than one presentation. Press Upload Selected to start
uploading to server. You can check upload status by moving mouse over server status
icon.
Select Not Uploaded will automatically select all presentations ready to be uploaded.
Stop Selected will stop selected transfer.
Stop All will stop all transfers.
Uploading by default runs in background process, so while uploading you can normally
operate ORBITVU EDITOR.
ORBITVU EDITOR User's Manual
31
Other Notes
Water mark notes
• Water Mark must be supplied in separate file in *.png format with transparency
• The size of the Water Mark should be adjusted to the size of the presentation (it is not
scaled)
• Placement of the Water Mark depends on chosen Alignment
• We recommend preparing the water mark in a graphic program like Corel Draw (or
free alternative: www.inkspace.org ). For example take a company logo, set the
transparency to 10 – 15% and export it to *.png file.
ORBITVU EDITOR User's Manual
32