1
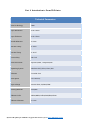
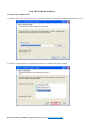
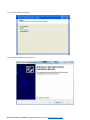
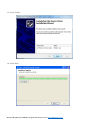
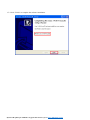
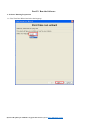
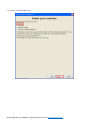
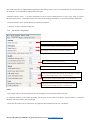
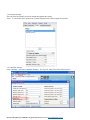
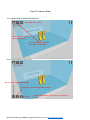
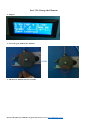
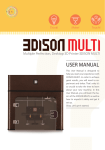
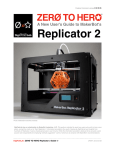
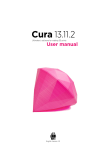
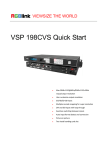
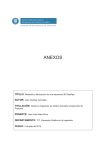
Focus3D Printer Setup Manual
Part I: Introduction to 3D Printer-----------------------------------------------------------------------------------------2
Part II: A Few Easy Steps to Set Up 3D Printer------------------------------------------------------------------------4
Part III: Install the Software-----------------------------------------------------------------------------------------------6
Part IV: Run the Software--------------------------------------------------------------------------------------------------10
Part V: 3D Print Model Parameters Setting ---------------------------------------------------------------------------14
1-> Print Model Parameters Configuration--------------------------------------------------------------------------------14
1.1> Switch to Full Setting ------------------------------------------------------------------------------------------------14
1.2.1 Basic Configuration----------------------------------------------------------------------------------------------15
1.2.2 Advanced Configuration-----------------------------------------------------------------------------------------16
1.2.3 Expert Configuration---------------------------------------------------------------------------------------------17
1.2.4 Plugins Settings---------------------------------------------------------------------------------------------------18
1.2.5 Machine Settings-------------------------------------------------------------------------------------------------18
Part VI: Start to Print------------------------------------------------------------------------------------------------------19
Part VII: Change the Filament -------------------------------------------------------------------------------------------21
Купить 3D принтеры Ultimaker и другие Вы можете здесь: http://3DPrinter.org.ua
Part I: Introduction to Focus3D Printer
Technical Parameters
Print Technology
FDM
Layer Resolution
0.06-0.2mm
Layer Thickness
0.06-0.5mm
Nozzle Diameter
0.4 mm
Extruder Temp
0-240℃
Hot Bed Temp
0-110℃
Connectivity
SD Card
Print File Format
Input:STL/OBJ,Output:G/X3G
Operating System
Windows XP/7/Vista, Linux, Mac
Software
Focus3D Cura
Print Speed
10-150mm/s
Input voltage
AC100-250V, 50/60H,250W
Printing Material
PLA/ABS
Filament Color
White/Black/Yellow/Red/Blue/Green
Filament Diameter
3.0 mm
Купить 3D принтеры Ultimaker и другие Вы можете здесь: http://3DPrinter.org.ua
Filament tube
Extruder
Power connector
On/Off button
SD card slot
Купить 3D принтеры Ultimaker и другие Вы можете здесь: http://3DPrinter.org.ua
Control button
LED Screen
Part II: 3D Printer Setup
As our 3D printer has been fully adjusted and calibrated before it is shipped, you just need a few easy steps to
finish installation as following:
1-> Connect the 3D Printer to power supply with the power adapter
2-> Press the power button
3-> Click the control button, rotate it and select “Prepare”, click and select “Preheat PLA” or “Preheat
ABS”.
3.1> Rotate the button and select “Prepare”
3.2>Select Preheat PLA or Preheat ABS
4-> Manually feed the filament into the filament tube and rotate the feeding gear to loose it, let the filament
come out smoothly. When you see filament flow out smoothly, please rotate the feeding gear to chuck it.
4.1> Trim one end of the filament to a cusp shape
4.2> Begin to feed the filament
Купить 3D принтеры Ultimaker и другие Вы можете здесь: http://3DPrinter.org.ua
Rotate the feeding gear and loose it
See the filament and push it to flow out from the nozzle
Begin to feed the filament
The filament flow out smoothly
Stuck the filament gear
5-> Check the print platform. Please move the print head to each corner and adjust.
If the platform is not very level, you can adjust the distance between print head and the platform on all four corners
by loosing or tightening the screws slightly.
Купить 3D принтеры Ultimaker и другие Вы можете здесь: http://3DPrinter.org.ua
Part III: Install the Software
1-> Install Cura_14.06-Focus3D
1.1> Double click “Cura_14.06-Focus3D.exe” and click “ Browse” to select the installation path and click “ next”.
1.2> Select Focus3D Software compatible file formats you would need and click “ Install”.
Купить 3D принтеры Ultimaker и другие Вы можете здесь: http://3DPrinter.org.ua
1.3> Focus3D Software Installing
1.4> Installation finished and click “Next”.
Купить 3D принтеры Ultimaker и другие Вы можете здесь: http://3DPrinter.org.ua
1.5> Click “ Finish”
1.6> Click “Next”
Купить 3D принтеры Ultimaker и другие Вы можете здесь: http://3DPrinter.org.ua
1.7> Click “ Finish” to complete the software installation.
Купить 3D принтеры Ultimaker и другие Вы можете здесь: http://3DPrinter.org.ua
Part IV: Run the Software
1> Software Running Preparation
1.1> First Time Run Wizard and select the language.
Купить 3D принтеры Ultimaker и другие Вы можете здесь: http://3DPrinter.org.ua
1.2> Select Focus3D Machine Type
Купить 3D принтеры Ultimaker и другие Вы можете здесь: http://3DPrinter.org.ua
1.3 Ready the software
Купить 3D принтеры Ultimaker и другие Вы можете здесь: http://3DPrinter.org.ua
1.4 Click “OK”.
Купить 3D принтеры Ultimaker и другие Вы можете здесь: http://3DPrinter.org.ua
Part V: 3D Print Model Parameters Setting
1> Print Model Parameters Configuration
1.1 Switch to Full Setting
Click “ Expert” and click “ Switch to Full Setting”.
Купить 3D принтеры Ultimaker и другие Вы можете здесь: http://3DPrinter.org.ua
1.2 Focus3D Software Parameter Configuration
1.2.1. Basic Configuration
The height of each layer ( MAX less than 80% of the
Nozzle diameter and MIN more than 0.02mm)
Retract some filament when the Nozzle is in non-printing area
The thickness of the bottom and top ( integral
multiple of layer height
The Density of the internal of the printing product
(0%-100%)
The speed of the traveling nozzle ( normally from 50
to 100 )
The temperature of nozzle during printing ( 210 for
PLA and 230 for ABS
Heated bed temperature. 0 for PLA, 100 for ABS
Provide support when printing products ungrounded
Add thick bottom or top for the printing products
Notes:
1- Layer Height will often be changed depending on the surface accuracy and the parameter is in mm ( MAX less than 80% of the
Nozzle diameter and MIN more than 0.02mm ). Recommended 0.05mm for ultra-high-precision surface; 0.1 mm for the
high-precision surface; 0.15 for good surface and 0.2mm for the general accuracy. It prints slower with lower value but with better
quality . The shell thickness normally is an integer multiple of the diameter of the nozzle.
2- Choose integer multiple of the thickness for bottom and top shell thickness. Internal fill density is set to be from 0 to 100 ( 0
means without any fill which is for thin-walled model and 100 is for entity printing ). Generally 20 percent is enough for support
strength. filling the smaller ratio It can also enhance printing speed with smaller fill density.
3- Printer nozzle movement speed is generally recommended value 80mm/s. This machine can reach a maximum speed of
150mm/s, but it would lead to out of step and the print quality would be declined.
Купить 3D принтеры Ultimaker и другие Вы можете здесь: http://3DPrinter.org.ua
The nozzle temperature is slightly different depending on the printing material. 210C is recommended for PLA and the hot bed as
0C while 230C is recommended for ABS and hot bed as 100C.
4- Platform Options: “ Brim” is to print at the bottom layer and is most recommended since it’s easy to peel. “ Raft” is to print a
thick base at the bottom. Print bottom support can reduce plastic shrinkage deformation.“ None”means printing model directly.
5- Filament diameter can be obtained directly by measuring the filament.
6- Flow (%) is used to adjust the feeding rate
1.2.2. Advanced Configuration
The diameter of the Nozzle ( 0.4mm as standard )
The movement speed of Feeder during retraction
The length of the retracted filament each time
The parameter for dual extrusion
The movement speed during non-printing
The lower the outer shell speed, the smoother or better
the surface of the object. 30 is recommended
The speed of printing inner parts. It can be faster.
Minimum time for each layer ( to make sure that
each layer has enough time for cooling down
Notes:
1- The supplier will provide Nozzle diameter size. The standard for Focus3D Nozzle diameter is 0.4mm
2- The bottom thickness of the model, the thicker and the easier for the model to be adhesive with the platform. 0 means the
thickness is the same with the other layer height.
3- Print after the model be cut off at the bottom. It’s applied to the model that does not have a flat bottom.
Купить 3D принтеры Ultimaker и другие Вы можете здесь: http://3DPrinter.org.ua
4- Dual nozzles imposed together which makes printed two lines overlap, This makes the lines fit together more closely printed by
the two nozzles .
5- Bottom printing speed, that is nozzle moving speed of the first layer.Generally it is set lower and it allows the first layer of the
model to be better adhered to the printing platform.
6- Print speed of the filling inside. 0 means the normal printing speed. The faster of the speed,the shorter of the printing time.
However it will impact the printing quality.
7- The minimum time to print each layer since each layer it need sufficient time to cool down the extruded material. In this way, the
value can not be set too small.
1.2.3 Expert Configuration
.
Купить 3D принтеры Ultimaker и другие Вы можете здесь: http://3DPrinter.org.ua
1.2.4 Plugins Settings
You can pause the printing at specific height throughout this setting.
Click “ V” and set the pause position at a certain height and also set the length of retraction.
1.2.5 Machine Settings
Click “Machine”, and select” Machine Settings”. If you print ABS, please add “Heated bed”.
Купить 3D принтеры Ultimaker и другие Вы можете здесь: http://3DPrinter.org.ua
Part VI: Start to Print
1-> Load the stl file and adjust the model size
Share the works
Load stl file to FOCUS
3D design platform
Save the finished gcode file
to SD card or other places
Rotate, Zoom, Mirror to adjust the file
Rotate object, up/down/left/ right
Zoom object, directly input data to adjust
Image adjustment, change object according to
image
Купить 3D принтеры Ultimaker и другие Вы можете здесь: http://3DPrinter.org.ua
File View Pattern
Click
View in normal mode
X-ray mode
2-> Save the gcode file to a SD card. Insert SD card to 3D printer and select the file to print.
2.1 Insert the SD card
2.2 Select the file to print
The 3D printer will start to print.
Notes:
When parameter settings are completed and the model position is adjusted then Focus3D software will automatically generate
Gcode print documents. If it’s generated correctly, then we will find the file in the directory named as .Gcode.
Купить 3D принтеры Ultimaker и другие Вы можете здесь: http://3DPrinter.org.ua
Part VII: Change the Filament
1> Prepare
2> Loose the gear, Pull out the filament
3> Fill the new filament into the extruder.
Купить 3D принтеры Ultimaker и другие Вы можете здесь: http://3DPrinter.org.ua
Thank you for purchasing our 3D printers. If you
have any more technical problem, please email us
with your questions. We will provide you with timely
help.
044 237-66-06
Купить 3D принтеры Ultimaker и другие Вы можете здесь: http://3DPrinter.org.ua