1
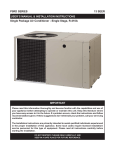
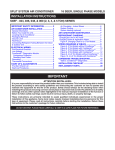
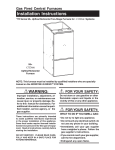
User’s Manual ELITE PROGRAMMABLE THERMOSTAT WITH MENU DRIVEN DISPLAY FEATURES: • Customizable programming options for every day, weekdays, weekends, or individual days. • Smart recovery gradually adjusts indoor temperatures for greater comfort. • Communicates to various components within the iQ Drive® system. • Auto changeover automatically switches the thermostat from heating to cooling or vice versa, based on programmed setpoints. • Provides system maintenance reminders. • No batteries required. Settings are stored internally in the event of power failure. • On-board diagnostics alert when service or maintenance is needed. • Two color backlight for easy viewing of the display at night time or in poorly lit rooms. • Energy saving features (temperature setbacks, heat pump/electric heat or furnace changeover) are customizable. • Senses and controls temperature and humidity. DO NOT DESTROY THIS MANUAL. KEEP IN A SAFE PLACE FOR FUTURE REFERENCE. Date, Day, Time, Maintenance Reminders or Service Issues Fan Setting Navigation and Entry Buttons Temperature at Outdoor Unit Indoor Temperature Indoor Humidity Level 10:00 AM 1/19/09 OUTDOOR 46 FAN AUTO 70° HEAT HUMIDITY 50 HEAT 70 COOL 80 Heat & Cool Setpoints RH TEMP MODE Menus FAN MENU Mode of Operation TABLE OF CONTENTS ABOUT THE iQ DRIVE THERMOSTAT ................. 3 PROGRAMMING THE THERMOSTAT .................. 9 Navigation ..................................................................... 3 Main Screen .................................................................. 3 Changing Program Schedules ...................................... 9 SCREEN SETTINGS ................................................... 4 Changing the Time of an EVENT ................................ 10 Date and Time ............................................................... 4 Auto Daylight Saving ..................................................... 4 Fahrenheit or Celsius .................................................... 5 12 or 24 Hour Clock ...................................................... 5 Contrast......................................................................... 5 Backlight ON Time ........................................................ 5 Copying a Program ....................................................... 9 Changing the HEAT Setpoint ...................................... 10 Changing the COOL Setpoint ..................................... 10 Changing the FAN Setting........................................... 10 ADVANCED THERMOSTAT SETTINGS ............. 11 Program Schedule Usage ........................................... 11 OPERATING THE THERMOSTAT ........................... 6 Programmable Options........................................... 11 Selecting an Operating Mode........................................ 6 Off Mode ................................................................... 6 Auto Mode ................................................................ 6 Cool Mode ................................................................ 6 Heat Mode ................................................................ 6 E - Heat Mode .......................................................... 6 Controlling Temperature with Holds .............................. 6 Temporary Hold ........................................................ 6 Permanent Hold........................................................ 6 Vacation Hold ........................................................... 7 Canceling a Hold ...................................................... 7 Fan Operation ............................................................... 7 On ............................................................................. 7 Auto .......................................................................... 7 Programmed Fan ...................................................... 8 Intermittent Fan ........................................................ 8 Security Lockout............................................................ 8 How to Lock the Thermostat ..................................... 8 How to Unlock the Thermostat ................................. 8 What to Do If You Forget Your PIN Number ............. 8 Nonprogrammable Option ...................................... 11 2 Auto Changeover Time................................................ 12 Smart Recovery .......................................................... 12 Dehumidification.......................................................... 12 Minimum Heat Pump Usage Temperature .................. 13 Backup Heat Response .............................................. 13 Offsets ......................................................................... 14 Indoor Temperature ................................................ 14 Remote Temperature .............................................. 14 Outdoor Temperature.............................................. 14 Relative Humidity.................................................... 14 Heat Anticipator ...................................................... 14 Humidity Control.......................................................... 14 Humidify / Dehumidify ............................................ 14 iQ Drive® Thermostat Site Map ................................... 15 iQ Drive® Thermostat Default Settings ........................ 16 ABOUT THE IQ DRIVE THERMOSTAT • The iQ Drive Thermostat is a wall mounted, low voltage controller that accurately maintains room temperature by controlling conventional or iQ Drive compatible components within the heating and air conditioning system. Easy-to-use operating modes (HEAT, COOL, AUTO, or E HEAT) activate cooling equipment (heat pump or air conditioner) during warm seasons and heating equipment (heat pump, electric heater, gas furnace or heat pump/electric heat combination) when the temperature gets colder. See page 6 for operating mode setup instructions. • Dehumidification mode quickly removes moisture from the air and regulates humidity levels throughout the home. Control output for optional humidifier is also provided. See page 12. • The blue backlight feature makes viewing the screen easier at night or in poorly lit rooms. The backlight turns on for a certain amount of time when any one of the five buttons is pressed. The duration that the backlight stays on can be programmed for 30, 60, 90, 120 seconds, or ON. See page 5. • Complete system monitoring alerts the homeowner when service is needed. Navigation • Navigation between display screens or changing operating commands can easily be made by using the five keys to the right of the screen (see page 2). NOTE: Selecting an item means that its name or value appears in a highlighted band on the screen. Another button will need to be pressed afterwards to access another menu or to select or change a value. and buttons are used to navigate up or down in a screen, within a list of choices, or to • The increase/decrease a number. NOTE: On some screens holding these buttons down for several seconds will adjust the value in larger increments. • The and buttons are used to navigate right or left in a screen, or move to the previous or next screen within a screen sequence. • The button is used to select an option category or value so that it can be changed or save a modified entry. NOTE: When a value is selected, the dark band will blink in most screens. Main Screen • The main screen of the iQ Drive Thermostat displays normal system information including: indoor temperature, outdoor air temperature*, heating and cooling setpoints, fan setting, relative humidity, and the system’s current mode of operation (See page 2). • The top line of the Main Screen alternates between showing: date and time, day of the week, service alerts such as CHANGE AIRFILTER, CHANGE UV LAMP, 10:00 AM 1/19/09 HVAC SERVICE AIR CLEANER, or SERVICE HUMIDIFIER, Status info such OUTDOOR FAN AUTO 46 as: HOLD UNTIL, PERM HOLD, SMART RECOVERY ON, INTERMITTENT FAN ON, and LOCKED and in the case of an equipment issue, a one-line description HEAT of the issue ( see page 2). In response to an extended or repeated problem, the HEAT 70 screen will flash red indicating service is needed. IMPORTANT NOTE: If the Main COOL 80 Screen displays CONFIGURATION NEEDED or flashes red with a message at the top of the screen, contact an authorized installer immediately with a detailed description of the message. Only iQ Drive certified technicians can correct these conditions. • The bottom line of the Main Screen displays five menus [RH, TEMP, MODE, FAN and MENU] that are entry points to other submenus (see page 2). To access these screens, select the menu with the and buttons and then the button. To return to the Main Screen, press the button repeatedly from any screen. If no buttons are pressed for 3 minutes, the thermostat will automatically revert back to the Main Screen. If a service alert appears at the top of the Main Screen, CANCEL ALERT will also be displayed at the bottom. To cancel the alert, use the and buttons and then the button. 70° HUMIDITY 12 RH TEMP MODE FAN MENU * Outdoor temperature can only be displayed if a heat pump or iQ Drive AC is installed outside. 3 SCREEN SETTINGS Many items that are displayed on the main screen can be easily changed by the homeowner. Some of these items include: Setting the date and time, 12 or 24 hour clock, auto daylight saving, temperature readings in Fahrenheit or Celsius scales and backlight on timer. Date and Time The SET DATE and TIME screen contains the setup menus for changing the current date and time that is displayed on the Main Screen. 1. Select MENU on the Main Screen using the or button. 2. Press the button. 3. Select SET DATE AND TIME using the or button. 4. Press the button. 5. Select SET DATE AND TIME using the or button. 6. Press the button. 7. Set the YEAR: • The button adjusts the year forward. button adjusts • The the year backward. 8. Press the button to save the setting. 9. Set the MONTH: button adjusts • The the month forward. button adjusts • The the month backward. 10. Press the button to save the setting. 11. Set the DAY: • The button adjusts the day forward. button adjusts • The the day backward. 12. Press the button to save the setting. 13. Set the HOUR: • The button adjusts the hour forward. button adjusts • The the hour backward. 14. Press the button to save the setting. 15. Set the MINUTE: • The button adjusts the minute forward. button adjusts • The the minute backward. • NOTE: Holding the or button down for several seconds will adjust the value in larger increments. 16. Press the button to save the setting. SET YEAR SET MONTH SET DAY SET HOUR SET MINUTE Auto Daylight Saving This thermostat can be set to automatically observe the new daylight saving hours established in 2007: between the second Sunday of March to the first Sunday in November. 1. 2. 3. 2. 4. 5. 6. 7. 4 Select MENU on the Main Screen using the Press the button. or Select SET DATE AND TIME using the Press the button. Select AUTO DAYLIGHT SAVING using the Press the button. or button. Select ON or OFF using the Press the button to save the setting. or button. button. or button. Fahrenheit or Celsius 12 or 24 Hour Clock The indoor and outdoor temperatures displayed on The time displayed on the main screen of the the main screen of the thermostat can be changed thermostat can be set to display the clock in 12 hour to the Fahrenheit or Celsius scale. (standard) time or 24 hour (military) time. 1. Select MENU on the Main Screen using the or button. 2. Press the button. 3. Select SETTINGS using the or button. 4. Press the button. The SETTINGS MENU will appear in the display with SCREEN SETTINGS already selected. button. 5. Press the The SCREEN SETTINGS MENU will appear in the d i s p l ay w i t h t h e temperature scale already selected. 6. Press the button. 7. C h a n g e the temperature scale: • The button changes the scale to Celsius. button • The changes the scale to Fahrenheit. 8. Press the button to save the setting. 1. Select MENU on the Main Screen using the or button. 2. Press the button. 3. Select SETTINGS or using the button. 4. Press the button. 5. S e l e c t S C R E E N SETTINGS using the or button. 6. Press the button. 7. Select the option beneath 12 or 24 HOUR CLOCK using or button. the 8. Press the button. 9. Change the clock type: • The button changes the time to 24 hour. • The button changes the time to 12 hour. 10. Press the button to save the setting. Contrast Backlight ON Time The contrast level of the screen can be changed from 1 (lightest) to 15 (darkest). The level is adjustable in increments of 1. NOTE: If power to the thermostat is shut off, the contrast level will return to the default setting (4) when power is restored. The blue backlight feature makes viewing the screen easier at night or in poorly lit rooms. The backlight turns on for a certain amount of time when any one of the five buttons are pressed. The duration that the backlight stays on can be programmed for 30, 60, 90, 120 seconds, or ON (all the time). 1. Select MENU on the Main Screen using the or button. 2. Press the button. 3. Select SETTINGS using the or button. 4. Press the button. 5. S e l e c t S C R E E N SETTINGS using the or button. 6. Press the button. 7. Select the option beneath CONTRAST or using the button. 8. Press the button. 9. Change the contrast level: • The button darkens the contrast. • The button lightens the contrast. 10. Press the button to save the setting. 1. Select MENU on the Main Screen using the or button. 2. Press the button. 3. Select SETTINGS using the or button. 4. Press the button. 5. S e l e c t S C R E E N 8. Press the button. SETTINGS using the 9. Change the value or button. to 30, 60, 90, 120 6. Press the button. seconds, or ON (all the time) using the 7. Select the option or button. beneath BACKLIGHT ON TIME using the 10. Press the button or button. to save the setting. 5 OPERATING THE THERMOSTAT The iQ Drive Thermostat can control conventional or iQ Drive compatible equipment in the heating or cooling system. Before the heating or cooling system can be activated, an operating mode such as AUTO, COOL, HEAT, or E HEAT must be selected. Temporary Hold Selecting an Operating Mode NOTE: When changing modes, the system may A temporary hold changes the temperature setpoint continue in the previous mode for a few minutes to until the next programmed event and can be set using any of these two methods: avoid sudden changes. • OFF MODE: This setting deactivates all equipment METHOD 1: Change the temperature setting by in the heating/cooling system. The furnace, air pressing the or button anytime the main conditioner, or heat pump will not operate when in screen is displayed during system operation. When this mode. The fan, however, can be set to operate the desired temperature is displayed, press the in off mode. See fan operation on pages 7 - 8. button to save the setting. • AUTO MODE: This setting lets the thermostat choose the appropriate mode (HEAT or COOL) METHOD 2: Select TEMP on the Main Screen or button and then the button. for maintaining the desired temperature between using the Change the temperature setting using the or the configured heating and cooling setpoints. To prevent the system from jumping back and forth, button. When the desired temperature is displayed on the controller waits for the auto changeover time the screen, press the button to save the setting. (see page 12) before changing modes. NOTE: CANCEL HOLD will appear at the bottom of • COOL MODE: This mode activates cooling the Main Screen. The hold can be canceled using equipment such as a heat pump or air conditioner the steps on page 7 or allowed to expire at the time during warmer seasons. shown in the HOLD THIS TEMPERATURE screen. • HEAT MODE: This mode activates heating Permanent Hold equipment such as heat pump, electric heater, gas A permanent hold can be used to override the furnace or a heat pump/electric heat combination temperature setpoints in the timed program. Just during cold seasons. set the temperature to a desired setting and the • E-HEAT MODE: For systems with heat pumps, this thermostat permanently maintains the temperature mode will heat only using separate gas or electric until the hold is cancelled on the Main screen. heat. This will disable heat pump operation. NOTE: This option is only used when the thermostat 1. Select MODE on the Main Screen using the or button. NOTE: The MODE MENU can also be accessed through MENU on the Main Screen. 2. Press the button. 3. Select AUTO, COOL, HEAT, E HEAT, or OFF or button. using the 4. Press the button. is in programmable operation. 1. Select MENU on the Main Screen using the or button. 2. Press the button. or button. 3. Select HOLD using the 4. Press the button. 5. 6. Controlling Temperature with Holds By default, the iQ Drive Thermostat operates 7. by controlling temperature to a timed schedule. • However, if desired, you can override the current • temperature setpoint in the Program Menu. Temperature holds can be used for quick temperature 8. changes without having to modify the thermostat’s Program Menu. This function is not available when • the thermostat is set to the nonprogrammable option. NOTE: Holding the or button down for • several seconds will adjust some of the values in larger increments. 6 or button. Select PERMANENT using the Press the button. Change the temperature setting: The button raises the temperature. The button lowers the temperature. button to save the setting. NOTES: CANCEL HOLD will appear at the bottom of the Main screen. To cancel the hold, see page 7. A permanent hold can be modified by simply or button when the Main pressing the screen is displayed. Press the Vacation Hold A vacation hold can be used to control the heating/ cooling system when away from home for an extended amount of time. Just set the temperature to hold the house at, and the date and time when you want the hold to expire. The thermostat will maintain the temperature until the hold is cancelled or expires. 1. Select MENU on the 10. Press the button Main Screen using to save the setting. the or button. 11. Change the time: 2. Press the button. button • The 3. Select HOLD using adjusts the minutes forward. or button. the button • The 4. Press the button. adjusts the minutes 5. Select VACATION backward. or using the button. 6. Press the button. 7. Change the tempera ture setting: button raises • The the temperature. button lowers • The the temperature. button 10. Press the to save the setting. CANCEL HOLD will appear at the bottom of the Main screen. NOTE: A vacation hold temperature setting can be modified by pressing the or button when 8. Press the button to the Main screen is save the setting. displayed. 9. Change the date: • The button adjusts the day forward. • The button adjusts the day backward. 60° 5/08/09 Canceling a Hold 1. Select CANCEL HOLD on the Main Screen using the or button. button. 2. Press the NOTE: This immediately removes CANCEL HOLD from the Main screen and reverts the setpoints to the programmed schedule. 1/19/09 10:00 AM FAN AUTO 70° HUMIDITY 12 RH HEAT CANCEL HOLD MODE FAN MENU Fan Operation Listed below are available fan options when running the heating/cooling system. The default setting for this thermostat is AUTO. 1. Select FAN on the 4. Press the button to save the setting. Main Screen using the or button. NOTE: 1/19/09 10:00 AM The FAN MENU can FAN AUTO also be accessed through MENU on the Main Screen. HEAT HUMIDITY 12 2. Press the button. 3. Select AUTO, ON RH TEMP MODE FAN MENU or PROGRAMMED FA N u s i n g t h e or button. 70° On This will run the fan continuously without operating any heating or cooling equipment, including in OFF mode. The fan speed is manually set to different speeds by using the or buttons and is indicated by the bar graph in the Manual Fan Speed screen. When heating or cooling is needed, the fan speed changes as needed. NOTE: In fan mode, the humidification option is turned on by default. Auto The fan switches on when the thermostat senses the need for heating or cooling and will run for the duration of the operation. When the heating/cooling equipment has shut off, the fan will continue to run for a short period of time afterwards. 7 Programmed Fan Security Lockout The fan will operate based on the fan setting (ON or AUTO) in the Program Schedule. Setup instructions are shown on page 10. The security lockout prevents accidental or unauthorized changing of the thermostat settings. This feature allows either the total lockout of the keypad or lockout of everything but the temperature setpoint adjustment. Both options require a 4 digit PIN number to be entered and saved. 8. Press the button How to Lock the after the last digit has been entered. Thermostat: The PIN number is 1. Select MENU on the saved internally until Main Screen using the the thermostat is or button. unlocked. 2. Press the button. 3. Select SECURITY IMPORTANT NOTE: LOCKOUT using the Write your PIN number down on page 16 and or button. store this manual in a 4. Press the button. safe place for future 5. Select the type of lockout using the reference. or button. How to Unlock the 6. Press the button. Thermostat: Intermittent Fan This option will run the fan for up to 20 minutes and then turn it off for up to 40 minutes if the thermostat doesn’t sense a need for cool or heat for at least one hour. This option is typically used when running the heating/cooling system in a vacation or permanent hold setting. Setting the FAN ON time to OFF disables this feature. See page 6 or 7 for HOLD setup instructions. 1. Select MENU on the Main Screen using the or button. 2. Press the button. 3. Select SETTINGS or using the buttons. 4. Press the button. 5. Select INTERMITTENT FAN using the or button. 6. P r e s s t h e button. NOTE: The INTERMITTENT FAN menu will appear in the display with the value beneath FAN ON TIME already selected. 7. Press the button. 8. Change the FAN ON TIME to OFF or between 5 - 20 minutes. • The button adjusts the time 5 minutes forward . • The button adjusts the time 5 minutes backward. 9. Press the button to save the setting. 10. Select FAN OFF TIME using t h e or button. 11. Press the button. 12. Change the FAN OFF TIME between 5 - 40 minutes. button adjusts • The the time 5 minutes forward. button adjusts • The the time 5 minutes backward. button 13. Press the to save the setting. NOTE: The fan ON and OFF cycles will continue until the fan has been called for heating or cooling. 1. Press the button to access the PIN logon screen. 2. Enter the first digit of the lockout number using the or button. When the desired number is displayed, press the button to jump to 7. Enter the first digit of the next digit. Repeat the PIN number using this process until the the or button. final digit is entered. When the desired 3. Press the button number is displayed, after the last digit press the button to has been entered. jump to the next digit. The thermostat is Repeat this process now unlocked and will until the final digit is remain unlocked until PIN is re-entered. entered. 8 What to Do If You Forget Your PIN Number: Return to the PIN logon screen and type in the code 9999.This will clear out the lock and reset all values back to 0000. PROGRAMMING THE THERMOSTAT The iQ Drive Thermostat is factory programmed with default schedules based on typical usages. Modification of the program schedules is not required, but can still be customized to adjust the heating/ cooling system on individual days, a combination of days, weekdays, weekends, every day, or an entire week. Before the heating or cooling system can be activated, the thermostat must be placed in an operating mode (AUTO, HEAT, COOL, or E HEAT). See Page 6 for mode setup instructions. This thermostat also features a nonprogrammable option to manually control the heating or cooling equipment by disabling the usage of all programming schedules, Smart Recovery, and temperature holds. In nonprogrammable operation, the thermostat requires less user setup. If this option is desired, see page 11 for setup instructions. Changing Program Schedules Copying a program: Each day in the PROGRAM MENU contains 2 or 4 customizable schedules (also called events) that display the TIME an event begins, temperature setpoints (HEAT and COOL), and FAN setting (AUTO or ON).The default setting for this thermostat is 4 Schedule Events/Day, but can be changed by performing the setup instructions on page 11. The thermostat requires that the COOL setpoint must be at least 2° (F) above the HEAT setpoint. This minimum difference is automatically maintained by or button the thermostat. NOTE: Holding the down for several seconds will adjust some of the values in larger increments. The COPY option is displayed at the top of the PROGRAM MENU and can be used to copy a schedule from one day to many other days without having to perform redundant programming of the thermostat.This feature can be used after a schedule has been set in one of the days. 1. Select MENU on the Main Screen using the or button. 2. Press the button. 3. Select PROGRAM or using the button. 4. Press the button. 5. Select an option from the list in the PROGRAM MENU or using the button. 6. Press the button. 7. See Page to change the time of an EVENT, t h e H E AT / C O O L setpoints, or FAN setting. 1. Select COPY at the top of the PROGRAM MENU using the or button. 2. Press the button. The thermostat will display a list of days to copy from. 3. Select a day in the COPY FROM list using the or button. 4. Press the button. The thermostat will display a list of days to copy your program to. 5. Select a day in the COPY TO list using the or button. button 6. Press the to save the setting. NOTE: To schedule additional days, repeat steps 3 - 6. 9 Changing the Time of an EVENT: Changing the HEAT Setpoint: Changing the COOL Setpoint: Changing the FAN Setting: 1. Select the starting time for the EVENT using the or button. 2. Press the button. 3. Change the time of the event: button adjusts • The the minutes forward. button adjusts • The the minutes backward. 4. Press the button to save the setting or button press the to jump to another column. 1. Select the temperature to be changed in the HEAT column using the buttons. 2. Press the button. 3. Change the HEAT setpoint: button raises • The the temperature. button lowers • The the temperature. 4. Press the button to save the setting or button press the to jump to another column. 1. Select the temperature to be changed in the COOL column using the buttons. 2. Press the button. 3. Change the COOL setpoint: button raises • The the temperature. button lowers • The the temperature. 4. Press the button to save the setting or button press the to jump to another column. 1. S e l e c t t h e FA N s e t t i n g using the buttons. 2. Press the button. 3. C h a n g e t h e FA N setting: • The button changes the fan to ON. • The button changes the fan to AUTO. 4. Press the button to save the setting or button press the to jump to another column. 4 Schedule Events/Day 4 Schedule Events/Day 4 Schedule Events/Day 4 Schedule Events/Day 2 Schedule Events/Day 2 Schedule Events/Day 2 Schedule Events/Day 2 Schedule Events/Day 2 Events/Day Business 10 2 Events/Day Business 2 Events/Day Business 2 Events/Day Business ADVANCED THERMOSTAT SETTINGS The iQ Drive Thermostat features additional fine-tuning options that can increase comfort, save energy, and maximize the performance of the heating and cooling system. These settings are optional and do not require modification for the heating/cooling system to operate. However, some of these settings may require the consultation of an installer for determining which settings will achieve peak performance. Program Schedule Usage This thermostat contains customizable energy-saving schedules (also called events) that can adjust the heating/cooling system 2 or 4 times a day on individual days, every day, just weekdays, just weekends, an entire week or a combination of days. Residential systems can be setup for a 2 event or 4 event per day schedule. Companies can set their schedule to 2 events per day using the business option. By default, this thermostat is factory set to a 4 Schedule Events/Day. If the nonprogrammable option or other event schedule is desired, then this setting must be changed before programming the thermostat. NOTE: Full programmable operation may be resumed by performing steps 1 - 9 below and selecting a programmable option in the program schedule usage menu. Programmable Options 4 Schedule Events/Day • WAKE: The temperature setting in the morning when everyone wakes up. • LEAVE: The temperature setting for the time away from home and energy savings are wanted. • RETURN: The temperature setting in the evening when everyone returns home. • SLEEP: The temperature setting at night when everyone is asleep. 2 Schedule Events/Day • DAY: The temperature setting during daylight hours. • NIGHT: The temperature setting during night time hours. 2 Events/D Business • ACTIVE: The temperature setting during business hours. • IDLE: The temperature setting when business is closed. Nonprogrammable Option The nonprogrammable option disables the usage of all programming schedules, Smart Recovery, and temperature holds. It requires no programming and is as basic as operating an old manual style rotary thermostat. To use this option, perform steps 1 - 9 below and select NONPROGRAMMABLE in step 8. To activate an air conditioner, furnace, or heat pump, place the thermostat in an operating mode as described on page 6. Adjust the temperature by or buttons anywhere simply pressing the on the Main Screen (or by accessing the TEMP menu on the Main Screen). When the desired temperature setting is displayed, press the button to save the setting. 1. Select MENU on the Main Screen using the or button. 2. Press the button. or button. 3. Select SETTINGS using the 4. Press the button. 5. Select OPTIONS using or button. the button. 6. Press the NOTE: The OPTIONS menu will appear in the display with an event beneath EVENTS PER DAY already selected. 7. Press the button. or buttons. 8. Change the event using the 9. Press the button to save the setting. 11 Auto Changeover Time Smart Recovery Auto Changeover Time sets the minimum time off before the thermostat can change from heat to cool or vice versa when in auto mode. This prevents the system from jumping back and forth between heating and cooling equipment. The time can be set between 15 - 120 minutes (in 15 minute increments) or DISABLE. Setting auto changeover time to DISABLE removes AUTO from the operating mode menu. To select an operating mode see page 6. The Smart Recovery option (disabled by default) can enhance comfort by modifying heating and cooling setpoints to ease the transition from one program schedule to the next. During the time prior to a program schedule change (which will call for higher heating setpoint or lower cooling setpoint), Smart Recovery gradually adjusts the setpoint in 1 degree increments to anticipate this change. Thus room temperature will be at or close to the setpoint for the next time block when that time block begins. Actual results depend on home system characteristics.This function is not available when the thermostat is in nonprogrammable mode. 1. Select MENU on the Main Screen using the or button. 2. Press the button. or button. 3. Select SETTINGS using the 4. Press the button. or button. 5. Select OPTIONS using the 6. Press the button. 7. Select the option beneath AUTO CHANGEOVER TIME using the or button. 8. Press the button. 9. C h a n g e t h e A u t o Changeover Time: • The button adjusts the time 15 minutes forward. • The button adjusts the time 15 minutes backward. 10. Press the button to save the setting. 1. Select MENU on the Main Screen using the or button. 2. Press the button. or button. 3. Select SETTINGS using the 4. Press the button. 5. Select OPTIONS using or button. the 6. Press the button. 7. Select the option beneath SMART RECOVERY or using the button. 8. Press the button. 9. Change the SMART RECOVERY setting: • The button changes the setting to ON. • The button changes the setting to OFF. 10. Press the button to save the setting. Dehumidification Dehumidification is the process of reducing the level of humidity in the air. The system can only provide dehumidification when an air conditioner or heat pump is connected to the heating/cooling system. The default setting is ON. 1. Select MENU on the Main Screen using the 8. Press the button. 9. Change the DEHUMIDIor button. FICATION setting: 2. Press the button. button changes • The or button. 3. Select SETTINGS using the the setting to ON. 4. Press the button. button changes • The or button. 5. Select OPTIONS using the the setting to OFF. 6. Press the button. button to 10. Press the 7. Select the option beneath DEHUMIDIFICATION save the setting. or button. using the 12 Minimum Heat Pump Usage Temperature Under most circumstances, the iQ Drive system uses a heat pump (if available) as the primary source of heating because it is usually less expensive to run than the gas furnace or electric heat.The Heat Pump Usage Temperature limit can be adjusted so that the heat pump will not operate below this temperature and switches the system to the furnace or electric heater for heat. The system will not allow the heat pump to operate below an outdoor temperature of 12° F (-11° C). Some reasons for choosing to increase this temperature above the default limit of 12° (F) include: • If the cost of electricity is high compared to gas in the area, it may be cheaper to run the furnace at higher temperatures. Consult the local dealer or utility for recommendations. • Comfort levels created by the gas furnace during cold weather may be preferred. IMPORTANT: Changing the Minimum Heat Pump Usage Temperature affects when and how much the furnace will be used instead of the heat pump for heating. This will change the total cost of heating your residence. In some areas, the total cost will decrease if the temperature is chosen correctly. However, this can only be determined by consulting with an iQ Drive trained, licensed dealer. Please do not alter this setting without first obtaining proper information specific to your area. Backup Heat Response The system will switch automatically from the heat pump to the furnace (when needed) to heat the room more quickly. If the system uses an iQ Drive modulating furnace with a conventional heat pump, there is some control over this response. If the “Fast” response is selected, the furnace will take over if the room temperature is 4° (F) lower than the setpoint after 10 minutes. “Slow” response will act after 20 minutes. NOTE: This option is only available when a one or two stage heat pump is installed with an iQ Drive furnace. 1. Select MENU on the Main Screen using the or button. 2. Press the button. 3. Select SETTINGS using the or button. 4. Press the button. 5. Select OPTIONS using the or button. 6. Press the button. 7. S e l e c t t h e o p t i o n beneath BACKUP HEAT RESPONSE using the button. or 8. Press the button. 9. Change the BACKUP HEAT RESPONSE to fast or slow using the or buttons: 10. Press the button to save the setting. 1. Select MENU on the Main Screen using the or button. 2. Press the button. or button. 3. Select SETTINGS using the 4. Press the button. 5. Select OPTIONS using or button. the 6. Press the button. 7. Select the option beneath HEAT PUMP USAGE or LIMIT using the button. 8. Press the button. 9. Change the HEAT PUMP USAGE LIMIT: • The button raises the temperature. • The button lowers the temperature. 10. Press the button to save the setting. 13 Offsets Humidity Control Many factors such as a room’s air flow, direct sunlight on the thermostat, positioning of the thermostat near windows, doors, etc. can cause the temperature or relative humidity on the Main Screen to vary from the actual value. Offsets can be used to balance out these fluctuations so that the temperature on the Main Screen more closely reflects the temperature of the living space.Temperature offsets can be changed to ±5 degrees. The relative humidity has a range of ±10%. The default setting for all the offsets is 0. Relative Humidity (RH) is the ratio of water vapor in the air compared to the maximum amount of water vapor the air can hold at the same temperature. RH is typically expressed as a percentage and is closely related to personal comfort. When humidity is high we tend to feel hotter than the actual temperature and when humidity is low, the air is drier and we feel cooler. While the iQ Drive compatible indoor furnace or air handler will always provide a humidifier control • INDOOR TEMPERATURE: the temperature of the output, actual humidification equipment is optional living space and is the largest number displayed and not provided with the heating units. on the Main Screen. • REMOTE TEMPERATURE: this offset is not used A limited capability for dehumidification control is provided with all iQ Drive air conditioning and with standard system equipment. • OUTDOOR TEMPERATURE: the measured heat pump systems and in iQ Drive modulating temperature at the outdoor unit (heat pump or air furnace systems coupled with any compatible air conditioner) and is displayed on the Main Screen. conditioner or heat pump. Dehumidification is not the • RELATIVE HUMIDITY: the humidity level measured primary function of an iQ Drive component. It may at the thermostat and shown on the Main Screen. not be able to fully dehumidify under all conditions. • HEAT ANTICIPATOR: The heat anticipator tells the Dehumidification may be enabled or disabled by furnace when to shut off as the room reaches the changing the setting in the OPTIONS screen. See desired temperature. This also affects how much page 12. temperature swing will occur in the room. The Humidify / Dehumidify heat anticipator function operates similar to the anticipator found in older thermostats and is only 1. Select RH on the Main Screen using the used with 1 or 2 stage conventional furnaces. This or button. setting should only be changed after consulting 2. Press the button. with your dealer. button to access the humidity 3. Press the settings. 1. Select MENU on the Main Screen using the 4. Select HUMIDIFY or or button. 10:00 AM 1/19/09 DEHUMIDIFY using the OUTDOOR FAN AUTO 2. Press the button. 46 or button. 3. Select SETTINGS using HEAT 5. Press the button. or button. the 6. Change the HUMIDIFY/ 4. Press the button. HEAT 70 COOL 80 DEHUMIDIFY setpoint: 5. Select OFFSETS using RH (5% increments only) or button. the • The button raises the 6. Press the button. humidity. or 7. Select an offset from the list using the • The button lowers the button. humidity. 8. Press the button. The option will blink in the button to 7. Press the display indicating the offset can be changed. save the setting. 9. Change the offset: 8. Press the button to exit • The button raises the offset. the Humidity Settings • The button lowers the offset. screen. 10. Press the button to save the setting. 11. Repeat steps 7-10 for additional offsets. 70° HUMIDITY 12 TEMP 14 MODE FAN MENU VACATION HOLD HOLD UNTIL TIME VACATION HOLD HOLD UNTIL DATE VACATION HOLD HOLD TEMPERATURE AUTO DAYLIGHT SAVING ON OFF NOTE: Bold Font Indicates Menu or Screen Title Name SET MINUTE SET HOUR SET DAY SET MONTH SET DATE AND TIME SET YEAR SET DATE AND TIME SET DATE AND TIME AUTO DAYLIGHT SAVING HOLD MENU VACATION PERMANENT HOLD THIS TEMPERATURE UNTIL HUMIDITY HUMIDITY SETTINGS HUMIDIFY DEHUMIDIFY TEMP RH COPY PROGRAM (Confirmation) COPY TO COPY FROM FAN MENU AUTO ON PROGRAMMED FAN SCREEN SETTINGS FAHRENHEIT OR CELSIUS 12 OR 24 HOUR CLOCK CONTRAST INTERMITTENT FAN BACKLIGHT ON TIME OPTIONS PROGRAM SCHED USAGE DEHUMIDIFICATION AUTO CHANGEOVER TIME SMART RECOVERY HEAT PUMP USAGE LIMIT BACKUP HEAT RESPONSE (TYPICAL FOR EACH DAY OR GROUP OF DAYS LISTED) MONDAY TIME HEAT COOL FAN SCHEDULE BLOCK 1 SCHEDULE BLOCK 2 SCHEDULE BLOCK 3 SCHEDULE BLOCK 4 MODE MENU OFF AUTO COOL HEAT E HEAT FAN MENU AUTO ON PROGRAMMED FAN OPERATING MODE MENU OFF AUTO COOL HEAT E HEAT PROGRAM MENU COPY [list of days] EVERY DAY WEEKDAYS WEEKENDS FAN MODE PERMANENT HOLD HOLD TEMPERATURE Main Screen OFFSETS INDOOR TEMPERATURE REMOTE INDOOR TEMP OUTDOOR TEMPERATURE RELATIVE HUMIDITY HEAT ANTICIPATOR SETTINGS MENU SCREEN SETTINGS OPTIONS OFFSETS INTERMITTENT FAN INTERMITTENT FAN FAN ON TIME FAN OFF TIME ENTER PIN NUMBER SECURITY LOCKOUT TEMP ADJUST ONLY TOTAL KEYPAD LOCKOUT MAIN MENU SET TIME AND DATE HOLD PROGRAM FAN MODE SETTINGS SECURITY LOCKOUT MENU IQ DRIVE® THERMOSTAT SITE MAP 15 iQ DRIVE THERMOSTAT SETTINGS MENU /OPTION SCREEN SETTINGS UNITS DEFAULT SETTING Auto Daylight Savings OFF or ON ON Fahrenheit or Celsius Fahrenheit or Celsius Fahrenheit 12 or 24 Hour Clock 12 or 24 12 Contrast Backlight On Time Holds (all) THERMOSTAT OPERATION RANGE 1 to 15 Increments of 1 4 30 to 120 seconds or Continuously ON 30 second increments 30 OFF or ON OFF Intermittent Fan On Time Off or 5 to 20 minutes 5 minute increments OFF Intermittent Fan Off Time 5 to 40 minutes 5 minute increments 40 Total keypad or Temp adjust only Write PIN number here: _____________________ OFF 10 minute increments 6:00 a.m. 8:00 a.m. 5:00 p.m. 10:00 p.m. Increments of 1° 70° F (21° C) 62° F (16° C) 70° F (21° C) 62° F (16° C) Increments of 1° 78° F (25° C) 85° F (29° C) 78° F (25° C) 82° F (27° C) Security Lockout EVENTS PROGRAMMING THE THERMOSTAT TIME 24 Hours HEAT 40° F to 90° F 4° C to 32° C COOL 40° F to 90° F 4° C to 32° C FAN Program Schedule Usage Auto Changeover Time ADVANCED THERMOSTAT SETTINGS AUTO or ON AUTO 4 Schedule Events/Day 2 Schedule Events/Day 2 Events/D Business Nonprogrammable 4 Schedule Events/Day 0 to 120 Minutes 15 minute increments 60 Minutes Smart Recovery OFF or ON OFF Dehumidification OFF or ON ON Minimum Heat Pump Usage Backup Heat Response 12° F to 74° F Increments of 1° Fast (10 Minutes) Slow (20 Minutes) 12° F Slow OFFSETS Indoor Temperature to 5° F to + 5° F Remote Temperature Increments of 1° F 0 Not Used Outdoor Temperature to 5° F to + 5° F Increments of 1° F 0 Relative Humidity to 10% to + 10% Increments of 1% 0 0 to 9 Increments of 1 0 Heat Anticipator (conventional furnaces only) iQ Drive® is a registered trademark of Nordyne. ¢709063'¤ O’Fallon, MO 709063 709063 Specifications and illustrations subject to change without notice or incurring obligations. Printed in U.S.A. (06/09)