1
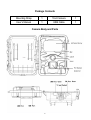
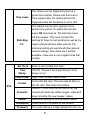
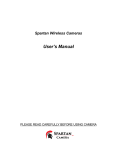
HCO Outdoor Products
Spartan SR1-IR / SR1-BK
User’s Manual
PLEASE READ CAREFULLY BEFORE USING CAMERA
Package Contents
Mounting Strap
1
Trail Camera
1
User’s Manual
1
USB Cable
1
Camera Body and Ports
1
Keys & Buttons
•
MENU: Enter the program menu in preview mode
•
▲▼◄►: Move between the menu items and change the value
•
OK:
o Save parameter settings in menu mode
o Play videos in playback mode
2
•
Playback button
: In live preview window, switch between
playback and preview mode
•
DEL: delete an image in playback mode
•
Use Shortcuts: In live preview window,
o ▲ is the shortcut to choose Video mode, and
o ▼ is the shortcut for the Camera mode
o OK is for capture photos or record a video manually
•
Mode (Power) Switch: ON at top. SETUP in the middle. OFF in the
bottom.
Quick Start
1.
Make sure the power switch is at OFF position. Load the batteries into
the battery compartment according to the polarities indicated. Load a
set of 12 (recommended), 8 or 4 (emergency, left 2 columns) batteries.
Or connect 6 V external power supply to the camera by using the
correct cable and external battery.
The following batteries can be used:
•
•
•
High-performance alkaline batteries
Lithium batteries
Rechargeable Ni-MH batteries
3
2.
Insert a SD card (32GB or smaller). Open the camera and insert the SD
card into the card slot. Refer to the card symbol on the case for proper
orientation. The camera supports up to 32 GB SD card. Please note that
the SD-card should not be locked.
3. Slide the power switch to the SETUP position. The camera will enter the
live preview mode.
4. Press
button to enter into the menu, then press ◄ or ► buttons
to move between the tabs (submenu) which contains different group of
items. Press the ▲ or ▼ buttons to activate the submenu and edit
different items. Press ◄► to change the value. Press the OK button to
save.
5. Press
button to exit from the submenu. Press the MENU again
to exit from setup menu and enter the live preview mode.
6. Press the OK button to capture image or record video manually.
7. Press the playback button to playback. Use the ◄ or ► buttons to go
through the images. Press ▲ or ▼ button to choose magnification times.
Press OK and ▲▼◄► to move the magnified area.
to exit.
8. Press Playback button
9. While reviewing the image, press
button to delete the current
image, or press
button to delete the current one or all the
images.
to exit the playback mode.
10. Press Playback button
11. Place the camera at the target area and turn on the camera (slide the
power switch to ON). The camera will take pictures or videos as
programmed. The height from the ground for placing the camera should
vary with the object size appropriately. In general, 3-6 feet is preferred.
12. Push the power switch to the OFF position to power off the camera.
Please note that even in the OFF mode, the camera still consumes a
4
small amount of battery power. Therefore, please remove the batteries
if the camera is not in use for an extended time.
Menu Settings
Switch the camera to SETUP mode & press MENU. Press ▲▼◄► to
select the desired value,And then press OK to save.
Setting Items
Mode
CAM
Photo Size
Choose the image size, e.g. 5MP, 8MP or 3MP.
Photo
Burst
Choose the number of images taken after each
trigger (1-5).
Burst
Interval
Video Size
Video
Length
Sensitivity
PIR
Description
Choose to take Photo / Video.
Trigger
Interval
Choose the interval time length between the
images taken in burst mode (Long / Short).
Choose the video resolution.
Set the video length to the desired duration.
Select between High, Low, Normal and OFF.
The sleeping time after each trigger.
5
Time Lapse
Start-Stop
1/2
Set Clock
Time
Stamp
Flash Power
Format
SYS
Overwrite
Default
Information
Password
The camera can be triggered by timer at a
preset time interval. Please note that even in
Time Lapse mode, the camera still can be
triggered unless the Sensitivity is set to OFF.
The camera can be set to operate only at
specific time period. To enable this function
select ON and press ok. The start-stop menu
will then appear. This menu contains the
settings for times to start and stop as well as the
trigger interval and time lapse interval. The
start-stop setting will override all other general
camera settings. Since there are 2 periods
available, make sure to not program times that
overlap.
Enter to set the Date and Time.
ON /Off. Choose if the image stamp is to be
shown or not.
High / Low. Infrared Flash Power:
Format the SD card. This will erase all data on
the SD card. This cannot be undone.
ON/OFF. If ON, once the SD card is full, the
camera will delete the oldest images / video and
keep recording the new images / videos.
Restore all settings to factory default values.
Show version of firmware on the camera.
This option allows a 6 digits password to be set.
6
•
•
•
•
•
•
•
•
•
•
Playback Button (Viewing Photo or Video)
Switch to SETUP mode.
to view the latest picture (or video).
Press Playback button
Press OK button to start playing the video clips.
Press OK button to stop playing and return to playback mode.
Press ◄ button to view the previous image and press ► button
for the next.
playback button again to exit the
Press the Playback button
playback mode.
Delete Photo or Video
to view the image (or video) which
Press Playback button
to be deleted.
Press DEL button.
Press LEFT or RIGHT to select Yes to execute or No to Exit.
Please note that after deleting a picture or a video file, the deleted
files can’t be restored!
7
Technical Specifications
Picture Resolution
8MP
Video Resolution
WVGA (800*480@30FPS) / QVGA
(320*240@30FPS) / 720p @30fps /
1080p @10fps
Trigger Time
1s
Lens
FOV (Field of View) = 52°
Night Illumination
Invisible Blackout Flash (SR1-BK)
Infrared (SR1-IR)
Display Screen
2.0” LCD
Memory Card
up to 32GB
Trigger
Motion (PIR) / Timer (Time Lapse)
PIR Sensitivity
Adjustable (High/Normal/Low/Off)
Temperature
-4 - +140F (Operation)
-22 - +158F (Storage)
Trigger Interval
0s – 60 min
Time Lapse Interval
5s – 60s/1 min–60 min/1 hr - 8 hrs
Photo Burst
1–5
Video Length
1–30s
Power Supply
4×AA, 8×AA or 12AA / External Power
Stand-by Current
< 0.20 mA (<5mAh/Day)
Sound Recording
Available
Mounting
Tripod/Mounting Strap/Python lock
Weight
0.8 lbs
Dimensions
6x5x3.5 inches
Operation Humidity
5% - 90%
8
WARRANTY INFORMATION
The Camera purchased from our authorized dealers is warranted to be free
from defects in material and workmanship for 2 year from the original date of
purchase under normal use. HCO Outdoor Products will, at its option, repair
or replace your camera with the same or comparable model, free of charge
(except you must pay for shipping charges set forth below), for a period of (1)
one year from the original date of purchase in the event of a defect in
materials or workmanship occurring with normal use. This warranty only
extends to the original retail purchaser. Purchase receipt or other proof of
date of original purchase is required before warranty performance. The
warranty on any replacement product provided under this warranty shall be
for the unexpired portion of the warranty period applicable to the original
product.
*Sorry but our warranty is ONLY applied to the cameras bought from our
authorized dealers.
This warranty extends solely to failures due to defects in materials or
workmanship occurring during normal use. It does not cover normal wear of
the product. This warranty is void if: the product housing has been removed,
if the product's label, logo or serial number have been removed or if the
product fails to function properly as a result of accident, misuse, abuse,
neglect, mishandling, misapplication, non-compatible batteries, faulty
installation, setup, adjustments, improper maintenance, alteration,
maladjustment of controls, modification, power surges, service by anyone
other than HCO or HCO authorized service center or acts beyond the
manufacturer's or distributor's control.
Note: The camera is not waterproof; please protect your camera properly for
outdoors use.
9
Should your product prove defective during this warranty period, please
contact us to obtain a RMA number prior to returning the defective unit.
*RMA number is required for all returns.
Include $11.95 for return shipping & insurance. (For U.S. customers only.
CHECK OR MONEY ORDER ONLY PLEASE, NON-REFUNDABLE). If the
product is beyond the warranty period, the price for repairing or replacing
may vary. Please allow 6-8 weeks for delivery. International customers pay
different amount of shipping & insurance. We will send detailed information
along with the RMA number.
Include with your camera the RMA form and a copy of your dated cash
register receipt or other proof of purchase.
The warranty work will not automatically extend the original warranty period.
The customer has 2 weeks to report any DOA (Dead on Arrival) products
(please test product upon receipt).
If you have any questions regarding the warranty of HCO products, please
send us an email at [email protected].
*Please consult your dealer or us if you have any question or problem while
you use the camera before you request a RMA number and send the
camera back for repair. Some problems may be solved easily with help from
our dealers or us.
CAMERA REPAIR
Repairs for damages not covered by the warranty will be subject to a charge.
Please contact HCO Outdoors to determine more information and to discuss
repair options not covered under warranty.
10
CUSTOMER SERVICE CONTACT
E-mail: [email protected]
Website: www.hcooutdoors.com
Phone: 1-770-582-0004
HCO Outdoor Products
6665 Corners Industrial Ct. Suite D
Norcross, GA 30092
U.S.A.
11