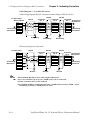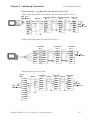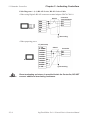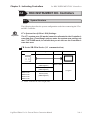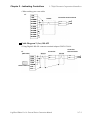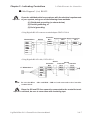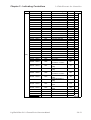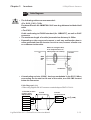
1
PREFACE PREFACE Thank you for purchasing the LogiTouch integrated development software, "LogiTouch Editor Ver. 1.0". Please read this manual carefully in order to use this software properly, and be sure to keep this manual handy for future reference. NOTES (1) The copyrights to all programs and manuals included in the LogiTouch Editor Ver. 1.0 (hereinafter referred to as "this product") are reserved by the Digital Electronics Corporation. Digital grants the use of this product to its users as described in the "Software Operating Conditions" documentation, included with this product's CD-ROM. Any actions violating the above-mentioned conditions are prohibited by both Japanese and foreign regulations. (2) The contents of this manual have been thoroughly inspected. However, if you should find any errors or omissions in this manual, please inform your local LT representative of your findings. (3) Regardless of article (2), the Digital Electronics Corporation shall not be held responsible for any damages or third party claims resulting from the use of this product. (4) Differences may occur between the descriptions found in this manual and the actual functioning of this product. Therefore, the latest information on this product is provided in data files (i.e. Readme.txt files, etc. ) and in separate documents. Please consult these sources as well as this manual prior to using the product. (5) Even though the information contained in and displayed by this product may be related to intangible or intellectual properties of the Digital Electronics Corporation or third parties, the Digital Electronics Corporation shall not warrant or grant the use of said properties to any users and/or other third parties. (6) The specifications set out in this manual are for overseas products only. As a result, some differences may exist between the specifications given here and for those of the identical Japanese product. © Copyright 2001 Digital Electronics Corporation. All rights reserved. Digital Electronics Corporation, April 2001 For the rights to trademarks and trade names, see “TRADEMARK RIGHTS”. LogiTouch Editor Ver. 1.0 External Device Connection Manual i PREFACE TRADEMARK RIGHTS TRADEMARK RIGHTS All company or product names used in this manual are the trade names, trademarks (including registered trademarks), or service marks of their respective companies. This product omits individual descriptions of each of these rights. Trademark / Trade Name Right Holder Microsoft, MS, MS-DOS, Windows, Windows 95, Windows 98, Microsoft Corporation, USA Windows Me, Windows NT, Windows 2000 Windows Explorer, Microsoft Excel 95 Intel, Pentium Pro-face, Flex Network Ethernet IBM, VGA, PC/AT Intel Corporation, USA Digital Electronics Corporation (in Japan and other countries) Western Digital Electric Corporation, USA International Business Machines Corporation (IBM), USA The following terms differ from the above mentioned formal trade names and trademarks. Term used in this manual Windows 95 Windows 98 Windows Me Windows NT Windows 2000 MS-DOS ii Formal Trade Name or Trademark Microsoft® Windows®95 Operating System Microsoft® Windows®98 Operating System Microsoft® Windows®Me Operating System Microsoft® Windows NT ® Operating System Microsoft® Windows®2000 Operating System Microsoft® MS-DOS® Operating System LogiTouch Editor Ver. 1.0 External Device Connection Manual PREFACE MANUAL SYMBOLS AND TERMINOLOGY MANUAL SYMBOLS AND TERMINOLOGY This manual uses the following symbols and terminology. Safety Symbols and Terms This manual uses the following symbols and terms to identify important information related to the correct and safe operation of this product. Symbol Description Indicates a potentially hazardous situation that could result in serious injury or death. Indicates a potentially hazardous situation that could result in minor injury or equipment damage. Indicates a potentially damaging action or dangerous situation that could result in abnormal equipment operation or data loss. Indicates instructions or procedures that must be performed to ensure correct product use. Indicates instructions or procedures that must not be performed. General Information Symbols and Terms This manual uses the following symbols and terms for general information. Symbol Description Provides hints on correct product use, or supplementary information. External Device LT LT Editor Indicates an item's related information (manual name, page number). Indicates a peripheral device (temperature controller, inverter, etc.). This does not include devices connected via the Flex Network or DIO. Generic name for the "LogiTouch Series" Graphic Logic Controller made by Digital Electronics Corporation. Indicates LogiT ouch Editor Version 1.0 (hereinafter referred as "this product"), LogiTouch integrated development software made by Digital Electronics Corporation. LogiTouch Editor Ver. 1.0 External Device Connection Manual iii PREFACE LOGITOUCH SERIES LOGITOUCH SERIES The LT Editor supports the following LT models. Series Type Type-A1 Type-A2 LogiTouch Series Type-B Type-C Product Model GLC150B-XY32SK GLC150B-XY32SC GLC150B-FLEX GLC150B-RSFL GLC150-BG41-XY32SK-24V GLC150-BG41-XY32SC-24V GLC150-BG41-FLEX-24V GLC150-BG41-RSFL-24V For the types of external devices supported by LT Editor, please refer to "External Device Connection Manual". HOW TO USE THIS MANUAL iv LogiTouch Editor Ver. 1.0 External Device Connection Manual PREFACE HOW TO USE THIS MANUAL HOW TO USE THIS MANUAL Manual Structure The "Parts List" is one in a series of manuals for this product and explains how to use the LT Editor. There are three other manuals in the series, as well as online help. Please refer to "Operation Manual - Screen Creation Guide Chapter 1 LT Editor Fundamentals” for an outline of this product. Operation Manual - Screen Creation Guide 1.6 LT Editor Manuals and Help In addition to these manuals, data files containing supplemental information on updated functions are also provided. To read these additional data files, click on the [Start] button in your Windows OS main screen and select the [Programs]®[LogiTouch] menu. Then, click on the [Read Me] selection. For detailed information on LT series products, please refer to "LogiTouch Series User's Manual". (Optionally available) Operation Manual Describes the operating procedures for the LT -Screen Creation Editor and all functions except for Logic Program Guide development (provided as a PDF file). Included on CD-ROM Describes logic program development. T his manual's "Programming" section uses a tutorial Operation Manual lesson to help users learn basic operation -Logic procedures, and a "Functions" section to explain Programming the software settings required for the combination Guide of the LT main unit and the LT Editor (provided as a PDF file). Describes the LT Editor's pre-made Parts and Parts List symbols (provided as a PDF file). External Device Connection Manual (this manual) Available on LT Editor Online Help screen Describes the methods for connecting the LT to external devices of various manufacturers (provided as a PDF file). Describes the methods for setting the LT Editor's windows and dialog boxes, instructions and functions of logic programs, as well as how to set up individual drivers. • Address settings described in these manuals are for explanatory purposes only. Appropriate addresses must be set according to your requirements. External Device Connection Manual • If you have any questions about the contents of this manual, please contact your local LT distributor. LT distributors will answer to your technical inquiries and provide you with technical support. Operation Manual - Screen Creation Guide A-4 Software Trouble Report If you have any question about your personal computer or Microsoft® Windows®, please contact your PC distributor or manufacturer. LogiTouch Editor Ver. 1.0 External Device Connection Manual v TABLE OF CONTENTS PREFACE TABLE OF CONTENTS PREFACE .....................................................................................................i TRADEMARK RIGHTS .......................................................................... ii MANUAL SYMBOL AND TERMINOLOGY ...................................... iii LogiTouch SERIES ...................................................................................iv HOW TO USE THIS MANUAL ............................................................... v TABLE OF CONTENTS ..........................................................................vi CHAPTER 1 Direct Access Communication 1.1 Communication Method ............................................................. 1-1-1 1.1.1 1.1.2 1.1.3 1.1.4 LS Area Structure ............................................................................... 1-1-2 Address Settings ................................................................................ 1-1-3 Contents and Range of System Data Area ......................................... 1-1-4 Special Relays ................................................................................... 1-1-7 1.2 Efficient Data Communication .................................................. 1-2-1 1.2.1 1.2.2 1.2.3 Block Transfer .................................................................................... 1-2-1 LS Area Communication .................................................................... 1-2-2 Reset GP on Data Write Error ............................................................ 1-2-3 CHAPTER 2 Indicating Controllers 2.1 Connectable Controllers ............................................................. 2-1-1 2.2 Yokogawa Electric/Yokogawa M&C Controllers..................... 2-2-1 2.2.1 2.2.2 2.2.3 2.2.4 System Structure ............................................................................... 2-2-1 Cable Diagrams ................................................................................. 2-2-2 Supported Devices............................................................................. 2-2-5 Environment Setup ............................................................................ 2-2-7 2.3 Yamatake Controllers ................................................................. 2-3-1 2.3.1 2.3.2 2.3.3 2.3.4 System Structure ................................................................................ 2-3-1 Cable Diagrams ................................................................................. 2-3-3 Supported Devices........................................................................... 2-3-10 Environment Setup .......................................................................... 2-3-12 2.4 RKC INSTRUMENT INC. Controllers .................................... 2-4-1 2.4.1 2.4.2 2.4.3 2.4.4 vi System Structure ............................................................................... 2-4-1 Cable Diagrams ................................................................................. 2-4-3 Supported Devices............................................................................. 2-4-8 Environment Setup ............................................................................ 2-4-9 LogiTouch Editor Ver. 1.0 External Device Connection Manual PREFACE TABLE OF CONTENTS 2.5 Omron Corporation Controllers................................................ 2-5-1 2.5.1 2.5.2 2.5.3 2.5.4 System Structure ............................................................................... 2-5-1 Cable Diagrams ................................................................................. 2-5-3 Supported Devices............................................................................. 2-5-7 Environment Setup .......................................................................... 2-5-11 2.6 Shinko Technos Corporation Controllers ................................. 2-6-1 2.6.1 2.6.2 2.6.3 2.6.4 2.6.5 System Structure ............................................................................... 2-6-1 Cable Diagrams ................................................................................. 2-6-4 Supported Devices............................................................................. 2-6-8 Environment Setup .......................................................................... 2-6-16 Error Code ....................................................................................... 2-6-17 2.7 Fuji Electronic Corporation Controllers .................................. 2-7-1 2.7.1 2.7.2 2.7.3 2.7.4 2.7.5 System Structure ............................................................................... 2-7-1 Cable Diagrams ................................................................................. 2-7-2 Supported Devices............................................................................. 2-7-5 Environment Setup ............................................................................ 2-7-8 Error Code ......................................................................................... 2-7-9 2.8 Toho Electronics Inc. Controllers .............................................. 2-8-1 2.8.1 2.8.2 2.8.3 2.8.4 2.8.5 System Structure ............................................................................... 2-8-1 Cable Diagrams ................................................................................. 2-8-5 Supported Devices............................................................................. 2-8-9 Environment Setup .......................................................................... 2-8-22 Error Code ....................................................................................... 2-8-23 CHAPTER 3 Inverters 3.1 List of Connectable Inverters ................................................... 13-1-1 3.2 Mitsubishi Electric Inverters ..................................................... 3-2-1 3.2.1 3.2.2 3.2.3 3.2.4 3.2.5 System Structure ................................................................................ 3-2-1 Cable Diagrams .................................................................................. 3-2-4 Supported Devices.............................................................................. 3-2-6 Environment Setup ............................................................................. 3-2-9 Error Codes ...................................................................................... 3-2-10 3.3 Fuji Electric Inverters ................................................................. 3-3-1 3.3.1 System Structure ................................................................................ 3-3-1 3.3.2 Cable Diagrams .................................................................................. 3-3-3 3.3.3 Supported Devices.............................................................................. 3-3-7 3.3.4 Environment Setup ............................................................................. 3-3-9 3.3.5 Error Codes ...................................................................................... 3-3-10 LogiTouch Editor Ver. 1.0 External Device Connection Manual vii PREFACE TABLE OF CONTENTS CHAPTER 4 Memory Link Communication 4.1 Setting Up Memory Link Communication ............................... 4-1-1 4.1.1 4.1.2 4.1.3 System Area ....................................................................................... 4-1-2 Contents and Range of System Data Area ......................................... 4-1-3 Special Relays .................................................................................... 4-1-5 4.2 Cable Diagrams ........................................................................... 4-2-1 4.2.1 4.2.2 RS-232C Communication .................................................................. 4-2-1 RS-422 Communication ..................................................................... 4-2-2 4.3 Memory Link Commands ........................................................... 4-3-1 4.3.1 4.3.2 4.3.3 Read Command .................................................................................. 4-3-3 Reply Command ................................................................................. 4-3-4 Write Command ................................................................................. 4-3-5 A1 Maximum Number of consecutive Addresses A.1.1 Maximum number of Consecutive External Device Addresses Appendix1-1 viii LogiTouch Editor Ver. 1.0 External Device Connection Manual Chapter 1 - Direct Access Communication 1 1.1 Communication Method Direct Access Communication The Direct Access (Programless) format, which frees the External Device from running protocol programs, performs communication between the LT and an External Device. This chapter describes the Direct Access method of Communication. 1.1 Communication Method Depending on the Parts used in your screen program, the LT can easily specify an External Device. By doing so, the LT automatically requests the data required for operation (System Data) and the screen display from the External Device. Then the LT, after receiving the External Device response, changes its screen display via its screen animation settings. Also, data can be sent to the External Device using LT touch key input. With Direct Access communication, the LT is always the master in the communication link. In Direct Access Communication, data required by the LT's screen display is automatically sent and received from the LT. Therefore, an External Device program for screen display operations is not required, thereby simplifying installation of the graphical control panel (LT). ! Caution When an error occurs because data is read or written outside the External Device's device range, the read/write operation continues retrying until the error is restored. For this reason, the LT display screen may seem to be not operating. To fix this problem, check to make sure the devices designated by the LT's Parts are within the External Device's designated range. LogiTouch Editor Ver.1.0 External Device Connection Manual 1-1-1 1.1 Communication Method 1.1.1 Chapter 1 - Direct Access Communication LS Area Structure The LS Area, located in LT memory, is the area used for the LT's operations. The LS Area structure is as follows. LS0 System Data : Area LS19 LS20 Reading Area : : User Area : LS2032 Special Relays : LS2047 Reserved LS2048 : LS2095 User Area LS2096 : LS4095 System Data Area This is the data write area for LT screen control data or error information necessary for LT operation. Reading Area Stores data common to all screens and performs LS Area Refresh. Up to 256 words can be designated here. Up to 16 words can be set in LS Area Refresh. User Area The devices which are only for the LT's internal use, and cannot be allocated as External Devices. This area is used to process Parts which can only be processed by the LT internally and cannot be controlled by as External Device. Special Relays This area is where the various status information is setup during LT communications. Note: The following describes how to access the LS Area. • Word Address access LS **** 0000~4095 • Bit Address access LS **** ** Bit position 00~15 Word Address 0000~4095 Reserved 1-1-2 Please do not use this area. It is only for LT's internal use. If you use this area, the LT will not operate properly. LogiTouch Editor Ver.1.0 External Device Connection Manual Chapter 1 - Direct Access Communication 1.1.2 1.1 Communication Method Address Settings Up to 20 words can be set as the System Data Area and up to 256 words can be set as the Reading Area.*1 The size of these areas determines each area's number of available addresses. ! • Part addresses cannot be set so that they include the System Area and Important the Reading Area, or the Reading Area and the User. Area. • When designating Parts that are inside the System Data Area's addresses, specify their data length as 16 bits. *1 If the device range of your External Device is less than 256 words, the size of the External Device's device range minus the size of System Data Area gives the maximum size for the Reading Area. *2 The Start Address means the start address of System Data Area specified in the INITIALIZE menu. Reference For more information, refer to "6.5 External Device SETUP" in LogiTouch Series User Manual (sold separately) *3 m = Reading Area Size *4 = Reading Area Start Address (20) + Reading Area Size LogiTouch Editor Ver.1.0 External Device Connection Manual 1-1-3 Chapter 1 - Direct Access Communication 1.1 Communication Method 1.1.3 Contents and Range of System Data Area The following table describes the data write contents of the System Area for each address. For an External Device using 16-bit addressing ! • When you wish to turn off the LT’s display, use the display’s ON/OFF bit (word address +9). Do not use the Control area’s Backlight OFF bit Important (word address +14). • Depending on the External Device, the device cannot be assigned to the System Data Area. Note: • The Word Address values assume that all the items have been selected for the System Data Area in the LT's INITIALIZE menu. • Here, “item #” represents the item numbers shown in the System Environment Setup area's SYSTEM AREA SETUP; found in the LT OFFLINE mode's INITIALIZE area. LT È External Device E x c l u s i v e W r i t i n g A r e a Item # Word Addr 1 +0 Dis play Screen Num ber Error Status Each bit changes to reflect the LT error status. When an error occurs, the bit is set ON . A bit that has turned ON remains ON until the 2 +1 pow er is turned OFF and back ON , or until RU N mode is re-entered from OFFLIN E mode. For Error Status data and processing notes, refer to the end of this section. 3 +2 +3 +4 +5 Current YEAR, BCD 2 digits Current MONTH, BCD 2 digits Current DAY, BCD 2 digits Current TIME, BCD 4 digits Bit 0,1 2 3 4 Not us ed Sys tem ROM/RAM Mem ory Checks um SIO Fram ing *1 5 6 7,8 SIO Parity *1 SIO Over-run *1 Not us ed Mem ory requires Initialization Tim er Clock Error 9 10 11 External Device Error *1 12 to 15 Not us ed Last two digits 01 to 12 (m onth) 01 to 31 (date) 00 to 23 hr, 00 to 59 m in 3 4 to 8 4 +6 Status Detail 1 to 8999 (However, 1 to 1999 when us ing BCD input) 0 to 2 *3 Res erved Writes a s et value *2 Res erved 9 Dis play 0: OFF, 1: ON 10 Backlight Alarm *4 *5 11 to 15 Res erved 5 1-1-4 Contents +7 Res erved LogiTouch Editor Ver.1.0 External Device Connection Manual Chapter 1 - Direct Access Communication Item Word # Addr External Device È LT E x c l u s i v e R e a d i n g A r e a Contents 6 +8 Change Screen Number 7 +9 *9 +10 8 1.1 Communication Method Screen Display On/Off Bit Detail 1 to 8999 (However, 1 to 1999 when using BCD input) FFFFh: Screen clears almost immediately. 0h: Screen turns ON. All other bits are reserved. Last 2 digits (bit #15 is the clock's Clock's YEAR set value, BCD 2 digits (+flag) data write change flag *6) +11 Clock's MONTH set value, BCD 2 digits 01 to 12 01 to 31 +12 Clock's DATE set value, BCD 2 digits 00 to 23 Hr: 00 to 59 Min +13 Clock's TIME set value, BCD 4 digits 0 1 2, 3 +14 Control *10 9 4 Backlight OFF *7 Buzzer ON Reserved Buzzer 0:Output 1:Non-output *8 5 to 15 Reserved Reserved A +15 Reserved B C +16 Reserved +17 Reserved +18 Reserved Reserved +19 Reserved Reserved D Reserved Reserved *1 LT Type-A1/A2/B cannot be used. *2 When an alarm is setup in the middle of Keypad Input Display, and a value outside the alarm range is entered, the bit turns ON. When you enter a value within the alarm range, or a screen change takes place, the bit turns OFF. *3 Monitor, in bit units, only the necessary bits. Since reserved bits may be used for LT system maintenance, etc., their ON/OFF status is not defined. *4 Adding the screen display ON/OFF status Adding the screen display ON/OFF bit to the system data area status allows you to detect the screen display OFF status based on the stand-by time period, on the External Device.Add the screen display ON/OFF status bit to the system data area's Bit 9. This bit will change in the following cases: (1) "FFFF" is written to the system data area's screen display ON/OFF bit (LS9 when using link type), to turn the screen display OFF. (Bit 9 = 1) (2) After the stand-by time has been elapsed, the screen display OFF bit is turned ON automatically. (Bit 9 = 1) (3) The screen display OFF status has been changed to the screen display ON status via screen switching, etc. (Bit 9 = 0) (4) The screen display ON/OFF status bit will not change via turning ON/OFF the system data area backlight OFF bit (Bit 0). <System Data Area Status> 15 14 13 12 11 10 9 8 7 6 5 4 3 2 1 0 0:Screen Dis play ON 1:Screen Dis play OFF LogiTouch Editor Ver.1.0 External Device Connection Manual 1-1-5 1.1 Communication Method Chapter 1 - Direct Access Communication *5 When the backlight burns out, the Status LED's orange light turns ON, and the Status Data Area's "Status"*3 bit 10 will turn ON. *6 When the data write flag changes (OFF—>ON, or ON—>OFF), the clock data is rewritten. Ex. October 16, 1995, 9:57 pm The current data in word address +10 is 0000. Month, Date, Time data is written as follows: • In word address +11 0010 • In word address +12 0016 • In word address +13 2157 When the YEAR's 15th bit is turned on, the data is written. • Inputting 8095 into word address +10 causes the clock data to be rewritten. *7 When the Backlight OFF bit (word address +14) turns ON, only the backlight will turn OFF, however, the LCD display will remain ON and all touch switches set up on the display can still be used. Use the Screen display ON/OFF bit (word address +9) to actually turn the screen display OFF. *8 Control Bit 1(Buzzer On) is output as shown below. Buzzer output: When control bit 1 is ON, the LT internal buzzer is activated. *9 After the screen display ON/OFF bit (word address +13) is set to OFF, simply touching the screen will turn the display ON again. *10 Be sure to turn all reserved bits OFF since they may be used for LT system maintenance, etc. Note: When writing data to the Control Area (Address +14) be sure to use bit units. Writing data in Word units can cause values to change. Error Status Contents and Correction Process Error Sys tem ROM/RAM Mem ory Checks um SIO Fram ing SIO Parity SIO Over-run Mem ory requires Initialization Tim er clock Error External Device SIO Error (only for Direct Access type) 1-1-6 Origin Problem with the hardware Becaus e the s creen file is corrupted, the screen m em ory data checks um does not m atch. Solution Run Self-Diagnos is . After powering up, check the s creen where the error developed. (For details, refer to the LogiTouch Series Us er Manual, "Error Mes s age" section.) Check the SIO Setup. (For details, Fram ing error refer to the LogiTouch Series User Parity error Manual, "Would Not Com m unicate" Over-run error s ection.) Internal Mem ory has not been Initialize internal m em ory. initialized. The LT internal clock has The LT internal battery m ay be been interrupted. drained. Contact your local LT distributor for s ervice. Either the SIO setup between Check the SIO Setup. (For details, the LT and External Device do refer to the LogiTouch Series User Manual, "Would Not Com m unicate" not m atch, or an error has s ection.) developed on the External Device s ide. LogiTouch Editor Ver.1.0 External Device Connection Manual Chapter 1 - Direct Access Communication 1.1.4 1.1 Communication Method Special Relays The structure of the LT's Special Relays is as follows. Reserved The Reserved area value is indeterminate. Do not use this area. LS2032 LS2033 LS2034 LS2035 LS2036 LS2037 LS2038 LS2039 : : LS2047 Common Relay Information Base Screen Information Reserved 1 Second Binary Counter Parts Scan Time SIO Cycle Time Parts Scan Counter SIO Error Code Reserved Common Relay Information (LS2032) 15 12 11 10 9 8 7 6 5 4 3 2 1 0 Bit 0 Contents Repeatedly turns ON/OFF in a communication cycle. 2 Remains ON when a screen change (base, window) occurs until the screen internal processing is completed. ON only in the middle of an SIO error developing. 3 ON when displaying the Initial screen after powering up. 4 Always ON 5 6 7 8 Always OFF Turns ON when backup SRAM data has been deleted. Turns ON if a BCD error occurs while D script is being used. Turns ON if a zero division error occurs while D script is being used. 1 9 Filing data. Turns ON if the data is not transferred to Backup SRAM. Filing data transfer is triggered by the Control Word Address. Turns ON if the data can not be transferred from External Device to SRAM. Also data transfer between External Devices is triggered by the Filing Data 10 Display. Turns ON if the data is not transferred from External Device to SRAM only when the transfer complete bit address is used. Filing data. Via transfer data to and from SRAM to LS area, via Filing Data 11 Display. When using D-script, turns ON if a communication error occurs when the 12 function memcpy () is used, or reading the data from designated Address Offset. Turns OFF when data read is normally completed. 13-15 Reserved LogiTouch Editor Ver.1.0 External Device Connection Manual 1-1-7 1.1 Communication Method Chapter 1 - Direct Access Communication Base Screen Information (LS2033) Repetedly turns ON/OFF in a communication cycle. Remains on from the base screen change to when the screen internal processing is completed. 1 Second Binary Counter (LS2035) Begins counting in 1 second units, after powering up. The data is in binary format. Parts Scan Time (LS2036) The time it takes to scan the setup screen display parts. The data is stored in binary ms units. The data renews at the point when the management of all the object parts is complete. The initial data value is 0. The measured time may differ by ± 10ms with the actual time. SIO Cycle Time (LS2037) The time it takes in 1 cycle, from the beginning to the end, to scan the SIO object (External Device Internal System Area) and various devices. The data renews at the point when the management of the System Area and all the object devices is complete. The initial data value is 0. The unit is 10ms. Parts Scan Counter (LS2038) Begins counting in binary units, roughly when the scan of the parts setup on the display screen is complete. SIO Error Code (LS2039) When an SIO error arises, the SIO error code displayed last is stored in binary data. Careful! • If a problem occurs which causes an SIO error for an extended period of time, such as the unit's data transmission cable becomes loose or disconnected, etc., it may ultimately create a System Error. When this occurs, reset the LT. • When using the 1 Second Binary Counter and Parts Scan Counter value as D script's trigger bit, and the SIO error condition continues, it may develop into a System Error. When this occurs, reset the LT. STOP 1-1-8 Special Relays are not write protected. Be careful not to use a part to overwrite this data. LogiTouch Editor Ver.1.0 External Device Connection Manual Chapter 1 - Direct Access Communication 1.2 1.2 Efficient Data Communication Efficient Data Communication When using the External Device Direct Access Type, the LT unit communicates based on the device addresses set on each screen. As a result, the more parts set on a screen, the more data is transferred, reducing the communication speed. For this reason, to speed up the response times, make data communication as efficient as possible. On the LT, in addition to the ordinary communication method, there are the Block Transfer and LS Area Communication methods, which upgrade data transfer efficiency. 1.2.1 Block Transfer When displaying consecutive External Device's devices on the LT, the LT automatically groups the transmission data into a block, which increases the communication speed. The addresses in the designated data range*1 must be consecutive to use Data Block Transfer. When parts are set up in consecutive addresses, the LT automatically reads the data as a single block. When you wish to transfer a block, design your part layout so that the addresses are consecutive. *1 The maximum number of consecutive addresses is limited by the type of External Device used. Refer to the Appendix, "Maximum Number of Consecutive Addresses". LogiTouch Editor Ver.1.0 External Device Connection Manual 1-2-1 1.2 Efficient Data Communication 1.2.2 Chapter 1 - Direct Access Communication LS Area Communication Use the LS area for communication in the following cases: when there is display data common to all screens, when there is Trend Graph block display data, or when a video window display is used. To run LS Area communication, first set up the size of the Reading Area in LT's INITIALIZE setting. Then transfer the common display data or block display trend graph data to the Reading Area, allocated in the External Device's internal memory. (Transfer the data via the External Device ladder program.) By doing so, the data transferred into the Reading Area and the System Data is sent to the LT unit at one time. By using the LS Area Communication method, no matter what screen is displayed on the LT, the System Data is transmitted continually. Therefore, to change screens quicker, use LS Area Communication instead of Block Transfer. ! Important • Use LS Area transmission only when there is data common to all screens or when performing LS Area refresh. Otherwise, communication will not be efficient • Setting up a Reading Area that is too large can cause the display of Parts that do not use the Reading Area, or can slow data communication speed. • When there are many Parts on an LT screen, set all the Parts so that they use consecutive addresses. Block data transfer can be utilized as a result, speeding up transmission. 1-2-2 LogiTouch Editor Ver.1.0 External Device Connection Manual Chapter 1 - Direct Access Communication 1.2.3 1.2 Efficient Data Communication Reset GP on Data Write Error If a Write error occurs, you can cancel the error from the error display. You will need to set up this feature beforehand via the LT OFFLINE mode’s INITIALIZE area. Refer to LogiTouch Series User Manual, Chapter 5 OFFLINE Reference Mode Note: • The default setting is OFF. • "Memory Link SIO" does not have this function. 1) Touch item #1, INITIALIZE. The INITIALIZE menu will appear. 2) Touch item #3, PLC SETUP. The PLC SETUP menu appears. 3) Touch item #1, SET UP OPERATION SURROUNDINGS. The SET UP OPERATION SURROUNDINGS menu will appear. 4) Touch the “RESET GP ON DATA WRITE ERROR” selection. The selected item is then highlighted. LogiTouch Editor Ver.1.0 External Device Connection Manual 1-2-3 1.2 Efficient Data Communication Chapter 1 - Direct Access Communication 5) To prepare for when a DATA WRITE ERROR occurs, select ON to cancel the error. When the LT is in RUN mode When a DATA WRITE ERROR occurs, the screen shown here will be displayed. *OFFLINE Mode Reference LogiTouch Series User Manual, Chapter 5 OFFLINE Mode • If you select "OFFLINE" : The LT unit's OFFLINE mode main menu will appear. • If you select " RESET" : The LT will be reset, then change automatically to "OFFLINE" mode and a DATA WRITE ERROR will not occur. Selecting [OFFLINE] or [RESET] will also cause the I/O to be reset. 1-2-4 LogiTouch Editor Ver.1.0 External Device Connection Manual Chapter 2 - Indicating Controllers 2 2.1 Connectable Controllers Indicating Controllers 2.1 Company Connectable Controllers Series Controller *1 External Device name in LT Editor Note UT2400- UT2800- UT320-1 UT350-1 Yokogawa M&C GREEN SERIES UT420-7 Corp. UT450-1 UT450-2 SDC20, SDC21 SDC30, SDC31 SDC Yamatake Corp. SDC40A, SDC40B SDC40G DMC DMC10 CB100 Z-1021 CB400 Z-1021 RKC CB Series CB500 Z-1021 INSTRUMENT CB700 Z-1021 INC. CB900 Z-1021 SR-Mini H-PCP-A Z-1021 THERMAC NEO E5EN--FLK *2 E5CN--FLK Electronic Omron Corporation Temperature E5GN--FLK E5AN--FLK Controller Yokogawa Corp. YOKOGAWA FACTORY ACE 1:1 Comm. or YOKOGAWA FACTORY ACE 1:n Comm. UT2000 Series C CPT-20A YAMATAKE SDC SERIES RKC CB/SR-Mini Series OMRON THERMAC NEO Optional unit is required when using muliple channels. FC Shinko Technos Corp. FIR GC FCL PC-900 FCD-13A,C FCD-13A,C5 FCD-15A,C FCD-15A,C5 FCR-13A,C FCR-13A,C5 FCR-15A,C FCR-15A,C5 FIR-201-M,C FIR-201-M,C5 GCS-300,C5 FCL-13A,C5 PC-935,C PC-935,C5 PC-955,C PC-955,C5 LogiTouch Editor Ver.1.0 External Device Connection Manual *3 When using the Controller for the first time, select the serial communication option. (,C:RS-232C) (,C5:RS-485) SHINKO TECHNOS INDICATING *4 2-1-1 Chapter 2- Indicating Controllers 2.1 Connectable Controllers Company Series Fuji Electric Corporation MicroController X TTM-004 TTM-X04 TTM-00B TTM-10L TTM-100B TTM-110 Series TTM-110B TOHO ELECTRONICS INC. *6 TTM-120 Series TTM-300 Series TTM-300B TTM-1020 Series Controller *1 PXR4-M00 PXR4-V00 TTM-004--A TTM-X04-- TTM-00B-- *5 Note External Device name in LT Editor FUJI TEMPERATURE PXR *7 TTM-10L--- TTM-100B4-- TTM-100B8--- TTM-114-- -- TTM-115-- -- TTM-117-- -- TTM-119-- -- TTM-110B-- -- TTM-124-- -- TTM-125-- -- TTM-127-- -- TTM-129-- -- TTM-304--N-- TTM-305--N-- TTM-309--N-- TTM-300B--N-- TTM-1520- - -- TTM-1521- - -- TTM-1522- - -- TTM-1523- - -- TTM-1524- - -- TTM-1525- - -- TTM-1920- - -- TTM-1921- - -- TTM-1922- - -- TTM-1923- - -- TTM-1924- - -- TTM-1925- - -- TOHO ELECTRONICS TTM SERIES *1 The Controller's model number " " will vary depending on each controller's functional specifications. *2 The Omron Controller model number is designed as follows. Standard No.- - Compoway/F Compatibility None : Not compatible FLK : Compatible (Communication is possible only when this is “FLK”) Other Options (Control Output, Alarm Output, etc.) *3 When using multiple channels with a C Series unit, the 2 ch temperature control unit (CCT-235-2-oo) is required. For “” model number details, refer to the C Series catalog. 2-1-2 LogiTouch Editor Ver.1.0 External Device Connection Manual Chapter 2 - Indicating Controllers 2.1 Connectable Controllers *4 Items with the serial communication option have a “,C” or “,C5” after the basic model number. Ex.) When specifying the RS-232C serial communication option for the FC Series. FCD-13A ,C RS-232C serial communication option Other options, such as the control input/output Basic Model Number *5 When connecting the Controller to an LT, the RS485(MODBUS) option “M00” or “V00” is required. PXR4 - M00 M00:RS485(MODBUS) option V00:RS485(MODBUS) option + digital input (1 point) option Other options (control input/output, etc.) Primary Model Number *6 About Toho Electronic Inc. Controller's Model Number The Controller model number is used to designate if a Controller is equipped with communication features or not. To check whether your Controller has communication features, refer to your Controller's User Manual or Catalog. For example, the Controller model number of the TTM-004 Controller is shown below. Only Controllers with the character "M" in their model number's Option section (the three right-most ”“ characters) are equipped with the communication feature. TTM-004- -A Symbol Output1 R Relay Contact P SSR Drive Voltage Symbol A B C D E M Option No options EV1 Contact Output Relay EV2 or Output 2 Contact Output Relay Voltage Output for SSR Drive (Output 2) CT Input DI Input RS-485 Communication Format *7 TTM-10L Unit Communication Format Depending on the unit's model number, the TTM-10L can use either the RS-485 or the RS-232C format. Select the Communication Format as shown below (Communication Format can be set to either RS-485 or RS-232C.). - TTM-10L- - Symbol A M1 M2 Option No options Event Output RS-485 Communication Format RS-232C Communication Format LogiTouch Editor Ver.1.0 External Device Connection Manual 2-1-3 2.1 Connectable Controllers Chapter 2- Indicating Controllers 1234567890123456789012345678901212345678901 1234567890123456789012345678901212345678901 1234567890123456789012345678901212345678901 1234567890123456789012345678901212345678901 1234567890123456789012345678901212345678901 1234567890123456789012345678901212345678901 1234567890123456789012345678901212345678901 1234567890123456789012345678901212345678901 1234567890123456789012345678901212345678901 1234567890123456789012345678901212345678901 1234567890123456789012345678901212345678901 1234567890123456789012345678901212345678901 1234567890123456789012345678901212345678901 1234567890123456789012345678901212345678901 1234567890123456789012345678901212345678901 1234567890123456789012345678901212345678901 MEMO 2-1-4 LogiTouch Editor Ver.1.0 External Device Connection Manual Chapter 2 - Indicating Controllers 2.2 2.2 Yokogawa Electric/Yokogawa M&C Controllers Yokogawa Electric/Yokogawa M&C Controllers 2.2.1 System Structure This chapter describes the system configuration used when connecting this Controller to the LT. Yokogawa UT2000 Series/Yokogawa M&C GREEN SERIES (1:1 communication) Controller *1 UT2400- UT2800- UT320-1 UT350-1 UT420-7 UT450-1 UT450-2 Cable Diagram LT RS-422 (4 wires) <Cable Diagram 1> LT Type-C *1 The Controller's model number "" will vary depending on each controller's functionality specifications. (1:n (multi-drop) Communication) Controller *1 UT2400- UT2800- UT320-1 UT350-1 UT420- 7 UT450-1 UT450- 2 Cable Diagram LT RS-422 (4 wires) <Cable Diagram 2> LT Type-C *1 The Controller's model number "" will vary depending on each controller functionality specifications. LogiTouch Editor Ver.1.0 External Device Connection Manual 2-2-1 2.2 Yokogawa Electric/Yokogawa M&C Controllers 2.2.2 Chapter 2 - Indicating Controllers Cable Diagrams The cable diagrams shown below and those recommended by Yokogawa or Yokogawa M&C may differ, however, using these cable connections for your Controller's operations will not cause any problems. Careful! • Ground the Controller's FG terminal according to your country's applicable standard. ! • When connecting the FG wire to the cable connector's hood, be sure that the hood material is conductive. Important • The maximum RS-422 cable length is 500 meters. When connecting this cable, be sure to connect the SG terminal. Terminal Numbers When Using an RS-422 Cable ! Important • The terminal numbers used will vary depending on the Controller model used. Since these terminal numbers are not shown in the cable diagram, please refer to the numbers shown below when performing cable wiring. Yokogawa UT2000 Series S ignal Name Terminal No. TX+ 4 TX- 6 RX+ 3 RX- 5 SG 2 FG 1 Yokogawa M&C GREEN Series 2-2-2 S ignal Name Terminal No. SDA(-) 24 SDB(+) 23 RDA(-) 26 RDB(+) 25 SG 27 LogiTouch Editor Ver.1.0 External Device Connection Manual Chapter 2 - Indicating Controllers 2.2 Yokogawa Electric/Yokogawa M&C Controllers Cable Diagram 1 (1:1) (RS-422 4-wire) • When using Digital's RS-422 connector terminal adapter GP070-CN10-0 Shield LT (25p, male) Terminating Resistance RDA RDB SDA SDB TERM SG FG Controller Terminal Block SDA(TX-) SDB(TX+) RDA(RX-) RDB(RX+) SG FG Terminating Rresistance Terminating Resistance Ground • When preparing your own cable LT (25p, male) Terminating Resistance Shield 7 SG 9 TRMX 10 RDA 16 RDB 11 SDA 15 SDB 18 CSB 19 ERB 21 CSA 22 ERA 1 FG Controller Terminal Block SDA(TX-) SDB(TX+) RDA(RX-) RDB(RX+) SG FG Terminating Resistance Terminating Resistance Ground Note: • Hitachi Densen's CO-SPEV-SB(A)3P*0.5SQ cable is recommended. • Certain controllers have no FG teminal. • The GREEN SERIES' terminating resistance is 220W (1/4W) and the UT2000 Series' terminating resistance is 100W(1/2W) or more. • Connecting the LT serial interface's Nos. 9 and 10 pins will insert 100W terminating resistance between RDA and RDB. • The maximum RS-422 (4-wire) cable length is 500 meters. LogiTouch Editor Ver.1.0 External Device Connection Manual 2-2-3 Chapter 2 - Indicating Controllers 2.2 Yokogawa Electric/Yokogawa M&C Controllers Cable Diagram 2 (1:n) (RS-422 4-wire) • When using Digital's RS-422 connector terminal adapter GP070-CN10-0 LT (25p, male) GP070-CN10-0 Shield Shield RDA RDB SDA SDB Terminating TERM Resistance SG FG Shield Controller No. 1 Controller No. 2 SDA(TX-) SDB(TX+) RDA(RX-) RDB(RX+) SG FG SDA(TX-) SDB(TX+) RDA(RX-) RDB(RX+) SG FG Grounding Grounding Controller Terminating No. n Resistance SDA(TX-) SDB(TX+) RDA(RX-) RDB(RX+) Terminating SG Resistance FG Grounding • When preparing your own cable LT (25p, male) Shield 7 SG 9 TRMX 10 RDA 16 RDB 11 SDA 15 SDB Terminating 18 CSB Resistance 19 ERB 21 CSA 22 ERA 1 FG Ground Note: 2-2-4 Shield Shield Controller No. 1 Controller No. 2 SDA(TX-) SDB(TX+) RDA(RX-) RDB(RX+) SG FG SDA(TX-) SDB(TX+) RDA(RX-) RDB(RX+) SG FG Ground Controller Terminating No. n Resistance SDA(TX-) SDB(TX+) RDA(RX-) RDB(RX+) Terminating SG Resistance FG Ground • The maximum RS-422 (4 wire) cable length is 500 meters. • Up to 31 Controllers (up to 16 for UT2000 Series) can be connected. • Certain controllers have no FG terminal. • The GREEN SERIES' terminating resistance is 220W(1/4W) and the UT2000 Series' terminating resistance is 100W(1/2W) or more. LogiTouch Editor Ver.1.0 External Device Connection Manual Chapter 2 - Indicating Controllers 2.2.3 2.2 Yokogawa Electric/Yokogawa M&C Controllers Supported Devices The following lists show the ranges of devices supported by the LT. Yokogawa UT2000 Series Depending on the Controller model, prohibited areas may exist even within the following ranges. Refer to Yokogawa's "UT2000 Detailed operation manual" Reference Device Bit Address Word Address I I0001 ~ I1024 I0001 ~ I1009 D Remarks L/H D0001 ~ D1024 Yokogawa M&C GREEN SERIES Depending on the Controller model,prohibited areas may exist even within the following ranges. Refer to Yokogawa M&C's "UT350/UT320 Digital Indicated ConReference trollers Operation Manual" and "GREEN SERIES further User's Manual". Device Bit Address Word Address I I0001 ~ I2048 I0001 ~ I2033 D D0001 ~ D1274 Remarks H/L • The system area (20 words) cannot be allocated to the Controller's own data area. Even though you can enter the system area settings via LT Important OFFLINE mode, it is impossible to actually allocate the system area to the Controller's data area. ! • Device fields will differ depending on the type of Controller. Refer to the Controller's manual for the range allowed for the device address area. After screen data is converted from a different type of Controller, be sure to check if the device addresses used are correct. Be sure to check the supported device addresses before using Trend graphs or Parts in your screens that use multiple words over continuous addresses. LogiTouch Editor Ver.1.0 External Device Connection Manual 2-2-5 2.2 Yokogawa Electric/Yokogawa M&C Controllers Note: Chapter 2 - Indicating Controllers With LT Editor Parts, the External Device Station number can be designated during address input. When a station number is not designated, the previously entered station number is automatically used. (The default value is 1.) Enter the selected Controller's Station No. 01/1D00201 Address Controller's Station No. 2-2-6 LogiTouch Editor Ver.1.0 External Device Connection Manual Chapter 2 - Indicating Controllers 2.2.4 2.2 Yokogawa Electric/Yokogawa M&C Controllers Environment Setup The following list shows the recommended Controller and LT communication settings. Yokogawa UT2000 Series/Yokogawa M&C GREEN SERIES LT Settings Controller Settings Baud Rate 9600 bps Baud Rate 9600 bps Data Length 8 bit Data Length 8 bit Stop Bit 1 bit Stop Bit 1 bit Parity Bit Even Parity Bit Even Data Flow Control Communication Format (When using RS-422) ER 4-wire Type For Dip Switch Communication Mode Selection UT2000 Series ON GREEN Personal computer SERIES link communication UT2000 1 ~ 16 1 ~ 16 Station No. Series (communication address) GREEN 1 ~ 31 1 ~ 31 SERIES Protocol Selection (PSL) Unit No. UT2000 Series GREEN SERIES Controller Communication Settings <UT2000 Series> Use the unit's rear face rotary switches: (1) Use the communication condition setting rotary switch to enter the communication condition. (2) Use the station number selection rotary switch to enter the unit number. (3) Turn the communication mode selection dip switch ON. <GREEN SERIES> Use the unit's front keys: (1) Hold down the Controller's [SET/ENT] key for 3 seconds or more to change the screen from [operation] to [operation parameter] . (2) When "OP.PA" appears on the measurement value (PV) display, use either or key to display "STUP". (3) For UT350/UT320, every time you press the [SET/ENT] key, the screen will change one by one, in the order of [Protocol Selection] --> [Baud Rate] --> [Parity] --> [Stop Bit] --> [Data Length] --> [Communication Address]. For UT450/UT420, press the [SET/ENT] key once, and the [Setup Parameter Settings] screen will appear. Use either or key to select "r485", and then, press the [SET/ENT] key again. After this, use the same procedure used for UT350/UT320. LogiTouch Editor Ver.1.0 External Device Connection Manual 2-2-7 2.2 Yokogawa Electric/Yokogawa M&C Controllers Chapter 2 - Indicating Controllers 12345678901234567890123456789012123456789012 12345678901234567890123456789012123456789012 12345678901234567890123456789012123456789012 12345678901234567890123456789012123456789012 12345678901234567890123456789012123456789012 12345678901234567890123456789012123456789012 12345678901234567890123456789012123456789012 12345678901234567890123456789012123456789012 12345678901234567890123456789012123456789012 12345678901234567890123456789012123456789012 12345678901234567890123456789012123456789012 12345678901234567890123456789012123456789012 12345678901234567890123456789012123456789012 12345678901234567890123456789012123456789012 12345678901234567890123456789012123456789012 12345678901234567890123456789012123456789012 MEMO 2-2-8 LogiTouch Editor Ver.1.0 External Device Connection Manual Chapter 2 - Indicating Controllers 2.3 2.3.1 2.3 Yamatake Controllers Yamatake Controllers System Structure This chapter describes the system configuration used when connecting this Controller to the LT. ! Important LT's System Area (LS0 to LS19) Settings The LT's system area (20 words) cannot be allocated to the Controller's own data area. Even though you can enter the system area settings via the LT OFFLINE mode, it is impossible to actually allocate the system area to the Controller's data area. Yamatake SDC Series (1:1 communication) Controller SDC 20 SDC 21 SDC 40A SDC 40B SDC 40G SDC 20 SDC 21 SDC 30 SDC 31 SDC 40A SDC 40B SDC 40G Cable Diagram LT RS-232C <Cable Diagram 1> RS-422 (4 wires) <Cable Diagram 2> LT Type-C RS-422 (2 wires) <Cable Diagram 3> LogiTouch Editor Ver.1.0 External Device Connection Manual 2-3-1 Chapter 2 - Indicating Controllers 2.3 Yamatake Controllers Yamatake SDC Series (1:n (multi-drop) communication) CPU SDC 20 SDC 21 SDC 30 SDC 31 SDC 40A SDC 40B SDC 40G Cable Diagram LT RS-422 (4-wire) <Cable Diagram 4> LT Type-C RS-422 (2-wire) <Cable Diagram 5> Yamatake DMC10 (1:1 communication) CPU DMC10 Cable Diagram LT RS-422 (2-wire) <Cable Diagram 6> LT Type-C Yamatake DMC10 (1:n (multi-drop) communication) CPU DMC10 2-3-2 Cable Diagram LT RS-422 (2-wire) <Cable Diagram 7> LT Type-C LogiTouch Editor Ver.1.0 External Device Connection Manual Chapter 2 - Indicating Controllers 2.3.2 2.3 Yamatake Controllers Cable Diagrams The cable diagrams shown below and those recommended by Yamatake may differ, however, using these cables for Controller's operations will not cause any problems. ! Important • When connecting the FG terminal to the connector cover, be sure that the connector cover material is conductive. • Ground the Controller's FG terminal according to your country's applicable standard. For details, refer to your Controller's manual. • When connecting a cable's shield line to an FG terminal, consider the needs of your system when deciding which side of the cable (LT or Controller) to connect. (The example below connects to the Controller's FG terminal.) • The maximum RS-232C cable length is 15 meters. If a communication cable is used, be sure to connect its SG (signal ground) terminal. • The maximum RS-422 cable length is 500 meters. • The recommended RS-422 cables are as follows: Company Fujikura Densen Hitachi Densen Type 2 2-wire IPEV-S-0.9mm ×1P 3-wire ITEV-S-0.9mm ×1T 2-wire KPEV-S-0.9mm ×1P 3-wire KTEV-S-0.9mm ×1T 2 2 2 • Since the Controller's terminal numbers will differ depending on the type of additional functions, check these numbers with the Controller's appropriate manual. Cable Diagram 1 (1:1) (RS-232C) LT Unit (25P) Shield 2 SD 3 RD 4 RS 5 CS 6 DR 8 CD 20 ER 7 SG 1 FG LogiTouch Editor Ver.1.0 External Device Connection Manual Controller Terminal block SD RD SG FG 2-3-3 Chapter 2 - Indicating Controllers 2.3 Yamatake Controllers Cable Diagram 2 (1:1) RS-422 4-wire, RS-422 5-wire Cable • When using Digital's RS-422 connector terminal adapter GP070-CN10-0 Shield 150Ω Ω +5% 1/2W or more GP070-CN10-0 RDA RDB SDA SDB Ω +5% 150Ω TERM 1/2W or more SG FG Controller Terminal block 150Ω Ω +5% 1/2W or more SDA SDB RDA RDB SG FG 150Ω Ω +5% 1/2W or more • When using Digital's RS-422 cable GP0230-IS11-0 Controller Terminal block RDA RDB SDA SDB SG FG GP230-IS11-0 SDA SDB RDA RDB SG FG 150Ω Ω +5% 1/2W or more 150Ω Ω +5% 1/2W or more • When preparing your own cable LT Unit (25P) 7 SG 9 TRMX Ω +5% 150Ω 10 RDA 1/2W or more 16 RDB Ω +5% 150Ω 11 SDA 1/2W or more 15 SDB 18 CSB 19 ERB 21 CSA 22 ERA 1 FG 2-3-4 Shield Controller Terminal block SG SDA SDB RDA RDB FG 150Ω Ω +5% 1/2W or more Ω +5% 150Ω 1/2W or more LogiTouch Editor Ver.1.0 External Device Connection Manual Chapter 2 - Indicating Controllers 2.3 Yamatake Controllers Cable Diagram 3 (1:1) RS-422 2-wire, RS-422 3-wire Cable • When using Digital's RS-422 connector terminal adapter GP070-CN10-0 Ω +5% 150Ω 1/2W or more GP070-CN10-0 Shield RDA RDB SDA SDB TERM SG FG Controller Terminal block SDA SDB RDA RDB SG FG 150Ω Ω +5% 1/2W or more • When using Digital's RS-422 cable GP230-IS11-0 Controller Terminal block RDA RDB SDA SDB SG FG GP230-IS11-0 SDA SDB RDA RDB SG FG 150Ω Ω +5% 1/2W or more • When preparing your own cable LT Unit (25P) 150Ω Ω +5% 1/2W or more 7 SG 9 TRMX 10 RDA 16 RDB 11 SDA 15 SDB 18 CSB 19 ERB 21 CSA 22 ERA 1 FG Controller Terminal block SG SDA SDB Ω +5% 150Ω RDA 1/2W or more RDB FG Shield LogiTouch Editor Ver.1.0 External Device Connection Manual 2-3-5 Chapter 2 - Indicating Controllers 2.3 Yamatake Controllers Cable Diagram 4 (1:n) RS-422 4-wire, RS-422 5-wire Cable • When using Digital's RS-422 connector terminal adapter GP070-CN10-0 RDA RDB SDA SDB TERM SG FG GP070-CN10-0 Controller No. 1 SDA SDB RDA RDB SG FG Shield Controller Controller Ω +5% 150Ω No. 2 No. n 1/2W or more SDA SDA SDB SDB RDA RDA RDB RDB Ω +5% 150Ω SG SG 1/2W or more FG FG Shield Shield • When using Digital's RS-422 cable GP230-IS11-0 RDA RDB SDA SDB SG FG GP230-IS11-0 Controller No. 1 SDA SDB RDA RDB SG FG Controller Controller 150Ω Ω +5% No. 2 No. n 1/2W or more SDA SDA SDB SDB RDA RDA RDB RDB Ω +5% 150Ω SG SG 1/2W or more FG FG Shield Shield • When preparing your own cable LT Unit (25P) 150Ω Ω +5% 1/2W or more 7 SG 9 TRMX 10 RDA 16 RDB 11 SDA 150Ω Ω +5% 1/2W or more 15 SDB 18 CSB 19 ERB 21 CSA Controller No. 2 SG SDA SDB RDA RDB FG Controller No. 1 SG SDA SDB RDA RDB FG Shield Shield Controller No. n Ω +5% 150Ω SG 1/2W or more SDA SDB RDA RDB Ω +5% 150Ω FG 1/2W or more Shield 22 ERA 1 FG 2-3-6 LogiTouch Editor Ver.1.0 External Device Connection Manual Chapter 2 - Indicating Controllers 2.3 Yamatake Controllers Cable Diagram 5 (1:n) RS-422 2-wire, RS-422 3-wire Cable • When using Digital's RS-422 connector terminal adapter GP070-CN10-0 150Ω Ω +5% 1/2W or more Shield Controller Shield Controller Shield No. 2 No. 1 RDA RDB SDA SDB TERM SG FG GP070-CN10-0 SDA SDB RDA RDB SG FG SDA SDB RDA RDB SG FG Controller No. n SDA SDB Ω +5% 150Ω RDA 1/2W or more RDB SG FG • When using Digital's RS-422 cable GP230-IS11-0 Controller No. 1 RDA RDB SDA SDB SG FG GP230-IS11-0 SDA SDB RDA RDB SG FG Shield Controller No. 2 Controller No. n SDA SDB RDA RDB SG FG SDA SDB RDA RDB SG FG Shield 150Ω Ω +5% 1/2W or more • When preparing your own cable LT Unit (25P) 7 SG 9 TRMX 10 RDA 150Ω Ω +5% 1/2W or more 16 RDB 11 SDA 15 SDB Shield Controller Controller Controller No. 2 Shield No. n No. 1 Shield SG SG SG SDA SDA SDA SDB SDB SDB Ω +5% 150Ω RDA RDA RDA 1/2W or more RDB RDB RDB FG FG FG 18 CSB 19 ERB 21 CSA 22 ERA 1 FG LogiTouch Editor Ver.1.0 External Device Connection Manual 2-3-7 Chapter 2 - Indicating Controllers 2.3 Yamatake Controllers Cable Diagram 6 (1:1) RS-422 2-wire, RS-422 3-wire Cable • When using Digital's RS-422 connector terminal adapter GP070-CN10-0 Shield GP070-CN10-0 RDA RDB SDA SDB SG FG Controller Terminal Block DA DB SG Grounding • When preparing your own cable LT (25P male) GP070-CN10-0 ! Important 2-3-8 1 FG 9 TRMX 10 RDA 16 RDB 11 SDA 15 SDB 18 CSB 19 ERB 21 CSA 22 ERA 7 SG Shield Controller DA DB SG Grounding Since terminating resistance is provided inside the Controller, DO NOT connect additional terminating resistance. LogiTouch Editor Ver.1.0 External Device Connection Manual Chapter 2 - Indicating Controllers 2.3 Yamatake Controllers Cable Diagram 7 (1:n) RS-422 2-wire, RS-422 3-wire Cable • When using Digital's RS-422 connector terminal adapter GP070-CN10-0 Shield GP070-CN10-0 Controller No. 1 RDA RDB SDA SDB SG FG Shield Controller No. 2 DA DB SG Grounding Shield DA DB SG Grounding Controller No. n DA DB SG Grounding • When preparing your own cable LT (25P, male) GP070-CN10-0 ! Important 1 FG 9 TRMX 10 RDA 16 RDB 11 SDA 15 SDB 18 CSB 19 ERB 21 CSA 22 ERA 7 SG Shield Controller No. 1 DA DB SG Grounding Shield Controller No. 2 DA DB SG Grounding Shield Controller No. n DA DB SG Grounding Since terminating resistance is provided inside the Controller, DO NOT connect additional terminating resistance. LogiTouch Editor Ver.1.0 External Device Connection Manual 2-3-9 Chapter 2 - Indicating Controllers 2.3 Yamatake Controllers 2.3.3 Supported Devices The following lists show the ranges of devices supported by the LT. Yamatake SDC Series Device Bit Address Word Address Data 00000 ~ 8999F 0000 ~ 8999 Remarks H/L Yamatake DMC10*1 Device Bit Address Word Address Data 10010 ~ 7804F 1001 ~ 7804 Remarks H/L *1. Data cannot be written or read to certain Addresses. For more detailed information, refer to the Yamatake unit's appropriate Operation Manual. ! Important • LT's System Data Area (LS0 to LS19) Settings The LT's system area (20 words) cannot be allocated to the Controller's own data area. Even though you can enter the system area settings via the LT OFFLINE mode, it is impossible to actually allocate the system area to the Controller's data area. • Be careful that the Device fields differ depending on the type of Controller. Refer to the Controller's manual for the range allowed for the device address area. After screen data is converted from a different type of Controller, be sure to check if the device addresses used are correct. Be sure to check the supported device addresses before using Trend graphs in your screens that use multiple words over continuous addresses. Note: 2-3-10 • When entering device addresses via the LT Editor, the top address (left-most digit) is used for the device name and remaining three digits (0 to 999) are used for the Controller data addresses. • When settings Parts in LT Editor, the device address can be designated during address input. When a device number is not designated, the previously entered device number is automatically used. (The default value is 1.) LogiTouch Editor Ver.1.0 External Device Connection Manual Chapter 2 - Indicating Controllers 2.3 Yamatake Controllers Ex. When entering Device Address "6728": Enter the device name "6", and then the Word Address "728". 01 6 728 Word Address Device name Controller's Device Address 01/06728 Address Controller Device Address LogiTouch Editor Ver.1.0 External Device Connection Manual Enter the selected Controller Device Address 2-3-11 Chapter 2 - Indicating Controllers 2.3 Yamatake Controllers 2.3.4 Environment Setup The following tables show Digital's recommended Controller and LT communication settings. Yamatake SDC Series LT Settings Controller Settings Baud Rate 9600bps Baud Rate 9600bps Data Length 8bit Data Length 8bit Stop Bit 1bit Stop Bit 1bit Parity Bit Even Parity Bit Even Data Flow Control ER -------- -------- RS-232C -------- -------- 4-wire -------- -------- 2-wire -------- -------- Device Address Enter all different Controller device addresses. Communication Format (when using RS-232C *1) Communication Format (when using RS-422) Communication Format (when using RS-422) Select a desired unit number from 1 to 32. Unit No. *1 RS-232C communication can be performed with SDC20, SDC21, SDC40A, SDC40B, and SDC40G. ! Important • Although the Controller's device address input range is from 0 to 127, be sure to use only from 1 to 32 on the LT to match the Controller's device address to the LT's. • When using 1:n communication, up to 31 Controllers can be connected. • When the device address is designated as 0 (default value), communication cannot be performed. Yamatake DMC10 LT Settings Controller Settings Baud Rate 19200bps Baud Rate 19200bps Data Length 8bit Data Length 8bit Stop Bit 1bit Stop Bit 1bit Parity Bit Even Parity Bit Even Data Flow Control ER -------- -------- Communication Format (when using RS-422 2-wire -------- -------- Unit No. *2 Select a desired unit number from 1 to 15. Device Address Enter all different Controller device addresses (1 to F). *2 Unit numbers entered on the LT are decimal numbers. 2-3-12 LogiTouch Editor Ver.1.0 External Device Connection Manual Chapter 2 - Indicating Controllers 2.4 2.4 RKC INSTRUMENT INC. Controllers RKC INSTRUMENT INC. Controllers 2.4.1 System Structure The following describes the system configuration used when connecting the LT to an RKC Controller. ! Important LT’s System Area (LS0 to LS19) Settings The LT’s system area (20 words) cannot be allocated to the Controller’s own data area. Even though you can enter the system area settings via the LT OFFLINE mode, be careful that you do not use the Controller’s own data area. CB Series/SR-Mini Series (1:1 communication) Controller H-PCP-A Z-1021 Cable Diagram Cables RS-232C (Cable Diagram 1) RKC's W-BF-01- XXXX RS-422 (4-wire) (Cable Diagram 2) CB100 Z-1021 CB400 Z-1021 CB500 Z-1021 CB700 Z-1021 CB900 Z-1021 LT *1 LT Type-C RS-422 (2-wire) (Cable Diagram 3) *1 XXXX indicates the cable length (mm). LogiTouch Editor Ver.1.0 External Device Connection Manual 2-4-1 2.4 RKC INSTRUMENT INC. Controllers Chapter 2 - Indicating Controllers CB Series/SR-Mini Series (1:n communication) Controller H-PCP-A Z-1021 CB100 Z-1021 CB400 Z-1021 CB500 Z-1021 CB700 Z-1021 CB900 Z-1021 Cable Diagram RS-422 (4-wire) (Cable Diagram 4) Cable LT RKC's W-BF-01-XXXX W-BF-02-XXXX *1 LT Type-C RS-422 (2-wire) (Cable Diagram 5) *1 XXXX indicates the cable length (mm). 2-4-2 LogiTouch Editor Ver.1.0 External Device Connection Manual Chapter 2 - Indicating Controllers 2.4.2 2.4 RKC INSTRUMENT INC. Controllers Cable Diagrams The cable diagrams shown below and the cable diagrams recommended by the RKC INSTRUMENT INC. may differ, however, using these cables for your Controller’s operations will not cause any problems. ! • When connecting the FG terminal to the connector cover, be sure that the connector cover conducts current. Important • Ground your Controller's FG terminal according to your country's applicable standard. For details, refer to your Controller’s manual. • When connecting a cable’s Shield line to an FG terminal, consider the needs of your system when deciding which side of the cable (LT or Controller) to connect. (The example below connects to the Controller’s FG terminal.) CB Series ! Important • Up to 31 CB Series units can be connected to a single LT. • If a communications cable is used, be sure to connect its SG (signal ground) terminal. • RS-422 ( 2-wire) cables, must be less than 500 meters or less. • The following RS-422 cable is recommended. Company Item No. Hirakawa Hewtech Corporation Type 2207-510-008 CO-HC-ESV-3P X 7/0.2 ! • The Controller terminal number will differ depending on the type of CPU used. The following examples reflect all the CB series units supImportant ported by the Digital Electronics Corporation. <CB100,CB400,CB500,CB900> <CB700> Terminal No. Signal Name Terminal No. Signal Name 13 SG 7 SG 14 T/R(A) 8 T/R(A) 15 T/R(B) 9 T/R(B) LogiTouch Editor Ver.1.0 External Device Connection Manual 2-4-3 Chapter 2 - Indicating Controllers 2.4 RKC INSTRUMENT INC. Controllers SR-Mini Series ! Important • Up to 16 SR-Mini Series modules can be connected to a single LT. • If a communications cable is used, be sure to connect its SG (signal ground) terminal. • RS-232C cables should be 15 meters or less. • RS-422 ( 2-wire) cables should be 500 meters or less. • The following RS-422 cables are recommended for SR-Mini Series units. Company Type Comments RKC W-BF-01- XXXX *1 INSTRUMENT INC. Used when connecting a SR-Mini to a LT RKC W-BF-02- XXXX *1 INSTRUMENT INC. Used when connecting a SR-Min to SR-Mini *1 XXXX indicates the cable length (mm). Cable Diagram 1 (1:1) RS-232C Controller Modular Connector LT 2 SD 3 RD 4 RS 5 CS 6 NC 8 CD 20 ER 7 SG 1 FG 2-4-4 2 SD(TXD) 4 RD(RXD) 3 SG(GND) 6 Shield Shield LogiTouch Editor Ver.1.0 External Device Connection Manual Chapter 2 - Indicating Controllers 2.4 RKC INSTRUMENT INC. Controllers Cable Diagram 2 (1:1) RS-422 4-wire Cable • When using Digital's RS-422 connector terminal adapter GP070-CN10-0 Controller Modular Connector GP070-CN10-0 LT 4 T(B) 5 T(A) 2 R(B) 1 R(A) 3 SG 6 Shield RDA RDB SDA SDB TERM SG FG 120Ω Ω +10% or less 120Ω Ω +10% or less Shield • When making your own cable LT(25P) 7 SG 9 TRMX 10 RDA 16 RDB 11 SDA 15 SDB 18 CSB 19 ERB 21 CSA 22 ERA 1 FG Controller Modular Connector 3 SG 4 T(B) 5 T(A) 2 R(B) 1 R(A) 6 Shield 120Ω Ω +10% or less Ω +10% or 120Ω less Shield LogiTouch Editor Ver.1.0 External Device Connection Manual 2-4-5 Chapter 2 - Indicating Controllers 2.4 RKC INSTRUMENT INC. Controllers Cable Diagram 3 (1:1) RS-422 2-wire Cable • When using Digital's RS-422 connector terminal adapter GP070-CN10-0 Controller Terminal Block LT GP070-CN10-0 T/R(B) T/R(A) SG RDA RDB SDA SDB TERM SG FG Shield • When making your own cable LT(25P) Controller Terminal Block 7 SG 9 TRMX 10 RDA 16 RDB 11 SDA 15 SDB 18 CSB 19 ERB 21 CSA 22 ERA 1 FG SG T/R(B) T/R(A) Shield Cable Diagram 4 (1:n) RS-422 4-wire • When using Digital's RS-422 connector terminal adapter GP070-CN10-0 LT RDA RDB SDA SDB TERM GP070-CN10-0 SG FG Controller No. 1 Controller No. 2 Resistance Ω +10% 120Ω Controller or less No. n (Collective) 4 T(B) 4 T(B) 4 T(B) 4 T(B) 4 T(B) 4 T(B) 5 T(A) 5 T(A) 5 T(A) 5 T(A) 5 T(A) 5 T(A) 3 R(B) 3 R(B) 3 R(B) 3 R(B) 3 R(B) 2 R(A) 2 R(A) 2 R(A) 2 R(A) 2 R(A) 2 R(A) 3 SG 3 SG 3 SG 3 SG 3 SG 3 SG 3 R(B) 6 Shield 6 Shield 6 Shield 6 Shield 6 Shield 6 Shield Shield COM.PORT1 COM.PORT2 Shield COM.PORT1 COM.PORT2Shield COM.PORT1 COM.PORT2 Resistance Ω +10% 120Ω or less (Collective) 2-4-6 LogiTouch Editor Ver.1.0 External Device Connection Manual Chapter 2 - Indicating Controllers 2.4 RKC INSTRUMENT INC. Controllers • When making your own cable Controller No. 1 LT(25P) 7 SG 9 TRMX 10 RDA 16 RDB 11 SDA 15 SDB 18 CSB 19 ERB 21 CSA 22 ERA 1 FG Resistance Ω +10% 120Ω Controller or less No. n (Collective) Controller No. 2 COM.PORT1 COM.PORT2 COM.PORT1 COM.PORT2 COM.PORT1 COM.PORT2 3 SG 3 SG 3 SG 3 SG 3 SG 3 SG 4 T(B) 4 T(B) 4 T(B) 4 T(B) 4 T(B) 4 T(B) 5 T(A) 5 T(A) 5 T(A) 5 T(A) 5 T(A) 5 T(A) 2 R(B) 2 R(B) 2 R(B) 2 R(B) 2 R(B) 2 R(B) 1 R(A) 1 R(A) 1 R(A) 1 R(A) 1 R(A) 1 R(A) 6 Shield 6 Shield Resistance Ω +10% 120Ω or less (Collective) 6 Shield 6 Shield Shield 6 Shield 6 Shield Shield Shield Cable Diagram 5 (1:n) RS-422 2-wire Cable • When using Digital's RS-422 connector terminal adapter GP070-CN10-0 LT GP070-CN10-0 RDA RDB SDA SDB TERM SG FG Controller No. 1 Controller No. 2 T/R(B) T/R(A) SG T/R(B) T/R(A) SG Shield Controller No. n T/R(B) T/R(A) SG Shield Shield • When making your own cable Controller No. 1 LT(25P) 7 SG 9 TRMX 10 RDA 16 RDB 11 SDA 15 SDB 18 CSB 19 ERB 21 CSA 22 ERA 1 FG Controller No. 2 SG T/R(B) T/R(A) SG T/R(B) T/R(A) Shield Controller No. n SG T/R(B) T/R(A) Shield Shield LogiTouch Editor Ver.1.0 External Device Connection Manual 2-4-7 2.4 RKC INSTRUMENT INC. Controllers 2.4.3 Chapter 2 - Indicating Controllers Supported Devices The following list shows the range of devices supported by the LT. CB Series ! Device Bit Address Word Address Data 00000 ~ 02EEF 0000 ~ 02EE Comments H/L • LT’s System Area (LS0 to LS19) Settings Important The LT’s system area (20 words) cannot be allocated to the Controller’s own data area. Even though you can enter the system area settings via the LT OFFLINE mode, be careful that you do not use the Controller’s own data area. • The data communication feature will not operate when the slave address No. is set to “0”. ( The default value is 0.) Note: When using parts in LT Editor, the External Device Station number can be specified during address Input. If a station number is not indicated, the previously entered station number is automatically used. (The default value is 1.) Ex. When entering Device Address 02EE Enter the Device Name “...”, and the Word Address “02EE”. 01 ... 02EE Word Address Device Name Controller’s Slave Address No. 01/02EE Address Controller’s Slave Address No. 2-4-8 Enter the selected Controller Slave Address No. LogiTouch Editor Ver.1.0 External Device Connection Manual Chapter 2 - Indicating Controllers 2.4.4 2.4 RKC INSTRUMENT INC. Controllers Environment Setup The following table lists Digital's recommended RKC INSTRUMENT INC. Controller and LT communication settings. LT Settings Baud Rate Data Length Stop Bit Parity Bit Data Flow control Communication Format using RS-232C *1 Communication Format Controller Settings 9600 bps 8 bits 1 bit None ER Baud Rate Data Length Stop Bit Parity Bit -------- 9600 bps 8 bits 1 bit None -------- RS-232C -------- -------- 4-wire type -------using RS-422 (4-wire) *2 Communication Format 2-wire type -------using RS-422 (2-wire) Select any unit Unit No. Slave Address No. number from 1 to 32. --------------Select any unit number from 1 to 32. *1 RS-232C can be used when the H-PCP-A (Z-1021) is used. *2 Only the H-PCP-A (Z-1021) can use a 4 wire cable, and only CB series units can use a 2 wire cable. ! Important • The Controller’s slave address number range is from 0 to 99 for the CB series units ( the data communication feature does not operate when it is set to “0”.) and from 1 to 16 for the SR-Mini series units. Use only from 1 to 32 on the LT. • With a 1:n connection, up to 31 CB series units, and up to 16 SR-Mini series units can be connected to a single LT. LogiTouch Editor Ver.1.0 External Device Connection Manual 2-4-9 2.4 RKC INSTRUMENT INC. Controllers Chapter 2 - Indicating Controllers 12345678901234567890123456789012123456789012 12345678901234567890123456789012123456789012 12345678901234567890123456789012123456789012 12345678901234567890123456789012123456789012 12345678901234567890123456789012123456789012 12345678901234567890123456789012123456789012 12345678901234567890123456789012123456789012 12345678901234567890123456789012123456789012 12345678901234567890123456789012123456789012 12345678901234567890123456789012123456789012 12345678901234567890123456789012123456789012 12345678901234567890123456789012123456789012 12345678901234567890123456789012123456789012 12345678901234567890123456789012123456789012 12345678901234567890123456789012123456789012 12345678901234567890123456789012123456789012 MEMO 2-4-10 LogiTouch Editor Ver.1.0 External Device Connection Manual Chapter 2 - Indicating Controllers 2.5 2.5 Omron Corporation Controllers Omron Corporation Controllers 2.5.1 System Structure The following describes the system configuration used when connecting the LT to this Controller. ! Important LT’s System Area (LS0 to LS19) Settings The LT’s system area (20 words) cannot be allocated to the Controller area. Even though you can enter the system area settings via the LT OFFLINE mode, be careful that you do not actually use the Controller area. THERMAC NEO Electronic Temperature Controller (1:1 communication) Electronic *1 Temperature Controller Cable Diagram E5EN--FLK E5AN--FLK RS-232C <Cable diagram 1> E5EN--FLK E5CN--FLK E5GN--FLK E5AN--FLK RS-422 (2-wire type) <Cable diagram 2> LT LT Type-C *1 The Controller’s model number ““ will vary, depending on each controller’s functional specifications. LogiTouch Editor Ver.1.0 External Device Connection Manual 2-5-1 2.5 Omron Corporation Controllers Chapter 2 - Indicating Controllers THERMAC NEO Electronic Temperature Controller (1:n communication) Electronic *1 Temperature Controller E5EN--FLK E5CN--FLK E5GN--FLK E5AN--FLK Cable Diagram LT RS-422 (2-wire type) <Cable diagram 3> LT Type-C *1 The Controller’s model number ““ will vary, depending on each controller’s functional specifications. 2-5-2 LogiTouch Editor Ver.1.0 External Device Connection Manual Chapter 2 - Indicating Controllers 2.5.2 2.5 Omron Corporation Controllers Cable Diagrams The cable diagrams shown below and the cable diagrams recommended by Omron Corporation may differ, however, using these cables for your Controller’s operations will not cause any problems. ! Important • An RS-232C cable must be 15 meters or less. Also, be sure to connect its SG (signal ground) terminal. • An RS-422 cable, use a cable length less than 500 meters or less. • Digital recommends the following RS-422 cables. Recommended RS-422 Cable Model *1 No. Standard 1 E5EN--FLK E5CN--FLK E5AN--FLK AWG28 or above 2 E5GN--FLK AWG14 to AWG24 *1 The Controller’s model number ““ will vary depending on each controller functionality specifications. Recommended RS-232C Cable Model *1 No. 1 E5EN--FLK E5AN--FLK Standard Twisted pair wire with shield, AWG28 or above *1 The Controller’s model number ““ will vary depending on each controller functionality specifications. Cable Diagram 1 (1:1) RS-232C LT (25p male) Controller Terminal Block 2 SD 3 RD 4 RS 5 CS 6 NC 8 CD 20 ER 7 SG 1 FG 11 SD 12 RD 13 SG Shield LogiTouch Editor Ver.1.0 External Device Connection Manual 2-5-3 Chapter 2 - Indicating Controllers 2.5 Omron Corporation Controllers Cable Diagram 2 (1:1) RS-422 The Pin Nos. used with a RS-422 connection will vary depending on the type of controller used. The controller pin assignment diagrams are shown below. Terminal numbers are not shown in the following RS-422 cable diagrams. Refer to the following tables and diagrams when making all wiring connections. E5EN/E5CN/E5AN Abbreviation Pin No. A( - ) 12 B(+) 11 Abbreviation Pin No. A( - ) 6 B(+) 5 E5GN • When using Digital's RS-422 connector terminal adapter GP070-CN10-0 Controller Terminal Block LT (25p male) GP070-CN10-0 B (+) A (-) RDA RDB SDA SDB TERM SG FG 120Ω Ω (1/2W) Shield • When using Digital's RS-422 cable, GP230-IS11-0 Controller Terminal Block LT GP 230-IS11-0 2-5-4 RDA RDB SDA SDB SG FG B (+) A (-) 120Ω Ω (1/2W) LogiTouch Editor Ver.1.0 External Device Connection Manual Chapter 2 - Indicating Controllers 2.5 Omron Corporation Controllers • When making your own cable LT (25p male) 7 SG 9 TRMX 10 RDA 16 RDB 11 SDA 15 SDB 18 CSB 19 ERB 21 CSA 22 ERA 1 FG Shield Controller terminal block B (+) A (-) Ω (1/2W) 120Ω Cable Diagram 3 (1:n) RS-422 2-wires For the shield wire grounding, be sure to use dispersion grounding, parallel grounding or series grounding (shown below), depending on your electrical equipment conditions. Note: • When using Digital's RS-422 connector terminal adapter GP070-CN10-0 (An example of series grounding) LT (25p male) Controller No.1 B (+) A (-) GP070-CN10-0 RDA RDB SDA SDB TERM SG FG Controller No.2 B (+) A (-) Shield Controller No.n B (+) A (-) 120Ω Ω (1/2W) Shield Shield • When using Digital's RS-422 cable, GP230-IS11-0 (An example of series grounding) Controller No.2 B (+) A (-) ControllerNo.1 LT GP230-IS11-0 RDA RDB SDA SDB SG FG B (+) A (-) Shield LogiTouch Editor Ver.1.0 External Device Connection Manual Controller No.n B (+) A (-) 120Ω Ω (1/2W) Shield 2-5-5 Chapter 2 - Indicating Controllers 2.5 Omron Corporation Controllers • When making your own cable (An example of series grounding) LT(25p male) 7 SG 9 TRMX 10 RDA 16 RDB 11 SDA 15 SDB 18 CSB 19 ERB 21 CSA 22 ERA 1 FG 2-5-6 Controller No.1 B (+) A (-) Controller No.2 B (+) A (-) Shield Controller No.n B (+) A (-) 120Ω Ω (1/2W) Shield Shield LogiTouch Editor Ver.1.0 External Device Connection Manual Chapter 2 - Indicating Controllers 2.5.3 2.5 Omron Corporation Controllers Supported Devices The following list shows the range of devices supported by the LT. THERMAC NEO Electronic Temperature Controller Device Variable Areas Operation Commands Bit Addresses Word Addresses Remarks C0000000 to C0000531 C00000 to C00005 C1000000 to C1001C31 C3000000 to C3003531 C10000 to C1001C C30000 to C30035 Double word device (write disabled) *1 Double word device Double word device A000000 to A000815 A0000 to A0008 Word device H/L *1 Data write is not possible. STOP ! Important LT Editor’s Simulation feature is not available with this protocol. To avoid a possible LT malfunction, do not use this feature. • The system area (20 words) of LT cannot be used. Although it is possible to set addresses for this area via the LT OFFLINE mode, it is impossible to actually allocate the system area to the controller’s data area. • Be careful as the Device fields differ depending on the type of Controller. Refer to the Controller’s manual for the range allowed for the device address area. • After screen data is converted from a different type of Controller, be sure to check if the device addresses used are correct. • Be sure to check that the device addresses are supported before using. Trend graphs in your screens should use multiple words over continuous addresses. LogiTouch Editor Ver.1.0 External Device Connection Manual 2-5-7 Chapter 2 - Indicating Controllers 2.5 Omron Corporation Controllers Note: • This protocol’s LS area uses a 32-bit device. • When setting parts in the LT Editor, the Controller communication unit No. can be specified during address input. If a communication unit No. is not indicated, the previously entered communication unit No. is automatically used. (The default value is 1.) Ex. When entering Device Address C00000 Enter the Device Name “C0”, and the Word Address “0000”. 01 C0 0000 Word Address Device Name Controller Communication Unit 01/C00000 Address Controller Communication Unit No. Note: 2-5-8 Enter the selected Controller Communication Unit No. (Station No.) After the Controller’s power is turned ON, it may take a few seconds until the Controller starts. Therefore, if the LT and the Controller are turned ON at the same time, there may be a delay of several seconds until communication starts. LogiTouch Editor Ver.1.0 External Device Connection Manual Chapter 2 - Indicating Controllers 2.5 Omron Corporation Controllers Operation Commands Command codes 00 to 08 are used for operation command service (command) to provide a total of 9 write commands. Certain command operations are identical, and the result (arbitrary value) is written to a variable area. Note: Device code Word address Command code A 0000 0001 0002 0003 0004 0005 0006 0007 0008 00 01 02 03 04 05 06 07 08 Meaning Data Transfer Write RUN / STOP Multi-SP AT RUN / STOP Write mode Store RAM data Software reset Setting area shift 1 Protection level shift • When a write command is performed, the device code used in LT Editor is 'A', and that command code is entered instead of the device address. Related data (2 bytes) is designated by each word switch part’s setting value. Since this device is a write-only device, readout is disabled. If used for readout, i.e. an Numeric display, a host communication error (02:F0:**) (** is set parts unit No.) will appear in the lower left corner of the LT screen. • Device "C0, C1, C3" C0, C1 and C3 devices are not used as device symbols. Instead they identify a variable area’s data type. User Manual (SGTD-706) for OMRON's E5AN/E5EN/E5CN/ E5GN Electronic Temperature Controller LT Error Codes Error codes are indicated in the left lower corner of the LT screen. Error codes consist of three types. When an error occurs, the corresponding error code and LT station number (where the error occurred) are saved either in LS2039 or LS2070. Since the method used will vary depending on the error type, refer to the following list for details. (Data saved in LS2039 or LS2070 is shown using hexa-decimal characters.) 1. Error Code (02:12) – 2 units Error Code 0x12 Data saved in LS2039 0x12 (error code) Data saved in LS2070 0 (fixed as “0”) LogiTouch Editor Ver.1.0 External Device Connection Manual 2-5-9 2.5 Omron Corporation Controllers 2. Error Code Error Code Data saved in LS2039 Data saved in LS2070 Chapter 2 - Indicating Controllers (02:12:34) – 3 units 0x12. The LT station number where the error occurred is 34(0x22) 0x1222 (The two digits shown here by “12” represent the error code, and the last two digits“22” represent the station no. Note that “0x” is not shown on the display.) 0 (fixed as “0”) 3. Error Code (02:12:34:56) – 4 units Error Code 0x1234. The LT unit number where the error occurred is 56(0x38) Data saved in LS2039 0x1234 (error code) Data saved in LS2070 0x38 (station no.) 2-5-10 LogiTouch Editor Ver.1.0 External Device Connection Manual Chapter 2 - Indicating Controllers 2.5.4 2.5 Omron Corporation Controllers Environment Setup The following table lists the recommended Controller and LT communication settings. THERMAC NEO Controller LT Settings Controller Settings Baud Rate 9600 bps Baud Rate 9600 bps Data Length 7 bits Data Length 7 bits Stop Bit 2 bit Stop Bit 2 bit Parity Bit Even Parity Bit Even Data Flow control Communication Format ER -------- -------- RS-232C -------- -------- 4-wire type -------- -------- 2-wire type -------- -------- (using RS-232C) *1 Communication Format (using RS-422 - 4-line) Communication Format (using RS-422 - 2-line) Unit No. *2 1 to 32 Unit No. 1 to 32 *1 The E5EN and the E5AN use an RS-232C connection. *2 It is possible to set a Controller communication unit No.from 0 to 99, however, the LT can only be set from 1 to 32. With a 1:n connection, up to 31 controllers can be connected to a single LT. LogiTouch Editor Ver.1.0 External Device Connection Manual 2-5-11 Chapter 2 - Indicating Controllers 2.5 Omron Corporation Controllers 12345678901234567890123456789012123456789012 12345678901234567890123456789012123456789012 12345678901234567890123456789012123456789012 12345678901234567890123456789012123456789012 12345678901234567890123456789012123456789012 12345678901234567890123456789012123456789012 12345678901234567890123456789012123456789012 12345678901234567890123456789012123456789012 12345678901234567890123456789012123456789012 12345678901234567890123456789012123456789012 12345678901234567890123456789012123456789012 12345678901234567890123456789012123456789012 12345678901234567890123456789012123456789012 12345678901234567890123456789012123456789012 12345678901234567890123456789012123456789012 12345678901234567890123456789012123456789012 MEMO 2-5-12 LogiTouch Editor Ver.1.0 External Device Connection Manual Chapter 2 - Indicating Controllers 2.6 2.6 Shinko Technos Corporation Controllers Shinko Technos Corporation Controllers 2.6.1 System Structure The following describes the system configuration used when connecting the LT to this Controller. • Do not use the system area because the LT’s system area (LS0 to LS19) cannot be allocated to the Controller area. (Deselect all system area selection items.) • The Controller’s read area can be used as normal. C Series CP U CPT -20A Control Unit* 1 CCT -235-2- Ca ble Dia gra m Ca ble s LT RS-422 CPM Shinko T ec hnos <Cable Diagram 4> Corporation RS-422 CPM and CPP Shinko (1:n) T ec hnos Corporation <Cable Diagram 5> LT T ype-C *1 The Controller’s model number “” changes, according to the options selected. For details about model numbers, refer to the C Series catalog. FC Series Controller *1 Link I/F Cable Diagram FCD-13A,C FCD-15A,C FCR-13A,C FCR-15A,C Serial Communication Option:C RS-232C <Cable Diagram 1> Serial Communication Option:C5 RS-422 <Cable Diagram 2> RS-422 (1:n) <Cable Diagram 3> FCD-13A,C5 FCD-15A,C5 FCR-13A,C5 FCR-15A,C5 LT LT Type-C *1 The Controller’s model number “” changes, according to the options selected . Items with the serial communication option have a “,C” or “,C5” after the basic model number. For details about model numbers, refer to each series catalog. LogiTouch Editor Ver.1.0 External Device Connection Manual 2-6-1 2.6 Shinko Technos Corporation Controllers Chapter 2 - Indicating Controllers FIR Series *1 Link I/F Cable Diagram FIR-201-M ,C FIR-201-M ,C Serial Communication Option:C RS-232C <Cable Diagram 1> FIR-201-M ,C5 FIR-201-M ,C5 Serial Communication Option:C5 RS-422 <Cable Diagram 2> RS-422 (1:n) <Cable Diagram 3> Link I/F Cable Diagram LT Serial Communication Option:C5 RS-422 <Cable Diagram 2> RS-422 (1:n Communication) <Cable Diagram 3> LT Type-C Link I/F Cable Diagram LT Serial Communication Option:C5 RS-422 <Cable Diagram 2> RS-422 (1:n Communication) <Cable Diagram 3> LT Type-C Link I/F Cable Diagram LT Serial Communication Option:C RS-232C <Cable Diagram 1> Serial Communication Option:C5 RS-422 <Cable Diagram 2> RS-422 (1:n Communication) <Cable Diagram 3> Controller LT LT Type-C GC Series Controller *1 GCS-300,C5 FCL Series Controller *1 FCL-13A,C5 PC-900 Series Controller *1 PC-935,C PC-955,C PC-935,C5 PC-955,C5 LT Type-C *1 The Controller’s model number “” changes, according to the options selected . Items with the serial communication option have a “,C” or “,C5” after the basic model number. For details about model numbers, refer to each series catalog. 2-6-2 LogiTouch Editor Ver.1.0 External Device Connection Manual Chapter 2 - Indicating Controllers 2.6 Shinko Technos Corporation Controllers When connecting an RS-232C cable (for RS-232C compatible Controllers) LT Controller Communication Option RS-232C RS-232C RS-485 cable (except the C Series Controller) LT Controller Controller RS-485 Termination Resistance Controller Termination Resistance Communication Option RS-485 up to 31 Controllers RS-485 cable (connecting with the C Series Controller) Controller CCT-235-2 (10 units max.) LT Termination Resistance Controller CPT-20A Modular Jack Controller Termination Resistance*1 RS-485 up to 15 Blocks *1 Turn Controller’s termination resistance switch ON. LogiTouch Editor Ver.1.0 External Device Connection Manual 2-6-3 Chapter 2 - Indicating Controllers 2.6 Shinko Technos Corporation Controllers 2.6.2 Cable Diagrams The cable diagrams shown below and the cable diagrams recommended by Shinko Technos Corporation may differ, however, using these cables for your Controller’s operations will not cause any problems. ! Important • Ground your External Device’s FG terminal according to your country’s applicable standard. • Since some Controllers do not have a GND signal (FG), be careful when selecting the side (LT or Indicating Controller) used for connecting the FG wire to the shield. • When connecting the FG wire to the cable connector’s cover, be sure it is made from a conductive material. • For an RS-232C cable, use a cable length of 15 meters or less. • For an RS-422 cable, use a cable length of 600 meters or less. • Pro-face recommends the OTSC-2PVB-7/0.32TA cable, made by ONAMBA Corporation. Cable Diagram 1 LT (25p male) 1 FG 2 SD 3 RD 4 RS 5 CS 7 SG 8 CD 20 ER 2-6-4 Shield Controller Terminal Block Rx Tx COM LogiTouch Editor Ver.1.0 External Device Connection Manual Chapter 2 - Indicating Controllers 2.6 Shinko Technos Corporation Controllers Cable Diagram 2 There are two ways of connecting the LT and the Controller. One is using the Shinko Technos' RS-232C RS-485 Converter (IF-300-C5). The other is using an RS-485 cable. • When using Shinko Technos’s RS-232C RS-485 Converter (IF-300-CS) When using this converter, be sure the LT’s communication setting is “RS232C”.Do not use any other manufacturer’s converter. LT (25 pin male) Shield 1 FG 2 SD 3 RD 4 RS 5 CS 7 SG 8 CD 20 ER Shield Controller Terminal Block Rx Tx COM YA YB COM GND YA YB COM RS-232C RS-232C 120Ω Ω Ω 1/4Ω RS-485 RS-485 Converter (Terminal Block) (IF-300-C5) • When connecting the LT and the Controller via RS-485 cable LT 680Ω Ω 680Ω Ω 1 FG 9 TERM 14 VCC 10 RDA 11 SDA 15 SDB 16 RDB 7 SG 18 CSB 19 ERB 21 CSA 22 ERA Shield LogiTouch Editor Ver.1.0 External Device Connection Manual Controller Terminal Block YB YA COM GND 120Ω Ω Ω 1/4Ω 2-6-5 2.6 Shinko Technos Corporation Controllers Chapter 2 - Indicating Controllers Cable Diagram 3 There are two ways of connecting the LT and the Controller. One is using the Shinko Technos' RS-232C RS-485 Converter (IF-300-C5). The other is using an RS-485 cable. • When using Shinko Technos's RS-232C RS-485 Converter (IF-300-C5) When using this converter, be sure the LT’s communication setting is “RS232C”.Do not use any other manufacturer’s converter. LT (25p male) Shield Shield 1 FG 2 SD 3 RD 4 RS 5 CS 7 SG 8 CD 20 ER Shield YA YB COM GND Rx Tx COM Controller Terminal Block YA YB COM GND 120Ω Ω 1/4W YA YB COM RS-232C RS-232C RS-485 RS-485 Converter (Terminal Block) (IF-300-C5) • When connecting the LT and the Controller via an RS-485 cable LT (25p male) 680Ω Ω 680Ω Ω 2-6-6 1 FG 9 TREM 14 VCC 10 RDA 11 SDA 15 SDB 16 RDB 7 SG 18 CSB 19 ERB 21 CSA 22 ERA Controller No.1 Controller No.2 YB YA COM GND YB YA COM GND 120Ω Ω 1/4W Shield Shield LogiTouch Editor Ver.1.0 External Device Connection Manual Chapter 2 - Indicating Controllers 2.6 Shinko Technos Corporation Controllers Cable Diagram 4 (RS-422) • When using Digital's RS-422 connector terminal adapter GP070-CN10-0 (Terminal Block) LT 100Ω Ω Ω) (1/2Ω GP070-CN10-0 TERM RDA RDB SDA SDB SG Controller (Modular Jack) 3 TXB 4 TXA 2 RXB 5 RXA 1 SG 6 SG Shinko Technos cable (Model Number : CPM) FG Note: Be sure to use only the Shinko Technos Corporation “CPM” cable. Cable Diagram 5 (RS-422) • When using Digital's RS-422 connector terminal adapter GP070-CN10-0 (Terminal Block) 100Ω Ω Ω) (1/2Ω GP070-CN10-0 TERM RDA RDB SDA SDB SG FG Note: 3 TXB 4 TXA 2 RXB 5 RXA 1 SG 6 SG Controller (Modular Jack) Shinko Technos cable (Model Number : CPM) Controller (Modular Jack) Shinko Technos cable (Model Number : CPP) • Be sure to use only the Shinko Technos Corporation “CPM” and “CPP” cables. • Be aware that the A and B signals of the LT and External Device are reversed. • To enable the Controller’s termination resistance, turn dip switch No.2 ON. LogiTouch Editor Ver.1.0 External Device Connection Manual 2-6-7 2.6 Shinko Technos Corporation Controllers 2.6.3 Chapter 2 - Indicating Controllers Supported Devices The following list shows the range of devices supported by the LT. C Series Device Bit Addresses*1 Word Addresses*1 Channel 1 1CH010 ~ 1CH84F 1CH01 ~ 1CH84 Channel 2 Channel 3 Channel 4 Channel 5 Channel 6 Channel 7 Channel 8 Channel 9 Channel 10 Channel 11 Channel 12 Channel 13 Channel 14 Channel 15 Channel 16 Channel 17 Channel 18 Channel 19 Channel 20 2CH010 3CH010 4CH010 5CH010 6CH010 7CH010 8CH010 9CH010 10CH010 11CH010 12CH010 13CH010 14CH010 15CH010 16CH010 17CH010 18CH010 19CH010 20CH010 ~ ~ ~ ~ ~ ~ ~ ~ ~ ~ ~ ~ ~ ~ ~ ~ ~ ~ ~ 2CH84F 3CH84F 4CH84F 5CH84F 6CH84F 7CH84F 8CH84F 9CH84F 10CH84F 11CH84F 12CH84F 13CH84F 14CH84F 15CH84F 16CH84F 17CH84F 18CH84F 19CH84F 20CH84F 2CH01 3CH01 4CH01 5CH01 6CH01 7CH01 8CH01 9CH01 10CH01 11CH01 12CH01 13CH01 14CH01 15CH01 16CH01 17CH01 18CH01 19CH01 20CH01 ~ ~ ~ ~ ~ ~ ~ ~ ~ ~ ~ ~ ~ ~ ~ ~ ~ ~ ~ 2CH84 3CH84 4CH84 5CH84 6CH84 7CH84 8CH84 9CH84 10CH84 11CH84 12CH84 13CH84 14CH84 15CH84 16CH84 17CH84 18CH84 19CH84 20CH84 H/L *1 Input all addresses in hexadecimal characters. Note: 2-6-8 • The LT processes all Controller data items in the same way. • Designating an address means that the data item number specifies the address. • For information about data item types and numbers, refer to the Multi Point Temperature Control Unit C Series Guide “Communication Command List”, made by Shinko Technos Corporation. LogiTouch Editor Ver.1.0 External Device Connection Manual Chapter 2 - Indicating Controllers 2.6 Shinko Technos Corporation Controllers The following data item list is mentioned in the C Series communication guide for each channel. The C Series supports up to 20 channels. Command Type Data Item Data 20H/50H 0001H : Main setting value (SV) setting Setting Value 20H/50H 0002H : Main proportional band setting Setting Value 20H/50H 0003H : Integral time setting Setting Value 20H/50H 0004H : Derivative time setting Setting Value : : : The item Nos. here are the LT addresses. 20H:Read command can be performed. 50H:Write command can be performed. • When the channel 1 data item is “the setting of main setting value (SV)”, the item No. is “0001H”, and the LT’s address is the following: 1 CH 0001 Address (Data Item) Channel Number • The channel 1 data item “the integrated time setting”, has an item number of “0003H”, and the LT address is “1CH0003”. • The channel 2 data item “the integrated time setting” has an item number of “0003H”, and the LT address is “2CH0003”. • When the command type is 20H, data read can be performed. When it is 50H, data write can be performed. (20H/50H are used to perform read and write.) FC Series Device Bit Addresses*1 Word Addresses*1 Data Item 00010 ~ 0086F 0001 ~ 0086 1S010 2S010 3S010 4S010 5S010 6S010 7S010 1S01 2S01 3S01 4S01 5S01 6S01 7S01 Setting Value Memory 1 Setting Value Memory 2 Setting Value Memory 3 Setting Value Memory 4 Setting Value Memory 5 Setting Value Memory 6 Setting Value Memory 7 ~ ~ ~ ~ ~ ~ ~ 1S86F 2S86F 3S86F 4S86F 5S86F 6S86F 7S86F ~ ~ ~ ~ ~ ~ ~ 1S86 2S86 3S86 4S86 5S86 6S86 7S86 H/L *1 Input all addresses in hexadecimal characters. LogiTouch Editor Ver.1.0 External Device Connection Manual 2-6-9 2.6 Shinko Technos Corporation Controllers Note: Chapter 2 - Indicating Controllers • The LT processes all Controller data items in the same way. • Designating an address means that the data item number specifies the address. • For information about data item types and numbers, refer to the FC Series Communication (Option : C,C5) Guide “Communication Command List”, made by Shinko Technos Corporation. The following data item list is mentioned in the FC Series communication guide for each channel. When the command type is 20H, data read can be performed. When it is 50H, data write can be performed. (20H/50H are used to perform read and write.) Contents Sub Addresses Command Classification Data Items 1 to 7 20H/50H 0001H 0 20H/50H 0002H 0 20H/50H 0003H 1 to 7 : 20H/50H : 0004H : Main setting value or step temperature setting value Setting value memory number or step number selection PID auto-tuning Performance / Cancellation Proportional band setting : Sub Addresses (Setting Memory No.) The item No. here is the LT addresses When using the FC Series, the sub addresses must be selected. Here, “sub addresses” mean “the setting value memory No.”. For example, “sub address 1” means “setting value memory No.1”. The data items that the sub addresses need to be set to, therefore, specify the device of “setting value memory *”. Data items with the sub addresses that do not need to be set (when the sub address is 0), can specify only the number of data items. Ex. Data items with the sub addresses that do not need to be set. When setting value memory No.1, LT address data items (the main setting value, “step temperature setting value”) are as follows: 1S 0001 Address (Data Item) Setting Value Memory No. (Sub Address) 2-6-10 LogiTouch Editor Ver.1.0 External Device Connection Manual Chapter 2 - Indicating Controllers 2.6 Shinko Technos Corporation Controllers Ex. Data items with the sub addresses that do not need to be set. LT address data items (the setting value memory number selection, “step numbers”) are as follows: 0002 Address (Data Item) FIR/GC/FCL Series Device Bit Addresses*1 Word Addresses*1 Data Item 00010 ~ 00A3F 0001 ~ 00A3 H/L *1 Input all addresses in hexadecimal characters. Note: • The LT processes all Controller data items in the same way. • Designating an address means that the data item number specifies the address. • For information about data item types and numbers, refer to the FIR-201-M Communication Guide “Communication Command List”, GCS-300 Communication Guide “Communication Command List”, and FCL-13A Communication Guide “Communication Command List”, made by Shinko Technos Corporation. The following data item list is mentioned in the FIR Series communication guide for each channel. When the command type is 20H, data read can be performed. When it is 50H, data write can be performed. (20H/50H allow read and write to be performed.) Command Type Data Item Data 20H/50H 20H/50H 20H/50H 20H/50H : 0001H : Alarm 1 (A1) Setting 0002H : Alarm 2 (A2) Setting 0003H : Alarm 3 (A3) Setting 0004H : Setting Value Lock Designation : Setting Value Setting Value Setting Value Setting Value : The item Nos. here are the LT addresses. 20H:Read command can be performed. 50H:Write command can be performed. • For the data item “Alarm 1 (A1) Setting”, the item number is 0001H. As a result, the LT address is as follows: 0001 Address (Data Item) • For the data item “Alarm 2 (A2) Setting”, the item number is 0002H. As a result, the LT address is “0002”. LogiTouch Editor Ver.1.0 External Device Connection Manual 2-6-11 2.6 Shinko Technos Corporation Controllers Chapter 2 - Indicating Controllers PC-900 Series Device Data Items Bit Addresses Word Addresses 00010 ~ 0400F 0001 ~ 0400 04010 ~ 0800F 08010 ~ 0C00F 0C010 ~ 1000F 10010 ~ 1400F 14010 ~ 1800F 18010 ~ 1C00F 1C010 ~ 2000C 20010 ~ 2400F 24010 ~ 2800F 28010 ~ 2C00F 2C010 ~ 3000F 30010 ~ 3400F 34010 ~ 3800F 38010 ~ 3C00F 3C010 ~ 4000F 40010 ~ 4400F 44010 ~ 4800F 48010 ~ 4C00F 4C010 ~ 5000F 50010 ~ 5400F 54010 ~ 5800F 58010 ~ 5C00F 5C010 ~ 6000C 60010 ~ 6400F 64010 ~ 6800F 68010 ~ 6C00F 6C010 ~ 7000C 70010 ~ 7400F 74010 ~ 7800F 78010 ~ 7C00F 7C010 ~ 7991F 0401 ~ 0800 0801 ~ 0C00 0C01 ~ 1000 1001 ~ 1400 1401 ~ 1800 1801 ~ 1C00 1C01 ~ 2000 2001 ~ 2400 2401 ~ 2800 2801 ~ 2C00 2C01 ~ 3000 3001 ~ 3400 3401 ~ 3800 3801 ~ 3C00 3C01 ~ 4000 4001 ~ 4400 4401 ~ 4800 4801 ~ 4C00 4C01 ~ 5000 5001 ~ 5400 5401 ~ 5800 5801 ~ 5C00 5C01 ~ 6000 6001 ~ 6400 6401 ~ 6800 6801 ~ 6C00 6C01 ~ 7000 7001 ~ 7400 7401 ~ 7800 7801 ~ 7C00 7C01 ~ 7991 Remarks *2 H/L *1 Input all addresses in hexadecimal characters. *2 The data items are internally processed, with each “block” being divided into 1024 words (0x400). Therefore, be aware of that the following functions cannot be used with settings that cross a block (1024 words). Be sure to set the data items within one block when using this type of unit. 1) Alarm setting (alarms will not displayed) 2-6-12 LogiTouch Editor Ver.1.0 External Device Connection Manual Chapter 2 - Indicating Controllers Note: 2.6 Shinko Technos Corporation Controllers • The LT processes all Controller data items in the same way. • Designating an address means that the data item number specifies the address. • For information about data item types and numbers, refer to the PC-935, PC-955 communication (option : C, C5, SVTC) guide “Communication Command List”, made by Shinko Technos Corporation. The following data item list is mentioned in the PC-900 Series communication guide for each channel. When the command type is 20H, data read can be performed. When it is 50H, data write can be performed. (20H/50H are used to perform read and write.) Command Classification Data Item Data 20H/50H 0001H : Fixed value control / Main setting value setting 20H/50H 0002H : Fixed value control / Setting Value Control output (OUT1) proportional band setting 20H/50H 0003H : Fixed value control / Integral time setting Setting Value 20H/50H 0004H : Fixed value control / Derivative time setting Setting Value : Setting Value : : The item Nos. here are the LT addresses. 20H:Read command can be performed. 50H:Write command can be performed. For data item “The setting of the main setting value (SV) for the stationary position control”, the item number is 0001H. As a result, the LT address is as follows. 0002 Address (Data Item) For data item “The setting of the integrated time for the stationary position control”, the item number is 0003H. As a result, the LT address is “0003”. LogiTouch Editor Ver.1.0 External Device Connection Manual 2-6-13 2.6 Shinko Technos Corporation Controllers Chapter 2 - Indicating Controllers For data item details, refer to the following Shinko Technos Corporation communication guides. Series C FC FIR GC FCL PC-900 Note: • Models CPT -20A FCD-130 FCD-150 FCR-130 FCR-150 FCS-200 FIR-200 GCS-300 FCL-100 PC-935 PC-955 Guides Multi-Point Temperature Control Unit C Series Guide FC Series Communication (Option:C,C5) Guide FIR Communication Guide GCS Communication Guide FCL Communication Guide PC-935, PC-955 Communication (Option:C,C5,SVTC) Guide When the data item’s setting value uses a decimal point items, the LT displays a value 10 times larger than the setting value. Also, when writing, be sure to write a value 10 times larger than the setting value. Ex. In case of the PC-900 Series’ control output (OUT1) proportional zone Indication of Controllers / Setting Value : 2.5% Indication of the LT : 25 Also, refer to each model’s communication guide for details (with/without a decimal point) about data item setting value ranges. • When setting parts in LT Editor, the Controller communication unit No. can be specified during address input. If a communication unit No. is not indicated, the previously entered communication unit No. is automatically used. (The default value is 1.) 2-6-14 LogiTouch Editor Ver.1.0 External Device Connection Manual Chapter 2 - Indicating Controllers 2.6 Shinko Technos Corporation Controllers Selecting Addresses Selecting Devices Data Items : ... Channel 1 : 1CH Setting Value Memory 1 : 1S and so on Enter the selected Controller Communication Unit No. (Station No.) 01/0001 Address (No. of Data Items) (For the C Series : 1ch01, for the FC Series : 1S0001) Controller Communication Unit No. Do not use the system area because the LT’s system area (LS0 to LS19) cannot be allocated to the Controller area. (Do not select all the system area.) The Controller’s read area can be used as normal. LogiTouch Editor Ver.1.0 External Device Connection Manual 2-6-15 2.6 Shinko Technos Corporation Controllers 2.6.4 Chapter 2 - Indicating Controllers Environment Setup The following table lists the recommended Controller and LT communication settings. C Series LT Settings Controller Settings Baud Rate 9600 bps Data Length 7 bits -------- -------- Stop Bit 1 bit -------- -------- Parity Bit Even -------- -------- Data Flow control ER -------- -------- Communication Format 4 Wires -------- -------- Unit No. 1 Baud Rate 9600 bps *1 1 Unit No. *1 It is possible to set a Controller communication unit No.from 0 to 15, however, the LT can only be set from 1 to 15. FC/FIR/GC/FCL/PC-900 Series LT Settings Controller Settings Baud Rate 9600 bps Data Length 7 bits -------- -------- Stop Bit 1 bit -------- -------- Parity Bit Even -------- -------- Data Flow control ER -------- -------- Communication Format (using RS-232C) Communication Format (using RS-422) Unit No. Baud Rate 9600 bps RS-232C Communication Format *1 Serial Communication 2 wire type Communication Format *1 Serial Communication 1 Unit No.*2 1 *1 PC-900 series only *2 It is possible to set a Controller communication unit No.from 0 to 95, however, the LT can only be set from 1 to 32. 2-6-16 LogiTouch Editor Ver.1.0 External Device Connection Manual Chapter 2 - Indicating Controllers 2.6.5 2.6 Shinko Technos Corporation Controllers Error Code Controller error codes are represented by the “Host communication error (02:**:##)”, and indicated in the left lower corner of the LT screen. Error Codes Meaning 01 03 04 05 Command does not exist Exceeds setting value range Unable to set (during AT execution) Key operation has activated Setting Mode For more details about the error codes, see “The Controller Manual : Communication Guide for each series made by Shinko Technos Corporation” LogiTouch Editor Ver.1.0 External Device Connection Manual 2-6-17 2.6 Shinko Technos Corporation Controllers Chapter 2 - Indicating Controllers 12345678901234567890123456789012123456789012 12345678901234567890123456789012123456789012 12345678901234567890123456789012123456789012 12345678901234567890123456789012123456789012 12345678901234567890123456789012123456789012 12345678901234567890123456789012123456789012 12345678901234567890123456789012123456789012 12345678901234567890123456789012123456789012 12345678901234567890123456789012123456789012 12345678901234567890123456789012123456789012 12345678901234567890123456789012123456789012 12345678901234567890123456789012123456789012 12345678901234567890123456789012123456789012 12345678901234567890123456789012123456789012 12345678901234567890123456789012123456789012 12345678901234567890123456789012123456789012 MEMO 2-6-18 LogiTouch Editor Ver.1.0 External Device Connection Manual Chapter 2 - Indicating Controllers 2.7 2.7 Fuji Electronic Corporation Controllers Fuji Electronic Corporation Controllers 2.7.1 System Structure The following describes the system configuration used when connecting the LT to this Controller. Micro-Controller X Series (Model:PXR) Controller *1 PXR4 - M00 PXR4 - V00 Cable Diagram LT RS-422 <Cable diagram 1> RS-422 (1:n) <Cable diagram 2> LT Type-C *1 The Controller’s model number “” will change, according to the options selected. For model number details, refer to the PXR4 Series catalog. When connecting the Controller to an LT, the RS-485 (MODBUS) option “M00” or “V00” is required. Temperature Controller LT Termination Resistance Temperature Controller Using RS-485 Communication Option RS-485 Temperature Controller Termination Resistance Up to 31 Controllers LogiTouch Editor Ver.1.0 External Device Connection Manual 2-7-1 2.7 Fuji Electronic Corporation Controllers 2.7.2 Chapter 2 - Indicating Controllers Cable Diagrams The cable diagrams shown below and the cable diagrams recommended by Fuji Electric Co., Ltd. differ, however, using these cables for your Controller’s operations will not cause any problems. • Ground your External Device’s FG terminal according to your country’s applicable standard. • All RS-422 cables must be 500 meters long or less. Cable Diagram 1 (1:1) RS-422(2-wire type) • Using Digital's RS-422 connector terminal adapter GP070-CN10-0 Controller LT GP070-CN10-0 Shield Controller Terminal Block 7+ 8- RDA RDB SDA SDB TERM SG FG 100Ω Ω 1/2W • Using Digital’s RS-422 Cable GP230-IS11-0 Controller Terminal Block LT GP230-IS11-0 RDA RDB SDA SDB SG FG 7+ 8- 100Ω Ω 1/2W Be sure that RDA - SDA and RDB - SDB are both connected to the Controller terminal block. Since the SG and FG lines cannot be connected to the controller terminal block, be sure to cover them with insulating tape. 2-7-2 LogiTouch Editor Ver.1.0 External Device Connection Manual Chapter 2 - Indicating Controllers 2.7 Fuji Electronic Corporation Controllers • When making your own cables LT 1 FG 7 SG 9 TERM 10 RDA 16 RDB 11 SDA 15 SDB 18 CSB 19 ERB 21 CSA 22 ERA Shield Controller terminal block 7+ 8- 100Ω Ω 1/2W Cable Diagram 2 (1:n) RS-422 • Using Digital's RS-422 connector terminal adapter GP070-CN10-0 LT (25P male) RDA RDB SDA SDB TERM GP070-CN10-O SG FG Controller terminal block Controller Shield Shield 7+ 8- LogiTouch Editor Ver.1.0 External Device Connection Manual 7+ 8- 100Ω Ω 1/2W 2-7-3 2.7 Fuji Electronic Corporation Controllers Chapter 2 - Indicating Controllers • Using Digital's RS-422 cable, GP230-IS11-0 LT (25P male) GP230-IS11-O RDA RDB SDA SDB SG FG Controller Shield Controller Terminal Block 7+ 8- 7+ 8- 100Ω Ω 1/2W Be sure that RDA - SDA and RDB - SDB are both connected to the Controller terminal block. Since the SG line cannot be connected to the controller terminal block, be sure to cover them with insulating tape. • When making your own cable connections LT (25P male) 2-7-4 1 FG 7 SG 9 TERM 10 RDA 16 RDB 11 SDA 15 SDB 18 CSB 19 ERB 21 CSA 22 ERA Shield Controller Shield 7+ 8- Controller Terminal Block 7+ 8- Ω 100Ω 1/2W LogiTouch Editor Ver.1.0 External Device Connection Manual Chapter 2 - Indicating Controllers 2.7.3 2.7 Fuji Electronic Corporation Controllers Supported Devices The following list shows the range of devices supported by the LT. Micro-Controller X Series (Model:PXR) Device Bit Address Word Address 00001 10001 ~ 10016 Parameter Comments *1 10001 *2 3000100 ~ 3001515 30001 ~ 30015 Internal Calculation Value *2 4000100 ~ 4011315 40001 ~ 40113 Internal Calculation Value *1 3100100 ~ 3101515 31001 ~ 31015 Engineering Unit *2 4100100 ~ 4111315 41001 ~ 41113 Engineering Unit *1 H/L *1 Addresses 00001, 40001 and 41001 are used to store write commands (FIX Processing) in non-volatile memory. The non-volatile memory’s write is performed via the writing of “Write Value 1”. FIX processing lasts approximately 5 seconds. The Display Communication cannot be performed for 5 seconds if there are any Read-out function setting on the same screen. Reference STOP Instruction Manual for Fuji Electric Corporation’s MICRO CONTROLLER X COMMUNICATION FUNCTION (RS-485 MODBUS), “FIX Processing” During the writing of data to non-volatile memory, do not turn off the Controller’s power. If the Controller’s power is cut, the data in non-volatile memory will be destroyed, thereby disabling the Controller. *2 Data write is not possible. • In the LT, the Controller’s parameters are set via the Coil No. and Register No. For each Coil No. (00001~, 10001~) the last digit is recognized as the device. For Register No.s (30001~, 40001~, 31001~, 41001~) the last two digits are recognized as the device. • For information about data item types and numbers, refer to the Instruction Manual for Fuji Electric Co., Ltd.’s MICRO CONTROLLER X COMMUNICATION FUNCTION (RS-485 MODBUS), “CHAPTER 7 ADDRESS MAP AND DATA FORMAT” • The LT supports two types of Address Maps, the “Engineering Unit Address Map” and the “Internal Calculation Value Address Map”. LogiTouch Editor Ver.1.0 External Device Connection Manual 2-7-5 2.7 Fuji Electronic Corporation Controllers Chapter 2 - Indicating Controllers The following data shows the memory maps for each parameter. • When using Bit Data Bit Data (Read Only) : Function [02H] Relative Address 0000H 0001H 0002H 0003H 0004H 0005H : Coil No. Type 10001 Bit 10002 10003 10004 10005 Bit 10006 : : Memory Contents Alarm1 ON/OFF (Reserved) (Reserved) (Reserved) Alarm2 ON/OFF (Reserved) : Read-out Data 0:Alarm1 OFF, 1:Alarm1 ON 0:Alarm2 OFF, 1:Alarm2 ON : The item Nos. here are the LT addresses. Ex. For the parameter “Alarm1 ON/OFF” of Coil No. 10001, the LT’s designated address is as follows. Use the first digit of the Coil No. (00001~, 10001~) to designate the device. 1 0001 Address (The last four digits of the Coil No.) Device (The first digit of the Coil No.) Ex. For the parameter “front surface control SV data” of Register No. 41003, the LT’s designated address is as follows. Use the first two digits of the Register No.s 30001~, 40001~, 31001~ and 41001~ to designate the device. 41 003 Address (The last three digits of the Coil No.) Device (The first two digits of the Coil No.) The Controller’s parameter data, when data transfer is performed, will have no decimal places. Thus, in the LT, processing must be performed to correct the data. For example, if a numeric display is used that in includes decimal places, the “Data Type” and “No. of Decimals” settings must be used. Also, when writing data to a Controller, it is necessary to write decimal values as integers. Ex. Register No. 41025’s “Output 1 Lower Limit” Controller Display/Setting Value : 3.00% LT value/setting : 300 Also, refer to “Instruction Manual for Fuji Electric Co., Ltd.’s MICRO CONTROLLER X COMMUNICATION FUNCTIONS (RS485 MODBUS)” for details (with/without a decimal point) about data item setting value ranges. 2-7-6 LogiTouch Editor Ver.1.0 External Device Connection Manual Chapter 2 - Indicating Controllers 2.7 Fuji Electronic Corporation Controllers When setting parts in LT Editor, the Controller communication unit No. can be specified during address input. If a communication unit No. is not indicated, the previously entered communication unit No. is automatically used. (The default value is 1) 01/10001 Address ( Parameter No.) Controller’s Station No. Enter the desired Controller Unit No. The LT’s system area (LS0 to LS19) cannot be allocated for the Controller and should not be used. (De-select all system area selection.) The Controller’s read area can be used as normal. LogiTouch Editor Ver.1.0 External Device Connection Manual 2-7-7 2.7 Fuji Electronic Corporation Controllers 2.7.4 Chapter 2 - Indicating Controllers Environment Setup The following table lists the recommended Controller and LT communication settings. Micro-Controller X Series (Model:PXR) LT Settings Controller Settings Baud Rate 9600 bps (Fixed) -------- -------- Data Length 8 bits (Fixed) -------- -------- Stop Bit 1 bit (Fixed) -------- -------- Parity Bit Odd Data Flow control ER -------- -------- 2-wire type -------- -------- Communication Format (using RS-422) Unit No. *1 1 Parity Settings (CoM) Unit Station No. (Stno) 0 : Odd 1 *1 It is possible to set a Controller communication unit No.from 0 to 255, however, the LT can only be set from 1 to 32. Zero cannot be used because it means “Communication function stop”. The Read-in area can be used in the Controller that has set the Unit No. here. 2-7-8 LogiTouch Editor Ver.1.0 External Device Connection Manual Chapter 2 - Indicating Controllers 2.7.5 2.7 Fuji Electronic Corporation Controllers Error Code Controller error codes are displayed by the “Host Communication Error (02:**:##)”, and indicated in the left lower corner of the LT screen ** indicates the Controller’s error code, and ## indicates the number of the Controller unit. However, when “the PLC is not correctly connected (02:FF)”, the unit number will not be shown. Error Code Meaning 01 Illegal function 02 Illegal data address 03 Illegal data value For more details about error codes, see Instruction Manual for Fuji Electric Co,. Ltd.’s MICRO CONTROLLER X COMMUNICATION FUNCTION (RS485 MODBUS) LogiTouch Editor Ver.1.0 External Device Connection Manual 2-7-9 2.7 Fuji Electronic Corporation Controllers Chapter 2 - Indicating Controllers 12345678901234567890123456789012123456789012 12345678901234567890123456789012123456789012 12345678901234567890123456789012123456789012 12345678901234567890123456789012123456789012 12345678901234567890123456789012123456789012 12345678901234567890123456789012123456789012 12345678901234567890123456789012123456789012 12345678901234567890123456789012123456789012 12345678901234567890123456789012123456789012 12345678901234567890123456789012123456789012 12345678901234567890123456789012123456789012 12345678901234567890123456789012123456789012 12345678901234567890123456789012123456789012 12345678901234567890123456789012123456789012 12345678901234567890123456789012123456789012 12345678901234567890123456789012123456789012 MEMO 2-7-10 LogiTouch Editor Ver.1.0 External Device Connection Manual Chapter 2 - Indicating Controllers 2.8 2.8 Toho Electronic Inc. Controllers Toho Electronics Inc. Controllers 2.8.1 System Structure The following describes the system configuration used when connecting the LT to this Controller. ! Important • After the Controller's power is turned ON, no communication is performed for about four seconds. As a result, note that it may take several seconds to start communication when the LT and the Controller are turned ON at the same time. • When a save request command is sent to the Controller (STR write command), it can take up to six seconds for the controller to respond. At this time, note that the communication speed may slow significantly, which is indicated by the slowing of the update frequency of the LT display, as the LT enters the standby state. TTM-004/X04 Temperature Controller TTM-004--A TTM-X04-- Cable Diagram LT RS-422 (2-wire type) <Cable diagram 1> RS-422 (2-wire type, 1:n) <Cable diagram 3> LT Type-C Cable Diagram LT RS-422 (2-wire type) <Cable diagram 1> RS-422 (2-wire type, 1:n) <Cable diagram 3> LT Type-C TTM-00B Temperature Controller TTM-00B-- LogiTouch Editor Ver.1.0 External Device Connection Manual 2-8-1 Chapter 2 - Indicating Controllers 2.8 Toho Electronic Inc. Controllers TTM-10L Temperature Controller Cable Diagram TTM-10L--- LT RS-422 (2-wire type) <Cable diagram 1> RS-232C <Cable diagram 2> LT Type-C RS-422 (2-wire type, 1:n) <Cable diagram 3> TTM-100B Temperature Controller Cable Diagram LT TTM-100B4- - - TTM-100B8- - - RS-422 (2-wire type) <Cable diagram 1> RS-422 (2-wire type, 1:n) <Cable diagram 3> LT Type-C Cable Diagram LT RS-422 (2-wire type) <Cable diagram 1> RS-422 (2-wire type, 1:n) <Cable diagram 3> LT Type-C TTM-110 Series Temperature Controller TTM-114-- -- TTM-115-- -- TTM-117-- -- TTM-119-- -- 2-8-2 LogiTouch Editor Ver.1.0 External Device Connection Manual Chapter 2 - Indicating Controllers 2.8 Toho Electronic Inc. Controllers TTM-110B Series Temperature Controller Cable Diagram LT TTM-110B-- -- RS-422 (2-wire type) <Cable diagram 1> RS-422 (2-wire type, 1:n) <Cable diagram 3> LT Type-C Cable Diagram LT RS-422 (2-wire type) <Cable diagram 1> RS-422 (2-wire type, 1:n) <Cable diagram 3> LT Type-C Cable Diagram LT RS-422 (2-wire type) <Cable diagram 1> RS-422 (2-wire type, 1:n) <Cable diagram 3> LT Type-C TTM-120 Series Temperature Controller TTM-124-- -- TTM-125-- -- TTM-127-- -- TTM-129-- -- TTM-300 Series Temperature Controller TTM-304--N-- TTM-305--N-- TTM-309--N-- LogiTouch Editor Ver.1.0 External Device Connection Manual 2-8-3 2.8 Toho Electronic Inc. Controllers Chapter 2 - Indicating Controllers TTM-300B Temperature Controller TTM-300B--N-- Cable Diagram LT RS-422 (2-wire type) <Cable diagram 1> RS-422 (2-wire type, 1:n) <Cable diagram 3> LT Type-C Cable Diagram LT TTM-1020 Series Temperature Controller TTM-1520- - -- TTM-1521- - -- TTM-1522- - -- TTM-1523- - -- TTM-1524- - -- TTM-1525- - -- TTM-1920- - -- TTM-1921- - -- TTM-1922- - -- TTM-1923- - -- TTM-1924- - -- TTM-1925- - -- 2-8-4 RS-422 (2-wire type) <Cable diagram 1> RS-422 (2-wire type, 1:n) <Cable diagram 3> LT Type-C LogiTouch Editor Ver.1.0 External Device Connection Manual Chapter 2 - Indicating Controllers 2.8.2 2.8 Toho Electronic Inc. Controllers Cable Diagrams The cable diagrams shown below and the cable diagrams recommended by Toho Electronics Inc. may differ, however, using these cables for your Controller’s operations will not cause any problems. ! Important • RS-422 connector terminal numbers will differ depending on the controller model. Prior to performing wiring, refer to your controller's User Manual. • When using RS-232C format, all cables must be 15 meters or less. With RS-422 format, all cables must be 50 meters long or less. Cable Diagram 1 (1:1) RS-422 (2-wire type) • Using Digital's RS-422 connector terminal adapter GP070-CN10-0 LT(25p male) GP070-CN10-0 Shield Controller Terminal Block T/R(A) T/R(B) RDA RDB SDA SDB TERM SG FG 75Ω Ω • Using Digital’s RS-422 Cable GP230-IS11-0 Controller Terminal Block LT (25p male) GP230-IS11-0 RDA RDB SDA SDB SG FG T/R(A) T/R(B) Ω 75Ω Note: Be sure that RDA - SDA and RDB - SDB are both connected to the Controller terminal block. ! Since the SG and FG lines cannot be connected to the controller terminal block, be sure to cover them with insulating tape. Important LogiTouch Editor Ver.1.0 External Device Connection Manual 2-8-5 Chapter 2 - Indicating Controllers 2.8 Toho Electronic Inc. Controllers • When making your own cables LT (25P male) 1 FG 7 SG 9 TRMX 10 RDA 16 RDB 11 SDA 15 SDB 18 CSB 19 ERB 21 CSA 22 ERA Note: Shield Controller Terminal Block T/R(A) T/R(B) 75Ω Ω When connecting the No.9 pin and No.10 pin in the LT Serial I/F, a termination resistance of 100W is added between RDA and RDB. Cable Diagram 2 RS-232C LT (25P male) Shield 1 FG 2 SD 3 RD 4 RS 5 CS 6 NC 7 SG 8 CD 20 ER 2-8-6 Controller Terminal Block 9T 8R 7 SG LogiTouch Editor Ver.1.0 External Device Connection Manual Chapter 2 - Indicating Controllers 2.8 Toho Electronic Inc. Controllers Cable Diagram 3 (1:n) RS-422 ! Ground a shielded cable in accordance with the electrical requirements Important of your system, using one of the following three methods. (1) Distributed grounding (as shown below) (2) Parallel grounding, or (3) Serial grounding. • Using Digital's RS-422 connector terminal adapter GP070-CN10-0 GP070-CN10-0 Shield RDA RDB SDA SDB TERM SG FG Controller Shield Controller Shield Controller No.1 No.n No.2 T/R(A) T/R(A) T/R(A) T/R(B) T/R(B) T/R(B) Ω 75Ω • Using Digital's RS-422 cable, GP230-IS11-0 Shield Shield Controller Controller Controller No.1 No.2 No.n LT GP230-IS11-0 Note: ! Important RDA RDB SDA SDB SG FG T/R(A) T/R(B) T/R(A) T/R(B) T/R(A) T/R(B) 75Ω Ω Be sure that RDA - SDA and RDB - SDB are both connected to the Controller terminal block. Since the SG and FG lines cannot be connected to the controller terminal block, be sure to cover them with insulating tape. LogiTouch Editor Ver.1.0 External Device Connection Manual 2-8-7 Chapter 2 - Indicating Controllers 2.8 Toho Electronic Inc. Controllers • When making your own cable connections LT (25P male) 1 FG 7 SG 9 TRMX 10 RDA 16 RDB 11 SDA 15 SDB 18 CSB 19 ERB 21 CSA 22 ERA Note: 2-8-8 Shield Shield Shield Controller No.1 T/R(A) T/R(B) Controller No.2 T/R(A) T/R(B) Controller No.n Ω 75Ω T/R(A) T/R(B) When connecting the No.9 pin and No.10 pin in the LT Serial I/F, a termination resistance of 100W is added between RDA and RDB. LogiTouch Editor Ver.1.0 External Device Connection Manual Chapter 2 - Indicating Controllers 2.8.3 2.8 Toho Electronic Inc. Controllers Supported Devices The following list shows the range of devices supported by the LT. ! Important • The Controller identifiers "1" and "2" (refer to your Controller's User Manual) are assigned to predefined addresses and devices. As a result, when you enter devices on the LT Editor, do so as shown below. Device Selection (Select from 00_, 10_, 100_, 110_, 120_, 300_ or1020_) Address Selection (Refer to Supported Devices List on following pages.) Enter the Controller's Communication Unit No. (Station No.) • Each identifier has read and write limitations detailed information, refer to your Controller's Instruction Manual. For details about precautions when using identifier "2" with LT Editor, refer to TTM-300 Series Supported Device’s *1 or *2. • When using a LT and a Controller, no area is available for assigning the LT's System Area (LS0 to LS19) in the LT. Therefore, DO NOT use the System Area (deselect the System Area for all devices). You can use the Read Area as usual. • When you save data to your Controller's EEPROM (send a Save request), write it in the device address corresponding to symbol STR or identifier STR. For the TTM-300 series, this procedure is not needed since it saves data directly to the EEPROM. • When saving data to the EEPROM, write the data to the device address that corresponds to your Controller's STR identifier. • In the Read Area, only the devices "00_","10_","100_", "110_", "120_ ,"300_" and "1020_" can be set. All other devices, "SSV" ,"END", "STI", "SOK", "SWZ", "SWT", "SON", "SOF", "SRN" and "SEO" cannot be used. LogiTouch Editor Ver.1.0 External Device Connection Manual 2-8-9 Chapter 2 - Indicating Controllers 2.8 Toho Electronic Inc. Controllers ! Important • Depending on the Controller's setting conditions, the LT's pre-set setting values may be used. Refer to the table as shown below. Model Address Identifier 0 TTM004/X04/00B (00_) 2 ~ 10 23 24 TTM-100B (100_) TTM-110/110B (110_) TTM-120 (120_) TTM-300/300B (300_) TTM-1020 (1020_) 0 0 0 0 4 0 Over Scale Under Scale When an arbitrary identifier has been assigned to the priority screen. (When the display of PR1 to PR9 on the temperature controller is not OFF.) In the case where no setting has been assigned to the priority screen. (When the display of PR1 to PR9 on the temperature controller is OFF.) In the case where the identifier COM has been assigned to the priority screen. PR1 ~ PR9 In the case where the identifier BPS has been assigned to the priority screen. In the case where the identifier ADR has been assigned to the priority screen. In the case where the identifier AWT has been assigned to the priority screen. In the case where the identifier MOD has been assigned to the priority screen. Over Scale PV1 Under Scale Over Scale CJ Under Scale Over Scale PV2 Under Scale Over Scale PV1 Under Scale Over Scale PV1 Under Scale Over Scale PV1 Under Scale Over Scale PV1 Under Scale When the Operation has finished TI Over Scale PV1 Under Scale PV1 0 TTM-10L (10_) Controller Condition Decimal marked values using on LT 32767(0x7FFF) -32768(0x8000) 0011 ~ 0077 *1 -32768(0x8000) 32767(0x7FFF) *2 32766(0x7FFE) *2 32765(0x7FFD) *2 32764(0x7FFC) *2 32763(0x7FFB) *2 32767(0x7FFF) -32768(0x8000) 32767(0x7FFF) -32768(0x8000) 32767(0x7FFF) -32768(0x8000) 32767(0x7FFF) -32768(0x8000) 32767(0x7FFF) -32768(0x8000) 32767(0x7FFF) -32768(0x8000) 32767(0x7FFF) -32768(0x8000) -32768(0x8000) 32767(0x7FFF) -32768(0x8000) *1 Addresses allocated to each identifier. 2.8.3 Supported Devices n TTM-004/X04/00B *2 This identifier cannot be registered as the priority screen function setting (PR1 to PR9) via a LT Write command. To register this function, use the front panel of the temperature controller. 2-8-10 • This device cannot be used as a 32-bit device, since each identifier’s addresses are not consecutive. LogiTouch Editor Ver.1.0 External Device Connection Manual Chapter 2 - Indicating Controllers 2.8 Toho Electronic Inc. Controllers TTM-004/X04/00B Device 00_ Bit Address W ord Address 000000 ~ 000015 0000 000100 ~ 000115 0001 000200 ~ 000215 0002 000300 ~ 000315 0003 000400 ~ 000415 0004 000500 ~ 000515 0005 000600 ~ 000615 0006 000700 ~ 000715 0007 000800 ~ 000815 0008 000900 ~ 000915 0009 001000 ~ 001015 0010 001100 ~ 001115 0011 001200 ~ 001215 0012 001300 ~ 001315 0013 001400 ~ 001415 0014 001500 ~ 001515 0015 001600 ~ 001615 0016 001700 ~ 001715 0017 001800 ~ 001815 0018 001900 ~ 001915 0019 002000 ~ 002015 0020 002100 ~ 002115 0021 002200 ~ 002215 0022 002300 ~ 002315 0023 002400 ~ 002415 0024 002500 ~ 002515 0025 002600 ~ 002615 0026 002700 ~ 002715 0027 002800 ~ 002815 0028 002900 ~ 002915 0029 003000 ~ 003015 0030 003100 ~ 003115 0031 003200 ~ 003215 0032 003300 ~ 003315 0033 003400 ~ 003415 003500 ~ 003515 003600 ~ 003615 003700 ~ 003715 003800 ~ 003815 0034 0035 0036 0037 0038 003900 ~ 003915 0039 004000 ~ 004015 0040 004100 ~ 004115 004200 ~ 004215 004300 ~ 004315 004400 ~ 004415 004500 ~ 004515 004600 ~ 004615 004700 ~ 004715 004800 ~ 004815 004900 ~ 004915 0041 0042 0043 0044 0045 0046 0047 0048 0049 Controller S etting item Process value PV Setting value SV Priority display set 1 Priority display set 2 Priority display set 3 Priority display set 4 Priority display set 5 Priority display set 6 Priority display set 7 Priority display set 8 Priority display set 9 Set/select of input Gain for PV correction Zero point for PV correction Filter input Decimal position Function by FUNC Key Lock SV H limit SV L limit Control mode Control type Set/select of normal or reverse Output1, manipulated value Tuning type AT coefficient AT sensitivity Output 1, proportional band Integral time Derivative time Output 1, proportional cycle Anti reset wind-up Setting of H limit for Output 2 MV limitter Setting of L limit for Output 2 MV limitter Output 1, control sensitivity Output 1, OFF position Output 2, manipulated value Output 2, proportional band Output 2, proportional cycle Setting of H limit for Output 2 MV limitter Setting of L limit for Output 2 MV limitter Manual reset Output 2, control sensitivity Output 2, OFF position Dead band EV 1, function EV 1, H limit EV 1, L limit EV 1, sensitivity EV 1, delay timer LogiTouch Editor Ver.1.0 External Device Connection Manual I dentifiers PV1 SV1 PR1 PR2 PR3 PR4 PR5 PR6 PR7 PR8 PR9 INP PVG PVS PDF DP FU LOC SLH SLL MD CNT DIR MV1 TUN ATG ATC P1 I1 D1 T1 ARW Others MH1 ML1 C1 CP1 MV2 P2 T2 MH2 ML2 PBB C2 CP2 DB E1F E1H E1L E1C E1T 2-8-11 Chapter 2 - Indicating Controllers 2.8 Toho Electronic Inc. Controllers Device 00_ Bit Address Word Address 005000 ~ 005015 0050 005100 ~ 005115 0051 005200 ~ 005215 0052 005300 ~ 005315 0053 005400 ~ 005415 0054 005500 ~ 005515 0055 005600 ~ 005615 0056 005700 ~ 005715 0057 005800 ~ 005815 0058 005900 ~ 005915 0059 006000 ~ 006015 006100 ~ 006115 006200 ~ 006215 006300 ~ 006315 006400 ~ 006415 006500 ~ 006515 006600 ~ 006615 006700 ~ 006715 006800 ~ 006815 006900 ~ 006915 007000 ~ 007015 007100 ~ 007115 0060 0061 0062 0063 0064 0065 0066 0067 0068 0069 0070 0071 0072 0073 0074 0075 007300 ~ 007315 007400 ~ 007415 2-8-12 Controller Setting item Abnormal SV/heater function EV 1, polarity CT input EV 1, abnormal current of heater EV 2, function EV 2, H limit EV 2, L limit EV 2, sensitivity EV 2, delay timer EV 2, abnormal SV/ heater function EV 2, polarity CT input EV 2, abnormal current of heater DI input Polarity of DI Control setting 2 Timer output Timer function Timer unit switch Allowable width for timer SV start Time setting Monitor of remaining time Timer start/stop Output monitor AT start/stop Data store Identifier E1B E1P CM1 CT1 E2F E2H E2L E2C E2T other E2B E2P CM2 CT2 DIF DIP SV2 TMO TMF H/M TSV TIM TIA TST OM1 AT STR LogiTouch Editor Ver.1.0 External Device Connection Manual Chapter 2 - Indicating Controllers 2.8 Toho Electronic Inc. Controllers TTM-10L Device 10_ Bit Address W ord Address 000000 ~ 000015 0000 000100 ~ 000115 0001 000200 ~ 000215 0002 000300 ~ 000315 0003 000400 ~ 000415 0004 000500 ~ 000515 0005 000600 ~ 000615 0006 000700 ~ 000715 0007 000800 ~ 000815 0008 000900 ~ 000915 0009 001000 ~ 001015 0010 001100 ~ 001115 0011 001200 ~ 001215 0012 001300 ~ 001315 0013 001400 ~ 001415 0014 001500 ~ 001515 0015 001600 ~ 001615 0016 001700 ~ 001715 0017 001800 ~ 001815 0018 001900 ~ 001915 0019 002000 ~ 002015 0020 002100 ~ 002115 0021 002200 ~ 002215 0022 002300 ~ 002315 0023 002400 ~ 002415 0024 0025 Controller S etting Item Process Variable (PV) Control Setting Value (SV) EV L. Limit Set EV H. Limit Set Auto-Tuning Start/Release Proportional Band Integral Time Derivative Time P-cycle Time Control Sensitivity Set/Select of Input/Output L. Limit of SV Limiter H. Limit of SV Limiter Control Type PV Correction Manual Reset OFF Position EV Function EV Sensitivity Decimal Point Position Selection of C/F Setting of Lock Function Temperature of cooling contact compensation Process Variable (PV) with decimal point Output state monitor Data store LogiTouch Editor Ver.1.0 External Device Connection Manual Identifier PV1 SV 1L1 1H1 AT P1 I1 D1 T1 C1 IO SLL SLH CNT PVS PBB CP A1F ALC DP CF LOC Other CJ PV2 OM1 STR 2-8-13 Chapter 2 - Indicating Controllers 2.8 Toho Electronic Inc. Controllers TTM-100B Series Device 100_ 2-8-14 Bit Address 000000 ~ 000015 000100 ~ 000115 000200 ~ 000215 000300 ~ 000315 000400 ~ 000415 000500 ~ 000515 000600 ~ 000615 000700 ~ 000715 000800 ~ 000815 000900 ~ 000915 001000 ~ 001015 001100 ~ 001115 001200 ~ 001215 001300 ~ 001315 001400 ~ 001415 001500 ~ 001515 Word Address 0000 0001 0002 0003 0004 0005 0006 0007 0008 0009 0010 0011 0012 0013 0014 0015 001600 ~ 001615 0016 001700 ~ 001715 001800 ~ 001815 001900 ~ 001915 002000 ~ 002015 002100 ~ 002115 002200 ~ 002215 002300 ~ 002315 002400 ~ 002415 002500 ~ 002515 002600 ~ 002615 002700 ~ 002715 0017 0018 0019 0020 0021 0022 0023 0024 0025 0026 0027 002800 ~ 002815 0028 002900 ~ 002915 003000 ~ 003015 003100 ~ 003115 0029 0030 0031 0032 Controller Setting Item Process value (PV) Control set value (SV) Main control MV (OUT1) Main control MV (OUT2) Auto-tuning start/release Alarm 1 L limit set Alarm 1 H limit set Main control P-band Integral time Derivative time Output 1 P-cycle time Output 1 sensitivity Output 2 P-band Output 2 P-cycle time Output 2 sensitivity Dead Band Cooling Point of Contact Compensation Set/Select of Input/Output Setting of L limit for OUT1 MV Limiter Setting of H limit for OUT1 MV Limiter Setting of L limit of SV Limiter Setting of H limit of SV Limiter Control action select Setting of sensor value correction Manual reset value Alarm 1 function AL output sensitivity Heater abnormal current Selection of data transmission function Selection of C/F Output state monitor Response Delay Speed Data store PV PV1 SV MV1 MV2 AT 1L1 1H1 P1 I1 D1 T1 C1 PC1 TC1 CC1 DB1 Other CJ IO MLL MLH SLL SLH CNT PVS PBB A1F ALC CT TR1 CF OM1 AWT STR LogiTouch Editor Ver.1.0 External Device Connection Manual Chapter 2 - Indicating Controllers 2.8 Toho Electronic Inc. Controllers TTM-110 Series(TTM-114, 115, 117, 119)/110B Device Bit Address 000000 ~ 000015 000100 ~ 000115 000200 ~ 000215 000300 ~ 000315 000400 ~ 000415 000500 ~ 000515 000600 ~ 000615 000700 ~ 000715 000800 ~ 000815 000900 ~ 000915 001000 ~ 001015 001100 ~ 001115 001200 ~ 001215 001300 ~ 001315 001400 ~ 001415 001500 ~ 001515 001600 ~ 001615 001700 ~ 001715 001800 ~ 001815 001900 ~ 001915 002000 ~ 002015 Word Address 0000 0001 0002 0003 0004 0005 0006 0007 0008 0009 0010 0011 0012 0013 0014 0015 0016 0017 0018 0019 0020 002100 ~ 002115 0021 002200 ~ 002215 0022 002300 ~ 002315 002400 ~ 002415 002500 ~ 002515 0023 0024 0025 002600 ~ 002615 0026 002700 ~ 002715 002800 ~ 002815 002900 ~ 002915 003000 ~ 003015 003100 ~ 003115 003200 ~ 003215 0027 0028 0029 0030 0031 0032 003300 ~ 003315 0033 003400 ~ 003415 003500 ~ 003515 003600 ~ 003615 003700 ~ 003715 003800 ~ 003815 0034 0035 0036 0037 0038 0039 0040 0041 110_ 004000 ~ 004015 Controller Setting Item Process Value (PV) Control Set Value (SV) Main Control MV (OUT 1) Sub-Control MV (OUT 2) Timer Remainder Time Auto-Tuning Start/Release Time Setting On Timer Alarm 1 L. Limit Set Alarm 1 H. Limit Set Alarm 2 L. Limit Set Alarm 2 H. Limit Set Main Control P-band Integral Time Derivative Time Output 1 P-cycle Time Output 1 Sensitivity Output 2 P-band Output 2 P-cycle Time Output 2 Sensitivity Dead Band Set/Select of Input/Output Type Setting of L. Limit For Out 1 MV Limiter Setting of H. Limit For Out 1 MV Limiter Setting of H. Limit of SV Limiter Setting of L. Limit of SV Limiter Control Action Select Setting of Sensor Value Correction Manual Reset Value Timer Operation Mode Alarm 1 Function Alarm 2 Function AL Output Sensitivity Heater Abnormal Current Selection of Data Transmission Function Decimal Point Position Selection of C/F Buzzer Sound Setting Setting of Lock Function Output State Monitor Timer Reset Run/Ready Status Data Store LogiTouch Editor Ver.1.0 External Device Connection Manual Identifier PV1 SV MV1 MV2 TIA AT TIM 1L1 1H1 2L1 2H1 P1 I1 D1 T1 C1 PC1 TC1 CC1 DB1 IO Other MLL MLH SLL SLH CNT PVS PBB TMM A1F A2F ALC CT TR1 DP CF BU LOC OM1 TMS RUN STR 2-8-15 Chapter 2 - Indicating Controllers 2.8 Toho Electronic Inc. Controllers TTM-120 Series (TTM-124, 125, 127, 129) Device 120_ 2-8-16 Bit Address 000000 ~ 000015 000100 ~ 000115 000200 ~ 000215 000300 ~ 000315 000400 ~ 000415 000500 ~ 000515 000600 ~ 000615 000700 ~ 000715 000800 ~ 000815 000900 ~ 000915 001000 ~ 001015 001100 ~ 001115 001200 ~ 001215 001300 ~ 001315 001400 ~ 001415 001500 ~ 001515 001600 ~ 001615 001700 ~ 001715 001800 ~ 001815 001900 ~ 001915 002000 ~ 002015 002100 ~ 002115 Word Address 0000 0001 0002 0003 0004 0005 0006 0007 0008 0009 0010 0011 0012 0013 0014 0015 0016 0017 0018 0019 0020 0021 002200 ~ 002215 0022 002300 ~ 002315 0023 002400 ~ 002415 002500 ~ 002515 002600 ~ 002615 002700 ~ 002715 0024 0025 0026 0027 002800 ~ 002815 0028 002900 ~ 002915 003000 ~ 003015 0029 0030 003100 ~ 003115 0031 003200 ~ 003215 003300 ~ 003315 003400 ~ 003415 003500 ~ 003515 0032 0033 0034 0035 003600 ~ 003615 0036 003700 ~ 003715 003800 ~ 003815 003900 ~ 003915 004000 ~ 004015 004100 ~ 004115 004200 ~ 004215 0037 0038 0039 0040 0041 0042 0043 Controller Setting Item Process Value (PV) Control Set Value (SV) Control Mode Main Control MV (OUT1) Sub-Control MV (OUT2) Auto-Tuning Start/Release Alarm 1L Limit Set Alarm 1H Limit Set Alarm 2L Limit Set Alarm 2H Limit Set Output 1 P-band Integral Time Derivative Time Output 1 P-cycle Time Output 1 Senstivity Main Control OFF Position Output 2 P-band Output 2 P-cycle Time Output 2 Sensitivity Output 2 OFF Position Dead Band Set/Select of Input/Output Type Setting of L. Limit for Out1 MV Limiter Setting of H. Limit for Out1 MV Limiter Setting of L. Limit of SV Limiter Setting of H. Limit of SV Limiter Control Action Select Rump Time of SV1 Setting of Sensor Value correction Digital PV Filter Manual Reset Value Swiching for Balanceless Bumpless Alarm 1 Function Alarm 2 Function AL Output Sensitivity Heater Abnormal Current Selection of Data Transmission Function DI Function Decimal Point Position Selection of C/F Buzzer Sound Setting Setting of Lock Output State Monitor Data Store Identifier PV1 AV MD1 MV1 MV2 AT 1L1 1H1 2L1 2H1 P1 I1 D1 T1 C1 CP PC1 TC1 CC1 CCP DB1 I0 Other MLL MLH SLL SLH CNT RP1 PVS PDF PBB BB A1F A2F ALC CT TR1 DI DP CF BU LOC OM1 STR LogiTouch Editor Ver.1.0 External Device Connection Manual Chapter 2 - Indicating Controllers 2.8 Toho Electronic Inc. Controllers TTM-300 Series (TTM-304, 305, 309)/300B Device 300_ Bit Address 000000 ~ 000015 000100 ~ 000115 000200 ~ 000215 000300 ~ 000315 000400 ~ 000415 000500 ~ 000515 000600 ~ 000615 SSV 000800 ~ 000815 000900 ~ 000915 000000 ~ 204715 END 000000 ~ 204715 STI 000000 ~ 204715 SOK 000000 ~ 204715 SWZ 000000 ~ 204715 SWT SON 000000 ~ 204715 000000 ~ 204715 Word Address 0000 0001 0002 0003 0004 0005 0006 0007 0008 0009 Controller Setting Item Identifier Process Value (PV) PV1 Mode change MD Control Setting Value (SV) SV Run Step Setting Value (SV) OSV The time elapsed TI Run step setting time OTI Count numbers of time executed SRR Step forward function execution ADV Pattern number PT Step number ST Step temperature setting SSV 0000 ~ 2047 *1 0000 ~ 2047 *1 Final step setting END 0000 ~ 2047 *1. Step time setting STI 0000 ~ 2047 *1 Final step finish condition setting SOK 0000 ~ 2047 *1 Step wait zone SWZ 0000 ~ 2047 *1 Step wait time SWT 0000 ~ 2047 *1 Time signal ON time SON SOF 000000 ~ 204715 0000 ~ 2047 *1 Time signal OFF time SOF SRN 000000 ~ 200015 0000 ~ 2000 *2 Execution time SRN SEO 000000 ~ 200015 001000 ~ 001015 001100 ~ 001115 001200 ~ 001215 001300 ~ 001315 001400 ~ 001415 001500 ~ 001515 001600 ~ 001615 001700 ~ 001715 001800 ~ 001815 001900 ~ 001915 002000 ~ 002015 002100 ~ 002115 002200 ~ 002215 002300 ~ 002315 002400 ~ 002415 002500 ~ 002515 002600 ~ 002615 002700 ~ 002715 002800 ~ 002815 002900 ~ 002915 003000 ~ 003015 003100 ~ 003115 0000 ~ 2000 0010 0011 0012 0013 0014 0015 0016 0017 0018 0019 0020 0021 0022 0023 0024 0025 0026 0027 0028 0029 0030 0031 *2 End signal ON time Pattern numbers Step numbers PV correction Change C/ F Type of Control Type of Input/Output Select decimal position Mainipulated value limiter Low Manipulated value limiter High Setting of L. limit of SV limiter Setting of H. limit of SV limiter Select PV start or SV start SV start setting value Select Start at Power ON Event Output 1 function PV Event Output 1 function Event Output 1 Low limit Event Output 1 High limit Event Output 1 sensitivity Time signal 1 Output mode Time signal 1 ON time Time signal 1 OFF time Event output 1 unusual looping time Event Output 2 function PV Event Output 2 function Event Output 2 Low limit SEO PAT STP PVS CF CNT IO DP MLL MLH SLL SLH PSV SVS PON DO1 A1F A1L A1H A1C TF1 ON1 OF1 300_ 003200 ~ 003215 0032 003300 ~ 003315 003400 ~ 003415 003500 ~ 003515 0033 0034 0035 LogiTouch Editor Ver.1.0 External Device Connection Manual Other LT1 DO2 A2F A2L 2-8-17 Chapter 2 - Indicating Controllers 2.8 Toho Electronic Inc. Controllers Device 300- Bit Address 003600 ~ 003615 003700 ~ 003715 003800 ~ 003815 003900 ~ 003915 004000 ~ 004015 Word Address 0036 0037 0038 0039 0040 004100 ~ 004115 0041 004200 ~ 004215 004300 ~ 004315 004400 ~ 004415 004500 ~ 004515 004600 ~ 004615 004700 ~ 004715 004800 ~ 004815 004900 ~ 004915 005000 ~ 005015 005100 ~ 005115 005200 ~ 005215 005300 ~ 005315 005400 ~ 005415 005500 ~ 005515 005600 ~ 005615 0042 0043 0044 0045 0046 0047 0048 0049 0050 0051 0052 0053 0054 0055 0056 005700 ~ 005715 0057 005800 ~ 005815 0058 005900 ~ 005915 0059 006000 ~ 006015 0060 006100 ~ 006115 0061 006200 ~ 006215 0062 0063 0064 0065 0066 006700 ~ 006715 2-8-18 0067 Controller Setting Item Identifier Event Output 2 High limit A2H Event Output 2 sensitivity A2C Time signal 2 Output mode TF2 Time signal 2 ON time ON2 Time signal 2 OFF time OF2 Event output 2 unusual looping LT2 time Key lock function LOC Output condition monitor OM1 [Low temperature] Proportional P1 [Low temperature] Integrated time I1 [Low temperature] Differential time D1 Middle point 1 setting PM1 [Middle temperature] Proportional P2 [Middle temperature] Integrated I2 [Middle temperature] Differential D2 Middle point 2 setting PM2 [High temperature] Proportional P3 [High temperature] Integrated time I3 [High temperature] Differential time D3 Proportional Cycle T Fuzzy constant FUZ Control sensitivity to [Low C1 temperature] Control sensitivity to [Middle C2 temperature] Control sensitivity to [High C3 temperature] Auto-tuning setting value of [High AT1 temperature] Auto-tuning setting value of [Middle AT2 temperature] Auto-tuning setting value of [High AT3 temperature] Auto-tuning execution of [Low AP1 temperature] Auto-tuning execution of [Middle AP2 temperature] Auto-tuning execution of [High AP3 temperature] Auto-tuning execution of [Low]AP4 >[Middle]->[High] temperature Auto-tuning under execution ATR Other LogiTouch Editor Ver.1.0 External Device Connection Manual Chapter 2 - Indicating Controllers 2.8 Toho Electronic Inc. Controllers *1 When using identifiers from SSV to SOF with a TTM-300 series unit, use the Device Name as the identifier, and the Step No. and Pattern No. as the address. The maximum values available for the pattern number and the step number that can be set on a LT are 20 and 47, respectively. Specify them as shown below. Ex. Device SSV Bit Address 000000 ~ 204715 Word Address 0000 ~ 2047 Control Setting Item Step Temperature Setting Identifier SSV 01/SSV0000 Step No. Pattern No. Controller’s Station No. *2 When using identifier SRN or SEO with the TTM-300 series unit, use the Device Name as the identifier, and the Step No. and Pattern No. as the address. The maximum values available for the pattern number and the step number that can be set on a LT is 20, respectively. Specify them as shown below. Ex. Device SRN Bit Address 000000 ~ 200015 Word Address 0000 ~ 2000 Controller Setting Item Execution Time Identifier SRN 01/SRN0000 0 (Fixed) Pattern No. Controller’s Station No. When entering addresses for identifiers SSV to SEO with a TTM-300 series unit, be sure to refer *1 or *2 above. Device Selection (Select from SSV, END, STI, SOK, SWZ, SWT, SON, SOF, SRN or SEO) Address Selection (Step No. or Pattern No.) Enter the Controller’s Station No. LogiTouch Editor Ver.1.0 External Device Connection Manual 2-8-19 Chapter 2 - Indicating Controllers 2.8 Toho Electronic Inc. Controllers TTM-1020 Series(TTM-1520, 1521, 1522, 1523, 1524, 1525, 1920, 1921, 1922, 1923, 1924, 1925) Device 1020_ 2-8-20 Bit Address 000000 ~ 000015 000100 ~ 000115 000200 ~ 000215 000300 ~ 000315 000400 ~ 000415 000500 ~ 000515 000600 ~ 000615 000700 ~ 000715 000800 ~ 000815 000900 ~ 000915 001000 ~ 001015 001100 ~ 001115 001200 ~ 001215 001300 ~ 001315 001400 ~ 001415 001500 ~ 001515 001600 ~ 001615 Word Address 0000 0001 0002 0003 0004 0005 0006 0007 0008 0009 0010 0011 0012 0013 0014 0015 0016 001700 ~ 001715 0017 001800 ~ 001815 001900 ~ 001915 002000 ~ 002015 002100 ~ 002115 002200 ~ 002215 002300 ~ 002315 002400 ~ 002415 002500 ~ 002515 002600 ~ 002615 002700 ~ 002715 002800 ~ 002815 002900 ~ 002915 0018 0019 0020 0021 0022 0023 0024 0025 0026 0027 0028 0029 003000 ~ 003015 0030 003100 ~ 003115 0031 003200 ~ 003215 003300 ~ 003315 003400 ~ 003415 003500 ~ 003515 003600 ~ 003615 003700 ~ 003715 003800 ~ 003815 003900 ~ 003915 0032 0033 0034 0035 0036 0037 0038 0039 Controller Setting Item Identifier Process Value (PV) PV1 CH No. CH Control Setting Value (SV) SV SV1 SV1 Set/Select of Auto/Manual MD1 Set/Select of Remote/Local REM Main Control MV (Out 1) MV1 Main Control MV (Out 2) MV2 Auto-Tuning Start/Release AT SV2 SV2 SV3 SV3 SV4 SV4 SV5 SV5 SV6 SV6 SV7 SV7 SV8 SV8 Set/Select of Input/Output Type IO Setting of Sensor Value PVS Correction Decimal Point Position DP Selection of C/F CF Setting of L. Limit of SV Limiter SLL Setting of H.Limit of SV Limiter SLH Setting of Lock Function LOC Control Action Select CNT Proportional band P1 Integrated time I1 Differential time D1 Output 1 P-cycle Time T1 Control sensitivity C1 Manual Reset Value PBB Setting of L. Limit for Out 1 MV MLL Limiter Setting of H. Limit for Out 1 MV MLH Limiter Setting for unusual FAL Cooling P-band PC1 Cooling P-cycle time TC1 Cooling Sensitivity CC1 Dead Band DB1 Setting of L limit of cooling output MCL Setting of H limit of cooling output MCH L limit of cascade scaling CSL Other LogiTouch Editor Ver.1.0 External Device Connection Manual Chapter 2 - Indicating Controllers Device 1020_ Bit Address 004000 ~ 004015 004100 ~ 004115 004200 ~ 004215 004300 ~ 004315 004400 ~ 004415 004500 ~ 004500 004600 ~ 004615 004700 ~ 004715 004800 ~ 004815 004900 ~ 004915 005000 ~ 005015 005100 ~ 005115 005200 ~ 005215 005300 ~ 005315 005400 ~ 005415 005500 ~ 005515 005600 ~ 005615 005700 ~ 005715 005800 ~ 005815 005900 ~ 005915 006000 ~ 006015 006100 ~ 006115 006200 ~ 006215 006300 ~ 006315 006400 ~ 006415 006500 ~ 006515 Word Address 0040 0041 0042 0043 0044 0045 0046 0047 0048 0049 0050 0051 0052 0053 0054 0055 0056 0057 0058 0059 0060 0061 0062 0063 0064 0065 006600 ~ 006615 0066 006700 ~ 006715 0067 006800 ~ 006815 0068 006900 ~ 006915 0069 007000 ~ 007015 0070 007100 ~ 007115 0071 007200 ~ 007215 0072 007300 ~ 007315 0073 007400 ~ 007415 007500 ~ 007515 007600 ~ 007615 0074 0075 0076 0077 LogiTouch Editor Ver.1.0 External Device Connection Manual 2.8 Toho Electronic Inc. Controllers Controller Setting Item H limit of cascade scalling Event 1 Function PV Event 1 Function PV Event 1 Low Limit PV Event 1 High Limit DI 1 Function Event 2 Function PV Event 2 Function PV Event 2 Low Limit PV Event 2 High Limit DI2 Function Event 3 Function PV Event 3 function PV Event 3 Low Limit PV Event 3 High Limit DI3 Function Event 4 Function PV Event 4 Function PV Event 4 Low Limit PV Event 4 High Limit DI4 Function Event 5 Function PV Event 5 Function PV Event 5 Low Limit PV Event 5 High Limit DI5 Function Selection of Data Transmission 1 Function L limit of transmission 1 scaling H limit of transmission 2 scaling Selection of Data Transmission 2 Function L limit of transmission 2 scaling H limit of transmission 2 scaling Close feedback resistance control Open feedback resistance control quota of function Output State Monitor Event condition monitor Data Store Identifier CSH EV1 P1F P1L P1H D1F EV2 P2F P2L P2H D2F EV3 P3F P3L P3H D3F EV4 P4F P4L P4H D4F EV5 P5F P5L P5H D5F Other TR1 T1L T1H TR2 T2L T2H CLS OPN FNC OM1 EM1 STR 2-8-21 Chapter 2 - Indicating Controllers 2.8 Toho Electronic Inc. Controllers 2.8.4 Environment Setup The following table lists the recommended Controller and LT communication settings. LT Settings Baud Rate Data Length Stop Bit Parity Bit Data Flow Control Communication Format (using RS-422) *1 Communication Format (using RS-232C) *1 Unit No. *2 Controller Settings 9600 bps 8 bit 2 bit None ER Baud Rate Data Length Stop Bit Parity Bit 9600 bps 8 bit 2 bit None RS-422 (2-wire) RS-232C 1 to 32 Communication Unit No. 1 to 32 Mode Setting *3 Communication Mode Mode Setting *4 Read/Write *1 Controller cannot switch the Communication Format. When purchasing the Controller, select either an RS-422 or RS-232C. *2 Although the settable range for a machine number on the temperature controllers is 1 to 99, the range for the LT is 1 to 32. *3 This setting is required for models other than the TTM-004/X04 series. When you perform communication between the Controller and the LT, be sure to set your Controller to Data Transfer mode. *4 This setting is required only for the TTM-004/X04 series. When the Controller is set to read-only, rewritable devices will become read-only. 2-8-22 LogiTouch Editor Ver.1.0 External Device Connection Manual Chapter 2 - Indicating Controllers 2.8.5 2.8 Toho Electronic Inc. Controllers Error Code Controller error codes are displayed by the “ Host Communication Error (02:**:##)”, and indicated in the left lower corner of the LT screen ** indicates the Controller’s error code, and ## indicates the number of the Controller unit. Error Code 00 01 02 03 04 05 06 Error Message Flat of the instrument (Memory error or A/D conversion error) Numeric data out of "the setting range respectively specified in each of setting items". Change of an item prohibited, or no item to be read out. Data written to an arbitrary device is out of the range for writing. No device exists in the address specified for the temperature controller connected to LT. Or, data was written to the specified device, even though that device is write protected. An ASCII code other than the numeric data is specified in the place. Or, an ASCII code other than "0" or "-" is specified in the place for the sign. Format error The format of the command from the LT is incorrect due to noise, etc. BCC error The format of commands sent from LT is erroneous due to noise or the like. Overrun error Framing error 07 Parity error 08 09 Meaning Machine Numbers for temperature controllers are overlapping. Or, the format of commands sent from LT is erroneous due to noise or the like. The current Data Transfer Parity setting is incorrect. Or, the format of commands sent from LT is erroneous due to noise or the like. Trouble has happened on PV in process of AT. Or, AT does not be finalized in 3 hours. Depending on the specification of the Controller, if two errors occur at the same time, the larger error number will be displayed. For more details about error codes, refer to the TOHO ELECTRONICS INC.’s COMMUNICATIONS FUNCTION Instructon Manual. LogiTouch Editor Ver.1.0 External Device Connection Manual 2-8-23 2.8 Toho Electronic Inc. Controllers Chapter 2 - Indicating Controllers 12345678901234567890123456789012123456789012 12345678901234567890123456789012123456789012 12345678901234567890123456789012123456789012 12345678901234567890123456789012123456789012 12345678901234567890123456789012123456789012 12345678901234567890123456789012123456789012 12345678901234567890123456789012123456789012 12345678901234567890123456789012123456789012 12345678901234567890123456789012123456789012 12345678901234567890123456789012123456789012 12345678901234567890123456789012123456789012 12345678901234567890123456789012123456789012 12345678901234567890123456789012123456789012 12345678901234567890123456789012123456789012 12345678901234567890123456789012123456789012 12345678901234567890123456789012123456789012 MEMO 2-8-24 LogiTouch Editor Ver.1.0 External Device Connection Manual Chapter 3 Inverters 3 3.1 List of Connectable Inverters Inverters This chapter shows examples of system configuration, supported devices and environment setup used when connecting the inverters to the LT. If communication is halted due to signal cable breakage, LT fault etc., the inverter will not recognize it. 3.1 List of Connectable Inverters The following inverters can be connected to the LT. Company Series Inverter *1 Link I/F or CPU External Device Name direct connection in LT Editor FREQROL-A500 FR-A520-K FR-A540-K FREQROL-A500L FR-A520L-K FR-A540L-K FREQROL-E500 FR-E520-K FR-E540-K FR-E520S-K FR-E510W-K Mitsubishi Electric FREQROL-F500 FR-F520-K Corp. FR-F540-K FREQROL-F500L FR-F520L-K FR-F540L-K FREQROL-S500 FR-S510W-K-R FR-S520-K-R FR-S520S-K-R FREQROL-B,B3 FR-B-K FR-B3-K FRENICS5000G11S FRNG11S-2 MITSUBISHI FREQROL SERIES FRNG11S-4 FRENICS5000P11S FRNP11S-2 Fuji Electric Co., Ltd. FRNP11S-4 FVR-E11S FVRE11S-2 FUJI INVERTER FVRE11S-7 FVR-C11S FVRC11S-2 Option FVRC11S-6 OPC-C11S-RS *2 FVRC11S-7 *1 The “ ” characters in the inverter model codes reflect applicable standard generator capacities. *2 The “ ” character in the option card model code reflects the classification of the card type (either A, B, or C) according to this series inverter capacities. The model codes’ last numbers 2, 4, 6, and 7 indicate 3 phase 200V, 3 phase 400V, single phase 100V, and single phase 200V, respectively. 3-1-1 3.1 List of Connectable Inverters Chapter 3 Inverters 12345678901234567890123456789012123456789012 12345678901234567890123456789012123456789012 12345678901234567890123456789012123456789012 12345678901234567890123456789012123456789012 12345678901234567890123456789012123456789012 12345678901234567890123456789012123456789012 12345678901234567890123456789012123456789012 12345678901234567890123456789012123456789012 12345678901234567890123456789012123456789012 12345678901234567890123456789012123456789012 12345678901234567890123456789012123456789012 12345678901234567890123456789012123456789012 12345678901234567890123456789012123456789012 12345678901234567890123456789012123456789012 12345678901234567890123456789012123456789012 12345678901234567890123456789012123456789012 MEMO 3-1-2 LogiTouch Editor Ver.1.0 External Device Connection Manual Chapter 3 Inverters 3.2 3.2 Mitsubishi Electric Inverters Mitsubishi Electric Inverters 3.2.1 System Structure The following table describes the system structure for connecting the Mitsubishi Electric inverters to the LT. If communication is halted due to signal cable breakage, LT fault etc., the inverter will not recognize it. Use its Communication retry or Communication check to diagnose the problem and prevent an accident. FREQROL-A500 Series Inverter *1 FR-A520-K FR-A540-K Cable Diagram LT RS-422 (4-wire) (Cable Diagram 1) RS-422 (4-wire, 1:n communication) (Cable Diagram 2) LT Type-C *1 “ ” indicates the capacity of each inverter. FREQROL-A500L Series Inverter FR-A520L-K FR-A540L-K *1 Cable Diagram LT RS-422 (4-wire) (Cable Diagram 1) RS-422 (4-wire, 1:n communication) (Cable Diagram 2) LT Type-C *1 “ ” indicates the capacity of each inverter. LogiTouch Editor Ver.1.0 External Device Connection Manual 3-2-1 Chapter 3 3.2 Mitsubishi Electric Inverters Inverters FREQROL-E500 Series Inverter *1 FR-E520-K FR-E540-K FR-E520S-K FR-E510W-K Cable Diagram LT RS-422 (4-wire) (Cable Diagram 1) RS-422 (4-wire, 1:n communication) (Cable Diagram 2) LT Type-C *1 “ ” indicates the capacity of each inverter. FREQROL-F500 Series Inverter *1 FR-F520-K FR-F540-K Cable Diagram LT RS-422 (4-wire) (Cable Diagram 1) RS-422 (4-wire, 1:n communication) (Cable Diagram 2) LT Type-C *1 “ ” indicates the capacity of each inverter. FREQROL-F500L Series Inverter FR-F520L-K FR-F540L-K *1 Cable Diagram LT RS-422 (4-wire) (Cable Diagram 1) RS-422 (4-wire, 1:n communication) (Cable Diagram 2) LT Type-C *1 “ ” indicates the capacity of each inverter. 3-2-2 LogiTouch Editor Ver.1.0 External Device Connection Manual Chapter 3 Inverters 3.2 Mitsubishi Electric Inverters FREQROL-S500 Series Inverter *1 FR-S520-K FR-S520S-K FR-S510W-K Cable Diagram LT RS-422 (4-wire) (Cable Diagram 1) RS-422 (4-wire, 1:n communication) (Cable Diagram 2) LT Type-C *1 “ ” indicates the capacity of each inverter. FREQROL-B/B3 Series Inverter FR-B-K FR-B3-K *1 Cable Diagram LT RS-422 (4-wire) (Cable Diagram 1) RS-422 (4-wire, 1:n communication) (Cable Diagram 2) LT Type-C *1 “ ” indicates the capacity of each inverter. LogiTouch Editor Ver.1.0 External Device Connection Manual 3-2-3 Chapter 3 3.2 Mitsubishi Electric Inverters 3.2.2 Inverters Cable Diagrams Recommended Cables For connection of the LT and Mitsubishi Electric inverters, the following cables and cable manufcturers are recommended: No. 1 2 3 4 5 Item Model Code FR-CB201 (1m) Cable FR-CB203 (3m) (available on the market) FR-CB205 (5m) Wires SGLPEV 0.5mm×4P RJ45 connector 5-554720-3 MBJ-8 6 RS-485 distributor (commercial type) MBJ-8P Company Mitsubishi Electric Corporation Mitsubishi Electric Corporation Mitsubishi Electric Corporation Mitsubishi Electric Corporation Tyco Electronics AMP K.K. Remark Used for 1:n connection Used for 1:n connection Used for 1:n connection 10BASE-T wires Used for 1:n connection End Terminal Hakko Electric Machine Works Resistance OFF Co., Ltd. Used for 1:n connection End Terminal Resistance ON Cable Diagram 1 • When using Digital's RS-422 connector terminal adapter GP070-CN10-0 1:1 RS-422, 4-wire Inverter LT GP070-CN10-O (25p, male) Resistance 100Ω *1 Distribution Terminal RDA RDB SDA SDB TERM SG 5 SDA 4 SDB 3 RDA 6 RDB 1 SG 5 SDA 4 SDB 3 RDA 6 RDB 1 SG Resistance 100 *1 Resistance 100Ω*1 5 SDA 4 SDB 3 RDA 6 RDB 1 SG PU Connector • When making your own cable LT Inverter (25p, male) Resistance 100Ω *1 9 TRMX 10 RDA 16 RDB 11 SDA 15 SDB 18 CSB 19 ERB 21 CSA 22 ERA 7 SG Distribution Terminal 5 SDA 4 SDB 3 RDA 6 RDB 1 SG 5 SDA 4 SDB 3 RDA 6 RDB 1 SG Resistance 100Ω*1 Resistance 100Ω*1 5 SDA 4 SDB 3 RDA 6 RDB 1 SG PU connector *1 Since a modular connector has been used, be sure to use a distributor when using a terminating resistor. 3-2-4 LogiTouch Editor Ver.1.0 External Device Connection Manual Chapter 3 Inverters 3.2 Mitsubishi Electric Inverters Cable Diagram 2 • When using Digital's RS-422 connector terminal adapter GP070-CN10-0 1:n RS-422, 4-wire LT GP070-CN10-O (25p, male) RDA RDB SDA SDB Resistance TERM 100Ω *1 SG Distribution Terminal 5 SDA 4 SDB 3 RDA 6 RDB 1 SG Distribution Terminal 5 SDA 4 SDB 3 RDA 6 RDB 1 SG 5 SDA 4 SDB 3 RDA 6 RDB 1 SG 5 SDA 4 SDB 3 RDA 6 RDB 1 SG 5 SDA 4 SDB 3 RDA 6 RDB 1 SG Unit No. 1 PU connector Distribution Terminal 5 SDA 4 SDB 3 RDA 6 RDB 1 SG 5 SDA 4 SDB 3 RDA 6 RDB 1 SG 5 SDA 4 SDB 3 RDA 6 RDB 1 SG Resistance 100Ω*1 Resistance 100Ω*1 5 SDA 4 SDB 3 RDA Unit No. n 6 RDB 1 SG Unit No. 2 PU connector PU connector • When making your own cable LT 9 TRMX (25p, male) 10 RDA 16 RDB Resistance 11 SDA 100Ω *1 15 SDB 18 CSB 19 ERB 21 CSA 22 ERA 7 SG Distribution Terminal 5 SDA 4 SDB 3 RDA 6 RDB 1 SG Distribution Terminal 5 SDA 4 SDB 3 RDA 6 RDB 1 SG 5 SDA 4 SDB 3 RDA 6 RDB 1 SG 5 SDA 4 SDB 3 RDA 6 RDB 1 SG Unit No. 1 PU connector Distribution Terminal 5 SDA 4 SDB 3 RDA 6 RDB 1 SG 5 SDA 4 SDB 3 RDA 6 RDB 1 SG 5 SDA 4 SDB 3 RDA 6 RDB 1 SG Unit No. 2 PU connector 5 SDA 4 SDB 3 RDA 6 RDB 1 SG Resistance 100Ω*1 Resistance 100Ω*1 5 SDA 4 SDB 3 RDA Unit No. n 6 RDB 1 SG PU connector *1 Since a modular connector has been used, be sure to use a distributor when using a terminating resistor. LogiTouch Editor Ver.1.0 External Device Connection Manual 3-2-5 Chapter 3 3.2 Mitsubishi Electric Inverters 3.2.3 Inverters Supported Devices Device Parameter (except for Pr.37 of FREQROL-S500 and FREQUROLE500) Parameter (Pr.37 of FREQROL-S500 and FREQUROL-E500) Operation mode Remarks Bit Addresses Word Addresses 000000 ~ 99315 0000 ~ 0993 *1 *3 P0037002 ~ P003731 P0037 *2 *4 H/L OPE000 ~ OPE015 OPE0 *3 Output frequency (rpm) OUTF000 ~ OUTF015 OUTF0 H/L Output current OUTC000 ~ OUTC015 OUTC0 Output voltage OUTV000 ~ OUTV015 OUTV0 Special monitor SPM000 ~ SPM015 SPM0 SSEL000 ~ SSEL015 SSEL Output frequency SOF000 ~ SOF015 SOF0 Output current SOC000 ~ SOC015 SOC0 Special monitor selection no. Output voltage SOV000 ~ SOV015 SOV0 Set frequency value FSET000 ~ FSET015 FSET0 Run speed RUNS000 ~ RUNS015 RUNS0 Motor torque MOT000 ~ MOT015 MOT0 Regenerative brake RBRK000 ~ RBRK015 RBRK0 Electronic thermal load factor ELOF000 ~ ELOF015 ELOF0 Output current peak value OCPV000 ~ OCPV015 OCPV0 Converter output voltage peak value COPK000 ~ COPK015 COPK0 Input power IPOW000 ~ IPOW015 IPOW0 Output power OPOW000 ~ OPOW015 OPOW0 Alarm (latest Nos. 1 & 2) A12D000 ~ A12D015 A12D0 Alarm (latest Nos. 3 & 4) A34D000 ~ A34D015 A34D0 Alarm (latest Nos. 5 & 6) A56D000 ~ A56D015 A56D0 Alarm (latest Nos. 7 & 8) A78D000 ~ A78D015 A78D0 RUNC000 ~ RUNC015 RUNC0 INVS000 ~ INVS015 INVS0 RWRT000 ~ RWRT015 RWRT0 SFWE000 ~ SFWE015 SFWE0 SFWR000 ~ SFWR015 SFWR0 Run command Inverter status monitor 2 Run frequency write (E PROM) Set frequency write (RAM and 2 E PROM) Set frequency write (only RAM) 2 Set frequency read (E PROM) SFRE000 ~ SFRE015 SFRE0 Set frequency read (RAM) SFRR000 ~ SFRR015 SFRR0 Error all clear ERCL000 ~ ERCL015 ERCL0 Inverter reset RSET000 ~ RSET015 RSET0 Parameter all clear ALLC000 ~ ALLC015 ALLC0 ALLC000 ~ ALLC015 ALLC0 LNKP000 ~ LNKP015 SECP000 ~ SECP015 LNKP0 SECP0 User clear Link parameter extended settings No. 2 parameter change *3 Write data H9669 *1 For detailed parameter information, refer to Mitsubishi Electric’s multi-purpose inverter manuals. *2 For the FREQROL-S500 parameter, designate “SP” as the device name and enter the parameter number as the address. *3 This device cannot be used for 32 bit data. 3-2-6 LogiTouch Editor Ver.1.0 External Device Connection Manual Chapter 3 Inverters 3.2 Mitsubishi Electric Inverters *4 The supported devices and their corresponding items described in an inverter manuals are as follows: [Parameter read/write] Address Data Code Function Parameter Number Basic Functions 0 Torque boost 00 80 Link Parameter Extension Setting Value (Data Code: 7F/FF) 0 1 Maximum frequency 01 81 0 2 Minimum frequency 02 82 0 3 Base frequency 03 83 0 Name Read Write : Excerpted from Mitsubishi transistorized Inverter FREQROL-A500 Operation Manual; Appendix 1. Data Code List [Devices other than the parameters] Select an applicable device from the supported device list. I tem No. R ead 1 H 7B Operation mode Write 2 C o mman d Code M onitoring HFB Output frequency H 6F [speed] N u mb er o f D ata D ig its D ata H 0000: C ommunication option operation H 0001: Ex ternal operation H 0002: C ommunication operation (PU connector) H 0000: C ommunication option operation H 0001: Ex ternal operation H 0002: C ommunication operation (PU connector) H 0000 to H F F F F : Output frequency (hex adecimal) in 0.01H z increments 4 digits 4 digits : Excerpted from Mitsubishi Transistorized Inverter FREQROL-A500 Operation Manual; Computer Link Operation <Setting Items and Set Data> *5 How to Enter a Device Name Enter device names in the LT Editor software as follows: Device When reading/writing a parameter, select either “....” or “SP”. LogiTouch Editor Ver.1.0 External Device Connection Manual Address Fixed to “0” except when reading/ writing a parameter. Inverter unit number 3-2-7 Chapter 3 3.2 Mitsubishi Electric Inverters Inverters *6 Depending on the parameter type, “9999” (indicates parameter settings are ineffective) or other values may be entered. In such a case, data write/read from the LT will become as follows: Parameter Set Value Read/Write Data List No. 1 2 3 4 Inverter Model Except for FR-S500 FR-S500 Inverter Set Value Written Data Read Data 9999 -1 (0xFFFF) -1 (0xFFFF) 8888 -16 (0xFFF0) -16 (0xFFF0) -1 (0xFFFF) -1 (0xFFFF) 888 -16 (0xFFF0) -16 (0xFFF0) Remark *7 The system area (20 words) cannot be used. In the LT OFFLINE mode and LT Editor’s System Area selection screen, the protocol and operation procedure screens will be the same as those that appear when the system area can be used. However, even if you select the system area on these screens, it will automatically be designated as not selected. 3-2-8 LogiTouch Editor Ver.1.0 External Device Connection Manual Chapter 3 Inverters 3.2.4 3.2 Mitsubishi Electric Inverters Environment Setup The following tables show Pro-face’s recommended Mitsubishi Electric inverter communication settings and their corresponding settings on the LT. LT Settings Inverter Settings Baud Rate 19200bps Baud Rate 19200bps Data Length 8bit Data Length 8bit Stop Bit 2bit Stop Bit 2bit Parity Bit Even Parity Bit Even Data Flow Control ER Communication Format When using RS-422 RS-422 (4-wire) Unit No.*1 0 ~ 31 Unit No. 0 ~ 31 Setting Method Use the inverter’s front keys to enter communication settings. Use the following parameters 117 to 124 for the inverter communication settings. No. Parameter No. Name 1 117 Station number 2 118 Communication Speed 3 119 Stop bit length/Data length 4 120 Parity check Presence/Absence Setting Range 5 121 Number of communication retries 0 ~ 31 48…4800bps 96…9600bps 192…19200bps 0…8/1 1…8/2 10…7/1 11…7/2 0: OFF 1: Even 2: Odd 0 ~ 10,9999 or --- 6 122 Communication check time internal 0 ~ 999.8,9999 or --- 7 123 Waiting time settings 8 124 CR, LF Presence/Absence selection 0 ~ 150,9999 or --0: CR and LF OFF 1: CR ON 2: CR and LF ON LogiTouch Editor Ver.1.0 External Device Connection Manual 3-2-9 Chapter 3 3.2 Mitsubishi Electric Inverters 3.2.5 Inverters Error Codes Inverter Specific Error Codes The following error numbers are supported by the inverters. Each error number (format = 02:OO: ) will be displayed on the left bottom of the LT screens. (The “OO” characters reflect an error number displayed on the LT (shown in the table below) and the “ ” characters reflect an inverter unit number where the error occurs.) Mitsubishi Electric Corporation; Each inverter series’ Operation Manual Error No. Error Name Causes 00 01 02 03 Computer NAK error Parity error Sum check error Protocol error The LT parity settings are incorrect. An error occurred on communication data due to noise, etc. 04 Flaming error An error occurred on communication data due to noise, etc., or the stop bit settings are incorrect. 05 06 07 08 09 Overrun error 0A Mode error 0B Instruction code error 0C Data range error Character error Parameter write was attempted when the mode is not the computer link operation mode or while the inverter is operating. A non-existent address has been designated during screen creation. When parameter or operation frequency data was written, the designated data was exceeded the correct setting range. 0D 0E 0F Depending on the inverter specifications, when multiple errors occurred simultaneously, the larger error number will be displayed. 3-2-10 LogiTouch Editor Ver.1.0 External Device Connection Manual Chapter 3 Inverters 3.3 3.3.1 3.3 Fuji Electric Inverters Fuji Electric Inverters System Structure The following describes the system configuration used when connecting Fuji Electric inverters to the LT. • If a communication error occurs while the unit is operating, a stop command may not be recognized via RS-485. To prevent accidents, be sure to use the inverter external signal terminal’s forced stop function so that emergency stop will always be enabled. • If an alarm is reset with a run command sent via RS-485, the unit will suddenly restart. To prevent accidents, be sure to confirm that the run command is not being sent. FRENICS5000G11S Series Inverter *1 FRNG11S-2 FRNG11S-4 Cable Diagram LT RS-485 (1:1) (Cable Diagram 1) RS-485(1:n) (Cable Diagram 2) LT Type-C FRENICS5000P11S Series Inverter FRNP11S-2 FRNP11S-4 *1 Cable Diagram LT RS-485 (1:1) (Cable Diagram 1) RS-485(1:n) (Cable Diagram 2) LT Type-C *1 The “ ” characters in the inverter model codes reflect standard applicable generator capacities. LogiTouch Editor Ver.1.0 External Device Connection Manual 3-3-1 Chapter 3 3.3 Fuji Electric Inverters Inverters FVR-E11S Series Inverter *1 FVRE11S-2 FVRE11S-7 Cable Diagram LT RS-485 (1:1) (Cable Diagram 3) RS-485(1:n) (Cable Diagram 4) LT Type-C FVR-C11S Series (Optional for Communication) Inverter FVRC11S-2 FVRC11S-6 FVRC11S-7 *1 Communication I/F Option: OPC-C11S-RS *2 Cable Diagram LT RS-485 (1:1) (Cable Diagram 1) RS-485(1:n) (Cable Diagram 2) LT Type-C *1 The “ ” characters in the inverter model codes reflect standard applicable generator capacities. *2 The “ ” character in the option card model code reflects the classification of the card type (either A, B, or C) according to this series inverter capacities. 3-3-2 LogiTouch Editor Ver.1.0 External Device Connection Manual Chapter 3 Inverters 3.3.2 3.3 Fuji Electric Inverters Cable Diagrams • The following cables are recommended: <For G11S, P11S, C11S> Furukawa Electric UL AWM2789 1/0.65 mm2 long distance braided shield cable < For E11S> Cable conforming to EIA568 standard (for 10BASE-T), as well as RJ45 connector • The maximum length of a cable (transmission distance) is 500m. • Depending on the usage environment, a unit may malfunction due to noise generated from the inverter. In such a case, connect a ferrite core or condenser to the cable. Attach to straight cable, or to looped section of cable (loop 2 to 3 times). Inverter LT RDA RDB FG DX(+) DX(-) SD Ferrite core G Condenser • A terminating resistor (100W ) has been embedded in the E11S. When connecting the inverter to the end of the cable, turn ON SW2 located below the connector. Cable Diagram 1 (1:1) • When using Digital's RS-422 connector terminal adapter GP070-CN10-0 1:1 RS-422, 2 wires LT(25p, male) GP070-CN10-0 Shield RDA RDB SDA SDB TERM SG FG LogiTouch Editor Ver.1.0 External Device Connection Manual Inverter terminal block DX(+) DX(-) SD 120Ω Ω (1/2W) 3-3-3 Chapter 3 3.3 Fuji Electric Inverters Inverters • When using Digital’s RS-422 connector terminal adapter GP070-CN10-0 Inverter terminal block DX(+) DX(-) RDA RDB SDA SDB SG FG LT GP230-IS11-0 120Ω Ω (1/2W) SD • When making your own cable LT (25p, male) GP070-CN10-0 7 SG 9 TRMX 10 RDA 16 RDB 11 SDA 15 SDB 18 CSB 19 ERB 21 CSA 22 ERA 1 FG Inverter terminal block DX(+) DX(-) SD 120Ω Ω (1/2W) Shield Cable Diagram 2 (1:n) • When using Digital’s RS-422 connector terminal adapter GP070-CN10-0 1:n RS-422, 2-wires LT (25p, male) GP070-CN10-0 RDA RDB SDA SDB TERM SG FG Inverter 1 Inverter 2 DX(+) DX(-) SD Inverter n DX(+) DX(-) Ω (1/2W) 120Ω SD DX(+) DX(-) SD Shield Shield Shield • When making your own cable LT GP230-IS11-0 3-3-4 RDA RDB SDA SDB SG FG Inverter 1 DX(+) DX(-) Shield Shield Inverter 2 Inverter n DX(+) DX(+) DX(-) DX(-) Ω (1/2W) 120Ω SD SD SD LogiTouch Editor Ver.1.0 External Device Connection Manual Chapter 3 Inverters 3.3 Fuji Electric Inverters • When making your own cable LT (25p, male) GP070-CN10-0 7 SG 9 TRMX 10 RDA 16 RDB 11 SDA 15 SDB 18 CSB 19 ERB 21 CSA 22 ERA 1 FG Inverter 1 DX(+) DX(-) SD Inverter n Inverter 2 DX(+) DX(-) SD Shield DX(+) DX(-) SD 120Ω Ω (1/2W) Shield Shield Cable Diagram 3 (1:1) • When using Digital’s RS-422 connector terminal adapter GP070-CN10-0 1:1 RS-422, 2-wire LT (25p, male) GP070-CN10-0 RDA RDB SDA SDB TERM SG FG Inverter RJ45 connector 4 DX(+) 3 DX(-) • When making your own cable LT (25p, male) GP070-CN10-0 7 SG 9 TRMX 10 RDA 16 RDB 11 SDA 15 SDB 18 CSB 19 ERB 21 CSA 22 ERA 1 FG LogiTouch Editor Ver.1.0 External Device Connection Manual Inverter RJ45 connector 4 DX(+) 3 DX(-) 3-3-5 Chapter 3 3.3 Fuji Electric Inverters Inverters Cable Diagram 4 (1:n) • When using Digital’s RS-422 connector terminal adapter GP070-CN10-0 1:n RS-422, 2-wire LT (25p, male) GP070-CN10-0 RDA RDB SDA SDB TERM SG FG Inverter 1 3 DX(-) 4 DX(+) Inverter 2 4 DX(+) 3 DX(-) Inverter n 4 DX(+) 3 DX(-) • When making your own cable LT (25p, male) GP070-CN10-0 7 SG 9 TRMX 10 RDA 16 RDB 11 SDA 15 SDB 18 CSB 19 ERB 21 CSA 22 ERA 1 FG 3-3-6 Inverter 1 4 DX(+) 3 DX(-) Inverter 2 4 DX(+) 3 DX(-) Inverter n 4 DX(+) 3 DX(-) LogiTouch Editor Ver.1.0 External Device Connection Manual Chapter 3 Inverters 3.3.3 3.3 Fuji Electric Inverters Supported Devices FRENICS5000G11S/FRENICS5000P11S Series Device Bit Addresses Word Addresses Basic function F0000 ~ F4215 F00 ~ F42 Terminal function E0100 ~ E4715 E01 ~ E47 Controlling function C0100 ~ C3315 C01 ~ C33 Motor 1 P0100 ~ P0915 P01 ~ P09 High level function H0300 ~ H3915 H03 ~ H39 Motor 2 A0100 ~ A1815 A01 ~ A18 Option o0000 ~ o2915 o00 ~ o29 Command data S0100 ~ S1115 S01 ~ S11 Monitor data Alarm reset M0100 ~ M4815 M01 ~ M48 m00 Remarks L/H *1 *2 *1 Data write cannot be performed. *2 “m00” is a virtual device and is used to reset the history of alarms occurred on the inverter. Writing any data to “m00” will reset the alarm. However, data read cannot be performed. FRENICS5000E11S Series Device Bit Addresses Word Addresses Basic function F0000 ~ F4215 F00 ~ F42 Terminal function E0100 ~ E4215 E01 ~ E42 Controlling function C0100 ~ C3315 C01 ~ C33 Motor 1 P0100 ~ P1015 P01 ~ P10 High level function H0100 ~ H4615 H01 ~ H46 Motor 2 A0100 ~ A1915 A01 ~ A19 Command data S0100 ~ S1115 S01 ~ S11 Monitor data Alarm reset M0100 ~ M4815 M01 ~ M48 m00 Remarks L/H *1 *2 *1 Data write cannot be performed. *2 “m00” is a virtual device and is used to reset the history of alarms occurred on the inverter. Writing any data to “m00” will reset the alarm. However, data read cannot be performed. LogiTouch Editor Ver.1.0 External Device Connection Manual 3-3-7 Chapter 3 3.3 Fuji Electric Inverters Inverters FRENICS5000G11S/FRENICS5000P11S Series Device Bit Addresses Word Addresses Basic function F0000 ~ F3615 F00 ~ F36 Terminal function E0100 ~ E0315 E01 ~ E03 Controlling function C0100 ~ C0715 C01 ~ C07 Motor 1 P0000 ~ P0015 P00 High level function H0100 ~ H2515 H01 ~ H25 Option O0000 ~ O1115 o00 ~ o11 Command data S05 ~ S06 S05 ~ S06 Monitor data Alarm reset M0100 ~ M4815 M01 ~ M48 m00 Remarks L/H *1 *1 *2 *1 Data write cannot be performed. *2 “m00” is a virtual device and is used to reset the history of alarms occurred on the inverter. Writing any data to “m00” will reset the alarm. However, data read cannot be performed. ! • The system area (20 words) cannot be used. Also, on the Caution LT OFFLINE mode, the protocol display and operation will be the same as that which appears when the system area can be used. Even if the system area is selected on these screens, however, it will automatically be designated as not selected. • Depending on the inverter series, supported functions and ranges will vary. For more detailed information, refer to each inverter series’ operation manual. • In the LT Editor, enter the device address and station address as follows: Address (decimal number) (Decimal bit position number) Device name 3-3-8 Station address (decimal number) LogiTouch Editor Ver.1.0 External Device Connection Manual Chapter 3 Inverters 3.3.4 3.3 Fuji Electric Inverters Environment Setup FRENICS5000G11S/FRENICS5000P11S Series LT Settings Inverter Settings Setting Function Baud Rate 9600bps Baud rate 9600bps H34 Data Length 8bit Data Length 8bit H35 Stop Bit 2bit Stop Bit 2bit H37 Parity Bit None Parity Bit None H36 Data Flow Control ER Station Address 1 ~ 31 H31 Communication Format 2-wire type Station Address 1 ~ 31 FVR-E11S Series LT Settings Inverter Settings Setting Function Baud Rate 9600bps Baud rate 9600bps H34 Data Length 8bit Data Length 8bit H35 Stop Bit 1bit Stop Bit 1bit H37 Parity Bit None Parity Bit None H36 Data Flow Control ER Station Address 1 ~ 31 H31 Communication Format 2-wire type Unit No. 1 ~ 31 FVR-C11S Series LT Settings Inverter Settings Setting Function Baud Rate 9600bps Baud rate 9600bps o04 Data Length 8bit Data Length 8bit o05 Stop Bit 2bit Stop Bit 2bit o07 Parity Bit None Parity Bit None o06 Data Flow Control ER Station Address 1 ~ 31 o01 Optional selection 1 o00 Communication Format 2-wire type Unit No. ! Caution 1 ~ 31 The FVR-C11S Series requires a communication card (Model: OPC-C11S-RS*). Be sure to set “o00” to 1 to enable the RS-485 communication option. LogiTouch Editor Ver.1.0 External Device Connection Manual 3-3-9 Chapter 3 3.3 Fuji Electric Inverters 3.3.5 Inverters Error Codes Inverter Specific Error Codes The error codes specific to the inverters will appear on the LT screen’s left bottom, as “Host Communication Error (02:**:##)”. (The “**” characters indicate an error code specific to the inverter, and the “##” characters indicate the station address of the inverter on which an error occurred.) Error Codes Error Code Error Name 4AH Format error • • 4BH Command error • • Note: 3-3-10 4CH Link priority error 4DH No write authorization error • 4EH Function code error 4FH Write inhibit error • • 50H Data error 51H Write error • • Description Data transmission request statement characters are incorrect. The last character of the request statement is not in the correct position. A non-existent command has been sent. It was attempted to write command or operation command data, with the link option installed. (When the link option has been installed, the command and operation command data cannot be written via RS-485.) It was attempted to write new function data during data write from the link option. A non-existent function code has been requested. It was attempted to write an operation inhibit function or write inhibit during run function while the unit was operating. Data that has been written has exceeded an effective range. It was attempted to write new function data during writing another function. • The latest communication error code has been stored in M26. • Alarms occurred on the inverter will have either code numbers M16, M17, M18, or M19. M16: Latest alarm M17: Previous alarm M18: Alarm before the previous alarm M19: Alarm before the two old alarms For more detailed information, refer to your inverter’s operation manual. LogiTouch Editor Ver.1.0 External Device Connection Manual Chapter 4 - Memory Link Communication 4.1 Setting Up memory Link Communication 4 Memory Link Communication Read this chapter if you are using the LT unit with the memory link communications. This chapter explains one-to-one communication between the LT unit and equipment such as a personal computer or a one-board microcomputer which do not have their own protocols. For information about the extended mode, refer to the GP70 SeReference ries Memory Link Communication Protocol Manual. 4.1 Setting Up Memory Link Communication Data transmission between the LT and Host (External Device) are run according to the host's ladder logic program. The LT runs its screen display relying on the host's data write commands, which are based on the screen display's data send restrictions. And, the LT, following the host's Reading command, passes stored data over to the host. Communication occurs between the LT and host in this way, and normally, the initiative is held on the host side. Data transmission between the LT and External Device is aided by the memory area (System Area) prepared internally in the LT. LogiTouch Editor Ver.1.0 External Device Connection Manual 4-1-1 4.1 Setting Up memory Link Communication Chapter 4 - Memory Link Communication 4.1.1 System Area The System Area is the medium that allows data transmission between the LT and host. The System area is prepared internally in the LT; the LT runs the screen display based on the System Area data. The System Area is 4096 words in size, organized as follows. LS0 : LS19 LS20 : : : LS2032 : LS2047 LS2048 : LS2095 LS2096 : LS4095 System Data Area Reading Area User Area Special Relays Reserved User Area System Data Area This is the write area for data necessary to operate the LT screen control data and error information. The data write contents of each address is predetermined. For more information, refer to 4-1-2 “Contents and Range of SysReference tem Data Area” User Area This area is used for LT-Host data transmissions. On the host side, determine which LT address the data will be written to, and create a program to perform the data write operation. Plus, to display the written data on the LT side, another setup must be performed Parts Setup. For the host to read data written with keypad input and touch panel input (i.e. switch), a program must be made on the host side that reads data from the LT. ! Important When using the Device Monitor feature, the User's Area (LS2096 to LS4095) will be reserved and cannot be used. Special Relays This area is for setting up LT's various status information. Note: • Writing to System Address 13, using a swich, or similar method, causes an interrupt output to the host. On the host, read this one byte using a command like the BASIC INPUT$ instruction, to call various subroutines which depend on the value, thus greatly simplifying the program. • When specifying an address bit, enter the bit position (00~15) after the word device. Ex. When specifying bit 02 of User's Area address 20: 20 02 Word 4-1-2 Bit Position Reserved Please do not use this area. It is only for LT's internal use. If you use this area, the LT will not operate properly. LogiTouch Editor Ver.1.0 External Device Connection Manual Chapter 4 - Memory Link Communication 4.1 Setting Up memory Link Communication 4.1.2 ! Important Contents and Range of System Data Area When you wish to turn the LT’s display OFF, use the Screen Display ON/OFF bit. Do not use the Control area’s Backlight OFF bit. Be aware that this feature's system Data Area settings and range used during Memory Link Communication will differ from the settings used with Direct Access Communication. Address 1 Detail Status Function *1 Bit Particulars 0 to 2 Reserved 3 Writes a set value *2 4 to 9 Reserved 10 Backlight Alarm *3 11 to 15 Reserved 2 3 Error Status Each bit changes according to the LT 0, 1 2 Unused System ROM/RAM error function. When an error occurs, the corresponding bit will turn on. 3 4 Screen Memory Checksum SIO Framing *4 * A bit that has turned on remains on until the power is turned off and back on, or 5 6 SIO Parity *4 SIO Overrun *4 until RUN mode is re-entered from OFFLINE mode. or details and the handling process about the Error Status contents, refer to the Section 1.1.3. 7, 8 9 Unused Initialization of Internal Memory Checksum Necessary 10 Timer Lock Error 11 to 15 Unused 4 Clock Data (Year) 0 to 7 Stores the last 2 digits of the Calendar year as 2 BCD digits "Year / Month / Day / Hour / Minute " Data is 8 to 15 Unused 5 Clock Data (Month) stored in BCD's 2digits. 0 to 7 Stores 01 to 12 (Month) as 2 BCD digits (E.g.) 98/02/01 17:15 8 to 15 Unused 6 Clock Data (Day) 0 to 7 Stores 00 to 31 (Day) as 2 BCD digits 8 to 15 Unused 7 Clock Data (Hour) 0 to 7 Stores 00 to 23 (Hour) as 2 BCD digits 8 to 15 Unused 8 Clock Data (Minute) 0 to 7 Stores 00 to 59 (Minute) as 2 BCD digits 8 to 15 Unused 10 Interrupt Output If you Write in word data, the bottom 8 bits will be output as an interuput code after touching (Touch OFF) OFF.However FFh will not be output. 11 Control *5 0 1 2, 3 4 5 6 Backlight *6 Buzzer ON Reserved Buzzer 0:Output, 1:No Output *7 Reserved Interrupt Output when touching panel to turn the display ON. (Interrupt Code:FFh) 0: Disabled 1: Enabled *8 7 to 15 Reserved LogiTouch Editor Ver.1.0 External Device Connection Manual 4-1-3 4.1 Setting Up memory Link Communication Chapter 4 - Memory Link Communication Address 12 Detail Screen Display *9 Function Bit Particulars FFFFh : Screen clears almost immediately ON/OFF 0h: Screen turns ON 13 Interrupt Output *10 Using a switch or other method to write absolute value data from LT causes an output of the interrupt code using the contents of the bottom 8 bits ( Will not out put 15 Screen Display No. 16 Reserved Reserved 17 Reserved Reserved 18 Reserved Reserved 19 Reserved Reserved FFh) Write the Screen No. in binary to change 0 to 14 Screen change number, 1 to 8999.( 1 to 1999 when using BCD input) *1 Monitor, in bit units, only the necessary bits. Since reserved bits may be used for LT system maintenance, etc., their ON/OFF status is not defined. *2 Every time a value is written with the Keypad Input Display, the bit is reversed. *3 When the backlight burns out, the Status LED's orange light turns ON, and the Status Data Area's "Status"*1 bit 10 will turnON. *4 LT Type-A1/A2/B cannot be used. *5 Be sure to turn all reserved bits OFF since they may be used for LT system maintenance, etc. *6 With the LT series, the backlight turns OFF when this bit is ON(LCD display does not change) and turns ON when the bit is OFF. When the Control area’s Backlight OFF bit turns ON, only the backlight will turn OFF, however, the LCD display will remain ON and all touch switches set up on the display can still be used. Use the Screen display ON/OFF bit to actually turn the screen display OFF. *7 Control Bit 1 (Buzzer On) outputs as shown below. Buzzer Sound While Control Bit1 is on, the LT internal buzzer is activated. *8 Do not write control codes 00 to 1F to word address 13. It may terminate data communication. *9 After the System Data Area’s “Screen Display ON/OFF” bit is set to turn the display OFF, simply touching the screen will turn the display ON again. *10 Interrupt output when touching the panel to turn the display OFF to ON. • Only when the display is turned ON by touching the panel, interrupt output will be operated. STOP • Addresses 0, 2, 9, 10, 14, 16, 17, 18, 19 are reserved areas. Do not write data to these addresses. • When addresses 3, 12, 13, 15 are utilized for System Control, displays that depend on parts do not function. • When addresses 12, 13, 15 are used to control word units, bit write cannot be performed. • Writing FFFFh to address 12 causes the screen display to erase within moments. When you wish to erase the screen using the STANDBY MODE TIME entered in LT's INITIALIZE setup, write 0000h in address 12. • Do not write control codes 00~1F in address 13. Data transmission may become impossible. 4-1-4 LogiTouch Editor Ver.1.0 External Device Connection Manual Chapter 4 - Memory Link Communication 4.1 Setting Up memory Link Communication 4.1.3 Special Relays The structure of the Special Relays is as follows: Reserved The Reserved address value is undefined. Do not use this area. 2032 2033 2034 2035 2036 2037 2038 2039 : : 2047 Common relay information Reserved 1 Second Binary Counter Parts Scan Time Reserved Parts Scan Counter Reserved Common Relay Information (2032) 15 12 11 10 9 8 7 6 5 0 Remains ON after when a screen change (base, window)occurs until the screen's internal processing is complete. 2 ON only in the middle of an SIO error developing. 3 ON when displaying the Initial screen after powering up. 4 Always ON 5 Always OFF 6 Turns ON when backup SRAM data has been delated 7 Turns ON if a BCD error occurs while D script is being used. 8 Turns ON if a zero division error occurs while D script is being used. 9 Filing data. Turns ON if the data is not transferred to Backup SRAM. Filing data transfer is triggered by the Control Word Address. Turns ON if the data can not be transferred from External Device to SRAM. 10 Also data transfer between External Devices is triggered by the Filing Data Display. Turns ON if the data is not trans Filing data. Via transfer data to and from SRAM to LS area, via Filing Data 11 Display. When using D-script, turns ON if a communication error occurs when the 12 function memcpy () is used, or reading the data from designated Address Offset. Turns OFF when data read is normally completed. 13-15 Reserved 1 LogiTouch Editor Ver.1.0 External Device Connection Manual 4-1-5 4.1 Setting Up memory Link Communication Chapter 4 - Memory Link Communication Base Screen Information (2033) Remains on from the base screen change to when the screen's internal processing is completed. 1 Second Binary Counter (2035) Begins counting in one second intervals after the LT's power is turned ON. The data is binary. Parts Scan Time (2036) The time it takes to prepare all the parts setup on the display screen. The data is stored as binary, millisecond units. The data renews itself at the point when preparation for all the object parts is complete. The data's default value is 0. It is accurate within + 10ms. Parts Scan Counter (2038) Counts until all the Parts used in a display screen have completed their preparation. The data is binary. STOP 4-1-6 The Special Relay is not write protected. Do not turn this Relay's data ON or OFF by using parts or other method. LogiTouch Editor Ver.1.0 External Device Connection Manual Chapter 4 - Memory Link Communication 4.2 4.2 Cable Diagrams Cable Diagrams Explains the connection between the LT and host. 4.2.1 RS-232C Communication When using an RS-232C cable, there are two types of control formats: DTR (ER) Control and XON/XOFF Control. The LT-Host connection for each type is illustrated below. DTR (ER) Control LT Unit 1 FG (25P) 2 SD 3 RD 4 RS 5 CS 6 NC 7 SG 8 CD 20 ER STOP FG SD RD RS CS ER DR SG Host Shield Set the host’s control software so that the host will not transmit data to the LT when the LT’s ER is turned OFF. XON/XOFF Control LT Unit 1 FG (25P) 2 SD 3 RD 4 RS 5 CS 6 NC 7 SG 8 CD 20 ER FG SD RD RS CS ER DR SG Host Shield ! • Depending on the host, the RS-232C connector's shape, pin numbers and corresponding signal names may differ. Be sure to follow the host Important interface specifications. • The maximum cable length is 15m. LogiTouch Editor Ver.1.0 External Device Connection Manual 4-2-1 Chapter 4 - Memory Link Communication 4.2 Cable Diagrams 4.2.2 RS-422 Communication When using an RS-422 cable, there is only the XON/XOFF Control. The various LT-Host connections are illustrated below. Careful! • Insert a termination resistor between RDA-RDB. • For a 24AWG line, use a twist pair cable with a static electrical capacity of 50pF/m, and a standard characteristic impedance of 100W • The maximum length of the cable is 600m. However, depending on the External Device, the maximum length of the cable is limited. When Important connecting, refer to the External Device's User's Manual. ! • Depending on the connected Host, the connection method and termination resistance differs. • When using Digital's RS-422 connector terminal adapter, GP070-CN10-0 GP070-CN10-0 LT RDA RDB SDA SDB TERM SG FG SD(+) SD(-) RD(+) RD(-) FG SG Shield Host Terminal Resistance * Connect when there is SG As a result of connecting GP070-CN10-0's RDA and TERM, a 100W termination resistance is inserted between RDA—RDB on the LT. • When using Digital's RS-422 Cable, GP230-IS11-0 LT GP230-IS11-0 RDA RDB SDA SDB SG FG SD(+) SD(-) RD(+) RD(-) FG SG Termination Resistance * Connect when there is SG When connecting the #9 and #10 pins in the LT Serial I/F, a termination resistance of 100W is added between RDA and RDB. 4-2-2 LogiTouch Editor Ver.1.0 External Device Connection Manual Chapter 4 - Memory Link Communication 4.2 Cable Diagrams • When making your own cable connections LT Unit 1 FG (25P) 7 SG 9 10 RDA 11 SDA 15 SDB 16RDB 18 19 21 22 SD (+) SD(-) RD(+) RD(-) FG SG Host Termination Resistance Shield When connecting the #9 and #10 pins in the LT Serial I/F, a termination resistance of 100W is added between RDA and RDB. LogiTouch Editor Ver.1.0 External Device Connection Manual 4-2-3 4.2 Cable Diagrams Chapter 4 - Memory Link Communication 1234567890123456789012345678901212345678901 1234567890123456789012345678901212345678901 1234567890123456789012345678901212345678901 1234567890123456789012345678901212345678901 1234567890123456789012345678901212345678901 1234567890123456789012345678901212345678901 1234567890123456789012345678901212345678901 1234567890123456789012345678901212345678901 1234567890123456789012345678901212345678901 1234567890123456789012345678901212345678901 1234567890123456789012345678901212345678901 1234567890123456789012345678901212345678901 1234567890123456789012345678901212345678901 1234567890123456789012345678901212345678901 1234567890123456789012345678901212345678901 1234567890123456789012345678901212345678901 MEMO 4-2-4 LogiTouch Editor Ver.1.0 External Device Connection Manual Chapter 4 - Memory Link Communication 4.3 4.3 Memory Link Command Memory Link Commands The communications protocol shows the format of data transferred between the host computer and the LT and the procedure for this data transfer. The communications protocol for the LT is classified into the following modes according to the application and the data processing capability of the host computer. Communications protocol Compatible mode (ASCII codes) Extended mode 1:1 ASCII codes Binary codes 1:n ASCII codes Binary codes Compatible mode In this mode, only writing to the system area (Esc W) and reading from the system area (Esc R) commands are performed using communications protocol. The compatible mode is basically a teletype protocol using ASCII codes. Therefore, the load for controlling the communications on the host computer is decreased. In contrast, the reliability of the transmitted and received data is relatively low. Extended mode This mode is a protocol which supports not only commands for writing to and reading from the system area, but also drawing commands. The extended mode is a communications protocol compatible with the multi-drop connection between the host computer and the LT. To improve the reliability of communications data, you may specify whether sum check codes are used or not and whether ACK and NCK are used or not. The ASCII codes and the binary codes are dependent on the development of the software environment. Select whichever codes are appropriate. Only the commands in the compatible mode are covered in this manual. Reference For the extended mode, Refer to The Memory Link Communica- tions Manual for the GP70 Series (sold separately). LogiTouch Editor Ver.1.0 External Device Connection Manual 4-3-1 Chapter 4 - Memory Link Communication 4.3 Memory Link Command LT-Host data transmissions are run as described for each command below. Read command This command reads data from the setup System Area address. Reply command This command responds to the Read command and passes this data from the LT to the Host. Write command This command writes the data to the setup System Area address. Interrupt output Using a touch tag or other method to write data to System Data Area address 13 causes an interrupt code in the contents of the bottom 8 bits, which is then output to the Host side. When using double-words (32-bit data), the upper and lower data are set up as follows: 0 H (High) (Upper) 1 Careful! L (Low) (Lower) Send the read command from the Host after receiving the reply command. Ex. Data communication between the Host computer and the LT Send the read command (2) after receiving the reply command (1). When the read command is sent continuously without waiting for the reply command, a system error may be generated two or three hours later. 4-3-2 LogiTouch Editor Ver.1.0 External Device Connection Manual Chapter 4 - Memory Link Communication 4.3.1 4.3 Memory Link Command Read Command The contents of the Read command are as follows: Ex. Reads 2 words of hexadecimal data from System Area address 100. Read Command The Address and Read Word Number can be entered in ASCII Code. LogiTouch Editor Ver.1.0 External Device Connection Manual 4-3-3 4.3 Memory Link Command 4.3.2 Chapter 4 - Memory Link Communication Reply Command The contents of the Reply command are as follows: Ex. Read 2 words of hexadecimal data from System Area address 100. Reply Command • The response command is output automatically from the LT in answer to the read command received. • The Address and Data can be entered in ASCII Code. • Data is read, in order, from the setup address. 4-3-4 LogiTouch Editor Ver.1.0 External Device Connection Manual Chapter 4 - Memory Link Communication 4.3.3 4.3 Memory Link Command Write Command The contents of the Write command are as follows: Ex. Writes hexadecimal data 1A2C and 145B from System Area address 100. Write Command • • • • The Address and Data can be entered in ASCII Code. Data is written, in order, from the setup (start) address. In Compatible mode, the Reply command does not return. If you keep sending the Write command to LT constantly, be aware that LT might fail to update the screen data. LogiTouch Editor Ver.1.0 External Device Connection Manual 4-3-5 Chapter 4 - Memory Link Communication 4.3 Memory Link Command 1234567890123456789012345678901212345678901 1234567890123456789012345678901212345678901 1234567890123456789012345678901212345678901 1234567890123456789012345678901212345678901 1234567890123456789012345678901212345678901 1234567890123456789012345678901212345678901 1234567890123456789012345678901212345678901 1234567890123456789012345678901212345678901 1234567890123456789012345678901212345678901 1234567890123456789012345678901212345678901 1234567890123456789012345678901212345678901 1234567890123456789012345678901212345678901 1234567890123456789012345678901212345678901 1234567890123456789012345678901212345678901 1234567890123456789012345678901212345678901 1234567890123456789012345678901212345678901 MEMO 4-3-6 LogiTouch Editor Ver.1.0 External Device Connection Manual Appendix 1 Maximum Number of Consecutive External Device Addresses A1 Maximum Number of consecutive Addresses The following lists the maximum number of consecutive addresses that can be read by each External Device. Refer to these tables to utilize Block Transfer. When the device is setup using the methods below, the Data Communication Speed declines by the number of times the device is read. • When consecutive addresses exceed the maximum data number range • When an address is designated for division • When device types are different To speed up data communication, plan the Parts layout in screen units, using consecutive devices. (Includes the Alarm.) A.1.1 Maximum number of Consecutive External Device Addresses With Electronic Temperature Controllers Yokogawa/Yokogawa M&C Controllers Device Max. No. of Consecutive Addresses D 63 Words I 63 Words Yamatake Controllers Device Max. No. of Consecutive Addresses Data 5 Words RKC INSTRUMENT INC.Controllers Device Max. No. of Consecutive Addresses 125 Words LogiTouch Editor Ver.1.0 External Device Connection Manual Appendix-1-1 Maximum Number of Consecutive External Device Addresses Appendix 1 Omron Corporation Controllers Device Max. No. of Consecutive Addresses C0 C1 2 Double Words C3 A 1 Word Shinko Technos Corporation Controllers C/FC/FIR/GC/FCL/PC-900 Series Device Max.No.of Consecutive Addresses DataItems 1 Word Setting Value Memory 1 to 7 Channel 1 to 20 1 Word 1 Word *1 *1 Although only a single word can be read at a time from a single controller, up to 20 channels can be read simulataneously. Fuji Electric Corporation Controller Micro-Controller X Series (Model:PXR) Device Address 00001 ~ 10001 ~ 30001 ~ 40001 ~ 31001 ~ 41001 ~ Appendix-1-2 Max. No. of Consecutive Address 1 bit 8 bit 15 words 60 words 15 words 60 words LogiTouch Editor Ver.1.0 External Device Connection Manual Appendix 1 Maximum Number of Consecutive External Device Addresses TOHO ELECTORICS INC. TTM Series Device Max. No. of Consecutive Addresses 00_ 10_ 100_ 110_ 120_ 300_ 1020_ Step Temperature Setting SSV Final Step Setting END Step time Setting STI Final Step Finish Condition Setting SOK Step Wait Zone SWZ Step Wait Time SWT Time Signal ON Time SON Time Signal OFF Time SOF Execution Time SRN End Signal ON Time SEO 1 word LogiTouch Editor Ver.1.0 External Device Connection Manual Appendix-1-3 Appendix 1 Maximum Number of Consecutive External Device Addresses Using Inverter Mitsubishi Electric Device P Fuji Electric Max. No. of Consecutive Address 1 Word 1 Double Word OPE 1 Word OUTF OUTC 1 Double Word Device Basic Function Terminal Function Control Function Motor 1 High Level Function Motor 2 OUTV SPM Max. No. of consecutive Address 1 Word Option Order Data SSEL SOF Monitor Data SOC SOV FSET RUNS MOT RBRK ELOF OCPV COPK IPOW OPOW A12D 1 Word A34D A56D A78D RUNC INVS RWRT SFWE SFWR SFRE SFRR ERCL RSET ALLC LNKP SECP Appendix-1-4 LogiTouch Editor Ver.1.0 External Device Connection Manual