1
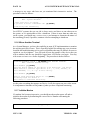
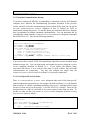
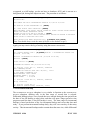
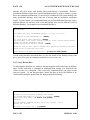
CHAPTER 1
INTRODUCTION
The development of the University of California Automated Vital Statistics System
(AVSS) began in 1980 using the most appropriate computing technology available at that
time. A conscious decision was made then to build upon a MUMPS platform that would
insure portability in the face of rapid technological change. After a decade of
development, this strategy has paid dividends since the same version of AVSS is
operational over a wide range of computer hardware, ranging from large VAX
minicomputers to a variety of IBM-PC compatibles. Operating multi-user/multi-tasking
software in a variety of hardware environments has placed additional burdens on the
AVSS system maintenance functions. Yet AVSS has been designed to give users a high
degree control over their hardware/software resources.
This manual is to be used by the individual responsible for the daily operation of a
facility utilizing AVSS. This person is commonly referred to as the AVSS "System
Manager." It is assumed that the System Manager is familiar with the AVSS User's
Manual and has basic knowledge of the computer equipment that supports AVSS. The
terminology introduced in the User's Manual is used here and the reader is encouraged to
review the User's Manual since this manual will assume a certain level of knowledge and
has less detail in describing AVSS procedures.
Many of the capabilities needed to perform system maintenance activities are contained
in the SYSTEM MAINTENANCE option. A major goal of AVSS Version 4 was to introduce
uniformity in the SYSTEM MAINTENANCE suboptions over the entire range of hardware
that AVSS presently operates. Previous minicomputer versions of AVSS required that
some of these functions be performed outside of AVSS, thus making it more difficult for
novice system managers to perform their tasks. This inconvenience was eliminated in
Version 4.004 where the standard SYSTEM MAINTENANCE suboptions were grouped in a
functionally related order for all sites as follows:
Managing Terminals And Other Computer Resources
SYSTEM STATUS
BROADCAST MESSAGE
JOB KILL
UNFREEZE ANOTHER TERMINAL (XON)
SHUTDOWN AVSS
MIRROR ANOTHER TERMINAL
INITIALIZE MODEM
HOW MUCH DISK SPACE REMAINS
Assuring Data Reliability
OPERATING SYSTEM INTEGRITY CHECKER
AVSS DATA BASE INTEGRITY CHECKER
ERROR ENTRY LISTING
VERSION 4.106
JULY 1991
PAGE 1-2
AVSS SYSTEM MAINTENANCE MANUAL
Reporting AVSS Systems Data
LIST OVERRIDE PROCESSING
COMMUNICATIONS LOG PROCESSING
DAYTIME COMMUNICATIONS STARTUP
USER REPORT BY ACTIVITY INDEX
Managing AVSS Records
BACKUP RECORD DATA
SET LAST FULL BACKUP DATE
DIFFERENTIAL BACKUP
INCREMENTAL BACKUP
VERIFY RECORD DATA
KILL RECORD DATA
RESTORE RECORD DATA
SELECTIVE RECORD RESTORE
Managing Security
DEVICE TABLE
CLASSIFICATION FILE
ID FILE
SECURITY REPORT
Special Suboptions
PERIPHERAL FILE
EXPAND DATABASE
The use and capabilities of these suboptions are discussed in Chapter 2. All except two
of these suboptions apply to all sites; the two exceptions are UNFREEZE ANOTHER
TERMINAL (XON), which is presently unavailable for AVSS-PC, and EXPAND DATABASE,
which is not applicable at minicomputer sites.
JULY 1991
VERSION 4.106
CHAPTER 2 OVERVIEW OF STANDARD SUBOPTIONS
The SYSTEM MAINTENANCE suboptions will be discussed by functional group. The order
of discussion follows the screen display in AVSS and is not necessarily in order of
importance in terms of system maintenance activities. Examples are taken from an
AVSS-PC implementation and will differ somewhat from minicomputer versions.
2.1 MANAGING TERMINALS AND OTHER COMPUTER RESOURCES
These suboptions allow the system manager to monitor the multi-user and multi-tasking
aspects of the AVSS hardware/software system.
2.1.1 System Status
The SYSTEM STATUS suboption allows you to determine the number and status of the
active jobs on your system:
SYSTEM MAINTENANCE OPTION > [SY][ENTER]STEM STATUS
MSM - System Job Status
12:13 PM
26-JUL-91
Max Partitions: 6
JOB
NUM
--1
2
3
5
UCI/VOL
NAME
------MGR,AVS
MGR,AVS
MGR,AVS
Current in Use: 4
ROUTINE
P-SIZE
NAME
CURR/MAX
-------- -------* * *
M S
%SS
2.9/20.0
FSPCTIM
1.1/20.0
FSF
3.0/20.0
STATUS
------M
* * *
RUNNING
CLOCK
TERMI-4
#-COMMANDS
TOTAL/INCR
---------7370/937
898/873
1266/0
DEVICES
OWNED
------1pc
4pc
p - Principal Device
c - Current Device
Total Buffers In System: 162, Modified#=0
Flush threshold=(4,8), Flush interval=2, flush count=1
SYSTEM MAINTENANCE OPTION >
The most important columns headings are highlighted in bold letters, i.e., JOB NUM,
ROUTINE NAME, and DEVICES OWNED. On AVSS-PC implementations, Job Number 1 is
always the MSM MUMPS operating system and owns no devices. The PC console is always
Device 1. In this example, Job Number 2 is associated with the ROUTINE NAME %SS,
indicating that Device 1 (the console) is running the system status job that created this
output. Since AVSS has multi-user capability, there can be other jobs operating
simultaneously, such as the "time job" or routine FSPCTIM, which should always be active
on AVSS-PC implementations and usually does not own a device. The term "device"
refers to a computer communications port, which can be attached to a terminal or printer.
VERSION 4.106
JULY 1991
PAGE 1-4
AVSS SYSTEM MAINTENANCE MANUAL
You should have a table of the communications devices on your computer summarizing
their baud rates and other communications parameters. In the example above, we see that
Device 4 is running the routine FSF, which is part of the AVSS program since all AVSS
routines begin with the two letters "FS," standing for "Forms System."
In summary, when you perform a SYSTEM STATUS, you should note the values for JOB
NUM, ROUTINE NAME, and DEVICES OWNED since you may need this information for other
SYSTEM MAINTENANCE suboptions. For most activities you do not need to know the
meaning of the remaining information produced by SYSTEM STATUS.
2.1.2 Broadcast Message
The BROADCAST MESSAGE suboption can be used to interactively send messages to users
with active jobs, such as Job Number 5 above on Device 4. For example, if you wanted
the user corresponding to Job Number 5 to logoff for system maintenance reasons, you
might perform the following procedure:
SYSTEM MAINTENANCE OPTION > [BR][ENTER]OADCAST MESSAGE
MSM - Terminal Broadcaster Utility
Enter Message: [?][ENTER]
Enter the text of the message that you wish to broadcast. It may
be up to 255 characters and should not include control characters.
Enter <RETURN> or '^' or '^Q' to exit this utility.
Enter Message: [PLEASE SIGN OFF ASAP TO ALLOW SYSTEM MAINTENANCE,
THANKS!][ENTER]
Enter target terminal(s): [?] ENTER]
Enter 'ALL' to broadcast to all active terminal devices, or
the number of a single active terminal device. The number must be
within one of the following ranges: 1,3-19,64-199 inclusive.
You may enter a list of these numbers separted by commas, or
a range of these numbers with the low and high element separated
by a hyphen.
You may enter any combination of lists and ranges.
Enter '^D' to get a list of all active jobs and their principal devices.
Enter <RETURN> or '^' to return to the previous question, or
'^Q' to exit this utility.
Enter target terminal(s): [4][ENTER]
Your message was broadcast to terminal 4.
Enter Message:[ENTER]
SYSTEM MAINTENANCE OPTION >
Note that many of the AVSS commands such as [?], [^], [^D] [^L], and [^Q] are in
force within many SYSTEM MAINTENANCE procedures, even though the operations are
implementation-specific and are frequently taking place within MUMPS operating system
utilities.
JULY 1991
VERSION 4.106
2.1.3 Job Kill
Occasionally it will be necessary to terminate a job. For example, due to electrical
disturbances a device may become "locked," or a user may abandon a terminal, or you
may need to stop the FSPCTIM job in order to expand the MUMPS database on AVSS-PC
(see Section 2.6.2). You should first run the SYSTEM STATUS suboption, then use the
following procedure:
SYSTEM MAINTENANCE OPTION > [J][ENTER] OB KILL
MSM - Job Termination/Device Release
Job number to be HALTed? [3] [ENTER]
Job #3 being HALTed.
Job #3 has terminated
Job number to be HALTed? [ENTER]
SYSTEM MAINTENANCE OPTION >
2.1.4 Unfreeze Another Terminal (XON)
If a terminal becomes "frozen" due to spurious electronic noise that produces an "XOFF"
or [CTRL-S] and if the user is unable to "unfreeze" the terminal using an "XON" or [CTRLQ] (please refer to Section 2.6 of the AVSS User's Manual), then with certain
minicomputer implementations, it is possible for the System Manager to free up the
communication line using the following example procedure:
SYSTEM MAINTENANCE OPTION > [UN][ENTER] FREEZE ANOTHER TERMINAL (XON)
Simulate an XON condition for a terminal that has issued an XOFF.
Terminal => [?][ENTER]
[Terminal number 1 or 4 or 64-95.]
Terminal => [65][ENTER]
[No XOFF was pending.]
Terminal => [78][ENTER]
OK. In a few seconds the terminal should be all right.
SYSTEM MAINTENANCE OPTION >
Note that this suboption is not yet operational on AVSS-PC.
2.1.5 Shutdown AVSS
It is very common to shutdown the AVSS-MUMPS system so as to perform backups and
other system maintenance functions. However, before you attempt a shutdown, you
should inform all users in advance and make sure that there are no active jobs, except for
the FSPCTIM routine. NOTE: You should always perform a shutdown before turning
off the power on your computer or re-booting. As suggested above, you can broadcast
VERSION 4.106
JULY 1991
PAGE 1-6
AVSS SYSTEM MAINTENANCE MANUAL
a message to any users who have not yet terminated their interactive session. The
procedure is then as follows:
SYSTEM MAINTENANCE OPTION > [SH][ENTER]UTDOWN AVSS
MSM - System Shutdown
1 other user still on system.
Do you want to force a shutdown? <N> [Y][ENTER]
System Going Down Immediately
On AVSS-PC systems, the FSPCTIM job is always active and shows as one other user on
the system, so it is permissible to force a shutdown. If there is more than one other user
on the system, you should run a SYSTEM STATUS and attempt to determine the nature of
the remaining job and, if possible, terminate it before attempting to shutdown.
2.1.6 Mirror Another Terminal
As a System Manager, you have the capability in most AVSS implementations to monitor
the ongoing activities of users. This is especially helpful for training new users in remote
locations and troubleshooting real or perceived problems that may be difficult for users to
explain to you by telephone. You will need to know the number of the device that you
wish to monitor, and the user should be logged onto AVSS before you begin. You may
wish to run SYSTEM STATUS before beginning. The procedure is then as follows:
SYSTEM MAINTENANCE OPTION > [M][ENTER]IRROR ANOTHER TERMINAL
MSM - Terminal Monitor Utility
Device Number: [?][ENTER]
Enter the device number of the device to be monitored. The device
number must be a terminal type device (i.e., 1, 3-19, 64-199), or
Enter <RETURN>, '^', or '^Q' to exit utility.
Device Number: [4][ENTER]
Ready to start monitoring device 4? <Y>:[ENTER]
Monitoring begun for device 4.
Enter CTRL/C to terminate monitoring.
At this point everything that appears on Device 4 will also appear on your video screen.
It is important to remember to use [CTRL-C] when you have completed monitoring.
2.1.7 Initialize Modem
If a modem line becomes inoperative, you should turn the modem power off and reinitialize the modem by determining the correct Device Number and running the
following procedure:
SYSTEM MAINTENANCE OPTION > [INI][ENTER]TIALIZE MODEM
JULY 1991
VERSION 4.106
INITIALIZE MODEM ON LINE NUMBER > [4][ENTER]
Note: There will be about a 1 minute delay at this point.
SYSTEM MAINTENANCE OPTION >
2.1.8 How Much Disk Space Remains
An important function of the System Manager is to monitor the usage of disk storage
space. As time progresses more and more data consumes more and more disk space and
it is possible to entirely fill your computer's disk. When this occurs, all data entry must
necessarily come to a halt. To avoid this problem it is necessary to regularly monitor
disk usage. If a disk is in danger of becoming full, you must immediately plan to archive
and delete existing records, or expand disk capacity. At least weekly you should obtain a
report on the remaining disk space by the following procedure:
SYSTEM MAINTENANCE OPTION > [H][ENTER]OW MUCH DISK SPACE REMAINS
MSM - Disk Space/Free Space Utility
Volume Group:
Vol
--0
Maps
---12
AVS
Tot Blks
-------6048
Index:
0
Free Spc
-------148
%-Free
-----2.45
Host File Name
-------------c:\avss\avss4106.msm
SYSTEM MAINTENANCE OPTION >
In this example, the disk has only 148 MSM blocks (Blks), or 148,000 characters
remaining. When the space remaining falls below 100 blocks, AVSS will automatically
issue a warning upon sign-on, and when it drops below 50 blocks, data entry will no
longer be permitted. It is advisible to begin immediate plans for providing more usable
space as soon as the free space falls below 500 blocks or 0.5 megabytes. If you manage
an AVSS-PC facility, please refer to Section 2.6.2 for instructions on how to expand a
database.
VERSION 4.106
JULY 1991
PAGE 1-8
AVSS SYSTEM MAINTENANCE MANUAL
2.2 ASSURING DATA RELIABILITY
Another important function of the System Manager is to maintain the integrity of the
AVSS-MUMPS database. Database structures are inherently quite complex involving
sophisticated indexes into individual records to allow for rapid storage, retrieval, and
updating. When a record is stored in AVSS, a number of consistent pieces of information
must be written to disk. If, for example, a power failure occurs during the process of
writing these components, and only some of them are successfully stored, then there will
result a database inconsistency or error. NOTE: This is but one reason why you
should never power down your computer equipment without performing a
shutdown as described in Section 2.1.5. The suboptions is this section were designed
to help you maintain an error-free database.
2.2.1 Operating System Integrity Checker
Although with proper system maintenance database errors are quite infrequent, we
recommend that you perform the OPERATING SYSTEM INTEGRITY CHECKER on a regular
basis. Ideally this would be daily, but no less frequent than once a week. It is an easy
procedure that you can perform as you are leaving the office at the end of each day, and
check the results the following morning. It is as follows:
SYSTEM MAINTENANCE OPTION> [O][ENTER]PERATING SYSTEM INTEGRITY CHECKER
MSM - Database Integrity Utility
Enter UCI to validate <ALL>:[ENTER]
Enable ZTRACE <N> [ENTER]
Enter output device <1>: [3][ENTER]
Validating Routines from [MGR,AVS]
Validating Globals from [MGR,AVS]
%
%E
%HELP
FS
FSI
FSL
FSLOG
FSO
FSTEMP
FSU
FSUL
FSX
T
UTILITY
Z90018
Z90028
FSD
FSQ
HELP
Z90033
FSF
FSR
LOG
FSF2
FSSYS
SYS
Done
Note that we overrode the default device of <1> (console) and wrote the results to Device
3, which is the system printer on most AVSS-PC implementations. This will direct the
output of the integrity check to hard copy so that you will have a permanent record of the
results. Thus, you may move on to other activities after you have responded with [3]
[ENTER] above. A successful integrity check will report "NO ERRORS FOUND" while a
problem in the database will produce a list of errors that should be reported to the AVSS
Project for technical support. The time required to complete the database integrity check
will vary from a few minutes to a few hours, depending on the size of the database and
the speed of the computer system. NOTE: You should always run the OPERATING
SYSTEM INTEGRITY CHECKER before performing any kind of backup.
2.2.2 AVSS Data Base Integrity Checker
JULY 1991
VERSION 4.106
In addition to the OPERATING SYSTEM INTEGRITY CHECKER, there
INTEGRITY CHECKER. This is an additional validity check that
is the AVSS DATA BASE
examines the internal
consistency of the data stored within the AVSS program structure. There is less
likelihood of an error here assuming no error was found in the operating system, and
since the AVSS DATA BASE INTEGRITY CHECKER takes much longer to run, you need no run
it as frequently. Once a week is often enough or even monthly. However, if you have
any reason to suspect that there is a problem with the AVSS data structure, you should run
it immediately; and you should run the AVSS DATA BASE INTEGRITY CHECKER before
backing up and deleting AVSS records (see Sections 2.4.1 and 2.4.6). The procedure
is as follows:
SYSTEM MAINTENANCE OPTION > [A][ENTER]VSS DATA BASE INTEGRITY CHECKER
FOR WHICH SITE <*> [ENTER]
(E) ERRORS ONLY, (A) ALL ERRORS AND WARNINGS,
OR (N) NO REPORTING <E> [ENTER]
RUN IN BACKGROUND <N> [Y][ENTER]
SOC. SAVE OUTPUT CODE <IC072991> [ENTER]
DESCRIPTION <INTEGRITY CHECK FOR 07/29/91> [ENTER]
DELAY UNTIL <NOW> [1800][ENTER]
Because it usually takes a considerable length of time to complete, it is advisible to run
this procedure in the background. As shown above, AVSS will automatically assign a
Save Output Code (beginning with IC followed by the MMDDYY date) and a textual
description. It is advisible to accept the defaults here as well. Finally, since this
procedure is a heavy consumer of computer resources, you may wish to delay the startup
until after normal working hours; you should specify the startup time in military syntax
as shown above with the example of 1800 Hours or 6:00 PM. When you begin work the
following day, you can review the results using the OUTPUT SAVED REPORT suboption
under the REPORT GENERATOR as follows:
REPORT GENERATOR OPTION > [O][ENTER]UTPUT SAVED REPORT
ID. ID CODE# <4> [ENTER]
MANAGER,SYSTEM
OUT. OUTPUT REPORT CODE > [I][ENTER]C072991 = INTEGRITY CHECK FOR
07/29/91
IC072991 =INTEGRITY CHECK FOR 07/29/91
IC072991 =[ENTER]
OUTPUT DEVICE <T>[ENTER]
AVSS DATA BASE INTEGRITY OUTPUT:
INTEGRITY CHECK FOR 07/29/91
FOR SITE: *
BY: MANAGER,SYSTEM
FROM DEVICE: 1
STARTED ON: 7/29/91 AT 6:00 PM
FINISHED ON: 7/29/91 AT 7:37 PM
ELAPSED TIME: 1 HOUR 36 MINUTES 50 SECONDS
VERSION 4.106
JULY 1991
PAGE 1-10
AVSS SYSTEM MAINTENANCE MANUAL
STEP 1: CHECK EACH DATA FILE FOR ITS CORRESPONDING INDEXES
STEP 1: CHECKING SITE 34 FOR INDEXING INFORMATION.
7/29/91 1059.31 FORM:LCA FILE#:18934018813 => INDEX NODE UNDEFINED: %FI
(REGISTRATION FILE DATE) SETTING...
7/29/91 1059.32 FORM:LCA FILE#:18934018813 => INDEX NODE UNDEFINED: %UP
(LAST UPDATE) SETTING...
INDEX: DT (DATE OF BIRTH)
7/29/91 1059.32 FORM:LCA FILE#:18934018813 => ERROR: UNDEFINED VARIABLE:
I4A FOR INDEX: NM (CHILD'S NAME)
STEP
STEP
STEP
STEP
STEP
STEP
STEP
STEP
2:
2:
2:
2:
2:
2:
2:
2:
CHECK EACH INDEX ENTRY FOR COMPATIBILITY WITH DATA FILE
CHECKING INDEX:%FI SITE:34
CHECKING INDEX:%UP SITE:34
CHECKING INDEX:DR SITE:34
CHECKING INDEX:DT SITE:34
CHECKING INDEX:FN SITE:34
CHECKING INDEX:MN SITE:34
CHECKING INDEX:NM SITE:34
DATA BASE STATISTICS AND REPORT SUMMARY:
SITE: 34 FORM: LCA HAS 2990 ENTRIES IN DATA BASE.
FOR SITE: *
BY: MANAGER,SYSTEM FROM DEVICE: 1
STARTED ON: 7/29/91 AT 6:00 PM
FINISHED ON: 7/29/91 AT 7:37 PM
ELAPSED TIME: 1 HOUR 36 MINUTES 50 SECONDS
REPORT GENERATOR OPTION >
In the example above AVSS found two missing indexes for one record and, using data
available within the records, reconstructed these indexes. Thus, by running the AVSS
DATA BASE INTEGRITY CHECKER not only are inconsistencies detected, but whenever
possible, they are corrected. However, there are some problems that AVSS is unable to
correct; these are referred to as "errors." In the example above, record 18934018813 is
missing the date of birth and the missing index cannot be constructed without this
information. It is advisible to contact a member of the AVSS Project for technical
assistance whenever an error is uncovered. Usually the error can be corrected quickly,
but it is important that it be corrected using the most appropriate means.
2.2.3 Error Entry Listing
The two integrity checkers described above are designed to search systematically for
database inconsistencies which usually arise from electrical disturbances or hardware
malfunctions. These are the most common malfunctions for an AVSS implementation.
Another less frequent type of problem is the result of a software error in AVSS or MUMPS.
Although both or these products are at a state of maturity and have undergone a decade of
development and operational usage, there is always the possibility of an error. This
generally occurs when an unusual set of circumstances occur that was not foreseen by the
AVSS Project design team, and are most likely to be observed soon after a new release of
AVSS. When a software error occurs, AVSS begins a recovery mechanism and asks you
to help document the circumstances that triggered the error: see Section 4.3 of the AVSS
User's Manual for a description of the procedure. The information generated as a result
JULY 1991
VERSION 4.106
of the error may be viewed using the ERROR ENTRY LISTING suboption. If any errors are
listed, please contact a member of the AVSS Project.
SYSTEM MAINTENANCE OPTION > [E][ENTER] RROR ENTRY LISTING
OUTPUT DEVICE <T> [ENTER]
<UNDEF>*XECUTE*^FSF:::4:0: ERROR OCCURRED ON 1/23/91 AT 04:44 PM
FORM: CONFIDENTIAL MORBIDITY REPORT
OPTION: REGISTER CONFIDENTIAL
MORBIDITY
REPORT
USER: NELSON,MARY
CLASSIFICATION: COUNTY SYSTEM MANAGER
CURRENT VARIABLE AT TIME OF ERROR WAS: REPORTER
COMMENT:
1> I WAS ATTEMPTING TO SKIP THE REPORTER NAME.
2.3 REPORTING AVSS SYSTEM DATA
A significant aspect of AVSS is its capability of automatically creating systematic logs of
user and communications activities. The System Manager should examine the contents
of these logs on a regular basis. Performing these functions every week is recommended.
2.3.1 List Override Processing
AVSS maintains extensive lists of choices for many data items; examples include: all the
states in the U.S. and countries in the world, all zip codes in California and its
surrounding states, and the attending physicians in a particular hospital. Users are
encouraged to make use of these lists by entering the first few characters of the name,
letting AVSS perform a match, and then completing the necessary information.
Occassionally, however, there will not be a match and the user will override the list and
enter non-list information. There are two principal reasons for such an override: an AVSS
list needs to be updated, or the user needs additional training in use of the list processing
feature. In both cases it is important that the System Manager be aware of the override.
In the former case, such as the appearance of a new zip code, there is a need to update
AVSS and this information needs to be communicated to the AVSS Project staff. In the
latter case, a minor amount of user followup training is usually necessary.
SYSTEM MAINTENANCE OPTION > [L][ENTER]IST OVERRIDE PROCESSING
PRINT OR SCRATCH VERIFICATION TABLE <P> [ENTER]
ENTER FORM CODE <*> [ENTER]
ENTER FIELD NAME <*> [ENTER]
OUTPUT DEVICE <T> [ENTER]
FORM: HCA - HOSPITAL BIRTH RECORD
FIELD: 7 - FATHER'S STATE OF BIRTH
SITE: 033
INDEX: 202539
BY: SMITH,MARTHA,CLERK ON 1/27/91
VALUE: FIJI ISLA
In this example the user entered the text "FIJI ISLA" rather that simply "FIJI" as contained
in the AVSS list for Item 7. The user could not complete "ISLAND" since there is room for
VERSION 4.106
JULY 1991
PAGE 1-12
AVSS SYSTEM MAINTENANCE MANUAL
only nine characters on the paper form. In this case the System Manager should contact
the user for some followup training in AVSS list processing.
A second example of output from the LIST OVERRIDE PROCESSING suboption is:
FORM: HCA - HOSPITAL BIRTH RECORD
FIELD: 13D - NAME, TITLE AND MAILING ADDRESS OF ATTENDANT
SITE: 033
INDEX: 223330
BY: TORREZ,FARINA,CLERK ON 6/23/91
VALUE: AGNES B. HOWARD, MD 5TH AVE. AND ESPLANADE CHICO
INDEX: 224657
BY: MARTIN,MARIE,CLERK ON 7/26/91
VALUE: AGNES HOWARD, M.D. W. 5TH AVENUE AND ESPLANADE
In this example two birth clerks have entered the entire birth attendant's name and
address and did not take advantage of the AVSS list for Item 13D. Although this too may
be the result of incomplete training, the fact that two clerks have overrode the list
processing for the same birth attendant indicates that it is a new birth attendant whose
name and address is not on the list for Item 13D. The System Manager should therefore
check the list for this item. If the attendant is not on the list, then the two records that
contained new attendant's name (file numbers 223330 and 224657) should be displayed
using the DISPLAY RECORD suboption under the HOSPITAL BIRTH RECORD option (see
Section 3.3.2 of the AVSS User's Manual). From these displays one can obtain the new
attendant's name, degree, address, and license number. Using this information, it is an
easy task to add the new birth attendant data to the Item 13D list by means of the MODIFY
USER LISTS suboption (see Section 3.3.18 of the AVSS User's Manual).
After you have reviewed and resolved all the entries in LIST OVERRIDE PROCESSING, then
you should delete them. This not only frees up disk storage space, but also reserves this
list for problems that need to be resolved, and since you must delete entries individually,
you will wish to keep the number to a minimum.
SYSTEM MAINTENANCE OPTION > [L][ENTER]IST OVERRIDE PROCESSING
PRINT OR SCRATCH VERIFICATION TABLE <P> [S][ENTER]
ENTER FORM CODE <*>[ENTER]
ENTER FIELD NAME <*>[ENTER]
FORM: HCA - HOSPITAL BIRTH RECORD
FIELD: 7 - FATHER'S STATE OF BIRTH
SITE: 033
INDEX: 202539
BY: SMITH,MARTHA ON 1/27/91
VALUE: FIJI ISL
SCRATCH <N> [Y][ENTER]
SCRATCHED
2.3.2 Communications Log Processing
In many implementations, AVSS automatically executes communications tasks during the
evening hours with other AVSS sites. Typically a local registration district computer will
telephone and connect to a hospital computer, then transfer electronic hospital birth
records. The process is more involved than ordinary electronic "bulletin boards" since
not only is the connection with another computer made automatically and information
transferred using error-correction techniques, but the receiving computer's database is
JULY 1991
VERSION 4.106
updated to reflect indexed information contained in the sending computer's database. An
even more complex process involves the reallocation of electronic birth certificates from
the district of birth occurrence to the district of mother's residence. Although these
communications occur automatically and require no human effort, it is the responsibility
of the System Manager to monitor them to identify any difficulties. The most common
problems are related to the inability of your computer to successfuly connect and sign-on
to its target computer. This can occur if the target computer is powered off, or powered
on but not running AVSS, or if its modem is not in an auto-answer state. Here is an
example of a successful hospital data transfer:
SYSTEM MAINTENANCE OPTION > [CO][ENTER]MMUNICATIONS LOG PROCESSING
WOULD YOU LIKE TO VIEW OR DELETE MESSAGES > [V][ENTER]
DISPLAY ALL LOGGED MESSAGES > [Y][ENTER]
CHOOSE OUTPUT DEVICE FOR DISPLAY
OUTPUT DEVICE <T>[ENTER]
RECEPTIONS HAVE OCCURRED ON LINE: 5
1 THURSDAY 4/18/91 AT 11:53.58 PM DIALING: Memorial Center (222),
NUMBER: 599-3900
2 THURSDAY 4/18/91 AT 11:54.23 PM PHONE CONNECTION MADE TO SITE NAME:
Memorial Center
l (222) PHONE NUMBER:599-3900
3 THURSDAY 4/18/91 AT 11:54.31 PM SUCCESSFUL LOGON TO: Memorial Center
(222) JOB:2
4 THURSDAY 4/18/91 AT 11:54.35 PM START RECEIVED
5 THURSDAY 4/18/91 AT 11:55.35 PM QUIT RECEIVED. FILED:2 AVG. TIME:30.0
SYSTEM MAINTENANCE OPTION >
An example of a successful receipt of reallocated electronic certificates is as follows:
SYSTEM MAINTENANCE OPTION > [CO][ENTER]MMUNICATIONS LOG PROCESSING
CHOOSE OUTPUT DEVICE FOR SUMMARY REPORT
OUTPUT DEVICE <T>[ENTER]
REALLOCATIONS HAVE OCCURRED ON LINE: 4
THERE ARE 398 LOG ENTRIES FROM TUESDAY 5/14/91 AT 08:13.29 AM
TO TUESDAY 5/14/91 AT 10:16.58 AM
WOULD YOU LIKE TO VIEW OR DELETE MESSAGES > [V][ENTER]
DISPLAY ALL LOGGED MESSAGES > [N][ENTER]
REALLOCATIONS
LINE 4
398 ENTRIES.
DISPLAY RANGE > [392--398][ENTER]
CHOOSE OUTPUT DEVICE FOR DISPLAY
OUTPUT DEVICE <T> [ENTER]
REALLOCATIONS ON LINE 4:
392 TUESDAY 5/14/91 AT 10:15.40 AM FILED:34,LCA,19134021087 ORIGIN
SITE=34
VERSION 4.106
JULY 1991
PAGE 1-14
393 TUESDAY
SITE=34
394 TUESDAY
SITE=48
395 TUESDAY
SITE=61
396 TUESDAY
SITE=34
397 TUESDAY
TIME:18.9
398 TUESDAY
AVSS SYSTEM MAINTENANCE MANUAL
5/14/91 AT 10:15.58 AM FILED:34,LCA,19134021140 ORIGIN
5/14/91 AT 10:16.19 AM FILED:48,LCA,19148001462 ORIGIN
5/14/91 AT 10:16.39 AM FILED:61,LCA,19161000975 ORIGIN
5/14/91 AT 10:16.58 AM FILED:34,LCA,19034019615 ORIGIN
5/14/91 AT 10:16.58 AM QUIT RECEIVED. FILED:371 AVG.
5/14/91 AT 10:16.58 AM REALLOCATION PROCESS TERMINATED.
DISPLAY RANGE > [^Q][ENTER]
Here are two examples of unsuccessful communications:
1 FRIDAY 6/28/91 AT 12:03.01 AM
NUMBER: 599-3900
2 FRIDAY 6/28/91 AT 12:09.42 AM
DIALING: Memorial Center (222),
PHONE CONNECTION RETRY EXCEEDED.
3 SATURDAY 6/29/91 AT 12:20.05 AM DIALING: Memorial Center (222),
NUMBER: 599-3900
4 SATURDAY 6/29/91 AT 12:20.59 AM UNABLE TO LOGON TO: Memorial Center
(222), HANGING UP...
In the Friday example, there was no answer by the Memorial Center modem, suggesting
that either the modem power was off, or the modem was not in an auto-answer mode, or
that it needed to be reset. You should contact Memorial staff and instruct them to check
all modem connections, turn off the modem power and power it back on, then run the
INITIALIZE MODEM suboption as described in Section 2.1.7.
In the Saturday example, a successful connection was made to the Memorial Center
modem, but there was no response by the computer, thus indicating that the computer
was powered off, or if the power was on that it was not running AVSS at 12:20 AM. You
should therefore contact the Memorial staff and instruct them to be sure that AVSS is left
running during during the appropriate evening/early morning hours.
Clearly the communications log can become large and consume much disk space. You
should therefore examine it frequently (ideally on a daily basis, but at least weekly),
resolve any difficulties, then delete it. If you wish, you could output it to a printer by
responding with a [P] or [3] (or other appropriate device number) in response to the
OUTPUT DEVICE > prompt. Once in the COMMUNICATIONS LOG suboption, the following
procedure should be used:
WOULD YOU LIKE TO VIEW OR DELETE MESSAGES > [D][ENTER]
DELETE ALL LOGGED MESSAGES > [?][ENTER]
ENTER 'Y' TO DELETE ALL MESSAGES LOGGED,
OR 'N' TO DELETE A PARTICULAR SET OF MESSAGES.
DELETE ALL LOGGED MESSAGES > [Y][ENTER]
FINAL CONFIRMATION. DELETE ALL MESSAGES <N> [Y][ENTER]
DELETED.
JULY 1991
VERSION 4.106
SYSTEM MAINTENANCE OPTION >
2.3.3 Daytime Communications Startup
If you have experienced difficulty in establishing a connection with an AVSS hospital
computer, have followed the troubleshooting procedures described in the previous
section, and wish to test the communications process without delay, then you can use the
DAYTIME COMMUNICATIONS STARTUP suboption in lieu of waiting for AVSS to
automatically attempt the process. To run this option you must know the Device Number
that is programmed to initiate automated communications. You can determine this by
examining the output from the COMMUNICATIONS LOG PROCESSING suboption (frequently
this will be Device 4). Then use the following procedure.
SYSTEM MAINTENANCE OPTION > [D][ENTER]AYTIME COMMUNICATIONS STARTUP
SOURCE FOR COMMUNICATION PARAMETERS
LINE NUMBER > [4][ENTER]
SITE NUMBER > [?][ENTER]
SELECT FROM ONE OF THE FOLLOWING SITES:
SITE: 1 = Memorial Center (222)
SITE: 2 = Community Hospital (270)
SITE: 3 = Central Health Clinic (300)
SITE: 4 = St. Ignacio (368)
SITE NUMBER > [1][ENTER] TRANSFER STARTED: Memorial Center (222)
EXIT
Your screen will be cleared, AVSS will automatically logoff this session, and then begin
dialing the target site. You can logon again, and monitor the process using the SYSTEM
If you observe the Routine Name
STATUS suboption described in Section 2.1.1.
associated with Device 4 to be FSRECR4 then there is good evidence that successful
communications are progressing. You may also examine the output from the
COMMUNICATIONS LOG PROCESSING for evidence of a successful connection.
2.3.4 User Report By Activity Index
There is a USER REPORT BY ACTIVITY INDEX suboption under each of the form-specific
options supported at a particular site; for example, the birth certificate (LCA), the hospital
birth record (HCA), and the confidential morbidity report (CMR). Examples of this report
for the HCA form were given in Section 3.3.14 of the AVSS User's Manual. There may be
instances however, where it is desirable to run a user report for more than one form. To
do this you must run the USER REPORT BY ACTIVITY INDEX suboption under the SYSTEM
MAINTENANCE option as follows:
SYSTEM MAINTENANCE OPTION > [US][ENTER]ER REPORT BY ACTIVITY INDEX
INITIALIZING..
SELECT THE FORMS AND SITES TO BE REPORTED ON:
FORM. SELECTION > [^L][ENTER]
CMR=
CONFIDENTIAL MORBIDITY REPORT
VERSION 4.106
JULY 1991
PAGE 1-16
HCA=
LCA=
AVSS SYSTEM MAINTENANCE MANUAL
HOSPITAL BIRTH RECORD
BIRTH CERTIFICATE
FORM. SELECTION > [*][ENTER]
FORM. SELECTION >[ENTER]
XIND. SITE CODES > [34][ENTER]
XIND. SITE CODES >[ENTER]
THE FOLLOWING SITES / FORMS WILL BE REPORTED ON:
34
CMR
34
HCA
34
LCA
BEGINNING DATE <1/1/91> [7 1 91][ENTER]
ENDING DATE <TODAY> [7 7 91][ENTER]
(7/1/91)
(7/7/91)
SUMMARY REPORT ONLY <Y> [ENTER]
OUTPUT DEVICE <T> [ENTER]
SEARCHING DATABASE **************
Please refer to the AVSS User's Manual for examples of the output format.
2.4 MANAGING AVSS RECORDS
Equal in importance to the assuring database integrity is the System Manager's
responsibility in maintaining backups of AVSS data. There are two basic types of
backups that you need to be concerned with: a full (or complete) system backup as
opposed to a backup of only AVSS records. The former backs up your entire AVSS
implementation including the MUMPS operating system and associated programs as well
as all AVSS programs and data. In some cases a full system backup will also contain all
PC-DOS files. These backups are necessarily dependent on specific system resources such
as the type of backup tape drive, size of floppy diskette, or specialized backup software.
In short, they are varied, cannot be standardized, and are not easily described in an
general-purpose manual. This section concerns procedures to backup and otherwise
manage selected AVSS records. These procedures are designed to be complementary to
complete system backups and to allow a second level of backup redundancy.
2.4.1 Backup Record Data
The BACKUP RECORD DATA suboption allows you to select a target group of AVSS records
to be backed up to tape or diskette. This is most frequently used to archive data so that it
can be purged from disk to free up space and restored at a later date if necessary. It also
provides for redundant backup. For example, as shown below, you could backup the
birth certificates (LCA forms) for a particular month:
JULY 1991
VERSION 4.106
SYSTEM MAINTENANCE OPTION > [BA][ENTER]CKUP RECORD DATA
INITIALIZING..
FORMS. SELECTION > [LCA][ENTER] = BIRTH CERTIFICATE
(Entering an asterisk "*" here will select all forms resident on the system.)
FORMS. SELECTION > [ENTER]
XINDS. SITE CODES > [34][ENTER]
(Entering an asterisk "*" here will select all site codes resident on the system.)
XINDS. SITE CODES > [ENTER]
THE FOLLOWING SITES / FORMS WILL BE OUTPUT :
34
LCA,
INDEX TO SEARCH > [DT][ENTER]
(DT) DATE OF BIRTH
ENTER BEGIN VALUE FOR DATE OF BIRTH <1/1/90 >[9 1 89][ENTER] (9/1/89)
ENTER ENDING VALUE FOR DATE OF BIRTH < T > [9 30 89][ENTER] (9/30/89)
RUN ARCHIVE IN THE BACKGROUND <Y> [ENTER]
SOC. SAVE OUTPUT CODE <ARCHIV01> [ENTER]
WHEN FINISHED, YOUR OUTPUT CAN BE VIEWED BY USING 'OUTPUT SAVED REPORT
UNDER THE REPORT GENERATOR OPTION.
PREPARE PC-DOS FILE AND HIT RETURN > [ENTER]
PLEASE BE SURE TO RUN 'VERIFY RECORD DATA' OPTION TO ENSURE A RELIABLE
BACKUP PRIOR TO DELETING THIS DATA.
ENTER OUTPUT FILE NAME <BU073091.C09> [A:SEPT89.LCA] [ENTER]
(You could accept the default name, but here the A: was used to indicate that the file
would be written to floppy disk, and a more meaningful file name was specified.)
Note that AVSS automatically generates a report that logs the backup activity and assigns
a default name of ARCHIV01, ARCHIV02, etc. (of course you may override the default
name if you wish). You may check on the progress of the backup job by running a
SYSTEM STATUS suboption as described in Section 2.1.1 and looking for the Routine
Name FSARCHV2 using Device 51. When the job is no longer active then you may use
the REPORT GENERATOR to examine the backup log as follows:
REPORT GENERATOR OPTION > [O][ENTER]UTPUT SAVED REPORT
ID. ID CODE# <4> [ENTER] MANAGER, SYSTEM
OUT. OUTPUT REPORT CODE > [A][ENTER]RCHIV01 = GENERAL BACKUP LOG
[9/30/90 12:09 PM]
ARCHIV01 =GENERAL BACKUP LOG [9/30/90 12:09 PM]
ARCHIV01 = [ENTER]
OUTPUT DEVICE <T> [ENTER]
VERSION 4.106
JULY 1991
PAGE 1-18
AVSS SYSTEM MAINTENANCE MANUAL
GENERAL BACKUP LOG [9/30/90 12:09 PM]
*** 9/30/90 12:09 PM ***, XIND=34, FORM=LCA
USER: MANAGER,SYSTEM
GENERAL ARCHIVE DATA FOR: 34(LCA) , VOL=1
PC FILE NAME: A:SEPT89.LCA
SEARCH METHOD: DATE OF BIRTH
BEGINNING RANGE > 9/1/89
ENDING RANGE
> 9/30/89
*** 9/30/90
12:10 PM ***, XIND=34, FORM=LCA
(N=674, TOTAL=674)
*** 9/30/90 12:27 PM ***
END ARCHIVE (SPACE=1210639, TOTAL=674, VOL=1)
We see that it took 17 minutes to backup 674 LCA records or about 2 seconds per record.
This time can vary considerably, however, depending on the inherent speed of your AVSS
computer. We also find that the 674 records required 1,210,639 byte of diskette storage
(about 1,800 bytes per record), and thus just fit on a single 5 1/4 inch high density
diskette, which can store 1,213,952 bytes. Note that AVSS does not have the capability of
spreading a backup across multiple diskettes, so that to be safe, you should specify a date
range that corresponds to fewer than 600 LCA records for 5 1/4 inch high density diskettes
or fewer than 700 LCA records for 3 1/2 inch high density diskettes. For example if your
site had 1,200 births per year, you could run the BACKUP RECORD DATA suboption in two
six-month increments onto two 5 1/4 inch high density floppies. However, if there were
1,500 annual births, you would run three four-month intervals.
2.4.2 Set Last Full Backup Date
As discussed above, the ability of AVSS to backup individual records is complementary
with a full system backup using other general purpose backup software. To insure this
complementarity, AVSS needs to know the date of the last full system backup. Thus, you
should run the following procedure after each full system backup:
SYSTEM MAINTENANCE OPTION > [SET][ENTER] LAST FULL BACKUP DATE
LAST FULL BACKUP DATE > 9/1/90
ENTER THE DATE OF THE LAST FULL BACK-UP <9/1/90> [9 7 90][ENTER] 9/7/90
SYSTEM MAINTENANCE OPTION >
2.4.3 Differential Backup
One successful backup strategy is to intermix full system backups with AVSS recordspecific backups. For example, you could perform a full system backup weekly and an
AVSS backup daily. The DIFFERENTIAL BACKUP suboption will backup all AVSS records
that have been added from the date of last full backup (as set by the procedure described
above) until today. Note this applies to the date the records were entered, not to the
date of the event. By combining the full backup and the differential backup, you can
restore the entire database. Running a differential backup daily is least disruptive, since
JULY 1991
VERSION 4.106
as opposed to a full backup, you do not have to shutdown AVSS, and it can run as a
background job, having little impact on users. The procedure is as follows:
SYSTEM MAINTENANCE OPTION > [DIF][ENTER]FERENTIAL BACKUP
INITIALIZING..
DATE RANGE FOR THIS DIFFERENTIAL BACKUP: 9/7/90 TO 9/10/90
RUN ARCHIVE IN THE BACKGROUND <Y> [ENTER]
SOC. SAVE OUTPUT CODE <ARCHIV01> [ENTER]
WHEN FINISHED, YOUR OUTPUT CAN BE VIEWED BY USING 'OUTPUT SAVED REPORT'
UNDER THE REPORT GENERATOR OPTION.
PREPARE PC-DOS FILE AND HIT RETURN > [ENTER]
PLEASE BE SURE TO RUN 'VERIFY RECORD DATA' OPTION TO ENSURE A RELIABLE
BACKUP PRIOR TO DELETING THIS DATA.
ENTER OUTPUT FILE NAME <BU091090.D57> [A:MONDAY1.DIF][ENTER]
(Note: You should always write the name of the file on the diskette or tape.)
Again, you may retreive the log of activity using the REPORT GENERATOR:
REPORT GENERATOR OPTION > [O][ENTER]UTPUT SAVED REPORT
OUT. OUTPUT REPORT CODE > [A][ENTER]RCHIV01 = DIFFERENTIAL BACKUP LOG
[9/10/90 03:47 PM]
ARCHIV01 =DIFFERENTIAL BACKUP LOG [9/10/90 03:47 PM]
ARCHIV01 =[ENTER]
OUTPUT DEVICE <T>[ENTER]
DIFFERENTIAL BACKUP LOG [9/10/90 03:47 PM]
*** 9/10/90 03:47 PM ***, XIND=34, FORM=LCA
USER: MANAGER,SYSTEM
DIFFERENTIAL ARCHIVE DATA FOR: 34(LCA) , VOL=1
PC FILE NAME: A:MONDAY1.DIF
SEARCH METHOD: LAST UPDATE
BEGINNING RANGE > 9/7/90
ENDING RANGE
> 9/10/90
*** 9/10/90 03:48 PM ***, XIND=34, FORM=LCA
(N=39, TOTAL=39)
*** 9/10/90 03:48 PM ***
END ARCHIVE (SPACE=70548, TOTAL=39, VOL=1)
2.4.4 Incremental Backup
The
INCREMENTAL BACKUP suboption is very similar in
BACKUP suboption, differing only in the date range
function to the DIFFERENTIAL
of records that is selected.
Differential backups always cover records that were entered during the time period from
the date of last full backup to today's date, and thus will span a longer period as time
progresses until the date of last full backup is reset. The time range for incremental
backups is based on the date of the last incremental backup and covers that date until
today. If you perform incremental backups daily, they will cover one day of data entry
activity. Thus incremental backups tend to remain about the same size, while differential
VERSION 4.106
JULY 1991
PAGE 1-20
AVSS SYSTEM MAINTENANCE MANUAL
backups will grow larger until another full system backup is performed. However,
incremental backups require more careful management since in order to restore a system
due to an equipment malfunction, it is necessary to combine the full system backup with
many incremental backups, and if any one is missing then an incomplete restoration
results. For this reason it is recommended that you perform differential backups using a
different diskette for each day of the week and possibly have several different weeks of
different diskettes. An example of an incremental backup is:
SYSTEM MAINTENANCE OPTION > [INC][ENTER]REMENTAL BACKUP
INITIALIZING..
DATE RANGE FOR THIS INCREMENTAL BACKUP: 9/10/90 TO 9/11/90
RUN ARCHIVE IN THE BACKGROUND <Y> [ENTER]
SOC. SAVE OUTPUT CODE <ARCHIV03> [ENTER]
WHEN FINISHED, YOUR OUTPUT CAN BE VIEWED BY USING 'OUTPUT SAVED REPORT'
UNDER THE REPORT GENERATOR OPTION.
PREPARE PC-DOS FILE AND HIT RETURN >[ENTER]
PLEASE BE SURE TO RUN 'VERIFY RECORD DATA' OPTION TO ENSURE A RELIABLE
BACKUP PRIOR TO DELETING THIS DATA.
ENTER OUTPUT FILE NAME <BU120389.H11> [A:IN091190.BAK][ENTER]
Use the same procedure described above to view the results of the backup activity with
the OUTPUT SAVED REPORT suboption under the REPORT GENERATOR.
2.4.5 Verify Record Data
To insure that the data that was written to backup magnetic media (either tape or diskette)
agree exactly with what is contained on permanent disk storage, you should run the
VERIFY RECORD DATA suboption. This is especially important before you purge records
from the system. To run this procedure, mount the tape or insert the diskette to be
verified while noting the name of the file, then perform the following:
SYSTEM MAINTENANCE OPTION > [VER][ENTER]IFY RECORD DATA
PREPARE PC-DOS FILE WRITE DISABLED AND ONLINE.
HIT RETURN WHEN READY OR '^Q' OR 'Q' TO QUIT >[ENTER]
ENTER INPUT FILE NAME > [A:SEPT90.LCA][ENTER]
REWINDING ...
ARCHIVE HEADER: GENERAL ARCHIVE DATA FOR: 34(LCA) ,VOL=1
CREATED ON: 9/30/90
CONTINUE (C) OR QUIT (Q) > [C][ENTER]
JULY 1991
VERSION 4.106
RUN VERIFY ARCHIVE IN THE BACKGROUND <N> [Y][ENTER]
SOC. SAVE OUTPUT CODE <VERIFY1> [ENTER]
You may examine the results of the verify process using the REPORT GENERATOR:
REPORT GENERATOR OPTION> [O][ENTER]UTPUT SAVED REPORT
ID. ID CODE# <4> [ENTER] MANAGER,SYSTEM
OUT. OUTPUT REPORT CODE > [V][ENTER]ERIFY01 = AVSS TAPE ARCHIVE VERIFY
VERIFY01 =AVSS TAPE ARCHIVE VERIFY (9/30/90
VERIFY01 =[ENTER]
10:27 AM)
OUTPUT DEVICE <T>[ENTER]
AVSS TAPE ARCHIVE VERIFY (9/30/90 2:27 PM)
USER: MANAGER,SYSTEM
*** 9/30/90 2:27 PM ***, XIND=34, FORM=SM
BEGINNING VERIFICATION.
HEADER:GENERAL ARCHIVE DATA FOR: 34(LCA) ,VOL=1
CREATED:9/30/90
*** 9/30/90
JOB:5
DEVICE:51
2:27 PM ***, XIND=34, FORM=LCA
SUCCESSFUL VERIFICATION - NO ERRORS. JOB:5 DEVICE:51
NUMBER OF RECORDS VERIFIED: 674
2.4.6 Kill Record Data
Sooner or later your disk storage space will be exhausted and it will be necessary to
delete some records. However, before doing this, you should run the AVSS DATA BASE
INTEGRITY CHECKER (Section 2.2.2), then backup and verify the target records according
to the procedures described in Sections 2.4.1 and 2.4.5. For AVSS-PC implementations it
is also a good idea to make DOS copies of the backup diskettes and store them in a
different physical location to have redundant backups. For minicomputers this
redundancy must be provided by running a second tape using BACKUP RECORD DATA, and
then verifying it. After you are certain that you have a valid backup and preferably a
redundant copy as well, then you may proceed with the KILL RECORD DATA as follows:
SYSTEM MAINTENANCE OPTION > [K][ENTER]ILL RECORD DATA
PASSWORD > [SPECIAL PASSWORD][ENTER]
(lease contact the AVSS Project if you do not know the special password.
INITIALIZING..
FORMS. SELECTION > [LCA][ENTER] = BIRTH CERTIFICATE
FORMS. SELECTION >[ENTER]
XINDS. SITE CODES > [34][ENTER]
VERSION 4.106
JULY 1991
PAGE 1-22
AVSS SYSTEM MAINTENANCE MANUAL
XINDS. SITE CODES >[ENTER]
*** WARNING ***
THIS ROUTINE PERMANENTLY REMOVES RECORDS FROM THE DATABASE.
ARE YOU SURE <N> [Y] [ENTER]
DELETE RECORDS FROM DATE <1/1/89> [9 1 89] [ENTER]
TO DATE <T> [9 30 89][ENTER]
RUN THIS PROGRAM IN THE BACKGROUND <N> [Y][ENTER]
FINAL CONFIRMATION.
DELETE RECORDS FROM 9/1/89 TO 9/30/89
FOR THE FOLLOWING SITES/FORMS:
34
LCA,
OK <N> [Y][ENTER]
2.4.7 Restore Record Data
If you should need to reload the records that you have backed up and deleted, then you
can use the RESTORE RECORD DATA suboption as follows:
SYSTEM MAINTENANCE OPTION > [RES][ENTER]TORE RECORD DATA
LOAD BACKUP MEDIA. HIT RETURN WHEN READY, Q TO QUIT >[ENTER]
ENTER INPUT FILE NAME > [A:SEPT89.LCA][ENTER]
REWINDING...
GENERAL ARCHIVE DATA FOR: 34(LCA)
OK TO RESTORE <N> [Y][ENTER]
R)EPLACE OR S)KIP DUPLICATE RECORDS <S>[ENTER]
RUN RESTORE IN BACKGROUND <Y> [ENTER]
SOC. SAVE OUTPUT CODE <RESTOR01>[ENTER]
The results of the restore activity are stored in a report that is automatically given the
name RESTORE01, RESTORE01, etc. As usual, you can review the results using the REPORT
GENERATOR:
REPORT GENERATOR OPTION > [O][ENTER]UTPUT SAVED REPORT
ID. ID CODE# <4>
MANAGER,SYSTEM
OUT. OUTPUT REPORT CODE > [R][ENTER]ESTOR01 = ARCHIVE RESTORE LOG
(12/4/90 12:14 PM)
RESTOR01 =ARCHIVE RESTORE LOG (12/4/90
RESTOR01 =[ENTER]
12:14 PM)
OUTPUT DEVICE <T>[ENTER]
ARCHIVE RESTORE LOG (12/4/90 01:26 PM)
*** 12/4/90 01:26 PM ***, XIND=34
JULY 1991
VERSION 4.106
USER: MANAGER,SYSTEM
*** 12/4/90 12:26 PM ***, XIND=34, RESTORED=0
*** 12/4/90 12:43 PM ***, XIND=34, FORM=LCA, INDX=18934145600
RESTORE COMPLETE: RECORDS SKIPPED:0, RECORDS RESTORED:674
2.4.8 Selective Record Restore
There may be unusual circumstances where you may wish to select individual records to
be restored using the following procedure:
SYSTEM MAINTENANCE OPTION > [SEL][ENTER]ECTIVE RECORD RESTORE
ENTER FILE NUMBERS TO BE RESTORED
> [18934013272][ENTER]
> [18934013286][ENTER]
> [18934013316][ENTER]
>[ENTER]
LOAD BACKUP MEDIA. HIT RETURN WHEN READY, Q TO QUIT >[ENTER]
ENTER INPUT FILE NAME > [A:SEPT89.LCA][ENTER]
GENERAL ARCHIVE DATA FOR: 34(LCA)
OK TO RESTORE <N> [Y][ENTER]
R)EPLACE OR S)KIP DUPLICATE RECORDS <S> [ENTER]
RUN RESTORE IN BACKGROUND <Y>[ENTER]
SOC. SAVE OUTPUT CODE <RESTOR02>[ENTER]
Againl, you should check the restore log using the REPORT GENERATOR:
OUT. OUTPUT REPORT CODE > [R][ENTER]ESTOR02 = ARCHIVE RESTORE LOG
(12/4/90 01:26 PM)
RESTOR02 =ARCHIVE RESTORE LOG (12/4/90
RESTOR02=[ENTER]
01:26 PM)
OUTPUT DEVICE <T>[ENTER]
ARCHIVE RESTORE LOG (12/4/90 01:26 PM)
*** 12/4/90 01:26 PM ***, XIND=34
USER: MANAGER,SYSTEM
*** 12/4/90 01:26 PM ***, XIND=34, RESTORED=0
*** 12/4/90 01:26 PM ***, XIND=34, FORM=LCA, INDX=18934018695
RESTORE COMPLETE: RECORDS SKIPPED:0, RECORDS RESTORED:3
2.5 MANAGING SECURITY
Another important aspect of system management is protecting against unauthorized use.
This is especially pertinent since much of the data stored in AVSS is confidential and
protected by state law. Access to AVSS options and data is limited by user identification
and by communication device number. Only those individuals with authorized
passwords are permitted to logon to the system, and their passwords tell the system not
only who they are by name and facility, but also the degree to which they have access to
AVSS options and suboptions. Similarly, communication devices can be restricted in
terms of access to certain options and suboptions. For example, as System Manager, you
VERSION 4.106
JULY 1991
PAGE 1-24
AVSS SYSTEM MAINTENANCE MANUAL
are authorized to access all AVSS functions, but you may attempt to perform an activity
by means of a modem line that does not allow entry into the SYSTEM MAINTENANCE
option. Alternatively, a birth clerk might use a terminal connected directly to the AVSS
computer, which allows access to all options and suboptions, but their password limits
access to only the BIRTH CERTIFICATE option. It is the responsibility of the System
Manager to control access by means of both password and device security.
2.5.1 Device Table
As discussed earlier, a "device" is a communications port on your computer that can be
used to support a terminal or printer, either by direct cable or by means of telephone
modems. Although terminals and printers conform to the American Standard Code for
Information Interchange (ASCII) character codes, there remains a considerable variation in
the protocols that control enhanced features. The DEVICE TABLE suboption allows you to
customize device ports to the specific characteristics of the terminals or printer on your
system. It also allows you to control access to AVSS functions by device number. Using
the DEVICE TABLE is somewhat more complex than other suboptions and will therefore be
described in several phases. First, an overview:
SYSTEM MAINTENANCE OPTION > [DE][ENTER]VICE TABLE
LINE NUMBER > [^L][ENTER]
1 : CONSOLE
4 : MODEM 894-4326
5 : WORKSTATION IN NH 2207
51 : PC-DOS FILE
LINE NUMBER > [4][ENTER]
OLD LINE BEING EDITED.
LOCATION <MODEM 894-4326> [ENTER]
TERMINAL TYPE > [?][ENTER]
ENTER THE TERMINAL TYPE OR ^L FOR A LIST OF SUPPORTED TERMINALS.
TERMINAL TYPE >[ENTER]
LINE LENGTH <80>[ENTER]
PAGE SIZE <24>[ENTER]
SOFT OR HARDCOPY <S> [?][ENTER]
ENTER 'S' IF THIS TERMINAL IS A CRT, 'H' IF IT PRINTS ON PAPER
SOFT OR HARDCOPY <S>[ENTER]
PRINTER TYPE <> [?][ENTER]
ENTER THE PRINTER TYPE OR ^L FOR A LIST OF SUPPORTED PRINTERS.
PRINTER TYPE <>[ENTER]
MODEM
=HAYES
Note: If the device is connected to a modem this should almost always be "HAYES".
MODEM
=[ENTER]
UPDATE DEVICE RESTRICTIONS? <N>[ENTER]
SETTING DEVICE TABLE ENTRY ...
LINE NUMBER >[ENTER]
SYSTEM MAINTENANCE OPTION >
JULY 1991
VERSION 4.106
In this overview, we have examined the settings for Device 4, but have not made any
changes. Note that there was not a terminal type or printer type specified, resulting in
Device 4 as a generic communications port that is unable to take advantage of any special
terminal or printer features such as reverse video or enhanced printing. In most cases,
however, you will want to tailor a device to a specific brand/model of terminal and
printer. Assume it is a Wyse Model 60 terminal and an IBM Proprinter Model II that you
wish to use exclusively on Device 4. The proper procedure would then be:
SYSTEM MAINTENANCE OPTION > [DE][ENTER]VICE TABLE
LINE NUMBER > [4][ENTER]
OLD LINE BEING EDITED.
LOCATION <MODEM 894-4326>[ENTER]
TERMINAL TYPE > [^L][ENTER]
C-4520
C-ADDS
C-ADM22
ETC.
C-TI820
C-VT100
C-VT132
C-VT220
ETC.
C-WY50
C-WY60
C-WY75
ETC.
TERMINAL TYPE > [C-WY60][ENTER]
PRINTER TYPE <> [^L][ENTER]
P-DESKJET
P-FX80
P-HPLJ2
P-HPLJ3
ETC.
P-PROPRNT
P-PROPRNT2
ETC.
PRINTER TYPE <> [P-PROPRNT2][ENTER]
MODEM
=HAYES
MODEM
=[ENTER]
UPDATE DEVICE RESTRICTIONS? <N>[ENTER]
SETTING DEVICE TABLE ENTRY ...
LINE NUMBER >[ENTER]
SYSTEM MAINTENANCE OPTION >
Just as you can customize a device to match certain models of terminals and printers, you
can also tailor it to the needs of specific users. Assume, for example, that Device 4 will
be used only by a hospital to produce birth certificate forms. You would wish to restrict
the use of that port by the following procedure using a [0] to indicate no access, an [*] to
indicate access to all suboptions, and a [1] to allow access to some suboptions:
SYSTEM MAINTENANCE OPTION > [DE][ENTER]VICE TABLE
LINE NUMBER > [4][ENTER]
OLD LINE BEING EDITED.
LOCATION <MODEM 894-4326>[ENTER]
TERMINAL TYPE <C-WY60>[ENTER]
PRINTER TYPE <P-PROPRNT2>[ENTER]
VERSION 4.106
JULY 1991
PAGE 1-26
AVSS SYSTEM MAINTENANCE MANUAL
MODEM
=HAYES
MODEM
=[ENTER]
UPDATE DEVICE RESTRICTIONS? <N> [Y][ENTER]
ENTER RESTRICTIONS FOR EACH OF THE FOLLOWING:
OLD BIRTH CERTIFICATE <0>[ENTER]
CONFIDENTIAL MORBIDITY REPORT <*>[0][ENTER]
CENSUS TRACTING UTILITIES <0>[ENTER]
DEATH CERTIFICATE <0>[ENTER]
DELIVERY RECORD <*>[0][ENTER]
FETAL DEATH CERTIFICATE <0>[ENTER]
OLD HOSPITAL BIRTH RECORD <0>[ENTER]
HOSPITAL BIRTH RECORD <0> [*][ENTER]
BIRTH CERTIFICATE <1>[0][ENTER]
MAILBOX <*> [ENTER]
OLD CONFIDENTIAL MORBIDITY REPORT <0>[ENTER]
YOUR PASSWORD <*> [ENTER]
REPORT GENERATOR <*> [1][ENTER]
QUERY DATABASE <0> [1][ENTER]
REPORT EDITOR <0>[ENTER]
GENERATE REPORT <0> [1][ENTER]
OUTPUT SAVED REPORT <0> [1][ENTER]
LIST SAVED REPORTS <0> [1][ENTER]
SYSTEM MAINTENANCE <0> [1][ENTER]
SYSTEM STATUS <0> [ENTER]
BROADCAST MESSAGE <0>[ENTER]
LIST OVERRIDE PROCESSING <0>[ENTER]
Use [0] for the remainder of the SYSTEM MAINTENANCE suboptions until:
CLASSIFICATION FILE <0> [ENTER]
ID FILE <0> [1][ENTER]
SECURITY REPORT <0>[ENTER]
PERIPHERAL FILE <0>[ENTER]
EXPAND AVSS DATABASE <0>[ENTER]
SETTING DEVICE TABLE ENTRY ...
LINE NUMBER >[ENTER]
SYSTEM MAINTENANCE OPTION >
In this example, we allowed Device 4 to access all suboptions under the HOSPITAL BIRTH
RECORD, MAILBOX, and YOUR PASSWORD. For the REPORT GENERATOR we allowed access
to all suboptions except REPORT EDITOR, and for SYSTEM MAINTENANCE, we restricted
access to only the ID FILE suboption.
2.5.2 Classification File
The CLASSIFICATION FILE limits access to AVSS options and suboptions for certain user
classifications in the same manner the the DEVICE TABLE limits access for specific
devices. In addition to the System Manager classification, which allows access to all
AVSS options and suboptions, there are nine standard classifications that come
automatically with every implementation. These classifications should suffice in most
instances, but there may be special circumstances the require you to create a custom
classification. The procedure is as follows:
SYSTEM MAINTENANCE OPTION > [CL][ENTER]ASSIFICATION FILE
CLASSIFICATION NUMBER > [?][ENTER]
ENTER THE CLASSIFICATION NUMBER TO BE ADDED OR EDITED,
JULY 1991
VERSION 4.106
OR '^L' FOR A CURRENT LIST OF CLASSES.
THIS SHOULD BE A THREE DIGIT NUMBER GREATER THAN 99.
CLASSIFICATION NUMBER > [^L][ENTER]
1 :
100
200
300
400
500
600
700
800
900
SYSTEM MANAGER
: SITE SYSTEM MANAGER
: COUNTY SYSTEM MANAGER
: HOSPITAL SYSTEM MANAGER
: REMOTE HOSPITAL MANAGER
: COUNTY DATA ENTRY
: HOSPITAL DATA ENTRY
: REMOTE HOSPITAL DATA ENTRY
: ANALYST
: RESERVED FOR FUTURE USE
CLASSIFICATION
CLASSIFICATION
TIME OUT VALUE
ENTER THE TIME
TIME OUT VALUE
NUMBER > [601][ENTER]
NEW CLASSIFICATION BEING ADDED
NAME > [SPECIAL HOSPITAL USER][ENTER]
> [?][ENTER]
OUT VALUE FOR ALL READS IN SECONDS.
> [300][ENTER]
The time out value, which is usually set to 300 seconds (5 minutes) , is the time AVSS will
stay active at your current prompting level. If there are several time out lapses, AVSS
will gradually "back out" and terminate the interactive session.
ENTER RESTRICTIONS FOR EACH OF THE FOLLOWING:
OLD BIRTH CERTIFICATE <0>
CONFIDENTIAL MORBIDITY REPORT <0>[ENTER]
CENSUS TRACTING UTILITIES <0>[ENTER]
(You may tailor the AVSS options and suboptions to this new classification using [0], [1],
or [*] as described in Section 2.5.1 above.)
SYSTEM MAINTENANCE <0> [ENTER]
ENTERED INTO CLASSIFICATION FILE.
CLASSIFICATION NUMBER >[ENTER]
SYSTEM MAINTENANCE OPTION >
2.5.3 ID File
The System Manager controls user access to AVSS by means of the ID FILE suboption.
Individuals may be admitted, deactivated, reactivated, or have identifying characteristics
edited. It can be used to list those persons having access using the following procedure:
SYSTEM MAINTENANCE OPTION > [ID][ENTER] FILE
ID FILE FUNCTION > [?][ENTER]
ENTER 'A' TO ADMIT A PERSON,
'E' TO EDIT A PERSON,
'D' TO DEACTIVATE A PERSON,
'R' TO REACTIVATE A PERSON,
'L' TO LIST ID FILE ENTRIES.
ID FILE FUNCTION > [L][ENTER]IST
VERSION 4.106
JULY 1991
PAGE 1-28
AVSS SYSTEM MAINTENANCE MANUAL
ID# A/D LAST,FIRST,TITLE ACKNOWLEDGE CLASSIFICATION
SITE
----------------------------------------------------------------------2 A CHAVEZ,PATRICIA,AA PATRICIA
HOSPITAL DATA ENTRY CNTY-0|HOSP-0
3 A MARTIN,JOAN A,RN
JOAN
HOSP SYSTEM MANAGER CNTY-0|HOSP-0
5 A SMITH,ROBERT,
BOB
COUNTY DATA ENTRY
CNTY-0|HOSP-*
1 D GOTTFRED,RONALD,
RON
COUNTY SYS MANAGER CNTY-0|HOSP-*
4 A MANAGER,SYSTEM
CHIEF
SYSTEM MANAGER
ID FILE FUNCTION > [ENTER]
SYSTEM MAINTENANCE OPTION >
The ID# is an arbitrary number assigned to each person admitted to a particular AVSS
implementation. Once admitted, an individual cannot be removed since an audit trail
must be preserved of past user activity for future reports. However, if a person changes
employment status and is longer to be permitted access to AVSS, they should be
deactivated. The A/D column reports on each user's active/deactive status. The name
column is self-explanatory, and the ACKNOWLEDGEMENT column lists the name or phrase
that the user desires AVSS to use for acknowledgement upon sign-on, etc. Classification
was discussed above, and the SITE column indicates the site(s) within the AVSS database
that the user is allowed to access. An asterisk (*) indicates all sites at that level. In the
example above, both Patricia Chavez and Joan Martin can access only Hospital 0 in
County 0, whereas both Robert Smith and Ronald Gottfred can access all hospitals but
only within County 0. Users classified as SYSTEM MANAGER can by definition access all
sites.
As System Manager, you can edit user attributes in using the ID FILE suboption. For
example, suppose that Robert Smith has forgotten his password. Since all passwords in
AVSS are encrypted and users are to protect the knowledge of their passwords from all
other persons, the only recourse is to assign a temporary password to Mr. Smith so that
he can sign-on again and run the CHANGE PASSWORD suboption under the YOUR
Assume, also that Mr. Smith requests that you change his
PASSWORD option.
acknowledgement name from "BOB" to "ROBERT" and you are authorized to give him
access to data from all counties stored on your AVSS computer. To do this, you would
apply the ID FILE suboption as follows:
SYSTEM MAINTENANCE OPTION > [ID][ENTER] FILE
ID FILE FUNCTION > [E][ENTER]DIT
NAME (LAST,FIRST) > [S,R][ENTER]
ID# A/D LAST,FIRST,TITLE ACKNOWLEDGE CLASSIFICATION
SITE
----------------------------------------------------------------------5 A SMITH,ROBERT,
BOB
COUNTY DATA ENTRY
CNTY-0|HOSP-*
IS THIS THE PERSON? <Y>[ENTER]
NAME (LAST,FIRST MIDDLE,TITLE) <SMITH,ROBERT>[ENTER]
CLASSIFICATION <500>[ENTER]
LOG-IN PASSWORD <722540> [NEWPASSWORD][ENTER]
ACKNOWLEDGEMENT NAME <BOB> [ROBERT][ENTER]
ALL COUNTYS <N> [Y][ENTER]
ALL HOSPITALS <N> [Y][ENTER]
DISPLAY HELP > [?][ENTER]
JULY 1991
VERSION 4.106
ENTER 1
DISPLAY
DISPLAY
ENTER 1
DISPLAY
TO ENABLE AUTOMATIC HELP DISPLAY FOR THIS USER.
HELP >[ENTER]
LISTS > [?][ENTER]
TO ENABLE AUTOMATIC LIST DISPLAY FOR THIS USER.
LISTS >[ENTER]
LAST,FIRST MIDDLE,TITLE > SMITH,ROBERT,
CLASSIFICATION > 500
PASSWORD > NEWPASSWORD
ACKNOWLEDGEMENT NAME > ROBERT
INDEX > CNTY-*|HOSP-*|
DISPLAY HELP >
DISPLAY LISTS >
OK? (Y/N) > [Y][ENTER]
SETTING UP ID FILE ENTRY ...
ID FILE FUNCTION >
You may also add a new user to AVSS using the ID FILE as follows:
ID FILE FUNCTION > [A][ENTER]DMIT
NAME (LAST,FIRST MIDDLE,TITLE) > [TYPICAL,USER A,MS][ENTER]
SEARCHING USER FILE USING 'TYP,US'
PERSON NOT FOUND
NAME (LAST,FIRST MIDDLE,TITLE) <TYPICAL,USER A,MS>[ENTER]
CLASSIFICATION > [500][ENTER]
LOG-IN PASSWORD > [TEMPORARYPASS][ENTER]
ACKNOWLEDGEMENT NAME > [USER][ENTER]
ALL COUNTYS <N>[ENTER]
CNTY. COUNTY > [0][ENTER] = TEST COUNTY
ALL HOSPITALS <N> [Y][ENTER]
DISPLAY HELP >[ENTER]
DISPLAY LISTS >[ENTER]
AVSS will continue in the same manner as above for the Edit ID FILE function.
Next, assume you need to reactivate a user that has been re-hired following the
restoration of funding for a staff position. You would execute the following procedure:
ID FILE FUNCTION > [R][ENTER]EACTIVATE
NAME (LAST,FIRST) > [G,R][ENTER]
ID# A/D LAST,FIRST,TITLE ACKNOWLEDGE CLASSIFICATION
SITE
----------------------------------------------------------------------1 D GOTTFRED,RONALD
RON
COUNTY SYS MANAGER CNTY-0|HOSP-*
IS THIS THE PERSON? <Y>[ENTER]
***NOTE***
GOTTFRED,RONALD IS CURRENTLY DEACTIVATED.
GOTTFRED,RONALD
OK TO REACTIVATE <N> [Y][ENTER]
REACTIVATED.
ID FILE FUNCTION >
A similar procedure would be used whenever you need to deactivate a user upon
termination of employment or other reason for discontinuing AVSS activities:
ID FILE FUNCTION > [D][ENTER]EACTIVATE
VERSION 4.106
JULY 1991
PAGE 1-30
AVSS SYSTEM MAINTENANCE MANUAL
NAME (LAST,FIRST) > [G,R][ENTER]
ID# A/D LAST,FIRST,TITLE ACKNOWLEDGE CLASSIFICATION
SITE
----------------------------------------------------------------------1 A GOTTFRED,RONALD
RON
COUNTY SYS MANAGER CNTY-0|HOSP-*
IS THIS THE PERSON? <Y>[ENTER]
GOTTFRED,RONALD
OK TO DEACTIVATE <N> [Y][ENTER]
DEACTIVATED.
ID FILE FUNCTION >
2.5.4 Security Report
When signing on to AVSS, users are given three attempts to successfully enter their
passwords. If they fail three consecutive times, then AVSS pauses and files a security
report. As System Manager you should review the contents of the SECURITY REPORT
suboption at least weekly for evidence of attempts at unauthorized access:
SYSTEM MAINTENANCE OPTION > [SEC][ENTER]URITY REPORT
PASSWORD >[SPECIAL PASSWORD][ENTER]
Please contact the AVSS Project if you do not know the special password.
DELETE ENTRIES OLDER THAN 30 DAYS <N>[ENTER]
OUTPUT DEVICE <T>[ENTER]
SECURITY REPORT OF FAILED PASSWORD ATTEMPTS
LINE
DATE
TIME
ATTEMPTS
-------------------------------------------------4
12/2/90
08:05.44 AM AVSS,USER,HACKER
DELETE <N>[ENTER]
4
12/5/90
06:26.29 PM NEWPASSWORD,TEST,SYSTEM DELETE <N>[ENTER]
SYSTEM MAINTENANCE OPTION >
2.6 SPECIAL SUBOPTIONS
Special suboptions may appear on some AVSS implementations. Two are described here.
2.6.1 Peripheral File
This suboption is used to identify the parameters of special features of terminals and
printers for use in the DEVICE TABLE suboption. The values of these parameters are set by
the equipment manufacturer and are programmed into AVSS by means of the PERIPHERAL
FILE suboption. Since these values remained fixed, there is very rarely, if ever, a need for
this suboption to be accessed by System Managers.
2.6.2 Expand Database
This section applies only to AVSS-PC sites. For these implementations all AVSSMUMPS routines and data reside in a single DOS file usually stored in the \AVSS directory
and usually named AVSSCXX.MSM, where XX is the standard county code (01=Alameda,
02=Alpine, 03=Amador, ..., 58=Yuba). This file is initialized upon installation to store
several months or up to one year of data. It is purposely left of modest size since the
larger it is, the longer it takes to perform a full system backup (and more backup media is
JULY 1991
VERSION 4.106
required as well). As your database grows, the capacity to store information in this file
will be reduced, and you should regularly monitor its reserve capacity using the HOW
MUCH DISK SPACE REMAINS suboption described in Section 2.1.8. When the space
remaining falls below 500 blocks, you should either backup, verify, and delete records as
described in Sections 2.4.1, 2.4.5, and 2.4.6, or you should expand the DOS file database.
If you elect to do the latter, you should first run the OPERATING SYSTEM INTEGRITY
CHECKER described in Section 2.2.1, and (if there are no errors) perform a full system
backup, have all users sign-off and power off all modems and terminals attached to the
AVSS computer, kill the time job (FSPCTIM) using the procedure described in Section
2.1.3, then follow the following procedure:
SYSTEM MAINTENANCE OPTION > [E][ENTER]XPAND AVSS DATABASE
PASSWORD >[SPECIAL PASSWORD][ENTER]
Please contact the AVSS Project if you do not know the special password.
WARNING!!! USE THIS OPTION CAREFULLY!!!
BE SURE TO KILL THE TIME JOB (FSPCTIM) BEFORE PROCEEDING.
OK TO PROCEED? <N> [Y][ENTER]
Select volume number to be expanded: [0][ENTER]
How many 1K blocks do you wish to expand by: [100][ENTER]
Database will be expanded by 100 1K blocks
OK to proceed <N>? [Y][ENTER]
Current space in volume group:
Volume Group: AVS
Vol Maps Tot Blks
--- ---- -------0
32
16048
Index: 0
Free Spc %-Free
-------- -----314
1.96
Host File Name
-------------c:\avss\avssc00.msm
Expanding Database:
16147
Database expansion completed
Expanded space in volume group:
Volume Group:
Vol
--0
Maps
---32
AVS
Tot Blks
-------16148
Index:
0
Free Spc
-------414
%-Free
-----2.56
Host File Name
-------------c:\avss\avssc00.msm
SYSTEM MAINTENANCE OPTION >
VERSION 4.106
JULY 1991