1
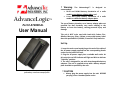
! Warning: AdvanceLogic™ Part # AT2000 AL User Manual The AdvanceLogic™ is designed to accommodate: Ni‐Cd and Ni‐MH battery chemistries of a radio model on one battery adapter plate, and Li‐Ion and Li‐Poly battery chemistries of a radio model on a different battery adapter plate. The use of battery chemistry on a battery adapter plate not specified for that chemistry may cause swelling in the battery or burst the battery, causing personal injury and damage. This unit is NOT to be used with Lead Acid, Carbon, Zinc, Alkaline, Mercury, Silver, Lithium, or any other battery other than the specified Ni‐Cd, Ni‐MH, Li‐Ion and Li‐Poly batteries. Set Up Battery adapter model purchased may differ from battery used in the example picture 1. Insert the male round metal plug at the end of the cable of the AC power supply supplied into the corresponding female socket on the back of the unit. 2. Plug the AC power supply into a suitable wall outlet. At this point the red LED indicator will light and blink to indicate "Stand By" position. 3. The unit is designed for use with interchangeable battery adapters. The unit is supplied set‐up with a battery adapter plate installed as specified by the user. ! CAUTION Always plug the power supply into the unit BEFORE you plug it into a standard power outlet Always remove the power supply from the outlet BEFORE you unplug it from the unit. Do not operate the unit in temperatures exceeding 45° C (113°F) Do not operate if the unit has been dropped or damaged, or if the cord or power supply has been damaged. Do not disassemble or attempt to repair or modify the unit. This action may be dangerous and will automatically void the warranty. ! NOTE: If the battery on the IMPRES™ radio is not an IMPRES™ battery, the unit will charge, but not recondition, the battery. 4. Once the battery is inserted onto the battery adapter plate the Red Stand‐by LED will turn off and the Green LED will blink indicating that the battery is being charged. 5. If the Green LED does not light and the blinking Red LED remains on with the battery in place, refer to "Trouble Shooting" further on in these instructions. 6. When the battery is fully charged, the Green LED will light steady indicating that the battery is fully charged and that the unit has entered the Maintenance Mode 7. If the battery is removed from the unit before the full charge cycle has been completed, the blinking Red LED indicator will turn on. To recommence the charging cycles, replace the battery on the unit. It is quite safe to remove the battery from the unit prior to completing the full charging cycle. 8. While in the maintenance mode the unit will keep the battery at 100% peak condition without ever overcharging the battery. 9. During the charging cycle the unit and the battery may become warm. This is quite normal and is not harmful to either the battery or the Radio General Use 1. Remove the battery from the radio and confirm that the battery chemistry of the battery matches the battery chemistry specified and labeled on the battery adapter plate. 2. Place the battery onto the battery adapter plate as you would onto the radio, matching the inside battery contacts (the ones that would make contact with the radio) with the contacts of the battery adapter plate. 3. If you are using a Motorola® IMPRES™ radio, a specially designed “drop‐in” adapter cup can be used to condition and charge the battery through the outer battery contacts without having to remove the battery from the radio. The battery alone or the battery attached to the radio can be accommodated in the Drop‐in adapter cup. The drop‐in adapter cup will accommodate Ni‐Cd, Ni‐MH, Li‐Ion and Li‐Poly chemistry batteries in the one cup. Ask your AdvanceTec sales representative for details. ! NOTE: If the battery is new and is being charged for the first time, the new battery may cause the Red and Green LEDs to blink alternately for a short time. If this should occur, leave the battery on the unit and the Red blinking LED will stop within two minutes. If the alternating blinking Red and Green LEDs do not stop within two minutes, it would appear that the battery is defective. 2. Before replacing a defective battery, it is suggested that the battery be placed on an AdvanceTec Analyzer, or another reliable analyzer available to accurately determine the capacity of the battery. If no analyzer is available, it is suggested that the battery be taken to your local two‐way dealer to confirm the status of the battery before discarding the battery. Trouble Shooting 1. If the blinking Red LED indicator does not light after the AC adapter is plugged into the wall outlet: (a) Check that the wall socket is powered and that the AC adapter is properly seated in the outlet. (b) Check that the plug into the unit or the cigarette lighter plug into the cigarette lighter adapter/power point (if being used in a vehicle) is properly seated. (c) If being used in the vehicle, check that the fuse in the cigarette lighter plug is intact and has not blown. To locate the fuse, unscrew the end metal tip of the cigarette lighter plug. Replace the fuse only with a 3 Amp fuse. 2. If the Red LED indicator lights with the battery in place: (a) Remove the battery and replace it, ensuring that the battery is properly seated. (b) Check the battery voltage to determine if the battery is still useful. (c) Remove the battery to check for visible damage or interference with the contacts. (d) Verify the battery type and/or chemistry for compatibility with the battery adapter plate. ! Warning 1. Do not use an AC or DC adapter other than those supplied with the unit or purchased from AdvanceTec. 2. Do not short circuit the output on the units. 3. The unit is a highly sophisticated electronic device, which may be damaged if handled roughly or dropped. Specifications AC Adapter Input: 120V AC 60Hz 22W Output: 12VDC 800mA Charger Input: 12V DC LED sequence Blinking RED = Stand‐by Blinking GREEN = Battery being charged Solid GREEN = Battery fully charged ! NOTE: The AdvanceLogic™ is suitable for indoor use ONLY. Warranty Your AdvanceLogic™ has a one‐year limited warranty from date of purchase against defects in material and workmanship. Under this warranty, you may return a faulty product to AdvanceTec and AdvanceTec will either repair or replace the faulty product free of charge. To return a faulty product for repair or replacement, please call AdvanceTec at 1‐800‐881‐8211 in the USA or + 305‐623‐3939 out of the USA to obtain a Return Material Authorization number. This warranty covers only defects in material or workmanship in normal use and not damage from negligent handling, misuse, charging of batteries other than those the AdvanceLogic™ was specified and designed to charge, or lack of proper care. Important: Opening of the charger will void this warranty. This warranty gives you specific legal rights. You may also have other rights, which vary from state to state. OTHER THAN AS EXPRESSLY SET FORTH ABOVE, AdvanceTec DOES NOT MAKE ANY EXPRESS OR IMPLIED WARRANTIES OR REPRESENTATIONS REGARDING THEIR PRODUCTS. ANY IMPLIED WARRANTIES OF MERCHANTABILITY, NONINFRINGEMENT, AND FITNESS FOR A PARTICULAR PURPOSE ARE EXPRESSLY EXCLUDED AND DISCLAIMED. AdvanceTec will not be liable or responsible for any loss, damage, or injury caused by any failure of it’s products to operate properly or promptly. MOTOROLA®.andIMPRES™areregisteredintheUSPatent&TrademarkOffice.All other product or service names are the property of their respective owners. © Motorola,Inc.2007.Allrightsreserved. AdvanceTec Industries, Inc 1150 NW 163rd Drive, Miami, FL 33169 USA Tel: 305-623-3939 Fax: 305-623-3996 www.advancetec.com