1
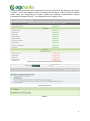
USER’S MANUAL
eLEMENT@
INTERNET BANKING FOR COMPANIES
AND SMALL BUSINESSES
ASSIGNING OF A TOKEN TO A USER AND
GIVING OF AUTHORISATIONS
Tokens are issued to corporate customers without being assigned to a person who is to use
the token for OTP bank internet banking. The Bank assigns the user registration data only for
the token with the highest authorizations. For the other users of tokens with lower
authorizations than the user of main token (or main smart card) to be able to use the internet
banking service, the user holding the token with the highest delegated authorizations shall:
-
Assign the name and surname of the employee to the serial number of the token
Assign the authorization for on-line transactions, separately per transaction
1. Assigning of the token to the user
Token user with the highest authorizations of the corporate customer shall activate all the
additional tokens. The first step is assigning of the token to a user. After entering the
transaction for assigning of authorizations, all the tokens of the corporate customer will be
shown on the screen as it is shown in the following example:
Picture 1. List of users and tokens
Token user with the highest authorizations with the selection of the option “Add token to the
user” activates the token and assigns the user to the additional token (Picture 1.).
After choosing the option „Add token to the user“ the screen will show two fillable text boxes in
which user enters the name of the additional token user and his registration number (Picture
2.).
Picture 2. Assigning the user to additional token
After the necessary data have been entered in text boxes and confirmed by clicking on the
„Confirm“ button the display will show the message “Information for token were successfully
authorized”.
If there is a need to change the users, you use the same transactions with the option "Change
user of the token".
2
Assigning the user to the additional token the token becomes active but still not ready to do
online transactions. Token user with the highest authorizations needs to grant the
authorizations to the additional by choosing the transactions from the list so additional token
user can do online transactions.
1. Authorization distribution
After assigning the user to additional token on the screen in the transaction “Authorization
distribution” in the column “Authorization distribution” the option for granting authorizations will
became visible (Picture 3.)
Picture 3. Authorization distribution
By clicking on the option” Authorization distribution” a list of transactions (Picture 4) is shown
on the screen. With this option you can ungrant authorizations for user.
Picture 4. List of transactions
By selecting an individual transaction (click on the small square box on the right side of the
transaction) or by clicking on the option “Select all” and then “Confirm” (at the bottom of the list
of transactions), you have initiated the process of granting authorisations to an additional user
(Picture 4.). After that, the display will show a list of all transactions with the status of
3
authorizations (authorized / non-authorized) as shown on Picture 5. By clicking on the option
"Confirm", on the new display is open for entering PIN (Picture 6.). After the PIN is entered
(main card) and authorizing the chosen options the message "authorizations entered
successfully" appears (Picture 7.), the additional card is ready for use.
Picture 5. List of all transactions with the status of authorisations
Picture 6. Authorization
Picture 7.
4
2. Combined use of smart cards and tokens
In case then client has combine use of smart card with the highest authorizations assigning
token to the user works the same way as described previously in this manual.
5