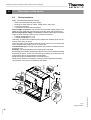
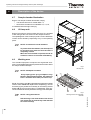
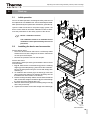
1
Operating Instructions
Biological Safety Cabinet
MSC-Advantage™
Valid:
Valid: 04.2011 / 50128856
Operating Instructions Biological Safety Cabinet | MSC-Advantage
Inhaltsverzeichnis
Copyright 2011
These operating instructions are protected by copyright. Rights resulting
thereof, particularly reprint, photomechanical or digital postprocessing or
reproduction, even in part, are only allowed with the written consent of
Thermo Electron LED GmbH.
This regulation does not apply to reproductions for in-plant use.
Trademarks
MSC Advantage and SmartFlow are registered trademarks of Thermo Scientific.
Thermo Scientific is a brand of Thermo Fisher Scientific Inc.
All other trademarks mentioned in the operating instructions are the exclusive
property of the respective manufacturers.
Thermo Electron LED GmbH
Robert-Bosch-Straße 1
D - 63505 Langenselbold
Germany
The Thermo Electron LED GmbH is a subsidiary from:
50128856_04.2011
Thermo Fisher Scientific Inc.
81 Wyman Street
Waltham, MA 02454
USA
2
Operating Instructions Biological Safety Cabinet | MSC-Advantage
Contents
1 General notes ......................................................................................... 6
1.1 Instruction of the operating personnel ........................................... 6
1.2 Applicability of the instructions ...................................................... 7
1.3 Warranty ......................................................................................... 7
1.4 Explanation of symbols .................................................................. 8
1.4.1 Symbols used in the operating instructions .............................. 8
1.4.2 Symbols on the device ............................................................. 9
1.5 Use of the device ......................................................................... 10
1.5.1 Correct use ............................................................................. 10
1.5.2 Incorrect use ........................................................................... 10
1.6 Standards and safety regulations ................................................ 11
2 Delivery ................................................................................................. 12
2.1 Standard components .................................................................. 12
2.2 Acceptance inspection ................................................................. 12
2.3 Transport security lock and device packaging ............................ 12
3 Installation ............................................................................................ 13
3.1 Ambient conditions ...................................................................... 13
3.2 Room ventilation .......................................................................... 14
3.3 Correct location ............................................................................ 14
3.4 Installation in series ..................................................................... 14
3.5 Transport ...................................................................................... 15
4 Description of the device .................................................................... 16
4.1 Overall view ................................................................................. 16
4.2 Safety system .............................................................................. 18
4.3 Filter system ................................................................................. 19
4.4 Operating and display elements .................................................. 20
4.5 Sample chamber access ............................................................. 21
4.6 Device interfaces ......................................................................... 22
4.7 Sample chamber illumination ...................................................... 24
4.8 UV lamp unit ................................................................................ 24
4.9 Working area ................................................................................ 24
50128856_04.2011
5 Start-up .................................................................................................. 25
5.1 Initial operation ............................................................................. 25
5.2 Installing the device and accessories .......................................... 25
5.3 Unlocking the transport protection ............................................... 26
5.4 Levelling the cabinet .................................................................... 26
5.5 Power supply connection ............................................................. 27
5.6 Installation test ............................................................................. 29
6 Handling and control ........................................................................... 30
6.1 Operating panel ........................................................................... 30
6.1.1 Functional units ....................................................................... 30
6.1.2 Display during calibration routine ........................................... 31
6.1.3 Display during UV disinfection ................................................ 31
6.1.4 Failure messages ................................................................... 32
6.2 Device start-up ............................................................................. 32
6.3 Description of the operating modes ............................................. 33
7 Operation .............................................................................................. 35
7.1 Hygiene preparations for the sample chamber ........................... 35
7.2 Loading the sample chamber ...................................................... 35
7.3 Response to failure messages .................................................... 35
7.4 Work rules .................................................................................... 36
3
Operating Instructions Biological Safety Cabinet | MSC-Advantage
Contents
8 Shut-down ............................................................................................. 37
8.1 Interrupting an operation ............................................................... 37
8.2 Shutting the device down .............................................................. 37
9 Cleaning and decontamination .......................................................... 38
9.1 Decontamination procedure .......................................................... 38
9.2 Wipe/spray disinfection ................................................................ 38
9.3 UV disinfection after a wipe/spray disinfection ............................. 40
9.3.1 UV disinfection using the integral UV lamp ............................. 40
9.3.2 UV disinfection using a mobile UV device (optional) ............... 40
9.3.3 Changing UV disinfection time ................................................ 40
9.4 Disinfection with formaldehyde ..................................................... 41
9.5 Cleaning the exterior surfaces ...................................................... 41
9.6 Cleaning the front window ............................................................. 41
9.7 Cleaning the floorpan .................................................................... 42
9.8 Cleaning the protective grid .......................................................... 42
10 Maintenance ......................................................................................... 43
10.1 Inspection ..................................................................................... 43
10.2 Service .......................................................................................... 43
10.2.1 Sample chamber illumination .................................................. 44
10.2.2 Optional UV lamps .................................................................. 44
10.3 Retrofitting and repairs ............................................................... 44
10.4 Exchanging SmartPorts ................................................................ 45
11
Disposal ................................................................................................. 46
11.1 Disposal procedure ...................................................................... 46
12 Technical data ...................................................................................... 48
13 Device log ............................................................................................. 52
14 Certificate of decontamination ........................................................... 53
Fig.
Fig.
Fig.
Fig.
Fig.
Fig.
Fig.
Fig.
Fig.
Fig.
Fig.
Fig.
Fig.
Fig.
Fig.
Fig.
Fig.
4
1
2
3
4
5
6
7
8
9
10
11
12
13
14
15
16
17
Device arrangement in the operating room ..................... 14
Lift points ........................................................................ 15
Overall view ..................................................................... 17
Filter system with downflow and exhaust air filter .......... 19
Operating and display elements ..................................... 20
Sample chamber opening ............................................... 21
Supply interfaces ............................................................ 22
UV lamp unit .................................................................. 24
Working area on the workplate, armrests ....................... 24
Stand installation ............................................................ 25
Unlocking the transport protection ................................. 26
Operating panel I ............................................................ 30
Operating panel II ........................................................... 31
Display upon start-up ..................................................... 32
Sitting posture ................................................................ 36
Protective grid segment .................................................. 42
UV lamp replacement ..................................................... 44
50128856_04.2011
Figures
Operating Instructions Biological Safety Cabinet | MSC-Advantage
1
General notes
The following are the addresses of the international Thermo
FisherScientific Sales Organisations.
Postal address Germany
Thermo Electron LED GmbH
Robert-Bosch-Straße 1
D - 63505 Langenselbold
Inquiries from Germany
Phone
Phone Sales
0800 1 536376
Phone Service
0800 1 112110
Fax Sales/Service
0800 1 112114
EMail
[email protected]
Enquiries from Europe, Middle East and Africa
Phone
+ 49 (0) 6184 / 90-6940
Fax
+ 49 (0) 6184 / 90-6772
EMail
[email protected]
Postal address USA
Thermo Fisher Scientific
275 Aiken Road
Asheville, NC 28804
USA
Enquiries from North America
Phone
+1 800-879 7767
Fax
+1 828-658 0363
EMail
[email protected]
Enquiries from Latin America
Phone
+1 828-658 2711
Fax
+1 828-645 9466
EMail
[email protected]
50128856_04.2011
Enquiries from Asia Pacific
Phone
+852-2711 3910
Fax
+852-2711 3858
EMail
[email protected]
5
Operating Instructions Biological Safety Cabinet | MSC-Advantage
1
General notes
1.1
Data of the MSC-Advantage and the documentation
Device identification
Device Name:
Biological Safety Cabinet
Model:
MSC-Advantage ™
Model lines:
0.9, 1.2, 1.5, 1.8
Model 1.2.from serial devices:
41070608
Model 1.8.from serial devices:
41070639
Assignment of the product documentation
User manual:
501268856
Availability:
04.2011
Certification and Quality Audit:
Conformity:
CE conformity marking
1.2
Instruction of the operating personnel
These operating instructions describe the biological safety cabinet
•
MSC Advantage
and apply to the models MSC 0.9, 1.2, 1.5, 1.8.
The biological safety cabinet has been manufactured in keeping with the latest technological developments and has been tested before delivery for its correct function.
It may, however, present potential hazards if it is not used according to the intended
purpose or outside of operating parameters. Therefore, the following procedures
must always be observed to prevent accidents:
• The biological safety cabinet must be operated only by trained and authorized
personnel.
• For any operation of this device, the operator must prepare clear and concise
written instructions in the language of the operating and cleaning personnel based on these operating instructions, applicable safety data sheets, plant hygiene
guidelines, and technical regulations, in particular:
• which decontamination measures are to be applied for the cabinet and
accessories,
• which protective measures apply while specific agents are used,
• which measures are to be taken in the case of an accident.
• Repairs to the device must be carried out only by trained and authorized expert
personnel.
•
•
•
•
6
Applicability of the instructions
The contents of the operating instructions are subject to change without
further notice.
Concerning translations into foreign languages, the German version of these
operating instructions is binding.
Keep these operating instructions close to the device so that safety instructions
and important information are always accessible.
Should you encounter problems that are not detailed adequately in these operating instructions, please contact Thermo Fisher Scientific immediately for your
own safety.
50128856_04.2011
1.3
Operating Instructions Biological Safety Cabinet | MSC-Advantage
1
General notes
1.4
Warranty
Thermo Fisher Scientific warrants the operational safety and functions of the biological safety cabinet only under the condition that:
• the device is operated and serviced exclusively in accordance with its intended
purpose and as described in these operating instructions,
• the device is not modified,
• only original spare parts and accessories that have been approved by Thermo
Fisher Scientific are used,
• inspections and maintenance are performed at the specified intervals,
• an installation test is performed prior to the initial operation of the device and
that a repeat test is performed on the occasion of all inspections and repairs.
The warranty is valid from the date of delivery of the device to the operator.
1.5
Standards and safety regulations
The device complies with the safety requirements of the following standards and
directives:
•
•
•
•
•
•
•
•
EN 12469
NF 095 Rev3.2006 / NF - Postes de Sécurité Microbiologique
IEC 61010-1
EN 61010-1
EN 12469
DIN EN 61326-1
Low Voltage Directive 2006/95 EG
EMC Directive 2004/108 EG
50128856_04.2011
For the setting-up and installation of the biological safety cabinet the respective
national regulations must be observed.
7
Operating Instructions Biological Safety Cabinet | MSC-Advantage
1
General notes
1.6
Explanation of symbols
1.6.1
Symbols used in the operating instructions
WARNING!
is used if non-observance may cause serious or even lethal
injuries.
CAUTION!
is used if non-observance may cause medium to minor injuries
or damage.
NOTE!
is used for hints and useful information.
RECYCLING!
Valuable raw materials can be reused.
50128856_04.2011
Warning against electric shock.
8
Operating Instructions Biological Safety Cabinet | MSC-Advantage
1
General notes
1.6.2
Symbols on the device
Observe operating instructions (switchbox ceiling)
Warning against hand injuries (device side walls)
Biohazard (left front section of device)
CE Conformity declaration
Checked safety (cover light dome)
Norme Française / NF - Postes de Sécurité Microbiologique
2 x T 5A
T5A note (sample chamber fusing)
RS 232 interface (top side of plenum panel)
50128856_04.2011
Installion of the armrests (right side of the light hood)
9
Operating Instructions Biological Safety Cabinet | MSC-Advantage
1
General notes
1.7
Use of the device
1.7.1
Correct use
The Biological Safety Cabinet is a laboratory device for installation and operation
in microbiological and biotechnical laboratories of safety levels 1, 2, and 3. It has
been designed as a Class II microbiological biological safety cabinet, in accordance
with EN 12469.
Depending on the hazard level of the agents involved, the operator must prepare
in writing appropriate decontamination procedures for the device and the accessories used in the sample chamber.
Prior to the initial operation of the cabinet, the operator must perform an installation
test. The test result must be documented by a test report. The cabinet must only
be released for operation if it is in compliance with the operating parameters specified by Thermo Fisher Scientific.
After any changes to the installation conditions and after any modification to the
technical system, a repeat test must be performed and the test result must be documented by a test report that shows that all operating parameters are in compliance with those specified by Thermo Fisher Scientific.
1.7.2
Incorrect use
The biological safety cabinet must not be used in laboratories that do not comply
with the requirements of safety levels 1, 2 or 3.
The device must not be operated as a Class II biological safety cabinet if:
• no repeat test is performed after changes to the installation conditions or after
modifications to the technical system,
• the alarm system of the device has issued a failure message and the cause
for the failure has not been repaired.
The alarm system must not be tampered with or disabled. If alarm system components heve been removed or disabled for service or repairs, the device must only
be released for operation if all alarm system components are functioning properly
again.
50128856_04.2011
The filters installed in the device are not capable of separating gaseous substances. Therefore, never store or process gases or gas-releasing substances in
the device:
• which in quantity or concentration are toxic,
• if a reaction with other substances may result in hazardous toxic concentrations
or formation of toxic gases,
• that may form combustible or explosive mixtures in combination with air.
10
Operating Instructions Biological Safety Cabinet | MSC-Advantage
2
Delivery
2.1
Scope of delivery
Delivery for the biological safety cabinet includes the following:
• biological safety cabinet (without stand)
• armrests
• device documentation:
– operating instructions
– factory test report
Optional components and accessories are listed as separate items in the delivery document.
2.2
Acceptance inspection
After the device has been delivered, immediately check the device:
• for completeness,
• for possible damage.
If the delivery is incomplete or if you detect any transport damage to the
device, contact the forwarding agency and Thermo Fisher Scientific immediately.
2.3 Transport security lock and device packaging
50128856_04.2011
A transport security lock protects the device counterweight during transport.
Protective packagings protect the floorpan, the front window, and the workplate
segments. To remove the transport security lock and the protective packagings,
please refer to the enclosed installation instructions and to Sections 5.2 and 5.3
of these instructions.
11
Operating Instructions Biological Safety Cabinet | MSC-Advantage
3
Installation
3.1
Ambient conditions
The operational safety and correct function of the device depends on the location
where it is to be operated. The biological safety cabinet must be operated only at
locations that meet the ambient conditions listed below.
Location requirements:
• The electrical system of the device has been designed for an operating height
of up to 2000 m above sea level.
• The mains power supply outlet should be out of casual reach to prevent accidental shut-off. Ideally, the outlet should be installed above the safety
cabinet.
The outlet must be accessible to authorized personnel only. It constitutes,
together with the power cable plug, the disconnection device for all poles.
• The flooring of the location must be adequately strong and not flammable.
• The stand must ensure a sufficient load-bearing capacity (twice the device
weight).
• The room in which the device is installed must be of adequate height. For
devices that are not connected to an exhaust system, the distance between
the exhaust air opening at the device ceiling and the room ceiling must be
at least 200 mm (8 in).
• The location must be equipped with an appropriate ventilation system
(see Section 3.2.).
• For the valves may be installed a lateral distance of at least 300 mm is required
to ensure accessibility for the installation, see Chapter 4.6
• The temperature within the room must be between 15 °C and 40 °C
(49 °F and 104 °F).
• The relative humidity in the vicinity of the device must not exceed 90 %.
NOTE - Ambient conditions!
If ambient conditions vary from those described above, please contact Thermo Fisher
Scientific for assistance in installing the device.
NOTE - Temporary storage!
50128856_04.2011
If the device is stored only temporarily (up to
four weeks), the ambient temperature may be
between -20 °C and +60 °C (-4 °F and +140 °F)
at a relative air humidity of up to 90 %. For longer storage periods, the location requirements
apply.
12
Operating Instructions Biological Safety Cabinet | MSC-Advantage
3
Installation
3.2
Room ventilation
The room ventilation should preferably be a ventilation system that complies with
the national requirements for the application.
• The inlet air and exhaust air openings of the room ventilation must be located
so that drafts are prevented from impairing the function of the safety cabinet
air system.
Coupling to laboratory exhaust systems
Coupling biological safety cabinets to a laboratory exhaust system, air that spills
of biological agents must be discharged to prevent inflow to the installation space.
The ventilation system of the biological safety cabinet itself are not to be influenced.
If a coupling to a laboratory exhaust system is installed, it must be ensured that
no harmful air flow is created in the installation space. The volume of air discharged
by the exhaust system must be tracked accordingly into the installation space.
It should be noted, that the equipment air flow itself is not affected.
The on site exhaust system should be dimensioned, so the air velocity scale in
the draft interruptor and exhaust air plenum is sufficient, that the equipment exhaust
air has no air resistance.
In states, where the coupling to a laboratory exhaust system is regulated by further
provisions, the relevant national regulations must be observed.
CAUTION – Installation test!
50128856_04.2011
During the initial start-up of the biological
safety cabinet an initial installation test must
be performed.
The installation location of the biological safety cabinet with connection to a technical ventilation or with a coupling to laboratory
exhaut system and additional installedexhaust
accessories are not to be changed.
Every modification of the installation location
requires a new installation test (see chapter
5.6)!
13
Operating Instructions Biological Safety Cabinet | MSC-Advantage
3
Installation
3.3
Correct location
1
2
3
Choose a draft-free location where the biological safety cabinet
does not interfere with the plant traffic.
Fig. 1: This figure shows preferred locations for biological safety
cabinets and unsuitable locations that are not in accordance
with the safety requirements.
Unsuitable locations: The locations [1], [2], and [3] are not
suitable because they are exposed to drafts from windows
and doors.
Location [5] is unsuitable because it is within range of plant
traffic and within the exhaust air range of a ventilation system
[4].
Preferred locations: The locations [6], [7], and [8] are correct
because they are in a draft-free section of the room and not exposed to plant traffic.
A counterweight at the device backpanel moves synchronously
with the vertical movement of the front window. To prevent the
counterweight from jamming, the device backpanel should be
as close to the wall as possible.
3.4
Installation in series
When several devices are to be installed in series, please observe the following:
•
5
8
7
6
Fig. 1
Device arrangement in the
operating room
50128856_04.2011
•
Make sure that vibrations cannot be transferred
between adjacent devices.
Exterior surfaces of the cabinets must always be accessible for cleaning and disinfection.
4
14
Operating Instructions Biological Safety Cabinet | MSC-Advantage
3
Installation
3.5
Transport
Fig. 2: To prevent tilting, always transport the device using a suitable carrier, even for a transport within a building, and separate
it from the stand (see Section 5.2).
CAUTION – Tilting danger!
If the unit is tilted too much during lifting,
risk of tipping exists. Lift the biological safety
cabinet only
vertically!
For transportation (including inside buildings)
use an appropriate lifting device, which
ensures that the unit:
• is on a stable stand and
• is secured against lateral tilting.
Do not transport the biological safety cabinet
on a base with roles.
CAUTION – Lift points!
Fig. 2
Lift points
For transport, lift the device only at the lift
points shown in Figure 2.
Do not allow the weight of the cabinet to rest
on the floorpan!
CAUTION – Crushing hazard!
The weight of the front window is counterbalanced by the counterweight (at the rear of the
device).
The device must not be transported unless the
counterweight has been locked.
• Install the four lockscrews (see Section 5.3).
15
Operating Instructions Biological Safety Cabinet | MSC-Advantage
4
Description of the device
4.1
•
•
•
•
•
•
•
•
•
•
Overall view
Fig. 3: Plenum assembly [3] with plenum for downflow blower [19] and plenum
for exhaust air blower [20]. The downflow filter and the exhaust air filter are installed immediately to the pertaining plenum. The exhaust air is discharged to
the exterior of the device through an opening.
The plenum assembly is concealed behind a cover [18].
Switchbox [2] with power supply unit and power supply cable [1]. The top
of the device contains an RS 232 connection [23] for a PC and two fuse holders [22].
Light dome [4] for the sample chamber illumination unit, equipped with one
fluorescent tube (model MSC 1.2) or two fluorescent tubes (model MSC 0.9,
1.5, 1.8).
The optional, device-integral UV lamp is installed to the ceiling at the front
section of the sample chamber.
Operating panel [5] with function keys and indicators.
Front window [7] with two handles [6].
Bushings [8] and [9] in the side panels (3 on each side). The bushings [9] can
be used to install media valves [11], the bushings [8] of type SmartPort are
provided for laying cables or hoses into the utility chamber.
Stand [10] (optional).
Workplate segments [13] with 2 armrests [14]. A one-piece workplate and special workplates are available as optional accessories.
Internal outlets [15] for the power supply of accessories (optionally, one of the
outlets can be equipped with an adapter [17] for mobile UV devices).
Test hoses for the downflow unit [16] at the left side of the sample chamber and
for the exhaust air unit [12] at the right side of the sample chamber.
NOTE – Test hoses!
50128856_04.2011
Do not remove the caps of the two test hoses
for checking downflow and exhaust air.
16
Operating Instructions Biological Safety Cabinet | MSC-Advantage
4
Description of the device
50128856_04.2011
Fig. 3
Overall view
17
Operating Instructions Biological Safety Cabinet | MSC-Advantage
4
Description of the device
4.2
Safety system
The safety system comprises a combination of protective and alarm systems
that ensure maximum personal and material protection.
Warning system:
• Airflow monitoring
Airflow monitoring determines the velocity of the airflow in the sample chamber
as well as the inflow velocity of the air aspired from the exterior through the
working opening. As soon as airflow velocities move above or below a specified safety value, a signal is transmitted to the alarm system.
• Visual and audible alarm system
The warning system constantly monitors the safety-relevant device functions:
• Inflow velocity of the air aspired from the exterior,
• downflow velocity,
• work position of the front window.
If the warning system detects changes to one of these device functions, it issues:
• an audible and a visual alarm signal.
18
50128856_04.2011
Safety systems:
• Vacuum-sealed air system
A vacuum-sealed air system in combination with HEPA filters for downflow
and exhaust air forms the basis of the safety system for personal and material protection.
• Personal protection
Air aspired from the exterior along the entire working opening at a constant
high velocity prevents:
• agents leaking through the working opening of the chamber.
As the exterior air pressure around the device exceeds the pressure of the
internal air system (vacuum sealing), it ensures:
• agents cannot be released to the exterior in the case of a leak in the
cabinet housing.
• Material protection
A steady airflow within the air system ensures:
• a constant downflow allowing the HEPA filters to remove contaminants
so that the samples are always surrounded by ultrapure air,
• harmful particles are not carried over through the sample chamber
(protection from cross-contamination).
• HEPA filters
The downflow (i.e. the air circulating within the device) and the exhaust air
(air that is released to the exterior) are cleaned by HEPA filters (HEPA = High
Efficiency Particulate Air Filter).
• Safety lockout
To protect from UV radiation, the optional UV disinfection routine can be run
only if the front opening is closed. During UV disinfection, the front opening
safety lockout is activated and prevents harmful UV radiation from being
emitted from the sample chamber.
Circuits can be driven via potential-free contacts (monitor contacts), e.g. a
solenoid that switches automatically upon cancellation of the work mode.
Operating Instructions Biological Safety Cabinet | MSC-Advantage
4
Description of the device
•
•
Position monitoring
The position sensors detect the opening state of the front
window and indicate whether the window is open or closed
in the work position.
SmartFlow Indicatordisplay
The SmartFlow Indicator displays the compensation capabillity of the exhaust control, if the window is in working position and blower on.
4.3
Filter system
Fig. 4: The filter system consists of two HEPA filters [5] and [2]
for the device downflow and exhaust air.
HEPA filters: Room air [10] is drawn into the sample chamber through the working opening. In the air duct, room air and
the downflow within the chamber [7] are then blended to make
up the blend air [8]. The blend air is then:
• filtered proportionally by the downflow filter [5] and supplied as ultrapure air [6] evenly into the sample chamber of
the device,
• filtered by the exhaust air filter [2] and released as ultrapure
air [1] to the exterior of the device.
Inlet air protection: Multi-segment protective grids [9] are installed below the work surface in the air duct between sample
chamber and device plenum. The grids prevent coarse particles
from entering the plenum where they might impair the function
of the blowers [3] [4] and of the filters [2] [5]. The grids can be
removed for cleaning.
Fig. 4
Filter system with downflow
and exhaust air filter
19
Operating Instructions Biological Safety Cabinet | MSC-Advantage
4
Description of the device
4.4
Operating and display elements
Fig. 5: The biological safety cabinet is operated using an operating panel consisting
of keys, function indicators and a display.
[A] The display with its 5-digit indicator panel shows the following information, regardless of the activated operating function:
– normal operation: operating hours of the device,
– safe work mode: downflow and exhaust air velocities,
– calibration routine: status of the calibration function,
– device-controlled UV disinfection (optional): remaining disinfection
time.
Values are output as integers.
[B] Keys for switching operational functions on or off,
[C] Status indicators show the operational status of:
– front window work position,
– airflow,
– reduced blower speed,
– SmartFlow Indicator
50128856_04.2011
Fig. 5
Operating and display
elements
20
Operating Instructions Biological Safety Cabinet | MSC-Advantage
4
Description of the device
4.5
Sample chamber access
Fig. 6: The manually movable front window [1] made of multilayer security glass seals the safety sample chamber front side
up.
The sample chamber is accessible through various positions
of the front window.
For operation:
• Work position with opening height A for access to the sample
chamber during the work process,
• maximal opening height B for loading the sample chamber,
• position C (closed state): closed front window and reduced
blower speed.
NOTE – Status indicator!
The two positions A and C are determined by
switches and output as status indicators on the
display (see Section 6.1.1).
For cleaning / maintenance:
• SmartClean window cleaning position with opening height D
for cleaning and disinfecting the upper section of the front window. For this purpose, the front window can be lowered
beyond closed position C so that a sufficiently high gap
exists between the sample chamber ceiling and the front window upper edge.
This gap can be also used for replacing the sample chamber
illumination lamps.
Fig. 6
Sample chamber
opening
CAUTION – Front window jamming!
Do not use force to move the front window.
If the window is jammed or sluggish, contact
Technical Service immediately.
Do not attempt to repair this problem!
21
Operating Instructions Biological Safety Cabinet | MSC-Advantage
4
Description of the device
4.6
Device interfaces
Fig. 7
Supply interfaces
22
50128856_04.2011
Fig. 7: The standard equipment includes:
• outlets for internal/external power supply,
• bushings on both sides for cables, media valves, and hoses,
• a communication port,
• a connection to external alarm systems.
Power supply connection: The connection to the power supply system is established via a cable with grounding plug [4] at the upper side of the device.
Device-integral power supply: The backpanel contains outlets [10] for the power
supply (overall maximal current: 5 A) of internal accessories.
• 2 outlets (model MSC 0.9, 1.2)
• 4 outlets (model MSC 1.5, 1.8)
Optionally, an outlet can be replaced with a disinfection adapter [9] for the connection of a mobile UV device.
Two fuse holders for 5 A miniature fuses at the top of the front cover protect the
device-integral power supply: [1] for (L), [2] for (N).
Communication port: The top of the device side contains an RS232 connection [3] for a PC.
Bushings: The standard fittings are 3 bushings per side panel.
SmartPort [6] is provided to lead through cables or hoses for accessories required
in the utility chamber. To this end, the rubber grommet [5] is punched out in the
exact opening size to avoid possible contamination.
Media valves [8] are installed solely in the bushings [7].
Media valves suitable for installing in bushings can be supplied as an option.
Upon delivery of the device, the bushings are sealed.
Operating Instructions Biological Safety Cabinet | MSC-Advantage
4
Description of the device
CAUTION – Unstable underpressure!
Do not switch the unit off as long as cables/
hoses are laid through the bushings.
If breached bushings are not used in operation, new covers must be inserted in the openings to ensure stable underpressure in the
utility chamber (see Chap. 10.4).
CAUTION – Combustible gas!
If a gas burner is to be operated in the sample
chamber, an appropriate shut-off device for
the gas supply system (shut-off valve, solenoid
valve) must be installed.
To ensure a safe distance to the recirculation
filter the laboratory safety burner are to be
placed at the working surface and not at an
elevated position.
Use only laboratory safety burners in the sample chamber.
Potential equalization: To avoid static charges and the associated risks, if
necessary, intended supply connections and the device itself should be integrated
in the on-site potential equalization.
For this purpose, the potential equalization connection on the stand can be used.
The installation of utility connections to the built-in fittings must be made with consideration to the current national technical rules.
External alarm systems: This alarm contact can be used for two different external
alarm systems:
• Potential-free contact (valve) for driving external exhaust air systems (technical
ventilation),
• Potential-free contact (monitor alarm) for the connection to an external alarm
system (failure reporting system) or gas supply solenoids.
50128856_04.2011
CAUTION – High voltage!
The contact with live parts may result to a
lethal electrical shock. During work on electrical equipment shut of the device and all
poles disconnected.
Repairs to the device must be carried out only
by trained and authorized expert personnel.
23
Operating Instructions Biological Safety Cabinet | MSC-Advantage
4
Description of the device
4.7
Sample chamber illumination
Fig. 8: The sample chamber illumination unit [2]:
• one flourescent tube for model MSC 1.2,
• two flourescent tubes for model MSC 0.9, 1.5,1.8,
is installed behind the light dome [3].
4.8
UV lamp unit
Fig. 8: The optional, device-integral UV lamp [1] is installed
to the ceiling at the front section of the sample chamber.
The operating time of the UV lamp is preset. The UV disinfection
routine can be started by depressing a key on the operating
panel.
NOTE – Protection from UV radiation!
To protect from UV radiation, the UV lamp can
be activated only when the front window is
completely closed.
When the front window is opened, the UV disinfection routine is cancelled immediately.
4.9
Working area
The standard equipment comprises the segmented workplate. The workplate segments are placed onto the frame above
the sample chamber floorpan.
Fig.8
UV lamp unit
NOTE – Workplate condition
Use properly plane lying workplates only.
Replace deformed workplates. Pay attention
to the maximum work load (see sction 12)!.
Fig. 9: The working area A for optimal product protection extends
over the entire width B and depth C of the workplate [1]. The two
armrests [3] are positioned centrically to the working area at
distance D (20 cm) from each other. For attachment, each armrest is inserted into the first perforation track [2] of the workplate.
Safe working in the work mode of the device
(see section 6.3) is ensured only if the armrests
are used correctly!
24
Fig.9
Working area on the workplate,
armrests
50128856_04.2011
NOTE – Using the armrests
Operating Instructions Biological Safety Cabinet | MSC-Advantage
5
Start-up
5.1
Initial operation
Prior to the initial operation, the biological safety cabinet must
be subjected to an installation test. Correct assembly and installation performed by the operator are essential for good start-up.
Upon the initial connection to the power supply system, the
device control starts an automatic calibration routine to determine the parameters for the safety system of the device.
NOTE – Calibration routine!
The calibration routine is no substitite for the
installation check performed by the service
personnel.
5.2
Installing the device and accessories
Device without stand:
• Place the device without stand onto a sufficiently stable
substructure so that the weight of the device frame does
not rest upon the floorpan.
• Remove the protective foil from the floorpan.
Device with stand:
Assemble the stand (accessory) and install the device frame
onto the stand:
1. Fig. 10: Slide the two crossmembers [2] onto the retaining
angles [3] of the side panels [1], then secure the crossmembers to the side panels using the screws with wedge lock
washers [4].
2. To install the device frame [5] to the stand [7], insert four
Allen screws with wedge lock washers [6] loosely into the
threaded holes at the bottom of the device.
3. Place the biological safety cabinet onto the stand so that the
Allen screws with wedge lock washers [6] are routed through
the holes [8] of the retaining tabs [10].
4. Slide the device frame [5] into the retaining tab grooves [9]
all the way to the stop.
5. Tighten the four Allen screws with wedge lock washers [6].
Fig. 10
Stand installation
25
Operating Instructions Biological Safety Cabinet | MSC-Advantage
5
Start-up
5.3
Unlocking the transport protection
Fig. 11: The front window counterweight [1] is secured to the
device backpanel to protect it from transport damage.
CAUTION – Unlocking the counterweight!
The counterweight at the device backpanel
compensates for the weight of the front window.
The front window must not be moved unless:
• the counterweight has been unlocked so
that it can move freely,
• the protective packaging has been removed
from the front window,
• the device frame has been installed safely
on a sufficiently stable substructure or onto
a stand.
Crushing hazard - after unlocking, keep hands
and fingers away from the motion range of the
counterweight!
To unlock the transport protection:
• Remove the four retaining screws (position: see arrows).
• Keep the counterweight retaining screws for later transports.
5.4
Levelling the cabinet
The cabinet should be levelled only after it has been
positioned.
1. Remove transport protection (vinyl) from the workplate or
from the workplate.
2. Place the workplate onto the front and rear support rails in
the sample chamber with the wide perforated track facing
the front window.
3. Devices without stand: Place a bubble level onto the workplate (segments) and align the stand until the level indicates
an absolutely horizontal position in all directions.
4. Devices with optional stand: Place a bubble level onto
the workplate and adjust the four stands until the level indicates an absolutely hotizontal position in all directions.
Proceed the elevating adjustment from right to left and from
rear to front.
26
Fig. 11
Unlocking the transport
protection
Operating Instructions Biological Safety Cabinet | MSC-Advantage
5
Start-up
5.5
Power supply connection
WARNING – High voltage!
Contact with current-carrying components may
cause a lethal electric shock.
Before connecting the device to the power supply system, check plug and power supply cable
for possible damage.
Do not use damaged components to connect
the device to the power supply system!
Establishing the power supply connection:
1. Before connecting the device to the power supply system, check to see if the
voltage of the outlet corresponds with the specifications on the nameplate
of the device. If the ratings given for voltage (V) and maximum current (A)
do not match, the device must not be connected to the power supply
system.
2. Connect the grounding plug of the device to a properly grounded and fused
outlet.
• The outlet must be fused separately using a fusible link T 16 A or using
a circuit breaker B 16.
3. Make sure that the power cable is routed away from the counterweight and
cable guide. For this purpose, the power cable can be secured to the device
ceiling using the enclosed adhesive bases and cable ties (see installation
instructions).
4. Make sure that the power supply line is not subjected to tensile or compressive
force.
Installation of the power supply connection:
To protect from accidental switch-off, the power supply outlets should be located out of casual reach und must be accessible only to authorized persons. Ideally,
the outlet should be located above the biological safety cabinet.
The power supply cable plug is the interruption device in all poles.
Connecting the equipotential bonding:
If the device sample chamber is supplied with media (gas, water, etc.), the onsite equipotential bonding must be connected to the main ground of the device
(see service instructions).
50128856_04.2011
Initialization routine:
Upon connection to the power supply system, the device control passes through
an initialization routine and switches the device to OFF mode (the right indicator
segment of the display shows a dot to indicate that voltage is present).
The biological safety cabinet is now ready for operation and can be operated using
the keys.
Initial start-up:
After the initialization routine, the calibration routine is started after the first connection to the power supply system:
• The display alternatingly shows "CAL" and the remaining routine time. The
entire calibration run takes approximately 30 minutes.
27
Operating Instructions Biological Safety Cabinet | MSC-Advantage
5
Start-up
•
•
The routine starts automatically when the front window is in the work position and if the air flows freely and steadily. If the airflow is disturbed during
this run time, the process is cancelled and the calibration routine is restarted.
To complete the routine, the determined parameters for safe operation and
the alarm limits are stored automatically.
NOTE – Initial operation!
50128856_04.2011
According to applicable national standards
and regulations, the calibration routine is no
substitute for a start-up performed by an authorized service technician.
28
Operating Instructions Biological Safety Cabinet | MSC-Advantage
5
Start-up
5.6
Installation test
Do not operate the device before an initial operation with installation test has been
performed after the final installation of the device.
• The installation test must be performed in accordance with the specifications of EN 12469 / 2000. The cabinet may be operated as a Class II microbiological biological safety cabinet, in accordance with EN 12469 / 2000, if the
device functions or function patterns listed below were checked and if the test
results are within the safety value tolerances specified by the manufacturer in
Annex F:
• Electrical safety test
• Inflow velocity test
• Downflow velocity test
• HEPA filter leakage test
• Airflow control test
•
A repeat test must also be performed after repairs to the device or after considerable changes (more than 5 cm) to the location of the device.
•
The operator must prepare a test report or request a written test report from
the authorized test service.
NOTE – Safety warranty!
The operational safety of the device, particularly the personal and material protection, are
guaranteed only if all safety functions of the
device have been tested and approved.
Thermo Fisher Scientific will not warrant the
operational safety if the device is operated without performance of the required installation
test or if the installation test and repeat test are
not performed by adequately trained and authorized personnel!
NOTE – Device hygiene!
50128856_04.2011
The initial operation with subsequent installation test does not include any decontamination
measures. For operation in the work process,
the sample chamber of the device and the accessories required for the work process must
be disinfected and cleaned in accordance with
the hygiene guidelines set forth for the
application.
29
Operating Instructions Biological Safety Cabinet | MSC-Advantage
6
Handling and control
6.1
Operating panel
Fig. 12: The operating panel is the major display and operating element and has
been divided into three functional units:
• Display [1], keys [2] - [7], status indicators [8] - [18]
Fig. 12
Operating panel
30
50128856_04.2011
6.1.1
Functional units
Display, Fig. 12:
[1] Display for numbers and text:
• normal operation: operating hours of the device,
• safe work mode: downflow and exhaust air velocities,
• calibration routine: status of the calibration function,
• device-controlled UV disinfection (optional): remaining disinfection
time.
Keys, Fig.12:
The keys are used for enabling / disabling device functions:
[2] Key for switching the device on / off (switch-off only in standby mode, see
Section 6.3).
[3] Operating data key with dual function:
• Indicating operating data:
Press the key to switch between the data: Operating hours, downflow
and exhaust air velocities in the safe work mode.
• Enabling (I) / disabling (0) the alarm acknowledge function:
In the OFF mode, keep the key depressed for approx 5 second. The
display momentarily shows the operating hours, then the switching
state:
I = alarm acknowledge function enabled
0 = alarm acknowledge function disabled
Within the scope of the EU (EN12469:2000), the alarm acknowledge
function is disabled upon delivery of the device.
[4] Key for switching the sample chamber illumination on and off.
[5] Key for switching the power supply of device-integral outlets on and off
(the LED indicates that voltage is present).
[6] Key for switching UV disinfection on and off (the yellow LED indicates
that the UV disinfection routine has been activated; if the optional UV
lamp is not installed, this key has no function).
[7] Key for acknowledging the audible alarm.
Operating Instructions Biological Safety Cabinet | MSC-Advantage
6
Handling and control
Status indicators, Fig. 12:
[8] The air system is operated at reduced capacity (the yellow LED
is illuminated),
[9] Airflow is not steady (the red LED is illuminated),
[10]Airflow is steady (the green LED is illuminated),
[11] Front window is not in work position (the red LED is illuminated),
[12]Front window is in work position (the green LED is illuminated).
SmartFlow dispaly, Fig. 12:
The SmartFlow Indicator displays the compensation capability of the exhaust control, with window in working position and blower on. The LEDs that illuminate in
pairs indicate the following:
[18] green + [17] green
sufficient compensation capability
[16] yellow + [15] yellow
compensation capability is depleted
[[14] red + [13] red
window outside working position or air velocity
outside alarm range
NOTE – Compensation capability!
If the display is steady yellow-yellow, there is
a possibility that the filters of the device are
fully loaded. In this case, the technical service
should be informed.
6.1.2
Display during calibration routine
NOTE – Calibration routine!
The calibration routine is started only upon the
initial operation.
The routine run takes approximately 30 minutes. During this time, the diplay alternatingly shows cal and the remaining time. If the calibration routine cannot
be started due to failures, the display shows cal permanently.
50128856_04.2011
6.1.3
Display during UV disinfection
If a UV lamp is installed, the diplay alternatingly shows dIS and the remaining
disinfection time.
31
Operating Instructions Biological Safety Cabinet | MSC-Advantage
6
Handling and control
6.1.4
Failure messages
Failure messages are shown on the display as text/number combinations with
the codes ER 3 to ER 7. If one of these codes appears on the display, contact
Technical Service immediately.
6.2
Device start-up
1. Fig. 14: Switch the device on, keep the ON key [2] depressed until:
• the blowers start (audible blower operation),
• the status indicators (LEDs) [9] - [12] illuminate.
NOTE – Switch-on!
A time delay of several seconds may occur
between key actuation and device response.
2. Move the front window to the work position. The correct position is reached
when the green status indicator FRONT WINDOW IS IN WORK POSITION [12] is illuminated.
The side guide rails have markings that define the lower edge of the front
window; these markings can be used as an additional orientation aid.
3. Wait until the green status indicator AIRFLOW IS
4. The device is ready for operation.
STEADY
[10] is illuminated.
50128856_04.2011
Fig. 14
Display upon start-up
32
Operating Instructions Biological Safety Cabinet | MSC-Advantage
6
Handling and control
6.3
Description of the operating modes
The following operating modes exist for the device:
• Calibration mode (after initial start-up)
• OFF mode
• Window open mode
• Work mode
• Standby mode
• UV mode
OFF mode: Designates the idle state of the device.
• The device is switched off (air system blowers are switched off).
• The sample chamber illumination is enabled.
• The internal power supply within the sample chamber is enabled:
– If the internal power supply is activated, the yellow status indicator
INTERNAL POWER SUPPLY ACTIVATED is illuminated.
50128856_04.2011
Window open mode: Designates the state in which the window is open and
positioned outside of the work position. To install or remove auxiliaries, the front
window can be moved to the maximum opening position. For cleaning, the front
window can be lowered (see also Section 4.5 / Fig. 6, P. 21).
• The air system blowers are switched on:
– The red status indicator AIRFLOW VOLUME STEADY is illuminated.
• The front window is not in the work position:
– The red status indicator FRONT WINDOW NOT IN WORK POSITION is illuminated.
• The sample chamber illumination is enabled.
• The internal power supply is enabled:
– If the internal power supply is activated, the status indicator INTERNAL
POWER SUPPLY ON is illuminated.
Work mode: Ensures personal and material protection. In this operating state, the work process is carried out in the sample chamber. Work mode is active when the front window is in the work position and the air system is operating
steadily.
• The front window is in the work position:
– The green status indicator FRONT WINDOW IS IN WORK POSITION is
illuminated.
The markings on the side guide rails and the lower edge of the front
window are at the same height.
– No audible alarm signal.
• The air system blowers are switched on to ensure steady airflow:
– The green status indicator AIRFLOW STEADY is illuminated.
• The sample chamber illumination is enabled.
• The power supply for the sample chamber outlets is enabled:
– If the internal power supply is ON, the yellow status indicator INTERNAL
POWER SUPPLY ACTIVATED is illuminated.
• The switching state of the potential-free contact (monitor contact) is pass (if
e.g. the gas supply solenoid is driven via this contact, gas is supplied in this
mode only).
• The display can show values for: operating hours, downflow velocity and exhaust air velocity.
33
Operating Instructions Biological Safety Cabinet | MSC-Advantage
6
Handling and control
Standby mode: The front window can be lowered to seal the sample chamber.
The air system output is reduced to match the lower air requirement.
• The front window is closed:
– The air system operates at reduced output.
– The red status indicator FRONT WINDOW NOT IN WORK POSITON is
illuminated.
– The yellow status indicator AIRFLOW REDUCED is illuminated.
– The red status indicator AIRFLOW NOT STEADY is illuminated.
• The sample chamber illumination is enabled.
• The internal power supply in the sample chamber is enabled:
– If the internal power supply is ON, the yellow status indicator INTERNAL
POWER SUPPLY ACTIVATED is illuminated.
• The biological safety cabinet can be switched off (in OFF mode):
– Keep the ON key depressed until all indicators are off.
50128856_04.2011
UV mode: For running the UV disinfection routine, the front window is completely
lowered to protect against UV radiation. The routine cannot be run until the front
window is in the "closed" position.
• The UV disinfection routine is activated:
– The yellow status indicator UV DISINFECTION ROUTINE ACTIVATED is illuminated until the preset time for the routine has elapsed. Then, the UV
lamps are switched off automatically, and the status indicator is switched off.
• The sample chamber illumination is disabled.
• The internal power supply in the sample chamber is disabled.
• The integral UV lamp (optional) is enabled.
• The power supply for the UV disinfection adapter (optional) is enabled.
34
Operating Instructions Biological Safety Cabinet | MSC-Advantage
7
Operation
7.1
Hygiene preparations for the sample chamber
The sample chamber surfaces and the accessories required for the work process
must be disinfected and cleaned in accordance with the hygiene guidelines set
forth for the application.
7.2
Loading the sample chamber
Installing auxiliaries:
1. Move the front window to the maximum opening position and switch the blowers on.
2. Install auxiliaries within the workplate working range.
3. Move the front window to the work position (the green status indicator FRONT
WINDOW IN WORK POSITION is illuminated) and wait until the airflow has stabilized (the green status indicator AIRFLOW STEADY is illuminated).
CAUTION – Operational safety!
The personal and material protection is ensured only if the airflow system of the device is
working properly.
If the alarm system issues failure messages
when the front window is in the work position,
stop all applications that may release harmful
aerosols!
4. Load the work surface with samples.
5. For work intermissions or for extended experimental phases without manual intervention, switch the device to standby mode.
7.3
Response to failure messages
50128856_04.2011
Failure messages are displayed in form of text/number combinations with a code
between ER 3 to ER 7 (see Section 6.1.4). If one of these codes is displayed,
contact the Technical Service of Thermo Fisher Scientific immediately.
To isolate the cause of the failure, the operating personnel must perform only
the following tests and measures:
• Check to see if the exhaust air opening on top of the cabinet is blocked.
• Ensure that the on-site exhaust air system is activated.
• Close doors and windows in the laboratory to prevent drafts.
• Switch off devices in the vicinity of the biological safety cabinet that cause air
turbulence or emit excessive heat.
• Open flames in the sample chamber may impair airflow conditions.
35
Operating Instructions Biological Safety Cabinet | MSC-Advantage
7
Operation
7.4
Work rules
The observance of work rules ensures a minimum of operational safety when
handling the biological safety cabinet.
Before starting an operation:
• Take off jewelry.
• Put on required personal protective gear, e.g. hand, face, or body protection.
• Clean and disinfect sample chamber surfaces at regular intervals.
During operation:
• Place samples only within the defined work area of the workplate.
• Do not place unnecessary items into the sample chamber.
• Use only disinfected and cleaned accessories for the work process.
• Do not cause air turbulence by quick hand, arm or body movement in the
sample chamber or in front of the work opening.
• Do not place accessories into the sample chamber that cause air turbulence
or emit excessive heat.
• Do not block air circulation at the ventilation slots of the workplate.
Sitting posture during work:
Fig. 15: To prevent risks to health, a height-adjustable working
chair with an adjustable seat back should be used during
extended work periods at the biological safety cabinet.
A When the forearm rests on the armrest, is should be in a
nearly horizontal position.
B When the upper leg is in a horizontal position, the angle
between upper and lower leg should exceed 90°.
To ensure a compensation between floor and sitting height, a
footrest (DIN 4556) should be used. The minimal effective
surface of the footrest should be 45 x 35 cm.
C The slope should be adjustable within a range of 5° to 15°.
D The adjustable height should extend to a minimum of 11 cm
above the floor.
After finishing an operation:
• Remove samples from the sample chamber and store them
properly.
• Clean and disinfect the sample chamber surfaces, including the workplate and the floorpan. Clean and disinfect all
accessories.
50128856_04.2011
Fig. 15
Sitting posture
36
Operating Instructions Biological Safety Cabinet | MSC-Advantage
8
Shut-down
8.1
Interrupting an operation
To interrupt a work process:
1. Remove all samples from the biological safety cabinet and store them properly.
2. Remove accessories from the sample chamber and clean and disinfect them.
3. Clean and disinfect the sample chamber surfaces, the workplate, and the
floorpan.
4. Switch the device to standby mode: Close the front window and keep the ON
key depressed until the indicators are off (the right indicator segment of the
display shows a dot to indicate that voltage is present).
NOTE – Blower switch-off!
For safety reasons, the blowers can be switched off only when the front window is closed.
8.2
Shutting the device down
If the device is not to be used or stored for an extended period of time, it must
be completely decontaminated.
WARNING – Decontamination measures!
To shut the device down, the sample chamber
must be disinfected completely and the plenum, including the filters, must be sterilized
using formaldehyde.
50128856_04.2011
1. After the device has been decontaminated, close the front window completely.
2. Disconnect the device from the power supply system.
37
Operating Instructions Biological Safety Cabinet | MSC-Advantage
9
Cleaning and decontamination
9.1
Decontamination procedure
Several procedures can be applied for decontaminating the biological safety cabinet.
Which procedure is selected, depends on:
• the potential risk imminent in the agents,
• the degree of purity required by an experiment or by a work process.
Possible decontamination procedures:
Wipe/spray disinfection: is the standard disinfection procedure for cabinets
used for microbiological experiments.
UV disinfection: is particularly suited as an intensifying additional disinfection
after a wipe/spray disinfection.
Sterilization with steam: can be used for treating the removable stainless steel
components. Examples of autoclavable components are the bezels of the UV
lamps, the workplate or workplate segments, the armrests and the protective
grid (see Section 9.6 / 9.7).
Disinfection with formaldehyde: can be performed if a sterile sample chamber
is required for the work process. This sterilization procedure is mandatory:
• when filters are replaced,
• when the device is shut down,
• when the device is discarded.
9.2
Wipe/spray disinfection
The wipe/spray disinfection is performed in three stages:
• predisinfection,
• cleaning,
• final disinfection.
Recommended disinfectants:
Chloride-containing disinfectants may damage
some surfaces, Therefore, use only chloridefree disinfectants or a disinfectant with a low
enough chloride content to have been proved
harmless for stainless steel finishes!
Disinfectants with an alcohol content of more
than 70 % may cause embrittlement of plastic
components after extended exposure. Use only
disinfectants with a low alcohol content. When
using a disinfectant with an alcohol content
of more than 70 %, the release limit of 200 g
within 2 hours must not be exceeded.
Also suited are disinfectants based on quaternary ammonium compounds.
38
50128856_04.2011
NOTE – Compatibility!
Operating Instructions Biological Safety Cabinet | MSC-Advantage
9
Cleaning and decontamination
Predisinfection:
1. Remove all samples from the sample chamber and store them properly.
2. Remove accessories from the biological safety cabinet and disinfect them using
the disinfection procedure recommended by the manufacturer.
3. The workplate and stainless steel components can be removed from the sample chamber and disinfected separately.
4. For predisinfection, spray disinfectant on all sample chamber surfaces or wipe
the surfaces using disinfectant.
5. Do not remove the optional UV lamps from the sockets; wipe them thoroughly using a damp cloth.
6. Switch the device to work mode, move the front window to the work
position.
7. Allow disinfectant to react as recommended by the manufacturer, then operate
the biological safety cabinet for at least 15 to 20 minutes in the work mode so
that released aerosols can be absorbed by the filters.
Cleaning:
1. Remove dirt residues and deposits thoroughly using a solution of tepid water
and commercially available dishwashing agent.
2. Wipe the surfaces clean using a clean cloth and plenty of clear water.
3. Remove the cleaning liquid from the floorpan and wipe all sample chamber
surfaces dry.
50128856_04.2011
Final disinfection:
1. Again, spray disinfectant on all sample chamber surfaces or wipe the surfaces clean using disinfectant.
2. Allow disinfectant to react as recommended by the manufacturer.
39
Operating Instructions Biological Safety Cabinet | MSC-Advantage
9
Cleaning and decontamination
9.3
UV disinfection after a wipe/spray disinfection
A UV disinfection can be performed either by using the optional integral UV lamps
or by using a mobile UV device.
9.3.1
UV disinfection using the integral UV lamp
To start the UV disinfection routine:
1. Close the front window completely, the air system operates in the reduced
mode (yellow LED illuminated).
2. Start UV disinfection using the UV key at the operating panel:
Keep the UV depressed until the display alternatingly shows dIS and the remaining disinfection time.
To interrupt / cancel the UV disinfection routine:
1. Press the UV key (the display shows the operating hours).
2. Slide the front window up.
9.3.2
UV disinfection using a mobile UV device (optional)
To control the disinfection routine of a mobile UV device with the biological safety
cabinet software, ensure that the connecting plug of the UV device is compatible
with the UV disinfection adapter of the biological safety cabinet.
To start the UV disinfection routine:
1. Position the mobile UV device centered on the work area and connect it to
the UV disinfection adapter.
2. Close the front window completely, the air system operates in the reduced
mode (yellow LED illuminated).
3. Start UV disinfection using the UV key at the operating panel:
Keep the UV depressed until the display alternatingly shows dIS and the remaining disinfection time.
9.3.3
Changing UV disinfection time
The UV disinfection time is preset; this setting can be changed, if required:
1. Switch the cabinet on and move the front window to the work position.
2. Keep the UV key depressed until the preset time is displayed.
3. To increase the time:
Press the INTERNAL POWER SUPPLY key. Each pressing of the key increases the
time by 30 minutes.
4. To reduce the time:
Press the INTEGRAL SAMPLE CHAMBER ILLUMINATION key. Each pressing of the key
reduces the time by 30 minutes.
5. To save the values:
Press the UV key.
The display shows the operating hours again.
40
50128856_04.2011
To interrupt / cancel the UV disinfection routine:
1. Press the UV key (the display shows the operating hours).
2. Slide the front window up.
Operating Instructions Biological Safety Cabinet | MSC-Advantage
9
Cleaning and decontamination
9.4
Disinfection with formaldehyde
Procedure:
For gas disinfection, formaldehyde is evaporated in the tightly sealed sample
chamber. The quantity of the formaldehyde used depends on the sample chamber
volume of the cabinet version to be disinfected (see Technical Data). Per cubic meter of sample chamber volume, at least 5 g formaldehyde must be evaporated with 20 ml water (corresponds with 25 ml of a 20 % formaldehyde solution).
The formaldehyde evaporates immediately when its boiling point is reached. The
required reaction time is at least 6 hours. After the required reaction time, the
formaldehyde should be neutralized by evaporating a 25 % ammonium solution (10 ml per cubic meter of sample chamber volume).
Ambient conditions and accessories:
The temperature at the cabinet location should be approx 21 °C, the relative
humidity should be between 60 and 85 %. To evaporate the solution, a heating
device with a container is required.
NOTE – Disinfection procedure!
A disinfection with formaldehyde must be
performed in accordance with the specifications of EN 12469.
As this procedure has considerable risks, it
must only be performed by specially trained
and authorized service personnel!
9.5
Cleaning the exterior surfaces
Wipe the exterior surfaces of the device clean using a solution of TAP water and
commercially available dishwashing agent. Then, wipe the exterior surfaces dry
using a soft, clean cloth.
9.6
Cleaning the front window
50128856_04.2011
For cleaning (and disinfection using the wipe disinfection procedure), the front
window can be lowered beyond the closing position (see Section 4.5).
The gap between the light dome and the front window upper edge ensures that
the upper section of the window can be cleaned or disinfected.
Clean the front window using a commercially available window cleaner.
41
Operating Instructions Biological Safety Cabinet | MSC-Advantage
9
Cleaning and decontamination
9.7
Cleaning the floorpan
Clean the floorpan using a solution of tepid water and commercially available dishwashing agent.
1. Remove the workplates from the sample chamber.
2. Remove dirt residues and deposits thoroughly.
3. Wipe the floorpan clean using a clean cloth and plenty of
clear water.
4. Remove the cleaning liquid from the floorpan and wipe the
floorpan surfaces thoroughly clean.
NOTE – Material residues!
After cleaning, make sure that all cleaning
materials have been removed completely from
the floorpan.
5. Reinstall the workplates.
9.8
Cleaning the protective grid
Fig. 16: The multi-segment protective grid is retained in the
installed position between support surface and airduct wall by
its own tension.
1. To remove a grid segment [2], push the retaining tab [1]
down until the grid segment can be removed from below
the counterholder [3] of the wall.
2. To install the grid segment [2], first place it behind the fixed
points [4], then push the retaining tab [1] down and against
the counterholder [3] of the wall so that the counterholder
engages in the tab.
NOTE – Inlet air protection!
Do not operate the device without inlet air
protection. Prior to any start-up of the device,
make sure that the inlet air protection is installed!
Fig. 16
Protective grid segment
42
Operating Instructions Biological Safety Cabinet | MSC-Advantage
10
Maintenance
10.1
Inspection
The SmartFlow Insicator, the test routine for the biological safety cabinet, determines the cabinet's system status by way of adjusting various device parameters.
• An inspection of the device should be performed if the SmartFlow Indicator
displays steady 2 yellow LED`s.
• Regardless of the SmartFlow Indicator, the biological safety cabinet should be
inspected annually.
The annual inspection comprises the following checks:
• Electrical safety in accordance with national regulations.
• Functional test of the device.
• Checking all components for possible damage.
• Checking the filter state.
NOTE – Perforated plate!
The perforated plate at the sample chamber
ceiling serves as the protection of the downflow filter and prevents refluxing.
While scanning the filter surface for a leak test,
the perforated plate must be installed.
•
•
Checking the airflow conditions.
Repeat test in accordance with EN 12469 / 2000.
10.2
Service
HEPA filters:
As the filter replacement is an interference with the safety system of the device,
filters must only be replaced by Thermo Fisher Scientific or by adequately trained
and authorized service personnel.
WARNING – Filter replacement!
50128856_04.2011
For any service work in a potentially contaminated section of the biological safety cabinet,
a declaration of non-objection by the manufacturer must be presented.
43
Operating Instructions Biological Safety Cabinet | MSC-Advantage
10
Maintenance
10.2.1 Sample chamber illumination
Fig. 18: The sample chamber is illuminated by one or two fluorescent tubes (model MSC 0.9, 1.2, 1.5, 1.8). The spring-loaded sockets of the fluorescent tube [2] are installed to the light
dome mounting frame in the sample chamber.
1. Switch the device off, disconnect it from the power supply system and protect it against accidental reconnection.
2. Move the front window down all the way beyond the frame
(SmartClean position) to ensure a sufficient gap between
window upper edge and light dome.
3. The fluorescent tubes are retained by rotatable sockets.
Rotate the tube carefully by 90° into the removal position
and remove it from the socket.
4. Insert the new tube und rotate it into the contact position.
10.2.2 Optional UV lamps
Fig. 17: The optional, device-integral UV lamp [1] is installed
to the sample chamber ceiling immediately behind the front window. The UV lamp should be replaced after 1500 operating
hours.
1. Switch the device off, disconnect it from the power supply system and protect it against accidental reconnection.
2. Move the front window to the maximum opening position.
3. Wear protective gloves to prevent skin fat residues from
burning into the lamp tube.
The UV lamp is installed in rotating sockets. To remove, rotate the lamp counter-clockwise to disengage the latch and
remove it from the sockets.
4. To install, slide the lamp contact pins into the rotating socket grooves and rotate the lamp clockwise to latch the sockets.
10.3
Retrofitting and repairs
External communication systems, e.g. failure report systems
or components for supplying media such as gas solenoid valves, can be retrofitted and integrated into the device control.
NOTE – Retrofitting and repairs!
All retrofitting and repair works are interferences with the safety system of the device.
Particularly modifications to the filter system
and resulting changes of the airflow may impair personal and material protection. Such
work must be carried out only by authorized
service personnel.
44
Fig. 17
UV lamp replacement
Operating Instructions Biological Safety Cabinet | MSC-Advantage
10
Maintenance
10.4
Exchanging SmartPorts
NOTE – Contamination
In order to prevent contaminated particles
escaping from the utility chamber, the unit
must be switched on in order to exchange the
SmartPorts.
The SmartPorts are removed inwards into the
utility chamber.
1. First remove the inner grommet of the SmartPort in the utility
chamber inwards from the side panel opening.
2. Then remove the outer grommet of the SmartPort in the utility
chamber inwards from the side panel opening.
3. Disinfect both grommets in the utility chamber and take them
out of the utility chamber.
4. Insert new outer grommet in the side panel opening from the
outside.
5. Insert new inner grommet in the side panel opening from the
inside.
45
Operating Instructions Biological Safety Cabinet | MSC-Advantage
11
Disposal
11.1
Disposal procedure
Discarded cabinets or device components contain reusable materials. All components with the exception of the HEPA filters can be discarded after having been
thoroughly cleaned and disinfected. The HEPA filters must be discarded in accordance with the applicable national and state regulations for special solid waste.
CAUTION – Contamination hazard!
As the device can be used for processing and
treating infectious substances, it may be
contaminated.
Prior to disposal, the complete device with
filters must be decontaminated by performing
a formaldehyde sterilization!
Recyclable materials!
Component
Material
Printed circuit boards
Enclosed electrical components coated with various
plastics, mounted on epoxy resin-bound boards.
Plastic components, general
Note material labeling
Exterior housing
Steel, painted
Device backpanel
Stainless steel/steel, painted
Front window
Multi-layer safety glass
Operating panel and indicator
foil
Polyethylene
Stainless steel
Armrests
Stainless steel
Diffusor
Aluminium, anodized
50128856_04.2011
Workplates
46
Operating Instructions Biological Safety Cabinet | MSC-Advantage
11
Disposal
WEEE Compliance:
This product is required to comply with the European Union‘s Waste Electrical
& Electronic Equipment (WEEE) Directive 2002/96/EC. It is marked with the
following symbol:
50128856_04.2011
Thermo Fisher Scientific has contracted with one or more recycling/disposal companies in each EU Member State, and this product should be discarded or recycled through them. For further information on Thermo Scientific‘s compliance
with these Directives, contact the recyclers in your country, and information on
Thermo Scientific products wich may assist the detection of substances subject to the RoHS Directive at www.thermo.com/WEEERoHS.
47
Operating Instructions Biological Safety Cabinet | MSC-Advantage
Technical data
50128856_04.2011
12
48
Operating Instructions Biological Safety Cabinet | MSC-Advantage
12
Technical data
Volume, weights, and loads
MSC 0.9
MSC 1.2
Description
Volume
Unit volume
Floorpan
MSC 1.5
MSC 1.8
m3
l
1.1
15
1.4
20
1.7
25
2.1
30
kg
kg
170
24
200
26
230
28
280
30
Weights
Cabinet
Stand
Loads
Max. load per working area
module
Max. load on overall working
area
kg
25
kg
50
Ambient conditions
MSC 0.9
MSC 1.2
Description
Temperature
MSC 1.5
Max. ambient temperature
during operation
°C
40
Min. ambient temperature
during operation
°C
10
% r.H.
% r.H.
90, non-condensing
95
MSC 1.8
Humidity
Max. humidity / operation
Max. gumidity / storage
Heat dissipation to environment
Room temperature 20 °C
kJ/s
0,15
0,2
0,28
0,34
°K
<2
<2
<2
<2
Room temperature rise
Above room temperature with
window closed
Ergonomics
50128856_04.2011
55
Noise level
dB(A)
59
The noise level was determined in accordance with EN
ISO3744. The sound pressure level was measured at a distance
of 1 m in front of the working opening. The measurement
uncertainty is within a range of ± 2 dB.
49
Operating Instructions Biological Safety Cabinet | MSC-Advantage
12
Technical data
Electrical data
MSC 0.9
MSC 1.2
MSC-Advantage
Voltage
Rated voltage
Blower voltage
Current
Power consumption max.
Leakage current IEC1010,
EN 61010
Motherboard fusing
Outlet fusing
On-site fusing
Power input max.
Protection
Protection class
Protection type
Overvoltage category
(IEC 1010, EN 61010)
Contamination degree
(IEC 1010, EN 61010)
A
mA
A
A
A
W
MSC 1.8
1/N/PE AC, 230 V - 50-60 Hz
48 V / DC
7.3
8.7
< 3.5
2 x T 16 A
2xT5A
Circuit breaker B16 / Fuse T 16 A
Power
1700.0
2000.0
I
IP 20
II
2
Cable (3.7 m)
50128856_04.2011
Connecting lines
Mains connection
V
V
MSC 1.5
50
Operating Instructions Biological Safety Cabinet | MSC-Advantage
12
Technical data
Airflow system
MSC 0.9
MSC 1.2
Description
Airflows / Airflow velocities
Inflow
Downflow
m/s
m/s
Air volume
Overall volume flow
Downflow volume flow
Exhaust air volume flow
m³/h
m³/h
m³/h
Filters
Type
Material
Separability in MPPS
Separability at 0,3 µm
particle size
MSC 1.5
MSC 1.8
1523
1037
486
1827
1244
583
0.45
0.32
914
622
292
1218
829
389
%
HEPA (H 14 according to DIN EN 1822)
Glas fiber fleece
99.995
%
99.999
Downflow
Width
Depth
Height
mm
mm
mm
915
Exhaust air
Width
Depth
Height
mm
mm
mm
610
1220
1525
1830
610
915
457
94
610
50128856_04.2011
457
117
51
Operating Instructions Biological Safety Cabinet | MSC-Advantage
13
Device log
Part number:
Service number:
Operator's note:
Notes
Date
Signature
50128856_04.2011
Device type:
Serial number:
Location:
Work carried out
52
Operating Instructions Biological Safety Cabinet | MSC-Advantage
Certificate of decontamination
50128856_04.2011
14
53
Internet: http://www.thermofisher.com
54
50128856_04.2011
Operating Instructions Biological Safety Cabinet | MSC-Advantage


![MSC-Advantage BSC Operating Instructions [IT]](http://vs1.manualzilla.com/store/data/006146994_1-af1ee73797fe896588f37763fa2d0375-150x150.png)