1
User's Manual
SE-S100
Electronic Cash Register
(S size drawer)
Introduction
Thank you very much for purchasing this CASIO electronic Cash Register. START-UP is QUICK and
EASY!
For the basic settings of your Cash Register, please see “Quick Start Guide”.
Original Carton/Package
If for any reason, this product is to be returned to the store where purchased, it must be packed in the
original carton/package.
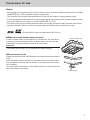
Location
Locate the Cash register on a flat, stable surface, away from heaters or areas exposed to direct sunlight,
humidity or dust.
Power Supply
Your Cash Register is designed to operate on standard household current (120 V, 220 V, 230 V, 240 V;
50/60 Hz). Do not overload the outlet by plugging in too many appliances.
Cleaning
Clean the Cash Register exterior with a soft cloth which has been moistened with a solution of a mild
neutral detergent and water, and wrung out. Be sure that the cloth is thoroughly wrung out to avoid damage to the printer. Never use paint thinner, benzene, or other volatile solvents.
The mains plug on this equipment must be used to disconnect mains power. Please ensure that the
socket outlet is installed near the equipment and shall be easily accessible.
2
To use the Cash Register safely...........................................................................4
Precautions for Use................................................................................................7
To use the Cash Register’s basic function..........................................................9
Getting to know your Cash Register......................................................................... 10
Getting started............................................................................................................ 15
Daily job flow..............................................................................................................20
Before opening your store.........................................................................................21
Registering items.......................................................................................................23
Corrections................................................................................................................. 31
Basic setups and operations.....................................................................................33
Daily sales reports.....................................................................................................42
Advanced features...............................................................................................45
Receipt control...........................................................................................................46
Character settings......................................................................................................47
Advanced programming............................................................................................58
Utilizing currency conversion feature......................................................................69
Tax table......................................................................................................................70
Printing programmed data......................................................................................... 71
To record business journal........................................................................................ 74
To utilize an SD card..................................................................................................77
Calculator mode.........................................................................................................80
Specifications.............................................................................................................82
Appendix...............................................................................................................83
Character code...........................................................................................................84
Error code...................................................................................................................85
About sales data storage in an SD card...................................................................86
Index............................................................................................................................88
3
To use the Cash Register safely
• Congratulations upon your selection of this CASIO product. Be sure to read the following safety precautions before using it for the first time. After reading this guide, keep it close at hand for easy reference.
• Please pay due attention to the following symbols to help you use the product safely and properly and
to avoid any personal injury or damage to the product.
*Danger
If this symbol is ignored and the product consequently misused, it can result in
serious personal injury and/or death.
*Warning
If this symbol is ignored and the product consequently misused, it may result in
serious personal injury and/or death.
*Caution
If this symbol is ignored and the product consequently misused, it may result in
personal injury and/or property damage.
The figures in this manual have the following meanings.
’
!
$
This symbol means be careful = a warning.
The example at left is a warning about an electrical shock.
This symbol indicates something you must not do = prohibited action. The example at left
means never disassemble the product.
This symbol indicates something you must do = an instruction.
The example at left indicates you should unplug the product from the outlet. Please note that
instructions that are difficult to express by a figure are indicated by +.
*Danger
If liquid that leaked from a battery gets in your eye, on your skin or clothes, deal with it immediately as follows.
-
1. Immediately rinse it off with lots of water.
2. Immediately get medical treatment.
Failing to act may result in a rash or loss of sight.
*Warning
Handling the register
$
4
• Should the register malfunction, start to emit smoke or a strange odor, or otherwise
behave abnormally, immediately shut down the power and unplug the AC plug from the
power outlet. Continued use creates the danger of fire and electric shock. Contact CASIO
service representative.
To use the Cash Register safely
*Warning
!
• Do not place containers of liquids near the register and do not allow any foreign matter
to get into it. Should water or other foreign matter get into the register, immediately shut
down the power and unplug the AC plug from the power outlet. Continued use creates the
danger of short circuit, fire and electric shock. Contact CASIO service representative.
• Should you drop the register and damage it, immediately shut down the power and unplug
the AC plug from the power outlet. Continued use creates the danger of short circuit, fire
and electric shock.
• Attempting to repair the register yourself is extremely dangerous. Contact CASIO service
representative.
• Never try to take the register apart or modify it in any way. High-voltage components
inside the register create the danger of fire and electric shock. Contact CASIO service
representative for all repair and maintenance.
Power plug and AC outlet
+
+
+
-
• Use only a proper AC electric outlet. Use of an outlet with a different voltage from the
rating creates the danger of malfunction, fire, and electric shock. Overloading an electric
outlet creates the danger of overheating and fire.
• Make sure the power plug is inserted as far as it will go. Loose plugs create the danger of
electric shock, overheating, and fire.
• Do not use the register if the plug is damaged. Never connect to a power outlet that is
loose.
• Use a dry cloth to periodically wipe off any dust built up on the prongs of the plug. Humidity can cause poor insulation and create the danger of electric shock and fire if dust stays
on the prongs.
• Do not allow the power cord or plug to become damaged, and never try to modify them
in any way. Continued use of a damaged power cord can cause deterioration of the insulation, exposure of internal wiring, and short circuit, which creates the danger of electric
shock and fire. Contact CASIO service representative whenever the power cord or plug
requires repair or maintenance.
*Caution
-
• Do not place the register on an unstable or uneven surface. Doing so can cause the
register - especially when the drawer is open - to fall, creating the danger of malfunction,
fire, and electric shock.
Do not place the register in the following areas.
+
• Areas where the register will be subject to large amounts of humidity or dust, or directly
exposed to hot or cold air.
• Areas exposed to direct sunlight, in a close motor vehicle, or any other area subject to
very high temperatures.
The above conditions can cause malfunction, which creates the danger of fire.
+
• Do not overlay bend the power cord, do not allow it to be caught between desks or other
furniture, and never place heavy objects on top of the power cord. Doing so can cause
short circuit or breaking of the power cord, creating the danger of fire and electric shock.
5
To use the Cash Register safely
*Caution
+
• Be sure to grasp the plug when unplugging the power cord from the wall outlet. Pulling on
the cord can damage it, break the wiring, or cause short, creating the danger of fire and
electric shock.
-
• Never touch the plug while your hands are wet. Doing so creates the danger of electric
shock. Pulling on the cord can damage it, break the wiring, or cause short, creating the
danger of fire and electric shock.
-
• At least once a year, unplug the power plug and use a dry cloth or vacuum cleaner to clear
dust from the area around the prongs of the power plug.
Never use detergent to clean the power cord, especially power plug.
+
• Keep small parts out of the reach of small children to make sure it is not swallowed accidentally.
Only use the specified batteries.
-
•
•
•
•
•
•
•
Do not disassemble, modify or short-circuit them.
Do not put them in fire or water or heat them.
Do not mix new and old batteries or different types of batteries.
Orient the terminals +- correctly.
Remove the batteries if the system will not be used for a long time.
After batteries are spent, dispose of them as per local regulations.
Do not try to recharge dry cell batteries.
Disposing of batteries:
+
-
6
• Make sure that you dispose of used batteries in accordance with the rules and regulations
in your local area.
• Be careful not to cut your finger by the paper cutter.
• The cover or the plastic case for the terminal may discolor or damaged when thinner,
gasoline, kerosene, various solvent, grease, any cleaner including them, adhesive, paint,
medical agent, cosmetics, etc., are adhered. Please be cautious.
Precautions for Use
Notice
• Any copying of the contents of this manual, either in part or its entirety without the permission of CASIO
COMPUTER CO., LTD is prohibited under copyright laws.
• The contents of this manual and specifications of this unit are subject to change without notice.
• In case the terminal malfunctions or for any question about the contents of this manual, please contact
your local CASIO service center or CASIO COMPUTER CO., LTD.
• To prevent losing all your settings and sales data, we strongly recommend that you install the memory
protection batteries before you use the Cash Register and replace them at least once a year.
SD and SDHC Logos are trademarks of SD-3C,LLC.
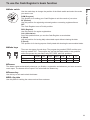
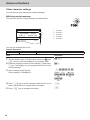
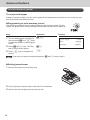
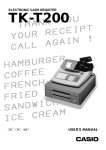
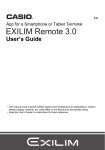
When the cash drawer does not open!
In case of power failure or the machine is in malfunction, the cash drawer does not open automatically. Even in these cases, you can open the
cash drawer by pulling drawer release lever (see below).
Drawer release lever
Important
• The drawer will not open, if it is locked with a drawer lock key.
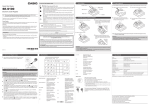
About drawer hook
Drawer hook prevents the Cash Register from falling caused by weight of
coins.
Insert the drawer hook in the ditch of the drawer. Peel the release paper
from the drawer hook and stick the drawer on the place where the register is installed.
As it may cause a malfunction of the drawer, please do not put coins and
bills in the drawer excessively.
(S size drawer)
7
Precautions for Use
Manufacturer:CASIO COMPUTER CO., LTD.
6-2, Hon-machi 1-chome, Shibuya-ku, Tokyo 151-8543, Japan
Responsible within the European Union:CASIO EUROPE GmbH
CASIO-Platz 1, 22848 Norderstedt, Germany
Please keep all information for future reference.
The declaration of conformity may be consulted at http://world.casio.com/
Laite on liitettävä suojamaadoituskostkettimilla vaurstettuun pistorasiaan
Apparatet må tilkoples jordet stikkontakt
Apparaten skall anslutas till jordat nätuttag.
The main plug on this equipment must be used to disconnect mains power.
Please ensure that the socket outlet is installed near the equipment and shall be easily
accessible.
WARNING
This is a Class A product. In a domestic environment this product may cause radio interference in which case the user may be required to take adequate measures.
This mark applies in EU countries only.
This product is also designed for IT power distribution system with phase-to-phase voltage
230 V.
GUIDELINES LAID DOWN BY FCC RULES FOR USE OF THE UNIT IN THE U.S.A.
(Not applicable to other areas)
WARNING: This equipment has been tested and found to comply with the limits for a Class A digital device,
pursuant to Part 15 of the FCC Rules. These limits are designed to provide reasonable protection against
harmful interference when the equipment is operated in a commercial environment. This equipment generates,
uses, and can radiate radio frequency energy and, if not installed and used in accordance with the instruction
manual, may cause harmful interference to radio communications. Operation of this equipment in a residential
area is likely to cause harmful interference in which case the user will be required to correct the interference
at his own expense.
FCC WARNING: Changes or modifications not expressly approved by the party responsible for compliance
could void the user’s authority to operate the equipment.
8
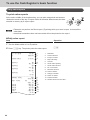
To use the Cash Register’s basic function
Basic function
Getting to know your Cash Register..................................................................10
Name of Parts............................................................................................................. 10
Display......................................................................................................................... 12
Keyboard..................................................................................................................... 13
Getting started......................................................................................................15
To install memory protection batteries.................................................................... 15
To set a paper roll....................................................................................................... 16
To set the language (country), date, time, and tax rates........................................ 18
Daily job flow........................................................................................................20
Before opening your store...................................................................................21
Checking the time and date.......................................................................................21
Setting date and time.................................................................................................21
Preparing bills and coins for change.......................................................................22
Registering items.................................................................................................23
Simple registration.....................................................................................................23
To register multiple items of the same price...........................................................25
Various payments.......................................................................................................26
Discount......................................................................................................................27
Price reduction...........................................................................................................28
Refund.........................................................................................................................29
To print reference numbers.......................................................................................30
Corrections...........................................................................................................31
To correct erroneous item input before registration.............................................. 31
To correct erroneous item input immediately after registration............................32
Basic setups and operations...............................................................................33
About HELP guidance................................................................................................33
To preset discount rate to : key............................................................................34
To preset taxable statuses to departments.............................................................35
To preset unit price to each department..................................................................36
To preset item names to departments......................................................................37
To preset PLUs............................................................................................................39
Daily sales reports...............................................................................................42
To print sales reports.................................................................................................42
9
To use the Cash Register’s basic function
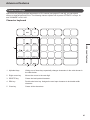
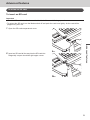
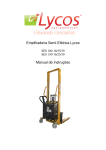
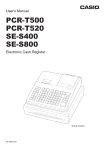
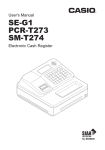
Getting to know your Cash Register
Name of Parts
Printer cover
Mode switch
Keyboard
Customer display
SD card slot cover
Take up reel
Drawer
Platen
Platen arm
Main display
Printer head
Paper cutter
10
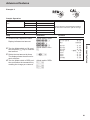
To use the Cash Register’s basic function
Use the mode keys to change the position of the Mode switch and select the mode
you want to use.
PGM (Program)
This position is for setting your Cash Register to suit the needs of your store.
RF (Refund)
Use this position for registering returned goods or correcting registered items.
OFF
The Cash Register turns off in this position.
REG (Register)
Use this position for regular registrations.
CAL (Calculation)
Set to this position when you use the Cash Register as a calculator.
X (Read)
Use this position for issuing daily sales totals report without clearing the data.
Z (Reset)
This position is for issuing reports of daily totals with clearing the accumulated totals.
Mode keys
PGM
OP
There are two types of mode keys. The program key marked “PGM” and the operator key marked “OP”. The program key can set the Mode switch to any position,
while the operator key can select only OFF, REG, and CAL positions.
OP key
PGM key
PGM
¡
RF
¡
OFF
¡
¡
REG
¡
¡
CAL
¡
¡
X
¡
Z
¡
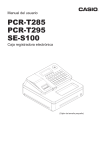
Drawer
The drawer opens automatically whenever you finalize a registration and whenever you issue a read or
reset report. The drawer will not open if it is locked with the drawer key.
Drawer key
Use this key to lock and unlock the drawer.
Bill clip plate
Use this plate for tacking the notes received from customer.
11
Basic function
Mode switch
To use the Cash Register’s basic function
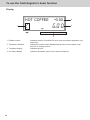
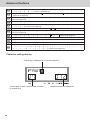
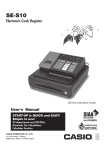
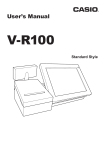
Display
HOT COFFEE
1
2
•3.00
4
&00
3
2
1 Repeat counter
2 Transaction indicator
3 7-segment display
4 Dot matrix display
12
Indicates number of repetition for such case as multiple registration of a
same item.
Indicates the status of the displayed amount such as tax status, total
amount, or change amount.
Indicates amount.
Indicates characters such as item names and prices.
To use the Cash Register’s basic function
1
5
2
6
3
7
Basic function
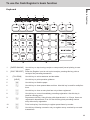
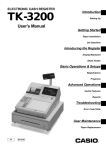
Keyboard
4
8
9
10
11
12
15
16
17
18
19
20
13
14
1
[PAPER SAVING]
Use this key to stop issuing receipts or compressed journal printing to save
paper.
2
[POST RECEIPT]
When the Register is set to not to print receipts, pressing this key prints a
receipt of the preceding transaction.
3
[TAX PGM]
4
[HELP]
5
l
Use this key to feed the paper.
6
h
Use this key to show present date and time. Also this key is used for multiplications.
7
y
Use this key to clear an entry that has not yet been registered.
8
g
Use this key to correct immediately preceding registration. Also this key is
used for reducing price.
9
j
Department shift key. Using this key with departments 1 to 12 keys, items are
registered in departments 13 to 24. Also this key prints preceding number
entry without any registration.
10
i
Price look up key. Use this key to register preset items by number.
11
.
Use this key following a numeric entry to register money received by non-sale
transactions.
Use this key to set tax statuses and tax tables.
Use this key to print operation guidance.
13
To use the Cash Register’s basic function
12
]
13
? to >"'
14
a to
Use this key following a numeric entry to register money paid out from the
drawer.
Ten-key. Use these keys for numeral entries.
Department keys. Use these keys to register items to the corresponding department.
15
c
Use this key for credit card payments.
16
:
Use this key for discounts. Also this key is used to sign a clerk on or off.
17
u
Use this key to register charge sales.
18
m
Use this key for check payments. Also this key is used for opening drawer.
19
o
Use this key to display and print the current subtotal amount.
20
p
Use this key to register cash sales.
14
To use the Cash Register’s basic function
Basic function
Getting started
This chapter explains how to set up the Cash Register and get it ready to operate.
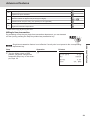
To install memory protection batteries
Important
• These batteries protect information stored in your Cash Register’s memory when there is a power failure or when you unplug the Cash Register. Be sure to install these batteries first.
1
Remove the printer cover by lifting it up.
2
Remove the take up reel.
3
Remove the battery compartment cover and install two new “AA”
type manganese batteries in the battery compartment over battery extraction ribbon.
4
Replace the battery compartment cover. Please make sure that
the battery compartment cover is fastened securely with a click
sound.
AA
15
To use the Cash Register’s basic function
Important
• Be sure that the plus (+) and minus (-) ends of the batteries are facing in the directions as indicated on
the battery compartment.
• The Cash Register will show “LOW BATTERY” on the display when the batteries are running low on
power. Install two new batteries when this occurs.
Warning
• Never try to recharge the batteries.
• Do not expose batteries to direct heat, let them become shorted or try to take them apart.
• Keep batteries out of the reach of small children. If your child should swallow a battery, consult a physician immediately.
• There is a risk of explosion if the batteries are replaced with improper type.
• Dispose used batteries according to the local rule.
To set a paper roll
This Cash Register is fitted with a thermal printer - only 58 mm wide thermal paper rolls can be used.
Caution (in handling the thermal paper)
• Never touch the printer head and the platen as they become hot.
• Be careful not to cut your finger with the paper cutter.
• Unpack the thermal paper just before your use.
• Avoid heat and direct sunlight.
• Avoid dusty and humid places for storage.
• Do not scratch the paper.
• Do not keep the printed paper under the following circumstances.
High humidity and temperature/direct sunlight/contact with glue, thinner or a rubber eraser.
16
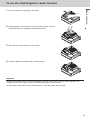
To use the Cash Register’s basic function
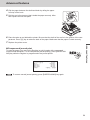
Open the platen arm by lifting it up slowly.
2
Hold the paper roll so that the end of the paper comes out from
the bottom of the roll and place it behind the printer.
3
Place the end of the paper over the printer.
4
Close the platen arm slowly until it locks securely.
Basic function
1
Important
• If the thermal paper roll is not properly installed, you will not be able to use the Cash Register. The
display shows ‟E014 Paper end” to indicate that the paper is not inserted.
• If the display shows “E010 Close the platen arm”, close the platen arm securely.
17
To use the Cash Register’s basic function
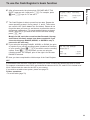
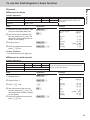
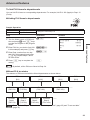
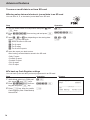
To set the language (country), date, time, and tax rates
Important
• In each setting of date, time and tax rates, the Cash Register prints your settings. Make sure that the
settings are correct. If you have made incorrect date and time setting, press y key . For other incorrect settings, pull out the AC cord, take out batteries, and start from the beginning.
• For UK model, plug in the power cord and start from step 3.
1
Plug in the power socket into a wall outlet. Be sure to check the
rating plate on the side of the Cash Register to make sure that its
voltage matches that of the power supply in your area.
2
For UK model, skip this operation and proceed to step 3.
As soon as you plug in the power cord, the printer prints instructions for selecting language (country). Input the language number
and press p key. For example, If you wish to select English,
press ? p keys. For selecting French, press Z p
keys etc.
PLEASE CHOOSE THE
LANGUAGE.
ENGLISH
:0<CA>
FRANÇAIS :1<CA>
ESPAÑOL
:2<CA>
NEDERLANDS:3<CA>
DEUTSCH
:4<CA>
SVENSKA
:5<CA>
DANSK
:6<CA>
NORSK
:7<CA>
SUOMI
:8<CA>
PORTUGUÊS :9<CA>
START RETURNING WITH
<C> WHEN CHANGE THE
LANGUAGE BY MISTAKE.
3
4
The printer prints the instructions for setting date and time, the
top digit of the display flashes. Enter the date in order of day,
month, and year. For example, input 210115 for January 21, 2015.
Display changes for setting time. Enter the present hours and
minutes in 24 - hour system. For example, 1300 for 1:00 pm.
DAY
00−00−00
TIME SETTING
00−00
5
18
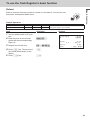
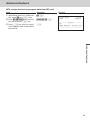
UK model only: For other countries, proceed to step 6.
The printer prints “PLEASE SELECT COUNTRY”. Press Z
p if you use the Cash Register in UK (other area than Ireland). To use the register in Ireland, press X p keys. This
selection is for selecting the currency symbol print £ or €. After
then, proceed to step 6 for tax rates setting.
UK
IRELAND
:1<CA>
:2<CA>
To use the Cash Register’s basic function
7
8
9
After a few seconds, the printer prints “PLEASE INPUT TAX
RATE”. Input tax rate 1 and press p. For example, press
M and p keys for 7% tax rate 1.
Basic function
6
PLEASE INPUT TAX RATE.
TAX RATE
EXIT
:RATE+<CA>
:<ST>
The Cash Register is able to preset four tax rates. Repeat the
same operation as step 6 for tax rates 2, 3, and 4. Those rates
are used for VAT (Value Added Tax: See below). Please do not
forget the rates you have set, and be sure to preset the rates to
department explained on “To preset taxable statuses to departments” (page 35). If you wish to exit from the tax rates setting,
press o key.
Models for UK, and other countries than Denmark, Norway,
and Finland, the basic setups have been completed. If you
chose the language DANSK, NORSK, or SUOMI in step 2,
proceed to the next step.
If you select the language DANSK, NORSK, or SUOMI, the printer inquires if you use the rounding system (treatment of fractions)
of your country. Press Z p if you wish to use the rounding
system. Press ? p keys when you are not using the
rounding system. For example, print on the right is for the case
DANSK is selected.
DO YOU USE DANISH
ROUNDING ?
USE
NOT USE
:1<CA>
:0<CA>
Now, you have completed the initial setups of the Cash Register.
VAT
In accordance with the items’ importance for daily life, some countries lay different tax rates on items.
For example, standard tax rate is 23% and reduced tax rates are 4.8%, 9%, and 13.5% in Ireland as of
2014. Please check the rates for the VAT in your country.
If you wish to set add-on tax system, please see page 70.
Further operations:
• To set tax table (page 70)
19
To use the Cash Register’s basic function
Daily job flow
Before opening your store
• Plugged in? (page 18)
• Enough paper roll? (pages 16 and 17)
• Date and time are correct? (page 21)
• Prepared enough bills and coins for changes? (page 22)
While the store is open
• Registrations (page 23)
• Issuing latest total sales report if needed (page 42)
After closing the store
• Issuing day’s total sales report (page 42)
• Withdraw the money from the drawer.
After you withdraw all the money from the drawer, we recommend that you leave the
drawer open when you leave your store.
• Turn the Mode switch to OFF.
20
To use the Cash Register’s basic function
Basic function
Before opening your store
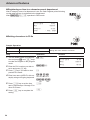
Checking the time and date
You can check the time or date on the display whenever there is no registration
being made.
Step
1
2
Operation
Display
Press X key to show the date and X
time on the display.
Press y key to clear the date/time y
display.
21-01-2015 (WED)
11−2'
Setting date and time
To change date and time, perform the following operations.
Step
Operation
1
Turn the Mode switch to PGM position.
2
Input the date and time from ten key pad and press h key
in order of DDMMYY. The example on the right is for January 21, 2015.
XZ?ZZBh
Press y key.
y
3
4
5
Input the present time in 24-hour system. For example, 1300 ZC??h
for 1:00 PM. After then press h key.
y
Press y key.
21
To use the Cash Register’s basic function
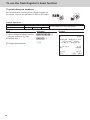
Preparing bills and coins for change
Use . key to open the drawer and store prepared bills and coins for changes in
the drawer.
You can also use m key to open the drawer however, the amount of prepared money for
change is not stored in the Cash Register’s memory, and cash amount in drawer is miscalculated on the sales reports.
Step
1
2
22
Operation
CB?B?.
Input the amount prepared for
changes and press . key. The
example on the right is for preparing
•350.50.
Put the money prepared for changes in the drawer and close the
drawer.
Printout
YOUR RECEIPT
THANK YOU
CALL AGAIN
21−01−2015
REG
RA
09:30
000002
•350.50
To use the Cash Register’s basic function
Basic function
Registering items
The following examples show how you can use the department keys in various
types of registrations. Departments are used for categorizing items. For example,
department 01 for vegetables, department 02 for fruits, and department 03 for
canned foods etc.
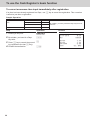
Simple registration
Paying the exact amount
Sample Operation
Unit Price
Item
Payment
•1.00
Quantity
1
Dept.
01
Cash
•1.00
Step
Operation
1
Enter the unit price.
1'
Press corresponding Dept. key. In
this example, Dept. 01.
a
Press p key.
p
2
3
One Dept. 01 item priced •1.00 is sold, and the
customer paid the exact amount in cash.
Printout
YOUR RECEIPT
THANK YOU
CALL AGAIN
21−01−2015
REG
DEPT01
CASH
09:45
000004
•1.00
•1.00
Further operations:
• To preset prices to departments (page 36)
• To preset item names to departments (pages 37 and 49)
• To register single item by single operation (pages 58 and 59)
• To preset tax statuses to departments (page 35)
23
To use the Cash Register’s basic function
Registration with change calculation
Sample Operation
Unit Price
Item
Payment
•12.34
Quantity
1
Dept.
01
Cash
•20.00
Step
Operation
1
Enter the unit price.
1234
Press corresponding department
key.
a
Press o key. The total amount
of the item is shown on the display.
o
2
3
One item priced at •12.34 is sold and the customer
paid more than the total amount (•20.00).
Printout and Display
YOUR RECEIPT
THANK YOU
CALL AGAIN
21−01−2015
REG
DEPT01
TOTAL
CASH
CHANGE
4
24
Enter the tendered amount then
press p key. The display
shows the amount of change.
20'p
09:50
000005
•12.34
•12.34
•20.00
•7.66
CHANGE
'66
To use the Cash Register’s basic function
Basic function
To register multiple items of the same price
Registering multiple items of the same price
Sample Operation
Unit Price
Item 1
•1.50
Quantity
3
Dept.
01
Unit Price
Item 2
Payment
•1.00
Quantity
12
Dept.
01
Cash
•20.00
Step
Operation
1
150
2
3
4
5
6
Enter the unit price of item 1.
Three items of Dept. 01 priced at •1.50 and a dozen
of •1.00 items of the same Dept. are sold, and the
customer paid •20.00 in cash.
Printout
Press corresponding department
key repeatedly for the purchased
quantity.
aaa
Enter the quantity then press X
key.
12X
Enter the unit price and press corre- 1'a
sponding Dept. key.
o
Press o key. Display shows
the total amount.
20'p
Enter the tendered amount then
press p key. The display
shows the amount of change.
21−01−2015
REG
10:20
000007
DEPT01
•1.50
DEPT01
•1.50
DEPT01
•1.50
12 X
@1.00
DEPT01
•12.00
TOTAL
•16.50
CASH
•20.00
CHANGE
•3.50
Department shift
Using j key, you can register items in Dept. 13 through 24. To register items in Dept. 13 through 24,
operate j key and <unit price> then Dept. key (a for Dept. 13 through
for Dept. 24).
Sample Operation
Unit Price
Item
Payment
•1.00
Quantity
1
Dept.
20
Cash
•1.00
Step
Operation
1
Press j key then enter the unit
price.
j1'
Press 8 key.
•1.00 item is registered in Dept.20.
•
Press p key to finalize the
transaction.
p
2
3
Registering one piece of •1.00 item of Dept. 20.
Dept. 20 is assigned by j and 8 keys.
Printout
21−01−2015
REG
DEPT20
CASH
10:50
000011
•1.00
•1.00
25
To use the Cash Register’s basic function
Various payments
Instead of p, you can use u, c or m keys for charge, credit card or check payments.
Other payments than cash
Sample Operation
Unit Price
Item
•10.00
Quantity
Payment
1
Dept.
01
Check
•10.00
One Dept. 01 item priced •10.00 is sold and the
customer paid by check.
Step
Operation
Printout
1
Enter the unit price.
10'
2
Press corresponding Dept. key.
a
21−01−2015
REG
3
Press m key.
m
DEPT01
CHECK
11:10
000012
•10.00
•10.00
Instead of m key, use u or c keys for charge or credit card payments.
Split payment
You can register mixed payment of cash, charge, check, and credit card.
Sample Operation
Unit Price
Item
Payment
•25.50
Quantity
1
Dept.
01
Cash
•10.00
Card
•15.50
Step
Operation
1
2550
Enter the unit price.
2
Press corresponding Dept. key.
a
3
Input cash amount and press
p key. The display shows the
balance.
10'p
Press c key. The balance is registered as credit card payment.
c
4
26
One Dept. 01 item priced •25.50 is sold, and the
customer paid •10.00 in cash and the rest (•15.50)
by credit card.
Printout
21−01−2015
REG
DEPT01
TOTAL
CASH
CREDIT
13:30
000013
•25.50
•25.50
•10.00
•15.50
To use the Cash Register’s basic function
Basic function
Discount
Discount on items
Sample Operation
Item 1
•10.00 (5% discount)
1 piece
Dept. 01
Item 2
•20.00 (no discount)
1 piece
Dept. 02
Payment
•30.00 in cash
Step
Operation
1
Enter the unit price of item 1, and
press corresponding Dept. key.
10'a
5:
3
Input the discount rate from ten
key pad, and press : key. The
discounted amount of the item is
shown on the display.
Register item 2.
20's
4
Enter the tendered amount then
press p key.
30'p
2
Five percent discount is given to a
•10.00 item.
Printout
21−01−2015
REG
15:25
000021
DEPT01
5%
%−
DEPT02
TOTAL
CASH
CHANGE
•10.00
−0.50
•20.00
•29.50
•30.00
•0.50
Further operation:
• To preset discount rate (page 34)
Discount on total amount
Sample Operation
Item 1
•10.00
1 piece
Dept. 01
Item 2
•20.00
1 piece
Dept. 02
Total
•30.00 (5% discount)
Payment
•30.00 in cash
Step
Operation
1
10'a
Register item 1.
2
Register item 2.
20's
3
Press o key.
o
4
Input the percent rate from ten
key pad, and press : key. The
discounted total amount is shown
on the display.
5:
Enter the tendered amount then
press p key.
30'p
5
•10.00 and •20.00 items are sold, and 5% discount
is given on the total amount.
Printout
21−01−2015
REG
16:10
000023
DEPT01
DEPT02
ST
5%
%−
TOTAL
CASH
CHANGE
•10.00
•20.00
•30.00
−1.50
•28.50
•30.00
•1.50
27
To use the Cash Register’s basic function
Price reduction
Sample Operation
Item 1
•10.00 (reduce •0.05)
1 piece
Dept. 01
Item 2
•20.00 (no reduction)
1 piece
Dept. 02
Payment
•30.00 in cash
Step
Operation
1
10'a
2
Register item 1.
Input reduction price (•0.05 in this
case) and press g key.
5g
Register item 2.
20's
4
Press o key.
o
5
Enter the tendered amount then
press p key.
30'p
3
28
Reducing •0.05 from item 1 unit price.
Printout
21−01−2015
REG
DEPT01
−
DEPT02
TOTAL
CASH
CHANGE
16:20
000025
•10.00
−0.05
•20.00
•29.95
•30.00
•0.05
To use the Cash Register’s basic function
Basic function
Refund
When a customer returned a goods for refund, use this feature. You can also use
this feature for deposited bottle return.
Sample Operation
Returned Item 1
•10.00
1 piece
Dept. 01
Returned bottle
•0.10
5 piece
Dept. 12
Step
1
2
3
4
5
Operation
Turn the Mode switch to RF position.
Enter the price of the returned
goods and press corresponding
Dept. key.
10'a
Register the second item.
5h10
Press o key. The amount of
the refund will be shown on the
display.
o
Press p key.
p
A customer returned one •10.00 item (Dept. 01) and
five bottles (Dept. 12) for refund.
Printout
21−01−2015
RF
DEPT01
5 X
DEPT12
CASH
18:40
000003
•10.00
@0.10
•0.50
•10.50
29
To use the Cash Register’s basic function
To print reference numbers
As a memorandum, you can print a reference number on
the receipt. You can use this feature in REG or RF modes.
Sample Operation
Reference number
Item 1
12345
•25.00
1 piece
Dept. 02
Printing “12345” as a note on the receipt.
Step
Operation
1
Input a reference number from ten
key pad, and press j key.
12345j
Register item 1.
25's
Finalize the transaction.
p
2
3
Printout
#
YOUR RECEIPT
THANK YOU
CALL AGAIN
21−01−2015
REG
DEPT02
CASH
30
12345
10:35
000009
•25.00
•25.00
To use the Cash Register’s basic function
Basic function
Corrections
To correct erroneous item input before registration
When you made incorrect input before you register it in a department, you can
correct it by using y key.
Sample Operation
Unit Price
Item
Payment
•1.00
Quantity
1
Dept.
01
Cash
•1.00
Step
Operation
1
By mistake, you have entered •4.00
for •1.00 item.
4'
Press y key to cancel the wrong
entry.
y
Input the correct unit price. Press
Dept. key.
1'a
Finalize the transaction.
p
2
3
4
By mistake, you have entered •4.00 instead of •1.00
for a Dept. 01 item.
Printout
YOUR RECEIPT
THANK YOU
CALL AGAIN
21−01−2015
REG
DEPT01
CASH
09:45
000004
•1.00
•1.00
Erroneous input is not printed on the
receipt.
31
To use the Cash Register’s basic function
To correct erroneous item input immediately after registration
If an item has been already registered in a Dept., use g key to cancel the registration. This correction
is effective just after a registration.
Sample Operation
Unit Price
Item
Payment
•2.50
Quantity
1
Dept.
03
Cash
•2.50
Step
Operation
1
250
2
3
4
32
Entering a unit price.
By mistake, you have hit a Dept.
key twice.
dd
Press g key to cancel the preced- g
ing registration (the last d key).
p
Finalize the transaction.
By mistake, you have pressed a Dept. key twice for
one item.
Printout
21−01−2015
REG
DEPT03
DEPT03
ERR CORR
CASH
18:20
000028
•2.50
•2.50
−2.50
•2.50
ENTER NUMBER THEN
PRESS <HELP> KEY.
To use the Cash Register’s basic function
01:HOW
About HELP guidance
In any Mode switch position, pressing / key prints a guide
ENTER NUMBER THEN
PRESS <HELP> KEY.
Enter the
example,
01:HOW TO PROGRAM
DATE AND TIME ?
02:HOW TO PROGRAM
TAX TABLE ?
03:HOW TO REPLACE
PAPER ROLL ?
04:HOW TO TAKE REPORTS ?
05:WHAT IS THE
ELECTRONIC JOURNAL ?
06:HOW TO CHANGE PRINTER
MODE ?
07:WHEN AN ERROR OCCURS
08:IN THE CASE OF
POWER FAILURE
09:WHEN THE
"LOW BATTERY" SIGN
APPEARS ON THE
DISPLAY
(ABOUT THE LOW−BATTERY
INDICATOR)
10:HOW TO SET DEPT/PLU
NAME ?
11:HOW TO PROGRAM
CHARACTER
FOR press / key. The printer prints the guidance what to be done.
guidance
number and
CLERK'S NAME /
enter 02
and press / key to print the guidance for programming tax table.
RECEIPT MESSAGE ?
12:HOW TO FORMAT
SD CARD.
13:HOW TO BACK UP ECR
SETTING IN SD CARD.
14:HOW TO RESTORE ECR
SETTING FROM SD CARD.
15:HOW TO SAVE SALES
DATA AND EJ DATA
TO SD CARD.
16:HOW TO SET
GRAPHIC LOGO.
Basic function
Basic setups and operations
TO PROGRAM
DATE AND TIME ?
02:HOW TO PROGRAM
TAX TABLE ?
03:HOW TO REPLACE
PAPER ROLL ?
04:HOW TO TAKE REPORTS ?
05:WHAT IS THE
ELECTRONIC JOURNAL ?
06:HOW
TO below.
CHANGE PRINTER
menu
shown
MODE ?
07:WHEN AN ERROR OCCURS
08:IN THE CASE OF
POWER FAILURE
09:WHEN THE
"LOW BATTERY" SIGN
APPEARS ON THE
DISPLAY
(ABOUT THE LOW−BATTERY
INDICATOR)
10:HOW TO SET DEPT/PLU
NAME ?
11:HOW TO PROGRAM
CHARACTER FOR
CLERK'S NAME /
RECEIPT MESSAGE ?
12:HOW TO FORMAT
SD CARD.
13:HOW TO BACK UP ECR
SETTING IN SD CARD.
14:HOW TO RESTORE ECR
SETTING FROM SD CARD.
15:HOW TO SAVE SALES
DATA AND EJ DATA
TO SD CARD.
16:HOW TO SET
GRAPHIC LOGO.
For
33
To use the Cash Register’s basic function
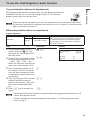
To preset discount rate to : key
Presetting discount rate makes discount calculations quick and easy.
Presetting discount rate
Sample Operation
Discount rate
10.5%
Presetting 10.5% to : key.
Step
Operation
1
Turn the Mode switch to PGM
position and press 1 and o
keys. Now, the Cash Register is in
the setup mode.
1o
Enter the discount rate. You can set
2-digit integer and 2-digit decimal.
10^5
Press : key.
:
Press o key to complete the
setting.
o
2
3
4
Printout
21−01−2015
P01
14:30
000013
%−
10.5%
Registering an item with preset discount rate
Sample Operation
Item 1
•10.00 (preset 10.5% discount)
1 piece
Dept. 01
Item 2
•20.00 (no discount)
1 piece
Dept. 02
Payment
•30.00 in cash
Step
Operation
1
Turn the Mode switch to REG position. Enter the unit price of item 1,
and press corresponding Dept. key.
10'a
Press : key. The item 1 is registered with preset discount rate.
:
Register item 2.
20's
4
Press o key.
o
5
Enter the tendered amount then
press p key.
30'p
2
3
Discounting 10.5%
(preset) on item 1.
Printout
21−01−2015
REG
18:30
000030
DEPT01
10.5%
%−
DEPT02
TOTAL
CASH
CHANGE
•10.00
−1.05
•20.00
•28.95
•30.00
•1.05
If you press : after o key, discount is given to the total amount with preset rate.
34
To use the Cash Register’s basic function
Basic function
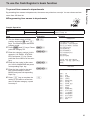
To preset taxable statuses to departments
By presetting taxable statuses to departments, the Cash Register performs tax
calculations with the rate you have set on pages 18 and 19 “To set the language (country), date, time, and tax rates”.
Please note that the tax statuses you set to the departments are for inclusive tax (add-in tax).
Tax amount is not printed on receipts but you can see it on X or Z reports. To set tax exclusive
(add-on tax) status, see page 70.
Presetting taxable statuses to departments
Sample Operation
Tax status
Dept. 05
Tax status 2 (8%)
Dept. 06
Tax status 3 (10%)
Step
Operation
1
Zo
2
3
4
5
Turn the Mode switch to PGM
position and press Z and o
keys. Now, the Cash Register is in
the setup mode.
Pressing ~ key repeatedly chang- ~ ~
es the tax status indication as; T/S1
→ T/S2 → T/S3 → T/S4 → ALL →
NON TAX. Select the tax status you
wish to set. In this example, T/S2.
∞
Press corresponding Dept. key. In
this example, Dept. 05. If you wish
to set the same tax status to another department, press the Dept. key
consecutively.
Press ~ key again. The tax status ~ §
indication changes to the next
status (in this example, T/S3). After
then, press corresponding Dept.
key.
o
Press o key to complete the
setting.
Presetting tax status 2 (8%) to Dept. 05 and tax
status 3 (10%) to Dept. 06. Eight and ten percent
tax rates have been set in “To set the language
(country), date, time, and tax rates” on pages 18
and 19 as an example.
Printout
21−01−2015
P01
DEPT05
DEPT06
16:10
000018
T2
T3
• Taxable amounts and tax amounts for each tax status are aggregated and printed on X or Z
reports. See pages 42 and 43.
• To check departments’ preset tax statuses, please refer to “To check settings (other than
PLU)” on page 71.
35
To use the Cash Register’s basic function
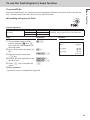
To preset unit price to each department
Presetting unit prices to departments
You can preset a unit price to corresponding department to make registrations
quick and easy.
Sample Operation
Preset price
Dept. 02
•3.50
Dept. 03
•5.25
Presetting •3.50 to Dept. 02 and •5.25 to Dept. 03.
Step
Operation
1
Turn the Mode switch to PGM
position and press Z and o
keys. Now, the Cash Register is in
the setup mode.
1o
Input the unit price and the Dept.
key you wish to preset to. The example on the right is for presetting
•3.50 to Dept. 02.
350s
Perform the same operation for
other Depts.
525d
Press o key to complete the
setting.
o
2
3
4
Printout
21−01−2015
P01
DEPT02
DEPT03
16:15
000020
#02
@3.50
#03
@5.25
Registering items with preset prices
By presetting unit prices to departments, you can register items just by pressing
Dept. keys.
Sample Operation
Unit Price
Item
•3.50 (preset)
Quantity
1
1
Dept.
02
03
Payment
Registering preset priced items.
Cash
Step
Operation
1
Turn the Mode switch to REG position and just press corresponding
Dept. keys. Items with preset prices
have been registered.
sd
Finalize the transaction.
p
2
•5.25 (preset)
Printout
21−01−2015
REG
DEPT02
DEPT03
CASH
15:10
000017
•3.50
•5.25
•8.75
If you enter unit price by ten key prior to the Dept. key, the preset price becomes ineffective,
and entered price is registered.
36
To use the Cash Register’s basic function
Basic function
To preset item names to departments
By presetting item names to departments, the names are printed on a receipt. You can choose an item
name from 200 item list.
Programming item names to departments
Sample Operation
Item
Dept. 07
MAGAZINE
Dept. 08
BOOK
Step
Operation
1
2o
2
3
4
5
6
Turn the Mode switch to PGM
position and press X and o
keys. The Cash Register becomes
program mode .
Press Z? and / keys. Printer 10/
prints the category list.
210/
Enter the category number (in this
example, 210: BOOK, STATIONERY) and press / key. Printer
prints the item code list of the category.
040¶
Enter the item code, in this example, 040 for MAGAZINE and press
corresponding Dept. key.
044•
Enter the item code for the next
item (in this example, 044 for
BOOK) and press corresponding
Dept. key.
o
Press o key to complete the
setting. If you wish to set an item
name of another category, repeat
from step 3.
Presetting “MAGAZINE” to Dept. 07 and
“BOOK” to Dept. 08.
Printout
Category list
110:ARTICLE SALE
210:BOOK, STATIONERY
310:ELECTRONIC GOODS
410:DRESSING
510:SERVICE
610:PHARMACY
710:FOODSTUFFS
810:MEAL
910:OTHERS
ENTER XXX AND PRESS
<HELP> TO SEE DEPT/PLU
NAME.
Item code
210:BOOK, STATIONERY
036
037
038
039
040
041
042
043
044
045
046
047
048
049
050
051
:
:
:
:
:
:
:
:
:
:
:
:
:
:
:
:
CD
DVD
ALBUM
COMIC
MAGAZINE
GUIDE
SUPPLIES
HOBBY
BOOK
NEWSPAPE
STATIONE
LITERARY
PAPERBAC
DICTIONA
CALCULAT
MAP
37
To use the Cash Register’s basic function
Registering items with preset names
The item names programmed by the above procedures are printed on receipts.
Sample Operation
Item
Dept.
Unit Price
Quantity
07
•8.75
1
08
•15.50
1
Step
Operation
1
Turn the Mode switch to REG position. Enter the unit price and press
corresponding Dept. key. If a preset
price is programmed to the Dept.
key, just press the Dept. key.
875¶
Register the other item.
1550•
2
3
38
Preset item name Registering Dept. 07
(preset as MAGAMAGAZINE
ZINE) and Dept. 08
BOOK
(BOOK) items.
Printout
21−01−2015
REG
p
Finalize the transaction. The item
names, MAGAZINE, and BOOK will
be printed on the receipt.
MAGAZINE
BOOK
CASH
15:15
000020
•8.75
•15.50
•24.25
To use the Cash Register’s basic function
Basic function
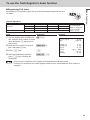
To preset PLUs
Apart from departments, you can preset unit prices and item names by using PLU (Price Look Up) feature. You can preset prices and names for up to 2000 PLU items.
Presetting unit prices to PLUs
Sample Operation
PLU item
PLU No.
Unit Price
5
•8.50
123
•14.00
Presetting •8.50 to PLU 5 and •14.00 to PLU 123.
Step
Operation
1
Turn the Mode switch to PGM
position and press Z and o
keys. Now, the Cash Register is in
the setup mode.
1o
Input a PLU number and press i
key.
5i
Enter the unit price and press
p key.
850p
Perform the same operation for the
next PLU item.
123i
2
3
4
5
Press o key to complete the
setting.
Printout
21−01−2015
P01
14:00
000007
PLU0005
#0005
@8.50
#0123
@14.00
PLU0123
14'p
o
Further operation:
• To link a PLU item to a department (page 55)
39
To use the Cash Register’s basic function
Naming PLU items
From 200 item name list, you can preset item names to PLU items.
Sample Operation
PLU item
PLU No.
Item name
Item name No.
5
UMBRELLA
061
123
SHIRT
077
Step
1
2
3
4
5
6
40
Operation
Turn the Mode switch to PGM posi- 2o
tion and press X and o keys
to set the Register in the program
mode.
Input the PLU number (in this case 5i
5) and press i key.
g
Press g key.
Input the item name code (in this
case 061: UMBRELLA) and press
p.
You can refer item name codes
by the printout using / key (see
page 37).
061p
123i
Repeat steps 2 through 4 for the
next PLU item (in this example, PLU g
123, item name code 077: SHIRT). 077p
o
Press o key to complete the
setting.
Presetting PLU No.5 as UMBRELLA and
PLU No.123 as SHIRT.
Printout
21−01−2015
P02
UMBRELLA
SHIRT
13:15
000008
#0005
#0123
To use the Cash Register’s basic function
Basic function
Registering PLU items
By entering a PLU number, preset unit price is automatically registered with preset name.
Sample Operation
PLU No.
Preset unit price
Quantity
Item name
PLU item
5
•8.50
2
UMBRELLA
123
•14.00
1
SHIRT
Payment
Cash
•50.00
Step
1
2
3
4
Operation
Turn the Mode switch to REG posi- 5ii
tion. Input the PLU number (5 in this
case) and press i key twice (for
two pieces).
123i
Enter the PLU number of the next
item, and press i key.
o
Press o key.
Input the tendered amount and
press p key to finalize the
transaction.
50'p
Registering two of
PLU 5 items (UMBRELLA, •8.50) and
one PLU 123 item
(SHIRT, •14.00).
Printout
21−01−2015
REG
UMBRELLA
UMBRELLA
SHIRT
TOTAL
CASH
CHANGE
14:45
000016
•8.50
•8.50
•14.00
•31.00
•50.00
•19.00
• If PLU name is not preset, PLU number is printed instead of an item name.
• If unit price is not preset, the Cash Register emits an error sound when the PLU number is
assigned.
41
To use the Cash Register’s basic function
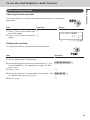
Daily sales reports
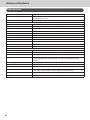
To print sales reports
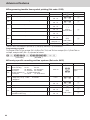
At the end or middle of the business day, you can print categorized and summarized sales results of the day. Z report clears all the sales data whereas the data
remains in memory by X report output.
• Please do not perform the Reset report (Z) printing while your store is open. It clears all the
sales data.
• Items that transactions have not been made will not be printed on the report.
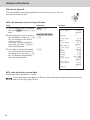
Daily sales report
Step
Operation
1
Turn the Mode switch to X or Z position.
2
Press p key. The printer prints the sales report.
21−01−2015
Z
19:25
000073
1
2
0000 DAILY
Z 0012
3
DEPT01
48
•50.10
28
•76.40
17
•85.80
4
•3.00
4
5
DEPT02
DEPT03
DEPT20
------------------------
GROSS TOTAL
NET TOTAL
CAID
CHID
CKID
CRID
TA1
TAX1
ROUND
RF−MODE TTL
CALCULATOR
108
•316.80
No
46
•325.13
•199.91
•16.22
•20.00
•85.00
•105.10
•4.20
•1.23
No
2
•0.50
No
3
------------------------
CASH
CHARGE
CHECK
CREDIT
42
RA
No
44
•203.91
No
3
•16.22
No
1
•20.00
No
2
•85.00
No
1
•6.00
6
7
8
9
10
11
12
13
14
1
2
3
4
5
6
7
8
9
10
11
12
13
14
p
Date/time
Consecutive No.
Z report counter
Dept. /Quantity
Amount
Gross sales quantity
Gross sales amount
No. of net sales
Net sales amount
Cash in drawer
Charge in drawer
Check in drawer
Credit in drawer
Taxable amount for tax rate 1
•316.80
46
•325.13
•199.91
•16.22
•20.00
•85.00
•105.10
•4.20
•1.23
No
2
•0.50
No
3
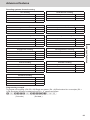
To use the Cash Register’s basic function
NET TOTAL
No
CALCULATOR
------------------------
CASH
CHARGE
CHECK
CREDIT
RA
PO
−
%−
ERR CORR
NS
No
44
•203.91
No
3
•16.22
No
1
•20.00
No
2
•85.00
No
1
•6.00
No
2
•10.00
1
•0.50
No
1
•0.66
No
21
•30.50
No
12
------------------------
CLERK
No
46
•325.13
------------------------
GT
•0000832271.20
15
16
17
18
19
20
21
22
23
24
25
26
27
28
29
30
31
32
33
34
35
36
37
38
39
40
41
15
16
17
18
19
20
21
22
23
24
25
26
27
28
29
30
31
32
33
34
35
36
37
38
39
40
41
Basic function
CAID
CHID
CKID
CRID
TA1
TAX1
ROUND
RF−MODE TTL
Tax amount for tax rate 1
Rounded amount
Refunded mode counter
Refunded amount
No. of CAL operation
No. of cash sales
Cash sales amount
Charge sales counter
Charge sales amount
Check sales counter
Check sales amount
Credit sales counter
Credit sales amount
Received on account counter
Received on account amount
Paid-out counter
Paid-out amount
Reduced counter
Reduced amount
Premium/Discount counter
Premium/Discount amount
Error correction counter
Error correction amount
No sale counter
No. of clerk 01 transactions
Clerk 01 sales amount
Grand total (not resettable)
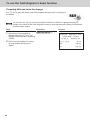
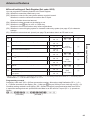
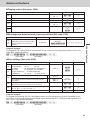
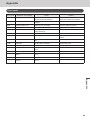
Periodic sales report
Apart from daily report, you can obtain periodic sales report. The register prints total sales data from the
last periodic report. Namely, if you do this operation monthly, you can obtain monthly sales reports.
Step
1
Operation
While Mode switch is in X or Z posi- 10p
tion, enter Z? from ten key pad
and press p keys.
Printout
21−01−2015
Z
16:15
000001
0010 PERIODIC
Z 0001
GROSS TOTAL
NET TOTAL
24
•956.00
No
21
•1,027.15
43
To use the Cash Register’s basic function
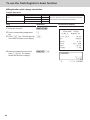
PLU report
You can issue PLU sales report.
Step
1
Operation
While Mode switch is in X or Z posi- 1p
tion, press Z and p keys.
The Cash Register issues PLU
sales report.
Printout
21−01−2015
X
14:15
000015
0001 PLU
X
PLU0005
3
•25.50
2
•6.50
5
•31.50
1
•2.50
1
•14.00
PLU0008
PLU0009
PLU0010
PLU0123
------------------------
TOTAL
44
12
•80.00
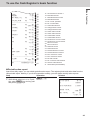
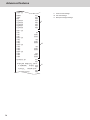
Advanced features
Receipt control.....................................................................................................46
To not print receipts ..................................................................................................46
To print receipts in paper saving mode....................................................................46
Character settings................................................................................................47
Character keyboard....................................................................................................47
Character setting display...........................................................................................48
To set characters to departments and PLUs ..........................................................49
Other character settings............................................................................................52
To link PLU items to departments ............................................................................55
Simple settings...........................................................................................................57
Advanced programming......................................................................................58
To program advanced features to departments......................................................58
To program advanced features of the function keys .............................................60
To program advanced features of the Cash Register.............................................61
To transact in Euro.....................................................................................................69
Tax table................................................................................................................70
To set tax table............................................................................................................70
Printing programmed data..................................................................................71
Checking your program............................................................................................. 71
To record business journal.................................................................................. 74
To use journal paper.................................................................................................. 74
Electronic journal.......................................................................................................76
To utilize an SD card............................................................................................77
To insert an SD card...................................................................................................77
To save or recall data in or from SD card.................................................................78
Calculator mode...................................................................................................80
To use Cash Register as a Calculator.......................................................................80
Specifications.......................................................................................................82
45
Advanced features
Utilizing currency conversion feature................................................................69
Advanced features
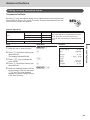
Receipt control
To save paper, you can stop receipt print and, even in the paper saving mode, the Cash Register is able
to print the receipt of immediately preceding transaction.
To not print receipts
If you do not need to print out receipts, use the paper saving mode.
1
To set the Cash Register in paper saving mode, just press [PAPER SAVING] key.
The printer will not print any receipt.
• Even in the paper saving mode, transactions are stored in the Cash Register and, you can
print X or Z reports.
• To unset the paper saving mode, press [PAPER SAVING] key again.
To print receipts in paper saving mode
If you wish to issue a receipt in the paper saving mode, use post receipt feature.
1
After the finalization of a transaction, press [POST RECEIPT] key. The receipt of the transaction is
issued.
• You can issue a receipt only for the immediately preceding transaction.
46
Advanced features
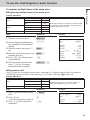
Character settings
Apart from the preprogrammed department or PLU names (see pages 37 and 40), you can attach
names to departments and PLUs. The following clauses explain how to preset “FRUITS” to Dept. 10
and “ORANGE” to PLU 100.
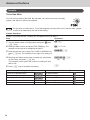
Character keyboard
5
DBL
C
2
3
Advanced features
4
1
1 Alphabet keys
Hitting one of those keys repeatedly changes characters in the order shown in
the table below.
2 Right cursor key
Moves the cursor to the next digit.
3 DELETE key
Clears the last inputted character.
4 DBL key
Double size letter key. Assigns the next input character to be double-width
character.
5 Clear key
Clears all the characters.
47
Advanced features
8
9
V
A → B → C → a → b → c → 8 → Ä → Å → Æ → Á → Â → À → Ã → Ç → â → ä →
à → å → æ → á → ã → ç returns to the beginning
D → E → F → d → e → f → 9 →
→ É → Ê → Ë → È →
→ é → ê → ë → è →
ƒ returns to the beginning
G → H → I → g → h → i → 4 → Í → Î → Ï → I → Ì → Ï → Î → Ì → í → í
returns to the beginning
B
J → K → L → j → k → l → 5 returns to the beginning
N
M → N → O → m → n → o → 6 → Ñ → Ö → Ø → Ó → Ô → Ò → Õ → ñ → ô → ö →
ò → ø → ó → õ returns to the beginning
Z
P → Q → R → S → p → q → r → s → 1 →
X
T → U → V → t → u → v → 2 →
returns to the beginning
TEL
→
→ ß returns to the beginning
→ Ü → Ú → Û → Ù → ü → û → ù → ú → µ
C
?
'
(Right cursor)
^
(Delete)
M
7 → @ → - → / → space
→ : → ! → ? → ~ → ( → ) → * → # → + → , → ^ →
; → < → → = → > → $ → ¥ → % → & → [ → ] → ‘‘ → { → | → } → • → “ → .
→ \ → _ → ` → £ → √ → ¿ → ¡ → ∕ → § returns to the beginning
W → X → Y → Z → w → x → y → z → 3 →
→ ÿ →
returns to the beginning
0
Character setting display
Setting digit is displayed in a reversed character.
FRUITS
07
Present digit of cursor. Double width character
is counted as 2.
48
012
Maximum number of characters
Advanced features
To set characters to departments and PLUs
Setting characters to departments
Sample Operation
Category name
Dept. 10
FRUITS
Step
1
3
4
5
6
7
Operation
Turn the Mode switch to PGM posi- Xo
tion and press X and o keys
to make the Register in the program
mode.
Press Dept. key you wish to set to.
In this example, Dept. 10.
Press h (DBL) key to assign the
next character as double-width
character.
h(DBL)
<Assigning double-width>
Press > key three times for letter
F.
>>>
<F>
Press h (DBL) key to release
double-width assignment.
h(DBL)
<Releasing double-width>
Press Z key three times for letter
R.
ZZZ
<R>
Press X key twice for letter U.
XX
<U>
VVV X
<I>
<T>
ZZZZ
<S>
p
8
Set the rest of characters “ITS”.
9
Press p key to determine the
setting. If you wish to set characters
to another department, repeat steps
2 through 9.
10 Press o key to complete the
Printout
21−01−2015
P02
FRUITS
14:40
000012
#10
Advanced features
2
Setting category name “FRUITS” to Dept. 10.
o
setting.
• Use ^ (DEL) key to delete the last inputted character. To clear all the characters of the
department, press y key.
• If you wish to set characters using the same key, use ' (right cursor) key to move the setting
digit.
• To insert a space between characters, press M (-) key five times.
49
Advanced features
Registering an item to a character preset department
After a category name of a department is set, the Cash Register prints following
receipt when an item is registered to the department.
After Z?'
p operation in REG mode.
21−01−2015
REG
FRUITS
CASH
14:42
000015
•10.00
•10.00
Setting characters to PLUs
Sample Operation
Item name
PLU100
Step
1
2
3
4
5
6
50
APPLE
Setting item name “APPLE” to PLU100.
Operation
Turn the Mode switch to PGM posi- Xo
tion and press X and o keys
to make the Register in the program
mode.
Z??i
Enter the PLU number you wish to
set to and press i key.
y
Press y key if you wish to clear
present PLU name.
Enter item name (APPLE in this ex- < Z ' Z
ample) using multi typing keyboard. <A><P><►><P>
BBB >>
<L>
<E>
p
Press p key to set the item
name. Repeat steps 2 through 5 for
other PLU items.
o
Press o key to complete the
setting.
Printout
21−01−2015
P02
APPLE
14:45
000013
#0100
Advanced features
Registering character preset PLU items
After the above setting, the register prints the following receipt by the operation
Z??ip in REG mode.
21−01−2015
REG
APPLE
CASH
15:12
000018
•1.23
•1.23
An error occurs if unit price is not set to the PLU number. See page 39 for setting PLU unit
price.
Advanced features
51
Advanced features
Other character settings
You can also set clerk names and receipt messages.
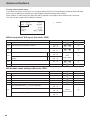
Setting receipt message
There are five lines for receipt message as shown below.
YOUR RECEIPT
THANK YOU
CALL AGAIN
21−01−2015
1
2
3
4
5
1
2
3
4
5
Line No.1
Line No.2
Line No.3
Line No.4
Line No.5
15:17
You can set message line by line.
Sample Operation
Line No. 1
CASIO
Programming to print CASIO on top of the receipt.
Step
Operation
1
Turn the Mode switch to PGM position and press X and
o keys to make the Register in the program mode.
Xo
Enter the message number (in this example 1), and press
u key. The Register is set to program the first line of the
receipt message.
Zu
Input message of the first line.
In this example, CASIO.
h <<< ' <
<DBL> <C>
<►><A>
ZZZZ VVV
<S>
<I>
NNN
<O>
p
2
3
4
5
52
Press p key to set the message of the first line. If you
wish to set another line, repeat steps 2 through 4.
Press o key to complete the setting.
o
Advanced features
Issuing receipts with preset message
After the above setting, the Cash Register issues the following receipts when
transactions are made in REG mode.
CASIO
YOUR RECEIPT
THANK YOU
CALL AGAIN
21−01−2015
15:17
Setting clerk name
Advanced features
You can set clerk name so that the Register prints the name of the clerk in
charge.
To print clerk name, you must program to force clerk number entry. (See page 65)
Sample Operation
Clerk No. 1
MARY
Programming clerk No. 1 MARY.
Step
Operation
1
Turn the Mode switch to PGM position and press X and
o keys to make the Register in the program mode.
Xo
Enter the clerk number you wish to set name. In this example 1. Then press : key.
Z:
Program the clerk name using multi typing keyboard.
N < ZZZ
<M><A>
<R>
CCC
<Y>
p
2
3
4
5
Press p key to set the name. If you wish to set another
name, repeat steps 2 through 4.
Press o key to complete the setting.
o
53
Advanced features
Printing clerk name on the receipt
After the above setting, the Cash Register issues the following receipt in REG
mode when the clerk has signed on.
1
21−01−2015
REG MARY
DEPT02
DEPT03
CASH
14:20
000014
1
Clerk name
•3.50
•5.25
•8.75
To print clerk name, you must program to force clerk number entry by D3 of “Overall settings of
Cash Register (Set code 0622)”. (page 65)
54
Advanced features
To link PLU items to departments
You can link PLU items to corresponding departments. For example, link PLU 100 (Apple) to Dept. 10
(Fruits).
Linking PLU items to departments
Sample Operation
PLU No.
Linking Dept.
100
Dept. 10
Step
1
3
4
Operation
Printout
Turn the Mode switch to PGM posi- Co
tion and press C and o keys
to make the Register in the program
mode.
Enter PLU No. you wish to link (100 Z??i
in this example) and press i key.
Z?p
Enter Dept. number from ten key
pad (10 in this example) and press
p key. Repeat steps 2 and 3
for other PLUs.
o
Press o key to complete the
setting.
21−01−2015
P03
16:20
000022
Advanced features
2
Linking PLU 100 to Dept. 10.
#0100
APPLE
10
By default, all the PLUs are linked to Dept. 24.
About PLU tax status
Tax statuses of PLUs accord with the linked departments as shown below.
T/S1
[5%]
Dept.1
(T/S1 5%)
Dept.2
(T/S1 5%)
PLU0001
Dept.1
(T/S1 5%)
PLU0002
Dept.2
(T/S1 5%)
T/S2
[10%]
T/S3
[15%]
Dept.3
(T/S2 10%)
Dept.4
(T/S3 15%)
PLU0003
Dept.3
(T/S2 10%)
PLU0004
Dept.3
(T/S2 10%)
T/S4
[20%]
……
……
Please refer to “To preset taxable statuses to departments” (page 35) and “To set tax table”
(page 70).
55
Advanced features
Registering PLU item linked to a department
When you register preset PLU item, linked department number is not printed on
the receipt but it is categorized in the corresponding department.
Receipt
21−01−2015
REG
1
APPLE
CASH
15:17
000018
1
PLU 100 with preset name linked to Dept.
10
1
2
Dept. 10 with preset name
PLU 100 item
•1.23
•1.23
X/Z Report
21−01−2015
X
11:30
000002
0000 DAILY
X
DEPT09
1
FRUITS
DEPT11
1
•1.00
1
•1.23
1
•2.00
------------------------
GROSS TOTAL
56
2
•3.00
2
Advanced features
Simple settings
Simple setting of key catch tones
You can set whether to sound key catch tones or not by simple programming.
Step
Operation
1
Zo
2
Turn the Mode switch to PGM position and press Z and
o keys.
Input 10800 from ten key pad and press o key.
Z?<??o
3
Input 0 (sound key catch tones) or 1 (not sound key catch
tones) and press p key. The example on the right is for
not sounding key catch tones.
Zp
Advanced features
Simple setting of double height printing
By this setting, the Cash Register prints receipts with double height characters.
Step
Operation
1
While Mode switch is in PGM position, press Z and
o keys.
Zo
Input 10200 from ten key pad and press o key.
Z?X??o
2
3
Zp
Input 0 (normal character height) or 1 (double character
height) and press p key. The example on the right is for
setting double height characters.
After the above setting, the Cash Register prints the following receipts in REG mode.
21−01−2015
REG
DEPT01
TOTAL
CASH
09:40
000003
•1.00
•1.00
•1.00
57
Advanced features
Advanced programming
To program advanced features to departments
You can also program the following features to the departments.
Minus unit price registration: U
nit price registered in the department is stored as minus value. It is useful
for refunded items or returned bottles.
Maximum digit limitation:To prevent wrong unit price entry, you can set the maximum number of digit
for numeral entry.
Single item transaction:This feature finalizes the transaction just by hitting a Dept. key for single
item registration. You do not need to press p key to finalize.
Advanced programming of Dept. keys
Sample Operation
(A)
(B)
(C)
Dept. 02
Normal
Dept.
Maximum
4-digit entry
Single item transaction dept.
Dept. 03
Minus
Dept.
Maximum
5-digit entry
Normal dept.
Step
1
2
3
4
58
Operation
Turn the Mode switch to PGM posi- Co
tion and press C and o keys
to make the Register in the program
mode.
Referring the set code list A, B, and ?VZs
(A) (B) (C)
C below, input the setting code.
In this example, (A) ? ; Normal
dept., (B) V ; 4-digit limitation, and
(C) Z ; Single transaction. After
then, press corresponding Dept.
key.
ZB?d
By the same manner, program the
(A) (B) (C)
set code to Dept. 03 as (A) Z ;
Negative Dept., (B) B ; 5-digit
limitation, and (C) ? ; Not single
transaction Dept.
o
Press o key to complete the
setting.
Programming Dept. 02 as normal (not
negative price) Dept., 4-digit limitation,
and single transaction Dept.
Dept. 03 as minus price Dept., 5-digit
limitation, normal (not single item)
Dept.
Printout
21−01−2015
P03
DEPT02
DEPT03
14:48
000014
#02
0041
#03
0150
Advanced features
Set code
(A)
(B)
(C)
Normal Dept.
?
Negative unit price allowable
Z
No digit limitation for unit price
?
Maximum number of digit for unit prices (up to 8 digits)
Z to <
Prohibit manual unit price entry (only preset price is registrable)
>
Normal registration department
?
Single item transaction department
Z
* Default value of (A), (B), and (C) are “000”.
Single item transaction
By presetting a Dept. key as single item transaction department, you can transact
an item just by pressing the Dept. key without any transaction key.
Step
Operation
1
s
Turn the Mode switch to REG
position, just press a single item
transaction Dept. key. In this example, Dept. 02.
Advanced features
Single item transaction feature is not effective if a unit price is not preset to the corresponding
department key.
Printout
21−01−2015
REG
DEPT02
CASH
17:20
000026
•3.50
•3.50
59
Advanced features
To program advanced features of the function keys
The following operation sets :, u, c ,m , and p keys further features.
Step
Operation
1
Turn the Mode switch to PGM position and press C and
o keys.
Co
Referring the following table, input the program code you
wish to program. For example, to program : key as %+
(premium) key, enter 0001.
BBBB
D4 D3 D2 D1
Press corresponding function key.
:, u, c ,m , or p
Press o key to complete the setting.
o
2
3
4
Programming : key further functions
Selection
Program code
Default value
D4
Always 0
Description
0
?
º
D3
Always 0
0
?
º
?,Z or X
º
? or Z
º
D2
D1
Round off, omit fraction, or round up?
Round off =0
Omit = 1
Round up = 2
Use : key as <%-> or <%+> key?
%- = 0
%+ = 1
Programming u, c ,m , and p keys further functions
Description
Use Finnish rounding?
D4
60
Selection
a
Yes = 1
No = 0
Limit last 2 digits of numeral entry 00 or 50?
(Only for p key)
b
Yes = 2
No = 0
Limit the last digit of numeral entry 0 or 5?
(Except u and c keys.)
c
Yes = 4
No = 0
D3
Prohibit partial payment?
(Except u and c keys.)
D2
D1
Program code
Default value
B*
Depend on the
(a+b+c)
region
Add a, b and c
Yes = 1
No = 0
? or Z
º
Always 0
0
?
º
Always 0
0
?
º
Advanced features
To program advanced features of the Cash Register
To program the advanced settings of the register, please follow the operations
shown below.
Operation
1
While Mode switch is in PGM position, press C and
o keys.
Co
Referring the following table, input the set code you wish
to program and press o key. For example, to program
overall features of Register, input 0622
BBBBo
(Set code)
Referring table of each program, input six-digit program
code and press p key.
BBBBBBp
D6 D5 D4 D3 D2 D1
(Program code)
o
2
3
4
Press o key to complete the setting.
Advanced features
Step
Set codes
Set code
Items to set
Set code
Items to set
0322
Tax related printings
1022
Operations in calculator mode
0422
Country-specific rounding and tax system
2022
Display control
0522
Print control
2322
Currency exchange rate setting
0622
Overall settings of the Register
2422
Euro settings
0822
Print control of X/Z reports
61
Advanced features
Programming taxable item symbol printing (Set code: 0322)
Description
D6
D5
D4
Print T/S (tax symbol)?
Print Australian GST message?
Print TA2 on the receipt?
Print TA3 on the receipt?
Print TA4 on the receipt?
D2
D1
Program code
Default value
0
?
º
a
Yes = 2
No = 0
? or X
º
b
Yes = 4
No = 0
? or V
º
a
Yes = 1
No = 0
b
Yes = 2
No = 0
º
c
Yes = 4
No = 0
B*
(a+b+c)
Add a, b and c
a
Yes = 1
No = 0
b
Print = 2
Not print = 0
B
(a+b)
Add a and b
º
?
º
Always 0
Print TA1 on the receipt?
D3
Selection
Print VAT (inclusive tax) on receipts?
Always 0
0
* Add a, b, and c. For example, to print TA1 (a= 1), TA2 (b=2), and TA3 (c = 4), D3 should be 7.
Programming example
To program Print T/S on receipts (D5 = 2)/Print TA1, TA2, and TA3 on receipts (D3 = 7)/Print TA4 on
receipts, and print VAT (D2 = 3), operate as follows.
Co?CXXo?X?MC?po
( Set code )
( Set data )
Country-specific rounding and tax systems (Set code: 0422)
Description
D6
D5
D4
D3
D2
Selection
Rounding system (see tables below)
00: No rounding
01: IF1
02: IF2
03: Denmark
04: Norway
05: Singapore
06: Finland
07: Australia 08: Canada
09: New Zealand (A)
10: New Zealand (B)
11: Malaysia
12: Czech
13: South Africa
Tax system
0: Single tax (1 to 4) 1: USA
3: Singapore
D1
62
??
Always 0
Allow . and ] amount only multiples of 0.05?
(Australian model only)
Depend on the
region
0 to 3
? to C
º
Yes = 1
No = 0
? or Z
º
0
?
º
B
(a+b)
Add a and b
º
ZC
Print invoice number on receipts?
Default value
to
00 to 13
2: Canada
Display rounded value?
Program code
a
Yes = 1
No = 0
b
Yes = 2
No = 0
º
Advanced features
Rounding systems for each country
IF 1 rounding
South African rounding
Last digit of ST
Result
Last digit of ST
Result
0 to 2
0
0 to 4
0
3 to 7
5
5 to 9
5
8 to 9
10
IF 2 rounding
New Zealander (A/B) rounding
Last digit of ST
Result
Last digit of ST/ CA CG
Result
0 to 4
0
0 to 4/5
0
5 to 9
10
5/6 to 9
10
Danish rounding
Malaysian rounding
Result
Last digit of ST/ CA CG
Result
00 to 24
00
0 to 2
0
25 to 74
50
3 to 7
5
75 to 99
100
8 to 9
10
Singaporean rounding
Advanced features
Last 2 digits of ST/ CA CG
Norwegian/Czech rounding
Last digit of item, %- REG
Result
Last digit of ST
Result
0 to 2
0
00 to 49
00
3 to 7
5
50 to 99
100
8 to 9
10
Finnish rounding
Canadian rounding
Last digit of ST/ CA CG
Result
Last digit of ST/ CA CG
Result
0 to 2
0
0 to 2
0
3 to 7
5
3 to 7
5
8 to 9
10
8 to 9
10
Australian rounding
Last digit of ST/ CA CG
Result
0 to 2
0
3 to 7
5
8 to 9
10
Programming example
To program No rounding: (D6, D5 = 00)/Single tax system: (D4 = 0)/Print invoice No. on receipts: (D3 =
1)/D2 should be 0/Display rounded amount (D1 = 1), operate as follows.
Co?VXXo???Z?Zpo
( Set code )
( Set data )
63
Advanced features
Programming print control (Set code: 0522)
Description
Use receipt or journal?*
D6
Normal print or double length print on receipts?
Print total amount when finalized?
D5
D4
Print detailed items on journal?
D2
Always 0
D1
Printing density
Normal: 0, Dark: 1, Max. darkness: 2
Default value
B
(a+b+c)
Add a, b and c
º
Character = 0
Graphic = 1
? or Z
º
Yes = 0
No = 4
? or V
º
B
(a+b+c)
Add a, b and c
º
?
º
?,Z or X
º
Receipt = 0
Journal = 1
b
Normal = 0
Tall = 2
c
Yes = 4
No = 0
Print the time on receipts?
Print total amount by o key?
Program code
a
Print receipt message characters or graphic logo?
Print consecutive number on receipts?
D3
Selection
a
Yes = 0
No = 1
b
Yes = 2
No = 0
c
Yes = 0
No = 4
0
0 to 2
* See page 74 for simple journal setting.
Programming example
Using journal, Normal print width, Print total amount by subtotal key: (D6 = 1 + 0 + 4)/Character receipt
message: (D5 = 0)/Print time on receipts: (D4 = 0)/Not print consecutive number, Print total amount by
o key (D3 = 1 + 2)/Print density: normal (D1 = 0), operate as follows.
Co?BXXoB??C??po
( Set code )
( Set data )
64
Advanced features
Overall settings of Cash Register (Set code: 0622)
You can program the following features to the Cash Register.
(D6) Whether to sound key catch tone or not.
(D5) Whether to clear the key entry buffer when a receipt is issued.
Whether to reset the consecutive number after Z report.
Allow to finalize minus total amount.
(D4) Whether to show seconds on the display or not.
(D3) Whether to use ' key as <00> or <000> key.
Whether to force clerk number entry before registrations.
(D2)Whether to use multi typing system or character code entry system (see page 47) for character
settings.
(D1) Whether to store electronic journal (see page 78) and sales data in an SD card or not.
Description
D6
Sound key catch tone?
Clear key entry buffer when issuing receipt?
Clear consecutive number after Z report?
Allow minus total finalization?
D4
D3
D2
D1
Force clerk number entry?
Default value
Yes = 0
No = 4
? or V
º
B
(a+b+c)
Add a, b and c
º
? or Z
º
B
(a+b)
Add a and b
º
? or X
º
B
(a+b)
Add a and b
º
a
Yes = 1
No = 0
b
Yes = 0
No = 2
c
Yes = 4
No = 0
Show seconds on the display?
Use ' key as <000> key?
Program code
Yes = 1
No = 0
a
Yes = 1
No = 0
b
Yes = 2
No = 0
Character set method is multi typing or key code entry
system?
Multi typing = 0
Key code = 2
Store electronic journal and sales data in an SD card
for X report?
a
Yes = 1
No = 0
Store electronic journal and sales data in an SD card
for Z report?
b
Yes = 2
No = 0
Advanced features
D5
Selection
* Add a, b, and c. For example, to set clear key entry buffer: a = 1, not clearing consecutive number: b = 2, not allowing minus
total finalization: c = 4. The set value for (B) is 1 + 2 + 4 = 7.
Programming example
Sound key catch tone: (D6 = 0)/Clear consecutive number, Allow minus total finalization (D5 = 1 + 2 +
4 = 7)/Show seconds on the display: (D4 = 1)/Not use ' key as 000 key/Force clerk sign on (D3 = 2)/
Character setting method is multi typing: (D2 = 0)/Store electronic journal and sales data in an SD for
X report/Not storing electronic journal and sales data in an SD card for Z report (D1 = 1), operate as
follows.
Co?NXXo?MZX?Zpo
( Set code )
( Set data )
65
Advanced features
Forcing clerk number entry
In the above program, if you set 2 or 3 to the set value of (D3), the Cash Register emits an alert and asks
you to sign on when you operate the Cash Register without entering clerk number.
Clerk number or clerk name (see page 54) will be printed on receipts if clerk number entry is forced.
You can use up to eight clerk numbers or names.
1
21−01−2015
REG CLERK03
DEPT01
DEPT02
CASH
1
16:15
000024
Clerk No.
•10.00
•20.00
•30.00
Print controls of X/Z report (Set code: 0822)
Description
D6
D5
D4
Selection
Program code
Default value
0
?
º
Clear electronic journal after Z report?
Yes = 0
No = 1
? or Z
º
Print total refunded amount?
Yes = 0
No = 1
? or Z
º
B
(a+b)
Add a and b
º
Yes = 4
No = 0
? or V
º
0
?
º
Always 0
Print zero amounts on reports?
D3
D2
D1
Print GT (accumulated amount of the Register) on
reports?
Print invoice numbers on receipts?
Always 0
a
Yes = 1
No = 0
b
Yes = 0
No = 2
Calculator mode settings (Set code: 1022)
Selection
Program code
Default value
D6
Always 0
Description
0
?
º
D5
Always 0
0
?
º
D4
Always 0
0
?
º
D3
Always 0
0
?
º
D2
Always 0
0
?
º
B
(a+b+c)
Add a, b and c
º
D1
66
Open the drawer when p key is pressed?
Yes = 1
No = 0
Open the drawer when m key is pressed?
Yes = 2
No = 0
Print number of p key depression on X/Z reports?
Yes = 0
No = 4
Advanced features
Display control (Set code: 2022)
Description
D6
Display rear indicator?
Selection
Program code
Default value
Yes = 0
No = 1
? or Z
0
D5
Always 0
0
?
0
D4
Always 0
0
?
0
Yes = 0
No = 1
? or Z
0
D3
D2
Light the illuminator?
Illumination off timer. (00 to 59 minutes)
??
to
D1
20
B>
Exchange rate between local currency and Euro (Set code: 2322)
Description
Exchange rate of main currency
against sub currency. See set code
2422 for main and sub currency
selection.
Program code
Default value
Example
6-digit rate
????<?
ºººººº
Advanced features
D6
to
D1
Selection
Program example
To program €1.00 = £0.80 when £ is main and € is sub currencies. Decimal point position is set in set
code 2422, operate as follows.
CoXCXXo????<?po
( Set code )
( Set data )
Euro settings (Set code: 2422)
Description
D6
D5
Rounding method of sub currency.
00: No rounding
01: IF1
02: IF2
03: Danish
04: Norwegian 05: Singaporean
06: Finnish
07: Australian 08: Canadian
09: New Zealand (A)
10: New Zealand (B)
11: Malaysian
12: Czech
13: South African
Select mainly used currency. Local currency or Euro?
D4
Selection
Print subtotal amount in main currency only or both
currencies?
Program code
Default value
??
00 to 13
to
ºº
B
(a+b)
Add a and b
º
ZC
a
Local = 0
Euro = 1
b
Main = 0
Both = 2
D3
Decimal position of exchange rate.
e.g.) for 123. set 0, for 12.3 set 1, for 1.23, set 2.
? to N
º
D2
ADD mode. (Decimal point position)
123 = 0, 12.3 = 1, 1.23 = 2, 0.123 = 3
? to C
2
D1
Always 0
?
º
0
Program example
To program No rounding (D6, D5 = 00)/Main currency is local and currency symbol of subtotal is only
local (D4 = 0+0)/Decimal position of exchange rate is second digit (D3 = 2)/Decimal point position is 2
(D2 = 2)/(D1 = 0), operate as follows.
CoXVXXo???XX?po
( Set code )
( Set data )
67
Advanced features
Quick Euro setup
The following operation programs Euro settings as follows in a lump.
Main currency symbol:
“€“
Symbol of main currency:
“•”
Main currency:
Euro
Exchange rate:
zero
Decimal position of exchange rate:
1st digit
Decimal point position:
3rd digit (0.00)
Step
Operation
1
Turn the Mode switch to Z position.
2
Enter 01072002 from ten key pad and press o key.
?Z?MX??Xo
3
Press p key to complete the setting.
p
68
Advanced features
Utilizing currency conversion feature
To transact in Euro
By using ] key, the register allows you to register items in the local currency
and transact in Euro or vice versa. To set the currency rate between Euro and
local currency, please see page 67.
Sample Operation
Unit Price
Item
•10.00
Quantity
1
Dept.
01
Exchange rate
Payment
€1.00 = •0.80
Cash
€20.00
Operation
1
Enter the item in local currency.
10'a
Press ] key before entering tendered amount.
The display indicates EURO.
]
Press o key to indicate the
price in Euro.
o
Press ] key before entering tendered amount.
]
Enter the tendered amount in Euro.
In this example, €20.00, and press
p key. The Cash Register
displays and prints change amount
in the local currency.
20'p
3
4
5
Printout
21−01−2015
REG
DEPT01
TOTAL
EURO
CASH
CASH
CHANGE
Advanced features
Step
2
The Cash Register is programmed as €1.00 is
•0.80, and main currency is local money.
A •10.00 item is sold and the customer paid in
Euro
10:05
000006
•10.00
•10.00
∕20.00
(•16.00)
•6.00
69
Advanced features
Tax table
To set tax table
You can set four kinds of tax table. By this table, you can set tax rates, rounding
system, and add-in or add-on tax systems.
The tax rates you have set in “To set the language (country), date, time, and tax rates” (pages
18 and 19) is replaced by the rate of this setting.
Sample Operation
Setting 7.0 percent tax rate, rounding off, and add-on tax to tax table 1.
Step
Operation
1
Turn the Mode switch to PGM position and press C and
o keys.
Co
Enter tax table number and press [TAX PGM] key. The
example on the right is for assigning tax table 1.
Z[TAX PGM]
Enter the tax rate in the range from 0.0001 to 99.9999 and
press p key. The example on the right is for setting 7.0
%.
M"?p
Referring the tables below, enter rounding (A), add-in/addon (B) codes, and press p key.
The example on the right is the code for rounding off, and
add-on tax.
B??Xp
(A)
(B)
Press o key to complete the setting.
o
2
3
4
5
Rounding system (A)
Add-in/Add-on (B)
Cut off to 2 decimal places
???
No specifications
?
Round off to 2 decimal places
B??
Add-on tax
X
Round up to 2 decimal places
>??
Add-in tax (VAT)
C
Tax on tax
V
VAT on tax (Thai system)
N
70
Advanced features
Printing programmed data
Checking your program
You can check programmed data you have set.
To check settings (other than PLU)
Step
Operation
1
o
Turn the Mode switch to PGM position and press o
key.
CASH
0000
CHARGE
0000
CHECK
0000
CREDIT
0000
−
%−
0000
T/S1
0100
T/S2
0200
10200
10800
10900
0001−22
0002−22
0003−22
0004−22
0005−22
0006−22
0007−22
16:40
000028
#01
@0.98
#02
@2.05
#03
@3.15
#04
@15.30
1
1
2
3
4
5
6
7
8
Dept. name and price
Transaction key setting
Reduction and discount settings
Tax shift settings
Receipt/Journal setting
Key catch tone setting
Storing in SD card setting
Set code and set data
Advanced features
21−01−2015
P03
FRUITS
0000
VEGETABLES
0000
FISH
0000
MEAT
0000
#01
#02
2
#03
#04
#07
#08
0%
#23
3
4
#24
0
0
0
000012
000000
020730
000101
501300
000000
000000
5
6
7
8
71
Advanced features
0028−22
000000
MARRY
JOHN
MAC
CLERK04
CLERK05
CLERK06
CLERK07
CLERK08
#01
#02
#03
#04
#05
#06
#07
#08
0001−25
TAX1
TAX1
TAX1
0002−25
TAX2
TAX2
TAX2
0003−25
TAX3
TAX3
TAX3
0004−25
TAX4
TAX4
TAX4
9 Clerk names settings
10 Tax rate settings
11 Receipt message settings
9
5%
0000
5003
10%
0000
5003
10
15%
0000
5003
20%
0000
5003
CASIO
#01
#02
YOUR RECEIPT
THANK YOU #03
#04
CALL AGAIN
#05
* INDICATES
#06
72
11
Advanced features
To check PLU settings
Step
Operation
1
Z?o
While Mode switch is in PGM position, enter Z? and
press o key.
Unit prices and item names preset to PLUs are printed.
1
2
17:05
000030
#0001
@1.80
#0002
@2.50
#0003
@3.20
#0004
@18.30
3
4
1
2
3
4
PLU item name
Linked Dept.
PLU No.
PLU unit price
Advanced features
21−01−2015
P01
APPLE
01
ORANGE
01
STRAWBERRY
01
PINEAPPLE
01
73
Advanced features
To record business journal
To use journal paper
Instead of issuing receipts, you can roll the printouts of transactions on the take up reel so that you can
use the printouts as business journal.
Programming to print business journal
The following operations set the Cash Register to print business journal. By this
setting, the printer omits receipt message, and the take up reel rolls the paper up.
Step
1
2
3
Operation
Turn the Mode switch to PGM posi- 1o
tion and press Z and o keys
to make the Register in the program
mode.
Press Z and u keys. The Reg- Zu
ister is set as journal printer.
o
Press o key to complete the
setting.
Printout
21−01−2015
P01
PRINTER
If you wish to resume receipt printing press ? and u keys in step 2.
Setting journal paper
1
Remove the printer cover by lifting it up.
2
3
Press l key so that the paper is fed about 15 centimeters.
74
Remove the left side plate from the take up reel.
11:45
000005
JOURNAL
Advanced features
4
5
6
7
Clip the paper between the shaft and hook by rolling the paper
from top of the hook.
Roll the reel a few turns so that it holds the paper securely. After
then replace the left side plate.
Place the take up reel behind the printer. Be sure that the shaft of the reel is in the groove of the compartment. Press l key to reduce a slack of the paper. Make sure that the paper is rolled securely.
Replace the printer cover.
Advanced features
Compressed journal print
To save the paper, you can set the Register to print journals with compressed
numbers and characters. To set compressed journal printing, press [PAPER SAVING] key while the Register is programmed to be journal printer.
21−01−2015
REG
DEPT01
DEPT02
DEPT03
CASH
18:00
000027
•10.00
•20.00
•30.00
•60.00
To resume normal journal printing, press [PAPER SAVING] key again.
75
Advanced features
Electronic journal
The Cash Register stores daily transactions in the memory and, you can call
transactions in specific date.
To call business journal of specific date
Step
1
2
3
Operation
B<p
Turn the Mode switch to X position
and press B< and press p
keys.
Input the date you wish to call in or- 2Z?ZZB
der of DD/MM/YY and press p p
key. The example on the right is
January 21 2015.
If you wish to obtain all the past
sales data, just press p key
without entering date.
p
If you wish to call specific transaction, input consecutive number of
the transaction. If not, press p
key. The Register prints transactions of the specific date.
Printout
21−01−2015
X
15:30
000025
0058 EJ
X
21−01−2015
P01
21−01−2015
X
0000 DAILY
21−01−2015
REG
DEPT01
DEPT02
DEPT03
CASH
21−01−2015
X
0000 DAILY
21−01−2015
X
0058 EJ
13:15
000020
13:18
000021
X
14:42
000015
•1.00
•2.00
•3.00
•6.00
15:25
000024
X
15:30
000025
X
To clear electronic journal data
Perform the above operations in Z mode.
To save electronic journal data in an SD card, follow “Saving sales data and electronic journal
data in an SD card” (page 78) first.
76
Advanced features
To utilize an SD card
To insert an SD card
Important
• Insert the SD card in the direction so that the label of the card is facing upward.
• To extract the SD card, turn the Mode switch off and push the card once lightly. As the card will be
popped out, pull it out.
Open the SD card compartment cover.
2
Insert an SD card all the way into the SD card slot.
Diagonally cut part should be right upper corner.
Advanced features
1
77
Advanced features
To save or recall data in or from SD card
Saving sales data and electronic journal data in an SD card
You can store X, Z, or electronic journal data in an SD card.
Step
Operation
1
Turn the Mode switch to PGM position and press Z and
o keys.
Zo
Enter Z?>?? from ten key pad and press o
key.
Z?>??o
Input Z , X or C key depending on the storing data
press p key after then.
0: Does not save in SD card
Z: For X report
X: For Z report
C: For X and Z reports
Z ,X or C
p
2
3
4
Issue the report you wish to store.
After issuing, selected data is saved in the SD card.
• Daily Z report
• Periodic X report
• Periodic Z report
• PLU X report
• PLU Z report
To back up Cash Register settings
You can back up the set data you have programmed in an SD card.
Step
Operation
1
While Mode switch is in PGM position, press M and o keys.
Mo
Enter VZZV keys from ten
key pad and press o key.
VZZVo
Press p key. After for a while,
Cash Register prints “Data Backup
Normal End”.
p
2
3
78
Printout
21−01−2015
P07
17:15
000010
- - - - - - - - - (4114)- - - - - - - - SD
Data Backup
Normal End
------------------------
Advanced features
To restore backed up program data from SD card
Step
Operation
1
While Mode switch is in PGM position, press M and o keys.
Mo
Enter VZ?V keys from ten
key pad and press o key.
VZ?Vo
Press p key. After for a while,
Cash Register prints “Data Restore
Normal End”.
p
2
3
Printout
21−01−2015
P07
17:18
000011
- - - - - - - - - (4104)- - - - - - - - SD
Data Restore Normal End
------------------------
Advanced features
79
Advanced features
Calculator mode
To use Cash Register as a Calculator
Using a, s, d, f, y, . and p keys, you can use the Cash Register as a Calculator. You can also use the calculator during registrations.
Example 1
Sample calculation
Operation
5+3–2=
BaCsXp
Display
=
&
(23 – 56) x 78 =
XCsBNdM<p
=
−2574
12 percent on .1500
ZB??dZX:
180
80
Advanced features
Example 2
Sample Operation
Item
Dept. 01
•12.50
Dept. 02
•9.50
Dept. 03
Total amount
•14.75
•36.75
Number of customers
Payment per person
3
Cash
•12.25
Operation
1
<Mode switch: REG>
ZXB?a
>B?s
ZVMBd
<Mode switch: CAL>
.
3
4
In REG mode, register the items.
Display indicates total amount.
Turn the Mode switch to CAL position and press . key to recall the
total amount.
Divide the total amount by three.
The display shows the amount for
each customer.
fCp
Turn the Mode switch to REG position and finalize the transaction by
recalling the charge per customer.
<Mode switch: REG>
.p
.p
.p
Printout
21−01−2015
REG
DEPT01
DEPT02
DEPT03
TOTAL
CASH
CASH
CASH
CHANGE
18:25
000029
Advanced features
Step
2
Three customers consumed items totaled
•36.75 and the customers split the charge.
•12.50
•9.50
•14.75
•36.75
•12.25
•12.25
•12.25
•0.00
81
Advanced features
Specifications
Entry
10-key system; Buffer memory 8 keys (2-key roll over)
Main display
20 characters x 1 line
10-digit numeral x 1 line
Customer display
Amount 8 digits (zero suppression)
PRINTER
Receipt/Journal
Thermal alpha-numeric system 24 digits, receipt on/off key
Paper roll
58 (W) x 80 (D) mm
Paper feed
Receipt or Journal
Print speed
10 lines/second max.
Listing capacity
Amount
99999999
Quantity
9999.999
Tendered amount
9999999999
Percent
99.99
Tax rate
9999.9999
Numbers
9999999999
Chronological data
Date print
Automatic date printout on receipt or journal, automatic calendar
Time print
Automatic time printout on receipt or journal, 24-hour system
Alarm
Key catch tone, error alarm
Memory protection battery
The effective service life of memory protection batteries (two new size AA
manganese batteries) is approximately one year from installation into the
machine.
Power supply/power consumption
See the rating plate.
Operation temperature
0˚C to 40˚C
Humidity
10 to 90%
Dimensions
180 mm (H) × 410 mm (W) × 450 mm (D) with medium size drawer.
167 mm (H) × 326 mm (W) × 345 mm (D) with small size drawer.
Weight
7.3 kg with medium size drawer 3.3 kg with small size drawer.
Accessories
Paper roll, Mode keys, Drawer key, Bill clip plate, Quick Start Guide
* Specifications and design are subject to change without notice.
82
Appendix
Character code.....................................................................................................84
Error code.............................................................................................................85
About sales data storage in an SD card.............................................................86
Index......................................................................................................................88
Appendix
83
Appendix
Character code
84
Chara Code
Chara Code
Chara Code
Chara Code
Chara Code
Chara Code
Chara Code
Chara Code
Chara Code
Chara Code
Chara Code
Chara Code
Chara Code
Chara Code
Appendix
Error code
Error code
Guidance on the display
Cause
Solution
E001
Wrong mode
Mode switch position has been
changed before finalization.
Return the Mode switch to its original
setting and finalize the operation.
E008
Please sign on
Registration without entering a clerk
number.
Input a clerk number.
E010
Close the platen arm
Platen arm is not closed.
Close the platen arm firmly.
E014
Paper end
There is no paper.
Insert paper.
E029
In the tender operation
Item registration is prohibited while
partial tendering.
Finalize the transaction.
E046
REG buffer full
Register buffer is full.
Finalize the transaction.
E081
EJ Full
Electronic journal memory is full.
Print reset (Z) report of electronic
journal.
E090
Totals remain in the memory Totals not cleared at the end of the
day.
Perform reset (Z) reporting.
E100
Insert SD
No SD card is inserted.
Insert an SD card.
E101
Illegal Format
SD card is not formatted correctly.
Format the SD card.
E102
File not found
There is no relevant file in the SD
card.
Create the file in the SD card.
E103
SD memory full
No space in the SD card.
Create space in the SD card.
E104
Check the write protect
switch
Write protect switch of the SD card
is on.
Turn the write protect switch off.
E109
SD card Error End
SD card error
Format or replace the SD card.
E139
Negative balance is not
allowed
The result of the transaction is
minus.
Register properly
Appendix
85
Appendix
About sales data storage in an SD card
Storing sales data in an SD card depends on the setting of 10900 Saving sales data and electronic journal data in an SD card.
Totalizers to store sales data
The following files data are subject to be stored. Group range, department range, or flash report data will
not be stored.
001
Fixed adder
002
Free function
004
PLU
005
Department
011
Clerk
020
Grand total
Folder and file names of stored sales data
<Folder name>
\CASIO\SES100\XZ\yyyy\mm\
yyyy: Year
mm: Month
<File name>
Xxxx_dda.CSV
~
X: Mode X or Z
xxx: 3-digit file number
dd: date
a: Identifier for the same file name
The first save of the day: none
The second save (in the same folder) of the day: A
The fourth save (in the same folder) of the day: B
The 27th save (in the same folder) of the day: Z
The 28th save (in the same folder) of the day: Error (SD CARD FULL error)
<Example>
File names of lump X report
Issuing lump X report on March 13, 2015.
↓
↓ The following files are created.
↓
\CASIO\SES100\XZ\2015\03\X001_13.CSV
X002_13.CSV
X005_13.CSV
X011_13.CSV
↓
Issuing lump X report on the same day.
↓
\CASIO\SES100\XZ\2015\03\X001_13A.CSV (with the extension “A”)
X002_13A.CSV (ditto)
X005_13A.CSV (ditto)
X011_13A.CSV (ditto)
86
Appendix
CSV file format of the sales data
Sales data are stored in the CSV format as described below.
Number of fields vary by the type of the totalizer.
“MACHINE
” , “MC#01
“MODE
” , “X
“Z COUNTER
” , “0000”
“DATE
” , “16-03-2015”
“TIME
” , “21:39”
“RECORD
” , “DESCRIPTOR
“0001” , “GROSS
“ , “0” , “0.00”
“0002” , “NET
“ , “0” , “0.00”
“0003” , “CAID
“ , “0” , “0.00”
~
”
”
” , “QUANTITY/No
” , “AMOUNT
”
~
Folder and file names of electronic journal
<Folder name>
\CASIO\SES100\XZ
<File name>
EJddmmyy.TXT
EJ……Fixed
dd……Date
mm…Month
yy……Year
Appendix
87
Appendix
Index
Advanced features of function keys
To program advanced features of the function keys..............................................60
Calculator mode
To program calculator functions (Set code 1022)....................................................66
To use Cash Register as a calculator.......................................................................80
Change calculation
To register with change calculation..........................................................................24
Character setting
Character keyboard....................................................................................................47
To preset characters to departments.......................................................................49
To preset characters to PLU items...........................................................................50
To preset clerk characters.........................................................................................53
To preset receipt messages......................................................................................52
Correction
To correct erroneous item input............................................................................... 31
To correct immediately after registration.................................................................32
Date/Time
To set date and time...................................................................................................21
To check date and time..............................................................................................21
Department
Department shift................................................................................................... 13, 25
To limit departments’ digit.........................................................................................58
To preset names to departments........................................................................ 37, 49
To preset unit prices to departments.......................................................................39
To program minus department ................................................................................58
To register items with preset department names....................................................38
To register items with preset unit prices..................................................................36
Discount
Discount on items......................................................................................................27
Discount on total amount..........................................................................................27
To register items with preset discount rate.............................................................34
To set discount rate to % key....................................................................................34
Display
Display...................................................................................................................12, 48
To program display control (Set code 2022)............................................................67
88
Appendix
Electronic journal
To call business journal of specific date..................................................................76
To clear business journal data..................................................................................76
Euro
To program Euro settings (Set code 2422)...............................................................67
To program exchange rate between local currency and Euro (Set code 2322)....... 67
To transact in Euro.....................................................................................................69
Help
Help guidance.............................................................................................................33
Journal
To print compressed journal............................................................................... 13, 75
To program to print business journal (Set code 0522)............................................64
To program to use business journal......................................................................... 74
To set journal paper................................................................................................... 74
Multiplication
Multiple items registration using multiplication key......................................... 13, 25
Overall settings
To program overall settings of Cash Register (Set code 0622)..............................65
To program to force clerk number entry (Set code 0622).......................................65
Paper saving mode
Paper saving mode......................................................................................... 13, 46, 75
Payments
Paying other than cash..............................................................................................26
Split payment..............................................................................................................26
PLU
Price reduction
To register items with price reduction.....................................................................28
Print control
To program print controls (Set code 0522)..............................................................64
Program check
To check PLU programs.............................................................................................73
To check your program.............................................................................................. 71
Receipt
To set to not print receipts........................................................................................46
To set receipt paper.............................................................................................. 16, 17
89
Appendix
To link PLU items to departments.............................................................................55
To preset names to PLU items............................................................................40, 50
To preset PLU unit prices..........................................................................................39
To register PLU items................................................................................................. 41
Appendix
Reference number
To print reference number.........................................................................................30
Refund
To register refunded items........................................................................................29
Sales report
To print daily sales report..........................................................................................42
To print periodic sales report....................................................................................43
To program X/Z reports printing (Set code 0822)....................................................66
X report........................................................................................................................42
Z report........................................................................................................................42
SD card
To back up Cash Register settings in an SD card...................................................78
To restore backed up program data to Cash Register............................................79
To save sales data and electronic journal in an SD card........................................78
Single item transaction
To program single item transaction .........................................................................58
To register single item transaction...........................................................................59
Tax
To check tax amount............................................................................................42, 43
To program country-specific rounding and tax system (Set code 0422)..............62
To program taxable item printing (Set code 0322)..................................................62
To set add-in or add-on tax.......................................................................................70
To set tax table............................................................................................................70
Taxable status
To preset taxable statuses to departments.............................................................35
90
MA1501-A
SES100*E