1
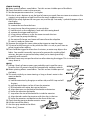
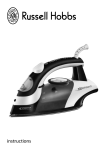
instructions
Problems?
Don’t take it straight back to the shop,
they may not be able to help you.
Try our helpline first
0845 658 9700
it’s a local rate number
2
Read the instructions, keep them safe, pass them on i If you pass the iron on. Remove all
packaging, but keep it in case you ever need to return the iron.
important safeguards
Follow basic safety precautions, including:
1 This appliance must only be used by or under the supervision of a responsible adult. Use and
store it out of reach of children
2Don’t put the appliance in liquid, don’t use it in a bathroom, near water, or outdoors.
3Route the cable so it doesn’t overhang, and can’t be tripped over or caught.
4 Don’t iron clothing while it’s being worn – you’ll burn or scald the wearer (this is not
a joke – I’ve seen it happen).
5Don’t touch the soleplate, and keep away from the steam coming from it.
6Don’t use the iron in the vicinity of children.
7 Sit the base unit on a stable, level, heat-resistant surface, preferably a purpose-built “steam
generator” type ironing board.
8Don’t sit the base unit on a soft, carpeted, or upholstered surface, as this may block the vents
underneath the base unit.
9Use the iron on a stable, level, heat-resistant surface, preferably an ironing board.
10 Don’t leave the iron unattended while plugged in, or while it’s standing on the ironing board.
It could be knocked over by you, by a child, or by a pet.
11 Unplug the appliance when not in use, before filling, moving, or cleaning. Let it cool down
fully before cleaning and storing away.
12 Don’t fit any attachment or accessory other than those we supply.
13 Don’t use the iron for any purpose other than those described in these instructions.
14 Take care not to scratch the soleplate – avoid buttons, zips, etc.
15 The appliance has a protective thermal fuse, which will blow if it overheats. If this happens,
the appliance will stop working, and must be returned for repair.
16 Don’t operate the appliance if it’s dropped or damaged, or if it malfunctions or leaks.
17 If the cable is damaged, return the appliance, to avoid hazard.
household use only
before using for the first time
• Remove any labels, stickers or packaging from the iron and soleplate.
• Fill the reservoir, set the steam level to maximum, set the temperature to • • •, iron an old
piece of cotton fabric (an old towel is ideal) and press the trigger a few times.
• Don’t worry if the iron smokes a bit at first, it’ll stop as the element cures.
auto shut-off
• If the iron is motionless for more than about ten minutes, the element will switch itself off.
• The base will beep, the display backlight will go out, and a flashing symbol N will show in the
top right of the display.
• To switch on again, press the 2 button or the trigger, and wait till it returns to its operating
temperature (about a minute).
• No settings are lost during auto shut-off.
input the water hardness
,Before you use your iron, you must tell it how hard your water is, so that it can tell you when
the anti-scale cartridge needs replacing (flashing P on the display).
• Put the iron on top of the base unit and put the plug into the power socket (switch the socket
on, if it’s switchable). The display will flash and beep.
• Press and release the 2 button on the base unit – the display will light and beep.
• Use the w button to set the hardness level to HI (high), MI (medium), or LO (low).
3
• That’s it – the iron will remember the level. You don’t need to set it again unless you move to
an area with harder/softer water.
• Hardness is usually measured in ppm (CaCO3). As a rough guide, up to 50ppm is soft, from
50ppm to 120ppm is medium, and above 120ppm is hard.
preparation
1 Check for textile care symbols (i j k l).
2Iron fabrics needing low temperatures j first, then those that need medium temperatures
k, and finish with those needing high temperatures l (or max).
3Sit the base on the end of the ironing board, and put the iron on the base.
filling
4 Fill the reservoir with tap-water.
5Don’t put anything in the water.
6Unplug the base.
7 Put your hand up and under the front of the reservoir, squeeze the release
button, and slide the reservoir out of the base.
8Flip up the cap at the front of the reservoir, and fill with fresh cold water.
9Slide the reservoir back into the base, and press it home.
switch on
10 Put the iron on the base unit.
11 Turn the temperature control to • or above, to enable the
thermostat.
12 Put the plug into the power socket (switch the socket on, if it’s
switchable). The base unit will beep, and the display will flash.
13 Press and release the 2 button on the base unit – the display will
light up and beep, and the ready light will glow.
14 When the ready light goes off, the iron has reached the temperature you set.
temperature setting guide
15 Turn the temperature control to bring the setting you want next to the mark.
,If you want to use steam, you must set the temperature to S or higher, or you’ll just get water.
label marking
temperature setting
j cool – nylon, acrylics, polyester
•
k warm – wool, polyester mixtures
••
l hot – cotton, linen
•••
denim/jeans
max
i do not iron
,If the instructions on the fabric label differ from this guide, follow the instructions on the
label.
reducing temperature
16 If you’ve missed something, remember that reducing the temperature takes a lot longer
than raising it.
17 You must wait till the ready light glows, then goes off again, to ensure that the iron has come
down to the correct temperature.
low water
18 If the water level gets too low while you’re ironing, the base unit will beep, and the low water
symbol v will flash on the display.
19 Release the trigger, then fill the reservoir, prime the iron, and carry on steam ironing.
4
steam ironing
,Water spotting affects some fabrics. Test this out on a hidden part of the fabric.
20Check that there’s water in the reservoir.
21Set the temperature control to S or higher.
22Use the + and - buttons to set the level of steam you need, from no steam to maximum. We
suggest using medium or high for all but the most stubborn creases.
23Wait till the ready light on the iron goes out, and the Z “not ready” symbol disappears from
the display.
prime the iron
a) remove the iron from the base
b) move it away from the garment, in case it drips
c) hold the iron so the soleplate is level with the ironing board
d) squeeze the trigger and hold it in
e) it may take a minute or so for the steam to reach the iron
f) you’ll hear the pump throbbing
g) the note will change, and steam will come from the soleplate
h) now it’s ready to steam iron
24Squeeze the trigger for steam, release the trigger to stop the steam.
25Try not to let the reservoir run dry while the iron is in use, or you’ll have to
prime it again after refilling.
26Don’t hold the trigger for more than 3 minutes, or water may drip on the
fabric. You wouldn’t normally iron part of a garment for anything like 3
minutes, but you can get carried away when you’re ironing vertically –
especially with curtains.
,Residual steam may escape from the iron after releasing the trigger. This is normal, don’t
worry about it.
spray
27Having 4 levels of steam means you probably won’t need the spray
function, but it’ll come in handy for exceptionally stubborn creases.
,Water spotting affects some fabrics. Test this out on a hidden part of
the fabric.
28This works with dry or steam ironing, as long as there’s water in the
atomiser bottle.
atomiser
a) hold the atomiser by the grips on either side, and lift it up and off
the iron
b) pull the bottle down, to free it from the atomiser
c) fill the bottle with water, but not to the brim
d) align the arrows on the back of the bottle and atomiser
e) lower the tube into the bottle
f) stop when the rim of the bottle fits inside the atomiser
g) align the tabs under the atomiser with the slots in the iron
h) lower the atomiser and bottle into the front of the iron
29Check that the atomiser bottle contains water.
30Lift the iron off the fabric.
31Aim the spray nozzle at the fabric.
32Press the * button.
5
dry ironing
33Don’t try to dry iron by not squeezing the trigger – you’ll forget, and steam something that
doesn’t like to be steamed.
34It might be a good idea to empty the atomiser as well, just in case.
35Use the - button to set the level of steam to Q (no steam).
vertical steaming
36This is simply steam ironing with the soleplate held vertically.
37Use this function to remove wrinkles from hanging clothes, curtains, and
furnishing fabrics
38Check that there’s adequate ventilation behind the fabric, otherwise
moisture may build up, causing mildew.
39Check there’s nothing behind the fabric that may be damaged by the steam.
40Check that pockets, turn-ups, and cuffs are empty.
41 Check that there’s water in the reservoir.
42Check that the temperature control is at S or higher.
43Wait till the ready light goes out.
44Hold the iron about a centimetre away from the fabric.
45Press the trigger to produce steam.
46Again, don’t squeeze and hold the trigger for more than 3 minutes, or you may drip water.
holidays
47If you’re going to leave the iron for more than a week, it’s best to empty the
reservoir, to avoid mould.
48Leave the iron to cool down completely.
49Remove the reservoir, flip open the cap, and empty it via the filling hole.
50Wipe off any excess moisture, then replace the reservoir in the base unit with
the cap open, so it dries out.
care and maintenance
cleaning
1 Unplug the appliance when not in use, before moving and before cleaning. Let it cool down
fully before cleaning and storing away.
2Wipe outer surfaces with a damp cloth. If necessary, use a little washing-up liquid.
3Remove spots from the soleplate with a little vinegar.
4 Take care not to scratch the soleplate.
5Don’t put the appliance in water or any other liquid.
6Don’t use harsh or abrasive cleaning agents, solvents, or descaling solutions.
self clean C
,Don’t use commercial descaler, vinegar, or anything else – you’ll damage the iron.
7 To prevent scale building up, use the self clean function regularly, at least monthly.
8You’ll need a basin or a large bowl to catch the water coming out of the soleplate.
9Sit the iron on the base unit, and switch it on.
10 Use the + button to set the level of steam to maximum.
11 Turn the temperature control to C.
12 Wait till the not ready symbol Z disappears from the display.
13 Now hold the iron over the basin or bowl, with the soleplate down.
14 Squeeze the trigger, and hold it for about 3 minutes.
15 Gently move the iron to and fro, over the basin or bowl.
caution keep clear of the escaping water and steam
16 Water and steam will wash scale and dust through the soleplate.
6
17 After 3 minutes, turn the temperature control to max, and iron a damp cloth, to clean the
soleplate.
18 Unplug the iron, and sit it on the base unit to cool.
19 When it’s cold, wipe off any moisture, and wind the cable round the heel.
20Store the iron on the base unit.
replacing the cartridge
21To reduce scale build-up, you must change the anti-scale cartridge regularly. How often
depends on the hardness of your water, and how much you use the iron.
22As the base unit now knows the hardness of the water in your area, it will tell you when to
change the anti-scale cartridge (flashing P on the display).
,You must change the cartridge while the base unit is plugged in and switched on, otherwise
it won’t register the new cartridge.
caution wait till the iron cools before replacing the cartridge
23When you see the flashing P, turn the temperature control down as far as it’ll go, and let the
iron cool while you try to remember where you put the spare cartridge.
24Remove the reservoir.
25The next part is just a bit tricky.
26The cartridge is full of water, which will spill as soon as you pull the holder out.
27Tuck a folded towel under the front of the base unit, to catch the water.
28If you can pull the holder out, and, at the same time, try to tilt it so that the rear of the holder
is higher than the front, then you won’t spill very much.
29Give it a try, it’s easier than juggling.
30Tip the old cartridge into the sink to drain.
31Wipe any spillage from the base unit and cartridge holder, and remove the wet towel.
32Remove the packaging from the new cartridge and drop it into the cartridge holder.
33Replace the cartridge holder in the base unit.
34Replace the reservoir in the base unit.
,Check the display, O flashing means the cartridge or holder isn’t pushed in properly.
35When the cartridge and holder are fitted, replace the reservoir and carry on ironing.
36If you don’t have a spare cartridge handy, or you’re waiting for one to be delivered, you
should use distilled water (not chemically descaled or softened water).
,Products returned under guarantee with faults due to scale will be subject to a repair charge.
7
connection
The product must be earthed. It has a 13A BS1362 fuse in a 13A BS1363 plug. To
replace the plug, fit the green/yellow wire to E or E, the blue wire to N, and the
brown wire to L. Fit the cord grip. If in doubt, call an electrician. Don’t use a
non-rewireable plug unless the fuse cover is in place. If you remove the plug,
dispose of it.
wheelie bin symbol
To avoid environmental and health problems due to hazardous substances in
electrical and electronic goods, appliances marked with this symbol mustn’t be
disposed of with unsorted municipal waste, but recovered, reused, or recycled.
service
If you ring Customer Service, please have the Model No. to hand, as we won’t be able to help
you without it. It’s on the rating plate (usually underneath the product).
The product isn’t user-serviceable. If it’s not working, read the instructions, check the plug fuse
and main fuse/circuit breaker.
If that doesn’t solve the problem, don’t take the iron back to the place you bought it – they
won’t be able to fix it. Ring Customer Service – they may be able to offer technical advice.
If they advise you to return the product to us, pack it carefully, include a note with your name,
address, day phone number, and what’s wrong. If under guarantee, say where and when
purchased, and include proof of purchase (till receipt). Send it to:
Customer Service, Russell Hobbs Ltd, Fir Street, Failsworth, Manchester M35 0HS
email: [email protected]
telephone: 0845 658 9700 (local rate number)
replacement cartridges
1Have the Model No. to hand, as we won’t be able to help you without it. It’s on the rating
plate (usually underneath the product).
2Ring 0845 658 9700, or email [email protected], for prices, then purchase
replacements using VISA or MASTERCARD.
guarantee
Defects affecting product functionality appearing within one year of purchase will be corrected
by replacement or repair provided the product is used and maintained in accordance with the
instructions. Your statutory rights are not affected. Documentation, packaging, and product
specifications may change without notice.
online
551-035
www.russellhobbs.co.uk for more product
8