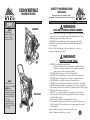
1
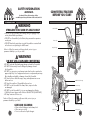
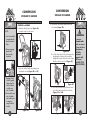
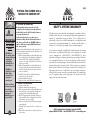
CONVERTIBLE
INSTRUCTIONS
TIPS
FACTS
CONVERTIBLE
weight: 10 lb. 8 oz.
volume: 500 in3
torso size: 15-20”
CARRIER
SAFETY INFORMATION
-IMPORTANTRead and follow all instructions before
assembling and using this frame child carrier/stroller!
WARNING
FALL OR STRANGULATION HAZARD
• Small children can fall through the leg opening. Child could suffer head
injuries or become entangled in straps and strangulation could occur.
• Adjust leg openings to smallest possible size.
• DO NOT use Convertible with a child weighing more than 40 lb.
• DO NOT use Convertible if child cannot hold head upright and sit
up unassisted.
Failure to follow this warning could cause death, serious injury or
permanent disability to your child.
WARNING
PROTECT YOUR CHILD
NOTE:
• KELTY carriers are
meant to be used BY
ADULTS only.
• KELTY carriers are
designed to transport
one child weighing
no more than 40 lb.
(18.1 kg).
• The total load limit
including the child
AND cargo is 50 lb.
(22.7 kg).
STROLLER
• DO NOT exceed maximum weight limits.
* Excessive weight may cause a hazardous, unstable condition.
* Parcels or accessory items placed on the handle of this product
may cause the stroller to become unstable.
• DO NOT place more than one child in the Convertible.
• DO NOT use the Convertible as a car seat, child seat, or high chair.
• DO NOT place the Convertible on soft, uneven or elevated surfaces.
• DO NOT allow your child to stand on the Convertible seat.
• DO NOT use Convertible if your child will not ride calmly in Convertible.
• DO NOT place Convertibler near a campfire, cook stove or open flame.
• DO monitor child while in Convertible. Periodically check the child’s position.
• DO fasten child’s harness when in use.
• DO NOT use, or leave Convertible on steep grades, inclines or hills.
• DO assure your child is dressed properly for the weather. Periodically
check the child’s comfort.
• DO protect your child from the harmful effects of the sun.
• If your child has special needs, consult with a physician before using a
Kelty Convertible. The Convertible may not be appropriate for special
needs children.
Failure to follow this warning could cause death, serious
injury or permanent disability to your child.
2
SAFETY INFORMATION
-IMPORTANTRead and follow all instructions before
assembling and using this frame child carrier/stroller!
WARNING
STROLLERS TO BE USED BY ADULTS ONLY
• DO NOT use the Convertible while skating, biking or engaging in any
activity that will affect your balance.
• DO NOT use Convertible if you feel faint, dizzy, nauseated or experience
muscle pain.
• DO NOT bend at the waist when using the Convertible as a carrier. Bend
at the knees to avoid pitching the child forward.
CONVERTIBLE FEATURES
-BEFORE YOU START-
Stroller handle
Double-hook, seat-height
adjustment
Plastic clips
No-pinch hinge
Failure to follow this warning could cause death, serious injury or
permanent disability to you or your child.
WARNING
5-Point Harness
DO NOT USE A DAMAGED CONVERTIBLE
• DO NOT overload. Overloading may damage or break the Convertible.
• DO NOT fold incorrectly. Incorrect folding may damage or break
the Convertible.
• DO NOT use accessories or replacement parts other than those produced or
approved by Kelty. Use of unapproved accessories or replacement parts may
affect handling and stability or damage or break the Convertible.
• DO check to assure all buckles snaps, straps, and adjustments are secure
before each use.
• DO check the condition of Convertible before each use.
• DO NOT use the Convertible if the frame, fabric, straps or buckles
are damaged.
• DO NOT use the Convertible if it is in any way damaged or defective.
Call Kelty Customer Support staff, toll free at 866-349-7225 (866-FIX-PACK).
• DO keep instructions for future use.
Padded shoulder straps
Sternum strap
Mesh backpanel
Failure to follow this warning could cause death, serious injury or
permanent disability to your child.
Padded waistbelt
with 5” torso adjustment
CARE AND CLEANING
3
• Clean with mild detergent and a damp cloth.
• Allow carrier to air dry.
• Do not use bleach or liquid detergent.
Wheel cover
Scherer Cinch
4
TIPS
NOTE:
Your new Kelty
Convertible comes
collapsed/folded
for ease of
shipping; it must
be set up and
adjusted prior
to use.
BEFORE YOU START
CONVERTIBLE ADJUSTMENT
TENSION STRAPS
ADULT BACKPACK FITTING
1. TENSION STRAPS
To assure proper fit and function, the tension straps
must be tightened before use. There are two tension
straps located behind the mesh panel/adult shoulder
straps. The tension straps are labeled “Please tighten
before using.”
TIPS
2. ADULT BACKPACK FITTING
A. Lock the front wheels in the forward
position by aligning the sliding red lever
with the locking tab located on the front of
the frame (Figure 2A). Slide the red lever
up to lock.
A. Tension straps must be tightened to minimize
cockpit frame movement.
B. Open the cockpit area by spreading the front
cockpit frame away from the cockpit backrest.
Reaching under the cockpit, grasp the end of
the tension strap, and pull down to tighten
(Figure 1A).
Figure 2A
B. Cover the front wheels by pulling the wheel
cover over and around the front wheels.
C. The waistbelt on your Convertible adjusts
up and down using the straps and locking
flip buckles located between the waistbelt
and mesh backpanel. Release the flip
buckles by rotating latch away from mesh
backpanel (Figure 2B).
Figure 1A
5
C. Repeat step A for opposite side.
NOTE:
• DO NOT adjust
Convertible
with child in it.
• If sharing the
Convertible
between
two adults, we
recommend
that you mark
a reference
point on the
waist belt
adjustment
strap for each
user. This will
ease adjustment
for each user.
Figure 2B
D. Loosen the shoulder straps, waistbelt and
sternum strap.
6
CONVERTIBLE ADJUSTMENT
CONVERTIBLE ADJUSTMENT
ADULT BACKPACK FITTING
CHILD’S COCKPIT ADJUSTMENT
E. Put the carrier on by slipping arms through shoulder straps. Buckle
waistbelt and adjust up or down so center of buckle lies over navel
(Figure 2C). Tighten waistbelt by pulling inward on the pieces of webbing
threaded through the Scherer Cinch (shown on page 4).
F. Tighten the shoulder straps by pulling down on the shoulder strap
webbing. The shoulder straps should lie smoothly over your shoulders, with
the upper end (at mesh backpanel attachment point) 1-2” below top of
shoulder (Figure 2D). Adjust waistbelt up or down to create best shoulder
strap fit.
TIPS
3. CHILD COCKPIT ADJUSTMENT
Before starting, make sure the child’s shoulder
harness is unbuckled (Figure 3A) and the leg
straps, located on the back of the cockpit, are fully
loosened (Figure 3B).
DO read all safety
information prior
to using your
Kelty Convertible.
Proper fit and
adjustment will
make using your
Convertible more
enjoyable for you
and your child.
2”
0’’
NOTE:
Figure 3A
Figure 3B
A. Place the Convertible on the floor or on firm,
level ground.
belly
button
Figure 2C
Figure 2D
B. Make sure the side-release buckles attached to
the silver webbing on the child’s shoulder
harness are unbuckled (Figure 3C).
G. When fitting is complete, remove carrier and lock flip buckles (Figure 2E).
Figure 2E
7
Figure 3C
8
CONVERTIBLE ADJUSTMENT
CONVERTIBLE ADJUSTMENT
CHILD’S COCKPIT ADJUSTMENT
CHILD’S COCKPIT ADJUSTMENT
C. Adjust the cockpit seat height by attaching the two snap-hooks to the
desired steel rings at the front of cockpit (Figure 3D). There are three
sets of steel rings for seat-height adjustment. To raise the seat height,
attach to the upper seat rings. To lower, attach to the lower rings.
E. Place child’s shoulder harness over child’s shoulders.
F. Attach the side-release buckles, sewn to the child’s shoulder harness to
the mating buckles on the silver webbing sewn to the child’s chest pad.
G. The child’s shoulder harness can be adjusted up or down by sliding it on
the webbing at the back of the child’s seat (Figure 3G). Adjust the
harness so the padded section lies smoothly over the child’s shoulders.
Figure 3D
D. Place child into cockpit. Make sure both legs go through leg openings
(Figure 3E and 3F).
NOTE: Your child’s legs must go under the padded, silver
leg straps.
9
Figure 3E
Figure 3F
Figure 3G
H. Adjust the leg straps so they fit comfortably over the child’s legs by
tightening or loosening the leg strap webbing on the back of the cockpit
(Figure 3H). Make sure the leg straps are not binding or pinching the
child’s legs.
Figure 3H
10
TIPS
NOTE:
• Your Convertible
is equipped with
dual rear wheel
locks.
CONVERSION
CONVERSION
CARRIER TO STROLLER
CARRIER TO STROLLER
4. CARRIER to STROLLER
A. Uncover the front wheels by pulling the wheel
cover up (Figure 4A). Tuck the waistbelt and
lower shoulder straps into the cover (Figure 4B).
TIPS
WARNING
• Always engage
wheel locks
when stroller
is parked.
1. Engage wheel
locks by gently
depressing the
red lock levers
on both rear
sets of wheels.
2. Assure both rear
sets of wheels
are locked prior
to stepping
away from the
stroller.
C. Rotate both black plastic clips outward and
away from the carrier (Figure 4D).
Figure 4D
D. Raise the stroller handle by pulling up and
away from the carrier (Figure 4E and 4F).
Figure 4A
If you are
uncomfortable
with, or unsure
of, any of these
adjustments,
call Kelty
Customer
Support staff,
toll free at
866-349-7225
(866-FIX-PACK).
Figure 4B
B. Unlock the front wheels by sliding red lever
down (Figure 4C).
Figure 4E
Figure 4F
E. Rotate both black plastic clips inward, locking
handle firmly in place (Figure 4G).
Figure 4C
11
Figure 4G
12
TIPS
CONVERSION
CONVERSION
STROLLER TO CARRIER
STROLLER TO CARRIER
5. STROLLER to CARRIER
A. Rotate the black plastic clips (Figure 5A),
outward, away from the carrier.
NOTE:
C. Push stroller rear wheels toward front of the
Convertible (Figure 5D).
• Your Convertible
is equipped with
dual rear wheel
locks.
TIPS
WARNING
• Always engage
wheel locks
when stroller
is parked.
Figure 5D
Figure 5A
D. Lock the front wheels in the forward position
by aligning the sliding red lever with the
locking tab located on the front of the frame.
Slide the red lever up to lock (Figure 5E).
If you are
uncomfortable
with, or unsure
of, any of these
adjustments,
call Kelty
Customer
Support staff,
toll free at
866-349-7225
(866-FIX-PACK).
B. Lower the stroller handle by pushing down
towards the carrier (Figure 5B and 5C).
1. Engage wheel
locks by gently
depressing the
red lock levers
on both rear
sets of wheels.
2. Assure both rear
sets of wheels
are locked prior
to stepping
away from the
stroller.
13
Figure 5E
E. Cover the front wheels by pulling the wheel
cover down and around the front wheels
(Figure 5F and 5G).
Figure 5B
Figure 5C
Figure 5F
Figure 5G
14
2/05
PUTTING THE CARRIER ON &
TAKING THE CARRIER OFF
TIPS
WARNING
CONVERTIBLE
TO BE USED
BY ADULTS
ONLY
• DO NOT use
the stroller while
skating, biking or
engaging in
any activity
that will affect
your balance.
• DO NOT use
stroller if you feel
faint, dizzy,
nauseated or
experience
muscle pain.
Failure to follow
this warning could
cause death,
serious injury or
permanent
disability to you
or your child.
15
6. PUTTING THE CARRIER ON
Before putting carrier on, make sure the
cockpit has been adjusted correctly and that
both buckles on the child’s shoulder harness
are properly fastened.
Look around you to be sure there is no
obstacle nearby that the child could strike or
the carrier could catch on. DO NOT shake or
jar the child unnecessarily. DO lift and lower
the carrier gently.
Make sure the adult backpack shoulder straps are loose
and the waistbelt and sternum strap are unbuckled. Lock
and cover the front wheels.
A. With feet approximately shoulder-width apart and
knees bent, grasp both red handles (located at the
front and rear of the cockpit) firmly and lift the
carrier to your knee, resting the front of the lower
frame on your thigh.
B. While still grasping the front red handle with one
hand, slip your other arm under and through the
shoulder strap. Lift the carrier off your knee and
onto your shoulder.
C. Carefully release the front red handle and slip
carrier onto the other shoulder.
D. Buckle waistbelt and tighten.
E. Tighten shoulder straps and buckle sternum strap.
KELTY’S LIFETIME WARRANTY
Kelty takes pride in its workmanship and undertakes to manufacture the best
possible products. Therefore, we warranty all Kelty products against defects in
materials or workmanship during your lifetime. Since no Kelty product is
indestructible, it does not cover defects attributable to or resulting from normal
wear and tear, natural hazard damage (i.e.: weather, animals), abuse or
alteration (i.e.: ultra violet [u.v.] damage on tents, exhausted zippers).
Service under our warranty is available to the original purchaser by returning
the product to any authorized Kelty dealer or by contacting our customer
service department at 1-866-349-7225 (1-866-FIX-PACK) for return
authorization. Charges for shipping and insuring your package to Kelty are
your responsibility. Please be sure to insure any shipment, as Kelty cannot be
responsible for uninsured packages. We require that all products returned for
warranty and repair be properly cleaned. If, after inspection, we determine
that the product is defective, we will repair or replace it free of charge. If your
Kelty product needs service or repair that is not covered under warranty, we
will provide the necessary service at a reasonable charge. This warranty gives
you, the original purchaser, specific legal rights. You may also have other
rights, which vary from state to state.
7. TAKING THE CARRIER OFF
A. Loosen shoulder straps.
B. Unbuckle waistbelt and sternum strap.
C. With feet approximately shoulder-width apart and
knees bent, remove one arm from shoulder strap
and grasp front red handle (behind head).
D. While still grasping front red handle, rotate your
body toward the carrier, allowing the front of the
lower frame to rest on your thigh.
E. Remove other arm from shoulder strap and grasp
rear red handle.
F. Carefully lower carrier to the floor or to firm, level
ground.
G. Move stroller rear wheels out, away from the front
of the carrier.
6235 Lookout Road, Boulder Colorado 80301
phone 800.423.2320 • fax 800.504.2745 • www.kelty.com