1
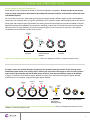
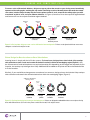
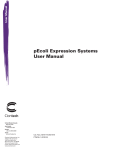
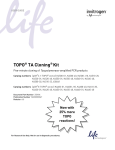
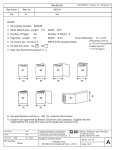
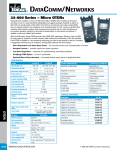
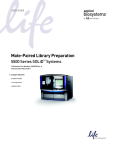
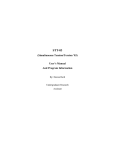
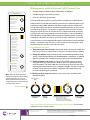
C l o n i n g
a n d
C o m p e t e n t
C e l l s
Mutagenesis with In-Fusion® HD Cloning Plus
Timeline
Before you begin
Pick your vector
(any vector!)
and envision
your final
construct.
Design and
order primers.
Day One
Linearize
your vector
by inverse
PCR, using
your new
primers.
Perform the
In-Fusion
reaction
with the
inverse PCR
product.
Transform
the In-Fusion
reaction into
Stellar competent cells.
Day Two
Recover
your final
construct
Note: Although all the examples
shown here involve protein coding
(gene) sequences, you can use
the same methods to modify noncoding sequences such as promoters
or transcription factors.
• A single system for deletions, base substitutions, or additions
• Flexible enough to use with any vector
• Over 95% efficiency, guaranteed
In-Fusion PCR cloning makes it easy to perform mutagenesis: it combines the
power of the In-Fusion HD enzyme with inverse PCR, a method for rapid in vitro
amplification of the DNA sequences that flank a region of known sequence (1).
During inverse PCR, primers are oriented in opposite directions on your circular
cloning vector (Figure 1). To perform mutagenesis with In-Fusion systems,
design your PCR primers so that they have a 15 bp overlap with each other
at their 5' ends and incorporate the mutation of interest. Use the CloneAmp™
HiFi PCR Premix (a high fidelity PCR polymerase included with all In-Fusion HD
Cloning Plus Systems) to perform your PCR reaction, add the In-Fusion HD
enzyme premix to your linearized PCR product, and transform into the provided
Stellar™ competent cells. You have a ≥95% chance of recovering your final
desired construct—the first time and every time.
Experimental Overview:
1. Think about your final construct: Choose the vector you want to modify and
envision your final, mutated construct (Figure 1; mutation shown in yellow).
2. Design your primers: Design inverse primers that overlap each other by 15 bp
at their 5' ends and incorporate your desired deletion, substitution, or addition.
Specific guidelines for mutagenesis primer design are described below.
3. Utilize the power of In-Fusion: Using an inverse PCR protocol, amplify
the vector with your new primers. Perform the In-Fusion reaction using
the PCR product. The linear DNA will re-circularize at the site of the 15 bp
overlap and will also contain your mutagenic changes. Transform a portion
of the In-Fusion reaction into Stellar Competent Cells according to the
In-Fusion HD Cloning Plus protocol.
4. Obtain your final construct: Recover your mutant from the Stellar cells
the following day.
Change occurs
here
Visit our website
15 bp
overlap
1. Envision final
construct
2. Design
primers
3. Perform In-Fusion protocol
•
•
•
Amplify linear construct
Perform In-Fusion reaction to
re-circulize vector at 15 bp overlap
Transform into Stellar Competent Cells
4. Recover final
construct
Figure 1. Procedure for performing mutagenesis with In-Fusion systems. The area where
mutagenesis occurs is shown in yellow.
Clontech Laboratories, Inc.
A Takara Bio Company
United States/Canada: +1.800.662.2566 • Asia Pacific: +1.650.919.7300 • Europe: +33.(0)1.3904.6880 • Japan: +81.(0)77.543.724
For Research Use Only. Not for use in diagnostic or therapeutic procedures. Not for resale. Clontech, the Clontech logo, CloneAmp,
EcoDry, In-Fusion, and Stellar are trademarks of Clontech Laboratories, Inc. All other marks are the property of their respective owners.
Certain trademarks may not be r egistered in all jurisdictions. ©2013 Clontech Laboratories, Inc.
6.13 IN (633337)
www.clontech.com
C l o n i n g
a n d
C o m p e t e n t
C e l l s
Primer Design for Deletion Mutagenesis
Primer design is a key component of simple, In-Fusion based deletion mutagenesis. To delete a region of your cloning
vector, you must design primers that include 15 bp overlap with each other at their 5' ends and do not include the bases
to be deleted (Figure 2).
For visual interest and easy understanding of the primer design concept, different regions of the vector backbone
and primers are marked in color. In Figure 2, the deletion site is marked in yellow and the binding site for the reverse
primer (pink and turquoise) spans the deletion. The binding site for the forward primer (turquoise and black) is located
against the cloning vector backbone. The two primers overlap by 15 bp at their 5' ends (the common area of turquoise).
Note that there is no gap between the pink and turquoise regions in the actual primer sequence—the deleted
nucleotides are not included in either of the primers.
Deletion
site
Reverse
primer
Forward
primer
15 bp
overlap
1. Envision final
construct
2. Design primers, then
perform In-Fusion
protocol
3. Recover final
construct
Figure 2. In-Fusion primer design for deletion mutagenesis. Primers are designed to eliminate a section of the original vector.
To create a series of C-terminal deletions, design only one forward primer that anneals to your cloning vector
immediately downstream of the coding region, retaining the stop codon. Then design a series of reverse primers
that include 15 bp of overlap with the forward primer at their 5' ends and span different regions to be deleted.
In Figure 3, Construct A has the blue region deleted, Construct B has the blue and turquoise regions deleted,
and Construct C has the blue, turquoise and pink regions deleted.
Deletion
site
Original
vector
Construct
A
Deletion
sites
Deletion
sites
Construct
B
E
Construct
C
Reverse
primers
A
B
C
Forward
primer
A
B
C
15 bp
overlap
1. Envision final constructs
2. Design primers,
then perform
In-Fusion protocol
3. Recover final constructs
Figure 3. In-Fusion primer design to create a series of C-terminal truncated proteins. Primers are designed to eliminate one or more
contiguous sections of the original vector.
2
C l o n i n g
a n d
C o m p e t e n t
C e l l s
To create a series of N-terminal deletions, design one reverse primer that anneals to your cloning vector immediately
upstream of the coding region, retaining the stop codon. Then design a series of forward primers that retain the natural
start codon, include 15 bp of overlap with the reverse primer at their 5' ends, anneal to the coding region you wish
to maintain at their 3' ends, and span different deletions. In Figure 4, Construct D has the turquoise region deleted
and Construct E has the turquoise and blue regions deleted.
Deletion
sites
Deletion
site
Reverse
primer
Original
vector
Construct
D
Forward
primers
D
E
D
Construct
E
E
15 bp
overlap
1. Envision final
constructs
2. Design primers,
then perform
In-Fusion protocol
3. Recover final
constructs
Figure 4. In-Fusion primer design to create a series of N-terminal truncated proteins. Primers are designed to eliminate one or more
contiguous sections of the original vector.
Primer Design for Base Insertions or Base Substitutions
Inserting bases is simple with the In-Fusion systems. To insert bases, design primers that include 15 bp overlaps
with each other at their 5' ends and contain the desired insertion(s) within the overlapping region (Figure 5). Only
the 15 bases at the 5' ends of the primers are required to overlap, but depending on the length and sequence of your
insertion, the overlap may be longer than 15 bp. Additional bases added to the primer will be maintained after the
In-Fusion reaction.
Similarly, if you would like to change one or more bases in a construct, design primers that include 15 bp overlaps
with each other and contain the desired substitutions within the overlapping region (Figure 5).
Added or substituted
bases go here
Reverse
primer
X XX
XXX
XXX
XXX
XXX
XXX
3. Amplify linear
construct
4. Recover final
construct
Forward
primer
Changed bases
are within 15 bp
overlap
1. Envision final
construct
2. Design
primers
Figure 5. In-Fusion primer design for inserting or substituting bases. Primers are designed to add additional bases or to replace existing
bases with different bases (Xs in the in the primers and the final vector) in the original vector.
3
C l o n i n g
a n d
C o m p e t e n t
C e l l s
In-Fusion Mutagenesis Protocol Overview
Please see the In-Fusion HD Cloning Kit User Manual for detailed instructions.
1. Select your vector and identify the mutation site.
2. Design PCR primers as described above, keeping
in mind these general guidelines:
• Primers should be 18–25 bases long. Insertions
may require longer primers.
• Primers should be 40–60% GC
• Primer Tms should be 58–65°C. Difference between forward and reverse primer Tms should
be ≤ 4°C.
3. Prepare CloneAmp HiFi PCR Master Mix:
CloneAmp HiFi PCR Premix.....
Forward primer...................
Reverse primer....................
Template...........................
H2O..................................
12.5 µl
200–300 nM
200–300 nM
0.1–5.0 ng
As needed
Total volume/rxn.................. 25 µl
4. Linearize the vector by inverse PCR using a threestep PCR protocol and CloneAmp HiFi PCR Premix.
30–35 cycles:
98°C........ 10 sec
55°C........ 5 or 15 sec
72°C........ 5 sec/kb
5. Treat the PCR product with Cloning Enhancer
to remove the circular double-stranded template
from the reaction. (Refer to Part VII, Protocol II.A in
the In-Fusion HD Cloning Kit User Manual.)
If your PCR product contains multiple bands, gelpurify instead using the NucleoSpin Gel and PCR
Clean-Up Kit. (Refer to Part VI, Protocol I.A in the
In-Fusion HD Cloning Kit User Manual.)
6. Assemble the In-Fusion reaction:
Linear construct containing..... 100 ng
your mutation
In-Fusion enzyme................. 2 μl
H2O.................................. As needed
Total volume....................... 10 μl
7. Incubate the reaction at 50°C for 15 min.
8. Transform Stellar Competent Cells with 2.5 μl
of the In-Fusion reaction.
9. The next day, screen for mutants. You have a ≥95%
chance of recovering your final desired construct
the very first time.
Reference
1. Ochman H., Gerber A. S., Hartl D. L. (1988) Genetics
120(3):621–623.
Cat. #
Product
Package Size
638916
638917
638919
638918
In-Fusion HD Cloning Plus CE
Liquid system; includes the In-Fusion Enzyme, CloneAmp HiFi
PCR Premix, Stellar Competent Cells, and Cloning Enhancer
10 Rxns
50 Rxns
96 Rxns
100 Rxns
638912
638913
638914
638915
In-Fusion HD EcoDry™ Cloning Plus
Lyophilized system; includes the In-Fusion Enzyme, CloneAmp
HiFi PCR Premix, Stellar Competent Cells, and Cloning Enhancer
8 Rxns
24 Rxns
48 Rxns
96 Rxns
638909
638910
638920
638911
In-Fusion HD Cloning Plus
Liquid system; includes the In-Fusion Enzyme, CloneAmp HiFi
PCR Premix, Stellar Competent Cells, and NucleoSpin Gel and
PCR Cleanup Kit
10 Rxns
50 Rxns
96 Rxns
100 Rxns
Notice to Purchaser
Your use of these products and technologies is subject to compliance with any applicable licensing requirements described on the product’s web page at http://www.clontech.com.
It is your responsibility to review, understand and adhere to any restrictions imposed by such statements.
Clontech® products are to be used for research purposes only. They may not be used for any other purpose, including, but not limited to, use in drugs, in vitro diagnostic purposes,
therapeutics, or in humans. Clontech products may not be transferred to third parties, resold, modified for resale, or used to manufacture commercial products or to provide a service
to third parties without prior written approval of Clontech Laboratories, Inc.
4