1
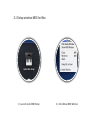
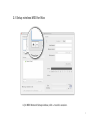
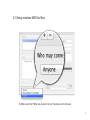
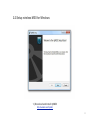
DAW Remote HD 1.5
USER MANUAL
Copyright EUMLab 2012
DAW Remote™ HD is a wireless DAW Controller
designed by EUMLab
http://DAWRemote.com
You can visit our website for more information. http://eumlab.com
If you have any questions, please feel free to send us an email : [email protected]
i
Chapter 1
Get it Work
Before the first time using DAW
Remote HD, you need to get both
your devices and DAW prepared.
Section 1
Get your devices ready
First of all, we need to make sure your iPad is connected to your Computer as a MIDI
device. There are two way to connect wirelessly and wirely.
STEPS
Wirelessly:
1.Make sure your iPad and Computer on the same network.
2.Setup wireless MIDI for Mac/Windows
Wirely:
Using MIDI/USB Cable.
3
1.Make sure your iPad and Computer on the same network
See Appendix for advanced network settings
2.1 Setup wireless MIDI for Mac
1. ) Launch Audio MIDI Setup
2. ) Click Show MIDI Window
2.1 Setup wireless MIDI for Mac
3.) In MIDI Studio window, click Network
6
2.1 Setup wireless MIDI for Mac
4.) In MIDI Network Setup window, click + to add a session.
7
2.1 Setup wireless MIDI for Mac
5.) Make sure that “Who may connect to me” has been set to Anyone
8
2.1 Setup wireless MIDI for Mac
1. Local Name will be shown in DAW
2. Bonjour Name will be shown in your
iPad Host List
6.) Enable Session
9
2.1 Setup wireless MIDI for Mac
Launch DAW Remote, you will see you MAC in the host list.
10
2.2 Setup wireless MIDI for Windows
1.) Download and Install rtpMIDI
http://eumlab.com/rtpmidi/
11
2.2 Setup wireless MIDI for Windows
2.) Launch rtpMIDI and click + to add a new session
12
2.2 Setup wireless MIDI for Windows
3.) Make sure that “Who may connect to me” has been set to “Anyone”
13
2.2 Setup wireless MIDI for Windows
1. Local Name will be shown in DAW
2. Bonjour Name will be shown in your
iPad Host List
4.) Enable Session
14
2.1 Setup wireless MIDI for Mac
Launch DAW Remote, you will see you computer in the host list.
15
Use Cable
iRig MIDI
Camera Kit + USB to MIDI
DAW Remote also supports wired connection.
When you plug a MIDI Device, it will be connected automatically.
16
Section 2
Get your DAW software ready
Now, your computer and DAW could receive MIDI Signals.
But in order to control the DAW, MIDI signals should be configured as control
signals. Sounds complicated huh? Don’t Panic!
Follow this section step by step, and you will get there in a minute.
And for some DAW we not mentioned, you could find the similar way to config.
17
Apple Logic Configure Automatically
Launch Apple Logic and DAW Remote, Connect to your MAC.
Apple Logic will be configured automatically.
18
Apple Logic Configure Manually
To make sure that DAW Remote has been configured properly.
Please open Control Surface Setup window.
19
Apple Logic Configure Manually
In Control Surface Setup window, if you don’t see a Logic Control Surface, you should install DAW Remote HD manually.
20
Apple Logic Configure Manually
In Control Surface Setup window, click New > Install...
21
Apple Logic Configure Manually
In popup window, find and add a Logic Control.
22
Apple Logic Configure Manually
Make sure that Logic Control’s Output/Input Port has been set to WIFI MIDI
(the local name you selected in Network MIDI Setup)
23
Apple Logic Configure Manually
NOTICE: If there are more than one controllers connected to your Logic,
please make sure they are not in a control surface group (one rectangle).
(Unless you are familiar with control surface groupping)
24
Pro Tools
Launch ProTools.
Open Peripherals (Setup > Peripherals...).
25
Pro Tools
In Peripherals window, select MIDI Controllers tab.
26
Pro Tools
Select Type to HUI
27
Pro Tools
Select Receive From and Send To to WIFI MIDI.
(the local name you selected in Network MIDI Setup)
28
Live
Launch Live and open Preferences window.
29
Live
Select Control Surface to MackieControl
And Input/Output to Network WIFI MIDI.
(the local name you selected in Network MIDI Setup)
30
Studio One
Launch Studio One and open Preferences...
31
Studio One
Select External Devices > Add...
32
Studio One
In Add Device window, find Mackie > Control.
And make sure that Receive From and Send To has been set to WIFI MIDI.
(the local name you selected in Network MIDI Setup)
33
Sonar
Launch Sonar and open Preference. (Edit > Preference...)
34
Sonar
In Preferences window, Select MIDI > Control Surfaces >
35
Sonar
In Controller/Surface Settings, select Control/Surface to Mackie Control.
Input Port/Output Port to WIFI MIDI.
(the local name you selected in Network MIDI Setup)
36
Cubase/Nuendo
Launch Cubase/Nuendo and open Device Setup. (Devices > Device Setup...)
37
Cubase/Nuendo
In Device Setup window, make sure WIFI MIDI Visible has been enabled.
38
Cubase/Nuendo
Click + and select Mackie Control.
39
Cubase/Nuendo
In Mackie Control, make sure that MIDI Input/Output has been set to WIFI MIDI
(the local name you selected in Network MIDI Setup)
40
FL Studio
Launch FL Studio, open MIDI Settings (Options > MIDI Settings)
41
FL Studio
In Settings, make sure Input/Output has been enabled.
Controller type has been set to Mackie Control Universal.
Output Port number has been set to 102.
42
Section 3
Start working with DAW Remote HD
Did you get your devices connected with each other? Congratulation!
You can start your work just in a second! Now you only need to choose
a default layout in the settings.
Tap Settings
43
Tap Layout
Select the layout with your DAW name
44
Cheers! Now you can start working with DAW Remote HD easily!
We have provided optimized layouts for most of the popular
DAWs. If you are already happy with the layout we provided, you
can skip the rest of this manual.
However, you may want to check the Chapter 2 for detailed
layout settings such as button abbreviations for your own DAW.
If you want to modify the default layout or even make an own
one, you can get detailed information in Chapter 3.
You may also want to look up the DAW manuals for some
advanced controls such as key combinations. You can find them
on our website.
Notice:
Only DAWs that support Mackie Control Protocol can be customized. (Pro Tools is currently not supported for
customizing)
If you want to use old layouts in earlier version of DAW Remote HD, you can find them in System Settings.
45
Do you know our DAW Remote for iPhone and iPod Touch?
Is iPad to big to bring it here and there in your studio? Try our DAW Remote for iPhone and iPod
Touch! It is more light-weighted and it also helps you control the transport and other basic
functions fast and smoothly.
DAW Remote is currently optimized for Logic Pro, Protools and Ableton Live.
Available on the AppStore!
Chapter 2
Default Layouts
Detailed information about default layouts
Section 1
Pro Tools
Pro Tools uses HUI protocol which is currently not supported for customizing. However, we have specially
designed a layout for this awesome DAW. You can control the channels, transport and basic functions on the
default view.
48
By slide the tabs, you can
In this time, the channel controls are
smoothly activate more
inactivated, but you can still use the
advanced control functions.
transport and basic buttons.
49
There are some abbreviations that you might want to know.
Abbreviations on
DAW Remote HD
Original name on
Mackie HUI
Abbreviations on
DAW Remote HD
Original name on
Mackie HUI
Aud.
Audition
Mon.
Monitor
CH.
Channels
Opt.
Option/All
Comp.
Compare
Rec. A
REC/RDY All
Ctl.
Control
Sd.M
Send Mute
Def.
Default
Sus.
Suspend
Edit.M
Edit Mode
Trans.
Transport
Edit.T
Edit Tool
<<
Bank/Channel left
Ins.Prg
Insert/Param
>>
Bank/Channel right
V-Pod Select: Double tap the V-Pod (knob) to enable V-Pod Select Function
You may want to check the Mackie HUI document for modifier combination keys. They are
available on our website. http://dawremote.com/doc/
50
Section 2
Logic Pro
We used the Logic Control Protocol in the earlier versions of DAW Remote HD. But from the version 1.5 on, we
uses Mackie Control Protocol for Logic Pro, which provides you more flexible functions. If you still want to use the
old version layout, however, you can enable it from the system settings (See appendix).
51
Gallery 2.1 Logic Layout Pages
There are three pages on the Logic Layout.
You can change it by tab the
button at any time.
52
There are some abbreviations that you might want to know.
Abbreviations on
DAW Remote HD
Original name on
Logic Pro
Abbreviations on
DAW Remote HD
Original name on
Logic Pro
A.T.
Audio Tracks
M.PREV
Previous Marker
A.Inst.
Audio Instrument
M.T.
MIDI Tracks
C.In
Cycle In
N/V
Name/Value
C.Out
Cycle Out
Opt.
Option
CH
Channels
P.In
Punch In
Ctrl.
Control
P.Out
Punch Out
Inst.
Assign Instrument
Rd./Off
Read/Off
M.DEL
Delete Marker
Repl.
Replace
M.NEXT
Next Marker
S/B
SMPTE/BEATS
V-Pod Select: Double tap the V-Pod (knob) to enable V-Pod Select Function
You may want to check the control surface document of Logic Pro for modifier combination
keys. They are available on our website. http://dawremote.com/doc/
For more information such as add a new page, change the button name, etc., you can
check Chapter 3 for Layout Editing.
53
Section 3
Ableton Live
We uses the Mackie Control Protocol for Ableton Live on DAW Remote HD. But from the version 1.5 on, we
changed the layout for Ableton Live, which provides you more flexible functions. If you still want to use the old
version layout, however, you can enable it from the system settings (See appendix).
54
Gallery 2.2 Live Layout Pages
There are three pages on the Ableton Live Layout.
You can change it by tab the
button at any time.
55
There are some abbreviations that you might want to know.
Abbreviations on
DAW Remote HD
Original name on
Ableton Live
CH
Channels
Clip/Fx
View Clip/Fx
L.Next
Locator Next
L.Prev
Locator Previous
PI
Punch In
PO
Punch Out
PLeft
Page Left
PRight
Page Right
Ret.
Returns
S/B
SMPTE/BEATS
Se./Arr.
View Sess/Arr.
V-Pod Select: Double tap the V-Pod (knob) to enable V-Pod
You may want to check the control surface document of Ableton Live for modifier combination
keys. They are available on our website. http://dawremote.com/doc/
For more information such as add a new page, change the button name, etc., you can check
Chapter 3 for Layout Editing.
56
Section 4
Cubase/Nuendo
We uses the Mackie Control Protocol for Cubase/Nuendo on DAW Remote HD.
57
Gallery 2.3 Cubase/Nuendo Layout Pages
There are three pages on the Cubase/Nuendo Layout.
You can change it by tab the
button at any time.
58
There are some abbreviations that you might want to know.
Abbreviations on
DAW Remote HD
Original name on
Cubase/Nuendo
Inst.
Instruments
CH
Channels
N/V
Name/Value
S/B
SMPTE/BEATS
Prev.
Previous
!SOLO
SOLO Defeat
V-Pod Select: Double tap the V-Pod (knob) to enable V-Pod
You may want to check the control surface document of Cubase/Nuendo for modifier
combination keys. They are available on our website. http://dawremote.com/doc/
For more information such as add a new page, change the button name, etc., you can
check Chapter 3 for Layout Editing.
59
Section 5
FL Studio
We uses the Mackie Control Protocol for FL Studio on DAW Remote HD.
60
Gallery 2.4 FL Studio Layout Pages
There are three pages on the FL Studio Layout.
You can change it by tab the
button at any time.
61
There are some abbreviations that you might want to know.
Abbreviations on
DAW Remote HD
Original name on
FL Studio
Abbreviations on
DAW Remote HD
Original name on
FL Studio
AS
Auto slice
Metro.
Metronome
+M
Add Marker
Norm
Normalize
CH
Channels
PM
Paste Mix
DM
Display Mode
PS
Pattern Song
Disp.
Display
Save.N
Save New
FI
Fade In
S/B
Time Format
FO
Fade Out
ZoS
Zoom on Select
I.Menu
Item Menu
V-Pod Select: Double tap the V-Pod (knob) to enable V-Pod
You may want to check the control surface document of FL Studio for modifier combination
keys. They are available on our website. http://dawremote.com/doc/
For more information such as add a new page, change the button name, etc., you can
check Chapter 3 for Layout Editing.
62
Section 6
SONAR
We uses the Mackie Control Protocol for SONAR on DAW Remote HD.
63
Gallery 2.5 SONAR Layout Pages
There are three pages on the SONAR Layout.
You can change it by tab the
button at any time.
64
There are some abbreviations that you might want to know.
Abbreviations on
DAW Remote HD
Original name on
SONAR
Abbreviations on
DAW Remote HD
Original name on
SONAR
BTV.
Open BigTime View
N/V
Name/Value
CH
Channels
Next.Win
Next Window
Comp.
Compressor
Prev.Win
Previous Window
END
Go to End
Rd./Off
Read/Off
F.Project
Fit Project
S/B
SMPTE/BEATS
F.Track
Fit Tracks
X.Win
Close Window
Jog P
Jog Param.
!Mute
Clear all mutes
N.Audio
New Audio
!Solo
Clear all solos
N.MIDI
New MIDI
V-Pod Select: Double tap the V-Pod (knob) to enable V-Pod
You may want to check the control surface document of SONAR for modifier combination
keys. They are available on our website. http://dawremote.com/doc/
For more information such as add a new page, change the button name, etc., you can
check Chapter 3 for Layout Editing.
65
Section 7
Studio One
We uses the Mackie Control Protocol for Studio One on DAW Remote HD.
66
Gallery 2.6 Studio One Layout Pages
There are two pages on the Studio One Layout.
You can change it by tab the
button at any time.
67
There are some abbreviations that you might want to know.
Abbreviations on
DAW Remote HD
Original name on
Studio One
Abbreviations on
DAW Remote HD
Original name on
Studio One
CH
Channels
Rd./Off
Read/Off
S/B
SMPTE/BEATS
S.Eff
Show Effects
A.Inst.
Audio Instruments
S.File
Show Files
A.T.
Audio Tracks
S.Inst.
Show Instruments
Insp.
Inspector
S.Pool
Show Pool
Opt.View
Toggle Optional
Views
Save.A
Save As
V-Pod Select: Double tap the V-Pod (knob) to enable V-Pod
You may want to check the control surface document of Studio One for modifier combination
keys. They are available on our website. http://dawremote.com/doc/
For more information such as add a new page, change the button name, etc., you can
check Chapter 3 for Layout Editing.
68
Chapter 3
Customize
layouts
If you are not satisfied with the
layout we provided, you can easily
edit it or even customize a new
one!
Section 1
Start Editing Mode
Edit and Duplicate a Layout
You could edit or duplicate a layout
by longtime pressing a layout.
Create a New Layout
You could create a new layout by
tapping +.
70
Get to Know Edit Mode
Interface
Settings
Show Toolbox
Pages
Working Area
71
Section 2
Basic settings
Layout Information
You could choose Title and Description for your layout.
Software Mapping
Different DAW has different definitions when implementing Mackie
Control Protocol. Choose a DAW
MIDI Map here if you wanna design a layout for it.
72
Section 3
Manage Pages
Add A New Page
Tap the [+] to add a new page
73
Change Page Order
Drag a page left/right to sort.
74
Delete A Page
Drag a page down and drop to delete.
75
Section 4
Manage Control Elements
Control Elements Toolbox
Tap toolbox to show all control elements.
76
Add A Control
Drag and drop a control to working area.
77
Cannot Drop
When the grids are occupied by other controls,
the grids will turn red.
78
Button Configuration
Tap button, it will show a config pop-up.
In this pop-up, you could choose a button function
color, size and label.
79
Delete Control
Drag a control back to toolbox to remove it from working area.
80
Section 5
Share a layout
Drag a layout bundle to your computer to share a layout
81
Install A Layout Bundle
Drag a layout bundle to iTunes DAW Remote Documents to install.
You can find more bundles on our website.
http://DAWRemote.com/layouts/
82
Chapter 4
Appendix
Advanced settings and other
notices
Section 1
Advanced Network Settings
Generally speaking, DAW Remote HD may work under the same network with your
host computer.
If your studio has more complicated network configuration than we have mentioned in
the first chapter, you can check this section.
The following network configurations may work properly.
84
Basic Network Configuration 1
MacPro or any computers connect to WIFI Router over ethernet,
and DAW Remote connects with the same router over WIFI.
85
Basic Network Configuration 2
Macbook Pro or any computers connect to WIFI Router over WIFI,
and DAW Remote connects with the same router over WIFI.
86
Advanced Network Configuration
Computer connects to Router1 over WIFI or ethernet. Router1 connects to Router2 over ethernet and
Router2 configured as net bridge mode or AP mode. DAW Remote connect to Router2 over WIFI.
No matter how complex the network configuration is, computers and DAW Remotes must under the
same sub-network.
For instance, computer's IP address is 192.168.1.2, iPad's IP address is 192.168.1.3, both devices connected to the same gateway 192.168.1.1
Ad-Hoc (Peer to Peer) Configuration
Macbook Pro or any computers connect to DAW Remote directly
over WIFI. To setting Ad-Hoc network, here are setup steps:
88
Ad-Hoc Setup Step 1
Make sure that your MIDI Network Session has turned on.
Ad-Hoc Setup Step 2
Turn on you WIFI, and select Create Network...
Ad-Hoc Setup Step 3
Choose a name for the network. Turn on your iPhone,
and connect to your computer network that just created
over WIFI. Launch DAW Remote and test again.
Section 2
System Settings
There are some configurations you could find them from iPad’s System Settings.
92
Name
Skip Waiting MIDI Signals
Change Button Labels When Mapping Changed
Restore Default Layouts
Enable Screen Auto Sleep
Enable Old Layouts
Function (When turn it on)
DAW Remote HD will not show waiting midi signals pop-up.
In Layout Editor, all buttons will change their labels to new mapping default value,
when Software MIDI Mapping is changed.
Restore all default layouts.
BE CAREFUL!
ALL MODIFICATION OF DEFAULT LAYOUTS WILL BE RESTORED.
The screen will dim out when idle.
Enable the layouts form last version of DAW Remote.
93