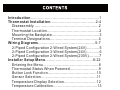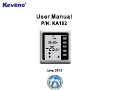
1
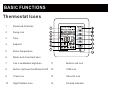
Your T102 room thermostat, based on advanced technique, is
designed to control most Heating/Cooling devices and 3-speed fan
as well. It’ll keep the room temperature at a stable temperature
degree. Once properly installed and configured, it’ll bring you many
years of trouble-free experience.
And please read the manual carefully and make a thorough
understanding of this manual.
Even though great attention has been paid for preparing the
manual. Keveno Electronics Inc. shall not
shoulder any
responsibilities for the errors or omissions in this manual. The user
should make sure the thermostat or the equipment connected to it is
operating to their respective specifications and in a safe manner.
The specifications of the T102 room thermostat, due to continuous product
improvements, will be changed without any further notice.
© 2012 Keveno Electronics Inc.
All rights reserved.
Introduction...........................................................1
Thermostat Installation.......................................2-4
Disassembly........................................................2
Thermostat Location.............................................2
Mounting the Backplate.........................................3
Terminal Designations..........................................4
Wiring Diagrams.................................................5-7
2-Piped Configuration 2-Wired System(24V)...........5
2-Piped Configuration 3-Wired System(24V)...........6
2-Piped Configuration 2-Wired System(230V).........7
Installer Setup Menu.........................................8-22
Entering the Menu................................................8
Thermostat Status When Powered.........................9
Button Lock Function..........................................10
Sensor Selection................................................11
Temperature Display Selection............................12
Temperature Calibration......................................13
Lowest Setpoint Setting......................................14
Max Setpoint Setting...........................................15
Temperature Hystersis Setting.............................16
Defrost Function.................................................17
Defrost Temperature Value Setting.......................18
Modbus Address Setup.......................................19
Night Setback Setting.........................................20
Fan Running Status when Valve Closed................21
Time Display Mode.............................................22
Four Period Time Setting.....................................23
Sensor Calibration...............................................24
Trouble Shooting.................................................25
Technical Specifications......................................26
BASIC FUNCTIONS
Thermostat Icons
1
Week and 4 Periods
2
Fixing Icon
3
Time
4
Setpoint
5
Room Temperature
6
Mode: Auto Cool Heat Vent
7
Fan: Low Medium High Auto
11
Button Lock Icon
8
Button: Up Down Fan Mode On/Off
12
COM Icon
9
Timer Icon
13
Valve On Icon
10
Night Setback Icon
14
Infrared Indicator
M
[1]
14
BASIC FUNCTIONS
Unit On/Off Operation
M
Press the button
to turn it OFF.
to turn the thermostat ON and again
[2]
BASIC FUNCTIONS
Setpoint Setup
M
Press button
or
to adjust the setpoint to the
desired degree.
Note: When -- displays, the thermostat will stop
working.
[3]
BASIC FUNCTIONS
MODE SELECTION
M
Press button M to circle between Auto , Cool ,
Heat
and Ventilation
. Then the setting will be
automatically confirmed in 5 seconds or press
button to confirm it.
[4]
BASIC FUNCTIONS
AUTOMATIC FAN MODE
M
The icon will be on the screen only when the
thermostat is in Heating or Cooling mode with valve
icon on the screen as well.
And the corresponding fan speed icon will be on
too.
[5]
BASIC FUNCTIONS
TIME, WEEK& ADVANCED SETUP
M
Simultaneously press the buttons and M up to 5
seconds and the weekday and the clock icons will
flash. Then press button or
to adjust the Week;
press M to switch to Hour setting, now the two digits
for Hour will flash, Then repeat the above method.
(see next page)
[6]
BASIC FUNCTIONS
TIME, WEEK& ADVANCED SETUP
M
Then press button
or
to adjust the Hour; then
press M to switch to Minute setting, now the two
digits for Minute will flash. Then press button or
to adjust the Minute. Then press M to switch to
the weekday 4-period programming(See next
page).
[7]
BASIC FUNCTIONS
TIME, WEEK& ADVANCED SETUP
M
Now the PROG. and the period for Wake will flash,
then press
or
to adjust it and the time will
increase or decrease at 30 minutes per press. Then
press M to switch to the setpoint for the Wake
period. then PROG. and the will flash. Then press
or to adjust the setpoint to the desired degree.
[8]
BASIC FUNCTIONS
TIME, WEEK& ADVANCED SETUP
M
Repeat the above steps till the last period’s time
and setpoint are set. Then comes to the Weekend’s
setting, and the corresponding icons will flash(See
the fig. above). Continuously repeat the steps till
the weekend is set up.
Note: The above steps are for 5+2 mode.
[9]
BASIC FUNCTIONS
TIME, WEEK& ADVANCED SETUP
M
Now the follwowing setup is for the 7-day
programmable mode. Then repeat the steps
mentioned above to finish the setup.
Note: The installer must know which mode is
preferred and should get the time and setpoint table
prepared in advance.
[10]
BASIC FUNCTIONS
BUTTON LOCK FUNCTION
M
Simultaneously pressing the
and
buttons up to
10 seconds till the icon displays, and it means that
the buttons are locked and repeat it again to unlock
the buttons.
[11]
BASIC FUNCTIONS
MODbus COMMUNICATION ICON
M
When the Rs485 interface is connected and works
well, the COM icon will flash.
[12]
TECHNICAL SPECIFICATIONS
[13]
Input Voltage
AC/DC24V or AC85-260V
Control Voltage
AC220V 50/60Hz
Power Consumption
<1W
Accuracy
0.5°C
Output Signal
On/Off Control
Setpoint Range
0-95°C
Operating Temp.
0-55°C
Operating Humidity
0-90% (no condensing)
Storage Temp.
0-65°C
Dimension
86*86*14.5 (L*W*D)
Warranty
2 Years