1
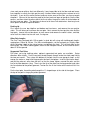
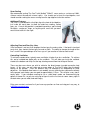
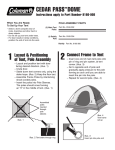
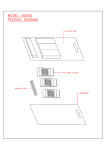
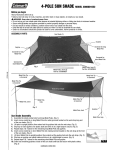
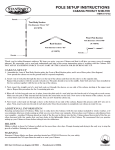
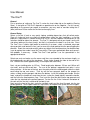
User Manual
The One™
General
For an overview of setting up The One™, review the short video clip on the website (Coming
Soon). A taut pitch of The One™ depends on good tension on the ridgeline. For this reason,
depending on the ground you expect to encounter, you may want to consider taking the 6”
(blue) aluminum Easton stakes for the front and rear guy lines.
General Setup
Select a site that is level or very gently sloping, avoiding depressions that will collect water.
Since all single wall tents are prone to condensation under the ‘right’ conditions, a site that
promises a light breeze is a better choice than still air, and the katabatic considerations of site
selection should be taken into account. The One™ is designed so that your head is on the left
side when looking at the front (mesh), but that’s just because the door is on that side. Since
The One™ has a relative high profile to maximize sit up room, select a sheltered setup spot
where possible, and locate the rear (vent) or one of the ends pointed into the prevailing breeze
direction. Scour the area and carefully move any objects that could puncture your bathtub floor
(save to replace later under Leave No Trace ethics). Place your groundcloth down and secure it
with pebbles if necessary. Unfold The One™ and position it on the groundcloth in the
appropriate direction.
Select one end, and make sure the corner roof lines are extended to the maximum length, so
the knotted ends are right at the tensioners. Place stakes through the hole at the end of this
line. Hold the two stakes approximately 3.5 feet apart and stake firmly.
Next, set your trekking poles to 125 cm. Fixed length poles between 120 cm and 130 cm will
also work, and are discussed later. The use of the optional segmented tent poles is also
discussed later. At the rear of the tent, pass the pointy end of the trekking pole under the shock
cord linking the two vent covers. Then lay out the rear grosgrain ‘boot’ so the orange line
makes a ‘hoop’ and the grosgrain tab forms the bottom. Insert the trekking pole handle into the
‘boot’, and pull the handle out, away from the tent, so that the ‘hoop’ tightens around the handle,
and the line to the floor becomes snug. Then insert the tip of the pole into the top grommet and
stake the line attached to the pullout grommet. Tension the line in the Lineloc on the bottom of
the roof until the line that is attached to the boot is taut.
Next, go to the front of the tent, unzip the vestibule and insert the tip of the pole into the top
pullout grommet. Set the pole handle at a right offset, so the pole lines up with the mesh zipper.
Pull the guy line taut against the rear pullout, and stake firmly. Next, go the side of the tent
where the unstaked corners are located and make sure the corner roof lines are extended to the
maximum length, so the knotted ends are right at the tensioners. Stake out these two corners
like you did the other two corners.
Now adjust and tighten the four roof corner tensioners and the front and rear tensioners for a
taut pitch. To secure the rear of the tent for breezy conditions, connect the cord loop around the
rear pole at the midpoint of the rear wall. For very breezy conditions, there are additional
pullouts along the rear edge that can be secured with stakes and line, or the shock
cord/stick/stone method.
Use the front shock cord clip to hold
down for privacy, and zip the beak
Please note that spinnaker is
the vestibule is not recommended,
the risk of the user. Fasteners are
one or
either side of the beak
closed for rain protection.
flammable, and cooking in
and if attempted, is done at
provided to allow furling of
both sides of the beak for
ventilation and views. The
mesh door may also be furled up to permit easier access or
increased ventilation where bugs are not an issue.
Securing the Floor
In most conditions, the floor does not need to be secured. The mesh door and side and rear
mesh panels have been redesigned so that they hold up the edges of the bathtub floor without
needing to tension the floor corners. However, in very windy or rainy conditions, it might be
wise to secure the floor for comfort and ease of use. You can do this in one of several ways.
The first method is to simply place pieces of gear or clothing, or even a rock, in the corners of
the floor. Your sleeping pad and bag will be enough weight to hold down the center area of the
floor.
The second method involves staking out the four side corners, the rear center and the front
center of the bathtub floor by placing stakes through the grosgrain loops located in each of
these positions. This requires six additional stakes to stake out all of these areas. Just slide a
stake through the loops and insert it into the ground.
The third method utilizes the extra 15’ of EZC1 cord that was shipped with your tent. Cut 4
pieces of this cord at 24” lengths. The remaining 7’ of cord can be cut as you see fit for the rear
and front center floor corners, depending on where you attach the cord to. This will be
explained in a moment. Attach each of the 24” pieces of cord to the side floor corners. Then
run each cord to the stakes that are holding the roof corners in place. Tie a loop at the end of
each cord and secure these lines with the roof corner stakes. As there are no line tensioners on
the floor, you may have to adjust the location of the loops at the end of the cords in order to
tighten the floor to the desired tension. You can also tie these ends of each cord to the roof
corner lines so that they are connected, like the 2008 model of the The One™. (Note: We
decided to leave the floor lines off of the tent this year since they aren’t necessarily needed and,
since each person pitches their tent differently, it was impossible to tie the floor and roof corner
lines together in exactly the right spot for every situation without requiring the customer to re-tie
the knots.) If you wish to secure the front and rear center areas of the floor, you have a couple
of options. You can tie the remaining cord to the front and rear loops of grosgrain, like the floor
corners, and then attach the other end of the line to either the guyline stakes or to the bottom of
the front and rear poles. The decision of where to tie these lines determines how long to cut
these pieces of cord as explained above.
Packing Up
First, loosen the rear top ridgeline and bottom roof tensioners, and remove the rear guyline
stake. This will allow you to remove the rear pole. Next, remove the front guyline stake and the
front pole. Loosen the end tensioners at each corner and remove the corner stakes, and fold,
roll or stuff the shelter into the stuff sack, if using one.
Other Pole Lengths
The One™ was designed with 125 cm poles in mind, but will set up with trekking pole lengths
ranging from 120 cm to 130 cm. For 130 cm trekking poles, set the front pole at a slightly wider
offset, offsetting it both to the side of center, and towards the front. This will help take up the
extra length. For 120 cm trekking poles, either set the front pole vertical, or find a rock to raise it
about 2” off the ground.
Segmented Tent Poles
For hikers not using trekking poles, optional segmented tent poles are available. Setup
directions differ slightly. For the rear pole, thread the pole through under the shock cord linking
the two vent covers. Then, place the bottom of the pole into the rear grosgrain ‘boot’ so the
orange line makes a ‘hoop’ and the grosgrain tab forms the bottom. Insert the tip into the ‘boot’,
and pull the pole out, away from the tent, so that the ‘hoop’ tightens around the pole, and the
line to the floor becomes snug. Then insert the tip of the pole into the top grommet and stake
the line attached to the pullout grommet. Tension the line in the Lineloc on the roof until this line
is taut.
For the front pole, thread the pole through the ‘V’ shaped loops at the side of the zipper. Place
the top of the pole in the guyline pullout grommet.
Seam Sealing
We recommend sealing The One™ with McNett® SilNet™ seam sealer or a mixture of 100%
silicone sealant thinned with mineral spirits. You should seal at least the top ridgeline, and
should consider sealing the seams running from the top ridgeline to the four corners.
Additional Features
The One™ is provided with a flashlight clip at the front of the ridgeline,
just inside the mesh door, to allow for hands-free reading, sorting
gear, etc. A mesh ditty pocket is provided to provide a spot to keep
flashlights, sunglasses, maps, or anything else small that you don’t
want to lose track of in the night.
Adjusting Front and Rear Guy Lines
If the front beak is not taut, then lengthen the front guy line and re-stake. If the beak is too hard
to zip shut, then shorten the front guy line and re-stake. The ability to change the length of the
line is useful if the ground drops off or rises up, or if you need to re-stake to avoid a rock.
Controlling Ventilation
To minimize condensation, typically more ventilation is better than less ventilation. To achieve
this, we’ve included two zipper pulls on the vestibule. This will allow you to zip the vestibule
closed at the bottom and unzip it at the top, allowing more airflow into the top of the tent.
There may be cases where you wish to minimize the direct breeze to avoid convective heat
losses. In this case, you can stake one or more edges of The One™ (other than the beak)
directly to the ground. There are different ways to accomplish this depending on other
objectives. If the bathtub floor feature is not needed, you can stake the four roof corners directly
to the ground, and shorten your rear pole to approximately 115 cm. This will give a very stormworthy pitch. If you anticipate wanting to use a ‘stake down’ mode, we recommend trying
options at home first, so you are not trying to figure it out the first time on some stormy night in
the dark when you are cold, tired and hungry.
Enjoy your new tent, and email us if you have any questions or if we can help you in any way, at
[email protected].
Updated 4/16/09