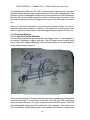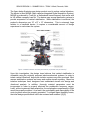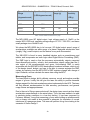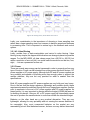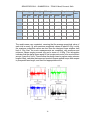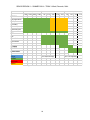
1
HANDHELD CAMERA STABILIZER SENIOR DESIGN II – SUMMER 2014 – TEAM 3 Thomas Mizell Alexander Pennock Ahmed Salih Report Submitted: July 30th, 2014 Project Sponsor: Professor Michael Young, George Mason University SENIOR DESIGN II – SUMMER 2014 – TEAM 3: Mizell, Pennock, Salih SENIOR DESIGN II – SUMMER 2014 – TEAM 3: Mizell, Pennock, Salih TABLE OF CONTENTS 1. EXECUTIVE SUMMARY ..................................................................................................... 1 2. INTRODUCTION ................................................................................................................... 2 2.1. Motivation .......................................................................................................................... 2 2.2. Objectives ......................................................................................................................... 3 2.3. Specifications & Requirements ................................................................................... 3 2.3.1. Customer Specifications........................................................................................ 3 2.3.2. Pilot & Passenger Use of HCS .............................................................................. 4 2.3.3. Microcontroller ......................................................................................................... 5 2.3.4. Motors ......................................................................................................................... 5 2.3.5. Motor Drivers ............................................................................................................ 5 2.3.6. Sensors....................................................................................................................... 5 2.3.7. Power Supply & Monitoring .................................................................................. 5 2.3.8. Frame Design ............................................................................................................ 6 2.3.9. PCB .............................................................................................................................. 6 3. RESEARCH & INVESTIGATION ....................................................................................... 7 3.1. Mechanical System Research ...................................................................................... 7 3.1.1. Existing Products & Designs ................................................................................ 7 3.1.1.1. Steadicam ........................................................................................................... 7 3.1.1.2. Fig Rig.................................................................................................................. 8 3.1.1.3. Glidecam HD 1000 ............................................................................................ 9 3.1.2. Proposed Designs ................................................................................................. 10 3.1.2.1. Arm Cuff Camera Stabilizer ......................................................................... 10 3.1.2.2. D-Grip Camera Stabilizer .............................................................................. 11 3.1.2.3. Gyro-Based Servo Camera Stabilizer........................................................ 12 3.1.3. Customer Review & Feasibility .......................................................................... 13 3.1.4. Objective and Specification Modification ........................................................ 15 3.2. Electrical System Research........................................................................................ 16 3.2.1. Control ...................................................................................................................... 16 3.2.1.1. Output System ................................................................................................. 16 3.2.1.1.1. DC Motors.................................................................................................. 17 3.2.1.1.2. Motor Drivers ............................................................................................ 23 i SENIOR DESIGN II – SUMMER 2014 – TEAM 3: Mizell, Pennock, Salih 3.2.1.2. Input System .................................................................................................... 29 3.2.1.2.1. IMU .............................................................................................................. 29 3.2.1.2.2. Hardware Sensors ................................................................................... 34 3.2.1.3. Controller .......................................................................................................... 36 3.2.1.3.1. Microprocessors...................................................................................... 36 3.2.1.4. Control Theory & Application ...................................................................... 38 3.2.1.4.1. PID ............................................................................................................... 38 3.2.1.4.2. Rolling Average ....................................................................................... 38 3.2.1.4.3. Value Binning ........................................................................................... 40 3.2.2. Power ........................................................................................................................ 40 3.2.2.1. Batteries ............................................................................................................ 41 3.2.2.1.1. Non-Rechargeable................................................................................... 41 3.2.2.1.2. Rechargeable............................................................................................ 41 3.2.2.1.3. Lithium Ion ................................................................................................ 42 3.2.2.1.4. Lithium Ion Polymer ............................................................................... 43 3.2.2.1.5. Nickel Metal Hydride ............................................................................... 43 3.2.2.1.6. Alkaline ...................................................................................................... 44 3.2.2.2. Battery Monitoring.......................................................................................... 45 4. PRODUCTION..................................................................................................................... 47 4.1. Electronic Circuitry ....................................................................................................... 47 4.1.1. PCB Options ............................................................................................................ 47 4.1.2. Layout & Rules of Thumb .................................................................................... 49 4.1.3. Connectors, Cables, Cables & Jumpers .......................................................... 49 4.1.4. Component Packages ........................................................................................... 53 4.1.5. Soldering Methods................................................................................................. 55 4.2. Frame ................................................................................................................................ 59 4.2.1. Materials ................................................................................................................... 59 5. DETAILED DESIGN CONTENT ....................................................................................... 61 5.1. Mechanical System Design ........................................................................................ 61 5.2. Electrical System Design ............................................................................................ 63 5.2.1. Control System ....................................................................................................... 63 5.2.1.1. Output System ................................................................................................. 63 5.2.1.2. Input System .................................................................................................... 64 ii SENIOR DESIGN II – SUMMER 2014 – TEAM 3: Mizell, Pennock, Salih 5.2.1.3. Controller .......................................................................................................... 65 5.2.2. Power ........................................................................................................................ 65 5.2.3. User Interface .......................................................................................................... 66 5.3. Explicit Design Summary ............................................................................................ 67 5.3.1. Block Diagram ........................................................................................................ 67 5.3.2. Electronic Parts List .............................................................................................. 68 5.3.3 Final Design Schematic ......................................................................................... 69 5.3.3.1 Voltage Regulation Subsystem .................................................................... 69 5.3.3.2 Microprocessor Subsystem .......................................................................... 69 5.3.3.3 IMU Subsystem ................................................................................................ 70 5.3.3.4 Motor Safety Kill Switch Subsystem .......................................................... 71 6. PROJECT QUALITY PLAN .............................................................................................. 72 6.1. Initial Testing Conditions ............................................................................................ 72 6.1.1. Acceleration Conditions....................................................................................... 72 6.1.2. Rapid Prototyping .................................................................................................. 79 6.2. Acceptance Test Plan .................................................................................................. 80 6.2.1. Battery Life .............................................................................................................. 81 6.2.1.1. Load.................................................................................................................... 81 6.2.1.2. No Load ............................................................................................................. 82 6.2.2. Hardware Ergonomics .......................................................................................... 82 6.3. Acceptance Test Procedure ....................................................................................... 82 6.3.1. Test 1: Handheld Stability.................................................................................... 82 6.3.2. Test 2: 30-Minute Stair Climb.............................................................................. 83 6.3.3. Test 3: Road Test ................................................................................................... 83 6.3.4. Test 4: Plane Test .................................................................................................. 84 6.4. User Manual Development .......................................................................................... 84 6.4.1. Initial Manual Excerpt ........................................................................................... 84 7. CONCLUSION..................................................................................................................... 86 7.1 Challenges ....................................................................................................................... 86 7.2 Demonstrated Results .................................................................................................. 86 7.3 Accomplished Objectives ............................................................................................ 87 7.4 Future Design Considerations .................................................................................... 88 8. ADMINISTRATIVE ............................................................................................................. 89 iii SENIOR DESIGN II – SUMMER 2014 – TEAM 3: Mizell, Pennock, Salih 8.1. Team Management ........................................................................................................ 89 8.2. Milestones & Timeline .................................................................................................. 93 8.3. Budget & Finances........................................................................................................ 93 Appendix A: Permissions ......................................................................................................... a Appendix B: Datasheets............................................................................................................ e Appendix C: Works Cited........................................................................................................... f iv SENIOR DESIGN II – SUMMER 2014 – TEAM 3: Mizell, Pennock, Salih 1. EXECUTIVE SUMMARY This senior design research paper is for a handheld camera stabilizer intended for videography in personal aircraft and personal use. Included are the product motivation and objectives, specifications and requirements, research and investigation, design content, project quality plan, and acceptance test plan. This project is coordinated by electrical engineering students Thomas Mizell, Alexander Pennock, and Ahmed Salih, University of Central Florida. Funding and guidance is provided by Professor Michael Young, George Mason University. Project approved by Dr. Samuel Richie, University of Central Florida. Figure 1: Team 3 (Left to Right) Thomas Mizell, Alex Pennock, and Ahmed Salih 1 SENIOR DESIGN II – SUMMER 2014 – TEAM 3: Mizell, Pennock, Salih 2. INTRODUCTION 2.1. Motivation The intention of this senior design project was to allow electrical engineering students to showcase the skills learned in college. The students planned, managed, researched, tested, designed, built, documented and reported on a dean-approved project. The main motivation behind the handheld camera stabilizer (HCS) originated from Professor Michael Young, George Mason University. Professor Young approached the Spring 2014 University of Central Florida Electrical and Computer Engineering (UCF ECE) Senior Design I students about a personal need for a handheld, lightweight, and electromechanical camera stabilizer for personal use while in a passenger plane for greater filming quality. Professor Young chose Senior Design Group Three to design and build the camera stabilizer. A secondary motivation for this project was due to the Accreditation Board for Engineering and Technology, Incorporated (ABET) approval criteria for the UCF ECE Bachelor’s Program to remain viable and accredited in the United States. ABET requires that all electrical engineering students must have (at least) a semester long capstone project. The ABET Engineering Criteria 2000 (EC2000), Criterion 4 states: “Students must be prepared for engineering practice through the curriculum culminating in a major design experience based on the knowledge and skills acquired in earlier course work and incorporating engineering standards and multiple realistic constraints, which might include the following considerations: Economic Environmental Sustainability Manufacturability Health and safety Social Ethical Political… [1]” 2 SENIOR DESIGN II – SUMMER 2014 – TEAM 3: Mizell, Pennock, Salih 2.2. Objectives The following is a list of the general objectives of the HCS system: Provide enhanced videography. Stabilizing against user motion. Primary rotational compensation via electronic system. Secondary linear vertical compensation via mechanical system. The design team’s goal was to provide a simple-to-use, battery-powered, handheld camera stabilizer for amateur aerial videography using higher quality digital singlelens reflex (DSLR) cameras such as the Nikon 1, Canon Rebel, or Pentax K series. The primary objective of the project was to design a handheld camera stabilizer that compensated for video disturbances that are introduced by human fatigue. 2.3. Specifications & Requirements 2.3.1. Customer Specifications The following is a list of requirements that was commissioned by Professor Young’s Single Axis Camera Stabilizer [2] handout. The handout (quoted below) were the desired goals for the project, these goals were not definite: Single handheld device. Must hold vertical position (y-axis) to within 1/8” with vertical transient jumps as much as at least 6”. Response time must be quick enough so as to eliminate all vertical movement as seen by the camera. Must have a standard camera mount. Supports the weight of a Nikon 1 camera as well as smaller cameras. Runs on a single rechargeable battery Must weigh less that 9 oz. Operates for at least 30 minutes on a single charge with light to moderate turbulence. Power on/off switch. Green Power-On LED flashes once every three seconds for about 100 milliseconds. LED flashes red when the battery is low. Circuit must be delivered on a double-sided printed circuit board (PCB) with surface mount components. Project requires complete Production Documentation: Schematic Mechanical and Fabrication Drawings Bill of Materials (BOM) with vendor part numbers and Digikey or Mouser part numbers. PCB artwork with Gerber Files. Production Test Plan and Procedure. User Manual. 3 SENIOR DESIGN II – SUMMER 2014 – TEAM 3: Mizell, Pennock, Salih 2.3.2. Pilot & Passenger Use of HCS In many ways, aircraft flight is very similar to automobile transportation; both driver and pilot must be focused, look for dangers up ahead, remain free of distraction, and passengers are depending their lives on the skill and perception of the pilot/driver. The HCS will be designed for both the pilot and passengers to easily use and put away in case of emergency maneuvers or choppy turbulence occur. For this reason, the HCS must be easy to pick up, activate, and quickly deactivate and put away. Originally one initial design resembled a cuffed-crutch handle; meaning the user slid their arm into the device, grabbed the grip, tightened the cuff around the forearm, and then operation was possible. After discussing this design consideration with pilot and sponsored, Professor Michael Young, this cuffedcrutch handle design was rejected due to restricting the user’s reaction time with their hands. The user would have to untighten the cuff, release the interior grip, slide their hand out of the cuff, and place the stabilizer down before being able to respond to an emergency. Other frame designs will be explored. A heavy consideration is a grip design that is similar to a pistol grip; quick and easy to grab, activation of the HCS would take one motion such as a trigger or button on the grip, and it has to feel comfortable and sure-gripped for the user. This design would also be easy for the user to put down in case of an emergency. The user would simply pull the trigger/button to deactivate the HCS, and place it in a safe place in the cabin. This could be done with one motion and become intuitive for the user. The less time taken to place the HCS down, the more time the pilot has to respond to an immediate emergency. Upon review and initial research, the design team has to make modifications to the customer specifications. The project was proposed to the design team as a camera stabilizer for vertical compensation in a small passenger plan. Because of the lack of design experience and project funding, the design team may not realistically meet customer specifications such as total weight of the product, and the required maximum 6” vertical translation. These changes in the specifications and requirements have been discussed and approved by Professor Young. The exact feasibility process that led to this decision will be fully discussed within the Research & Investigation section of the report. The design team will try to maintain as many of the customer specifications as possible. Compared to the specifications, the design team’s main focus will be to eliminate optical jitter introduced by human interaction, rather than jitter introduced as a result of vehicle turbulence and vertical translation. 4 SENIOR DESIGN II – SUMMER 2014 – TEAM 3: Mizell, Pennock, Salih 2.3.3. Microcontroller The controller will have the following qualities: Integrated Inter-Integrated Circuit (I2C) serial communication. Minimum output control for three motors. Pulse Width Modulation (PWM) output. C/C++ programmable. Available development board. Integrated PID (Proportion-Integration-Derivative) controller (if needed). Surface mount package with 0.5 mm pin pitch. 2.3.4. Motors The motor design will have the following qualities: Small (Approx. 2” diameter or less). Low power consumption (Max voltage < 15 V, low current draw). Fast yet smooth operation. High holding torque (> 2 Nm). High torque/force-to-weight ratio. 2.3.5. Motor Drivers The motor drivers will have the following qualities: Input: voltage PWM. Output: amplified varying DC current. Efficiency > 95%. Impedance matching. Fast transfer time. Possible heat sink. Surface mount package. 2.3.6. Sensors The sensors will have the following qualities: Read acceleration figures past ± 3.8 g and quickly. Read radial velocity figures accurately and quickly. Reliable range of accuracy. I2C serial communication protocol. Sleep/low power mode. Small footprint and surface mount component. 2.3.7. Power Supply & Monitoring The power supply and monitoring will have the following characteristics: Haptics (Green Power-On LED, Red Low-Power LED). ON/OFF button on handle. Compact and lightweight rechargeable battery with separate and external recharger. Low voltage (< 15 DCV). Power monitoring hardware must have I2C serial communication (if needed). 5 SENIOR DESIGN II – SUMMER 2014 – TEAM 3: Mizell, Pennock, Salih Low thermal waste/output. Built for shock and bumpy conditions. 2.3.8. Frame Design The frame will have the following qualities: Single handheld device. Automatic tilt and roll rotational gimbal system. Manual pan system. Standard camera mounting. Lightweight (System < 2lb). Comfortable, sturdy, and balanced grip. Battery and PCB housing. Rigid construction. Compact when not in use. 2.3.9. PCB The printed circuit board (PCB) will have the following characteristics: Double-sided. Surface mount components only. Passive and low-power components must be 805 or 603 (imperial). Non-ROHS (Restriction of Hazardous Substances Directive) components and construction when possible. Compact dimensions. Multiple PCBs for measuring equipment locations. Durable and stiff. Leaded solder pads. Fiberglass construction. Ideal for solder paste and convection oven. 6 SENIOR DESIGN II – SUMMER 2014 – TEAM 3: Mizell, Pennock, Salih 3. RESEARCH & INVESTIGATION 3.1. Mechanical System Research Probably the most fundamental and challenging component of the project design was the mechanical system. The project was originally introduced to the design team as a vertical camera stabilization system. The specifications provided by the customer generated numerous questions and technical complications. When initially proposed, the design team realized that a lot of mechanical research would be required as the design team had little mechanical design experience. To gain a better understanding of the project design requirements, the design team first researched currently existing products. 3.1.1. Existing Products & Designs 3.1.1.1. Steadicam The Steadicam, invented in 1975 [3] by a cameraman of the name of Garrett Brown, is a camera stabilizer mount used to isolate the camera from any movement by the user. It’s definitely one of the well-known devices used for camera stability by camera enthusiasts due to the fact that it can take high quality images while the user is running on an unbalanced surface. The Steadicam is a rather large construct that starts with the user wearing a vest that acts as a harness between the user and the Steadicam. The harness is then connected to an armature on one end, a sled which mounts the camera on another end and also uses counterbalance weights on the bottom of the device. There is a gimbal used to connect the harness with the armature and is used as a pivot point keeping the bottom portion of the Steadicam, which is slightly heavier upright with the top portion. The added weight of the counterweights and the camera allows for a very high inertial mass that will not allow movement that may be caused by the motion of the user. The pivoted gimbal that is attached to the armature gives the user increased stability of photography as well as videography. The user has the flexibility to adjust the armature as needed to tailor any type of project. For example if there is a need for a low angle shot, then the user can have the camera at the bottom of the Steadicam by putting the armature in a vertical position. The Steadicam does indeed appear to be quite sturdy and very good at isolating movements from multiple axis. Also, it has been used in the film industry from quite a while, which shows that that experts in photography and videography have found it a very good device for camera stability. With regards to basing the Steadicam as a reference for the camera stabilizer intended for the senior design project, it would seem that unfortunately, the Steadicam is not an ideal choice. Of the reasons that the Steadicam may not be the best choice to use as a design reference is simply because the device is a large and very heavy construct. As 7 SENIOR DESIGN II – SUMMER 2014 – TEAM 3: Mizell, Pennock, Salih stated previously, the camera stabilizer, based on the specifications would need to be light weight and also is meant to be a handheld device. Also the central idea behind the Steadicam is using weight balances that take advantage the inertia of the device and gravity. It can easily be argued that this is quite an effective method that can be used to isolating any kind of movement. The only concern here is that the camera stabilizer is intended to be a project for an electrical engineering student which would mean that the design would ideally use electronic movements via an electric motor to stabilizer the camera. The Steadicam may be a more lucrative project for perhaps a mechanical engineering project. 3.1.1.2. Fig Rig The Fig Rig camera stabilizer was invented by an English film director by the name of Mike Figgis [4]. At first glance, this particular device is quite different from most of the camera stabilizers that have been researched for this project. The model of the Fig Rig camera stabilizer can best be described as the steering wheel of an automobile. Within the circular frame of the Fig Rig model is a cross bar on which a camera can be mounted onto. The frame of the Fig Rig can also mount additional accessories to the camera such as a remote controller, lights, monitors and microphones. The way the Fig Rig is able to stabilize the camera mount is through its nonconventional frame. As someone is filming or taking pictures, their muscles and tendons will absorb all the disturbances caused by the users movement and the Fig Rig will only receive fluid motion from the user. This allows for one to take video images from various angles while in motion. Lots of camera hobbyist tend to prefer the Fig Rig over other devices such as the Steadicam due to it being more user friendly and yet still giving a professional feel to its use. It is also very easy to set up and use unlike the Steadicam which requires the user to be harnessed on to the device. Also the price of the Fig Rig is lower than that of the Steadicam. One problem that comes with basing the camera stabilizer of the Fig Rig design would be that the Fig Rig is a two hand grip, while the camera stabilizer is indeed to only require a one hand grip. Also, the Fig Rig design appears to be overly simplified. What is meant by this statement is that there isn’t much room innovation with adding electrical components to add stability to the device. The camera stabilizer project for the senior design calls is intended for three student project, it would appear almost impossible to delegate enough substantial 8 SENIOR DESIGN II – SUMMER 2014 – TEAM 3: Mizell, Pennock, Salih work between three individuals for a camera stabilizer design that would be based on the Fig Rig. One good note to take from the Fig Rig design that would be applicable to the camera stabilizer is how the Fig Rig model gives the user the option to add additional components. This something that will be looked into in terms of something along the lines of a manual control for moving the camera in a certain direction will maintaining stability. 3.1.1.3. Glidecam HD 1000 The Glidecam HD 1000 is manufactured by a company called Glidecam. Glidecam was established in 1992 and has since been a well-known brand by both professional film producers as well has camera hobbyist. All of the products that are produced by the Glidecam have been reviewed by many as being able to produce very smooth camera shots even when the user is running or go up and down stairs [5]. Of the many camera stabilizers that have been produced by Glidecam the HD 1000 model is of particular interest for a number of reasons. The Glidecam HD 1000 is constructed of a flat sheet metal that is used as the camera mount. The plate that acts as a camera mount has a number of holes which allows for a variety of cameras to be used as well as varies potions of the camera based on what type of images need to be taken. A pole is run through both the top plat as well as the bottom plat of the Glidecam. In the middle of the plate is a hinge which the user will use to primarily carry the Glidecam and move it accordingly. The way the Glidecam is used is that at the bottom of the pole are counterweights. Once these counterweights are balanced properly, they will work with the hinge to remove any disruptive movements or shakes caused by the user while they are filming or taking pictures. The Glidecam HD 1000 is known by many indie film makers as the poor man’s Steadicam. The image quality produced by using these devices is quite remarkable and very comparable to a Steadicam although its price range is far lower than the Steadicam. However, one of the well-known setbacks with selecting the Glidecam HD 1000 for camera stability is that it isn’t very user friendly. Many of the critics and the reviews for this product have stated that there is a significant learning curve with regards to being able to accurately place the counterweights with respect to the particular camera chosen. Also, a number of users of the Glidecam HD 1000 have raised concerns with experiencing fatigue when using the Glidecam for an extended period of time. Having to hold the hinge in the manner that is constructed along with supporting the counterweights will most likely cause anyone to become very frustrated and tired. 9 SENIOR DESIGN II – SUMMER 2014 – TEAM 3: Mizell, Pennock, Salih In researching the Glidecam HD 1000, it has brought to light one very important decision towards designing the camera stabilizer for the senior design project. That decision is that counterweights method will not be introduced into the final design. Not only will counterweights cause the system to become very heavy but it may also add unnecessary strain and fatigue to the user as the Glidecam is known to do. Also as it has been mentioned by the previously existing models, the lack of electrical components towards to stability of the camera is a great concern and does not appear to model what an electrical engineering project should focus on. 3.1.2. Proposed Designs 3.1.2.1. Arm Cuff Camera Stabilizer The first HCS proposal design mimicked an arm brace device. It was designed to be compact, lightweight, rugged, and safe. The HSC base frame housing would use an ergonomic design inspired by cuffed crutches. Below is a rough illustration of the original design in figure 2. . Figure 2: Arm Cuff Camera Stabilizer Rough Illustration The structural materials of the base and arms were to be constructed of lightweight composite materials. The main body of the Arm Cuff HCS (AC-HCS) would be a composite base with arm cuffs, grip, and grip-mounted ON/OFF button. The PCB and rechargeable battery would be attached to the underside of the main body. Two control arms, of adjustable length, were attached to the base at a single pivot 10 SENIOR DESIGN II – SUMMER 2014 – TEAM 3: Mizell, Pennock, Salih point. At the pivot point, a motor would control major-axis motion (illustrated on the right side of Figure 2). The control arms would be guided by fixed rails, attached to one of the arm cuffs. The motor would provide vertical translation for the camera mount. On the opposite ends of the control arms, the camera stage would contain the camera mounting. The camera stage would contain another point of angular motion termed as the “minor-axis”. The minor-axis angle would be manipulated with another motor or gimbal. To control the AC-HCS, accelerometers would be placed in various places: the camera stage, control arms, and base. Feedback would be sent to a microcontroller unit (MCU). The MCU would take the accelerometer information and maintain minimum and equal acceleration on two accelerometers found on the camera stage. A maximum swing allowance would ensure that the AC-HCS does not go beyond the maximum vertical translation range, ensuring the arms do not accidently injure the user. This design was rejected by Professor Young due to constriction of the pilot’s arm. Professor Young was concerned that in case of an emergency, the pilot would not be able to take their hand out of the cuff and regain control of the airplane in time. 3.1.2.2. D-Grip Camera Stabilizer The implementation of this idea is a rolling camera along a D-shaped frame. Below is a rough illustration of this design shown in figure 3. . Figure 3: D-Grip Camera Stabilizer Rough Illustration The D-Grip Camera Stabilizer contained two major components: the composite channel grip and the movable camera mounting. The camera mounting attached to the grip along the vertical section. The camera mounting self-automated to align itself to the center of the vertical section. The camera mounting contained two guide wheels on either side of the vertical section. One of the wheels would be 11 SENIOR DESIGN II – SUMMER 2014 – TEAM 3: Mizell, Pennock, Salih directly connected to a drive motor. When the wheels rolled along the vertical section, the camera mounting moved in the corresponding direction. Using an accelerometer within the channel grip, the camera mounting would detect position variations of the channel grip. The camera mounting moved in the opposite direction to compensate for the grip’s vertical position change. The camera mounting would try to always return to a zero reference point. Limit switches would also be used to prevent the camera mounting from exceeding allowable vertical positions on the grip. As a result, camera stabilization could be achieved. 3.1.2.3. Gyro-Based Servo Camera Stabilizer The Gyro-Based Servo Stabilizer (GSS), was a hand-held device designed to stabilize the vertical position of a camera. Below is a rough illustration of this design in figure 4. Figure 4: Gyro-Based Servo Stabilizer Rough Illustration Gyro-based servo stabilizer would be a light weight composite frame designed in a football goal post shape. The gyro-based servo stabilizer had servo motors that travel along the upper sides of the frames. Both motors could be connected using a beam containing the camera mounting. The gyro-based servo stabilizer had two gyroscopic sensors located on each top end of the device. Two slider arms, connected between the gyro sensors and the camera mount. The lower end of the gyro-based servo stabilizer served as the grip. It housed a rechargeable battery and microcontroller. Right above the grip, the device contained an indicator light for power and low battery statuses. The gyro-based servo stabilizer had a microcontroller used to initialize the appropriate reference angles for the slider arms used to balance the device. The gyroscopic sensor measured the angular 12 SENIOR DESIGN II – SUMMER 2014 – TEAM 3: Mizell, Pennock, Salih rate of the rotation for the slider arms. When changes in the slider arms’ angles were detected, the servo motors moved, causing the camera mount beam to move as well. The motors continue to move in a direction until the angles of the slider arms have been adjusted to the appropriate angle, resulting in camera stabilization. 3.1.3. Customer Review & Feasibility Each of the previous decisions were presented to the customer for review. Due to various issues with each design, the customer did not approve the development of any of the designs. The design team was forced to modify and review their design approach. Based on further feedback provided by the customer, it was noted that the ideal method for their satisfaction would be a design that closely resembled a vertically positioned linear actuator. As a result, linear actuators were researched as a possible output to drive the mechanical system. As the design process continued, members of the design team questioned the feasibility of the customer request. The primary concerns were regarding the product’s weight, vertical stabilization, and response time. Previous products researched were advertised as “lightweight” yet most contained a weight range of two to six pounds. This was nearly four times the customer specifications of only nine ounces. Due to lack of technical experience with mechanical systems, the design team sought guidance from several engineers with relatable experience to the design team’s project. Guidance included a spacecraft systems engineer from Boeing, mechanical engineer for Lockheed Martin, and lead design engineer for Lead’Air, a company that specializes in aerial survey systems. Each individual provided extremely enlightening information regarding camera stabilization performance and methods that are currently being practiced. The general methodology uses a dampening isolation system. This comes in various forms: pneumatic suspension, rubber shock material, or springs. One of the simplest methods for vertical stabilization within an aircraft system is to design an isolated mounting platform. In order to do this, the random vibration frequency of the aircraft must be determined. The frequency is dependent on the aircraft’s rotor RPM and the amount of blades it contains. Once the frequencies are obtained, acceleration data is acquired for a “typical flight.” The data must go through signal processing to obtain the acceleration spectral density (ASD), which is an applied use of the power spectral density function. By using a combination of low and high pass filtering, the vibrations can be isolated. Corresponding springs or rubber shocks are placed between platforms to dampen vibrations. The stiffer the shocks, the higher the frequency that is mitigated. This method is extremely dependent and therefore sensitive to the specific aircraft and isolator material parameters. [6] [7] 13 SENIOR DESIGN II – SUMMER 2014 – TEAM 3: Mizell, Pennock, Salih The figure below illustrates one design product used to reduce vertical vibrations. The device is titled MIDAS (Multi-cameras Integrated Digital Acquisition System). MIDAS is produced by Track’Air, a Netherlands based company that works with its US affiliate company Lead’Air. The device uses several pneumatic systems to provide suspension for vertical stabilization. While stabilization is achieved, the product’s dimensions are 19” x13” x 15” dimensions. This is extremely large relative to a handheld device. It requires a considerable amount of design experience to scale down the system. Figure 5: MIDAS Camera Assembly Illustration (reprinted with permission) Upon this investigation, the design team believes that vertical stabilization is unfeasible using the originally proposed electromechanical systems. In order to isolate vertical vibrations, large scale isolation systems are often produced. Most camera stabilization systems are heavy and require aircraft mounting. Based on isolation techniques used, designers must understand aircraft rotor design and vibrational analysis. In addition, thorough material parameters must be incorporated in order to properly eliminate the problematic frequency ranges. Lastly, without systematic data acquisition, the accelerations experienced in flight cannot be properly modeled. As a result, the controllability and observability of the control system cannot be properly generated. To mitigate these feasibility issues, the initial design specifications had to be reviewed and modified. [8] [9] 14 SENIOR DESIGN II – SUMMER 2014 – TEAM 3: Mizell, Pennock, Salih 3.1.4. Objective and Specification Modification Customer Specification Modified Specification Modification Reason Single Hand Held Device None N/A Hold vertical position to within 1/4" when no transient jumps are present Objective was ambiguous and without proper mechanical isolation, response of stabilizer to 6” is unrealistic Must hold vertical position to within 1/8” with vertical transient jumps as much as least 6” Response time must eliminate all vertical movement Hold vertical position within 4” vertical tolerance window Motor response time < 500ms Quantified a response time None N/A Supports the weight of a Nikon 1 camera as well as smaller cameras Supports weight of Nikon 1 camera only Because multiple test cameras are unavailable to test, design focus will be on Nikon 1 series only. Runs on a single rechargeable battery None N/A Must weigh less than 9 oz Weight less than 2 lbs 9 oz system was incredibly unrealistic to house entire stabilizer system Operates at least 30 minutes on single charge None N/A Power on/off switch None N/A Green Power- ON LED flashes once every three seconds for about 100ms None N/A LED flashes red when battery is low None N/A Must have a standard camera mount Table 1: Specification Modification The design team had found that certain design objectives and specifications generated by the user could not be realistically achieved. Therefore after reinvestigating customer requirements, the design team provided modifications to the original objectives and specifications. Table 1 summarizes the original objectives and specifications compared to the modified objectives and 15 SENIOR DESIGN II – SUMMER 2014 – TEAM 3: Mizell, Pennock, Salih specifications that will be used. In addition, a brief explanation of why the objective or specification was modified is provided. 3.2. Electrical System Research 3.2.1. Control With the stabilizer’s major mechanical system designed, the most fundamental design issue is the system’s motion control. The basic design concept is to initialize a horizontal reference point for the camera staging. The motion control is tasked with maintaining this reference point by engaging the mechanical motion system to compensate for positive or negative differentials. Closed loop negative feedback will be used to control the dynamic behavior of the stabilizer system. The motion control has to consist of three key component systems: the controller, the output system, and input sensor system. Each system will be further divided into separate subsystems. 3.2.1.1. Output System Parameters and Requirements It goes without saying that in order to successfully design and build a prototype for the camera stabilizer, careful consideration and research must be made for the type of motor that is to be selected. The motor must fall within the parameters of the design that will particularly affect the motor. Primarily the specifications about device that are mainly being considered are that the device must be lightweight, able to hold a vertical position to within 1/8”, perform vertical transient jumps of at least 6” and also last for at least thirty-minutes on charge. These specifications affect the decision of the motor in many ways. The motor cannot be so heavy that it causes the entire design to be too heavy. However, the motor must be able to generate a high enough torque that cause the camera to move as needed while not consuming too much power as to keep at least thirty minutes of charge. All the motors that will be considered for the camera stabilizer will be investigated with regards to how they perform against the requirements stated previously. AC vs. DC Both AC and DC motors are very useful in their own right, however they can exhibit different characteristics in terms of the power output, torque and controllability that must be looked into. All motors have standardized motor dimensions established by the National Electrical Manufactures Association (NEMA). Based on these dimensions, industries that use motors have reported that DC motors have an advantage over AC motors in power out per unit frame as well as the torque output per unit frame. Having a better power output will contribute to optimizing the usage of the battery. Also, having more torque produced per unit frame will also only aide to insuring that the camera stabilizer can perform as required. 16 SENIOR DESIGN II – SUMMER 2014 – TEAM 3: Mizell, Pennock, Salih Power Density Comparisons of Motor Catalog Ratings RATED HP 500 400 300 200 100 0 180 210 250 280 320 360 400 NEMA FRAME DIAMETER AC DC Figure 6: Rated Horsepower, AC vs. DC Motors The camera stabilizer will not be expected to operate at very high speeds. Rather this device will be required more than often to function at slower speeds. Here another important distinction must be made between AC motors and DC motors. DC motors exhibit constant flux at very low speeds and because of that, DC motors will produce constant torque. AC motors however, cannot maintain constant flux at very low speeds and therefore will not be able to produce constant torque at very low speeds. Not having constant torque at very low speeds can only lead to unnecessarily complicating the control design. DC motors appear to satisfy all the requirements that are needed for the camera design in terms of power and torque and offer a simpler controller design then that of AC motors. Therefore DC motors will be chosen over AC motors moving forward. 3.2.1.1.1. DC Motors Brushed vs. Brushless Brushed motors have been the standard for motors historically for quite a while, however brushless motors started to immerge and dominate a good part of industry. A look into what distinguishes these types of motors as well as the pros and cons between brushed and brushless motors will be required to determine what would be more advantages to use in the design of the camera stabilizer. Brushed Motors Within the confines of a brushed DC motor there is the armature, commutator, and a permanent magnet [10]. The armature is made up of a set of wire coils that rotate and becomes an electromagnet with two poles. The commutator is a mechanical rotary switch that causes direction of electric current to be reversed about twice every cycle. When current starts to pass through the armature, the poles of the electromagnet will push and pull against permanent magnets. As the poles of the electromagnet pass the poles of the permanent magnet, the commuter steps in to 17 SENIOR DESIGN II – SUMMER 2014 – TEAM 3: Mizell, Pennock, Salih cause an instantaneous change in polarity. The inertia of the motor allows for the motor to move in the right direction during the polarity changes. The brushed motor has lots features that can prove to be very beneficial towards designing the camera stabilizer. Of the reasons is cost of the motor. Brushed motors are much more relatively cheaper than brushless motors. The first brushed motor acquired as research for this project was the RP3091 model that that was worth $2.91. Another important aspect to consider is the controllability of brushed DC motors. The motor control schemes of brushed motors are much simpler than that of brushless motors. As stated before in the discussion of AC vs. DC, having to worry about overly complicated control may prove to be time consuming and unnecessary for the scope of performance needed from the camera stabilizer. Brushed motors have also been found to have superior performance over brushless motors in more aggressive environments because they do not rely on electronics as much. This is very relevant considering the fact that the camera stabilizer will be expected to operate on a plane at high altitudes. Despite all the benefits discussed previously, careful consideration must also be taken into the cons of theses brushed motors as well. Many users have found that more than often the most troublesome part of the Brushed motors is the constant maintenance of the brushes. The constant contact between the brushes and the armature causes ware and tare of the components. In some instances there have been statements made by users of sparks generated in the motor caused by these brushes that leads to the motor catching fire and damaging the motor all together. Other cons to consider are that the internal rotor construction in most brushed motors do not allow for proper heat dissipation. Also, the torque production is limited at high speeds, which can be attributed to mechanical limitations of the brushes. The multiple issues attributed to the brushes are most alarming when the motor is expected to operate at very high speeds. The camera stabilizer will not be expected to run at very high speeds and therefore the maintenance issues with the brushes are not expected to arise with what is needed from this application. Brushless Motors Brushless motors are comprised of permanent magnet on the rotors, three phase driving coils on the stator and Hall Effect sensors [11]. Current passes through one phase of the driving coil at a time which will cause the rotor to turn. The Hall Effect sensor determines the position of the rotor and sends those signals to a motor driver that will determine which phase of the stator coils to pass current through. The outcome of this operation is a three phase synchronous motor [12]. Two brushless motors where acquired in the beginning stages of the research in order to learn more about their operations. One was the GWS 3000kV Inrunner 18 SENIOR DESIGN II – SUMMER 2014 – TEAM 3: Mizell, Pennock, Salih brushless motor and the other was the Turnigy D2826/10 1400kV Outrunner brushless motor. Figure 7: GWS 3000kV Inrunner Brushless DC Motor There are several reasons why brushless motors have become popular over brushed motors. One the most important reasons is the fact that brushless motors are much more efficient then brushed motors. Brushless motors have very good electronic communications, which can be attributed to the addition of the Hall Effect sensor. These sensors have higher accuracy in determining the position of the permanent magnet rotor. Signals are then sent from the Hall Effect sensors to the electronic drives. The drives can then determine which phase to pass current through in order to appropriately allow continuous movement of the rotor [13]. Figure 2 Turnigy D2826/10 1400kV Outrunner Motor Not being mechanically limited by the brushes also leads to several benefits as well. There is no voltage drop to account for in the brushes which increases the efficiency of the device and also the power output per frame size is much greater in brushless motors. This gives an advantage of limiting power consumption in order to allow the battery to last a minimum of 30-minutes on a single charge. Although selecting brushless motors may lead to better performance, the drawbacks also have to be weighed in. Once important factor is the cost. Brushless motors and their drivers do cost more than brushed motors would. In designing the 19 SENIOR DESIGN II – SUMMER 2014 – TEAM 3: Mizell, Pennock, Salih prototype, there are expected to be lots of trial and errors which may lead to constantly having to try different motors and using brushless motors may drive up the cost of this project if great caution isn’t taken into account. Also, the addition of the electronic devices causes the complexity of the controller. This is biggest dilemma with choosing the brushless motor as lots of time and effort will be delegated to control. If control is not properly design, the results can be very detrimental to performance of the camera stabilizer. Stepper Motors Stepper motors, often referred to as the baby of the motor family, are brushless DC motors that have a unique construct from other motors with respect to the rotor. The permanent magnets are placed on the rotor in a fashion that causes the rotor to be magnetized axially as opposed to most other motors that will have the rotor magnetized radially. Another unique feature about stepper motors is the fact it has a doubly salient design, in other words both the rotor and the stator have protruding structures or teeth. One advantage for using a stepper motor is that they are well known for giving very good position control. Also, stepper motors can hold their position once they are set through open loop constant current. This feature of the stepper motor can prove to be quite useful for the camera stabilizer. The stepper motor would be able to provide accuracy in keeping the camera within 1/8” of its desired position. Stepper motors do not require an encoder for position feedback. This results in having an inexpensive motor. Being able to meet the position accuracy requirements while maintaining simple control is very good advantage. The stepper motor have anywhere from 50 to 100 poles between the rotor and the stator. This high pole count leads to a generation of high torque for stepper motors at low speeds. At high speeds this leads to a significant loss of torque, however this can be overlooked since the camera stabilizer will not be operating at very high speeds. Thus far, the stepper motor has shown it is reliable in the sense that it can give high accuracy position control and generate a lot of torque while remaining relatively low cost and not adding complexity to the control. Though, despite these advantages, stepper motors have important drawbacks that must be addressed. In order to achieve the position accuracy that stepper motors are well known to have, they much have a constant current open loop scheme. Due to the high pole counts of the stepper motor, there will be a high volume of current exchange through the windings. This leads to a great deal of power being drawn from the battery. Since the design of the power system requires a battery that lasts for at least 30 minutes, unless a strong enough battery is used, the stepper motor may not be an optimal motor to use. 20 SENIOR DESIGN II – SUMMER 2014 – TEAM 3: Mizell, Pennock, Salih Figure 9: Stepper Motor Teeth Diagram (reprinted with permission) Another area of concern for stepper motors is the fact that they are very underdamped and can have resonance. If appropriate measures are not taken into account in the motor control design then any type of noise can increase into the system. The results from the increased noise cause stepper motors to behave sporadically and lead to poor position accuracy and jeopardize the video image stability. If the motor controller can prevent resonance to appear in the motor and the battery be designed in a way to support the constant current scheme of the stepper motor in a 30-minute interval, then stepper motor may very well be a sufficient motor to use the design of the camera stabilizer. Servomotors Servomotors are rotary actuators that are coupled with sensors. Servomotors do not necessarily distinguish themselves from other types of motors because of any changes in there fundamental operating principles. Rather what separates servomotors apart are how they are able to attain close loop control using servomechanism. Servomechanisms describe an error sensing negative feedback. The servomechanism uses an encoder for sensing feedback data to determine performance correction that is needed for a specific task. A servo will measure the difference between the encoder and the desired position and will draw the current needed to move accordingly. Unlike stepper motors, servomotors do not require a constant current scheme to operate. The control will only send current to a servomotor if it needs to move to a certain position or hold a load. This is significant in the sense that unlike stepper motors, there will not be a concern about a battery being constantly drained by the 21 SENIOR DESIGN II – SUMMER 2014 – TEAM 3: Mizell, Pennock, Salih motor. Therefore a servomotor shows that it can have an advantage with regards to being very efficient with power consumption. The first issue that may arise when looking at servomotors is the fact that they do not generate the same amount of torque as stepper motors do at low speeds. As discussed before, the camera stabilizer will be expected to perform at low speeds. There are more powerful servomotors, however they tend to be very heavy and may very well cause the camera stabilizer to be out of its required specifications for desired weight. Another area of concern for servomotors is the fact they require specialized circuit drivers for motor control. A tradeoff here occurs between stepper and servomotors. One can opt for a more accurate position control with servomotors but the complexity of motor controller will increase greatly over a stepper motor. Linear Actuator Linear Actuators are unique in the motor family due to the fact that rather than providing rotary motion, they have a linear motion of the rotor. Linear actuators are typically broken up into mechanical, hydraulic, pneumatic, piezoelectric and electromechanical actuators. The only type of linear actuator that will be considered for the camera stabilizer will be the electro-mechanical actuator. Linear actuators are typical comprised of a ball screw or rollers screw and an electric motor that moves the screw. The principle in the linear actuator design is that there is a concept of threads on lead screws that will become a ramp. A rotational force will be used to move a load in a linear direction in two directions based on whether there is clockwise or counterclockwise rotational force. The overall performance of a linear actuator appears to have some of the highest level of accuracy for motion, speed and force control. Linear actuators are available in brushed dc, stepper or servomotors. The operations that result from using linear actuators have shown to be very and quite. Looking from the standpoint of strictly controlling where the camera stabilizer needs to be, linear actuators have a good advantage of most of the motors on the market. One of the biggest disadvantages seen in most linear actuators is the simple fact that they are not very fast at all. In fact of the first linear actuators that were looked into for the camera stabilizer it would appear that even though there would be sufficient position control, the linear actuator would not be able to respond quickly enough to stabile the camera. The result from this would show in a poor quality of the video images taken. There are however linear actuators that exist in the market that would indeed appear to respond fast enough to be able to stabilize the video image taken by the camera. However the issue that will arise is that those linear actuators are very expensive. The camera stabilizer is not meant to exceed a budget of roughly $500 22 SENIOR DESIGN II – SUMMER 2014 – TEAM 3: Mizell, Pennock, Salih and a good high speed linear actuator can price well over $200 dollars. If a linear actuator is chosen for camera stabilizer, then enough research must be made to find a reasonable priced motor. Also great precaution must be taken with that motor as not to damage it in order to keep the project within the budget constraints. The last hurdle that must be overcome with choosing a linear actuator for the design of the camera stabilizer is implementation of these motors will require a high level of understanding of operation and troubleshooting. This is referring to the fact that there will be a level of complexity added to the motor controller needed for the linear actuator. 3.2.1.1.2. Motor Drivers The key component that will drive the control system’s design is the output system. The output system consists of a single mechanical motion system. But in addition to the actual motion system, a motor controller will be used. All motors require a controller. In its simplest form, a motor controller is used to turn on and off the motor. However their use can become more complex to include direction control, speed and torque regulation, and overload protection. Motor controllers become an essential component for precise closed loop precision control. Design of motor controllers varies significantly based on the type of motor used. There are two main criteria when designing the motor controller: the type of controlled motor compared to its ease of computational control. While there are many types of motors, the three prominent design choices, and therefore motor controller designs, are DC brushed, DC brushless, and DC stepper motors. In actuality, a complete motor controller includes the signal processor, drive circuits, and feedback sensors. Because of the design requirements of the project, the processor and feedback sensors will be discussed in detail separately. Brushed DC Motor Driver The first motor driver design to be considered is for brushed direct current (BDC) motors. Brushed motors are one of the easiest to control as their speed and torque are proportional to the applied voltage and current. However, because of the heavy rotor design, brushed motors require more inertial starting and stopping power. In addition, heat is generated on the windings and is difficult to dissipate. One advantage of BDC motors is that the commutation of windings is performed mechanically and therefore current switching is not required. However, because of this, BDC motors suffer a lot from wear on the commutator and brushes. [14] The purpose of the drive circuit is to vary the current within the windings of the motor. The current can be driven through analog control. However analog control requires the addition of variable resistance to the motor circuit. To obtain better efficiency, pulse-width modulation (PWM) will be used to vary the speed of the motor. Because the mechanical requires both positive and negative vertical compensation, the motor must be driven bi-directionally. To obtain this characteristic, the drive circuit must be designed in a half-bridge format. The circuit contains two half bridges (quadrant 1/quadrant 2 and quadrant 3/quadrant 4) that 23 SENIOR DESIGN II – SUMMER 2014 – TEAM 3: Mizell, Pennock, Salih allow current to flow in either direction of the motor winding. The circuit is shown in the figure 10 below. Figure 10: Brushed DC Motor Driver with Two Half-Bridges (reprinted with permission) By using this circuit design, four modes of operation can be achieved. The motor can be placed in a forward, reverse, coast, or brake mode of operation. By turning on a combination of the control inputs, the MOSFETs will pull one side of the motor to the supply voltage and one side to ground. The MOSFET combination for each mode of operation is shown in table 2 below. Action: Quadrant 1: Quadrant 2: Quadrant 3: Quadrant 4 Forward on off off on Reverse off on on off Coast off off off off Brake off on off on Table 2: Brushless DC Motor Driver Modes of Operation Using this circuit design, several other factors should be considered. It is noted that the diodes across each MOSFET helps protect each one from current spikes that are generated by back EMF. The diodes are only required when the MOSFETs’ internal diodes cannot sufficiently dissipate the back EMF current. The capacitors are optional as their purpose is to reduce any RF radiation that may be produced by commutator arching. Lastly, the final design consideration regards MOSFET biasing during unpredictable circuit input, such as controller initialization. If the MOSFETs on either half-bridge is turned on at the same time, a short will occur potentially damaging the MOSFETs and rendering the circuit useless. The pull-down resistors at each input will help alleviate this concern. The design team has the option to build a custom BDC motor drive circuit following this circuit topology. MOSFET choices would be dependent on the voltage range of the output 24 SENIOR DESIGN II – SUMMER 2014 – TEAM 3: Mizell, Pennock, Salih motor system. However, there are many predesigned circuit devices available that would accomplish this goal. One characteristic of BDC motor control that makes it useful is that the speed is directly proportional to the applied voltage of the motor. Using a PWM signal, an average voltage is obtained in the motor. The winding acts as a low pass filter, generating a stable current in the motor. The relation between the supply voltage, duty cycle, and average motor voltage is shown in equation 1 below. 𝑉𝑎𝑣𝑒𝑟𝑎𝑔𝑒 = 𝐷 ∗ 𝑉𝑠𝑢𝑝𝑝𝑙𝑦 Equation 1: BDC Motor Average Voltage Because of the relationship, the frequency of the PWM signal becomes an important consideration. Low frequencies cause noisy motors and sluggish responses. Extremely high frequencies diminish the system’s efficiency due to switching losses. Based on information researched, good modulation occurs with input waveforms in a frequency range of 4 kHz to 20 kHz. Following this rule of thumb, a PWM signal must be generated. One option is to use a microcontroller and toggle its output pin accordingly. However, with the components currently available, it is usually easier to select a microcontroller that contains dedicated PWM modules. Brushless DC Motor Driver Another viable motor driver design is for brushless DC motors. As the name suggests, brushless DC motors do not contain the brushes and commutator found within a brushed DC motor. As a result, brushless DC motors are usually faster, more efficient, and more reliable than their brushed counterparts. In addition, heat is much easier to remove and maintain. Because less inertia is required, it is easier to start and stop the motor. Brushless DC motors are also referred to as brushless permanent magnet, permanent magnet AC, and permanent magnet synchronous motors. The various names arise because brushless DC motors do not operate directly off a DC voltage source. Because brushless DC do not operate directly off DC sources, they are ideal for fixed-speed applications, but require complex control for variable speed and torque. Usually, most brushless DC motors use six-step commutation. Each step is located in position that is equivalent to sixty electrical degrees. The six steps make up 360 electrical degrees or one complete electrical revolution. In order to complete a revolution, all six steps must be properly sequenced. At any given time, only two windings in the motor are activated. One is driven positively and one is driven negatively. This commutation method is usually referred to as a trapezoidal commutation. Unlike the brushed DC motor, the stator position must be known in order to continue proper sequencing. This is performed through sensor and sensor less control. Sensor controls has Hall Effect sensors incorporated to provide appropriate feedback. The sensor system creates a more complex control system 25 SENIOR DESIGN II – SUMMER 2014 – TEAM 3: Mizell, Pennock, Salih and drives up the cost of brushless DC motors. The other control method used is sensorless control. [15] [16] Although the name would suggest that no feedback is required, sensorless control does in fact require position information to drive the motor. When the brushless DC motor rotates, each winding will generate back EMF that opposes the supplied voltage. Using this information is key to effective torque and speed control. DC Stepper Motor Driver The last motor driver design consideration is the stepper motor driver. Advantages of stepper motors include the brushless design that decreases maintenance, set speed regardless of load, open loop positioning, excellent response, and good holding torque. However stepper motors are generally noisy, and require holding torque even at rest. This causes a much higher power consumption and is not efficient for battery powered applications. Due to the design criteria, a bipolar stepper motor would be required. The basic circuit used to drive a bipolar stepper motor is two half-bridge circuits. In total eight control lines are sent to the driver circuit. However most available components use internal inverting circuits to compensate. If a predesigned full-bridge circuit driver is used, only four control inputs are used similar to the brushed DC motor design. [17] [18] Available Driver Devices If brushed DC or stepper motors are used the design team has several components options available. Microchip and Texas Instrument both contain viable components. Microchip supplies two full bridge drivers: the MTS2916A and the MTS62C19A. Texas Instruments supplies the DRV8834, DRV8833, and DRV8835. There are several options also available for brushless DC motor use. Texas Instrument and Microchip supplies several brushless DC motor drivers. After a short investigation, the design team narrowed the options: DRV8332-HT, DRV8313, DRV10866, MCP8063, MCP8024, and MTD6501C. The MTS2916A and MTS62C19A dual full-bridge motor drivers are 24-pin CMOS devices used for driving two windings of a stepper motor, or provide bidirectional control of two independent DC Motors. The load voltage supply range is 10V to 40V. The outputs can sustain 40V and deliver up to 750mA of continuous current. Current levels are controlled by internal PWM using two logic inputs, a current sense resistor, and a selectable reference voltage. Full, half, and micro-stepping operations are possible. Selectable output current limits are 0%, 33%, 67%, or 100%. The DRV8835 dual low-voltage half bridge IC is a 12-pin device for control of a single stepper motor, or two DC motors. Each half bridge has a 1.5A maximum current drive which can also be paralleled for a 3A drive. Motor operating range is 0V to 11V and the Logic Supply is 2V to 7V. The device uses either PWM or Phase/Enable interfaces. It features a low-power sleep mode of 95nA maximum current, and is packaged in a 2mm x 3mm space. 26 SENIOR DESIGN II – SUMMER 2014 – TEAM 3: Mizell, Pennock, Salih The DRV8834 Dual Bridge Stepper/DC Motor Driver is a 24-pin device. The output current is 1.5A continuous rating. The power supply voltage range is 2.5V to 10.8V. It has two control modes: the built-in indexer logic capable of up to 1/32-step microstepping and phase/enable with capabilities greater than 1/32 step-micro-stepping. In phase/enable mode, input pins control the direction of current flow through each H-bridge allowing PWM speed control of a DC motor, or enabling/disabling current in a stepper motor. Indexer mode allows simple step and direction interfacing for stepper motors. The DRV8825 Dual H-Bridge Motor Driver is a 16-in device. The output current is 1.5A or 500mA depending on the packing options. Both options allow for paralleled output current. The power supply voltage range is 2.7V to 10.8V. It features PWM current regulation. The current is controlled by a fixed-frequency PWM current regulation (current chopping). The DRV8332-HT Three Phase PWM Motor Driver is a 44-pin device produced by Texas Instruments. The operating supply voltage is up to 50V. In addition, the continuous current is up to 5A. It operates on a PWM frequency up to 500 kHz. It features self-protection circuits against under-voltage, over-temperature, overload, and short circuits. The device requires two power supplies, one at 12V and another up to 50V. The device has independent supply and ground pins for each half bridge, allowing possible current measurements via shunt resistors. The DRV8313 triple ½ half-bridge driver IC is a 28-pin device produced by Texas Instruments. The operating supply voltage range is 8V to 60V. It provides 2.5A maximum current drive at 24V. It contains a 3.3V 10mA built-in low drop-out (LDO) regulator. The device has the functionality for the use of low-side current sensing of each half H-Bridge. The device is primarily used to drive a single brushless DC motor but has the capacity to drive a BDC motor and one additional unipolar device. The DRV10866 5V three-phase, sensorless brushless DC motor driver is the last product choice provided by Texas Instruments. The input voltage range is 1.65V to 5.5V. It provides a 680 mA peak output current and runs in a 5 µA standby mode. It is developed for a back EMF control scheme. PWM inputs are allowed in the range of 15 kHz to 50 kHz. The MCP8063 three-phase brushless sinusoidal sensorless Motor Driver is an 8pin device produced by Microchip. It supports 180º sinusoidal drive and power supplies ranging between 2V to 14V. It requires no external tuning and speed control can be generated either using power supply modulation (PSM) or PWM signal. It generates a 23 kHz PWM output frequency. It also contains built-in overcurrent limitations and thermal shutdown protection. The device is optimized for notebook cooling fan systems, but also provides precision speed control in closed-loop applications. 27 SENIOR DESIGN II – SUMMER 2014 – TEAM 3: Mizell, Pennock, Salih The MCP8024 three-phase brushless DC motor gate driver with power module is a 40-pin device. Its peak output is 500mA at 12V. It contains three operational amplifiers used for motor phase current and position monitoring. Its operation voltage range is 6V to 40V. The device is capable of driving a three phase brushless DC motor, a comparator, voltage regulator, power monitoring system, over temperature sensor, and motor current monitoring system. The system uses PWM speed control using either fast decay (chop-chop) method or slow decay (chop-coast). The last device available through Microchip is the MTD6501C three-phase brushless DC sinusoidal sensorless fan motor driver. The device comes in either 8-pin or 10-pin packaging. It supports voltage power supplies between 2V and 14V. Speed control is achieved through Pulse Amplitude Modulation (PAM) or PWM. The device has maximum current outputs of 800mA and 500mA and PWM output frequencies of 23 kHz and 20 kHz for the 8-pin and 10-pin package, respectively. The device also features a frequency generator function, thermal shutdown, lockup protection and automatic restart, and a boost mode. An alternative option to designing a custom controller circuit is to purchase an electronic speed controller (ESC). ESC are available for both brushed and brushless motors; however, they are generally purposed for brushless DC motors as they mitigate the complexity of brushless DC motor control. ESC devices are usually found on hobby models such as radio controlled cars and aerial vehicles. Many ESC provide the hobbyist the ability for programmable modes to mimic coasting, acceleration, and direction reversal. The ESC controls motor velocity by varying the amount of time the motor is on and off. Regarding brushless DC motors, the ESC performs the necessary phase inversions to maintain a rotating motor. This greatly simplifies the complexity of the project’s motor control system. Most ESC incorporate a battery eliminator circuit which eliminate the need for a power supply for motor output and a power supply for the circuit functionality. While the ESC simplifies the circuitry required, it limits the design versatility of a custom built control circuit. Usually ESC are designed by manufacturers for their specific motor brand. In addition, a unique ESC is usually needed for different rated motors. To diminish the amount of required programming required by the hobbyist, only a few operating conditions can be modified. The ESC may be useful in design its corresponding hobbyist brushless DC motor can be found. Otherwise, a custom controller circuit should be created. The design team has many choices regarding the motor driver. Therefore it is best to determine which driver criteria are most fundamental to the decision of the project design. First and foremost, the type of driver circuit required will depend on the motor decision. Each type of motor requires a different method of driving power. Once the type of motor is chosen, a comparison of the products previously listed can be performed. 28 SENIOR DESIGN II – SUMMER 2014 – TEAM 3: Mizell, Pennock, Salih 3.2.1.2. Input System 3.2.1.2.1. IMU Polysilicon micromachined MEMS (microelectromechanical system) analog and digital accelerometers have been in production were invented in 1999 [19], and have been highly desirable for the industry for their reliability, survival to high g conditions (in excess of 10,000 g), favorable range of operation temperatures, linear acceleration-to-output-voltage behavior, and low cost of production. The automobile and aircraft industries were first to implement large volume use of polysilicon micromachined MEMS accelerometers. Figure 11: Accelerometer Structure (reprinted with permission) The theory behind MEMES accelerometers is pretty simple. There is a rigid structure known as the test mass, with known inertial properties. The test mass is suspended by a springs of equal and controlled spring constant. Attached to the test mass are ‘whiskers’ that branch out in a perpendicular fashion and are accompanied with carefully aligned external whiskers attached to a common base. The base whiskers and test mass whiskers form capacitive plates. When the test mass moves in one direction, the effective capacitive area will increase in the direction of acceleration, while the effective capacitive area will decrease in the direction away from the acceleration. This changing of capacitance is called a differential capacitor. Figure 12: Model of Unbalanced Differential Capacitor Figure 12 is a model of the differential capacitor set-up found in accelerometers. The positive x-axis capacitor plates (C2) will have a zero-phase square wave 29 SENIOR DESIGN II – SUMMER 2014 – TEAM 3: Mizell, Pennock, Salih passing through it (coupled with a resistor), while the negative x-axis capacitor plates (C1) will have a 180°-phase square wave passing through it. Then the signals are demodulated (phase-sensitive), amplified, rectified, summed, and measured. The phase-sensitive demodulation filters out the first half of the square wave and last half of the square wave, delays the first half, and sums the demodulated signals. The model only provides the amplification and summing of the output signal. Figure 13: Output of Unbalanced Differential Capacitor If the accelerometer is moving in the negative x-axis, then the test mass will move toward the negative x-axis, thus C1’s effective capacitive area will increase while C2’s effective capacitive area will decrease. C2 will allow have less impedance while C1 will have greater impedance, thus the first half of the summed wave will have greater signal energy and the last half of the summed wave will have less signal energy, as seen in figure 13. Then the signal is demodulated and amplified. The model does not provide the demodulation and amplification is due to initial voltage. In a MEMS accelerometer, the voltage passed through the differential capacitor is in the millivolt range, thus amplification is needed for the final output. Figure 14: Output of Balanced Differential Capacitor If the accelerometer is in freefall then the test mass is at rest and the effective capacitance area of both plates (C1 and C2) are equal. Since there is equal capacitance, the impedance is the equal, and the differential capacitor is balanced. 30 SENIOR DESIGN II – SUMMER 2014 – TEAM 3: Mizell, Pennock, Salih Thus, the first half and last half of the square wave have equal signal energy, as seen in figure 14. MEMS Gyroscopes Another important factor in determining the motion of an object is radial velocity. From classical mechanics, radial velocity is the speed at which an object rotates around an observed axis, usually measured in radians per second or degrees per second. Being able to measure the angular velocity of the frame of the camera stabilizer is important because image blur is highly likely when large radial velocity figures are applied to the body of the camera, and image blur is the largest reason for an unsteady shot. Most modern MEMS-based gyroscopes are designed around the idea of the Coriolis vibratory gyroscope (CVG), a term coined and standardized by the IEEE. Method of Operation The CVG primarily uses measurements of the Coriolis force as means to measure radial velocity. The CVG also uses a double test mass setup known as the ‘tuning fork configuration’. In the tuning fork configuration, the two equal-valued test masses are tethered together with a spring (with a known spring constant). The two test masses are never at rest and constantly oscillate in opposite directions, as seen by a reference point found at the center of inertia of the system. ⃗⃗ × 𝒗 ⃗𝑭𝐶𝑜𝑟𝑖𝑜𝑙𝑖𝑠 = −2𝑚𝜴 ⃗ Equation 2: Coriolis Force Figure 15: Coriolis Force on Tuning Fork Gyroscope (reprinted with permission) Since the test masses are moving at nearly constant speeds, the linear velocity vector for equation 2 is known. When the system rotates about the center of mass is a z-wise direction (as seen in figure 15), a Coriolis force is produced. The Coriolis force is measured in a similar manner found in the accelerometer; a square wave pulse in sent through a differential capacitor where one set of plates is attached to the side of the test mass. Since the Coriolis forces and linear velocity is known, the analog signals can be converted to digital information, sent through a specialized on-board arithmetic logic unit (ALU), and sent out of the gyroscope module to be used for information processing. 31 SENIOR DESIGN II – SUMMER 2014 – TEAM 3: Mizell, Pennock, Salih Inertial Measurement Units Luckily, due to the similar technologies and micromachining techniques needed to produce MEMS-based accelerometers and gyroscopes, many manufacturers provide packages that provide both acceleration and radial velocity output. Such packages are called inertial measurement units (IMU). Popular and low-cost manufacturers of IMUs include Analog Devices and InvenSense. Analog VS Digital IMU There are two methods of using the output of the IMU to the microcontroller (MCU): Using an analog-output IMU and using an analog-to-digital (ADC) converter on the MCU. Using a digital IMU and find an MCU that can accompany the same digital format. Analog IMU: PROS: Easy to start reading information from the ADC ports of the IMU. Cheap. Small package footprint. CONS: Will have a slower sampling rate as compared to digital IMUs. Power hungry. Lower resolution of data compared to digital IMU. Slow sampling rate. Digital IMU: PROS: Will communicate with any devices that share the same digital format. Again, cheap. Higher resolution of data compared to analog IMUs. Power efficient compared to analog IMUs. Small package footprint. CONS: Having to learn to use the MCU to access the IMU’s data and functions. Most inexpensive IMUs use either I2C or SPI digital communication formats due to their availability to share multiple master and slave devices on just two wires. This will greatly simplify the printed circuit board (PCB) design and decrease the number of pins needed in the MCU. MPU-6050 by InvenSense The camera stabilizer will need to have quick and accurate access to the IMU output, thus, it seems logical to go with a digital IMU package. The MPU-6050 offers programmable three-axis acceleration, three-axis radial velocity, as well as thermal information; thus this package is referred to as a six-axis IMU. 32 SENIOR DESIGN II – SUMMER 2014 – TEAM 3: Mizell, Pennock, Salih Gyro Full Scale Gyro Sensitivity Accel Full Scale Accel Range Range (g) Sensitivity (LSB/degrees/second) (degrees/second) (LSB/g) ±250 131 ±2 16384 ±500 65.5 ±4 8192 ±1000 32.8 ±8 4096 ±2000 16.4 ±16 2048 Table 3: MPU-6050 Characteristics [20] The MPU-6050 uses I2C digital output, logic voltage supply of 1.8±5% or the master MCU VDD level, operating voltage range of 2.375 – 2.46 DCV, and has a small package size of 4x4x0.9 mm. We chose the MPU-6050 due to its low-cost, I2C digital output speed, range of accelerations available are within range of a plane’s designed acceleration load (roughly 3.8g), small footprint, and the device is very well-documented. The IMU-6050 is found in many handheld devices such as smartphones and tablets, and incorporates an inner logic called Digital Motion Processing (DMP). The DMP logic is used so that the processor automatically outputs computed three-dimensional position, velocity, and acceleration outputs rather than the 6axis output of the accelerometers and gyros. Unfortunately DMP is easily accessible with the $600 MPU-6050 development board and software, which is out of the design team’s budget; we hope to be able to reverse engineer the DMP system by exploring how the MPU-6050’s DMP registers change with change of input. Elsewise, we can calculate the same data using the MCU. Measuring g-Force The team needs to design, build, calibrate, measure, record, and analyze possible ranges of g-force. Luckily this will give the team the ability to perform essential design research for the instrumentation system implemented in the HCS. The team will test different accelerometers for their accuracy, performance, and general usage fitness and appropriateness. Due to the cost of flying a personal aircraft, the design team cannot perform direct acceleration measurements in the actual plane. Thus, the team needs to be able to simulate similar conditions in a low-cost fashion. It has been proposed by Professor Michael Young that measuring g-force while holding an accelerometer unit on bumpy dirt roads at slow speeds is adequate for simulation of normal turbulence in a passenger plane. The team will perform this g-force testing in the semester of Senior Design I. 33 SENIOR DESIGN II – SUMMER 2014 – TEAM 3: Mizell, Pennock, Salih The ‘Brick Road Test’ will be presented in the Project Quality Plan section of this document. 3.2.1.2.2. Hardware Sensors In order to obtain reliable and efficient results, data measurements are usually required. Based on the expected output performance, data feedback will definitely be required to complete the design project. The feedback can be broadly categorized into two parts: the hardware feedback system that will control the mechanical performance of the project, and the electronic monitoring system that will be used to control any processes required by the internal electronic circuitry. Regarding the mechanical input sensor system, probably the most crucial component is the inertial measurement unit. The main expected external forces that act on the system will be in the form of vertical accelerations. However for reliability and safety purpose, other sensor devices must be incorporated into the final design. The most significant system that must be properly sensed is the motor output system. It is absolutely necessary to obtain proper feedback regarding the motor’s status. There are several methods that can be incorporated to obtain motor information. The motor’s rotational position, speed, current, back EMF, direction can all be evaluated. In order to generate a closed-loop motor system, at least one of these sensor systems must be investigated and implemented. For more reliability and precision performance, more sensors could be incorporated into the motor control; however, with each additional sensor, the complexity of the entire control system increases. It is important to evaluate the effectiveness of each of the sensor types listed above. Hall Effect Sensors One possible method to determine motor data is to use Hall Effect sensors. The Hall Effect sensor is a transducer which varies output voltage based on the corresponding magnetic field. For the purpose of motor control, the sensors are generally implemented inside the motor housing itself. The magnetic sensors determine the amount of current that can applied to the motor coils resulting in rotation. When choosing the appropriate Hall Effect sensor, several characteristics must be evaluated including the sensors’ sensitivity, repeatability, temperature stability, and response time [21]. The sensitivity of the sensors effect the air gap placement-effectively how far the sensors can be placed away from the motor. Sensor repeatability is directly related to the sensor’s latching time. When the magnet in the motor rotates passes the sensor, repeatability helps determine how well the sensor changes its input state at the exact same angular position. Stability also determines how much the angular position changes but in response to temperature and temperature. Lastly the response time corresponds to the time it takes for the sensor to change state. Faster response time provides greater motor commutating efficiency. While all of these conditions can greatly affect the efficiency of brushless DC motors, the design team is primarily interested in the repeatability response time. Based on initial considerations, it is believed that the 34 SENIOR DESIGN II – SUMMER 2014 – TEAM 3: Mizell, Pennock, Salih voltages and temperature of the system will not reach levels that greatly affect the sensors. One of the primary concerns of the design team is the physical implementation of a Hall Effect sensor in a brushless DC motor. The design team would either have to find a brushless DC motor that already has a Hall Effect sensor incorporated into it or design its own motor mounting for the sensor. While there are some brushless DC motors that contain Hall Effect sensors, the cost of the motor is much higher than its non-sensored counterpart. While building a Hall Effect sensor board and adapter is relatively easy to produce, the sensor board sensitivity must be brought into consideration. As stated previously, the design team would like to mitigate this problem by having a Hall Effect sensor built into the motor and therefore closer to the motor magnet. Because of this issue, it is highly probable that the design team will not use Hall Effect sensors. If brushless DC motors are used, back EMF readings will likely be used. Optical Encoders Another option to obtain motor data is the use of rotary encoders. Rotary encoders are sensor devices that convert the angular position of a shaft or axle into useable analog or digital signals. Two main types of encoders are produced: absolute and relative encoders. The outputs of absolute encoders establish the current shaft position, making them ideal for angle data. Relative encoders provide shaft motion information. This data can be further manipulated into information for speed and position. Absolute encoders continuously generate digital signals indicate their current position, which can be obtained even when power is turned off. Relative encoders only pulse when the shaft is turned. In order for the sensor to work properly, an initial time must be set. All future pulses are then counted against the elapsing time. [22] Potentiometer One of the simplest data methods that could be implemented are potentiometers. They can be incorporated into the turning shaft of the system. As the system rotates, the potentiometer also rotates. The design team can use the variable voltage output to determine the current potentiometer position. Because the rotation of the sensor will be directly related to the system’s rotation, the motor’s position can be inferred. The control of the sensor would be extremely simplistic. However one of the major drawbacks of potentiometers is the potential for slippage. Once the sensor’s shaft has slipped, it becomes incredibly difficult to tune the output control as the motor has lost its reference point. Another hindrance is the physical size of the potentiometer. Because of size constraints it will become very problematic to properly mount the potentiometer onto the motor shaft. Because of the lack of accuracy, size, and possibility of slippage, it is highly improbable that the design team will use potentiometers for motor feedback. 35 SENIOR DESIGN II – SUMMER 2014 – TEAM 3: Mizell, Pennock, Salih 3.2.1.3. Controller 3.2.1.3.1. Microprocessors The last major component of the control system is the microcontroller. As previously mentioned, a complete motor controller requires the motor driver output, feedback input, and a controller. Because of this, a clear distinction should be made. The microcontroller will have two main purposes: motor control and system control. If possible, the design team would also like the microcontroller to regulate any required power monitoring. Each of these tasked objectives can theoretically be separate electronic circuits. However because of cost and physical space constraints, the microcontroller will be tasked with as many of the control objectives as possible. When choosing a microcontroller, the design team will try to find an available product that is capable of handling “worst case” computation scenarios. In other words, the product must be able to realistically handle all the project control in reasonable functionality time. If tasks are chosen to be mitigated to other components, this will only improve the product’s performance. To begin research into available microcontrollers, the design team began by evaluating the required amount of inputs and outputs in the project design. To do this, the design team chose to assume the “maximum” amount of data lines required. The design team decided that a maximum of three motors would be used. Depending on the control used, the maximum amount of output channels required for the motors would be eighteen. This is under the assumption that all motors are brushless DC which at most require two controls for each of its three phases. With the output amount determined, the design team had to realize how many input channels were required. The MCU-6050 inertial measurement unit will definitely be used. The unit transmits unique data for its accelerometer and gyroscopic sensor. If the acceleration and rotation is measured on all three axes, a maximum of six inputs are required for the inertial measurement unit alone. As previously stated, the design team will focus on compensation of the tilt and roll motors. If quadrature encoders are used, each of the motors will require two inputs for position sensing. As the pan motor will be manually driven, its position feedback is non-essential as the other motors. The design team can use a single current input to correlate its velocity direction. During prototyping, the design team can use a “brute force” method and just test the motor at different values to find an acceptable speed at which the motor rotates. However, to prevent component breakdown, two limit switches will be used to the pan rotation within approximately 120°. Recounting these requirements, the system will require thirteen inputs to mechanically function. This does not include inputs required for the power monitoring system. Overall, the mechanical control will need 31 data lines. Because of this reason, it will be highly probable that the design team will only implement the mechanical control through the microprocessor. Either a separate processor will be dedicated to the power monitoring system, or it will be performed through analog circuit design. 36 SENIOR DESIGN II – SUMMER 2014 – TEAM 3: Mizell, Pennock, Salih Other than having a large amount of IO lines, the microcontroller must also be able to meet other specifications. The most important factor that also has to be considered is the processor’s computational performance. By maintaining an acceptable performance, the control response of the motor output will be maximized. This is essential for the rotational compensation required in the gimbal system. It has to be power efficient due to the size constraints of the battery. Because of the operating voltage range of the motors, it is preferential for the microcontroller to be able to provide output voltages of 5v to 7.5v. In addition it must Available Components The design team researched several initial components that could be used for the microprocessor. Each component was investigated because the design team was previously aware of development kits that had the devices as their main processor. This would allow for easy testing and evaluation of the components. The initial components were the ATmega2560, ATmega328, MSP430G2553, and MSP430G2333. The table 4 provides a quick comparison of specifications the design team researched on each component. Architecture (bits) Frequency (MHz) Max Operating Voltage (V) Program Memory (KB) RAM (KB) USART / SPI I2C I/O Pins Analog to Digital Convertors Development Board ATmega2560 ATmega328 MSP430G2553 MSP430G2333 8 8 16 16 16 20 16 16 5.5 5.5 3.6 3.6 256 32 16 4 8 4/5 1 86 2 1/1 1 23 0.5 1 1 24 0.25 4/3 3 140 16- 10bit 8- 10bit 8- 10bit 8- 10bit Arduino Mega Arduino Uno EEL4750 Kit Launchpad Table 4: Possible Processors For testing purposes, the design team chose to work with the ATmega2560. Several members had an Arduino Mega development board and therefore the most work could be collectively produced using this development board. It provided acceptable PWM control of servos and 5v brushed motors. However the ATmega2560 will not be used for the final design as the design team wanted to 37 SENIOR DESIGN II – SUMMER 2014 – TEAM 3: Mizell, Pennock, Salih maintain a 16-bit architecture that would allow the best data resolution provided by the MPU-6050 inertial measurement unit. The design team soon found that none of the processors would provide the performance to execute the project control. Upon suggestion from Professor Michael Young, George Mason University, the design team investigated Microchip’s PIC controllers. Members of the design team were familiar with programming PIC controllers. Because of this familiarity, the design team focused on an acceptable Microchip product. Microchip’s website had provided documentation and recommended products for motor control. Because advanced closed loop control will be required, the design team chose to research Microchip’s dsPIC33E family of digital signal controllers. The family is energy efficient, incredibly powerful, and contains high performing peripherals. In addition, Microchip provides a vast amount of documentation including complete user manuals, software libraries, and application notes of motor control. 3.2.1.4. Control Theory & Application The following experiments in control theory use only the MPU-6050 accelerometer data from the ‘Brick Road Trials’ that was previous discussed. Since the team has not built any stabilizer yet, feedback cannot be used to measure the performance of such control methods. Rather, the following experiments are used to smooth out any extreme changes in the sensor data acquisition and to give an idea or clue as to what effect and to what scale the following methods may be used. This is a practice in control simulation, and not control itself. 3.2.1.4.1. PID Due to the troubleshooting involved with tuning a PID controller, the team will most likely employ a PID if all other methods fail or heavy use of brushless DC motors are used. 3.2.1.4.2. Rolling Average The rolling average method is very similar to discrete convolution, except that the sums of the ‘rolling window’ are divided by the number of elements that are examined within the rolling window. The data used in the following experiments will be the magnitude of acceleration of each trial. The number of samples used for the rolling window width will be 1 (raw data), 2, 5, 10, 20, 50, 100, and 500 samples. Each sample represents roughly 2 ms of acceleration data. 38 SENIOR DESIGN II – SUMMER 2014 – TEAM 3: Mizell, Pennock, Salih Figure 16: Rolling Filter, Brick Road Trials 1 & 2 The operation of a rolling filter is very simple, it takes the current value, and calculates the average from n-amount of previous samples (1, 2, 5, 10, 20 samples) for a given causal signal. Every time the amount of samples in the rolling filter are increased, the output loses signal quality versus the raw output. As seen from figure 16, signal characteristics are mostly maintained for sampling sizes between 2 and 5 samples; from 10 to ever-increasing sampling sizes, the filtered data becomes ‘flattened’ or dampened. Thus, there is a bit of an art to selecting an appropriate sampling size so as to lose the major swings or noise in the signal, but to also maintain or keep the characteristics to be studied or used. As a side not, rolling averages is a reliable tool and a common practice found in future stock price estimation (acausal rolling filter) and as a business trendfollowing indicator [23]. This aspect seems relevant to the HCS research because of the bounded nature of a random output, such as item pricing and acceleration measurements. Figure 17: Rolling Filter, Brick Road Trials 3 & 4 39 SENIOR DESIGN II – SUMMER 2014 – TEAM 3: Mizell, Pennock, Salih Figure 18: Rolling Filter, Brick Road Trials 5 & 6 Lastly, one consideration in the importance of choosing a lower sampling size rather than a larger sampling size is an increase in decision speed and decrease in processing time. This is important to reduce lag in the feedback and control system. 3.2.1.4.3. Value Binning Lastly, another form of data manipulation and control is value binning. Value binning is very simple; the degree at which values can change is place into possible ranges. For the MPU-6050, all data values range from +65,536 to -65,535, but rather a resolution of one unit (bit), one could lower the resolution so that two, four, eight, … bits are represented as one unit. 3.2.2. Power There are several ways energy can be harnessed in order to properly perform any type of function. Power can be extracted from either power electronic devices, DC power supplies or AC power supply. Although both DC and AC power supplies are very powerful and capable of providing more than enough power to support the camera stabilizer, they are not very practical for what is needed from the specifications. Both AC power supplies and DC power supplies are very bulky and very heavy. Due to the fact that the design requires a lightweight and portable device, these requirements cannot be achieved through the use of large power supplies. Another point to emphasis is the cost of AC power supplies and DC power supplies. As stated before, it is very important to remain within the budget of $500 that was set for building this device. Using an AC or DC power supply will immediately cause the cost to produce the camera device to more than double the intended budget. Batteries on the other hand are a very practical alternative. They are very lightweight, allowing for easy portability and not causing the camera stabilizer to be overweight. Also, most commercial batteries on the market are very reasonability priced. Most batteries however, do have one very distinct draw back 40 SENIOR DESIGN II – SUMMER 2014 – TEAM 3: Mizell, Pennock, Salih that can make them inferior to AC and DC power supplies. That simply is the power output. This being the very purpose for their use means that careful consideration must be taken in choosing which battery will be used. The ideal battery used for camera stabilizer would be optimized with respect to the lifetime of the battery, power output and cost. One very important distinction that must be made about choosing the battery is knowing to go with either a rechargeable battery or a non-rechargeable battery. Both options come with their advantages and disadvantages that will need to be weight in order to make a sound decision on what would be best for the camera stabilizer. 3.2.2.1. Batteries 3.2.2.1.1. Non-Rechargeable Non-rechargeable batteries are well known to have a much longer shelf life than that of the rechargeable batteries. Meaning that two comparable batteries are used for the same application, the non-rechargeable battery will be able to provide power to the application for a longer period of time than that of rechargeable battery. This type of battery would appear to aide in insuring the device meets the specifications of at least 30 minutes of power supply. A second point of advantage for non-rechargeable batteries over rechargeable batteries is the fact that non-rechargeable batteries cost less. This something that will not only help in keeping the budget down for the project but it also may be a point of interest for the user. Since the shelf life is very good on non-rechargeable batteries, the user isn’t expected to have to replace the batteries to often but even when it comes time to replace the batteries, there won’t be financial burden since the price of the battery is very low. 3.2.2.1.2. Rechargeable Although non-rechargeable batteries have a longer shelf life the rechargeable batteries, rechargeable batteries will last longer. This simply means that the user will be able to recharge the power supply and continue operating the device, rather than having to always purchase new batteries then the charge is depleted. This leads up to the following point that even though non-rechargeable batteries cost much less the rechargeable batteries, the rechargeable batteries are more cost efficient. Because of the fact that rechargeable batteries will last longer, than then means the user will not buy as much batteries in a time frame and therefore this becomes cost efficient. The primary factor that will lead in deciding which type of two batteries to use for the camera stabilizer will be the devices power requirements. If it is determined that there will be a high drain generated by the camera stabilizer then it would be more optimal to use a non-rechargeable battery. 41 SENIOR DESIGN II – SUMMER 2014 – TEAM 3: Mizell, Pennock, Salih Another thing to consider other than whether the battery is chargeable or nonrechargeable, is the type of battery. There are quite a few batteries to choose from, however only batteries that may seem applicable to the camera stabilizer will be considered. 3.2.2.1.3. Lithium Ion Lithium-ion batteries are of the most well-known rechargeable batteries in the market. The overwhelming majority of consumer electronics as well as an emerging electrical car market have turned to these batteries as their source for power generation. A typical lithium-ion battery has a cathode, positive electrode and an anode negative electrode. The cathode is made of a metal oxide and the anode is made of carbon or graphite. A lithium ion battery also has an electrolyte transport medium that is needed for the lithium ion to flow freely. The electrolyte is made of an organic solvent and also has layer called the separator used to prevent a short circuit within the battery. The electrical current is able to reach the batteries due to the conductive surfaces like aluminum and copper. Lithium ions are stored in the anode and when battery is discharged, Lithium ion passes through use the electrolyte to pass the separator and reach the cathode. The operation is reversed when the battery is charging. One of the biggest advantages of using a lithium-ion a battery source for the camera stabilizer would be because these batteries are very well known for the fact that they run on a single charge for a very long period of time compared to other battery alternatives. This is due to the fact that lithium-ion batteries have very low self-discharge rates. Lithium Ion batteries will lose roughly 2 percent of its charge in a month. The primary task of the battery is being able to support enough power to last at least 30 minutes. This is a task that given the lithium ion battery, given that the proper selection and measurements are made, should be able to achieve. Another significant advantage found in using Lithium-ion battery is the fact that they are very lightweight in comparison the majority of alternative batteries available in the market. Although they may be lightweight, lithium ion batteries do not fall short to other batteries with respect to energy density. In fact they can store as much as 150 watt-hours of energy in 1 kilogram. This makes lithium-ion batteries superior to other batteries in terms of the energy per unit of gram. Unfortunately, as good as this battery is, it has significant drawbacks that come with it. Firstly is that the battery doesn’t have a relatively good lifespan. It ages very quickly when stored. To limit this affect, the battery needs to be around 40% charged and in a very cold environment. This is an unpractical scenario to expect a user to perform in order to optimize the battery lifetime. Another inconvenient that may arise from choosing lithium ion batteries is the fact that they do not come 42 SENIOR DESIGN II – SUMMER 2014 – TEAM 3: Mizell, Pennock, Salih in standard cell sizes, unlike traditional alkaline batteries that come in AA, AAA, etc [24]. The lithium ion battery is designed to fit a specific device when it is manufactured. This leads into the fact that lithium ion batteries are more expensive than the alternative batteries that would be considered for the camera stabilizer. A final point to bring up is unfortunately a safety concern due to the fact that Lithium ions are not as durable as other forms of batteries. A Lithium ion batteries may be unsound and will need a power circuit to keep it safe. The power circuit limits peak voltage when charge and limits the voltage drop from getting too low during discharge. There have been report of lithium ions being very and can even explode if not used properly. If indeed a lithium ion battery is choose, careful consideration into that specific batteries history must be made in order to prevent any serious problems that may arise from the battery. 3.2.2.1.4. Lithium Ion Polymer This class of battery was released around 1997, and they differ from a typical lithium ion battery due to the material of the used as the separator. The electrolyte in a lithium ion poly is a gel type material made up of a micro-porous polymer. The electrolyte gel is a catalyst which limits the energy barrier in reaction between the cathode and anode. The reduced energy barrier will allow for an increase in the energy density of the battery up to 30% compared with a regular lithium ion battery [25]. Also, this battery is the most lightweight of all the battery types that will be discussed and can be manufactured in any form to fit any particular design. This will aide in insuring that the camera stabilizer be as lightweight as possible and also gives added room in designing the handle of the device that will house the battery along with other components. The primary drawback to getting the lightweight and flexibility that comes with choosing a lithium ion polymer is the simple fact that it will most likely be the most expensive of all the battery options that will be presented. It also shares the same disadvantage of the regular lithium ion battery in terms of the battery being potentially hazardous due to explosions. However the lithium ion polymer battery is safer than a regular lithium ion battery due to it being more resistant to overcharge and less prone to electrolyte leakage. 3.2.2.1.5. Nickel Metal Hydride NiMH (Nickel-metal hydride) batteries have been historically the most common rechargeable batteries in the market as they have been readily available since 1989 for consumer products. In 2010, 22% of rechargeable batteries sold in Japan were NiMH. Similarly in Switzerland 60% of the sold rechargeable batteries were NiMH. NiMH batteries have similar constructs to their predecessor, NiCD (nickelcadmium cell). The cathode is made up of nickel oxyhydroxide (NiOOH) and a 43 SENIOR DESIGN II – SUMMER 2014 – TEAM 3: Mizell, Pennock, Salih hydrogen absorbing alloy as an anode. The electrolyte is made of a potassium hydroxide. Of the many advantages found in selecting NiMH batteries as a battery is that they are available in various sizes such as AAA, AA, C, and etc. This will lead to an easier design scheme with regards to the handle grip of the camera stabilizer that will house the battery. This is also very convenient for the user as if and when they need to replace their battery, it would be relatively easy to find a replacement compared to a Lithium ion battery. Modern NiMH batteries have made huge progress in terms of the energy density they hold. The energy density of NiMH can approach 300 watt hour per length which equates to about 1000 MJ/m3 of energy. That type of energy density is almost of that of the lithium ion cells. Another thing to consider is of course the cost of these batteries. NiMH batteries cost a lot less then lithium ion batters. This is very especially important for the user considering that they would not have to worry about overpriced maintenance cost caused by replacing the battery. One of the most significant drawbacks that can be attested to using NiMH batteries as a power source are the problems with the self-discharge rates. NiMH batteries are historically known for having very high self-discharge rates. About 4% of their charge can be lost per day of storage. There is a type of NiMH battery known as LSD NiMH, this stands for low selfdischarge NiMH batteries that was introduced around 2005. These batteries give an astonishing rate of about 1.25% on a monthly basis compared to lithium ion batteries which would give at best a 4% monthly self-discharge rate. The one drawback with using the LSD NiMH batteries is that they will have less energy density when compared to both lithium ion batteries and regular NiMH batteries. 3.2.2.1.6. Alkaline Alkaline batteries, since the early 1900’s have been of the most well-known batteries known to the average consumer. These batteries take up about 80% of the United States battery market, 60% in the United Kingdoms and 47% for the European Union. Alkaline batteries are comprised of a zinc negative electrode and a positive electrode made up of manganese dioxide. The electrolyte is made up of potassium hydroxide. Unlike most other batteries, when an alkaline battery discharges, only the cathode and anode are consumed, meaning that the electrolyte is not part of the reaction. The main advantages alkaline batteries have over most other batteries like NiMH batteries is their discharge rates and also they are of the most inexpensive of all battery types that are most commonly used by average consumers. However these 44 SENIOR DESIGN II – SUMMER 2014 – TEAM 3: Mizell, Pennock, Salih alkaline batteries due have quite a few number of disadvantages as well. Of these disadvantages is their very low energy capacity. If the device was a very current device that was being used then the obvious choose from the list of batteries to use would have been the alkaline battery. However, the camera stabilizer will be considered as a high current drain device. Another even more concerning issue with these batteries is the fact that they can leak potassium hydroxide. The leaks can be due to a number of reasons that can be attributed to either attempting to recharge disposable alkaline batteries, mixing various brands of batteries and other conditions as well. When an alkaline battery starts to leak, the corrosion will spread and cause oxidation of the electronic components and ultimately damages the circuitry. This obviously, is something that must be avoided as to not damage the camera stabilizer. 3.2.2.2. Battery Monitoring Another important feature and customer specification is the “Power-ON” green LED and the “Power-LOW” red LED, intended on letting the user know the current condition of the battery and mode of operation. The design team researched two methods of power monitoring: using analog comparators or using the HCS’s processor for battery monitoring. Considerations for the analog battery monitoring system include power consumption, complexity of design, component sensitivity, and voltage reference isolation. If the analog battery monitoring system is implemented, then the LM741C comparator will be used in respect of Bob Widlar, inventor of the LM741 op-amp, analog IC pioneer, and all-around crazy guy [26]. Below is a rough sketch of the intended analog power monitoring system. Figure 19: Analog Battery Monitoring System As seen in figure 19 above, the analog battery monitoring system has many analog components: the LM741C comparator, a voltage regulator, optocoupler for voltage isolation, NPN bipolar junction transistor, a green LED, a red LED, the battery, and many jelly bean parts (resistors and capacitors). This system will add more space 45 SENIOR DESIGN II – SUMMER 2014 – TEAM 3: Mizell, Pennock, Salih to the PCB, and more than likely will draw a lot of power to properly function. Another downside to this design is that the voltage regulator and reference resistor (Rref) will need to be precision parts. Any unbalance in the voltage reference section may cause the LM741C’s output to drop from high to low, due to its typical input voltage offset of 2mV [27]. Other design details include the need for a blinking red LED when the battery’s power is low. Professor Young requested that the blinking rate of the red LED to 100ms (100ms on, 100ms off, etc), thus RRED and CRED will have to be finely tuned to allow the red LED to have the required current for easy visibility, yet also blink at the required rate. The analog solution may be a bit overkill and unnecessary for the design team’s application. The above solution seems proper for higher powered circuits for larger motor use or power monitoring systems, where digital ICs cannot deal with large changes in voltage or current. More than likely the HCS will be controlled by the dsPIC33EP128GM306 microprocessor (referred to as GM306) by Microchip Inc. The GM306 is a 64-pin microprocessor intended but not limited to brushless motor control. Fortunately, the design team will more than likely not use all the analog I/O pins, nor the available op-amps and comparators that are featured in the package. Also, the clock speed on the GM306 is 70 MIPS, so there is not worrying that the added function of battery monitoring will slow down performance of the GM306. Implementation would be simple; pull a resistor between the battery and power isolation device to the ground, attach an analog-in pin from the GM306 to the positive terminal on the resistor, and adjust the parameters of the GM306 to flip in a red LED when the voltage in the pull-down resistor reaches below a minimum. All of the parameters depend upon the final chosen components. This will more than likely be one of the last stages of development. 46 SENIOR DESIGN II – SUMMER 2014 – TEAM 3: Mizell, Pennock, Salih 4. PRODUCTION A significant amount of time and effort has been put towards researching different types of subsystems that will go into the camera stabilizer. Once all the appropriate subsystems are chosen and accounted for, another integral step to the process must be taken. This step is none other than the production of the electrical system as well as the frame that will house varies components. It is important to note that having knowledge of the various subsystems that have been researched up to this point does not imply that there is also a knowledge as to how these various components can be properly integrated and housed in a frame. Appropriate time and effort also must be taken in order to look into different ways an electrical system can be produced. Also research must be made for all the possible options to choose from in deciding how to construct the frame needed for the camera stabilizer. 4.1. Electronic Circuitry One of the requirements for any senior design project is to have a double-sided printed circuit board (PCB) as a part of the project. The PCB board will house the electrical components and be used to connect the electric motors, drivers, sensors, microcontroller and the power system. This is a very sensitive step in the production and requires a great deal of attention as to insure all the various components are properly connected. Detail to craft and construction techniques is key for a success manufacturing process. The research into the PCB board will focus on the various options of attaining a PCB board as well as the layout rules. Appropriate connecters and cables for the PCB boards must also be considered. Also, of the most important concerns with the PCB boards will be the soldering methods and techniques that will be needed to put everything together. 4.1.1. PCB Options DIY PCB One interesting method of attaining a PCB board can simply be to physically make one. An individual by the name of Collin Cunningham has a very informative YouTube video on a step by step process into etching a circuit board. Initially, a PBC layout program, such as Eagle, can be used to design most kind of circuits and produce the necessary Gerber files. The circuit design is then printed on to an overhead transparency sheet. A bare copper board is then washed with isopropyl alcohol to rid of any hand oils, manufacturing grime, and dust. A clean copper board is key to proper circuit stencil transfer. From now onwards, any handling with the copper board should be done with gloves, to avoid surface contamination. Next a photosensitive development film is gently placed on top of 47 SENIOR DESIGN II – SUMMER 2014 – TEAM 3: Mizell, Pennock, Salih the bare copper board (note: beware of bubbles and folds in the development film), and placed in a calm and warm water bath (deionized water is favorable) for ten minutes. The combination of the photosensitive film and bare copper board will be referred to as the ‘developer board’. After a developer board is prepared, a red light source is the only light that should be initially exposed to the developer board. A simple picture frame can be used to keep the printed circuit design on the board. The transparency containing the circuit layout must be taught. Place the developer board with transparency under a desk lamp for about 8 minutes, the circuit board is to be exposed to any regular study lamp, keeping a distance of about 6 inches between the board and the lamp. A solution of water and positive-type developer is placed on any Pyrex dish. The printed circuit board is placed into the Pyrex dish that contains the developer solution and the dish is rocked back and forth. The procedure continues until it is clear that there is no signs of resist coating on the circuit board. The board is then rinsed in cold water In order to properly etch the circuit board, a solution of ferric chloride and water is poured onto the Pyrex dish. The circuit board is once again dipped into the dish that is agitated for about 30 seconds. The printed circuit board is left in the solution for roughly 20 minutes. After which, the PCB at this point can have all its component holes drilled. Attaining a printed circuit board in this fashion can often times be a faster approach rather than waiting for a manufacturer to send one. Also it is more cost effective and ultimately becomes an unmeasurable learning experience as well. Unfortunately, the drawbacks to making a printed circuit board is that firstly it isn’t safe to handle the various hazardous solutions needed to etch a PCB. Also, the printed circuit design may sometimes leave out ink in locations that will lead to a poor PCB. Contract PCB Manufacturing The alternative option to making one’s one printed circuit board is having a manufacturer produce one and later ship it to a desired location. There is a price that comes with but that price may not be the biggest concern with ordering PCB. For instance a website sells PCBs for as low as $33 [28]. The real concern with ordering a printed circuit board is having to wait for it to arrive. This means that one must ensure the design is accurate as to not waist time having to wait for another PCB to arrive. Also, the board must be handled with care as to not damage the soldering pads or crack a layer. 48 SENIOR DESIGN II – SUMMER 2014 – TEAM 3: Mizell, Pennock, Salih An adequate time cushion must be given for the electrical system production prior to the deadline of the presentation of the project as to not be jeopardized by waiting for a PCB board and costing undue penalties to the grading of the project. 4.1.2. Layout & Rules of Thumb It goes without saying that in order to have a manufacturer provide the printed circuit board, they will require a design of the board from the individual placing the order. Fortunately there are quite a few tips and rules available for one to follow so as to insure that the PCB is designed correctly. The team will use the Eagle PCB CAD program for layout, layering, artwork, and Gerber file production. Broad frame should be rectangular on a 0.5” grid. Drill size no less than 15mm. Ideal trace size is 10mm and no less than 7mm (Power lines require thicker trace sizes). Power lines require thicker trace sizes. Power symbols are needed (VCC, 5V, etc.). GND is the symbol for all ground connections. LEDs are to have the function on the label (status, power, etc.). All connecters, pins, and switches are to be labeled. Ground pour is used wherever applicable. Color notes are needed for various designs on a PCB. A solder mask is needed when adding footprints. Footprints require a reference designator. Footprints require silkscreen showing size and dimensions of a part. Avoid having footprints over pads [29]. Other considerations include: Ask the PCB manufacturer the accuracy of the drilling and routing tools. Options in solder-resist coatings (ROHS and leaded solder need different coatings). Ask the manufacturer about solder pad placement accuracy for various pad sizes. 4.1.3. Connectors, Cables, Cables & Jumpers Most PCBs do not have all the necessary components needed to operate correctly; such as power supply, other systems and subsystems that are not physically attached to the PCB, and off-board rerouting of lines for components on the PCB. Many considerations come into play when choosing connector type, such as: Maximum current. Cost. Thermal capacity. Junction resistance. PCB footprint. Connection strength and durability. 49 SENIOR DESIGN II – SUMMER 2014 – TEAM 3: Mizell, Pennock, Salih Wires Materials Historically electrical wiring has been made of mostly copper metal, due to its conductance properties, thermal stability, and flexibility. At times, in the United States, there have been shortages in copper wire and aluminum wiring used as a replacement. Aluminum is not an appropriate wiring material due to its sensitivity of conductance from changes in heat. 𝑅= 𝜌 𝑙 𝐴 Equation 3: Resistance of a Conductor Diameter Diameter is a major contributor to the overall resistance of the wire. Diameter is directly proportional to the cross-section area of the wire with equation 4: 𝐴= 𝜋∗𝑑 Equation 4: Area of a Circle The consideration with resistance within the wire as found in equation 3. Thus, as the diameter of the wire increases, the cross-sectional area increases, and the resistance of the wire decreases. For higher current applications, you want to have the least amount of voltage drop across the wire, to have a high-efficiency power transfer. Increasing the resistance will drop the power transferred from the source to the powered device. Length Due to maintaining simplicity in the design, the design team will use any data line connectors such as RS-232, USB, or other serial connectors. Instead, the design team will be using simple solid copper wire on the I2C lines. The design team can cheat away with just copper wire for the data lines since the design team will be keeping the distance from processor to I/O component very short, thus no fear of excess noise due to cable length. Wire Diameter Standards Like most measurements, the United States uses a different standard in wire diameter than the rest of the world: this is comparable to English units (feet, gallons, pounds, etc) to the metric system (meters, liters, grams, etc). There is the American wire gauge (AWG). Below is table 5 to compare gauge sizes to metric sizes. Contrary to usual measurements, the smaller the value of gauge, the larger the diameter of the wire. 50 SENIOR DESIGN II – SUMMER 2014 – TEAM 3: Mizell, Pennock, Salih AWG: Inches: Millimeters: 30 0.010 0.255 24 0.201 0.255 20 0.032 0.812 18 0.040 1.024 14 0.064 1.628 10 0.102 2.588 8 0.129 3.264 4 0.204 5.189 0 0.325 8.251 Table 5: AWG vs. Inches vs. Millimeters [30] Thread Count Depending on the connection, sometimes the wire has different needs in flexibility, and this is where thread count comes into play. Generally, the higher the thread count of the wire, the more flexible the wire is, and vice versa. Applications of where a stiff wire is used would be where you need long lengths of wire, and want to minimize length during installation (such as the electrical grid system). Flexible cables are useful for tight packaging spaces, moving auxiliary systems, and joints. Flexible cables also make production easier (generally). Insulation and Temperature Ratings When you run a current through a material with resistance there will be dissipation of energy in the form of heat. This heat dissipation can cause cables to sag, material resistance to increase, device-to-device power transfer reduction, and possible cable breakdown and fire hazards. Generally, the higher the current, the higher the temperature in the wire, the higher the risk of wire failure. There are many different type of insulation wrapping made for different temperature ranges. Below is table 6 of different materials and temperature ratings. 51 SENIOR DESIGN II – SUMMER 2014 – TEAM 3: Mizell, Pennock, Salih Material Type: Operational Temperature Rating (°C) 75 High Molecular Weight Polyethylene (HMPE) PolyVinyl Chloride (PVC) 60, 75, 90 Polypropylene 80 Tefzel 150 Teflon 150, 200 Table 6: Temperature Ratings of Wire Insulation Materials Ampacity The National Electrical Safety Codes (NESC) combines the definitions of electrical resistance, frequency of current, heat loss, insulation temperature rating, and outside temperature to determine the maximum current in a wire before failure, known as ‘ampacity’ [31]. Though, ‘current rating’ is a more commonly used term than ampacity. Below is table 7 with a listing of current ratings for AWG-sized wires. AWG: Max Current (A) Max Current for Power Transmission (A) 30 0.860 0.142 24 3.500 0.577 20 11.000 1.500 18 16.000 2.300 14 32.000 5.900 10 55.000 15.000 8 73.000 24.000 4 135.000 60.000 0 245.000 150.000 Table 7: Current Rating for Various Wire Gauge The component of the handheld camera stabilizer which has the most concern for an appropriate wire type would have to be the motors. The motors are going to 52 SENIOR DESIGN II – SUMMER 2014 – TEAM 3: Mizell, Pennock, Salih draw the majority of current and power in the device. It is speculated that the maximum current of any necessary motor will be in the range of 20 – 25 amps, thus 16-gauge wire should be the largest diameter the design team uses. 4.1.4. Component Packages Due to product needs such as price point, operating environment, allowable size, and fusion of technologies, electrical components come in many varieties of packaging. Below is a general list of different component packages, along with the pros and cons: Point-to-Point Technology (PTP): Figure 30: Point-To-Point Component Technology (reprinted with permission) One of the oldest-used component packaging methods. The components are soldered and wired together from node to node and then mounted to a board using adhesives, tape, screws, and various other mounting materials. PROS: Quick and easy to rig together. Great for compact apparatus dimensions and last-minute bodge-jobs. CONS: Easy to short out components due to bare leads. Vibration can wrangle the soldered connections loose. 53 SENIOR DESIGN II – SUMMER 2014 – TEAM 3: Mizell, Pennock, Salih Through Hole Technology (THT): Figure 41: Through Hole Technology (reprinted with permission) Emerged in the 1950s [32] and still used in larger and bulk production products. The silicon chip is embedded in a plastic body with long pins stick off the sides and downward with uniform length and pin pitch. The pins are placed into a PCB that is properly drilled and designed for THT. Most common form is the dual-inline package (DIP package), where the pins are on opposite sides of the plastic body. PROS: Conforms to common breadboard design. Great for prototyping. Easy to test and probe the pins. Easy to solder for amateurs. CONS: Larger footprint than surface mount Most newer components do not come in DIP. More expensive than surface mount components. Surface Mount Technology (SMT): Developed in the 1960s for deep space vehicles, became popular for manufacturing and industrial purposes in the mid and late 1980s [33] and onward. Very similar to THT, except the pins are soldered to pads rather than through a drilled hole and soldered. PROS: Smaller package footprint than THT. Less resistance through the soldered joints than THT. Cheap. Great for heat-dissipating components. 54 SENIOR DESIGN II – SUMMER 2014 – TEAM 3: Mizell, Pennock, Salih CONS: Hard or impossible to hand solder. Can be too small to hand solder. Repair and reworking of component is difficult. Alignment issues. Figure 52: Surface Mount Technology (reprinted with permission) 4.1.5. Soldering Methods The final and perhaps the most important step in producing the electrical system is soldering all the various components on to the printed circuit board. This can be a rather delicate step in the process. Finalization of the camera stabilizer may be set back for quite a bit of time if damaged is caused to the PCP due to poor soldering. Hand Soldering The equipment that will be needed to solder is a temperature-adjustable soldering iron, a damped sponge, solder wire, wire cutters, liquid flux, needle-nosed picks and tweezers, toothbrush, isopropyl alcohol, deionized water, and lastly safety glasses for the operator that will be soldering on the PCB and trimming of the leads. First, the PCB is wiped clean of oils and contaminants with isopropyl alcohol and allowed to dry. Drying should take a maximum of three minutes. Next, the soldering iron is plugged into a power outlet and left to heat up for about two minutes or a temperature of 650 °F. Generally a medium chisel tip is best for general soldering, due to their larger surface area. The tip of the soldering iron is wiped on the damped sponge to insure that it stays clean. Also, if using ROHS solder, soldering must take places in locations with open ventilation as to insure that the operator doesn’t breath in the solder fumes. The only vapor from leaded solder is water from the flux core. Tinning is then performed on the soldering iron. Tinning can be described as adding a lit bit of solder to the tip of the iron in order to prevent the tip of the soldering iron from oxidizing. Wipe away excess solder on the dampened sponge. 55 SENIOR DESIGN II – SUMMER 2014 – TEAM 3: Mizell, Pennock, Salih Gather your components-to-be-soldered, liquid flux, solder, picks, and tweezers. Drop a very small amount of flux on the pads-to-be-soldered. Then the component is placed on to the printed circuit board and heat is then applied to the component and pad using the chisel tip. Solder is then applied not to the iron tip but rather the heated pad and/or the component. Allow the solder to cool and settle. Generally, smaller the pin pitch on components, the smaller diameter solder is to be used. After all soldering is finished, wet the toothbrush in deionized water and scrub away any excess solder and allow the board to air dry. You can use bathroom hand dryers or hair dryers (on low heat) to speed up the drying process. Wire cutters are used to cut any excess leads left from the component. It’s best to cut the lead as close to the PCB board as possible but at the same time not cutting any of the solder joint itself. A rule of thumb is to cut the leads at a slight angle to ensure the solder hasn’t been clipped. After all the components have cooled appropriately, a multimeter in the ‘short circuit detection’ setting can be used to measure connection to applicable components and pads to ensure the soldering was done correctly. Last, visually inspect the soldered PCB for any component alignment issues, proper component direction, and no short circuits due to excess solder on ICs. A jeweler’s monocle is handy for looking at the small soldering points. If there happens to be any errors with soldering any of the components then the process can be repeated. A device known as a desoldering tool (aka solder sucker) acts as a vacuum that can be used to remove any solder from the PCB. First the soldering iron will provide heat to melt the solder on the board then the desoldering tool will suck the solder in to its tube chamber. A second technique of readjusting the soldering of components is to use tweezers and a heat gun to loosen the soldered joint. If there are external components that attach to the PCB with wire, then the wire needs to be lightly tinned with solder, flux added to the pad, and then the wire be soldered onto the PCB and washed. Fortunately, the University of Central Florida’s Robotics club offers free soldering lessons. Also as part of taking on the assignment of the camera stabilizer from Professor Young, A specialized soldiering class will be offered by Professor Young. Solder Pasting The previously mentioned soldering method is great if the soldering technician has a very steady hand or larger pin pitches are used on surface mount and through hole components. Unfortunately, to reduce component footprint, some components have joining pads (rather than pins) located on the underside of the component. Many high-output LEDs and thermally active components have this ‘underpad’ placement. 56 SENIOR DESIGN II – SUMMER 2014 – TEAM 3: Mizell, Pennock, Salih For the screen soldering method you’re going to need a precut metal soldering screen, solder paste, a stiff metal putty trowel, various picks and tweezers, doublesided Scotch tape, and a solder paste oven (or modified/hacked toaster oven). First, acquire a metal soldering screen. Usually PCB manufacturers or high-quality machine shops will be able to take the Gerber file and produce a laser-etched solder pad screen. If not, one can use flat 1.6 mm thick aluminum sheet and manually cut out the solder placement with a hobby knife. Before any soldering job, always clean the PCB of containments with alcohol and allow to air dry. Also wash the solder screen with alcohol and allow to dry. Next, apply a few strips of double-sided Scotch tape to the bottom of the PCB, and allow inch-long sections of the tape to hang out. Flip the PCB over, and stick it to a clean and level surface. This will ensure that the PCB does not move or jiggle during the printing process. Grab the clean solder screen, and very carefully align the cut-out screen with the proper pads, then press down to ensure that the screen has attached to the double-sided tape (thus, why the excess tape was needed). The screen should now be aligned with the PCB. Now, using an alcohol cleaned trowel, scoop a small amount of soldering paste onto the solder screen, just above the cut-out area. Using quite a bit of pressure, slowly scrape the solder paste over the cut-out area of the soldering screen. Be sure to keep an even pressure, speed of sweep, and trowel angle. Always work in the same direction, top-to-bottom. Once all of the pad locations are filled and level with soldering paste, gently lift the soldering screen mask from the work surface, and, with extreme care as to not smudge the applied solder paste, peel the PCB off the bottom side of the soldering screen. Now the soldering paste is applied to the pads. Be sure to visually inspect all pads for uniform soldering paste thickness. Gather the picks, tweezers, and components-to-be-mounted. With a steady hand use the picks and tweezers to place to components onto their desired locations. Once happy with the placement of a component, lightly press down on the component to ensure that it’ll stay on the pad. Again, a jeweler’s monocle is useful for smaller components. Visually inspect the populated PCB for correct component placement and that all pins are padded. Preheat the toaster oven to 350 °F and gently place the populated PCB into the heating chamber. Make sure that the board rests level so that excess solder doesn’t slide onto nearby pads. Allow the populated board to cook for seven to nine minutes, then turn off the heating element, and allow the board to cool. Once the board is cool enough to touch, take it out of the heating chamber, scrub the board with a toothbrush and deionized water, and allow the board to air dry. Some components cannot be pasted on, so hand solder where appropriate. 57 SENIOR DESIGN II – SUMMER 2014 – TEAM 3: Mizell, Pennock, Salih Like any project, cut the leads, visually inspect the populated PCB for shorted pads and correct component alignment and test connections are proper with a multimeter. Fortunately, the University of Central Florida’s Robotics club offers free soldering lessons. Also as part of taking on the assignment of the camera stabilizer from Professor Young, A specialized soldiering class will be offered by Professor Young. These various resources will be help in perfecting the soldering techniques that will be used to complete the electrical system. Wave Soldering Another method of PCB construction is wave soldering. Wave soldering can only be used on single-sided PCBs with through-hold components. The producer takes the PCB and places through-hole parts in the correct placement and direction, then bends and cuts the leads on the bottom of the PCB. After populating the board, the producer puts a “tacky, putty-like compound” to cover any holes needed for post-population. Then, the producer places the populated PCB onto a slightly uphill conveyor belt. Within the wave soldering machine is a chamber of heated liquid solder that is ‘rolled over’ like a wave. As the board goes up the conveyor belt, the wave of liquid solder splashes on the bottom of the board, and adheres solder to any metallurgical junction. [34] After the PCBs have passed through the wave soldering machine, the boards need to be washed in deionized water, dried, and the leads clipped and checked for short-circuits. Afterwards, other components such as jumpers, surface mount, and cabled connectors can be hand-soldered onto the PCB. Figure 63: Wave Soldering Machine (self-taken photo) Wave soldering is efficient for high-gross manufacturing. The challenges with being able to use a wave soldering machine is to design a single-sided PCB and finding all the surface component parts you need. It takes many jumpers and careful placement of the ground-plane of the PCB. Since this type of PCB manufacturing is only single-sided, this does not comply with the requirements of the project. 58 SENIOR DESIGN II – SUMMER 2014 – TEAM 3: Mizell, Pennock, Salih 4.2. Frame One of the major obstacles that the senior design group will face is designing a rigid, light, and functional frame that will be used to house the camera, printed circuit board, the dc brushless motors and other materials as well. The reason behind the struggle with regards to frame design is due to the fact that this is considered to be more of a mechanical engineering aspect of the design rather than an electrical engineering one. The frame work is very important considering that it will be a camera housing/cage to hold the camera, and might possibly be a swinging arm that connects the motor to the camera stage. 4.2.1. Materials The purposed materials for the frame include aluminum, carbon fiber, and Acrylonitrile Butadiene Styrene. Acrylonitrile Butadiene Styrene, also referred to as simply ABS is the plastic material used by 3D printers. The material will have to be stiff and rigid enough for impacts above 3g, able to withstand torque ranges around 5 foot-pounds, lightweight, easy to cut/drill, and replaceable (in case of damages). The cutting and manufacturing will most likely be done by UCF’s manufacturing lab, found in ENGR2-101. Table 28 gives a good illustration between the benefits and concerns of each of the materials that will be used. 59 SENIOR DESIGN II – SUMMER 2014 – TEAM 3: Mizell, Pennock, Salih Aluminum [35], [36] Pros Cons Moldable into any shape Difficult to reshape if damaged Very Strong Can be sharp if not properly cut Light Weight Thin layers can be dented Impact resistant Complications in joining the material Carbon Fiber [37] Pros Cons Extremely light Most expensive Strongest material being considered Can crack or fracture Best at absorbing shock The stiffness is depended on design Moldable to any type of design Not as readily available compared to other materials Acrylonitrile Butadiene Styrene (ABS) [38] Pros Cons Very sturdy and hard material Made out of oil and is damaging to the environment Very high melting point Very limited to weather resistance Very long lifespan High cost to print Easiest material to use in designing Not as strong when compared to other materials considered for this project. Table 8: Pros & Cons of Considered Frame Materials 60 SENIOR DESIGN II – SUMMER 2014 – TEAM 3: Mizell, Pennock, Salih 5. DETAILED DESIGN CONTENT 5.1. Mechanical System Design After investigation, the design team originally narrowed the project design to two major designs. The design team believed that it was best to investigate both designs’ feasibility and functionality. In order to increase productivity, both designs were designed nearly identically in regards to its electrical system. This allowed a modular system in the subsystem components. Design A focused on camera stability via linear actuator and vertical translation correction. Design B instead employed a two axis gimbal system to reduce vibrations introduced as a result of human interaction. Ultimately, the particular mechanical design that was incorporated involved stability through the use of a parallel twin-axis servo motor system and support frame. This system design focused on eliminating optical jitter that was introduced by human motion and mild turbulent forces. The emphasis of the motion stabilization was in the vertical z-axis to prevent the bumps and peaks experienced when flying above the clouds in a passenger aircraft. To compensate for these vibrations, the mechanical design was comprised of two main component sections: two U-channels and a vertical handle grip. The first major component sections are the two U-channels. Each channel had a mounted servomotor for motion control. The camera was mounted on to the base of the smaller U-channel. The smaller of the two servomotors was mounted to the side of the same U channel. The larger U-channel was connected directly to the grip. It also housed the stronger of the two servomotors. There were two parallel arms that connect the two U-channels for motion control and frame support. The two U -channels acted as a pivot arm system for axis control. Each servomotor was controlled through the main microprocessor and powered by the enclosed battery. While original design concepts incorporated two inertial measurement units (IMU) sensors, only one was attached in the final product demonstration. The IMU was mounted within the handle for acceleration and radial velocity data acquisition. The control was determined by input data received from the inertial measurement unit. Acceleration and calculated gyroscopic data was used with the servomotors to maintain stability of the camera. The material that was selected for the construction of the frame was 7075 aluminum. It was a very lightweight material yet it could provide the strength required for the frame design. To accommodate testing of various arm lengths, the aluminum material was purchased as a single channel with a length of 18” and a width of 1.5”. The channel was prefabricated with holes of diameter 0.5” encircled by smaller holes that allowed for 6-32 hardware fastener mounting. By simply cutting the channel in the required lengths, the design team mounted the servos directly onto the channels since the holes perfectly supported standard servo size hardware. The frame’s channel width was determined by the width of the Nikon 1 J1 camera model. As a result the camera U-channel was designed to support 61 SENIOR DESIGN II – SUMMER 2014 – TEAM 3: Mizell, Pennock, Salih cameras of widths up to 4.2”. The rear U-channel was 4.5” in width to support hardware spacing requirements. The other major component was the vertical handle grip. The handle grip housed the necessary battery power supply as well as the printed circuit board. Embedded within the grip was all the necessary user interfaces including the power switch and the power indicator light. The handle was designed to provide an ergonomic and sure-fitted feel for the videographer, to provide a solid grasp and control of the handheld camera stabilizer. The handle was essentially a hollow cylinder that was made from a polymer material similar to polyvinyl chloride (PVC). The handle’s diameter was 1.5” to support the width of the internal PCB and battery systems. The length of the handle was 7” to house the electronic components and provide an ergonomic design for user satisfaction. To mount the handle, the cylinder contained two flat mounting caps on each end. When held vertically, the top cap was directly mounted using several hardware fasteners. This provided a flush plane for the rear U-channel frame to rest on. The bottom cap was fitted to allow the user to directly connect the stabilizer to an external battery charger. The bottom cap was attached using a polymer adhesive. Lastly, common cycling bar tape was wrapped on the exterior of the handle to provide user comfort. To operate the handheld camera stabilizer, the user would attach their camera on top of the smaller U-channel mount. Provided with the device was a universal ¼20 mounting hub to attach the camera onto. Because different cameras have different mounting locations, the mounting hub was removable to accommodate different camera designs up to 4.2” in length and approximately 1lb in weight. Once the camera is securely attached to the device, the user would hold the stabilizer’s handle grip vertically and turn on the device. An initial calibration would occur and the camera mounting would center itself perpendicularly to the handle grip. As the user experienced vertical changes as a result of fatigue and small turbulent variations, the handle grip would also experience these changes. To compensate for these changes, data was sent to the servomotor attached to the large, back U-channel. By pivoting frame arms attached to the camera mount, the vertical differences were mitigated and the camera maintained its vertical center position. However, because the device uses rotational motion to adjust for vertical translations, the angle of the camera’s focus point with respect to the handle grip would change. This was undesirable because the camera would no longer be pointed in the direction the user desired. To mitigate the problem the second servomotor was used. By directly attaching the motor in axis to the camera mounting U-channel, the angle of the camera’s line of sight was adjusted. Whenever the camera was moved in the vertical direction, the back servomotor rotated. In turn, the front servomotor rotated in the opposite direction to adjust the camera’s angle. At any given time, the two servomotors maintained the same complementary angle pair to keep the camera mount parallel to the large, back U-channel and perpendicular to the vertical handle grip. 62 SENIOR DESIGN II – SUMMER 2014 – TEAM 3: Mizell, Pennock, Salih 5.2. Electrical System Design As previously mentioned, the design team tried to follow a modular design for the electrical system. Doing this allowed concurrent research on the mechanical systems’ feasibility with the electrical system design. Regardless of which mechanical system that would be used, all electrical system design could still be applied. The only fundamental difference was Design B had one additional system for manual pan functionality. Electrical system design was based on the inclusion of this functionality and the design content had been written to reflect as such. If the functionality was not used, any components required for the subsystem, would be eliminated from the final design. The design team combined aspects from its two original designs. The design team spent several weeks researching, prototyping, and coding autonomous control of BLDC motors. The initial PCB was designed for two BLDC motors including the Hbridge drive circuitry and Hall Effect sensing required to control them. However the design team decided against the use of BLDC motors due to poor results of load testing. The motors were incapable of supporting the weight of the frame design. In addition, the power supply would not be sufficient enough to drive the BLDC motors. It was extremely unfeasible to complete a PCB and power system design that would be lightweight and could fight in the proposed 1.5” diameter of the handle grip. Per recommendation from the academic adviser, the design team investigated the use of servomotors. 5.2.1. Control System 5.2.1.1. Output System For the electrical system, the first major consideration of the design team was determining which motors were to be used. The design team reviewed several types of motor outputs including brushed DC motors, stepper motors, brushless DC motors, servomotors, and linear actuators. The design team decided that for the output system, two servomotors would be used. This was decided after extensive and failed research on the original brushless DC motor system scheme. The Hitec HS-5645MG servomotor was used to support the stabilization required in the camera U-channel. The Hitec HS-5645MG servomotor had been found to be cost efficient while still being able to generate the torque needed to support the weight of 16 oz. The fact that the Hitec servomotor could support a weight of up to 16 oz proved to be useful in the sense that the Nikon 1 camera is about 12 ounces. The 4 oz buffer meant that there was flexibility in choosing from a range of batteries that could weigh up to 4 oz. The Hitec HS-5685MH servomotor was used for the rear U-channel that was mounted directly onto the grip. It was more than capable of providing the necessary torque needed to lift the arm that supported the U-channel and camera. The 63 SENIOR DESIGN II – SUMMER 2014 – TEAM 3: Mizell, Pennock, Salih chosen servomotors are also energy efficient for the particular needs of the project, compared to previously researched motor systems such as brushless DC motors. The servomotors were directly powered by 7.4 V lithium ion battery. The features of both motors can be compared using the specifications found in table 9. Servomotor Configuration Table Hitec Servo HS-5645MG HS-7980TH Torque 168 oz-in 611 oz-in Weight 2.21 oz 2.7 oz Max Current 1.3A 1.5A Max Speed 0.18 sec/60° 0.21 sec/60° Max Voltage 6V 7.4V Gear type Metal Titanium Motor Type 3-pole Coreless Support Dual Bearings Dual Bearings Length 1.59 in 1.72 in Width 0.77 in 0.88 in Height 1.48 in 1.57 in Table 9 : Hitec HS-5645MG & Hitec HS-7980TH servomotor specifications 5.2.1.2. Input System The stability of the camera depended on understanding and reacting to the external jitter experienced by the turbulence of the aircraft and movement created by the user. In order to respond to the external forces to be compensated against, an IMU with acceleration and radial velocity data was needed. The MPU-6050 by InvenSense was employed for such use. Upon performing preliminary acceleration force simulations by driving a car on a rough road at slow speeds and recording the acceleration, it was found that the maximum acceleration magnitude was ±2g. The rear servo (HS-5685TH) could move at a maximum of 285.7 °/sec (no load). Thus, Setting 1 for the IMU clock seemed appropriate with a ±4g and 500°/sec data threshold. As previously mentioned, the final design incorporated the use of two IMUs; one in the handle as a base-reference of acceleration and rotation movements, and a second on the camera U-channel for secondary comparison and error of the compensation. The challenge was to have the camera U-channel 64 SENIOR DESIGN II – SUMMER 2014 – TEAM 3: Mizell, Pennock, Salih to experience normal acceleration conditions (1g) for stability while the handle moved up and down. 5.2.1.3. Controller In order to control all of the various components of the handheld camera stabilizer a microcontroller unit (MCU) was employed. The MCU needed to have a small footprint, I2C communication compatibility, adjustable pulse-width modulation (PWM) outputs, and normal clock speed. Originally the Texas Instruments MSP430 line of MCUs was used, but due to the large footprint, poor quality of documentation, and internal clock configuration issues, a different MCU had to be used. Due to time constraints and deadlines, the ATMega328p by Atmel was used. The ATMega328p is a 32-pin TQFP MCU with six PWM outputs, 8-bit RISC architecture, 32 KB of programmable flash memory, 7 mm by 7 mm footprint, twowire interface (TWI) compatible with I2C, with many various and reconfigurable analog-to-digital converters (ADC) and interrupt capabilities [5]. The ATMega328p is clocked with a 16 MHz ceramic resonator and powered by a 5 V linear regulator. The MCU served as the controller for the servomotors, provided I2C communication with the IMUs, provided battery monitoring via an ADC pin, initiated an n-channel MOSFET kill switch for the servomotors if battery voltage dropped below a safe level, provided the user interface via a bi-color LED (red and green), and perform all necessary calculations, conversions, and decisions for camera stability. The I2C clock was set to 400 kHz, meaning that all necessary data from one IMU could be received in under 860 µs. The PWM signal length to control the servomotors was 4.11 ms, with sweep length varying between 0.78 ms and 1.92 ms. To measure the battery voltage, the ATMega328p housed within the handheld camera stabilizer had a measured internal pin impedance of 11.3 MΩ, the ADC pin was in parallel with a 1 MΩ ceramic resistor tied to ground, with another 1 MΩ pullup resistor tied to the positive battery terminal. All programming for the ATMega328p was done with the Arduino IDE due to time-constraints, excellent documentation, simple user interface, wide device compatibility and usage (available for Mac, PC, Linux, and Android), and open source and educational ethics. 5.2.2. Power For the final design that would go towards the electrical system, the power component was supported by a lithium ion battery as well as battery charger. The particular lithium ion battery that was chosen for the handheld camera stabilizer project was the Tenergy Lithium Ion 18650 battery. As for the battery charger, the Tenergy TLP-2000 Smart Charger was selected. One of the biggest advantages of choosing the Tenergy Lithium Ion 18650 battery was the fact that it is a small, lightweight battery and yet still provided 7.4V and 5200mAh. Both of the Hitec 65 SENIOR DESIGN II – SUMMER 2014 – TEAM 3: Mizell, Pennock, Salih servomotors required a maximum operating voltage of 7.4V and drew up to a maximum current of 2 amps. The accelerometer required an operating voltage of 3.46V and drew up to a max current of 3.8mA. The Tenergy Lithium Ion 18650 battery high energy density very comfortably met the requirements of all the electrical components that would be going into the final design of the camera stabilizer. Not only did the Tenergy Lithium Ion 18650 battery meet the requirements but it ran all the devices while the components were drawing max current at the same time for at least an hour. This ensured that the thirty minute minimum requirement for the battery to run on a single charge was easily provided by the Tenergy Lithium Ion 18650 battery. Another reason that the Tenergy Lithium Ion battery was chosen as the power supply option for the final design of the camera stabilizer project was due to the fact that it was a high quality rechargeable battery pack. The battery did not suffer from any type of memory effect and had a built in integrated circuit chip that protected the battery from overcharge and over discharge. This particular feature allowed the Tenergy Lithium Ion 18650 battery to have a prolonged life. The Tenergy Lithium Ion 18650 battery is very lightweight which came in handy in keeping the overall device as lightweight as possible. Also, due to its small size, the battery was able to fit into the handle and reduce the dimensions of the handheld camera stabilizer. Rather than having to remove the battery from the handle when its charge was depleted, the senior design team elected to acquire a suitable battery charge to go along with the Handheld Camera Stabilizer. The Tenergy TLP-2000 Smart charger was compatible with the Tenergy Lithium Ion 18650 battery and several other lithium ion batteries. It has a led display indicator to inform the user when the battery if fully charged. The Tenergy TLP-2000 Smart charger was capable of detecting when that battery was fully charged and stopped the charging process. This feature would ensure the life time of the battery was optimized. 5.2.3. User Interface The final design consideration was the user interface. The design was kept as simple as possible. There was a single two-position switch to turn the system on and off. The user interface also contained a single battery status indicator light. The indicator light used was the HSMF-C15x, a surface mount chip LED device. It featured a 3.2mm x 2.7mm footprint and contained two LED dies: one for red and green. During normal operation the LED was lit green and it was lit red every 500ms when the battery was near dead. 66 SENIOR DESIGN II – SUMMER 2014 – TEAM 3: Mizell, Pennock, Salih 5.3. Explicit Design Summary 5.3.1. Block Diagram Figure 31 is a block diagram of the system the final design. The final design complexity was greatly reduced from the BLDC motor scheme to minimize PCB dimensions and increase the ease of manufacturability. By doing this, the design team was capable of meeting size and weight specifications, and minimized battery power consumption. Figure 24: Final Design Block Diagram 67 SENIOR DESIGN II – SUMMER 2014 – TEAM 3: Mizell, Pennock, Salih 5.3.2. Electronic Parts List The primary electrical components that went towards the developed product are provided in Table 10. The list is comprised of the components that were required for assembly of a final proposed design. Component Name Part Number Qty Microcontroller AtMega328P 1 16 MHz Resonator CSTCE16M0V53-R0 1 Bicolor LED HSMF-C15x 1 150K Ohm Resistor 2 1M Ohm Resistor 2 10k Ohm Resistor 3 100nF Capacitor 1 0.1uF Capacitor 1 Subsystem System Control Inertial Measurement Unit MPU-6050 2 0.1uF Capacitor 4 2.2nF Capacitor 2 10nF Capacitor 2 Power Switch Rocker Switches DPST 16A 1 Lithium Ion Battery Tenergy 18650 1 5V Voltage Regulator L4931 1 100nF 1 10uF 1 MOSFET Kill Switch IRLML6244TRPBF IMU Power Management 1 Motor Kill Switch 10k Ohm Resistor 1 Servomotor (Camera) Hi-tec 5645 1 Servomotor (Grip) Hi-tec 5685 1 Motor System Table 90: Final Design Electrical Parts Listing 68 SENIOR DESIGN II – SUMMER 2014 – TEAM 3: Mizell, Pennock, Salih 5.3.3 Final Design Schematic 5.3.3.1 Voltage Regulation Subsystem The schematic illustrates the voltage regulation system used in the final design of the handheld camera stabilizer system. An input of 7.4 V from the battery was supplied to a LD1117S50TR voltage regulator, which provided a fixed 5 V, 0.8 A power supply to the electronic power bus. The bus supplied required voltages to the microprocessor and IMU devices. Figure 75: Voltage Regulator Schematic 5.3.3.2 Microprocessor Subsystem The schematic illustrates the main microprocessor subsystem. An ATmega328P microchip was used. To provide the necessary PWM control frequencies, an external 16 MHz crystal oscillator was attached to the processor. All necessary supply voltages were 5 V. The processor used I2C communication via its SDA and SCL data lines to obtain information from the IMU devices. Header pins were attached to the ICSP pins (MISO, MOSI, RESET, SCK). This allowed for direct-to-PCB programming of the processor from a separate Arduino development board. A simple voltage divider circuit was incorporated into the analog to digital converter pin of the microprocessor. Doing so provided an effective supply voltage detection system. At above the minimum threshold voltage, the ATmega328 would send a digital output signal to the MOSFET kill switch subsystem. In addition, pulsed signals were sent to the attached LED light to provide user notification of the current battery status. 69 SENIOR DESIGN II – SUMMER 2014 – TEAM 3: Mizell, Pennock, Salih Figure 86: Microcontroller Schematic 5.3.3.3 IMU Subsystem The IMU subsystem was comprised of two MPU-6050 sensor units. One was directly incorporated into the main PCB system. A separate sensor unit was created for off-board use that was attached to the camera mounting U-channel. The design was based on schematic designs provided by SparkFun. Both IMUs used I2C protocols and shared the same data and clock lines from the microprocessor. To differentiate between the two units, one IMU had an address pin that was pulled high while the other was pulled low. This provided communication within the software to realize addresses 0x68 and 0x69 for the grip and camera units respectively. The figure 27 below illustrates the core configuration for the IMU. 70 SENIOR DESIGN II – SUMMER 2014 – TEAM 3: Mizell, Pennock, Salih Figure 97: Accelerometer Schematic 5.3.3.4 Motor Safety Kill Switch Subsystem The last subsystem that was incorporated in the final schematic design was the motor safety kill switch. By using an N channel power MOSFET, the microprocessor could control power to the servomotors. This was incorporated to prevent overcurrent conditions. As long as the microprocessor detected an acceptable operating voltage from the battery, it would send a signal to the gate of the MOSFET switch. Doing so would complete a circuit between the servomotors and PCB system ground. Below is an illustration of the schematic design of the MOSFET kill switch. Figure 108: Kill Switch Schematic 71 SENIOR DESIGN II – SUMMER 2014 – TEAM 3: Mizell, Pennock, Salih 6. PROJECT QUALITY PLAN 6.1. Initial Testing Conditions The HCS was intended for image mechanical stabilization of a point-and-shoot sized camera during times of high turbulence in a personal aircraft (such as a Cessna, Piper, or Diamond). Before choosing definitive parts such as motors, MCU, and frame design the conditions of operation of the HCS must be well understood. Below is a list of definitive conditions and considerations that are important for further development: Ease of use for pilot and passengers. Changes in position and acceleration. Cabin dimensions and product maneuverability. Atmospheric conditions. 6.1.1. Acceleration Conditions A large consideration for frame design and choosing of motors was the forces involved with light turbulence. 𝐹 = 𝑚𝑎 Equation 5: Newton's Second Law of Motion Above is Newton’s Second Law; every engineer and related-scientists should have this formula engrained in their memory. For the HCS, the design team needed to have understood the range of accelerations the device experienced during normal use to minimize the movement of the camera. Knowing the range of acceleration was the largest contributing factor in choosing the size, weight, pole count, thrust range, and efficiency of the motors. The g-forces involved determined how rigid the frame construction needed to be, which influenced weight of the HCS, frame material and dimensions, and structure of the frame. Objects on Earth experience a near equal pulling force of 9.80665 m/s 2 [42], this is referred to as 1 g (gravitational unit of acceleration). For ease of calculation the design team used the approximation 9.807 m/s2 as 1 g. First and foremost, the design team needed to get a rough idea of where g-forces varied for normal use of the HCS. Table 11 showed the range of accelerations to develop a general idea of where the design team needed to measure. 72 SENIOR DESIGN II – SUMMER 2014 – TEAM 3: Mizell, Pennock, Salih Activity: g-Force (g): Airplane negative limit load: -1.52* Weightlessness: 0.00 Standard gravity (g) [43]: 1.00 Nissan GTR max cornering: 1.19 Airplane positive limit load: 3.80 Sustained human blackout range [44]: 4.00 – 6.00 Rock n’ Rollercoaster, Disneyworld: 5.00 Top-fuel dragster [45]: 5.30 Airplane ultimate limit load: 5.70 Immediate human blackout [46]: 18.00 Human record for consciousness [46]: 46.20 50.00 – 70.00 Severe injury or death: Table 11: g-Force Ranges Figure 29: SEN-11028 Breakout Board with MPU-6050 IMU (reprinted with permission) The team will use the SEN-11028 IMU breakout board (figure 29) from Sparkfun.com, the Arduino Mega 2560 board and IDE, and a laptop. First, a team member will create a program using the Arduino interactive development environment (IDE) so that the Arduino Mega board can communicate between the MPU-6050 IMU and the laptop’s serial output. The program will have to access the I2C data register found on the MPU-6050. Second, a team member will calibrate the MPU-6050 within the Arduino program so that it reads nearly 1 g when the sensor is held stationary in the X, Y, and Z directions of the IMU. Third, the SEN11028 board will be attached to a prototype stabilizer frame (composed of wooden dowels), drive down a bumpy dirt or gravel road at low speeds, and record the acceleration values. These acceleration values will be read out to the serial output 73 SENIOR DESIGN II – SUMMER 2014 – TEAM 3: Mizell, Pennock, Salih found in the Arduino IDE. Forth, the data will be converted to comma-separatedvariable (.csv) data format and formatted in Microsoft Excel as a spreadsheet. Lastly, the formatted acceleration data will be read into Matlab, and analyzed to find average acceleration, maximum and minimum acceleration values, and determine typical peak-acceleration values. This test will be performed several times, and all calculated values will be compared with different trials to get an idea of acceptable acceleration changes. Figure 30: Acceleration Testing Apparatus (self-taken) Knowing the acceptable range of acceleration values is important in deciding on the torque/force requirements for the major-axis motor. Brick Road Testing An important factor in designing the HCS is the amount of force exerted onto the frame and motors due to the camera’s mass during turbulent flight. In order to understand the forces generated during flight, changes in acceleration must be measured, due to Newton’s Second Law of Motion (equation 5). When asked, Professor Young suggested that driving slow on a bumpy dirt or brick road would be comparable to medium turbulence experienced in flight. The Nikon 1 camera weighs 13.5 oz [47]. The design team is aiming for a total lifting weight of less than 24 oz. The team drove on bumpy brick roads of Winter Park and Orlando, Florida at sublegal speeds, recording the acceleration values in the x, y, and z directions. There were a total of six tests all recorded using the test apparatus found in figure 30. Time for the recordings ranged between 1-3 minutes. Table 14 gives the values of the six brick road acceleration trials; contained within table 14 are the maximum and minimum values of acceleration in g of the different axis, and magnitude maximum and mean values. The z-axis has mean values listed due to interest in changes in vertical motion. 74 SENIOR DESIGN II – SUMMER 2014 – TEAM 3: Mizell, Pennock, Salih Trial: X-Axis (g): Y-Axis (g) Z-Axis (g): max max min max min min Magnitude: mean max mean Time (sec): 1 1.93 -1.74 1.87 -1.99 1.96 -1.93 0.94 3.19 0.98 106.2 2 1.89 -1.99 1.93 -1.99 1.75 -1.99 0.94 3.14 0.98 127.4 3 1.93 -1.81 1.93 -1.99 1.94 -1.80 0.94 2.65 0.99 115.2 4 1.95 -1.79 1.81 -1.99 1.94 -1.99 0.95 2.77 0.99 23.93 5 1.75 -1.92 1.87 -1.99 1.87 -1.87 0.94 2.99 0.99 105.1 6 1.87 -1.85 1.95 -1.93 1.87 -1.87 0.94 3.20 1.00 85.6 Table 10: Brick Road Acceleration Testing The results seem very consistent, meaning that the average magnitude value of each trial is nearly 1g, with maximum magnitude values all above 2.65g. Luckily the maximum magnitude values are less than the designed lower airplane load limit of 3.8g. Also, the z-axis measurements are consistent, with maximum and minimum values ranging around ±2g and a mean of +0.95g. This information indicates that the design team needs to find a major-axis motor to be most efficient around 1g worth of force. This will allow the design team to explore major-axis arm lengths freely, calculate that mean and max/min torque applied torque with respect to prospected arm length, and then find appropriate motors. Figure 111: Trial 1 - Brick Road Acceleration Testing 75 SENIOR DESIGN II – SUMMER 2014 – TEAM 3: Mizell, Pennock, Salih Figure 122: Trial 2 - Brick Road Acceleration Testing In the first and second trials, you can see moments in the graph when the car is stopped (possibly at a stop sign, rather than a traffic light), as indicated by the stable spots, then followed by acceleration in the y-axis; start around 42 and 50 seconds, respectively. Figure 133: Trial 3 - Brick Road Acceleration Testing 76 SENIOR DESIGN II – SUMMER 2014 – TEAM 3: Mizell, Pennock, Salih Figure 34: Trial 4 - Brick Road Acceleration Testing Figure 35: Trial 5 - Brick Road Acceleration Testing Figures 31 through 35 are shown to ensure that the statistics in table 14 are accurate and consistent upon visual inspection. Figures 31 through 35 show that the x and y-axis acceleration does not sway from 0g often, and that the z-axis and magnitude acceleration does not sway from +1g often. This verifies that, though there is much acceleration in all directions, the majority of the force is in the z-axis. 77 SENIOR DESIGN II – SUMMER 2014 – TEAM 3: Mizell, Pennock, Salih Figure 36: Trial 6 - Brick Road Acceleration Testing After FFT analysis of the data, there seemed to be no overpowering frequency leaking out of the system that could be dampened. As prototyping evolves, FFT analysis will persist to ensure stability and understanding in the design. Axis: Max g: Min g: Mean g: X 1.95 -1.99 0.00 Y 1.95 -1.99 0.11 Z 1.96 -1.99 0.94 Magnitude 3.20 0.18 0.99 Table 11: Overall Brick Road Testing Values Table 15 are the grand statistics of the brick road trials. Again, the data is consistent, since all values are close to the values found in table14. Again, the primary forces are in the z-axis, yet sidewall maximums and minimums float around ±2g. Testing Conclusion: Overall, all of the data has shown that the majority of force during simulated turbulence is in the z-direction, with a mean of 1g and a consistent sidewall maximum/minimum acceleration of ±2g, and a maximum magnitude acceleration of 3.2g. 78 SENIOR DESIGN II – SUMMER 2014 – TEAM 3: Mizell, Pennock, Salih Conclusion: The worrisome data found in table 15 is the maximum magnitude of 3.20g. This will be a design constraint and challenge for keeping the frame rigid yet light. We’ll have to investigate as to what construction techniques and materials to employ for such quick and high forces. The killer of stability are small changes in acceleration (aka ‘jerk’). 6.1.2. Rapid Prototyping After the team discussed with Dr. Richie, University of Central Florida, about the rough draft of the research paper, Dr. Richie gave the team a pair of Futaba S3117 RC car servos to experiment with. The team mated a servo with the testing apparatus to experiment with stability and feedback. The motivation behind this prototype was to understand the ease or difficulty of finding stability in a system. The objective of the prototype was to keep a needle attached to the servo motor pointing upwards. Now, due to the Futaba S3117 servos being limited to 180° range of rotation, the counter-movement of the needle was limited. Servos are very easy to work with. Basically there are only three connections: power (3.3 – 5DCV for the Futaba S3117), ground, and PWM. The PWM connection controls the position of the servo. Given the range of motion, the duty cycle of the PWM is proportional to where in the range of motion the servo rests at. For example, the Futaba S3117 servo has a 180° range of motion, thus 0% duty cycle relates to the 0° position, 25% duty cycle relates to the 45° position, 50% duty cycle relates to the 90° position, 75% duty cycle relates to the 135°, and 100% duty cycle relates to the 180° position. Using the Arduino IDE, it was simple to take in the raw sensor values (+1 g = 16384 bit value, -1g = -16383 bit value). Luckily, it was pretty easy to convert from bit value, to g value (x-axis), to servo counter-angle position, to a PWM signal. Initially testing the prototype involved moving the frame in a ‘roll’ manner (like a plane ‘rolls’). Luckily, first try the needle attached to the servo stayed upright, but was very jittery. Below are pictures of the first session of the prototype. Note the jitter is evident in the middle photo. 79 SENIOR DESIGN II – SUMMER 2014 – TEAM 3: Mizell, Pennock, Salih Figure 37: Raw Prototype Testing (self-taken) For greater stability, in the future the design team will use a rolling average with sampling sizes between 2 and 5 samples. Due to time constraints, this will be implemented after the spring semester. Also, the MPU-6050 IMU was located near the servo motor, so there was probably feedback being sent through the system due to the torque jitter. 6.2. Acceptance Test Plan The acceptance test plan is the design team’s quality documentation. Its purpose is to provide a comprehensive set of instructions that should be followed in order to properly gather data regarding the project’s robustness. The acceptance test plan is used in conjunction with the acceptance test procedure. To avoid confusion, the acceptance test plan will be referred to as the ATP. Members of the design team have extensive experience developing industry ATP documents. While a complete ATP document cannot be developed until the design team produces a working prototype, investigation can begin in the content that should be found within the document. The ATP will be categorized in a way to support a subsystem representation. Subsystem categorization will include, but not limited to battery, frame design, motor control. Each subsystem category will be further categorized into functionality tests. By doing this, the ATP can be produced to contain the required information regarding all systems. Each section will contain a detailed instruction set on how to test a particular functionality. The ATP will detail all required parameters specifications to perform the corresponding test. Each section will contain expected results of the test being performed. The document should be written in a manner that provides the user a very defined understanding of pass/ failure criteria for each subsystem’s complete functionality. This is critical as it removes ambiguity of expected results. Whenever possible, the pass/failure criteria should be defined with quantifiable numerical data. Table 16 below demonstrates an example of the expected formatting and recorded information from an initial draft revision of an ATP document generated for industry testing. 80 SENIOR DESIGN II – SUMMER 2014 – TEAM 3: Mizell, Pennock, Salih Test Parameter: Focus Settling Time Purpose: To Determine the camera’s average settling time. Implementation: For various distances, hold camera steady, measure time it takes for camera to focus. Conditions Tested: Result: 3” Approx. 3s Comments: 4’ Focus point was an 8.2” x 11” paper with paragraph text at 640x480 resolution. Focus Approx. 3s time felt relatively short when it could focus. Camera seems to work better on Approx. 4s microscopic rather than macro imaging. Approx. 3s After approx. 3’ the image could not focus, Unable to focus so settling time data could not be recorded. 8’ Unable to focus 16’ Unable to focus 6” 1’ 2’ Table 12: Settling Time Testing Example The ATP document will be used every time a quality test is performed. This provides uniformity between tests. By providing instruction references, it guarantees the user performed tests in the exact same way, keeping recorded data consistent across all test procedure cycles. After all tests are performed, the ATP document can be used a reference lookup of all previous test results. All expected test procedures will be fully detailed in the ATP document so it may properly support the acceptance test procedure goals. While a complete ATP will be a running document until the completion of the project prototype, the design team has developed some topics that must be tested for quality purposes. The tests are based on initial assumptions and will probably be modified and refined as the design team has a more complete prototype available. 6.2.1. Battery Life One of the more important specifications of the HCS is that the battery must last 30 minutes or longer. Below are the methods to employ to determine a passable battery life. 6.2.1.1. Load In order to determine the battery life of the HCS, the team will perform a series of simple real-world test to determine if the battery is suitable for the HCS application. 81 SENIOR DESIGN II – SUMMER 2014 – TEAM 3: Mizell, Pennock, Salih Load Test 1 The team will walk up and down flights of stairs with the HCS powered on, till stability is lost or the unit ‘dies’. The footage caught using the HCS will be reviewed to ensure that at no point stability and filming quality was reasonably lost. The team will record the time taken till shut down. Load Test 2 The team will drive on bumpy dirt or brick roads with the HCS powered on, till stability is lost or the unit ‘dies’. Again, the footage caught using the HCS will be reviewed to ensure that at no point stability and filming quality was reasonably lost. The team will record the time taken till shut down. 6.2.1.2. No Load The team will place the HCS in a vice grip, turn the unit on, and allow it to operate without any disturbances till the unit dies. The team will record the time taken till shut down. 6.2.2. Hardware Ergonomics In any form of filming (photo or video), a steady and confident sense of grip is important for the user. If the user does not feel comfortable while using a filming device, they become distracted with holding the camera correctly, rather than focusing on the subject that is being filmed. Another point for good ergonomics is that it creates an emotional attachment for the user; an undefinable quality. The team will ask photographers and videographers (focusing on sports and nature image capturing) to use the HCS for 10 to 30 minutes. Then, a team member will ask the user for opinions, input, criticism, and the short falls of using the HCS. Afterwards, the team will adjust the components or systems under severe criticism and find new users to give the HCS a try. 6.3. Acceptance Test Procedure The camera stabilizer is to be tested in multiple ways in order to determine if it can meet the desired specifications. There will be four unique tests; handheld stability, 30 minute stair climb, road test and a flight test. The number of trials for each of these tests will vary. The main criteria’s that will be measured throughout the tests are the stability of the video images taken by the camera stabilizer, accuracy of how close or far is the camera from the desired 1/8” position and the battery life of the device. All the measurement data will be logged and used for future analysis as well as a reference if it is discovered that modifications must be made to any part of the design. 6.3.1. Test 1: Handheld Stability The first test of the camera stabilizer is meant to measure the stability conditions. The user will simply hold the camera stabilizer and begin to move the device in an upward and downward motion. Data will be collected from this test to see how quickly the motor moves the device as well as how much torque will be produced. 82 SENIOR DESIGN II – SUMMER 2014 – TEAM 3: Mizell, Pennock, Salih The video images taken from this test are then compared to video images taken from another camera performing the same movements but without being connected to the stabilizer. An arrow will be placed on a wall with another arrow placed on the camera. As the device is moving, an observation will be taken to see how the far the arrow on the camera is moving away from the arrow on the wall. This observation will aide in determining wither or not the device can keep the camera within 1/8” of its original position. This test will have three trials. 6.3.2. Test 2: 30-Minute Stair Climb This test was previously mentioned in the Battery Life section. The second test of the camera stabilizer will not only test stability but will also aide in testing the performance of the power supply. An individual will begin to climb up and down a flight of stairs. Once that person begins to feel fatigue, they will pass the device to another person to continue climbing up and down the flight of stairs. This test will continue to run for about 30 minutes. The images from the camera stabilizer will be compared to that of images taken from a camera that was not stabilized. Also, if the camera stabilizer continues to functions properly for the entire duration of the test without having to recharge the battery, then that would show that the power supply would meet the requirements of lasting at least 30 minutes. This test will also have 3 trials. 6.3.3. Test 3: Road Test This test was previously mentioned in the Battery Life section. For this test, the camera stabilizer will be operated by a user that will be in car that is driven on a very bumpy road. The road would ideally be a dirt road but can also be a brick road. The reasoning behind this test is to simulate an in an environment similar to that of being on a plan that may experience turbulence. The constant vibration caused by driving on the car will help in measuring the devices performance. The videos taken from this test will be compared to another video taken from a camera that was not stabilized. Also, the video will be compared to the images taken from the previous tests. Another observation will be made to see how accurate the camera stays within 1/8” of its original position. Due to the fact that roads will be bumpy, the device will more than likely have to constantly stabilize the camera. This test may be one of the best test for the battery. Having the device to constantly work on stabilizing the camera on a single charge for at least 30 minutes would support the idea that the power system is cable of meeting the desired specifications. There will be 4 to 5 trails for test. Based on the results of first three tests, data will be compared to the desired specifications. If any the specifications are not meet, a review of the specific area as well as all the sub systems that are directly tied into that area will be made. Once cause of the error is determined and all the appropriate actions have been taken to correct issue, the final test can be taken. 83 SENIOR DESIGN II – SUMMER 2014 – TEAM 3: Mizell, Pennock, Salih 6.3.4. Test 4: Plane Test This will be the final test taken and will only be performed once all the specifications desired have been meet during the previous three tests. The camera stabilizer will be used during a flight on a plane. Different video images will be taken in various angels. The camera stabilizer will be tested to see how it may respond to sudden movements caused by a number of factors (i.e. sudden movement of the plane, caused by the pilot or turbulence, etc.). Once again, the video images taken by this camera will be compared to that of images taken without the camera being stabilized as well as the video images from the previous tests. Observations will be made to see if the cameras position stays within the desired limits. Also, the flight test will be at least 30 minutes long to test the performance of the battery once more. This particular test will only have one trial due to cost. Ideally, at this point of the testing all measurements meet the desired specifications. If however after the flight test is conducted and an error is detected, then adjustments will be made and all the previous tests would have to be repeated once more before attempting the flight test again. 6.4. User Manual Development In addition to the design of the project, the design team must also provide a deliverable document to the customer. User manuals come in a variety of formats. Sections that are typically found in user manuals are a cover page, contents page, usage guide for system’s main functionality, a troubleshooting section, frequently asked questions, and contact details for further assistance. For the user manual development, the design team will focus on component functionality and troubleshooting. The user manual will be written in as simple language as possible and use many figures and pictures. However it will be assumed that the reader is familiar with current technology topics. The user manual will not be fully developed until a working prototype is available. Below is an excerpt of the current user manual in initial revision. Its purpose is to provide an understanding of the terminology that will be used, in addition to the level of knowledge that is required. 6.4.1. Initial Manual Excerpt The purposes of this user manual is meant to be a guide for the operator of the camera stabilizer. Although the camera stabilizer is meant to be a very simple design and will not require too much technical knowledge to full operate. However, this user manual will be used as a reference and to add clarity. It is with high hopes of the senior design group that the operator of the camera stabilizer is able to use the device to its full potential and is able to generate a high quality of photo images and videography. 84 SENIOR DESIGN II – SUMMER 2014 – TEAM 3: Mizell, Pennock, Salih Parts: Camera Stabilizer 14.8V Tenergy Lithium Ion 18650 Battery Star bit head screws Star bit screwdriver Mounting plate When the operator is about to put together the camera stabilizer for operation, the main things they will mostly be consider with are the battery and mounting the camera. With regards to the battery, at the very bottom of the handle grip will be a compartment that can easily be opened and closed. The operator will open the door of the compartment and then be able to insert the 14.8V Tenergy Lithium Ion 18650 battery. After which, the operator will close the door of the handle grip compartment. The operator can then observe the light emitted diode (LED) indicator to see the status of the battery. Table 17 below will show the operator how to interpret what the LED indicator is displaying. LED indicator Solid Red Light The battery is fully charged Blinking Red Light The battery is low and needs charging No Light at all The battery has no charge at all Table 13: LED Indicator Status The operator also must be able to properly mount the camera on to the frame compartment of camera stabilizer. If the camera is not properly mounted, the device will not be able to properly stabilizer the camera and will lead to very poor video images. A simple screw will be available on the L channel located above the handle grip. The screw is a universal 0.25” screw that will fit almost all cameras. Once the operator properly places the camera on the screw, an added plate is placed above the camera and used as a clamp to properly hold the camera. Operation Once the camera is properly mounted on the device and the battery is placed into the handle grip, the camera stabilizer will be ready for use. The operator can start moving the camera in any direction with any kind for force. Immediately the operator will be able to notice that the camera will remain in its original position with little to no disruption to the video images being taken. Also the device is very light weight and easy to handle, because of this design the operator is free take images in any angel they choose and is not limited to a singular movement. The operator is also able to take the camera stabilizer in a moving car and take images while running. 85 SENIOR DESIGN II – SUMMER 2014 – TEAM 3: Mizell, Pennock, Salih 7. CONCLUSION 7.1 Challenges The senior design project was definitely a challenging experience. One of the first noticeable complications of the project was the project’s originality. Based on research, the design team had found that there are currently no other systems that has the project’s functionality. Most camera stabilizers either use a mechanical damping isolation system, or provide electrical control around a fixed rotation point. The design team had to develop a completely unique design that could compensate in a vertical translation instead of just a point of rotation. Because of this, the design team had to engineer its own mechanical design for motion control. This proved to be exceptionally difficult as it was not the team’s field of expertise. A significant portion of the research was dedicated to developing a working mechanical system. Due to time dedicated to mechanical design, the team made fundamental oversights of key control components. The design team originally believed that BLDC motors would be a satisfactory motor control scheme. Specifications regarding the product’s response time were placed in highest priority. To achieve this, hobbyist gimbal motors were selected for their smooth response and speed. However hobbyist motors are unreliable and credible product specifications were difficult to find. Power consumption and torque ratings were obtained mostly from consumers as manufacturers provided very little information. This led to poor design choices for the original circuit components and required power supply. During testing and assembly of the final design, the team experienced failure of several components. Due to user misuse, several servomotors were tested beyond their rated rotation points. This affected the control parameters that was used in the control system. In addition, this also physically damaged the servomotors and slowed development of the project. Finally, during final stages of testing, the design team unfortunately damaged its PCB. The microprocessor had to be replaced on the PCB. Trying to debug and replace the component, the entire PCB was damaged- only two days prior to the required working demonstration of the project. 7.2 Demonstrated Results Because of the PCB failure, the design team was unsuccessful in its first attempt of the working demonstration. The team was provided an additional week to correct hardware complications. After discussion, it was decided that a replacement PCB was unfeasible to obtain within a one week turnaround time. The design team reproduced its hardware by mounting an Arduino Uno development board on the outside of the grip housing. An independent 5 V regulator was attached to provide power solely to the development board. For simplicity, the power indicator LED was also removed from the secondary working demonstration. 86 SENIOR DESIGN II – SUMMER 2014 – TEAM 3: Mizell, Pennock, Salih 7.3 Accomplished Objectives Despite the setbacks experienced, the design team believed that it met, if not exceeded, its original product objectives and specifications. The project was intended to be a maximum of 3 lbs. The measured weight of the system was 2.7 lbs. The design team met the objective of incorporating the battery supply within the handle grip. The minimum operation time of the system was supposed to be 30 minutes. The project ran for several hours on a single charge. During the two weeks of testing and development, the design team only recharged the battery once. The project supported the weight of the camera while maintaining an acceptable stability. Finally, the PCB had to be mounted within the stabilizer’s handle grip. If the PCB had not be damaged during testing, all electrical components would have been fully enclosed within the handle. The handle had approximate dimensions of 1.5” diameter and 7” length. The PCB was manufactured at approximately 1.2” width and 2” length. The length also included the off board IMU unit, prior to its separate mounting. The figure below shows the manufactured PCB with reference. Figure 14: Manufactured PCB with lighter for size reference 87 SENIOR DESIGN II – SUMMER 2014 – TEAM 3: Mizell, Pennock, Salih 7.4 Future Design Considerations While the design team met all of the original objectives and specifications, modifications could be incorporated. The design team would replace the servomotor on the large U-channel with one rated at a higher torque value. This would allow more load to be added to the stabilizer. In addition this would provide better response for the loads that it is already capable of handling. To reduce product weight and increase frame stability, the design team would replace the aluminum material with manufactured carbon composite material. With slight modifications, the PCB footprint could be reduced even further. Lastly, the design team believed that the operating time of the stabilizer was absurd. A smaller capacity battery could be used and it would still operate much longer than the minimum user requirement originally established. 88 SENIOR DESIGN II – SUMMER 2014 – TEAM 3: Mizell, Pennock, Salih 8. ADMINISTRATIVE In order to for any good idea to become successful, an important element of administration must play a significant role so as to insure the success of that idea. This would also hold true with the camera stabilizer that is to be presented for the purposes of the senior design project. Careful planning with respect to time management as well as proper delegations is needed in order to insure an efficient and well balance work load is assigned to all members in the group. Having very good administration will not only insure the project is completed successfully, rather it will also help prevent having one member of the group having to have much more work than another. Also, having good administration is meant to ensure that each member of the group is utilized to their strengths rather than their weakness. Most importantly of all the points, having good administration on a project will lead to everyone from the group benefiting and learning from the senior design project on the camera stabilizer. 8.1. Team Management Before any member of the group got started writing anything that went towards the documentation, several meetings needed to be held. The first step was the matter of delegating which member of the group was going to write what part of the documentation. Having these meetings benefited the group in a multitude of ways. As the group meet to discuss what was needed, lots of times the person who suggested something be added or placed would also be very comfortable with writing about the topic. Another very important point was the fact that the group wanted to insure that there was no overlap. The last thing anyone would want is for two members of the group writing about the same exact topic at same time. Meeting with the group and discussing about what was written also insured that everyone on in the group would agree on what one member suggested they would write about in order to insure a high level of quality. Throughout the course of this project a constant and clear form of communication was made between the members of the group in several ways. First of all, any and all writings where shared on a google drive that was accessible to all members of the groups. This would insure that at any given time a group member could access a writing about a particular topic to review it and discuss with the group if any edits were needed to the documentation. The group would have anywhere between two to four meetings throughout the course of the week. Two of the meetings would be held prior to the start of the senior design class and would roughly last for about an hour. The main objectives behind these meetings where to recap what each member of the group had already completed towards the writing and also talk about what they would be expected to write throughout the course of the following week. The group meet regularly every weekend at a coffee shop to discuss important issues relating to the senior design project. This served as one of the most 89 SENIOR DESIGN II – SUMMER 2014 – TEAM 3: Mizell, Pennock, Salih beneficial times throughout the course of the project. Lots of ideas were bounced around the group and the discussion about the projected would stimulate new design prospects and areas to research. The weekly meeting would also serve as a time to allow the group to sit together while the individual members would write about their specific topics. Having immediate access to the group members while one is writing a topic towards something like the design would help in insuring no mistakes are made in the writing and that everyone’s input can be given in real time. The content needed towards documenting the senior design project for the camera stabilizer was broken into several components and proportionally given to the members of the group. The bulk of the research that would be needed not only for the documentation but also for the purposes of building the prototype was divided in to three main parts. One of the main components of the research was for accelerometer as well as the data logging and computations that would be needed for the accelerometer. This was one of the more difficult aspects towards the camera stabilizer and would be delegated towards one of the members of the group to research and write about. This member through their experience with internships with various internships as well as being currently employed as an engineer seemed to be most suited to spearheading the research on the accelerometer. Another of the main components was the research needed for electric motors and the batteries that would needed to supply power to the camera stabilizer. The electric motors and power supply are critical towards the project and as such have been delegated to specifically be address by one of the members of the group to properly document. The member of the group that was tasked to write about these topics was concentrating on power systems and electric machinery in school and naturally was very interested in researching and writing about the electric motors and power supply. The last of the main components would be research and documentation towards the microcontroller as well as the appropriate sensors and motor drivers needed. The three main components that were previously mentioned obviously would not be sufficient material to research and document on. Other topics such as writing about existing projects and design concepts would have inputs and documentations by all members of the group. 90 SENIOR DESIGN II – SUMMER 2014 – TEAM 3: Mizell, Pennock, Salih Janurary 19-Jan 26-Jan 2-Feb Feburary March April 9-Feb 16-Feb 23-Feb 2-Mar 9-Mar 16-Mar 23-Mar 30-Mar 6-Apr 13-Apr 20-Apr 27-A RESEARCH: Similar Designs Frame Design Rapid Frame Prototyping Materials Motor Technologies Measurement Technologies Power & Batteries Control Theory Measuring Systems Motor Systems System Integration RESEARCH REPORT Report Editing In Progress On Schedule Behind Schedule If Required Goal 1: Complete Tech. Research Figure 159: Spring 2014 Timeline & Schedule 91 Goal 2: Complete Systems Prototyping SENIOR DESIGN II – SUMMER 2014 – TEAM 3: Mizell, Pennock, Salih May 5-May 12-May 19-May 26-May 1-Jun June 8-Jun 15-Jun 22-Jun 29-Jun 6-Jul July 13-Jul 20-Jul PROTOTYPING Frame Design & Materials Motor Systems Control & MCUs Measurement Systems Power & Battery System Software DESIGN Frame Mechanical Hardware Electrical Hardware PCB TEST & DEBUG FINAL REPORT PRESENTATION PREP In Progress On Schedule Behind Schedule If Required Goal 3: Prepare Initial Design Figure 40: Summer 2014 Timeline & Schedule 92 Goal 4: "Final" Design Ready 27-Jul SENIOR DESIGN II – SUMMER 2014 – TEAM 3: Mizell, Pennock, Salih 8.2. Milestones & Timeline A millstone of the project was also crafted in order to bring a sense of clarify to all the members of the group. The milestone would help to quantify the goals in a timely fashion so as make sure that no part of the project gets left behind or not given an appropriate amount of time. Figure 39 and Figure 40 (on the previous page) will depict the expect time that each step of the project is to start as well as when it will be completed. 8.3. Budget & Finances Initially when the group decided to choose the camera stabilizer as the project to pursue for senior design, it was clear that the price to put together and build the camera stabilizer was going to be significant. The group however was very fortunate in the fact that the camera stabilizer was a project that was pitched to the senior design class by Professor Michel Young of George Mayson University. Professor Young was looking for a senior design group to design and build the camera stabilizer for his own use. In exchange for the group building the camera stabilizer, Professor Young agreed to reimburse any of the cost that would go towards the camera stabilizer project for an amount of up to $500. Having Professor Young sponsor the camera stabilizer proved to be a very beneficial part of choosing this project. Having a very reasonable budget mean that senior design group would not have to worry about making compromises on low quality components due to a lack of funds. However, the senior design group did not lose sight of the fact that there was a strict cap limit of $500 that Professor Young made as a budget constraint for this project. This meant that careful consideration of which components of the camera stabilizer took precedents over the other. Having this hierarchy of which component was more important than the next would help in insuring that money did not go wasted unnecessarily. An appropriate means of keeping record of expenditure is also needed to insure that all expense are accounted for and also group members are reimbursed for the costs accordingly. Whenever a member of the senior design group is to perches a component for the camera stabilizer, the receipt for that transaction must be scanned and sent to one of the folders on a google drive that is dedicated for receipts for transactions. The folder on the google drive that is meant for receipts will be organized according for each member of the senior design group and also categorized by when the transaction was made. Have the data for the expense properly logged will help to guide senior design team to keep track of the budget and make sure that the $500 budget is not exceeded. Finally with the date of the expenditure and the receipts for all the transactions will be presented to Professor Young for him to review. Professor Young will then reimburse the senior design group by writing a check for the amount that was spent at that time. Once the check has been cashed, each member of the senior design group will receive their portion of the check based on how much each member of the group spent out of their out pocket. The group will expect to send a constant 93 SENIOR DESIGN II – SUMMER 2014 – TEAM 3: Mizell, Pennock, Salih log of the receipts of expenditure roughly every month. The senior design group will attempt to have the day that reimbursement occurs to be as properly aligned as possible with any credit card payment cycles that the group members may use. This will help in preventing any of the group members from accruing any interest on their credit cards. The reason that there such an emphasis on this point is because Professor Young will not reimburse any interest that may accrue on any of the member’s credit cards. A table has been provided in table 18 to give a clear representation of what expenses that are to be expected when construction is to begin of the prototype for the camera stabilizer. It is very important to note that the data provided in table 18 is only meant as very rough estimation and is not meant to be comprehensive of all expenses. This is simply due to the fact that at this stage of the project all that can be done is a forecasting of the expenses based on research of subsystems and other comparable products and past projects. Expected Budget Items: Cost: Motors $120 Sensors $120 PCP Production $60 Battery $50 Hardware Frame $150 Total $500 Table 14: Expected Budget Table 19 is another table that provides the current expense that have already accrued at this point. Having this particular table may prove to be very beneficial in terms of providing comparison between what has already been spend and what was expected to be spent. Also, it is important to note that the data in table 19 includes expense towards certain transactions that will not be reimbursed by Professor Michael Young. 94 SENIOR DESIGN II – SUMMER 2014 – TEAM 3: Mizell, Pennock, Salih Implementation Budget Items: Price: Date: Member: Where: Tenergy $52.99 6/18/20 14 Ahmed Salih Allbattery.com Tenergy $21.95 6/18/20 14 Ahmed Salih Allbattery.com Hitec -5645 $46.99 7/9/201 4 Alex Pennock Skycraft Hitec -5805 $69.99 7/10/20 14 Alex Pennock Skycraft ATmega328p $3.61 7/10/20 14 Tom Mizell digikey.com Hitec -5790 $174.99 7/17/20 14 Ahmed/Alex/ Tom Skycraft Aluminum Hardware $42.61 7/15/20 14 Alex Pennock servocity.com PCB $50.00 7/15/20 14 Tom 4pcb.com Miscellaneous Hardware fasteners $15.00 7/22/20 14 Alex Pennock Home depot Hitec -5685 $39.99 7/23/20 14 Alex Pennock Skycraft Total $518.12 Table 15: Implementation budget Mentoring One of the biggest successes found with administration was having the assistance and mentorship of Professor Michael Young. He would regularly check in with the group and get the status of where the project stood. Professor Young analyzed all the data the senior design group provided and gave appropriate feedback. Often times Professor Young’s comments and suggestions on a particular topic would lead the senior design group to producing an idea that would later prove to be very beneficial towards the camera stabilizer project. Professor Young was very aware that this project is meant to be a learning experience for the senior design group and as such would not want to give away key information that would otherwise oversimplify designing and building the camera stabilizer. 95 SENIOR DESIGN II – SUMMER 2014 – TEAM 3: Mizell, Pennock, Salih Appendix A: Permissions Figure 2: Stedicam Harness and Stabilizer (reprinted with permission) ......... Error! Bookmark not defined. Figure 9: Rated Horsepower, AC vs. DC Motors ............................................................................ 17 Figure 12: Stepper Motor Teeth Diagram ...................................................................................... 21 a SENIOR DESIGN II – SUMMER 2014 – TEAM 3: Mizell, Pennock, Salih Figure 14: Brushed DC Motor Driver with Two Half-Bridges (reprinted with permission)............ 24 Figure 15: Accelerometer Structure ............................................................................................... 29 b SENIOR DESIGN II – SUMMER 2014 – TEAM 3: Mizell, Pennock, Salih Figure 19: Coriolis Force on Tuning Fork Gyroscope ...................................................................... 31 Figure 20: Point-To-Point Component Technology (reprinted with permission) .......................... 53 Figure 21: Through Hole Technology (reprinted with permission)................................................ 54 c SENIOR DESIGN II – SUMMER 2014 – TEAM 3: Mizell, Pennock, Salih Figure 22: Surface Mount Technology (reprinted with permission).............................................. 55 Figure 30: Two-Axis BLDC Gimbal Stabilizer (permission pending) .. Error! Bookmark not defined. Attempted to contact by phone. No email provided. http://cs.dx.com/FAQ/Phone Figure 33: SEN-11028 Breakout Board with MPU-6050 IMU (reprinted with permission) ............ 73 d SENIOR DESIGN II – SUMMER 2014 – TEAM 3: Mizell, Pennock, Salih Appendix B: Datasheets Selecting Hall Effect for DC Brushless Motors http://www.mouser.com/pdfdocs/Selecting-Hall-Effect-for-DC-Brushless-Motors.pdf Quadrature Encoder Fundamentals http://www.ni.com/white-paper/4763/en/ Motor Control and Drive https://www.microchip.com/pagehandler/en-us/technology/motorcontrol/ Brushed DC Motor Fundamentals http://ww1.microchip.com/downloads/en/AppNotes/00905B.pdf Brushless DC Motor Control Made Easy http://ww1.microchip.com/downloads/en/appnotes/00857a.pdf Sensorless Trapezoidal Control of BLDC Motors http://www.ti.com/general/docs/lit/getliterature.tsp?literatureNumber=sprabq7&fileTy pe=pdf MSP430 Stepper Motor Controller http://www.ti.com/lit/an/slaa223/slaa223.pdf Stepper Motor Fundamentals http://ww1.microchip.com/downloads/en/AppNotes/00907a.pdf Sensorless BLDC Control http://ww1.microchip.com/downloads/en/AppNotes/01160b.pdf Sinusoidal Control of PMSM Motors with dsPIC30F DSC http://ww1.microchip.com/downloads/en/AppNotes/01017A.pdf e SENIOR DESIGN II – SUMMER 2014 – TEAM 3: Mizell, Pennock, Salih Appendix C: Works Cited [1] Accrediation Board for Engineering and Technology, "EngineeringChange: A Study of the Impact of EC2000," [Online]. Available: http://www.abet.org/engineering-change/. [Accessed 27 April 2014]. [2] P. M. Young, "Single Axis Camera Stabilizer," Orlando, 2014. [3] Wikipedia.org, "Steadicam - Wikipedia, the free encylopedia," 3 March 2014. [Online]. Available: http://en.wikipedia.org/wiki/Steadicam. [Accessed 27 April 2014]. [4] Manfrotto, "SYMPLA Version Fig Rig With Universal Mount Fitting to Rods MVA522W Components | Manfrotto," [Online]. Available: http://www.manfrotto.us/sympla-versionfig-rig-with-universal-mount-fitting-to-rods. [Accessed 27 April 2014]. [5] Edward Schneckloth, "Glidecam HD-2000 Review & Rating | PCMag.com," PCMag.com, [Online]. Available: http://www.pcmag.com/article2/0,2817,2417224,00.asp. [Accessed 27 April 2014]. [6] D. Swando, Interviewee, Lead Air Designs. [Interview]. 15 February 2014. [7] R. Mortimore, Interviewee, Mechanical Vibration Isolation. [Interview]. 6 April 2014. [8] P. Nguyen, Interviewee, Design Feasibility. [Interview]. 7 January 2014. [9] L. Sotomayor, Interviewee, Aircraft Vibrations. [Interview]. 24 April 2014. [10 "Clemson Vehicular Electronics Laboratory: Brushed DC Motors," [Online]. Available: ] http://www.cvel.clemson.edu/auto/actuators/motors-dc-brushed.html. [Accessed 27 April 2014]. [11 Wikipedia.org, "Brushless DC electric motor - Wikipedia, the free encylopedia," 2 April ] 2014. [Online]. Available: http://en.wikipedia.org/wiki/Brushless_DC_electric_motor. [Accessed 27 April 2014]. [12 Pushek Madaan & Cypress Semiconductor, "Brushless DC Motors - Part I: Construction and ] Operating Principles | EDN," EDN Network, 11 April 2013. [Online]. Available: http://www.edn.com/design/sensors/4406682/Brushless-DC-Motors---Part-I-Construction-and-Operating-Principles. [Accessed 27 April 2014]. [13 "Technical Documents - Documentos Tecnicos Servomotors," [Online]. Available: ] http://en.wikipedia.org/wiki/Brushless_DC_electric_motor. [Accessed 27 April 2014]. f SENIOR DESIGN II – SUMMER 2014 – TEAM 3: Mizell, Pennock, Salih [14 Microchip, "Brushed DC Motor Fundamentals," 2010. [Online]. Available: ] http://ww1.microchip.com/downloads/en/AppNotes/00905B.pdf. [Accessed 2 February 2014]. [15 Microchip, "Sensorless BLDC Control," 2008. [Online]. Available: ] http://ww1.microchip.com/downloads/en/AppNotes/01160b.pdf. [Accessed 27 April 2014]. [16 T. Instruments, "Sensorless Trapezoidal Control of BLDC Motors," July 2013. [Online]. ] Available: http://www.ti.com/lit/an/sprabq7/sprabq7.pdf. [Accessed 28 February 2014]. [17 Microchip, "Stepper Motor Fundamentals," 2004. [Online]. Available: ] http://ww1.microchip.com/downloads/en/AppNotes/00907a.pdf. [Accessed 27 March 2014]. [18 T. Instruments, "MSP430 Stepper Motor Controller," November 2004. [Online]. Available: ] http://www.ti.com/lit/an/slaa223/slaa223.pdf. [Accessed 6 March 2014]. [19 P. L. Walter, "Evolution and Comparison of Accelerometer Technologies," [Online]. ] Available: http://sem.org/PDF/31_evolution_of_accel_technologies.pdf. [Accessed 27 April 2014]. [20 InvenSense, "MPU-6000/6050 Six-Axis (Gyro + Accelerometer) MEMS MotionTracking ] Devices for Smart Phones, Tablets, and Wearable Sensors," InvenSense, [Online]. Available: http://www.invensense.com/mems/gyro/mpu6050.html. [Accessed 27 April 2014]. [21 Honeywell, "Redirecting," December 2012. [Online]. Available: ] http://www.mouser.com/pdfdocs/Selecting-Hall-Effect-for-DC-Brushless-Motors.pdf. [Accessed 27 April 2014]. [22 N. Instruments, "Quadrature Encoder Fundamentals- National Instruments," 9 January ] 2014. [Online]. Available: http://www.ni.com/white-paper/4763/en/. [Accessed 27 April 2014]. [23 Financial Visualizations, "finviz.com," [Online]. Available: http://finviz.com/help/technical] analysis/moving-averages.ashx. [Accessed 27 April 2014]. [24 Wikipedia.org, "Alkaline battery - Wikipedia, the free encylopedia," 7 March 2014. ] [Online]. Available: http://en.wikipedia.org/wiki/Alkaline_battery. [Accessed 27 April 2014]. [25 Wikipedia.org, "Lithium polymer battery - Wikipedia, the free encylopedia," 22 March ] 2014. [Online]. Available: http://en.wikipedia.org/wiki/Lithium_polymer_battery. [Accessed 27 April 2014]. g SENIOR DESIGN II – SUMMER 2014 – TEAM 3: Mizell, Pennock, Salih [26 Chris Gammell, "A Widlar Poster For The Agers | The Amp Hour Electronics Podcast," 9 3 ] 2011. [Online]. Available: http://www.theamphour.com/a-widlar-poster-for-the-ages/. [Accessed 27 April 2014]. [27 Intersil, May 2001. [Online]. Available: ] http://www.intersil.com/content/dam/Intersil/documents/ca14/ca1458-1558-741-741clm1458-lm741-lm741c.pdf. [Accessed 27 April 2014]. [28 Advanced Circuits, Advanced Circuits, [Online]. Available: http://www.4pcb.com/. ] [Accessed 27 April 2014]. [29 Enzo, "28 Basic PCB Design Rules - Upverter Blog," 1 August 2013. [Online]. Available: ] http://blog.upverter.com/28-basic-pcb-design-rules. [Accessed 27 April 2014]. [30 Wikipedia.org, "American wire gauge - Wikipedia, the free encylopedia," 14 April 2014. ] [Online]. Available: http://en.wikipedia.org/wiki/American_wire_gauge. [Accessed 27 April 2014]. [31 IEEE Standards Association, "IEEE-SA - National Electrical Safety Code (NESC)," 2014. ] [Online]. Available: Ref: http://standards.ieee.org/about/nesc/. [Accessed 27 April 2014]. [32 Wikipedia.org, "Through-hole Technology - Wikipedia, the free encylopedia," 26 January ] 2014. [Online]. Available: http://en.wikipedia.org/wiki/Through-hole_technology. [Accessed 27 April 2014]. [33 Wikipedia.org, "Surface-mount Technology - Wikipedia, the free encylopedia," 22 April ] 2014. [Online]. Available: http://en.wikipedia.org/wiki/Surface-mount_technology. [Accessed 27 April 2014]. [34 B. Patel, Interviewee, Wave Soldering Discussion. [Interview]. 8 April 2014. ] [35 ElementAluminum, "Pros and Cons of aluminum," [Online]. Available: ] http://elementaluminum.tripod.com/id8.html. [Accessed 27 April 2014]. [36 J.W. Winco, Inc, "J.W. Winco - Engineering Tips - Pros and Cons of Aluminum," 2011. ] [Online]. Available: http://www.jwwinco.com/engineeringtips/prosconsaluminum.html. [Accessed 27 April 2014]. [37 Lee Agur, "Carbon Fiber vs Aluminum vs Steel vs Titanium >> I Love Bicycling," I Love ] Bicycling, 10 December 2013. [Online]. Available: http://www.ilovebicycling.com/carbonfiber-vs-aluminum-vs-steel-vs-titanium/. [Accessed 27 April 2014]. [38 "Acrylonitrile ButadieneStyrene (ABS)," ides.com, 2014. [Online]. Available: ] http://www.ides.com/pm/3_ABS.asp. [Accessed 27 April 2014]. h SENIOR DESIGN II – SUMMER 2014 – TEAM 3: Mizell, Pennock, Salih [39 Firgelli Linear Actuators, "Minature Linear Motion Series - L12," [Online]. Available: ] http://www.firgelli.com/Uploads/L12_datasheet.pdf. [Accessed 27 April 2014]. [40 "D2826-6-2200kv Outrunner Motor," hobbyking.com, [Online]. Available: ] http://www.hobbyking.com/hobbyking/store/__12919__d2826_6_2200kv_outrunner_mo tor.html. [Accessed 27 April 2014]. [41 "Tenergy Li-Ion 18650 14.8V 2000mAh PCM Protected Rechargeable Battery Pack with ] 22AWG Bare Leads," all-battery.com, 2014. [Online]. Available: http://www.allbattery.com/liion18650148v2600mahrechargeablebatterypackpcbprotectionwith22awgbareleads.aspx. [Accessed 27 April 2014]. [42 Wikipedia.org, "g-force - Wikipedia, the free encylopedia," 23 April 2014. [Online]. ] Available: http://en.wikipedia.org/wiki/G-force. [Accessed 27 April 2014]. [43 Wikipedia.org, "Standard Gravity - Wikipedia, the free encylopedia," 5 April 2014. [Online]. ] Available: http://en.wikipedia.org/wiki/Standard_gravity. [Accessed 27 April 2014]. [44 G. E. &. Students, "Acceleration That Would Kill a Human," 2004. [Online]. Available: ] http://hypertextbook.com/facts/2004/YuriyRafailov.shtml. [Accessed 27 April 2014]. [45 C. Norton, "Formula One drivers feel the G-force," The Telegraph, 10 May 2010. [Online]. ] Available: http://www.telegraph.co.uk/motoring/motorsport/7681665/Formula-Onedrivers-feel-the-G-force.html. [Accessed 27 April 2014]. [46 P. Tyson, "NOVA | All About G Forces," PBS.org, 1 November 2007. [Online]. Available: ] http://www.pbs.org/wgbh/nova/space/gravity-forces.html. [Accessed 27 April 2014]. [47 Nikon, "Nikon | Imaging Products | Specifications - Nikon 1 V1," Nikon, 2014. [Online]. ] Available: http://imaging.nikon.com/lineup/acil/bodies/v1/spec.htm. [Accessed 27 April 2014]. [48 Microchip, "Motor Control and Drive," Microchip, 2014. [Online]. Available: ] https://www.microchip.com/pagehandler/en-us/technology/motorcontrol/. [Accessed 6 March 2014]. [49 Microchip, "Brushless DC Motor Control Made Easy," 2002. [Online]. Available: ] http://ww1.microchip.com/downloads/en/appnotes/00857a.pdf. [Accessed 28 Feburary 2014]. [50 Microchip, "Sinusoidal Control of PMSM Motors with dsPIC30F DSC," 2005. [Online]. ] Available: http://ww1.microchip.com/downloads/en/AppNotes/01017A.pdf. [Accessed 27 April 2014]. i