1
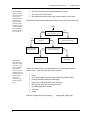
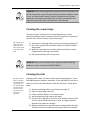
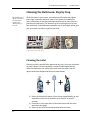
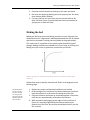
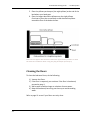
A Residential Cleaning Guide . . . . For Men, by Men by Shawn Ritchie, PhD. Updated with new information for 2012! Table of Contents Table of Contents Table of Contents ....................................................................... 1 Introduction ............................................................................... 3 Cleaning the Kitchen: Quickstart Guide ..................................... 5 Cleaning the Kitchen: Step by Step ............................................ 6 Cleaning the countertops ................................................ 7 Cleaning the sink ............................................................. 7 Cleaning the stove ........................................................... 8 The stovetop ......................................................... 8 The oven ................................................................ 9 Cleaning the refrigerator ................................................. 9 Cleaning the floor .......................................................... 10 Cleaning the Bathroom: Quickstart Guide ............................... 11 Cleaning the Bathroom: Step by Step ...................................... 12 Cleaning the toilet ......................................................... 12 Cleaning the sink ........................................................... 13 Cleaning the shower ...................................................... 13 Cleaning the floor .......................................................... 14 Cleaning the Living Room: Quickstart Guide ........................... 15 Cleaning the Living Room: Step by Step .................................. 16 1 A Residential Cleaning Guide . . . . For Men by Men Cleaning the tables ........................................................ 16 Cleaning the sofas and chairs ........................................ 17 Dusting objects .............................................................. 17 Cleaning the floors ......................................................... 17 Cleaning the Master Bedroom: Quickstart Guide .................... 19 Cleaning the Master Bedroom: Step by Step ........................... 20 Putting clothes away ..................................................... 20 Making the bed .............................................................. 21 Cleaning the floors ......................................................... 22 2 Introduction Introduction Let’s face it, this manual tries to accomplish what most men hate to do – clean a house and read a manual. Are you tired of your wife (who, to be politically correct, is referred to as “partner” throughout the rest of this guide) always harping on you to clean the house because you never seem to get around to doing it? I know, when the game is on, or if the boys want to play poker, the last thing on your mind is the vacuuming that your partner told you to do over a week ago. The guide is divided into sections by room, with a quick-‐start page at the front of each section showing you how to immediately start cleaning the room. This is especially useful for those “emergency” situations, for example, if your partner calls you from the airport to let you know their flight was early and they’ll be home in 20 minutes! The instructions for each room aim to achieve the highest level of visual cleanliness impact (or VCI), in the shortest amount of time. There is no point in washing the walls behind the fridge when there are empty beer bottles scattered everywhere. But don’t fret; this guide also goes beyond the surface clean. For those with focus and drive, a state of cleanliness utopia is attainable. In preparing to write this guide, I interviewed hundreds of female subjects, both married and single, to identify the most commonly critiqued parts of a cleaned room. We all know that when we say the job is done, it will, without question, be inspected and scrutinized. Therefore, face-‐slap warning labels are used in this guide to highlight specific tasks that are likely to undergo such scrutiny. These tasks must be given the utmost attention and be completed to near perfection. If they aren’t, look out. Other tasks, which do not necessarily affect the VCI but are required for attaining that utopia cleanliness state mentioned above, are highlighted by the happy wife symbol. Do not underestimate the potential implications of completing these advanced tasks. Take my advice – heed all of the warnings in this guide. One of most important decisions you will be faced with is deciding which room to clean first (assuming you might tackle more than one room at a time). Although you might be inclined to start with the man cave or the garage, these may not be the most logical choices. The room you must clean first is based on a combination of variables including: 3 A Residential Cleaning Guide . . . . For Men by Men Tip: to determine the VCI of a room, observe the level of clutter, such as empty bottles and dirty dishes, the height of dust on stationary objects, and the amount of grime on the floor. If any of these are observed, the VCI is low. Look hard. • • • the last room that your partner asked you to clean the current VCI of the room the relative amount of time your partner spends in the room Use the flowchart below to determine which room you should clean first: START NO NO Has your partner asked you to clean the room? Does the room have a low VCI? YES YES Start with this room, since it likely needs cleaning. You don’t need to clean this room! NO Does your partner spend time in this room? YES Tip: microfiber cloths clean better than paper towels or old shirts. They are very soft and likely yellow or green in color. You probably paid a lot for these when your partner bought them at an environmentally-‐ friendly cleaning party. You don’t need to start with this room. START WITH THIS ROOM! If you have made it this far, congratulations! You are nearly ready to clean a room – fast! The only items you need are: • • • • • • • • focus clean cloths (paper towels, or preferably microfiber cloths) cleaning solution (water and dishsoap) steel wool or 3M pads from your workshop the chrome polish you use on your truck your BBQ degreaser solution a vacuum a mop And don’t forget the age-‐old saying . . . . . happy wife, happy life! 4 Cleaning the Kitchen: Quickstart Guide Cleaning the Kitchen: Quickstart Guide Follow the four steps in the diagram below to immediately start cleaning the kitchen. 5 A Residential Cleaning Guide . . . . For Men by Men Cleaning the Kitchen: Step by Step The kitchen must first be surveyed for obvious signs of clutter, and the clutter removed. Differentiate between items that can be cleaned versus those that must be discarded. Not all items cluttering the kitchen should simply be disposed of. Refer to the diagram to help you identify typical kitchen clutter. 3 1 1 1 2 5 4 Example of a cluttered kitchen with a low VCI. Tip: You probably do not know where everything is kept in the kitchen. If not, just guess and store it anywhere out of sight. When your partner asks where something is, you can respond, “Oh, I put it in the cabinet with the frying pans when I cleaned the kitchen last week!” You really can’t go wrong here. Use the table below to determine the action required for different types of kitchen clutter. 1 6 # 1 Item dirty dishes piled in the sink, on the counter, and on the stove 2 3 clean dishes in the dishwasher empty cereal boxes and HungryManTM dinner packages overflowing garbage on the floor the refrigerator 4 5 Action clean by hand or use dishwasher; store in the proper place1 store in the proper place discard discard this is a wildcard, see pg. 10 See my book, Cleaning Dishes . . . . for Men, by Men, on how to clean dishes in detail. Cleaning the Kitchen: Step by Step WARNING! These actions significantly impact the VCI of the kitchen. DO NOT be tempted to stop at this point because the kitchen appears clean. In fact, you have barely started. Crud that is dried onto the counters, baked onto the stovetop, and fallen onto the floor, and liquids in the fridge that used to be solids, need attention. Stay focused. Cleaning the countertops The grime may be so heavy on the countertops that you cannot determine whether they are natural stone (such as granite or quartz) or Formica, but it doesn’t matter. Follow these steps: 1) Remove any remaining clutter from the countertop (see page 7). 2) Dip a clean rag (not the microfiber cloth) into a bucket of warm soapy water. 3) Wipe the countertops in a circular motion until they are clean. Frequently rinse the rag in the bucket. 4) Dry the countertops with a clean cloth Tip: To make warm soapy water, fill a bucket with warm water and then add three drops of dish soap. WARNING! Do not use microfiber cloths with any chemical cleaning products or soap. Use them with WATER ONLY! Cleaning the sink Tip: Ensure that all dishes are washed, and any other tasks requiring the sink are complete before you clean the sink. You don’t want to dirty the sink after you have just cleaned it! Cleaning a sink is easy. You do not need special cleaning agents – just a little elbow grease. However, steel wool, or the 3M pads that you use to polish the top of your table saw can make this job easier. Follow these steps: 1) 2) 3) 4) 5) Remove remaining dishes from the sink (see page 7). Place the drain plug in the sink. Fill the sink with about 1 inch of warm water. Add three drops of dish soap to the water. Use the SOS or 3M pad to scrub the sides, bottom and top of the sink. Do not be afraid to work up a sweat, as tough stains and deposits may need extra oomph! 6) Wipe the faucet with a rag. Make sure to wipe between the taps and the back of the countertop where grime often accumulates. 7 A Residential Cleaning Guide . . . . For Men by Men Take your sink to the next level and earn bonus points by making it look brand new. This means NOT a single mark, stain or blemish can be visible on any of the chrome parts. Use the polish and technique that you use for the chrome grill on your truck, and give it the same level of attention! Cleaning the stove There are several different types of stoves, but it doesn’t matter. What matters is that you clean it. A stove typically has two parts: the stovetop, and the oven. If you are in luck, your oven will have a self-‐clean feature that will do the work for you. To clean your stove, follow these steps: The stovetop 1) Ensure the burners or elements are turned off. 2) Remove any remaining pots or pans from the stovetop. If you have a glass-‐top stove (a seamless piece of glass with no burners), proceed to step 4. 3) Remove the grates and burner assemblies for a gas stovetop, or the elements and trays if the stove is electric. 4) Dip a clean rag (not a microfiber cloth) into a bucket of warm soapy water. 5) Wipe the stovetop, using sufficient force to remove all the baked-‐ on crud. As with the sink, you may have to work up a sweat here and really lean into it. 6) Dry the grates, burner assemblies or element parts with a clean rag and re-‐assemble. Crud refers to baked-‐on food that spilled or boiled over when the cook wasn’t paying attention. WARNING! If there is baked-‐on crud that you cannot wipe off, do not give up and put the stovetop back together. Your partner likely spends a lot of time in front of the stove and will notice if the crud is still there after you have “cleaned.” Follow these steps to remove challenging baked-‐on crud: 1) 2) 3) 4) 8 Fill the sink with hot water. Add five squirts of dish soap. Soak the grates and elements for at least 30 minutes. Use the steel wool or 3M pad to scrub the off the crud. Cleaning the Kitchen: Step by Step 5) Wipe the parts with a rag to ensure every last bit of crud is removed. 6) Dry and replace the parts. The oven 1) Ensure the oven is off. 2) Refer to your stove manual and pray that there is a self-‐clean option. Follow those instructions. If not, proceed to step 3. 3) Spray the inside of the oven, including the racks, with the degreaser solution you use to clean your BBQ. 4) Wait at least 30 minutes. 5) Wipe off all crud with old rags. If the crud is still hard, wait longer. 6) When all the crud is removed, wipe the oven and racks using more rags and soapy water. 7) Wipe the oven and racks dry with more clean rags. 8) Wipe down the outside of the oven door until you can see your reflection in the glass. Cleaning the refrigerator Your partner may not be expecting you to clean the refrigerator. So, if it hasn’t been mentioned and you do it anyways, you will be in the good books. If you are expected to clean the fridge, keep reading. Visually scan the contents of the refrigerator for signs of mold. Look for clear containers with black fuzzy blobs on the inside. Inspect the expiration date of items, particularly milk and other dairy products. Pay special attention to fruits and vegetables, which should be stored in the crisper drawers at the bottom of the refrigerator. These items should be solids. If they have turned into liquids, or have a soft squishy feel, discard them. Follow these steps to clean your refrigerator: 1) 2) 3) 4) 5) 6) 7) Discard all rotten and expired items. Remove all items on the top shelf. Wash the shelf with warm soapy water. Rinse and dry the shelf, ensuring all soap is removed. Place items to be kept neatly back onto the shelf. Repeat steps 2 through 5 for the remaining shelves. Wipe down the front of the fridge until you can see your reflection 9 A Residential Cleaning Guide . . . . For Men by Men WARNING! You may not think that the shelves in your refrigerator need cleaning. You are probably wrong. If your partner asked you to clean the refrigerator, those shelves need to be spotless when you’re done. This means that no streaks, soap spots or other marks should be visible, especially if the shelves are clear glass or plastic. Cleaning the floor Next to dusting, floors are the most scrutinized part of a cleaned room according to the experts surveyed for this guide. There is no room for error here. The floor in your kitchen could be tile, hardwood, or linoleum, but it doesn’t matter. They can all be cleaned with diluted vinegar in warm water. Follow these steps to clean your kitchen floor: 1) Vacuum the floor. If you happen to have carpet in your kitchen, you are done. 2) Add a capful of white vinegar to a bucket of warm water. 3) Mop the floor and let dry. How t o determine if y our f loors are truly c lean. To determine if y our floors are truly c lean, s tand o n the e nd o f the r oom opposite a ny large w indows o r light sources. Lower y our h ead u ntil y ou can see the reflection o f light f rom the window in the f loor as shown. T he lower you g o, t he more visible s mall crumbs, dust and h air w ill b ecome. T he floor should be spotless if you d id t he job r ight. I f n ot, r epeat s teps 1 t o 3 above. Note t hat this method d oes not work for carpeted f loors. 10 Cleaning the Bathroom: Quickstart Guide Cleaning the Bathroom: Quickstart Guide Follow the four steps in the diagram below to immediately start cleaning the bathroom. 11 A Residential Cleaning Guide . . . . For Men by Men Cleaning the Bathroom: Step by Step Tip: The bathroom is the only room where you may want to consider using rubber gloves. It is your call. Of all the rooms in your house, the bathroom will require the highest level of grit, attention and focus. Most of the clutter is probably not yours, and neither is the sticky coating everywhere from your partner’s profuse use of hairspray. The shower may be a nothing short of a level four biohazard. If you bathroom resembles any of the images below, give plan on at least two hours to get the job done. Examples of a vanity countertop (left), a shower wall (middle), and a toilet (right) with very low VCIs. Cleaning the toilet Cleaning a toilet is possible with water and rag, but in this case, chemicals are your friends. There are probably a couple of odd-‐shaped bottles under the bathroom sink, and a toilet brush near the toilet. Look for objects with these shapes and follow the steps below: 1) Squirt the toilet bowl cleaner (in the funny shaped bottle) up and around the inside rim of the bowl. Let it soak for at least 15 minutes. 2) Continue to clean other parts of the bathroom while the toilet soaks (see next page). 3) Return to the toilet and scrub the bowl with the brush. 12 Cleaning the Bathroom: Step by Step 4) Spray exterior parts of the toilet bowl with WindexTM (or other glass cleaner) and wipe them clean with a rag. WARNING! Do not use microfiber cloths with any chemical cleaning products or soap. Use with WATER ONLY! Cleaning the sink The bathroom sink is similar to the kitchen sink, but the bathroom sink is probably porcelain and not stainless steel. WARNING! Do not use steel wool or 3M abrasive pads on a white sink. Severe and permanent damage may occur! You can clean the entire sink and faucet with glass cleaner as follows: 1) Spray the sink, taps and faucet with WindexTM (or other glass cleaner). 2) Wipe vigorously with rag. Alternatively, use a microfiber cloth and water to clean the sink, taps and faucet. Cleaning the shower A weekend warrior is a person who attempts projects, usually on the weekend, for which they likely have inadequate training. The shower could be the worst room in your house to clean. Depending on its condition, it may not be suitable for the weekend warrior. If there are black or multi-‐colored blobs growing in the shower, hire professional cleaners, and leave it to them. Your job here is done. However, if you absolutely must clean the shower and there is only mild soap-‐scum visible, use the microfiber cloths. DO NOT spray every cleaner you own on the walls of the shower as the fumes could kill you. Follow these steps: 1) Remove all the items from the shower. 13 A Residential Cleaning Guide . . . . For Men by Men 2) Vigorously wipe all surfaces, including tile, taps, and base with the microfiber cloths and lots of water. The soap-‐scum should magically disappear. 3) For extra tough scum on grout, follow these steps: a. Prepare a concentrated soap solution (squirt dishsoap for a count of five steamboats into a small bucket of water). b. Scrub the grout using a small brush (look for it in the bathroom vanity). c. Use the bucket and rinse with clean water. 4) Polish chrome parts, such as the taps and doorframe (if there is one) using WindexTM or a similar glass cleaner and a rag. Or, try the stuff that you use on the chrome parts of your truck. 5) Perform a final cleaning of the glass doors with WindexTM Your partner’s bottles of shampoos and conditioners that you removed likely have soap-‐scum on them too. To earn bonus points, clean them all before placing them back into the shower. If there is a ball-‐shaped object made of a mesh-‐like material hanging in the shower, throw it out and buy a new one. For even more bonus points, go to the store called Bath and Body Works, and ask for a Loofah (pronounced loo-‐fah). Cleaning the floor The floor in your bathroom should be tile or linoleum. Like the kitchen, the bathroom floor can be cleaned with diluted vinegar in warm water. What differentiates the bathroom floors from other floors in the house is the build-‐up of hairspray, perfume, and probably urine. Follow these steps to clean your bathroom floor: 1) Add two capfuls of white vinegar to a bucket of warm water. 2) Mop the floor. 3) Repeat step 2 as necessary until the floor is no longer sticky when you walk on it with bare feet. 4) Let the floor dry. Refer to page 11 to determine if your floors are truly clean. 14 Cleaning the Living Room: Quickstart Guide Cleaning the Living Room: Quickstart Guide Follow the four steps in the diagram below to immediately start cleaning the living room. 15 A Residential Cleaning Guide . . . . For Men by Men Cleaning the Living Room: Step by Step The living room is the easiest room to clean, but if you have been bacheloring, there are probably dirty dishes and beer bottles everywhere that need to be dealt with. Study the photo below to help you identify common types of living room clutter. 3 4 2 1 5 Typical living room clutter: 1, blankets from sleeping on the couch every night; 2, hockey equipment bag; 3, piles of laundry; 4, dirty dishes; 5, stacks of Maxim magazines Cleaning the tables The living room probably has two or more small tables and one larger table. The only items that should be on the small tables are lamps and maybe a picture or two. On the big table, there should only be a book with scenic pictures (no, not your Maxim magazine collection). Follow these steps to clean the tables: 1) Remove items from tables. 2) Wipe down the tables using a damp microfiber cloth. 3) Place only lamps, picture frames, and fat books with scenic pictures on the tables. 16 Cleaning the Living Room: Step by Step Cleaning the sofas and chairs It doesn’t get easier than sofas and chairs. Do the following: 1) Remove items from couches and chairs. 2) If the couches are leather, wipe them with a damp microfiber cloth. If the couches are fabric, give them a quick vacuum. 3) Replace pillows that are supposed to be on the couches or chairs. Dusting objects This is your opportunity to win bonus points! Although dusting has a low impact on the VCI, your partner will notice. According to experts surveyed for this guide, the finger swipe test was the most commonly used technique to assess the quality of a cleaned room. Follow the steps below to dust your living room: Trinkets are useless objects that are placed around the room for apparent visual appeal. 1) Identify objects in the room that are noticeably dusty, such as: • the tops of picture frames • lampshades • electronics such as televisions and stereo speakers • trinkets 2) Wipe the dust off the objects using a damp microfiber cloth. Cleaning the floors Cleaning the floors of a living room is simple. Follow these steps: 1) Pick up any remaining clutter from the floors. 2) Vacuum the floors. 3) If the floor is carpeted, you are done. If the floor is hardwood, proceed to step 4. WARNING! Do not slack off when vacuuming. Make sure you get behind couches, under tables, and anywhere else you think your partner will look to see how good of a job you really did. If possible, make fresh tracks with the vacuum cleaner in all visible areas, and do not walk on it until your partner compliments you on the job well done! 17 A Residential Cleaning Guide . . . . For Men by Men 4) Add a capful of white vinegar to a bucket of warm water. Mop the hardwood, but wring out the mop well to avoid standing water. If your floors are not carpeted, refer to page 11 to determine if they are truly clean. 18 Cleaning the Master Bedroom: Quickstart Guide Cleaning the Master Bedroom: Quickstart Guide Follow the four steps in the diagram below to immediately start cleaning the master bedroom. 19 A Residential Cleaning Guide . . . . For Men by Men Cleaning the Master Bedroom: Step by Step Clutter can build up quickly in the master bedroom, and within a week clothes may be piled waist deep. It is likely that the bed is not made, and that there are clean clothes from laundry that was done a month ago still piled in baskets. Cleaning the master bedroom, however, may be the room that earns you A LOT of bonus points because your partner is probably not expecting it. For a relatively small amount of time invested, a large impact on the VCI is possible. Study the diagram below to identify common forms of bedroom clutter. 2 4 3 1 Typical master bedroom clutter: 1, clothes on the floor; 2, unmade bed; 3, other miscellaneous items on the floor; 4, baskets of clean clothes Putting clothes away Tip: Consider clothing items dirty if they smell bad or if you can’t remember the last time they were worn. If in doubt, wash it! 20 Putting away clothes is easy. The key for success is motivation. Follow these steps, and do not stop until you are done. 1. Visually assess the room for piles of clothes. 2. Pick up clothes, placing dirty items in the laundry hamper. Put items that do not need washing in a separate pile. Cleaning the Master Bedroom: Step by Step 3. Continue until all the piles of clothing in the room are sorted. 4. Put items not requiring washing into their proper place. Put away clean clothes piled in baskets. 5. For items that are not yours that you do not know what to do with, fold them into a neat pile and place them into a basket for your partner to deal with later. Making the bed Making the bed may seem intimidating, but do not worry. Research has shown that there is a logarithmic relationship between the VCI of the bed and the time invested in making the bed (shown by the graph below). This means that it is possible to very quickly make the bed look good enough. Making the bed to the standard of a 5-‐star hotel, by tucking and folding every last corner to perfection, would take you forever. Graph showing the relationship between the VCI of a bed and time spent making it. Follow these steps to quickly make the bed. Refer to the diagram on the following page. Decorative pillows are the ones that you don’t actually use. They are the big fancy ones that should be piled on top of the bed. 1. Remove any clutter and decorative pillows from the bed. 2. Grab the edge of the comforter (the heavy blanket part) and the loose sheet below it at the same time along the same side. 3. Fling the comforter and sheet up and down together a few times, until they are approximately centered on the mattress. 4. Walk around the bed tugging at the edges of the comforter to ensure it is squarely aligned with the mattress and an even distance from the floor. No wrinkles should be present if you did this correctly. 21 A Residential Cleaning Guide . . . . For Men by Men 5. Place the pillows you sleep on (the night pillows) at the end of the bed where your head goes. 6. Place the largest decorative pillows over the night pillows. Continue to place the successively smaller decorative pillows toward the foot of the bed as shown. Side view of a typical bed. Arrows indicate the approximate positions to hold the sheet and comforter when using the fling technique (see step 3). Cleaning the floors To clean the bedroom floors, do the following: 1) Vacuum the floors. 2) If the floor is carpeted, you are done. If the floor is hardwood, proceed to step 4. 3) Add a capful of white vinegar to a bucket of warm water. 4) Mop the hardwood, but wring out the mop to avoid standing water. Refer to page 11 to see if your floors are truly clean. 22 Congratulations for making it this far. Go and drink a cold one! 23