1
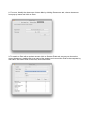
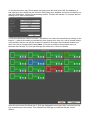
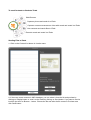
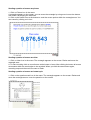
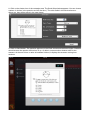
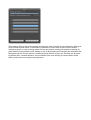
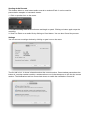
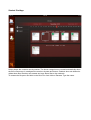
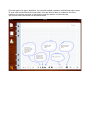
TEA User Manual
TEA OS X Application
Tea application is a floating logo over the top always. It is dimmed when inactive, to activate just
click on it. Firstly you should login to use Tea by clicking on the logo. There are two kind of users
the standart users (teachers) and admin user.
For standart users;
User Name: teacher
Password: test
For Admins;
User Name: admin
Password: password
To identify students iPads, User Logon Keys (USB keys that can be used for logon credentials)
and the classroom of the computer you should logon with admin user. To open and manage a
lesson session teacher account should be used.
For a demo Mac you should identify some settings for one time procedure by using admin account;
1- After login as admin, click on Settings icon on circular menu of Tea.
Menu to start and manage the session
Content sharing menu
Send quiz
Settings menu
2- For once, identify the classroom of demo Mac by clicking Classrooms tab, choose classroom
from pop-up menu and click on Save.
3- To match an iPad with a student account click on Student iPads tab, ensure you choose the
correct classroom, double-click on a name of the student and connect the iPad to the computer by
usb cable. Tea reads UDID of the iPad, click Save button.
4- If you want to use a USB stick as logon key (Since it is difficult and not safe to type password in
a Mac without keyboard by using keyboard viewer on the smartboard screen) click on User Logon
Keys, double-click on a name, plug the USB stick and click on Save. After this process you can
use this USB stick to logon to Tea by pluging to the Mac.
To Start a Lesson Session
Start new session or continue to existing one.
Suspend the active session.
Attendence list.
Finish the active session.
First of all, check that all iPads and the Demo Mac are in the same Wi-Fi network.
1- Click on Tea logo and logon by inserting the USB key or typing “teacher” for user name and
“test” as password.
2- Click on the teacher button and then green button in submenu.
3- Choose the lesson type (These datas are coming from the local demo SQL Lite database. In
real world they are coming from the school’s LMS system by a database connector provided by us)
and click Start button. If there was an existing session, Tea asks the teacher if to continue with the
existing one or start a new session.
4- The list of classroom comes to screen, the teacher can control the attendence by clicking on the
buttons. (-) means the student is permitted by some reason (sick, duty, etc.) and (x) means absent.
In this position teacher can ask the students to open their iPad app, the connected students are
seen in the list as orange picture frame (Note: If you can not see the orange frame even you
launched the iPad app. Try to kill the iPad app and relaunch it). Click on continue.
After the session start the Guest icon in iPad app disappears and a green halo is seen around the
logo at bottom-left of the screen. This indicates that iPad app is connected with the current
session.
To send Contents to Students’ iPads
Web Browser
Captures picture and sends it to iPads
Captures screen movements as video with sound and sends it to iPads
Lists contents and sends files to iPads
Records sound and sends it to iPads
Sending Files to iPads
1- Click on the Content List button in circular menu.
2- If there are some contents in LMS database, you can select it from the list and preview by
clicking on Display button or send it to the iPads by clicking on Send button. If you want to send a
local file just click on Browse... button. Choose the file and after the file comes to Preview area
click Send button.
Sending a portion of screen as picture
1- Click on Picture icon in the menu.
A rectangle appears on the screen, you can move the rectangle by using move icon at the bottom
and resize it by draging the side lines.
2- Click on the shutter icon at the bottom to send the screen portion within the rectangle area. You
can cancel by clicking red x icon.
Sending a portion of screen as video
1- Click on video icon in the menu. The rectangle appears on the screen. Resize and move the
rectangle area.
2- To start recording click on record button at the bottom of area. After clicking the button all screen
movements within the area begins to be recorded. When you click the same button again,
recording stops and the movie are sent to iPads.
Sending a portion of screen as instant quiz
1- Click on the question mark icon in the menu. The rectangle appears on the screen. Resize and
move the rectangle area to cover the question on the screen.
2- Click on the shutter icon of the rectangle area. The Send Quiz window appears. You can choose
number of choices in the question and set the time. ( The other fields in this window have no
effects yet, they will be active in the near future)
3- Click on Send button. The question appears on the iPads screen and the timer begins. Students
should answer the question before time is up. On Mac’s screen another window waits for the
answers. At the end of time or after all students finished, it displays the answers coming from
students.
Then teacher click on the correct answer and send the quiz as pic file to the students by clicking on
Send Correct Answer button. If the answer of students is correct then only the correct answer
marked as green, in case of wrong answer the correct answer coming from teacher is marked as
green and the wrong answer of the student as red. If the student can not answer the quiz within the
time given then the correct answer is marked as green and the rest as red. This files can be seen
by parents also. If teacher wants to send a solution video, then clicking on Send Solution Video
button opens the screen capture rectangle area.
Sending Audio Records
This feature allows to send instant audio records to students iPads. It can be used for
pronunciation samples or homework memos.
1- Click on speaker icon on the menu.
2- To start recording click on record button and begin to speak. Clicking on button again stops the
recording.
3- Send it to iPads as an audio file by clicking on Send button. You can also Cancel the process.
Settings
You can access to settings window by clicking on gear icon on the menu.
The first tab is Info. It shows information about the current session. Guest student passcode at the
bottom is a random number used by a student who are not in that classroom to join into the current
session. The Notifications tab has some check boxes to switch the notifications on and off.
Student iPad App
Library keeps the contents sent by teacher. The lesson categories are created automatically when
the first content sent. It catalogues the sessions by date and lesson. Students does not allowed to
delete these files. But they can rename and copy these files to the notebook.
To rename the file press and hold on the file’s icon. And click on Rename. Type the name.
The other part of the app is Notebook. You can add multiple notebooks with different paper styles.
To send a file into Notebook hold on the file’s icon and click on Move to notebook. Go to the
notebook you choose and click on the library icon at the bottom of notebook page.
You can find other instructions on the picture below.