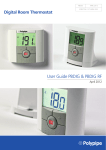
1
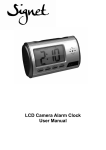
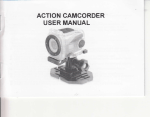
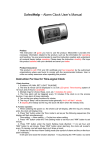
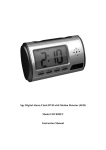
User Manual of V1000
Content
I Preface …………………………........................................2
II Guarantee ......................................................................2
III Operation of Alarm Clock...............................................4
1 Function features........................................................4
2 Function settings…………………………………………4
IV Instruction of Digital Video………………………………..8
V Operation of Digital Video..............................................8
1 Function features………………………………………..8
2 Store files and play………………………………………9
VI Technical Date of Digital video.....................................10
VII Power Supple and Packing list....................................11
VIII Notice........................................................................12
I Preface
Thank you for choosing this product. This manual will guide you
how to use the product and provide particular information about
using and operation. Please read this manual carefully and
comprehensive understand. Also please keep this manual
well, we hope this product will help you and take enjoyment
to you.
II Guarantee
The product has passed FCC & CE certifications, which
takes safety and assurance while in using.
III Operation of Alarm Clock
1 Function features
¯ Time display: display current time, day, month and year.
¯ Alarm and delay function: set alarm time and alarm delay
time (1~60min).
¯ Time talking: voice talks the current time.
¯ Temperature display: detect and display the environment
temperature.
¯ Nature sound play: adjustable play time (10~60min)
2 Function settings
1) Current time settings:
¯ In the time display mode, press button “SET” to enter year
settings mode, the screen displays “2010” and flickers, press
button “UP”, “DOWN” to select correct year.
¯ Press button “SET” again to enter “Month-day-hour-minute”
settings by turn. The corresponding digits will flicker.
Time display mode
Year setting
Month settings
Day setting
Hour setting
Minute setting
¯ When the date and time settings are finished, press button
“MODE” to quit time settings and the screen displays the set
time.
2) Alarm time settings:
¯ In the time display mode, press button “MODE” to enter alarm
time setting mode. The screen display “- - : - -”
¯ Press button “SET” to set “alarm hour”; press button “SET”
again to set “alarm minute”; press button “SET” on third time to
set alarm delay time (1~60min); press button “SET” on fourth
time to set alarm music, press button “UP”, “DOWN” to choose
the different alarm music.
Alarm time mode
Alarm hour setting
Alarm time delay setting
Alarm minute setting
Alarm music setting
¯ Press button “MODE” to quit alarm time settings and the screen
displays the current time.
¯ In the alarm time mode, press button “UP” to start or stop alarm
function. When alarm delay function is open, symbol “ ” will
flicker.
Alarm close
Alarm open
Alarm delay open
¯ Press button “MODE” to turn to time display mode.
3) In the time display mode, press button “UP” to switch 12H/24H
mode; Press button “DOWN” to switch Celsius (℃)/Fahrenheit
(℉) temperature mode.
12h mode
Celsius (℃) mode
24h mode
Fahrenheit (℉) mode
4) Time talking and nature sound function
¯ In the time display mode, press button “TALK” to speak the
current time.
¯ In any mode, press button “TIME” to set nature sound play time
(10~60min).
Set nature sound play time
¯ In any mode, press button “TALK” and hold on for 3 seconds to
enter nature sound play mode. It will play the nature sound by
countdown the set time to “00:00”
Nature sound play mode
Nature sound stops
¯ In the nature sound play mode, press button “TALK” to pause,
press this button again to play next sound. Press button
“MODE” to quit.
Note: on the left of the screen, the corresponding position of the
two digital tubes is printed symbol “PM”, “ ” as below:
IV Instruction of Digital Video
The product is a remote digital video timer which has external TF
storage, 30FPS (640x480) high definition camera and monitor
function. It concentrates digital video recording, voice recording,
self-video-shooting, web camera, electronic timer and storage
function together. It is configured a built-in high capacity battery
which can record 12 hours video and 25 hours voice continuously.
The camera is 2M pixels for high definition video recording. And the
product has multi-language talking and voice recording. The
storage supports up to 32GB TF memory card. It is also a hidden
security device with evidence record function as a good assistant.
(Self-video-shooting is automotive sensing video recording)
V Operation of Digital Video
1 Function features
1) Open the capping cover on the right side of the product. Plug in
TF memory card. The machine starts ON.
2) Press button “ ” on remote controller to start by aligning toward
the receiver. Then the blue LED indictor turns on, and the
machine goes into standby status.
3) Press button “ ” on remote controller to record video. The blue
LED indictor flickers three times to start recording, press button
“ ” again to stop and blue LED indictor turns on.
4) Press button “ ” on remote controller to record voice. The blue
LED indictor flickers twice to start recording, press button “ ”
again to stop and blue LED indictor turns on.
5) Press button “ ” on remote controller for photo shooting, the
blue LED indictor flicker slowly.
6) Press button “ ” on remote controller to start
self-video-shooting standby status. Press the button again to
quit and blue LED indictor turns on.
7) Press button “ ” again to shut down and blue LED indictor off.
8) USB disk function: When the machine is in standby “ON” status,
plug in USB cable and then start by button “ ” on controller, it
will go to USB disk mode.
9) Web camera function: please install the driver in CD-ROM before
first using. When it is in standby “ON” status, press button “ ”
to start, then connect it to computer by USB cable, then it will
work as a web camera.
10) Charging: push the toggle switch to “OFF” terminal, plug into
USB charger, then red LED indictor turns on, when the battery is
full, the LED will turn off. PC USB port also can charge the
battery.
11) Reset: when the machine is no response by invalid operation or
other unknown reasons, please push the toggle switch to “OFF”
terminal, and then turn back to “ON” terminal, it will reset.
12) Low-power warning: when the battery is low power, the blue
LED indictor will flicker continuously that means the battery
should be charged. When the battery is out of power, it can store
the data automatically.
13) If the program is lost, please install the driver in CD-ROM firstly.
After click the STK02NU program update tool, and then click
“update” to upgrade. Select 0x35 after ①DRAM Timing and
select 8M after ②DRAM Size, press button “OK” to burn new
program in a couple of minutes.
2 Store files and play
After finishing video recording, put the toggle switch to ON
terminal, and plug USB cable to computer. Start the machine by
pressing button “
” on controller, it will work as USB disk. Copy
the files inside to computer disk and play. Also you can take the
TF memory card out, and read the data by card reader. Suggest
using “Media Player / KM Player” to play.
VI Technical Data of Digital Video
Pixels
5M pix CMOS
Resolution
VGA640x480
Video format
FPS
View
Sensing distance
Min illumination
Battery capacity
Video record time
Remote distance
Voice record area
Power consumption
Storage temp.
Operate temp.
Operate humidity
Support memory card
Memory card up to
Play software
USB port
Support OS
Storage consumption
Charging time
AVI
30fps
140°
6m
1Lux
4800mAh
>30h
18m
40m2
130ma/3.7V
-20℃~+80℃
-10℃~+60℃
15~85%RH
TF memory card
32GB
Media player / KM Player
USB1.1/2.0
Win 2000/XP/Vista32
1GB/40min
~ 8 hours
VII Power Supply and Packing list
1 Power supply
2 Packing list
CD-ROM
Power supply
USB cable
User manual
VIII Notice
¯ Using occasion: please strictly abide the national relevant laws.
The product can not be used for other illegal purposes, or peril.
¯ Update: for better performance and serve to customers, we will
improve the product software constantly. To customer’s
continence, it is very easy to update, please contact the local
distributor to get the latest version and updating ways.
¯ Working temperature: the product should work understand
natural temperature. Please do not work at where human being
is not suitable.
¯ Working humidity: the product is not waterproof; please do not
work at wet environment.
¯ Shoot illumination: the camera should work in the sufficient light
environment, please do not shoot the lens to the ultra strong
light, such as sun, to avoid damaging the lens.
¯ Cleaning: please do not use in the environment that dust
density is too large to avoid the lens dirty by dust. The lens can
be cleaned by lens cleaning paper or glasses cloth gently.
¯ Other items: the product is sophisticated electronic product,
please keep it well from strong attack, vibration; And please do
not use it under strong magnetic filed or electric filed.
Thank you for using this product, please enjoy it!