1
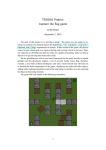
User’s Manual
Adaptive
Sound
Therapy
Machine
Visit our website at
www.asoundtech.com
ASM1001
© 2008 Adaptive Sound Technologies Inc.
Getting Started
1. Plug the AC adaptor into the wall and into the unit
2. Press the power button to turn the unit on
3. Adjust the volume with the volume switches
4. See the manual to change the Sound Story or operating mode
5. To reset the unit, unplug the AC adaptor
2
FCC Declaration
This equipment has been tested and found to comply with the limits for a Class B Digital Device,
pursuant to Part 15 of the FCC Rules. These limits are designed to provide reasonable protection
against harmful interference in a residential installation. This equipment generates, uses, and can
radiate radio frequency energy, and if not installed and used in accordance with the instructions,
may cause harmful interference to radio communications. However, there is no guarantee that
interference will not occur in a particular installation.
If this equipment does cause harmful interference to radio or television reception, which can
be determined by turning the equipment off and on, the user is encouraged to try to correct the
interference by one or more of the following measures:
• Reorient or relocate the receiving antenna.
• Increase the separation between the equipment and receiver.
• Connect the equipment to an outlet on a circuit different from the one to which the receiver is
connected.
• Consult the dealer or an experienced radio/TV technician for help.
Declaration of Conformity
Trade Name:
ASTI Adaptive Sound Therapy Machine
Model Name:
ASM1001
Responsible Party: Adaptive Sound Technologies Inc.
Address: 1475 S Bascom Ave, Campbell, CA 95008 USA
Telephone Number: 408-377-3411
This device complies with Part 15 of the FCC Rules. Operation is subject to the following two
conditions: (1) This device may not cause harmful interference, and (2) this device must accept any
interference received, including interference that may cause undesired operation.
Changes or modifications not expressly approved by the party responsible for compliance could void
the user’s authority to operate the equipment.
It is possible with the occurrence of an electrostatic discharge event near this device
that the unit may power off. In that event, the operator can resume normal operation of
the unit by pressing the Power button once.
3
Important Safety Instructions
• All the safety and operating instructions should be read, followed, adhered to and
retained for future reference.
• The unit should not be used near water, such as a bathtub, swimming pool,
washbowl, kitchen sink, laundry tub or in a wet basement.
• Care should be taken so that objects do not fall and liquids are not spilled onto the
unit.
• Do not reach for unit if it has fallen into water. Unplug it immediately.
• The unit should be situated away from heat sources such as radiators, heat registers,
stoves or other appliances (including amplifiers) that produce heat.
• Avoid placing this unit in areas that are exposed to direct sunlight or close to
heat-radiating products such as electric heaters. Do not place unit on top of stereo
equipment that radiates heat.
• Avoid placing the unit in areas that are dusty, humid and moist, lack ventilation or
are subject to constant vibration.
• This unit may be subject to interference from external sources such as transformers,
electric motors or other electronic devices. To avoid distortion created by such
sources, it is advised that you place the unit as far away from such sources as
possible.
• Do not apply excessive force when using any switches or controls.
• The unit should be connected to a power supply only of the type described in the
operating instructions or as marked on the unit.
• Power supply cords should be routed so that they are not likely to be walked on or
pinched by items placed on or against them, paying particular attention to cords at
plugs, convenience receptacles and the point where they exit the unit.
• The unit should be cleaned only as recommended in the instructions.
• The power cord of the unit should be unplugged from the outlet when left unused
for long periods of time.
• The user should not attempt to service the unit beyond that described in the
operating instructions.
• Do not attempt to clean the unit with a chemical solvent as this might damage the
finish. Use a clean, dry cloth.
• Operate controls and switches as described in the manual.
• When moving the unit, be sure to first unplug the power cord.
4
Table of Contents
A Message from the President ..................................................................................... 6
Location of Controls and Indicators............................................................................. 7
Getting Started ...............................................................................................................8
Unpacking the Ecotones Unit .................................................................................... 8
Choosing a Location ................................................................................................... 8
Installing the AC Power Adaptor............................................................................... 8
Basic Operations............................................................................................................. 9
Powering on Ecotones ............................................................................................... 9
Selecting SoundStories ............................................................................................. 9
Adjusting the Volume ............................................................................................... 10
Choosing an Operating Mode ................................................................................. 10
SoundStories ................................................................................................................ 11
Operating Modes .......................................................................................................... 12
Adaptive Mode .......................................................................................................... 12
Background Mode .................................................................................................... 13
Manual Mode ............................................................................................................ 13
Using the Sleep Timer ................................................................................................. 14
Additional Features ...................................................................................................... 15
Using Headphones ................................................................................................... 15
Using an Amplified Audio System ......................................................................... 16
Restoring the Factory Settings ................................................................................... 16
Troubleshooting............................................................................................................ 16
Care and Maintenance ................................................................................................. 18
Specifications................................................................................................................ 18
Customer Support ........................................................................................................ 19
Owner’s Record ............................................................................................................ 19
SoundStory Credits ...................................................................................................... 19
Warranty ........................................................................................................................ 20
Index ............................................................................................................................... 22
5
A Message from the President
Congratulations! You have just purchased Adaptive Sound Technologies,
Inc’s. (ASTI’s) revolutionary patented Ecotones Adaptive Sound Therapy
Machine. This easy-to-use product is packed with advanced technology
to provide you with an ultra high-quality listening experience. At ASTI,
we take pride in Ecotones’ unique functionality, superior sound quality,
and exceptional case materials and finish. We provide a stylish enclosure
and high quality speakers that deliver greater sound quality than CD
technology. ASTI employs audio experts to ensure the sounds that
Ecotones produces are of the highest quality and free from annoying
audio artifacts. We have made every effort to make Ecotones an excellent
product to help you eliminate annoying noise sources and improve the
quality of your life
Please contact me if you have any concerns or suggestions for
improvement.
Sam Nicolino
Adaptive Sound Technologies, Inc.
President and CEO
408 377-3411
[email protected]
6
Location of Controls and Indicators
1
6
5
4
2
8
3
10
9
7
1.
2.
3.
4.
Color Display
Up/Down Volume Control
Power On/Off
Sleep Timer (30, 60, 90 min,
unlimited (LCD Off))
5. Mode (Adaptive, Background,
and Manual)
6. SoundStory (cycles through
SoundStories)
7. Microphone
8. Speaker Grill
9. Headphone Jack
10. Power Connector
7
Getting Started
Unpacking the Ecotones Unit
1.
2.
3.
4.
Remove the top packing material from the unit.
Remove the AC power adaptor from the top box.
Remove the Ecotones unit from the box.
Note the Serial Number on the bottom of your unit and write this number in
the section provided at the end of this manual.
5. Save the carton and packing materials in case the unit ever needs to be
returned for service. Using the original carton and packing materials is the
only way to safely repack the unit for shipment.
Choosing a Location
• Chose a stable, level surface for the Ecotones unit.
• Pick a location where the unit’s microphone will not be blocked. The
microphone picks up background noise and enables the Ecotones unit to
dynamically respond to its environment. If the microphone is blocked, your unit
may not function properly.
• Chose a location within easy reach of an AC outlet.
• The location should be out of direct sunlight and away from sources of
excessive heat, dust, moisture and humidity.
Installing the AC Power Adaptor
1. Unwind the AC power adaptor cord and extend it to its full length.
2. Insert the small end of the AC adaptor into the plug at the back of the Ecotones
unit. (10)
3. Insert the larger end of the AC adaptor into the wall outlet. Make sure to use
an outlet that is always “live”. Do not use an outlet that is controlled by a wall
switch.
Caution: Use only the AC power adaptor that came with your Ecotones unit. Using
any other power adaptor may damage your unit and void your warranty.
8
Basic Operations
Powering On Ecotones
• Power on the Ecotones unit by pressing the Power button (3). The Ecotones
splash screen will appear on the color display (1). When the unit powers up, the
previous SoundStory, volume and mode settings are restored. Pressing the
Power button again turns Ecotones off. Note, the Sleep Timer button can also be
used to power on Ecotones directly into the Sleep Timer mode. See the Sleep
Timer section for more information about the Sleep Timer.
Selecting SoundStories
• Cycle through the available SoundStories using the SoundStory button. (6)
• Each SoundStory is described by an image in the color display. (1)
• Ecotones maintains the current operating mode while cycling through the
SoundStories. (See the Operating Modes section for more information about
the operating mode.)
• The available SoundStories are described in detail in the SoundStories section.
9
Adjusting the Volume
• Use the Up/Down Volume control buttons (2) to adjust the
overall volume of the unit. A violet bar indicating the overall
volume level appears across the top of the color display (1)
whenever the volume is adjusted.
• Note that the Volume buttons control both the volume
level and microphone sensitivity of the unit in Adaptive
and Background modes. These modes will dynamically
adjust the volume up and down while reacting with the
surrounding noise environment based upon the user
settings.
Violet Volume bar located
at top of color display
Choosing an Operating Mode
• Use the Mode button (5) to select between the different modes of operation.
Available modes are Adaptive, Background and Manual.
• The first letter of each mode is indicated in the lower right hand corner of the
color display. (1)
• The different modes of operation are described in greater detail in the
Operating Modes section below.
10
SoundStories
Your Ecotones unit comes with 12 high-quality audio SoundStories. Each
Ecotones SoundStory is a composition of many related sounds interacting with
your environment. Each sound component is recorded in higher-than-CD quality
and composed into an interactive audio story by ASTI’s audio experts.
The SoundStory button (6) scrolls through the available SoundStories. Each
SoundStory displays its own graphic icon in the color display (1) to identify the
selected SoundStory. The SoundStories shipped with your Ecotones unit are:
Soothing
Seaside
Calming
Waves
Distant
Thunderstorm
Gentle
Rain
Babbling
Brook
Nature’s
Meadow
Crackling
Fireplace
Warming
Campfire
Relaxing
Fan
Big City
Background
Restful
Train Ride
Pure
Meditation
Some SoundStories work better than others to mask particular background noise
situations. Experiment with these selections to find the SoundStory that works
best in your particular noise environment.
11
Operating Modes
Your Ecotones unit has 3 modes of operation. Pressing the Mode button (5)
advances to the next mode of operation. Ecotones remembers the previous mode
volume setting when changing operating modes. The 3 modes are Adaptive,
Background and Manual.
Adaptive Mode
The Adaptive mode dynamically covers the background noise with a pleasant
SoundStory. The unit instantly responds to sudden changes in ambient noise and
adjusts the current SoundStory to blend the changes away. Adaptive mode is the
best mode to use when you have ambient noise that includes lots of variation
in sound and volume. Adaptive mode uses only enough volume to mask the
annoying background sound, which creates less overall noise in the room than
with a continuous volume setting. Because of the possibility of large, sudden
volume fluctuations, Adaptive mode cannot be used when using the headphone
jack. When running in adaptive mode, a small letter “A” inside a black circle can be
seen in the lower right corner of the color display.
12
Background Mode
The Background mode begins generating a SoundStory once the room becomes
quiet. When the background conversation level rises in the room, Ecotones senses
the change and gradually shuts down the SoundStory. When adjusting the volume
in background mode, the sound will be played even with background noise in
the room. Ecotones will return to normal background operation after the Volume
buttons have not been pressed for a small duration. Background mode is useful
to run in environments where you want a pleasing background sound, but do not
want to adjust the volume whenever a conversation starts or the phone rings. This
mode is also useful when using the headphones in order for the unit to respond
when someone enters the room. When running in background mode, a small
letter “B” inside a black circle can be seen in the lower right corner of the color
display.
Manual Mode
The Manual mode generates SoundStories at a user-selected fixed output volume.
Although the output level is fixed, Ecotones uses Adaptive Sound Technology
to reactively insert random sound elements into the SoundStory for a natural
listening experience. Manual mode is good to use when you want to prevent
Ecotones from reacting to the room environment or want to set a steady level for
use with headphones. When running in manual mode, a small letter “M” inside a
black circle can be seen in the lower right corner of the color display.
13
Using the Sleep Timer
Your Ecotones unit comes equipped with a countdown
Sleep Timer function. The Sleep Timer activates your
Ecotones for a set amount of time before turning the unit off.
While the Sleep Timer is on, the display (1) is turned off to
prevent disturbing your sleep. The Sleep Timer is controlled
through the Sleep Timer button. (4)
To activate the Sleep Timer, press the Sleep Timer button
(4) once. This works if Ecotones is powered on or off. An
alternating red and green bar graph will appear across
the top of the current SoundStory icon representing the
amount of time for the Sleep Timer setting. Each bar
represents 30 minutes of operation under the Sleep Timer.
The Sleep Timer can be set to run for 30, 60, 90, 120, or
unlimited (LCD Off) minutes.
Sleep Timer bar located at
top of color display
Turn LCD OFF
If you want the display to be off during normal operation,
set the Sleep Timer to unlimited minutes (LCD Off). In
this mode, your Ecotones unit responds just as it would
in normal mode, but the display will automatically turn
off after no button activity for one minute. When the
display is on, the unlimited time setting is indicated by a
red and green “barber shop” diagonal line at the top of
the display.
Sleep Timer bar with
unlimited time setting
When you first enter Sleep Timer mode, the Sleep Timer remembers the time
settings from the last Sleep Timer session. If your last sleep session ran for 60
minutes, the next time the Sleep Timer is activated, the default starting time will
be 60 minutes. Pressing the Sleep Timer button (4) increments the total timer
14
period by 30 minutes. Pressing the button multiple times cycles through 30
minutes, 60 minutes, 90 minutes, 120 minutes, unlimited (LCD Off) timer settings.
When the timer reaches the unlimited setting, another button press will reset the
timer back to 30 minutes.
When the color display (1) is turned off, pressing any button on the Ecotones unit
will cause the display to come on again. Pressing the Sleep Timer button once will
turn on the display and show the remaining time at the top of the display. Pressing
the Sleep Timer button again resets the timer to the previous setting. For example,
if there are 45 minutes left on a 60 second timer setting, pressing the button will
reset the timer to 60 minutes. One more button press will increment the Sleep
Timer to the next preset time.
To exit from Sleep Timer mode, press the Power button (3) twice. When the
system powers up again, it will switch back into normal operation mode. Press the
Sleep Timer button again to return to the Sleep Timer mode.
Additional Features
Using Headphones
Located on the back of the Ecotones unit is a standard 3.5 mm stereo headphone
jack. (9) Standard headphones can be plugged into this jack to listen to the SoundStories. When headphones are plugged into the jack, the Ecotones speakers are
disabled.
Note - Due to the possibility of large sudden volume changes, Adaptive mode is
disabled when using the headphone jack. Both Background and Manual mode
operation can be used with headphones. If the unit is in Adaptive mode when
headphones are plugged in, it will automatically switch to Background mode.
CAUTION: Avoid using headphones at high volume levels. Prolonged exposure to
high sound pressure levels may impair hearing.
15
Using an Amplified Audio System
Since Ecotones generates 18-bit (better than CD quality) sound, the Ecotones
sounds excellent when amplified through an audio system. Use the headphone
jack (9) as input to your audio system.
Since the headphone jack is in use, Adaptive mode is disabled. (See note in last
section.) While both Background mode and Manual mode can be used, it is possible for Background mode to pick up the audio system output as room noise. If
you experience slow up-and-down fluctuations in the volume of the output when
using an external audio system, try running in Manual mode instead.
Restoring the Factory Settings
If the Ecotones unit behaves strangely for any reason, it is possible to restore the
unit to the factory settings. Simply unplug your Ecotones unit from the AC power
adaptor for approximately 10 seconds, and then reapply the power. The unit will
be reset to the factory settings and will start up in the factory SoundStory, volume
and mode of operation settings.
Troubleshooting
Should the Ecotones unit exhibit a problem, please refer to the following table
before seeking service.
Symptom
Possible Cause
Solution
Unit is playing sound, but
display is blank
Unit is running in Sleep Timer
mode.
Press the Sleep Timer button to
temporarily turn on the display for
one minute. To permanently turn on
the display, exit from Sleep Timer
mode by powering off the unit and
then turning it back on by pressing
the Power button twice.
16
Symptom
Possible Cause
Solution
No operation when unit is
powered on
Disconnected power plug
Check the power connection at the
back of the unit and at the wall jack.
Ensure both are firmly seated in the
jacks.
AC adaptor is connected to a
switched wall outlet
Move the unit to an unswitched wall
outlet
Faulty AC outlet
Move the unit to another outlet and
try powering on again
System needs to be reset
Restore the default factory settings
by unplugging the unit for 10
seconds and then plugging it in.
Volume is turned down
Press and hold the Volume Up button
until volume increases
Unit is in Background mode.
In Background mode, the unit
senses noise in the room and
reduces the unit’s volume in
response.
Reducing the noise in the room
should make the volume increase
again automatically. You can also
change the mode to Adaptive or
Manual.
Unit powers off unexpectedly
Possible electrostatic
discharge event near unit.
An electrostatic discharge (ESD)
event near this device may cause it
to power off. In this event, simply
press the Power button to resume
normal operation.
Other unexpected behavior
System needs to be reset
Restore the default factory settings
by unplugging the unit for 10
seconds and then plugging it in and
try the Sound Story again.
Unit is powered on but no sound
can be heard
17
Care and Maintenance
• Vacuum the speaker grill to prevent an accumulation of dust.
• Do not put liquids directly into the electronics. If a liquid ever gets spilled on the
grill, immediately turn the unit up side down to protect from fluid damaging the
speakers or electronics.
• To clean this unit, wipe with a soft, dry cloth.
• Never use alcohol, paint thinner or benzene or other chemicals to clean this unit.
• Never use an abrasive on the case.
Specifications
SoundStories
12
Audio Quality
18-bit high-fidelity
Speakers
3" woofer, 1" tweeter
Frequency Range
90 Hz – 20,000 Hz
Operating Modes
Adaptive, Background, Manual
Sleep Timer
Up to 120 minutes
Headphone Jack
3.5 mm stereo
Dimensions (w/h/d)
6.125" x 7.5" x 5.5"
Case volume
2.4 liter
Weight
3.5 lbs
Power Requirements
5V, 1A DC
18
Customer Support
For customer support, please contact Adaptive Sound Technologies directly:
866-954-ASTI
408 377-3411
[email protected]
http://www.asoundtech.com
Owner’s Record
The model and serial numbers are located on the bottom of the unit. Record your
serial number in the space provided below. Refer to these numbers whenever you
contact support regarding this product.
Model Number: ASM1001 Serial Number:
SoundStory Credits
The SoundStories contained in the Ecotones unit may contain pieces of one or
more of the following sound files from the Freesound Project:
13543_acclivity_MidwifeToads3.wav
13563_acclivity_FrogsInRiver.wav
19102_acclivity_OlgasTable.flac
19910_acclivity_Avocet.flac
20418_acclivity_HerringGull_InTheRain.flac
24952_Erdie_thunder_long_distance
25379_FreqMan_Thunder_1989_b_rumbles_.wav
27942_genghis_attenborough_Herring_Great_Black_backed_Gulls_2_edited.wav
30216_Erdie_thunder_rumble.wav
38562_digifishmusic_Daintree_Rainforrest_Birds_4
38757_stormpetrel_27022005_snares_island_sea_lion.ogg
40861_dobroide_20070910
43692_lanmour_orage
44250_digifishmusic_Medium_Rolling_Surf.wav
19
ONE (1) YEAR LIMITED WARRANTY
ASTI warrants this product against defects in materials and/or workmanship under normal
use for a period of ONE (1) YEAR from the date of purchase by the original purchaser
(“Warranty Period”). If a defect arises and a valid claim is received within the Warranty
Period, at its option, ASTI will either 1) repair the defect at no charge, using new or
refurbished replacement parts, or 2) replace the product with a new product that is at
least functionally equivalent to the original product, or 3) provide an ASTI in the amount
of the purchase price of the original product. A replacement product or part, including a
user-installable part installed in accordance with instructions provided by ASTI, assumes
the remaining warranty of the original product. When a product or part is exchanged, any
replacement item becomes your property and the replaced item becomes ASTI’s property.
When an ASTI part is given, the original product must be returned to ASTI and becomes
ASTI’s property.
Obtaining Service: To obtain warranty service, call ASTI Limited Warranty Service at
1-866-954-ASTI (2784). Please be prepared to describe the product that needs service and
the nature of the problem. A purchase receipt is required. All repairs and replacements
must be authorized in advance. Service options, parts availability and response times will
vary. You are responsible for delivery and the cost of delivery of the product or any parts to
the authorized service center for replacement, per our instructions.
Limits and Exclusions: Coverage under this Limited Warranty is limited to the United States
of America, including the District of Columbia and the U.S. Territories of Guam, Puerto Rico,
and the U.S. Virgin Islands.
This Limited Warranty applies only to products manufactured for ASTI that can be identified
by the “ASTI” trademark, trade name, or logo affixed to them or their packaging. The
Limited Warranty does not apply to any non-ASTI products. Manufacturers or suppliers
other than ASTI may provide their own warranties to the purchaser, but ASTI, in so far as
permitted by law, provides these products “as is.”
20
This warranty does not apply to: a) damage caused by failure to follow instructions
relating to product’s use or the installation of components; b) damage caused by accident,
abuse, misuse, fire, floods, earthquake or other external causes; c) damage caused by
service performed by anyone who is not a representative of ASTI; d) accessories used in
conjunction with a covered product; e) a product or part that has been modified to alter
functionality or capability; f) items intended to be periodically replaced by the purchaser
during the normal life of the product including, without limitation, batteries or light
bulbs; or g) any and all pre-existing conditions that occur prior to the effective date of this
Limited Warranty relating to any product sold “as is” including, without limitation, floor
demonstration models and refurbished items.
ADAPTIVE SOUND TECHNOLOGIES INC. SHALL NOT BE LIABLE FOR INCIDENTAL OR
CONSEQUENTIAL DAMAGES RESULTING FROM THE USE OF THIS PRODUCT, OR ARISING
OUT OF ANY BREACH OF THIS WARRANTY. TO THE EXTENT PERMITTED BY APPLICABLE
LAW, ASTI DISCLAIMS ANY AND ALL STATUTORY OR IMPLIED WARRANTIES,
INCLUDING, WITHOUT LIMITATION, WARRANTIES OF MERCHANTABILITY, FITNESS FOR
A PARTICULAR PURPOSE AND WARRANTIES AGAINST HIDDEN OR LATENT DEFECTS.
IF ASTI CANNOT LAWFULLY DISCLAIM STATUTORY OR IMPLIED WARRANTIES, THEN
TO THE EXTENT PERMITTED BY LAW, ALL SUCH WARRANTIES SHALL BE LIMITED IN
DURATION TO THE DURATION OF THIS EXPRESS WARRANTY.
Some states disallow the exclusion or limitation of incidental or consequential damages or
how long an implied warranty lasts, so the above exclusions or limitations may not apply to
you. This warranty gives you specific legal rights and you may also have other rights, which
vary from state to state.
21
Index
A
G
Adaptive Mode...................................... 12
Getting Started ....................................... 8
Audio System ........................................ 16
H
B
Headphones ...................................... 7, 15
Background Mode ................................ 13
I
Button
Icons ....................................................... 11
Operating Mode .......................... 10, 12
Power .............................................. 9, 14
Sleep Timer ....................................... 14
SoundStory.................................... 9, 11
Volume ............................................... 10
C
Care and Maintenance ......................... 18
Color display ................................... 10, 11
Controls and Indicators ......................... 7
Customer Support ................................ 19
F
Factory Settings.................................... 16
22
L
Locating the unit ..................................... 8
M
Manual Mode ........................................ 13
Microphone ......................................... 7, 8
O
Operating Modes ............................ 10, 12
Adaptive Mode .................................. 12
Background Mode ............................ 13
Manual Mode .................................... 13
Owner’s Record .................................... 19
P
Power
Installing the AC Adaptor................... 8
Turning the unit on ............................. 9
S
Serial Number ................................... 8, 19
Sleep Timer ........................................... 14
SoundStories .................................... 9, 11
Specifications........................................ 18
Support .................................................. 19
T
Timer ...................................................... 14
Troubleshooting.................................... 16
U
Unpacking................................................ 8
V
Volume ................................................... 10
W
Warranty ................................................ 20
23
EUM080923
Ecotones, SoundStories, Adaptive Sound Processor, Adaptive Sound Technologies, and the ASTI logo
are trademarks of Adaptive Sound Technologies Inc.. All other marks are trademarks or registered
trademarks of their respective owners.
© 2008 Adaptive Sound Technologies Inc.