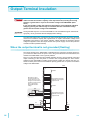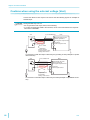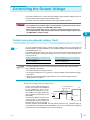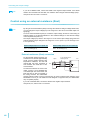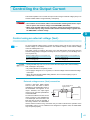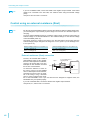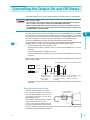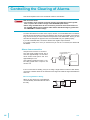
1
PART NO. IB022997 Dec. 2014 User’s Manual Regulated DC Power Supply PWX Series PWX750ML Installation and Preparation 1 Basic Functions 2 External Control 3 Parallel/Series Operation 4 Maintenance 5 Specifications 6 Isolated Analog Interface OPtions 7 App Troubleshooting PWX 1 Thank you for purchasing the PWX750ML Regulated DC Power Supply. About the PWX750ML Manuals These manuals are intended for users of the Regulated DC Power Supply and their instructors. It is assumed that the reader has knowledge about electrical aspects of regulated DC power supplies. Documentation Structure Safety information This document contains general safety precautions for this product. Keep them in mind and make sure to observe them. User’s manual (this manual, PDF) This manual is intended for first-time users of this product. It provides an overview of the product and notes on usage. It also explains how to configure the product, operate the product, perform maintenance on the product, specifications the product, and so on. To effectively use the product features, read this manual from beginning to end. We recommend that you read it thoroughly before using this product for the first time. If you forget how to use the product or if a problem occurs, we recommend that you refer to this manual again. Quick reference This manual explains Panel description and operation briefly. Communication Interface Manual (HTML, partially PDF) This manual contains details about using commands to control the product remotely. It also contains details about the multichannel function (Virtual Multi Channel Bus), which makes it possible to control up to 31 PWXs from a single PC. The interface manual is written for readers with sufficient basic knowledge of how to control power supplies using a PC. The command list is provided in PDF format. PDF and HTML files are included in the accompanying CDROM. Adobe Reader 6.0 or later is required to view the PDF files. Microsoft Internet Explorer 6.0 or later is required to view the HTML files. Firmware versions that this manual covers This manual covers firmware versions 2.2X. When contacting us about the product, please provide us with: The model (marked in the top section of the front panel) The firmware version (see page 13) The serial number (marked on the rear panel) Trademarks Microsoft, Windows, and Visual Basic are registered trademarks of Microsoft Corporation in the United States and/or other countries. All company names and product names used in this manual are trademarks or registered trademarks of their respective companies. Copyrights The contents of this manual may not be reproduced, in whole or in part, without the prior consent of the copyright holder. The specifications of this product and the contents of this manual are subject to change without prior notice. © 2011 Kikusui Electronics Corporation Checking the Package Contents When you receive the product, check that all accessories are included and that the accessories have not been damaged during transportation. If any of the accessories are damaged or missing, contact your Kikusui agent or distributor. We recommend that you save all packing materials, in case the product needs to be transported at a later date. Component Quantitiy Power cord 1 pc. Output terminal cover 1 set J1 connector plug kit 1 set Output terminal M6 bolt set 2 sets Chassis connection wire 1 pc. Packing list 1 pc. Quick reference English: 1 pc. Japanese: 1 pc. Safety information 1 pc. CD-ROM 1 disc If you find any misplaced or missing pages in the manuals, they will be replaced. If the manual gets lost or soiled, a new copy can be provided for a fee. To replace or purchase a manual, please contact your Kikusui agent or distributor. At that time, inform your agent or distributor of the “Part No.” written on the front cover of this manual. Every effort has been made to ensure the accuracy of this manual. However, if you have any questions or find any errors or omissions, please contact your Kikusui agent or distributor. After you have finished reading this manual, store it so that you can use it for reference at any time. 2 PWX Features Product Overview Communication feature The PWX750ML is a constant voltage (CV)/constant current (CC) automatic crossover power supply that can output a wide range of voltage and current within rated output power. It can be controlled remotely through the standard-equipped communication feature. Model PWX750ML Maximum operating current Operating voltage Power 28 A 0 V to 80 V 750 W RS232C, USB, and LAN interfaces are all installed as standard. The remote interfaces comply with IEEE Std 488.2 1992 and SCPI Specification 1999.0. Because the LAN interface complies with the LXI standard, the construction of a highly cost-effective system is possible. If you use the multichannel (VMCB) function, you can construct a multichannel power supply system in which up to 31 PWXs are controlled from a single PC. Master-slave parallel operation You can increase the PWX750ML’s output current by connecting up to four units in parallel. You can set one unit as the master unit, and control the remaining units as slave units. Setting preset feature You can save up to three sets of output settings (the combination of the voltage value and current value). You can simply select a set of output settings that you want to use rather than having to specify each setting every time. Automatic output on setting You can set the PWX750ML so that when a protection function is activated and the output is turned off, output is automatically turned back on when the problem that caused the protection function to be activated is fixed. Set voltage/current limitation feature You can apply limits to the voltage and current settings. This prevents you from setting an appropriate value by mistake, which would cause the output to turn off. Overcurrent protection (OCP) detection time setting You can set a detection time, which is the amount of time that an overcurrent must persist after the first detection of the overcurrent before the overcurrent protection (OCP) is activated. By setting the detection time, you can prevent an alarm from occurring when an inrush current from the EUT connected to the output causes an excessive current to flow temporarily. Bleeder on/off feature You can turn the bleeder circuit on and off. Turn the bleeder circuit off when you do not want the internal bleeder circuit to sink output current. When you connect a battery, you can prevent excessive electrical discharges by turning the bleeder circuit off. Compatibility with other products You can set the command language and emulation that are used during remote control. By setting the command language, you can enable the PWX to support the proprietary commands of other products. By selecting the emulation, you can remotely control products other than the PWX. Isolated analog interface (factory option) You can use isolated optical signals to set and monitor the output voltage and current. The signal is isolated from the reference potential of this product. You can use a voltage control (0 V to 5 V or 0 V to 10 V) or a current control (4 mA to 20 mA). PWX 3 Safety Precautions When using this product, be sure to observe the “Safety Precautions” in the Safety information manual. Notations Used in This Manual • In this manual, the PWX750ML Regulated DC Power Supply is referred to as the “PWX Series” or “PWX750ML.” • The term “PC” is used to refer generally to both personal computers and workstations. Precautions Concerning Installation Location • The screen captures used in this manual may differ from the actual screens that appear on the PWX750ML. The screen captures are merely examples. • The following markings are used in this manual. When installing this product, be sure to observe the “Precautions Concerning Installation Location” in the Safety information manual. The following precautions pertain only to this product. • When installing this product, be sure to observe the temperature and humidity ranges indicated below. Operating temperature range: 0 °C to +50 °C (32 °F to 122 °F) Operating humidity range: 20 %rh to 85 %rh (no condensation) • When storing this product, be sure to observe the temperature and humidity ranges indicated below. Storage temperature range: -20 °C to +70 °C (-4 °F to 158 °F) Storage humidity range: 90 %rh or less (no condensation) WARNING Indicates a potentially hazardous situation which, if ignored, could result in death or serious injury. CAUTION Indicates a potentially hazardous situation which, if ignored, may result in damage to the product or other property. Indicates information that you should know. DESCRIPTION Explanation of terminology or operation principle. See Indicates a reference to detailed information. Indicates reference to detailed information operation manual. CFxx:x “CF” stands for a CONFIG parameter. The two digits after CF indicate the CONFIG parameter number. The value after the colon indicates the selected setting. SHIFT+key name (blue characters below the keys) Indicates an operation that requires you to press a key indicated in blue characters (below the key) while holding down the SHIFT key. Memo Indicates useful information. 4 PWX Contents 3 External Control Overview.......................................................... 54 About the PWX750ML Manuals ..................2 Checking the Package Contents ................2 Product Overview .......................................3 Safety Precautions ......................................4 About the J1 Connector ................................... 54 Output Terminal Insulation............................... 56 When the output terminal is not grounded (floating) .................................................... 56 Precautions Concerning Installation Location 4 When the output terminal is grounded ...... 57 Cautions when using the external voltage (Vext) ........................................................ 58 Notations Used in This Manual ...................4 Controlling the Output Voltage......................... 59 Search by Topic ...........................................7 Control using an external voltage (Vext)... 59 Component Names......................................8 Control using an external resistance (Rext)60 Controlling the Output Current......................... 61 1 Installation and Preparation Connecting the Power Cord ............................. 12 Turning the Power On ...................................... 13 Turning the POWER switch on ................. 13 Turning the POWER switch Off................. 14 Rack Mounting ................................................. 14 Load Considerations ........................................ 15 Load Cables ..................................................... 17 Connecting to the Output Terminals ................ 18 Sensing ............................................................ 20 Control using an external voltage (Vext)... 61 Control using an external resistance (Rext)62 Controlling the Output On and Off States ........ 63 Controlling Output Shutdown........................... 65 Controlling the Clearing of Alarms ................... 66 External Monitoring.......................................... 67 4 Parallel/Series Operation Master-Slave Parallel Operation...................... 70 Features of the PWX750ML during masterslave parallel operation ............................. 70 Connection (master-slave parallel operation) . Local sensing ............................................ 21 72 Remote sensing ........................................ 21 Settings (master-slave parallel operation) 74 Starting master-slave parallel operation .. 75 2 Measured Value Display and Setting Display .. 24 Series Operation.............................................. 76 Features of the PWX750ML during series operation ....................................................... 76 Panel Operations ............................................. 25 Connection (series operation)................... 78 Output Operations............................................ 26 Settings (series operation) ........................ 79 Operation Overview ......................................... 26 Starting series operation ........................... 79 Basic Functions CV Power Supply and CC Power Supply ........ 27 Using the PWX750ML as a CV or CC Power Supply .................................................................... 29 Protection Functions and Alarms ..................... 30 5 Maintenance Calibration........................................................ 82 Alarm occurrence and clearing alarms...... 30 Calibration overview.................................. 82 Protection function activation .................... 31 Calibration procedure................................ 83 CONFIG Settings ............................................. 36 CONFIG parameter details ....................... 39 Preset Memory Function .................................. 47 Saving settings to preset memory ............. 47 Recalling preset memory entries............... 48 Locking Panel Operations (Key lock) ............... 49 Bleeder On/Off Feature.................................... 49 Switching from Remote Mode to Local Mode .. 50 Factory Default Settings (Initialization) ............ 51 6 Analog Inter7 Isolated face Specifications Introduction ...................................................... 96 Isolated Analog Interface Connector ............... 97 Setup and Operation........................................ 98 PWX 5 Appendix A Options ......................................100 B Troubleshooting........................102 6 PWX Search by Topic Preparation • I want to check the accessories. →See “Checking the Package Contents” or the included packing list. • The installation space is limited, so I want → See the included “Safety Precautions” to check the installation conditions. document, or the electronic version of the document on the CD-ROM. • How do I connect the AC power supply? → “Connecting the Power Cord” • What kind of load cables should I use? → “Load Cables” • How do I ensure stable voltage when the → “Sensing” cables connected to the load are long (the distance to the load is long)? • How do I rack mount the PWX750ML? What kind of parts are needed? Setup → “Rack Mounting” • How do I use remote sensing to stabilize →“Sensing” the PWX750ML? • How do I set the protection functions to prevent damage to the load? →“Protection Functions and Alarms” p.2 – p.12 p.17 p.20 p.14 p.20 p.30 • After a protection function has been acti- →“Alarm occurrence and clearing alarms” vated, how do I restart tests automatically p.30 when the cause of the alarm is fixed? • How do I set the communication conditions for remote control? →See the Communication Interface Manual on the CD-ROM. • How do I check the settings in preset memory? →“Recalling preset memory entries” – p.48 • How do I reset the PWX750ML to its fac- →“Factory Default Settings (Initialization)” p.51 tory default settings? • How do I use the multichannel (VMCB) →See the Communication Interface Manfunction to construct a multichannel power ual on the CD-ROM. supply system? Operation • How do I use the PWX750ML as a constant voltage power supply (CV mode)? →“Using the PWX750ML as a CV or CC Power Supply” • How do I use the PWX750ML as a constant current power supply (CC mode)? • How do I operate the PWX750ML at a specific current? How do I save current values to the preset memory? →“Preset Memory Function” • How do I control the output voltage with an external DC voltage? →“Overview” →“Master-Slave Parallel Operation” • How do I prevent the settings from being →“Locking Panel Operations (Key lock)” changed? Maintenance • How do I clean the PWX750ML? • How do I calibrate the PWX750ML? p.29 p.47 • How do I monitor the output voltage and →“External Monitoring” output current? • How do I use parallel operation to increase the current capacity? – →See the included “Safety Precautions” document, or the electronic version of the document on the CD-ROM. →“Calibration” p.54 p.67 p.70 p.49 – p.82 Troubleshooting See “Troubleshooting” on page 102 PWX 7 Component Names Front Panel Display area 12 13 16 17 1 2 18 6 7 8 15 19 20 21 3 Display area 5 8 14 9 4 10 11 PWX No. 1 Name Function POWER switch Flip the switch to the ( ) side to turn the power on. Flip it to the ( power off. See ) side to turn the p.13 CURRENT knob Used to set the current value or select a parameter number in the CONFIG settings. FINE Used to make fine current value adjustments. VOLTAGE knob Used to set the voltage value or change the value of a CONFIG parameter. FINE Used to make fine voltage value adjustments. 4 Air inlet (louver) Air inlet for cooling the inside of the PWX750ML. 5 OUTPUT key Used to turn output on and off. p.26 2 3 6 7 8 9 10 p.25, p.36 p.25 p.25, p.36 p.25 – SET key Used to set and confirm the output voltage and output current (the key has an LED). p.24 ALM CLR key Used to release protection functions that have been activated (the key has an LED). p.31 OCP • OVP keys Used to set and display the overcurrent protection (OCP), overvoltage protection (OVP), undervoltage limit (UVL) trip points (the key has an LED). p.32 A Used to recall and save the value of preset memory A (the key has an LED). p.47 CONFIG key Used to configure the various operating conditions (the key has an LED). p.36 B Used to recall and save the value of preset memory B (the key has an LED). p.47 PWR DSPL key Used to display the output power on the ammeter (the key has an LED). p.24 C Used to recall and save the value of preset memory C (the key has an LED). p.47 LOCAL key Used to switch between local mode and remote mode (the key has an LED). p.50 LOCK key Used to lock the operation of all keys other than the OUTPUT key (the key has an LED). p.49 11 SHIFT key Used to enable the functions that are written in blue characters below the key. – 12 Ammeter Displays the current, power, or the parameter number of a CONFIG parameter. p.24, p.36 13 CC LED Lights in red during constant current mode. p.29 p.24, p.30, p.36 14 Voltmeter Displays the voltage, the value of a CONFIG parameter, or the cause of an alarm. 15 CV LED Lights in green during constant voltage mode. 16 OUTPUT LED Lights in green when output is turned on. Blinks orange when output is on and a protection function has been activated. p.26, p.30 17 ALARM LED Lights in red when a protection function has been activated, However, does not light when a undervoltage limit (UVL) protection has been activated, Blinks red when the power limit (POWER LIMIT) has been activated. p.30 18 PRESET LED A: Lights in green when the memory A values are being recalled or saved. B: Lights in green when the memory B values are being recalled or saved. C: Lights in green when the memory C values are being recalled or saved. p.47 19 LOCK LED Lights in green when the keys are locked. p.49 20 REMOTE LED Lights in green during remote control. – LAN LED Lights and blinks when the LAN interface is in use. • No fault status: Lights in green. • Fault status: Lights in red. • Standby status: Lights in orange. • WEB identify status: Blinks green. – 21 PWX p.29 9 Rear Panel 2 1 7 8 3 9 4 5 6 10 * The serial number is displayed on the side of the product next to the AC inlet. No. 10 Name Function See p.18 1 DC OUTPUT Output connector 2 USB USB port for controlling the PWX750ML remotely 3 RS232C RS232C port for controlling the PWX750ML remotely 4 LAN Ethernet port for controlling the PWX750ML remotely 5 Air outlet Air outlet for cooling the inside of the PWX750ML 6 AC INPUT AC inlet 7 Chassis terminal Connector for grounding the output 8 Sensing terminal connectors Terminals to connect the sensing cables 9 J1 External control connector 10 Option slot Slot for the isolated analog interface option (factory option) Interface Manual – p.12 – p.20 p.54, p.69 p.95 PWX Installation and Preparation This chapter describes how to turn on the PWX750ML, what kind of load cables to use, and how to connect cables to the output connectors. Connecting the Power Cord WARNING Risk of electric shock. • This product is a piece of equipment that conforms to IEC Safety Class I (equipment that has a protective conductor terminal). Be sure to earth ground the product to prevent electric shock. • The product is grounded through the power cord ground wire. Connect the protective conductor terminal to earth ground. • Use the supplied power cord to connect to the AC line. If the supplied power cord cannot be used because the rated voltage or the plug shape is incompatible, have a qualified engineer replace it with an appropriate power cord that is 3 m or less in length. If obtaining a power cord is difficult, contact your Kikusui agent or distributor. • The power cord with a plug can be used to disconnect the PWX750ML from the AC power line in an emergency. Connect the plug to an easily accessible power outlet so that the plug can be removed from the outlet at any time. Be sure to provide adequate clearance around the power outlet. • Do not use the supplied power cord for other devices. This product is a piece of equipment that conforms to IEC Overvoltage Category II (equipment that consumes energy supplied from a fixed installation). 1 Check that the AC power line meets the nominal input rating of the product. The product can receive a nominal line voltage in the range of 100 Vac to 240 Vac at 50 Hz or 60 Hz. 2 3 4 12 Check that the POWER switch is turned off. Connect the power cord to the AC inlet on the rear panel. Insert the power plug into a grounded outlet. PWX Turning the Power On Turning the POWER switch on CAUTION See p.51 See p.39 See p.19 Risk of electric shock. Regardless of whether load cables are connected to the output terminals, be sure to attach the OUTPUT terminal cover before turning the POWER switch on. You can use the CONFIG settings to set how the PWX750ML starts when you turn the POWER switch on. Depending on the setting, the output may be turned on automatically when the POWER switch is turned on. In case that you connect a load without setting OVP and OCP to the appropriate values, the load may be damaged if output automatically turns on at the PWX750ML power-on. When you turn the POWER switch on for the first time after purchase, the PWX750ML starts with its factory default settings. Subsequent times that you turn the PWX750ML on, it starts with the panel settings (excluding the output on/off setting) that were in use immediately before the POWER switch was turned off. You can use the CONFIG settings (CF02) to select how the PWX750ML starts when the POWER switch is turned on. 1 2 3 Installation and Preparation WARNING 1 Check that the power cord is connected correctly. Check that the OUTPUT terminal cover is attached. When the product is shipped from the factory, the OUTPUT terminal cover is not attached. Turn the POWER switch on ( ). All the LEDs light, and then the voltmeter and the ammeter display the following sequence of information: the rated voltage and rated current, the firmware version number, the build number, and then the selected interface. Each item is displayed for approximately 1 second. After a few seconds, the PWX750ML enters the operation standby state (the output value is displayed). Rated voltage and rated current display (The PWX750ML is being used in this example.) Firmware version display (Version 1.00 in this example) Build number display (Build number BLD 0120 in this example.) Interface display (The LAN interface is selected in this example.) Inrush current When the POWER switch is turned on, an inrush current of up to 70 A flows. Check that sufficient current capacity is available in the AC power line or the switchboard, particularly if you are using multiple PWX750ML and turning on their POWER switches simultaneously. PWX 13 Rack Mounting Turning the POWER switch Off Flip the POWER switch to the ( ) side to turn the PWX750ML off. The PWX750ML saves the panel settings (except the output on/off setting) that were in use immediately before the POWER switch was turned off. You can use the CONFIG settings (CF02) to select how the PWX750ML starts when the POWER switch is turned on. See p.39 If the POWER switch is turned off immediately after the settings have been changed, the last settings may not be stored. CAUTION After you turn the POWER switch off, wait at least 10 seconds after the panel display turns off before you turn the POWER switch back on. Repeatedly turning the POWER switch on and off at short intervals can cause damage to the inrush current limiter. Furthermore, this will shorten the service life of the POWER switch and the internal input fuse. Rack Mounting See p.100 You can mount one or two PWX750MLs side by side to a rack. You can use brackets or slide rails to mount the PWX750ML to a rack. Remove the rubber feet before you mount the PWX750ML to a rack. If you are mounting two PWX750MLs side by side, install the optional support board to support the two PWX750MLs. Attach the optional support angles (KRB1-PWX SUPPORT ANGLE) to support the PWX750ML. We recommend that you keep all pieces that you have removed from the PWX750ML. You will need these pieces if you remove the PWX750ML from the rack. If you remove the PWX750ML from the rack, re-attach the original rubber feet. When using several PWX750ML power supplies together, such as for master-slave parallel operation or series operation, mount them to a rack before use. You can mount the PWX750ML to the Kikusui KRC series and KRO series racks. Rubber foot Screw (4 locations) M3 screw Max. depth: 8 mm [0.31 inches] ( ) Removing the rubber feet Loosen the screws to remove the rubber feet (in four locations). 14 PWX Load Considerations Note that the output will become unstable if the following types of loads are connected. 1 The PWX750ML only indicates mean values. Even when the indicated value is less than or equal to the set constant current, the peak values may exceed the set constant current. If this happens, the PWX750ML is instantaneously put into constant-current mode, and the output voltage drops. For these types of loads, you must increase the set constant current or increase the current capacity. Set constant current Ammeter reading (mean value) Set constant current Ammeter reading (mean value) Load current with peaks Installation and Preparation Loads with peak current or pulse-shaped current Pulse-shaped load current Loads that generate reverse current to the power supply The PWX750ML series cannot absorb reverse current from the load. Therefore, if a regenerative load (such as an inverter, converter, or transformer) is connected, the output voltage increases and becomes unstable. This can cause a malfunction. For these types of loads, connect a resistor (RD) as shown in the following figure to bypass the reverse current. However, the amount of current to the load decreases by Irp. IO EO + Load RD Output current Equivalent circuit of the PWX750ML CAUTION PWX +IO 0 -IO Regenerative load RD (in Ω) ≤ Irp Reverse current EO (in V) Irp (in A) RD: Reverse current bypass dummy load EO: Output voltage Irp: Maximum reverse current Use a resistor with sufficient rated power for RD. If a resistor with insufficient rated power for the circuit is used, resistor RD will burn out. 15 Load Considerations Loads with accumulated energy Connecting a load with accumulated energy, such as a battery, to the PWX750ML may cause current to flow from the load to the internal circuit of the PWX750ML. This current may damage the PWX750ML or reduce the life of the load. For this type of load, connect a reverse-current-prevention diode (DRP) between the PWX750ML and the load in series as shown in the following figure. This cannot be used in conjunction with remote sensing. DRP DRP: Reverse-current-protection diode PWX750ML Load with accumulated energy CAUTION • To protect the load and the PWX750ML, use a DRP that conforms to the following specifications. Reverse voltage withstand capacity: At least twice the rated output voltage of the PWX750ML. Forward current capacity: Three to ten times the rated output current of the PWX750ML. A diode with small loss. • Be sure to take into account the heat generated by DRP. DRP will burn out with inadequate heat dissipation. 16 PWX Load Cables Risk of fire. • Use load cables whose capacity is adequate for the PWX750ML’s rated output current. • The output connector and its surrounding area become hot. Use cables whose covers have heat resistance at 85 °C and higher. Risk of electric shock. • Use load cables whose rated voltage meets or exceeds the PWX750ML’s isolation voltage. The cables’ allowable current depends on the insulation’s maximum allowable temperature. A cable’s temperature is determined by the resistive loss based on the current, the ambient temperature, and the cable’s external thermal resistance. The following table shows the current capacity of heat-resistant vinyl wires that have a maximum allowable temperature of 60°C, assuming that a wire is stretched out horizontally in air in an ambient temperature of 30°C. The current capacity must be reduced under certain conditions, such as when vinyl cables that have a low heat resistance are used, when the ambient temperature is 30 °C or greater, or when cables are bundled together and little heat is radiated. Nominal cross-sectional AWG (reference cross- area [mm2] sectional area) [mm2] Allowable current1 [A] (Ta = 30 °C) Kikusui-recommended current [A] 2 14 (2.08) 27 10 3.5 12 (3.31) 37 - 5.5 10 (5.26) 49 20 8 8 (8.37) 61 30 14 6 (13.3) 88 50 22 4 (21.15) 115 80 30 2 (33.62) 139 - 38 1 (42.41) 162 100 50 1/0 (53.49) 190 - 60 2/0 (67.43) 217 - 80 3/0 (85.01) 257 200 100 4/0 (107.2) 298 - 125 - - 344 - 150 - - 395 300 200 - - 469 - 1 1 Installation and Preparation WARNING Excerpt from Japanese laws related to electrical equipment. Taking measures against noise When connecting wires that have the same heat resistance, separating the wires as much as possible to increase heat radiation enables a greater amount of current to flow. However, wiring the + (positive) and - (negative) output wires of the load cable side by side or bundling them together is more effective against unwanted noise. The Kikusui-recommended currents shown in the above table are allowable currents that have been reduced in consideration of the potential bundling of load cables. Use these values as a guideline when connecting load cables. Limitations of the remote sensing function All wires have resistance. As the wire becomes longer or the current becomes larger, the voltage drop in the wire becomes greater. This results in a smaller voltage being applied at the load end. The PWX750ML has a sensing function that compensates for this voltage drop up to approximately 4 V for a single line. If the voltage drop exceeds this level, use wires that have a greater cross-sectional area. PWX 17 Connecting to the Output Terminals WARNING Risk of electric shock. • Turn the POWER switch off before you touch the OUTPUT terminals. • Even if you turn the output off or turn the POWER switch off, if the bleeder on/off setting (CF11) is set to “oFF,” the voltage that was present when the output was on will remain at the output terminals. Set the bleeder on/off setting to “on” before you touch the output terminals. • Regardless of whether load cables are connected to the output terminals, be sure to attach the OUTPUT terminal cover before turning the POWER switch on. - terminal + terminal Chassis terminal 1 2 Turn the POWER switch off. Check that there is no voltage across the output terminals. Connect one end of the included chassis connection wire to the chassis terminal, and then connect the other end of the wire to the negative or positive output terminal. Use the screw that is attached to the PWX750ML to connect the wire to the chassis terminal. Use the screw that is attached to the output terminal to connect the wire to the output terminal. Screw (M3) Use an M3 screw and an M4 screw to connect the wire. Chassis connection wire Screw (M4) 3 4 Attach crimping terminals to the load cables. The output terminals have bolt holes (M6) for connecting the load cables. Use crimping terminals that are designed for M6 bolts. Use the included bolt set to connect the load cables to the output terminals. Connect the positive cable to the positive output terminal and the negative cable to the negative output terminal. Bolt (M6) Spring washer Washer Crimping terminal Use the M6 bolt set to connect the cables. Nut 18 PWX Connecting to the Output Terminals Attaching the OUTPUT terminal cover Remove the screw that is attached next to the output terminals on the PWX750ML. Use this screw to attach the OUTPUT terminal cover. Memo 2 Both the top and bottom of the OUTPUT terminal cover are the same shape. Remove the screws, and then line up the cover. 3 Memo Place the bottom half of the OUTPUT terminal cover underneath the load cables connected to the output terminals. 4 It is easier to slide the OUTPUT terminal cover in place if you make the load cables perpendicular with the PWX750ML. 1 Installation and Preparation 1 Align the hooks of the top half of the OUTPUT terminal cover with the bottom half of the OUTPUT terminal cover. Pushing the top half of the OUTPUT terminal cover toward the rear panel, slide the top half of the OUTPUT terminal cover onto the bottom half. Continue sliding the cover until you hear a click. Top cover Line up the two halves so that the protruding parts of the top cover are in front of the protruding parts of the bottom cover. Push this part toward the panel. Continue sliding the cover until you hear a click. Bottom cover 5 Push the OUTPUT terminal cover against the rear panel, and then use screws to fix the cover in place. Make sure that both screws are securely fastened. After you have lined up the top and bottom covers, use the screws to fix them in place. Screws (M3) PWX 19 Sensing When the PWX750ML is shipped from the factory, terminal cover and connector are attached to the sensing terminals. For safety reasons, when not using the sensing terminals, be sure to attach to terminal cover. If they are damaged or lost, contact your Kikusui agent or distributor. Terminal cover Connector P1-000-109 84-61-7305 Connecting the sensing cables WARNING Risk of electric shock and damage to internal circuits. • Never wire the sensing terminals while the POWER switch is turned on. • Use sensing cables whose rated voltage is higher than the PWX750ML’s isolation voltage. Protect the uncovered sections of the shielded cable by using insulation tubes whose withstand voltage is greater than the PWX750ML’s isolation voltage. • The sensing terminals are at approximately the same electric potential as the negative output terminal. Insert the cables so that the wire strands do not touch the chassis when they stick out of the sensing terminal. Also, insert the cables so that the stripped wires do not stick out of the terminal. • Even if you turn the output off or turn the POWER switch off, if the bleeder on/off setting (CF11) is set to oFF, the voltage that was present when the output was on will remain at the output terminals. Set the bleeder on/off setting to on before you touch the sensing terminals. • Regardless of whether local sensing or remote sensing is used, be sure to attach the sensing terminal cover before turning the POWER switch on. If the sensing cables come loose, the output voltage across the load may become unstable, and an excessive voltage may be applied to the load. If an appropriate OVP trip point is set, the OVP will trip before an excessive voltage is generated. When you are finished with remote sensing, return the PWX750ML to local sensing mode. Strip gauge Correct 7 mm (0.28 inches) Incorrect The wire itself is in contact with the chassis. Use this screw to fix the cables in place so that they do not come loose. Strip 7 mm (0.28 inches) of the cable covering, and then insert the cable here. Local sensing jumpers 20 Incorrect Wire scraps are in contact with the chassis. Terminal Function -S Negative remote sensing terminal -LS Negative local sensing terminal Connected to the negative output terminal — Not connected +LS Positive local sensing terminal Connected to the positive output terminal +S Positive remote sensing terminal Sensing cable AWG28 to AWG16 PWX Sensing Local sensing PWX Use twisted-pair wires for the load cables. Make the cables as short as possible. Output terminal + Chassis terminal Load Sensing terminal +S – +LS -LS 1 Installation and Preparation By factory default, the PWX750ML is set to local sensing (the rear panel sensing connector is hard wired). The sensing point during local sensing is the output terminal. This method does not compensate for the voltage drop in the load cable, so use this method when the load current is small or when you do not need to consider the load effect voltage. -S Remote sensing See p.17 Remote sensing is a feature that stabilizes the output voltage across the load by reducing the influence of voltage drops and other effects caused by the load cable resistance. You can use the PWX750ML’s remote sensing feature to compensate up to 4 V for a single line. Select a load cable that has sufficient current capacity to prevent the voltage drop in the load cable from exceeding the compensation voltage. When you perform remote sensing, set the voltage of the sensing point (across the load) so that it does not exceed the rated output voltage. If you are performing remote sensing with the voltage close to the maximum output voltage, the output is limited by the maximum output voltage (105 % of the rated output voltage). Electrolytic capacitors may be required at the sensing point (across the load). To reduce the effect of noise, use twisted-pair wires or 2-core shielded wires. When you are using shielded wires, connect the shield to the ground of the PWX750ML or the load. PWX Use twisted-pair wires for the load cables. Make the cables as short as possible. Output terminal + Chassis terminal + Load Sensing terminal +S +LS -LS – – C Connect an electrolytic capacitor across the load as necessary. -S For the sensing cables, use twisted-pair wires or shielded wires. PWX 21 Sensing 1 2 3 4 Turn the POWER switch off. Remove the sensing terminal cover and sensing connector from the rear panel sensing terminals. Remove the local sensing jumpers from the sensing connector. Remove 7 mm of the wire covering. Connect the negative sensing cable to -S and the positive sensing cable to +S. Use cable screws to securely fix the cables in place so that they do not come loose. 5 6 Firmly attach the sensing terminal cover and sensing connector to the rear panel sensing terminals. Turn the POWER switch on. Electrolytic capacitor to connect across the load If the wiring inductance component is large, the following symptoms may appear. • The PWX750ML oscillates If the wires used to connect to the load are long, the wiring inductance and capacitance can cause phase shifting at a level that can not be ignored. This may lead to oscillation. • The output fluctuates If the load current changes drastically in a pulse-shaped pattern, the output voltage may become large due to the wiring’s inductance component. You can reduce the inductance component by twisting the load cables, which stabilizes the voltage. However, if this does not rectify the problem, connect an electrolytic capacitor across the load. Electrolytic capacitor to use Capacity: 0.1 μF to a few hundred μF Withstand voltage: At least 120 % of the rated output voltage of the PWX750ML If you are inserting a mechanical switch between the PWX750ML and the load If you want to connect and disconnect the load using a mechanical switch that is inserted between the PWX750ML and the load, be sure to include switches in the sensing cables as shown in the following figure and turn on and off the load cable and the sensing cables simultaneously. Before you turn the mechanical switch on or off, be sure to turn the output or the POWER switch off. + +S S + + Load –S – C – – 22 PWX Basic Functions This chapter describes how to turn the output on and off and the basic operations that you can perform from the front panel. Measured Value Display and Setting Display The voltage and current displays have the following two states. • Measured value display • Setting display In addition to the voltmeter and ammeter, the PWX750ML can display the power, the set OVP or OCP, and the system configuration. Measured value display See p.29 The present output voltage and load current are displayed. In this situation, the SET key LED is off. You can change the output voltage and output current in the measured value display. Power display In the measured value display, press PWR DSPL to display the output power on the ammeter. The output power is calculated from the measured output voltage and the measured output current. When the power is being displayed, the PWR DSPL key lights. Press PWR DSPL again to turn off the LED and return to the measured value display. Lit Setting display Press SET to light its LED and display the present output voltage and output current settings. Press SET again to return to the measured value display. Lit When you recall a preset memory entry, the values stored in the preset memory entry are displayed on the panel. 24 PWX Panel Operations Overvoltage protection and overcurrent protection setting display Press OCP•OVP to light its LED and display the present overcurrent protection and overvoltage protection settings. Lit Press CONFIG to light its LED and display the present system configuration settings. Lit 2 Basic Functions System configuration setting display Panel Operations Measured value display, setting display, and set OVP/OCP display Turn the VOLTAGE knob to change the voltage. Turn the CURRENT knob to change the current. Decrease See p.32 Increase Decrease Increase Press SET to switch to the setting display, and then change the output voltage and output current while you view their actual settings. You cannot set the output voltage to a value that is 95% of the OVP trip point or higher. You cannot set the output current to a value that is 95% of the OCP trip point or higher. The displayed current or voltage may not change even if you turn the CURRENT or VOLTAGE knob. In this situation, the values are being changed at a finer resolution that which is being displayed. The display will change when the amount that you change the value by reaches the smallest display digit of the set voltage or current. Fine adjustment Memo When you set a value, it is convenient to first use normal resolution to set the value roughly and then switch to fine resolution to set it precisely. PWX You can change the resolution of the VOLTAGE and CURRENT knobs. Hold down SHIFT while you turn the VOLTAGE knob or CURRENT knob to make small changes to the value. 25 Output Operations The output turns on and off each time you press OUTPUT. When output is on, the OUTPUT LED in the display area lights. When the output is off, the OUTPUT LED in the display area turns off. When the output is on, output is generated at the present set values. If you change the settings while the output is on, the changes are applied immediately to the output. If the output is off, the setting display will appear (the SET key lights) as soon as you change the settings. Then, you can press OUTPUT to output using the new settings. You can use external control to turn the output on and off. See p.42, p.63 You can use the CONFIG settings to set the output-on startup state (CF12: prioritize CC or CV). Output on Lit Output on or off when the PWX750ML turns on In the factory default settings, output is off when the PWX750ML turns on. Using a CONFIG parameter (CF02:Forc), you can set the PWX750ML so that output is turned on at power on. If you set the PWX750ML so that output is turned on at power on, be sure to check the OVP trip point setting before you turn the PWX750ML off. See p.51 See p.32 CAUTION If you change the load, it may be damaged if the PWX750ML’s OVP and OCP settings are not correct. Operation Overview The PWX750ML is a constant voltage (CV)/constant current (CC) regulated DC power supply that can output a wide range of voltage and current within rated output power. See p.35 If you configure the settings so that “output voltage × output current” is less than or equal to the rated output power, the PWX750ML operates as a traditional constant-voltage (CV)/constant-current (CC) power supply. If you configure the settings so that “output voltage × output current” is greater than the rated output power, the actual output is limited by the power limit (POWER LIMIT: approximately 105% of the rated output power), and the output voltage and output current change depending on the load value. 90 Rated output voltage: 80 V Output voltage (V) 80 70 Rated output power: 750 W 60 50 40 30 20 Rated output current: 28 A 10 0 0 26 5 10 15 20 Output current (A) 25 28 30 PWX750ML operating range PWX CV Power Supply and CC Power Supply The PWX750ML has features that enable it to function as a constant-voltage source and constant-current source even when the load is changed. The constant-voltage source operation is referred to as constant-voltage (CV) mode. The constant-current source operation is referred to as constant-current (CC) mode. The operation mode is determined by the following three values. • The set output voltage (Vs) 2 • The set output current (Is) The operation modes are described below. RL > Rc Vmax p Vs Out p ut voltage Vout RL = Rc Crossover point A RL < Rc q B 0 Is Imax Output current Iout A = CV mode area B = CC mode area Vs = Set voltage Is = Set current Rc = Vs/Is (Ohm’s Law) RL = Load resistance Vmax = Maximum settable voltage Imax = Maximum settable current Basic Functions • The load resistance (RL) The above figure shows the PWX750ML operation modes. The load resistance is denoted as RL. The resistance, which is denoted as Rc, is calculated from the set voltage and current (Rc = Vs/Is). The power supply is designed so that it operates in CV mode in area A and CC mode in area B . The boundary is the line defined by RL = Rc. This line represents the load at which the output voltage and the set voltage are equal and the output current and the set current are equal. If load resistance RL is greater than resistance Rc, the operating point is in area A , and the PWX750ML operates in CV mode (point p). In this case, the set current Is equals to the current limit. When operating in CV mode, the output voltage is maintained at the set voltage. Output current I is determined by the equation I = Vs/RL and is a current that is less than current limit Is. The actual current that flows is not necessarily equal to the specified value. For loads in which transient peak current flows, current Is must be set so that the peak value does not reach the current limit. Conversely, if load resistance RL is less than resistance Rc, the operating point is in area B , and the PWX750ML operates in CC mode (point q). In this case, set voltage Vs equals to the voltage limit. When operating in CC mode, the output current is maintained at the set current. Output voltage V is determined by the equation V = Is × RL and is a voltage that is less than voltage limit Vs. The actual voltage that is applied is not necessarily equal to the specified value. For loads that generate transient surge voltage, Vs must be set so that the surge voltage does not reach the voltage limit. Crossover point The PWX750ML switches automatically between CV mode and CC mode according to the changes in the load. A crossover point is the point at which the mode switches. For example, when operating in CV mode, if the load changes and the output current reaches the current limit, the PWX750ML automatically switches to CC mode to protect the load. Likewise, when operating in CC mode, if the output voltage reaches the voltage limit, the PWX750ML switches to CV mode. PWX 27 CV Power Supply and CC Power Supply CV mode and CC mode operation example This section uses a power supply with a rated output voltage of 100 V and a rated output current of 10 A as an example. A load resistance (RL) of 8 Ω is connected to the output terminals of the power supply. The output voltage and output current are set to 30 V and 5 A, respectively. In this case, Rc = 30 V/5 A = 6 Ω. Because 8 Ω is greater than 6 Ω (RL > Rc), the power supply operates in CV mode. When you want to increase the voltage in CV mode, you can increase the voltage up to the voltage defined by the following equation: Vs = Is × RL. Substituting the values, we obtain Vs = 5 A × 8 Ω = 40 V. If you try to increase the voltage above this point, the crossover point is reached, and the power supply automatically switches to CC mode. To maintain operations in CV mode, increase the current limit. Next, a load resistance (RL) of 5 Ω is connected to the output terminals of the power supply. The output voltage and output current are set to 30 V and 5 A, respectively. In this case, Rc = 30 V/5 A = 6 Ω. Because 5 Ω is less than 6 Ω (RL < Rc), the power supply operates in CC mode. When you want to increase the current in CC mode, you can increase the current up to the current defined by the following equation: Is = Vs/RL. Substituting the values, we obtain Is = 30V/5Ω = 6 A. If you try to increase the current above this point, the crossover point is reached, and the power supply automatically switches to CV mode. To maintain operations in CC mode, increase the voltage limit. 28 PWX Using the PWX750ML as a CV or CC Power Supply When using the PMX750ML as a constant-voltage power supply, the set current is the limit to the current that can flow through the load. When using the PMX750ML as a constant-current power supply, the set voltage is the limit to the voltage that can be applied to the load. See p.18 See p.25 1 2 3 Turn the POWER switch off. Connect the load to the output terminals. Turn the POWER switch on. If the OUTPUT LED in the display area is lit, press OUTPUT to turn the output off. 4 Press SET to change to the setting display. 5 Turn the VOLTAGE knob to set the voltage. 6 Turn the CURRENT knob to set the current. 7 Press OUTPUT to turn output on. 2 Basic Functions If the specified limit is reached, the PMX750ML automatically switches its operation mode. When the PMX750ML switches its operation mode, the lit LED in the display area (CV LED or CC LED) changes to indicate the switch. The SET key lights. Voltage range: 0 V to 84 V Current range: 0 A to 29.4 A The SET LED turns off, and the OUTPUT LED in the display area lights. The voltage and current are generated from the output terminals. When the PMX750ML is operating as a constant-voltage power supply, the CV LED in the display area lights. When the PMX750ML is operating as a constant-current power supply, the CC LED lights. Even when the output is on, you can set the voltage and current by carrying out step 5 and step 6 while checking the actual output voltage or current. See p.24 See p.42 You can set the voltage that is actually output while checking the power. You can use the CONFIG settings to set the output-on startup state (CF12: prioritize CC or CV).Set this according to the operation mode that you are using. You can prevent overshoot from occurring when the output is turned on by prioritizing CV when using the PWX series as a constant-voltage power supply and by prioritizing CC when using the PWX series as a constant-current power supply. When used as a slave device, CC is automatically prioritized. To use the PWX series as a standalone unit or master unit after using it as a slave unit, set the operation mode that you want to use. If you do not set the operation mode, CC will be prioritized. When the output is turned on, the internal capacitors are charged. Depending on the set current, the PMX750ML may enter CC mode for an instant. PWX 29 Protection Functions and Alarms The PMX750ML is equipped with the following protection functions. • Overvoltage protection (OVP) • Overvoltage protection 2 (OVP2) • Overcurrent protection (OCP) • Undervoltage limit (UVL) • Overheat protection (OHP) • Fan failure protection (FAN) • Incorrect sensing connection protection (SENSE) • Low AC input protection (AC-FAIL) • Shutdown (SD) • Power limit (POWER LIMIT) • Communication monitoring (WATCHDOG) Alarm occurrence and clearing alarms Alarm occurrence When a protection function has been activated, the PMX750ML behaves as follows. Lit Alarm indication when OHP has been activated Alarm indication when OHP has been activated with the output on Blinking (in orange) Lit • The output turns off. For the overheat protection (OHP), fan failure protection (FAN), and low AC input protection (AC-FAIL) functions, you can use the CONFIG settings to select to turn the output on automatically when the problem that caused the alarm is fixed (CF03: Auto) or to leave the output turned off when the problem that caused the alarm is fixed (CF03: SAFE). This parameter is the same for the OHP, FAN, and AC-FAIL alarms. You cannot set this parameter separately for each protection function. • The ALARM LED in the front panel display area lights to indicate that an alarm has occurred. The voltmeter indicates the cause of the alarm. • The ALARM LED in the front panel display area blinks (only when the power limit has been activated). • The OUTPUT LED in the front panel display area blinks (only when a protection function has been activated when the output is on). See p.40 If a protection function is activated when the output is on, the ALARM LED lights and the OUTPUT LED blinks in orange. If the PWX750ML is set so that output turns on automatically after the problem that caused the alarm is fixed (CF03: Auto), the output is turned on and the OUTPUT LED lights automatically when the problem that caused the alarm is fixed. If the PWX750ML is set so that output remains off even after the problem is fixed (CF03: SAFE), output remains off even after the problem that caused the alarm is fixed. • The alarm signal is generated from pin 14 of the J1 connector (when the OVP/ OVP2/ OCP/ OHP/ FAN/ SEN/ AC-FAIL/ SD/ WATCHDOG has been activated). When a CONFIG parameter is being displayed, only the ALARM LED turns on; the cause of alarm is not displayed. To view the cause of the alarm, exit from the CONFIG parameter display. 30 PWX Protection Functions and Alarms Clearing alarms To clear alarms, (press ALM CLR (SHIFT+SET); (2) set pin 5 of the J1 connector to LOW (0 V to 0.5 V) or shorted; or (3) turn the PWX750ML off, fix the problem that caused the alarm, and then turn the PWX series on. If overvoltage protection 2 (OVP2) and Shutdown (SD) has been activated, turn the PWX series off, fix the problem that caused the alarm, and then turn the PWX750ML on. If an alarm still occurs even after you have corrected all the causes of alarms, the PWX750ML may be malfunctioning. Stop using it immediately, and contact your Kikusui agent or distributor. For an explanation of the problems that cause the alarms, see the explanation of each protection function. 2 Basic Functions When the overheat protection (OHP), fan failure protection (FAN), or low AC input protection (AC-FAIL) protection function is activated, output is turned off. You can use the CONFIG settings to select how the PWX750ML will perform after the problem that caused the alarm is fixed. You can select to turn the output on automatically (CF03: Auto) or to leave the output off (CF03: SAFE). If you select to turn the output on automatically after the problem that caused the alarm is fixed, the output will turn on automatically. Alarm signal The alarm signal is isolated from other terminals as it is through an open collector photocoupler. J1 connector ALM STATUS 16 STATUS COM 3 PWX750ML Maximum voltage: 30 V Maximum current: 8 mA Protection function activation Setting limitation functions You can use the CONFIG settings to apply limits to the voltage and current settings. You can set limitations so that the values do not exceed the set overvoltage protection (OVP trip point) and the set overcurrent protection (OCP trip point) and so that the values are not lower than the set undervoltage limit (UVL trip point). See p.42 See p.42 PWX By using this feature, you can avoid turning the output off by mistakenly setting the voltage or current to a value that exceeds the set OVP or OCP or to a value that is lower than the set UVL. If you have selected to limit the voltage setting (CF15: ON), you will no longer be able to set the output voltage to a value that is 95 % of the OVP trip point or higher or to a value that is lower than the UVL trip point. In addition, you will no longer be able to set the OVP trip point to a value that is lower than the set output voltage or the UVL trip point to a value that exceeds the set output voltage. If you have selected to limit the current setting (CF14: ON), you will no longer be able to set the output current to a value that is 95 % of the OCP trip point or higher. In addition, you will no longer be able to set the OCP trip point to a value that is lower than the set output current. 31 Protection Functions and Alarms Overvoltage protection (OVP), overvoltage protection 2 (OVP2), and overcurrent protection (OCP) The overvoltage protection (OVP) function is activated under the following conditions. • When the output terminal voltage exceeds the set voltage (OVP trip point). See p.30 • When the load or the PWX750ML is malfunctioning. The overvoltage protection 2 (OVP2) function is activated under the following conditions. • When the output terminal voltage exceeds 120 % of the rated output voltage (when a voltage is being applied from an external source). • When the load or the PWX750ML is malfunctioning. If OVP2 is activated, turn the POWER switch off and on. Alarm when OVP2 has been activated Lit The overcurrent protection function (OCP) is activated under the following conditions. • When the output current exceeds the set current (OCP trip point). • When the load or the PWX750ML is malfunctioning. Set the OVP and OCP trip points to appropriate values. Immediately after you purchase the PWX750ML or immediately after a load is changed, you have to set the OVP and OCP trip points to values that are appropriate for the load. The OVP2 trip point is fixed to 120 % of the rated output voltage. Setting the OVP and OCP trip points and the detection time of OCP activation See p.31, p.42 See p.42 The PWX750ML OVP operates according to the output terminal voltage. If you want to activate the protection function according to the voltage across the load, take the voltage drop in the load cable into consideration when you set the OVP trip point. You can use the CONFIG settings to limit the set OVP (CF15) and the set OCP (CF14). You can use the CONFIG settings to set the detection time of the OCP activation (CF13) OCP trip point OVP trip point OVP and OCP trip point displays Lit 1 2 Press OCP•OVP. The OCP•OVP key lights, and the OVP trip point and OCP trip point are displayed in the display area. While viewing the panel display, turn the VOLTAGE knob to set the OVP trip point or the CURRENT knob to set the OCP trip point. OVP setting range:8.00 V to 89.60 V OCP setting range:2.80 A to 31.36 A 3 32 Press OCP•OVP twice to finalize the settings. The OCP•OVP key turns off, and the PWX750ML returns to the measured value display PWX Protection Functions and Alarms Checking OVP and OCP operation The OVP and OCP functions are designed to protect the load. If you use the CONFIG settings to limit the voltage setting (CF15: ON), you will no longer be able to set the output voltage to a value that exceeds the OVP trip point. This means that you won’t be able to check the operation of the OVP function. If you use the CONFIG settings to limit the current setting (CF14: ON), you will no longer be able to set the output current to a value that exceeds the OCP trip point. This means that you won’t be able to check the operation of the OCP function. 1 2 3 4 Check that the OUTPUT LED in the display area is turned off. Set the output voltage to a value lower than the OVP trip point. Press OUTPUT to turn output on. The OUTPUT LED lights. Slowly turn the VOLTAGE knob clockwise. 2 Basic Functions To check the operation of the OVP function, carry out the procedure below. When the output voltage exceeds the OVP trip point, the front panel display area’s ALARM LED lights and the OUTPUT LED blinks to indicate that the OVP function has been activated. Display of the OVP activation alarm Blinking (in orange) 5 6 Lit Check that output has turned off. Turn the POWER switch off. To check the operation of the OCP function, carry out the procedure below. 1 2 3 4 5 6 Short the output terminal. Turn the POWER switch on. Check that the OUTPUT LED in the display area is turned off. Set the output current to a value lower than the OCP trip point. Press OUTPUT to turn output on. The OUTPUT LED lights. Slowly turn the CURRENT knob clockwise. When the output current exceeds the OCP trip point, the front panel display area’s ALARM LED lights, and the OUTPUT LED blinks to indicate that the OCP function has been activated. Display of the OCP activation alarm Blinking (in orange) 7 Lit Check that output has turned off. If you do not change the output settings, the OVP or OCP function will be activated again. PWX 33 Protection Functions and Alarms Undervoltage limit (UVL) See p.31, p.42 This protection function is activated when you attempt to set the output voltage to a value that is lower than the set undervoltage limit (the UVL trip point). In other words, it prevents you from setting the output voltage to a value lower than the set limit. This function does not turn the output off. You can use the CONFIG settings to limit the set UVL (CF15). Setting the UVL trip point 1 Press OCP•OVP. 2 Press OCP•OVP again. The OCP•OVP key lights, and the OVP trip point and OCP trip point are displayed in the display area. The present UVL trip point is displayed. Display example of the UVL setting 3 While viewing the panel display, turn the VOLTAGE knob to set the UVL trip point. UVL setting range: 0 V to 84 V 4 Press OCP•OVP to finalize the setting. Overheat protection (OHP) This protection function is activated when the PWX750ML’s internal temperature rises to an abnormal level. • When the PWX750ML is used in an environment outside its operating ambient temperature range (0 °C to +50 °C [32 °F to 122 °F]) • When the PWX750ML is used with its air inlet and exhaust port blocked. • When the fan motor has stopped. Lit See p.40 Alarm indication when OHP has been activated If you do not fix the problem that caused the OHP to be activated, OHP will be activated again even if you restart the PWX750ML. Fan failure protection (FAN) This function is activated when the number of fan rotations drops to an abnormal level. Lit 34 Alarm indication when fan failure protection has been activated PWX Protection Functions and Alarms Incorrect sensing connection protection (SENSE) This function is activated when the remote sensing cables are connected with the incorrect polarity (positive or negative), and the remote sensing function is then used. Lit Alarm indication when incorrect sensing connection protection has been activated This function is activated when a low AC input is detected. Lit Alarm indication when low AC input protection (AC-FAIL) has been activated Basic Functions 2 Low AC input protection (AC-FAIL) Shutdown (SD) See p.65 Shutdown (SD) is not activated as a result of the PWX750ML detecting an error. It is a function that is used to turn the output off through the application of a signal to the rear-panel J1 connector when an abnormal condition occurs. If SD is activated, turn the POWER switch off and on. Lit Alarm indication when the shutdown (SD) function has been activated Power limit (POWER LIMIT) See p.26, p.30 This function changes the output voltage or output current according to the changes in the load resistance. This function limits the output power to a value that is approximately 105 % of the rated output power. This function does not turn the output off. When the output limit function has been activated, the ALARM LED blinks. An alarm signal is not transmitted. Power limit value (fixed): 787.5 W Communication monitoring (WATCHDOG) See p.43 The watchdog function monitors the SCPI command communication status. Communication is assumed to have stopped if there is no communication within the time period specified by the communication monitoring timer setting (CF17). This function operates regardless of whether the product is in remote or local (panel control) mode. When using local mode (panel control), set communication monitoring to off in the timer settings. When using remote mode, you can set the timer using a command (OUTP:PROT:WDOG). You cannot stop communication monitoring with the *RST, *RCL, or *CLS command. In the alarm state, turn off communication monitoring before clearing the alarm. Lit PWX Alarm indication when the communication monitoring (WATCHDOG) has been activated 35 CONFIG Settings Use the CONFIG settings to set the PWX750ML system configuration. You can set and display the following parameters in the CONFIG settings. The CONFIG parameters are listed in a separate document (included with this manual). Effects: ● indicates a parameter that may be affected when the panel settings are reset (CF00) or when a preset memory entry is loaded. ▼indicates a parameter that may be affected when the master unit, the slave unit, or the number of units is changed (CF01). In the “Note” column, “A” indicates a parameter that is applied immediately, “B” indicates a parameter that is applied when the PWX series is turned on, and “C” indicates a parameter that is applied when CF34 is executed. Parameter number, CF (CONFIG) + a two-digit number Display switching SYSTEM CONFIG setting and display examples — A CF01 ▼ Effect Note Master-slave parallel operation parameter Power-on status parameter — B B CF041 Method for clearing OHP, FAN, and AC-FAIL alarms Memory content display parameter — — B A CF051 CC control using an Vext or Rext ● A CF061 CV control using an Vext or Rext ● A 1 CF071 CF08 CF09 1 CF101 CF11 CF121 CF13 CF14 1 CF151 CF16 CF17 INTERFACE CF20 CF21 CF22 CF23 CF24 CF25 LAN CF30 CF31 CF32 CF33 CF34 CF35 CF36 CF37 CF38 CF39 CF40 CF41 CF42 USB CF50 CF51 RS232C CF60 36 Lit Parameter Setting or display description number Resets the panel settings CF001 CF02 CF03 1 Setting display CV/CC control range parameter — A Range during voltage and current monitoring External control parameter for turning output on and off — A A External control logic parameter for turning output on and off ▼ A Bleeder on/off parameter Output-on startup state parameter — A A Detection time of OCP activation Current setting limit ●▼ ▼ — ●▼ A A Voltage setting limit ●▼ A Panel display brightness setting Communication monitor timer setting Remote interface parameter Command language parameter Emulation parameter during remote control SCPI communication error display parameter Multichannel (VMCB) domain number parameter Multichannel (VMCB) channel number DHCP parameter AUTO IP address parameter MANUAL IP address parameter Resets the LAN interface settings (LCI) Restarts the LAN interface (REBOOT) IP address display (1) IP address display (2) IP address display (3) IP address display (4) MAC address display (1) and (2) MAC address display (3) and (4) MAC address display (5) and (6) SCPI-RAW protocol TCP port number VID (vendor ID) display PID (product ID) display RS232C baud rate parameter — — ▼ A A B B B A B B B or C B or C B or C A A ▼ ─ ▼ ─ ▼ ─ ▼ ─ ▼ ▼ ▼ ▼ ▼ ▼ ▼ ▼ ▼ ▼ ▼ ─ ▼ ─ ▼ ─ ▼ B or C ▼ ─ ▼ ─ ▼ B You can only specify this parameter when the PWX series is being used as a master unit. PWX CONFIG Settings Setting and viewing CONFIG parameters CONFIG key CONFIG key CURRENT knob Used to select the Used to select the parameter number. parameter number. VOLTAGE knob Used to select the value or the parameter to display. 2 Measured value display System settings CF00 CF01 ... Basic Functions CONFIG key CURRENT knob CF17 CONFIG key Interface settings ... CF20 CF21 CF25 CURRENT knob LAN (CF20: LAn) USB (CF20: uSb) RS232C (CF20: 232) CF30 CF31 CF50 CF51 CF60 CONFIG key Interface-specific settings ... CF42 CURRENT knob CF00, CF33, and CF34 are used to execute operations. CF35 to CF41, CF50, and CF51 are used to display the status of the PWX750ML. You cannot set the values of any of these CONFIG parameters. The SET key blinks when you have selected a CONFIG parameter whose setting you must confirm by pressing SET (CF00, CF33, or CF34). Specifying the CONFIG settings (Excluding resetting the settings, resetting the LAN interface settings, and restarting the LAN interface) 1 Memo Press CONFIG or turn the CURRENT knob to switch between the parameter numbers. These two methods switch between the parameter numbers differently. PWX 2 Press CONFIG. The CONFIG key lights, and the SET key blinks. The ammeter displays the parameter number—CF00 . The voltmeter displays the corresponding setting— rST . Press CONFIG or turn the CURRENT knob to select the number of the parameter that you want to set. When you press CONFIG, the PWX series switches between the parameter numbers in the following order. CF00 → CF20 → CF30 → CF50 → CF60 → measured value display When you turn the CURRENT knob, the PWX750ML switches between the parameter numbers. The parameter numbers that are displayed are those within the ranges defined by the parameter numbers that pressing the CONFIG key switches between. 37 CONFIG Settings 3 4 5 Turn the VOLTAGE knob to change the value of the parameter. To specify or display other parameters, repeat step 2 and step 3 . To stop specifying CONFIG settings, proceed to step 5. Continue pressing CONFIG until the measured value display appears. Alternatively, press OUTPUT or PWR DSPL. If you are configuring a slave unit, press CONFIG or PWR DSPL. Some CONFIG parameters will be applied immediately after you set them, some will be applied after you restart the PWX750ML, and some will be applied after you execute CF33 or CF34. See p.36 Specifying the CONFIG settings (Resetting the settings, resetting the LAN interface settings, and restarting the LAN interface) • Resetting the settings (CF00) • Resetting the LAN interface settings (CF33) • Restarting the LAN interface (CF34) 1 2 3 Press CONFIG once (for CF00) or three times (for CF33 and CF34). The CONFIG key lights and the SET key blinks. If you pressed CONFIG once, the ammeter displays the parameter CF00 . The voltmeter displays the corresponding setting—rST If you pressed CONFIG three times, the ammeter displays the parameter CF30 . The voltmeter displays the corresponding setting—on If you are resetting the LAN interface settings (CF33) or restarting the LAN interface (CF34), turn the CURRENT knob to select the parameter number. Press SET, which is blinking. The CONFIG key turns off, and the SET key, the parameter number displayed on the ammeter, and the setting displayed on the voltmeter all blink. CF33 display example CF33 display example Blinking Blinking Blinking Blinking Memo Press any key other than SET to cancel the confirmation of the parameter. Memo CF33 and CF34 will continue to be displayed while the settings are being applied (this takes approximately 4 to 5 seconds). When the measured value display appears, the new settings have been applied. 38 4 number— . number— . Press SET, which is blinking, again. The settings are applied. While the parameter number and the setting are blinking, no new settings will be applied until you press SET. When setting CF00, the measured value display appears. When you are setting CF33 or CF34, the display changes once after you press SET. The ammeter displays “boot.” In both cases, all key LEDs light. After these are displayed for approximately 4 to 5 seconds, the measured value display appears, and the settings are applied. All lit Display example of CF33 or CF34 being applied PWX CONFIG Settings CONFIG parameter details The CONFIG parameters are explained in detail below. CF00 Resets the panel settings Communication Interface Manual Sets whether the panel settings will be reset. The following settings will be reset. When the settings are reset, the PWX750ML settings take on the same values as they do when an *RST command is received. You can only specify this parameter when the PWX series is being used as a master unit. • Output voltage• Output on/off at power-on • Output current• Constant current control using an Vext or Rext (CF05) • Overvoltage protection• Constant voltage control using an Vext or Rext (CF06) • Overcurrent protection• External control setting for turning output on and off (CF09) • Undervoltage limit• Voltage and current setting limits (CF15 and CF14) Value Parameter description rSt Resets the panel settings 2 Basic Functions See p.36, p.51, CF01 Master-slave parallel operation parameter See p.70 See p.36 Sets the total number of units (master unit and slave units) in master-slave parallel operation. Specify “SLAV” for the units that you want to use as slaves. This parameter is applied when you restart the PWX750ML. Changing this setting may affect the settings of the master unit or the slave units that are connected in parallel. Value Parameter description SLAV Use the PWX as a slave unit. 1 to 4 Set the total number of units (1 to 4; 1 indicates independent operation--factory default setting). CF02 Power-on status parameter See p.13 Sets the condition that the PWX750ML will be in when the power is turned on. This setting is invalid when you are using an external contact to turn the output off. This parameter is applied when you restart the PWX750ML. You can only specify this parameter when the PWX750ML is being used as a master unit. PWX Value Parameter description SAFE The settings that were in use immediately before the POWER switch was turned off are used. The output is off (factory default setting). Auto The settings that were in use immediately before the POWER switch was turned off are used. This includes whether output was on or off. Forc The settings that were in use immediately before the POWER switch was turned off are used. The output is turned on. 39 CONFIG Settings CF03 Method for clearing OHP, FAN, and AC-FAIL alarms See p.31 See p.34 Sets the method for clearing alarms when overheat protection (OHP), fan failure protection (FAN), or low AC input protection (AC-FAIL) has been activated. You cannot set this parameter separately for each protection function. When you select “Auto,” if the overheat protection function (OHP) has been activated, output will turn on again automatically when the internal temperature drops to a normal level. However, if you do not fix the problem that caused the alarm to occur, the alarm will occur again, which will force you to clear the alarm again. The overheat protection devices have long service lives (approximately 100000 uses), but if they reach the end of their service lives, they will stop operating. To maintain the performance of the PWX750ML for a long time, we request that you fully understand the Auto feature and only use it when necessary. Value Parameter description SAFE After the problem that caused an alarm to occur is fixed, the output is not turned on automatically (factory default setting). Auto After the problem that caused an alarm to occur is fixed, the output is turned on automatically. CF04 Memory content display parameter See p.48 Sets whether to display the saved contents in the preset memory before recalling them. You can use this CONFIG parameter if you forget what settings have been saved to a preset memory entry or if you want to view the saved settings. You can only specify this parameter when the PWX750ML is being used as a master unit. Value Parameter description oFF The saved contents of preset memory will be recalled without displaying them. on The saved contents of preset memory entries will be displayed (factory default setting). CF05 CC control using an Vext or Rext See p.39, p.48, p.59 Selects whether constant current will be controlled by an external voltage (Vext) or an external resistance (Rext) (the J1 connector). This is set to “oFF” when the panel settings are reset (CF00) and when a preset memory entry is recalled. You can only specify this parameter when the PWX750ML is being used as a master unit. Value Parameter description oFF Control will not be performed (factory default setting). on Control will be performed. CF06 CV control using an Vext or Rext See p.59 40 Selects whether constant voltage will be controlled by an external voltage (Vext) or an external resistance (Rext) (the J1 connector). This is set to “oFF” when the panel settings are reset (CF00) and when a preset memory entry is recalled. You can only specify this parameter when the PWX750ML is being used as a master unit. Value Parameter description oFF Control will not be performed (factory default setting). on Control will be performed. PWX CONFIG Settings CF07 CV/CC control range parameter See p.59, p.61 Selects the range that is used when controlling constant current and constant voltage with an external voltage or an external resistance (the J1 connector). You can only specify this parameter when the PWX750ML is being used as a master unit. Value Parameter description Lo 0 V to 5 V (factory default setting) Hi 0 V to 10 V CF08 Range during voltage and current monitoring See p.67 Selects the range during voltage and current monitoring. Value Parameter description Lo 0 V to 5 V (factory default setting) Hi 0 V to 10 V Basic Functions 2 CF09 External control parameter for turning output on and off See p.63 Selects whether an external contact (the J1 connector) will be used to turn output on and off. This is set to “oFF” when the panel settings are reset (CF00) and when a preset memory entry is recalled. You can only specify this parameter when the PWX750ML is being used as a master unit. Value Parameter description oFF External control is not performed (factory default setting). on External control is performed. CF10 External control logic parameter for turning output on and off See p.63 Sets the logic that is used when an external contact (the J1 connector) is being used to turn output on and off. If you are not using an external contact to turn output on and off, select “Hi.” You can only specify this parameter when the PWX750ML is being used as a master unit. Value Parameter description Lo Output is turned on when a LOW signal (0 V to 0.5 V) or short-circuit is received (factory default setting). Hi Output is turned on when a HIGH signal(4.5 V to 5 V) or open-circuit is received. CF11 Bleeder on or off See p.49 Turns the bleeder circuit on and off. You can turn the bleeder circuit off when you don’t want current to be sinked by the internal bleeder circuit, such as when you are charging a battery. Even when the output terminal is off (open) or when the set voltage is 0 V, if you turn the bleeder off, a voltage as large as a few hundred millivolts may appear at the output terminal. Depending on whether the breeder circuit is on or off, the sink current and the fall time of output voltage when an external voltage sources connected will vary. When using master-slave parallel operation or series operation, use the same settings on all connected units. Value PWX Parameter description oFF The bleeder circuit is turned off. on The bleeder circuit is turned on (factory default setting). 41 CONFIG Settings CF12 Output-on startup state parameter See p.29 Sets the operation mode to be prioritized when the output is turned on. When used as a slave device, CC is automatically prioritized. To use the PWX series as a standalone unit or master unit after using it as a slave unit, set the operation mode that you want to use. If you do not set the operation mode, CC will be prioritized. You can only specify this parameter when the PWX750ML is being used as a master unit. Value Parameter description CC CC (constant current) is prioritized. CV CV (constant voltage) is prioritized (factory default setting). CF13 Detection time of OCP activation See p.32 Set the time when the overcurrent protection (OCP) is activated after an overcurrent is detected. Set this in 100 ms steps. Value Parameter description 0 0 ms (factory default setting) 100 to 2000 100 ms to 2000 ms CF14 Current setting limit See p.31 Set whether to limit the set output current so that its value does not exceed the set overcurrent protection (approximately 95 % of the OCP trip point). When the current setting limit is set to “oFF,” if you set the current setting limit to “on” when the set OCP is lower than the set current, the current value will be maintained, and the set OCP will be changed to 105 % of the current value. The parameter will also be changed if the output is on. This is set to “on” when the panel settings are reset (CF00) and when a preset memory entry is recalled. You can only specify this parameter when the PWX750ML is being used as a master unit. Value Parameter description oFF The setting is not limited. on The setting is limited (factory default setting). CF15 Voltage setting limit See p.31 Set whether to limit the set output voltage so that its value does not exceed the set overvoltage protection (approximately 95 % of the OVP trip point) and is not lower than the set undervoltage limit. When the voltage setting limit is set to “oFF,” if you set the voltage setting limit to “on” when the set OVP is lower than the set voltage, the voltage value will be maintained, and the set OVP will be changed to 105 % of the voltage value. In addition, the set UVL will be changed to match the voltage value. The parameter will also be changed if the output is on. This is set to “on” when the panel settings are reset (CF00) and when a preset memory entry is recalled. You can only specify this parameter when the PWX750ML is being used as a master unit. Value oFF Parameter description The setting is not limited. The setting is limited (factory default setting). 42 PWX CONFIG Settings CF16 Panel display brightness setting Adjusts the panel display brightness. The larger the number, the brighter the display. Memo When multiple units are used side-by-side, if the brightness of the panel display is different between units, you can adjust it. Even if you specify the same number, the brightness may be different between individual products. The brightness is not proportional to the setting. Value Parameter description 1 to 7 Screen brightness (factory default setting: 7). CF17 Communication monitor timer setting See p.35 Sets the interval for monitoring SCPI command communication. The communication monitoring function operates regardless of whether the product is in remote or local (panel control) mode. When using local mode (panel control), be sure to specify oFF. Value Parameter description oFF Communication monitor timer is set to off (factory default setting). 1 to 3000 1 s, 3 s, 10 s, 30 s, 100 s, 300 s, 1000 s, 3000 s Basic Functions 2 CF20 Remote interface parameter Selects the remote interface that you want to use. This parameter is applied when you turn the POWER switch off and on. Value Parameter description LAn The LAN interface will be used (factory default setting). uSb The USB interface will be used. 232 The RS232C interface will be used. CF21 Command language parameter Selects the command language that is used in remote control messages. This parameter is applied when you turn the POWER switch off and on. Value Parameter description SCPi The SCPI language will be used (factory default setting). LGCy Legacy languages will be used. CF22 Emulation parameter during remote control Selects the emulation that is used during remote control. If you have set the command language to legacy languages, you can only select “Gen” or “PAG.” This parameter is applied when you turn the POWER switch off and on. PWX Value Parameter description nonE Remote control is performed using the PWX750ML commands made by Kikusui (factory default setting). 5700 Remote control is performed using the N5700/N8700 commands made by Agilent Technologies. GEn Remote control is performed using the Genesys series commands made by TDKLambda. PAG Remote control is performed using the PAG series commands made by Kikusui. DCS Remote control is performed using the DCS series commands made by Sorensen. 43 CONFIG Settings CF23 SCPI communication error display parameter Selects whether to display communication errors. The errors are only displayed when you are using the SCPI language. Value Parameter description oFF SCPI communication errors are not displayed (factory default setting) on SCPI communication errors are displayed. CF24 Multichannel (VMCB) domain number parameter Set the multichannel domain number. PWXs that have the same domain number perform multichannel operations. If you do not want to use the multichannel function, set this to 0 (this is the factory default setting). If 5700 or DCS emulation is selected, you cannot use multichannel. This parameter is applied when you turn the POWER switch off and on or when you execute CF34. For details on the multichannel function, see the Communication Interface Manual on the included CD-ROM. Value Parameter description 0 The multichannel function is not used (factory default setting). 1 to 255 The domain number when the multichannel function is used. CF25 Multichannel (VMCB) channel number Set the multichannel channel number. Specify a unique number on the network. If you do not want to use the multichannel function, set this to 0 (this is the factory default setting). If 5700 or DCS emulation is selected, you cannot use multichannel. This parameter is applied when you turn the POWER switch off and on or when you execute CF34. For details on the multichannel function, see the Communication Interface Manual on the included CD-ROM. Value Parameter description 0 The PWX is used as a master unit on the multichannel network (factory default setting). 1 to 30 The PWX is used as a slave unit with this channel number on the multichannel network CF30 DHCP parameter Selects whether or not to obtain an IP address from a DHCP server. If you are using a fixed IP address, set this to “oFF.” This parameter is applied when you restart the PWX750ML or when you execute CF34. Value 44 Parameter description oFF A DHCP server is not used. on A DHCP server is used (factory default setting). PWX CONFIG Settings CF31 AUTO IP address parameter Set whether to automatically attain an IP address when you are not using or can not use a DHCP server. The address that is assigned by the AUTO IP function is 169.254.x.x (where x is a number between 0 and 254). If you are using a fixed IP address, set this to “oFF.” This parameter is applied when you restart the PWX750ML or when you execute CF34. Parameter description The AUTO IP function will not be used. on The AUTO IP function will be used (factory default setting). CF32 MANUAL IP address parameter Set whether to manually specify an IP address when you are not using or can not use a DHCP server. If you are using a fixed IP address, set this to “oFF.” This parameter is applied when you restart the PWX750ML or when you execute CF34. Value Parameter description oFF The MANUAL IP function will not be used (factory default setting). on The MANUAL IP function will be used. 2 Basic Functions Value oFF CF33 Resetting the LAN interface settings (LCI) Sets whether the LAN interface settings will be reset to their factory default settings. You can use this if you forget the security password or IP address. This parameter is only displayed when you are using the LAN interface. Value Parameter description LCi The LAN interface settings will be reset to their factory default settings. CF34 Restarts the LAN interface (REBOOT) Restarts the LAN interface. The LAN interface settings that you have specified do not change. Value Parameter description boot The LAN interface settings are saved, and the interface is restarted. CF35 to CF38 IP address display These parameters display the set IP addresses. These parameters are only displayed when you are using the LAN interface. The IP addresses are just displayed; they cannot be set from the panel. To set a fixed IP address, access the PWX750ML through a Web browser. When you access the PWX750ML through a Web browser, do so under conditions in which a DHCP server or AUTO IP can be used. For information about the Web browser interface, see the included CD-ROM. Parameter number PWX Display Description CF35 0 to 255 Displays the first IP address number CF36 0 to 255 Displays the second IP address number CF37 0 to 255 Displays the third IP address number CF38 0 to 255 Displays the fourth IP address number 45 CONFIG Settings CF39 to CF41 MAC address display These parameters display the set MAC addresses. These parameters are only displayed when you are using the LAN interface. The MAC addresses are just displayed; they cannot be set from the panel. To set a fixed MAC address, access the PWX750ML through a Web browser. When you access the PWX750ML through a Web browser, do so under conditions in which a DHCP server or AUTO IP can be used. MAC addresses are set to 00.0F.CE.xx.xx.xx (where x is a hexadecimal number between 0 and F). For information about the Web browser interface, see the included CD-ROM. Parameter number Display Description CF39 00.0F Displays the first and second MAC address numbers CF40 CE.xx Displays the third and fourth MAC address numbers CF41 xx.xx Displays the fifth and sixth MAX address numbers Display example of the MAC address “00.0F.CE.11.22.33:” CF39: 00.0F CF40: CE.11 CF41: 22.33 CF42 SCPI-RAW protocol TCP port number setting Set the TCP port number of the SCPI-RAW protocol for when the LAN interface is in use. This parameter is applied when you turn the POWER switch off and on or when you execute CF34. TCP port number 4880 cannot be used. When 4880 is specified, it is set to the factory default value of 5025 when the settings are applied. Value Parameter description 1000 to 9999 (except 4880) TCP port number (factory default setting: 5025) CF50 Vendor ID (VID) display Displays the USB vendor ID. Display Description 0b3E 0x0B3E CF51 Product ID display Displays the USB product ID. Display Description 1025 0x1025 CF60 RS232C baud rate setting Sets the RS232C baud rate. This parameter is applied when you restart the PWX750ML. 46 Value Parameter description 1.2 1200 bps 2.4 2400 bps 4.8 4800 bps 9.6 9600 bps 19.2 19200 bps (factory default setting) PWX Preset Memory Function The PWX750ML has the preset memory that stores three sets of the following settings: the voltage, the current, the OVP, the OCP, and the UVL. You can recall the stored set from the preset memory whenever you need. To select the preset memory that you specify for saving or recalling a set of settings, press A, B, or C key while holding down SHIFT key. Saving settings to preset memory 1 2 See p.32 3 4 See p.34 5 Press SET. 2 Basic Functions The recalling will be effective at the moment when you select the preset memory. To save the present settings, you need to keep holding down the keys (SHIFT+A, B, or C). The SET key lights, and the present voltage and current settings are displayed on the panel. While viewing the values displayed on the panel, turn the VOLTAGE knob to set the preset memory voltage and turn the CURRENT knob to set the preset memory current. Press OCP•OVP. The OCP•OVP key lights, and the OVP trip point and OCP trip point are displayed in the display area. While viewing the values displayed on the panel, turn the VOLTAGE knob to set the preset memory OVP value and turn the CURRENT knob to set the preset memory OCP value. Press OCP•OVP again. The present UVL trip point is displayed. 6 While viewing the value displayed on the panel, turn the VOLTAGE knob to set the preset memory UVL value. 7 Press SHIFT+the memory key (A, B, or C) to which you want to save the settings. Hold the keys down until their LEDs turn on. The PRESET A, PRESET B, or PRESET C LED in the display area—whichever one corresponds to the memory entry that you selected—lights to indicate that the preset memory entry has been saved. By following step 7, you can save preset memory entries when the output is on and the measured value display is being shown (the SET key LED is off). After you save a preset memory entry, press SET to view the preset memory values. PWX 47 Preset Memory Function Recalling preset memory entries You can recall preset memory entries from the measured value display (when the SET key LED is off) and from the setting display (when the SET key LED is lit). If the output is on, the values in the preset memory entry are applied to the output the moment that the preset memory entry is recalled (the moment that the settings are applied). See p.40 There are two methods to recall a preset memory entry. One method is to display the saved contents for confirmation and then recall (CF04: on). The other is to recall immediately without displaying the contents (CF04: oFF). If you hold down SHIFT+the memory key (A, B, or C) from which you want to recall the preset memory entry, the present values in use will be saved to the preset memory entry instead. When you recall a preset memory entry, the following items are set to their factory default settings. • Constant current control using an Vext or Rext (CF05: oFF) See p.40, p.41, p.42 • Constant voltage control using an Vext or Rext (CF06: oFF) • Output on/off control using an external contact (CF09: oFF) • Current setting limit (CF14: on) • Voltage setting limit (CF15: on) Displaying the saved contents for confirmation and then recalling Memo 1 This is convenient when you want to view the contents that have been saved to memory. Memo Press SHIFT+the memory key (A, B, or C) from which you want to recall the preset memory entry. The SET LED and the contents (voltage and current) of the loaded preset memory that are shown in the display area blink. If you press another memory key, the contents of the corresponding memory appear blinking. 2 Press OCP•OVP, CONFIG, or PWR DSPL to cancel the recall operation. Check the displayed settings, and then press SET. The SET LED and the LED that corresponds to the loaded preset memory entry both light, and the set voltage and current are displayed on the panel. Easily recalling a preset memory entry Memo This is convenient when you know the contents that have been saved to memory. 1 Use the CONFIG settings to set the PWX series to hide the saved contents of preset memory entries (CF04: oFF). 2 While holding down the SHIFT key, press the appropriate memory key (A, B, or C). The LED that corresponds to the preset memory entry that you have loaded (PRESET A, B, or C) lights. If no load is connected, it will take time for the output voltage to decrease. 48 PWX Locking Panel Operations (Key lock) The PWX750ML’s key lock function prevents you from accidentally changing the settings. Lit 1 Configure all the settings, such as the output voltage and output current, as necessary. 2 Hold down LOCK (SHIFT+LOCAL) until the LOCK LED in the display area lights. When the LOCK LED lights, the keys are locked. Basic Functions 2 When the keys are locked (when the LOCK LED is lit), only the OUTPUT key is valid. To unlock the keys, hold down LOCK again (SHIFT+LOCAL) until the LOCK LED turns off. Bleeder On/Off Feature You can turn the bleeder circuit on and off. Turn the bleeder circuit off when you do not want the internal bleeder circuit to sink output current. When you connect a battery, you can prevent excessive electrical discharges by turning the bleeder circuit off. When using master-slave parallel operation or series operation, use the same settings on all connected units. See p.41 Depending on whether the breeder circuit is on or off, the sink current and the fall time of output voltage when an external voltage sources connected will vary. The sink current or fall time indicated here is a standard value. WARNING Risk of electric shock. Set the bleeder on/off setting to “on” before you touch the output terminals. Even if you turn the output off or turn the POWER switch off, if the bleeder on/off setting is set to “oFF,” the voltage that was present when the output was on will remain at the output terminals. Sink current from an external voltage source when the breeder is on and off (When the voltage from the external voltage source is larger than the set voltage) Vout = Output terminal voltage Bleeder circuit 5 Vout1 10 Vout 20 Vout 30 Vout 40 Vout 50 Vout 60 Vout 70 Vout 80 Vout ON 704 mA 667 mA 593 mA 519 mA 444 mA 370 mA 296 mA 222 mA 148 mA OFF 0.1 mA 1 PWX Sink current 0.2 mA 0.4 mA 0.6 mA 0.8 mA 1.0 mA 1.2 mA 1.4 mA 1.6 mA Even when the breeder is on, the sink current decreases gradually at output terminal voltages lower than this voltage. If the output terminal voltage is near 0 V, hardly any current will be sunk even when the breeder is on. 49 Switching from Remote Mode to Local Mode Fall time of the output voltage when the breeder is off This is the time period for the rated output voltage to fall from 90 % to 10 % when the output is changed from on to off under no load conditions. Fall time 250 seconds Switching from Remote Mode to Local Mode When the PWX750ML is being controlled remotely, the REMOTE LED in the display area lights. Lit To switch the PWX750ML to local mode from the front panel, press LOCAL. 50 PWX Factory Default Settings (Initialization) If you hold down SHIFT+LOCAL while you turn the POWER switch on, the PWX750ML will be reset to the factory default settings. The factory default settings are shown below. Basic settings Parameter description Output voltage 0V 2 Output current 105 % of the rated output current OVP (overvoltage protection) 112 % of the rated output voltage OCP (overcurrent protection) 112 % of the rated output current UVL (undervoltage limit) 0V CONFIG settings Param. number Parameter description CF01 Master-slave parallel operation parameter 1 (independent operation) CF021 Power-on status parameter SAFE (panel settings that were in use the last time the power was turned off) CF03 Method for clearing OHP, FAN, and AC-FAIL alarms SAFE (do not clear the alarm automatically) CF041 Memory content display parameter ON (displayed) CF051 CC control using an Vext or Rext OFF CF061 CV control using an Vext or Rext OFF CF071 CV/CC control range parameter LO (0 V to 5 V) Range during voltage and current monitoring LO (0 V to 5 V) CF08 CF09 1 External control parameter for turning output on and off OFF External control logic parameter for turning output on and off LO (a LOW signal turns output on) 2 CF11 Bleeder on/off parameter ON (bleeder circuit is on) CF121 Output-on startup state parameter CV (CV is prioritized) CF13 Detection time of OCP activation 0 ms CF141 Current setting limit ON (the setting is limited) 1 Voltage setting limit ON (the setting is limited) CF16 Panel display brightness setting 7 CF17 Communication monitor timer setting OFF (Communication monitoring timer off) CF20 Remote interface parameter LAN CF21 Command language parameter SCPI CF22 Emulation parameter during remote control NONE (PWX series commands) CF23 SCPI communication error display parameter OFF (not displayed) CF24 Multichannel (VMCB) domain number 0 (the multichannel function is not used) CF25 Multichannel (VMCB) channel number 0 (the PWX is used as a master unit on the multichannel network) CF30 DHCP parameter ON (a server is used) CF31 AUTO IP address parameter ON (the AUTO IP function is used) CF32 MANUAL IP address parameter OFF (the MANUAL IP address function is not used) CF42 SCPI-RAW protocol TCP port number 5025 CF60 RS232C baud rate parameter 19.2 (kbit/s) CF101 CF15 1 2 PWX CONFIG parameter Basic Functions Basic item You can only specify this parameter when the PWX series is being used as a master unit. 0 V to 0.5 V or shorted. 51 This page is intentionally blank. 52 PWX External Control External Control This chapter explains external control and external monitoring using the J1 connector. Overview You can use the J1 connector on the rear panel of the PWX750ML to perform the following types of external control. • Output voltage control Controlled using an external voltage or external resistance • Output current control Controlled using an external voltage or external resistance • Turning output on and off using an external contact • Output shutdown control using an external contact • Clearing alarms using an external contact • Monitoring operation modes About the J1 Connector Plug kit 749809-9 DB25 is included for connecting to the J1 connector. The plug kit is constructed of connector parts made by AMP. Simple pressure welding tools and contact removal tools are not included. These items must be purchased separately. For information about how to use these components, see the AMP catalogs. For information about how to obtain these tools or replacement parts, contact your Kikusui agent or distributor. Attaching the USB cable core To connect to the J1 connector, requires a core on the cable for connection. The core is not included. Use an appropriate core. Recommended core: ZCAT3035-1330 EMI FILTER 250 Ohm 100 MHz by TDK 1 2 Unlock the snap-on core and open to split. Wrap the cable twice around either half of the open core. Wrap the wire so that the distance between the core and the J1 connector is within 30 mm. 3 Unlock and open the core 30 mm Close the core keeping the USB cable from being wedged in between. Check that the core is securely locked. Core To J1 connector 54 To connection PWX About the J1 Connector J1 connector pin arrangement 13 12 11 10 9 8 7 6 5 4 3 2 1 25 24 23 22 21 20 19 18 17 16 15 14 Pin number positions when you are facing the rear panel Connector type 5747461-3 (AMP) Plug type 745211-7 (AMP) Wire diameter AWG26 to AWG22 Manual pressure welding tool AMP handle assembly 58074-1 AMP head assembly 58063-2 Insertion/extraction tool AMP 91232-1 or equivalent Pin no. Signal name Description 1 STATUS COM Status signal common for pins 2, 3, and 14 to 16.1 2 CV STATUS On when the PWX750ML is in CV mode (open-collector output from a photocoupler).2 3 CC STATUS On when the PWX750ML is in CC mode (open-collector output from a photocoupler).2 4 N.C. Not connected. 5 ALM CLR Alarm clear terminal. Alarms are cleared when a LOW (0 V to 0.5 V) or short-circuit is applied to this terminal. 6 SHUT DOWN Output shutdown control terminal. The output is turned off when a LOW (0 V to 0.5 V) or short-circuit is applied to this terminal. 7 PRL IN- Negative input terminal for master-slave parallel operation. 8 PRL IN+ Positive input terminal for master-slave parallel operation. 9 PRL COMP IN Correction signal input terminal for master-slave parallel operation. 10 A COM External signal common for pins 5 to 9, 11 to 13, 20 to 22, 24, and 25. During remote sensing, this is the negative electrode (-S) of sensing input. When remote sensing is not being performed, this is connected to the negative output. 11 PRL OUT+ Positive electrode output terminal for master-slave parallel operation. 12 PRL COMP OUT Correction signal output terminal for master-slave parallel operation. 13 I SUM Current signal terminal for master-slave parallel operation. 14 ALM STATUS On when a protection function (OVP, OVP2, OCP, OHP, FAN, SEN, or AC_FAIL) has been activated or 3 External Control J1 when an output shutdown signal is being applied (output through an open-collector photocoupler).2 15 PWR ON STATUS Outputs a low level signal when power is turned on (output through an open-collector photocoupler).2 16 OUT ON STATUS On when output is on (output through an open-collector photocoupler).2 17 N.C. Not connected. 18 OUT ON/OFF CONT Output on/off terminal. On when set to LOW (0 V to 0.5 V) or shorted; off when set to HIGH (4.5 V or 5 V) or open (CF10: Lo) On when set to HIGH (4.5 V to 5 V) or open; off when set to LOW (0 V or 0.5 V) or shorted (CF10: Hi) 19 A COM External signal common for pins 5 to 9, 11 to 13, 20 to 22, 24, and 25. During remote sensing, this is the negative electrode (-S) of sensing input. When remote sensing is not being performed, this is connected to the negative output. 20 REF OUT External resistance control terminal; 5.25 V (CF07: Lo) or 10.5 V (CF07: Hi). The maximum output current 2.5 mA. 21 I PGM Terminal used to control the output current with an external voltage or external resistance. 0 V to 5 V; 0 % to 100 % of the rated output current (CF07: Lo). 0 V to 10 V; 0 % to 100 % of the rated output current (CF07: Hi). 22 V PGM Terminal used to control the output voltage with an external voltage or external resistance. 0 V to 5 V; 0 % to 100 % of the rated output voltage (CF07: Lo). 0 V to 10 V; 0 % to 100 % of the rated output voltage (CF07: Hi). 23 A COM External signal common for pins 5 to 9, 11 to 13, 20 to 22, 24, and 25. During remote sensing, this is the negative electrode (-S) of sensing input. When remote sensing is not being performed, this is connected to the negative output. 24 I MON Output current monitor. 0 % to 100 % of the rated output current is generated as a voltage between 0 V and 5 V (CF08: Lo) or a voltage between 0 V and 10 V (CF08: Hi). 25 V MON Output voltage monitor. 0 % to 100 % of the rated output voltage is generated as a voltage between 0 V and 5 V (CF08: Lo) or a voltage between 0 V and 10 V (CF08: Hi). 1 2 PWX The status common is floating (isolation voltage of 60 V or less), it is isolated from the control circuit. If connected for master-slave parallel operation, STATUS COM of the master unit will be connected to A COM of the slave unit (it will no longer be floating). Open collector output:Maximum voltage of 30 V and maximum current of 8 mA. 55 Output Terminal Insulation WARNING CAUTION Risk of electric shock. For safety reasons, even if the output terminal is grounded, make sure that the insulation capacity of the output terminal (including the sensing terminal) is greater than or equal to the isolation voltage of the PWX750ML (±250 Vmax). If you cannot obtain a cable with sufficient rated voltage, secure adequate withstand voltage by passing the cable through an insulation tube with a withstand voltage greater than the isolation voltage of the PWX750ML. The signal cable may burn out. If the PWX750ML is to be controlled through an external voltage (Vext), do not ground the external voltage (leave it floating). The cable and load that are connected to the output terminal (including the sensing terminal) must have an insulation capacity that is greater than or equal to the isolation voltage of the PWX750ML with respect to the chassis. Isolation voltage indicates the maximum allowed voltage that appears across the output terminal of the power supply unit and the protective conductor terminal (chassis terminal). When the output terminal is not grounded (floating) The output terminal of the PWX750ML is isolated from the protective conductor terminal. If you connect the GND wire of the power cord to the ground terminal of the switchboard, the chassis of the PWX750ML is set to ground potential. Pins 5 to 13 (for external control and parallel operation) and 18 to 25 (for external control and output monitoring) of the rear panel J1 connector are at approximately the same electric potential as the PWX750ML’s negative output terminal. Cables and devices that are connected to these pins must have an insulation capacity greater than or equal to the isolation voltage of the PWX750ML. PWX 1 J1 Isolated 3 Because the output terminal is floating, the section shown on a gray background must have an insulation capacity greater than or equal to the PWX750ML isolation voltage. + – Vext SENS 56 + – DC OUTPUT Approximately the same potential as the negative output terminal Isolated 16 18 19 20 21 22 23 24 25 Rext Load 5 6 7 8 9 10 11 12 13 14 Approximately the same potential as the negative output terminal +S –S + – L AC INPUT N PWX Output Terminal Insulation When the output terminal is grounded If the positive output terminal is connected to the chassis terminal, the positive output terminal is at ground potential. The cable and load that are connected to the output terminal (including the sensing terminal) will only require an insulation capacity that is greater than or equal to the maximum output voltage of the PWX750ML with respect to the chassis. There is no need to provide insulation that is greater than or equal to the isolation voltage of the PWX750ML. The same holds true when the negative terminal is connected to the chassis terminal. The cable and load require an insulation capacity that is greater than or equal to the maximum output voltage of the PWX750ML. PWX 1 3 Because the positive output terminal is at ground potential, the section shown on a gray background must have an insulation capacity greater than or equal to the maximum output voltage relative to the chassis. + – Vext SENS DC OUTPUT + – J1 Isolated Approximately the same potential as the negative output terminal Isolated 16 18 19 20 21 22 23 24 25 Rext Load 5 6 7 8 9 10 11 12 13 14 3 External Control For safety reasons, connect one of the output terminals to the chassis terminal unless your application requires the output terminals to be floating. Approximately the same potential as the negative output terminal +S –S + – L AC INPUT N Chassis terminal PWX 57 Output Terminal Insulation Cautions when using the external voltage (Vext) Connect the cables so that output is not shorted. See the following figures for examples of shorted output. CAUTION The signal cable may burn out. • Do not ground the Vext output, that is, leave it floating. • If you are connecting the shield to the Vext side, do not connect the shield to the output terminal of the PWX750ML. 2-core shielded wire PWX J1 Approximately the same electric potential as the negative output terminal Vext + + – – × Prohibited + Ground the positive output terminal. – Output is shorted by the grounding of Vext, causing current to flow. A connection in which the output is shorted by the grounding of Vext (example of a prohibited connection) 2-core shielded wire Vext PWX J1 + + – – Prohibited × Approximately the same electric potential as the negative output terminal + Ground the positive output terminal. – Output is shorted by the shield, causing current to flow. A connection in which the output is shorted by the shield (example of a prohibited connection) 58 PWX Controlling the Output Voltage This section explains how to control the output voltage using an external voltage (Vext) or an external variable resistor (Rext) of approximately 10 kΩ. If no load is connected, it takes some time for the output voltage to decrease. WARNING Risk of electric shock. • The insulation of Vext or Rext and the connected cable must be greater than or equal to the isolation voltage of the PWX750ML (±250 Vmax). Control using an external voltage (Vext) To use an external voltage (Vext) to control the output voltage, set the CV control using an external voltage or an external resistance in the CONFIG settings so that external voltage control is enabled (CF06: on). See p.40 3 External Control • When using shielded cables for the connection, protect the uncovered sections of the shielded cable by using insulation tubes whose withstand voltage is greater than the PWX750ML’s isolation voltage. The output voltage (Eo) varies in the range of 0 to the rated output voltage (Ertg) when the external voltage (Vext) is changed in the range of 0 V to 5 V (CF07: Lo) or in the range of 0 V to 10 V (CF07: Hi). CAUTION External voltage (Vext) 0 V to 5 V (CF07: Lo) External voltage (Vext) 0 V to 10 V (CF07: Hi) Eo = Ertg × Vext/5 (in V) Vext = 5 × Eo/Ertg (in V) Eo = Ertg × Vext/10 (in V) Vext = 10 × Eo/Ertg (in V) • The signal cable may burn out. Do not connect the Vext output, that is, leave it floating. Risk of damage to the product. • Pay careful attention to the polarity of Vext. • Do not apply a voltage of 10.5 V or greater, or a reverse voltage across the external voltage control pins. • When using the optional isolated analog interface, do not connect anything to pin 22 (VPGM) of the J1 connector. External voltage (Vext) connection Use a low-noise, stable voltage source for Vext. The noise in Vext is multiplied by the amplification factor of the PWX750ML and appears in the output. Therefore, the output ripple noise may not meet the specifications of the PWX750ML. 2-core shielded wire or twisted-pair wire PWX J1 22 23 Vext + – Output terminals To reduce the influence of noise on the output, connect a 2-core shielded wire or a twisted-pair wire across Vext, and keep the wire as short as possible. If the wiring between the PWX750ML and the external contact is long, it becomes easy for noise to influence the operation of the PWX750ML. Even if you use cables that are designed to suppress noise, the PWX750ML may not operate properly. PWX 59 Controlling the Output Voltage See p.58 If you use a shielded cable, connect the shield to the negative output terminal. If the shield needs to be connected to the Vext side, see “Cautions when using the external voltage (Vext).” Use pins 22 and 23 of the J1 connector. Control using an external resistance (Rext) See p.40 By using an external resistance (Rext) to change the reference voltage’s voltage-divider ratio, you can change the output voltage (Eo) in the range of 0 to the 105 % of the rated output voltage (Ertg). To use an external resistance (Rext) to control the output voltage, set the CV control using an external voltage or an external resistance in the CONFIG settings so that external voltage control is performed (CF06: on). The output voltage (Eo) varies in the range of 0 to the rated output voltage (Ertg) when the external voltage (Vext) is changed in the range of 0 V to 5 V (CF07: Lo) or in the range of 0 V to 10 V (CF07: Hi). External voltage (Vext) 0 V to 5 V (CF07: Lo) External voltage (Vext) 0 V to 10 V (CF07: Hi) Eo = Ertg × Vext/5 (in V) Vext = 5 × Eo/Ertg (in V) Eo = Ertg × Vext/10 (in V) Vext = 10 × Eo/Ertg (in V) External resistance (Rext) connection For the external resistance (Rext), use a resistor that is rated at approximately 10 kΩ, 1/2 W or greater, that has a low temperature coefficient, and that will change little over time. Examples of such resistors are metal film or wire wound resistors. Wiper 2-core shielded wire or twisted-pair wire PWX J1 20 Rext 22 23 Vext Output terminals To reduce the influence of noise on the output, connect a 2-core shielded wire or a twisted-pair wire across Rext, and keep the wire as short as possible. If the wiring between the PWX750ML and the external contact is long, it becomes easy for noise to influence the operation of the PWX750ML. Even if you use cables that are designed to suppress noise, the PWX750ML may not operate properly. If you use a shielded cable, connect the shield to the negative output terminal. Use pins 20, 22, and 23 of the J1 connector. 60 PWX Controlling the Output Current This section explains how to control the output current using an external voltage (Vext) or an external variable resistor of approximately 10 kΩ (Rext). WARNING Risk of electric shock. • The insulation of Vext or Rext and the connected cable must be greater than or equal than or equal to the isolation voltage of the PWX750ML (±250 Vmax). • When using shielded cables for the connection, protect the uncovered sections of the shielded cable by using insulation tubes whose withstand voltage is greater than the PWX750ML’s isolation voltage. Control using an external voltage (Vext) To use an external voltage (Vext) to control the output current, set the CC control using an external voltage or an external resistance in the CONFIG settings so that external voltage control is enabled (CF05: on). See p.40 External Control 3 The output current (Io) varies in the range of 0 to the rated output current (Irtg) when the external voltage (Vext) is changed in the range of 0 V to 5 V (CF07: Lo) or in the range of 0 V to 10 V (CF07: Hi). CAUTION External voltage (Vext) 0 V to 5 V (CF07: Lo) External voltage (Vext) 0 V to 10 V (CF07: Hi) Io = Irtg × Vext/5 (in A) Vext = 5 × Io/Irtg (in A) Io = Irtg × Vext/10 (in A) Vext = 10 × Io/Irtg (in A) • The signal cable may burn out. Do not connect the Vext output, that is, leave it floating. Risk of damage to the product. • Pay careful attention to the polarity of Vext. • Do not apply a voltage of 10.5 V or greater, or a reverse voltage across the external voltage control pins. • When using the optional isolated analog interface, do not connect anything to pin 21 (IPGM) of the J1 connector. External voltage source (Vext) connection Connect a low-noise, stable voltage source to Vext. The noise in Vext is multiplied by the amplification factor of the PWX750ML and appears in the output. Therefore, the output ripple noise may not meet the specifications of the PWX750ML. 2-core shielded wire or twisted-pair wire PWX J1 21 23 Vext + – Output terminals To reduce the influence of noise on the output, connect a 2-core shielded wire or a twisted-pair wire across Vext, and keep the wire as short as possible. If the wiring between the PWX750ML and the external contact is long, it becomes easy for noise to influence the operation of the PWX750ML. Even if you use cables that are designed to suppress noise, the PWX750ML may not operate properly. PWX 61 Controlling the Output Current See p.58 If you use a shielded cable, connect the shield to the negative output terminal. If the shield needs to be connected to the Vext side, see “Cautions when using the external voltage (Vext).” Use pins 21 and 23 of the J1 connector. Control using an external resistance (Rext) See p.40 By using an external resistance (Rext) to change the reference voltage’s voltage-divider ratio, you can change the output current (Io) in the range of 0 to the 105 % of the rated output current (Irtg). To use an external resistance (Rext) to control the output current, set the CC control using an external voltage or an external resistance in the CONFIG settings so that external voltage control is enabled (CF05: on). The output current (Io) varies in the range of 0 to the rated output current (Irtg) when the external voltage (Vext) is changed in the range of 0 V to 5 V (CF07: Lo) or in the range of 0 V to 10 V (CF07: Hi). External voltage (Vext) 0 V to 5 V (CF07: Lo) External voltage (Vext) 0 V to 10 V (CF07: Hi) Io = Irtg × Vext/5 (in A) Vext = 5 × Io/Irtg (in A) Io = Irtg × Vext/10 (in A) Vext = 10 × Io/Irtg (in A) External resistance (Rext) connection For Rext, use a resistor that is rated at approximately 10 kΩ, 1/2 W or greater, that has a low temperature coefficient, and that will change little over time. Examples of such resistors are metal film or wire wound resistors. Wiper 2-core shielded wire or twisted-pair wire PWX J1 20 Rext 21 23 Vext To reduce the influence of noise on Output terminals the output, connect a 2-core shielded wire or a twisted-pair wire across Rext, and keep the wire as short as possible. If the wiring is long, it becomes easy for noise to influence the operation of the PWX750ML. Even if you use wires that are designed to suppress noise, the PWX750ML may not operate properly. If you use a shielded cable, connect the shield to the negative output terminal. Use pins 20, 21, and 23 of the J1 connector. 62 PWX Controlling the Output On and Off States This section explains how to use an external contact to control the output on and off states. WARNING Risk of electric shock. • The insulation of the external contact (S) and the connected cable must be greater than or equal to the isolation voltage of the PWX750ML (±250 Vmax). • When using shielded cables for the connection, protect the uncovered sections of the shielded cable by using insulation tubes whose withstand voltage is greater than the PWX750ML’s isolation voltage. See p.41 If you use a shielded cable, connect the shield to the negative output terminal. To use an external contact to control the output on and off states, set the appropriate CONFIG parameter (CF09: on). Then, select the logic setting from the following two options. • Turn the output on with a low signal (CF10: Lo) Output is turned on when a LOW (0 V to 0.5 V) or short-circuit is applied to pin 1 of the J1 connector. • 3 External Control To reduce the influence of noise on the output, connect a 2-core shielded wire or a twistedpair wire across the external contact, and keep the wire as short as possible. If the wiring is long, it becomes easy for noise to influence the operation of the PWX750ML. Even if you use wires that are designed to suppress noise, the PWX750ML may not operate properly. Turn the output on with a high signal (CF10: Hi) Output is turned on when a HIGH (4.5 V to 5 V) or open-circuit is applied to pin 1 of the J1 connector. When you have used an external contact to turn the output off, the OUTPUT key on the front panel becomes invalid. ▼ represents that the OUTPUT key has been pressed. External contact H = On L = Off Output On Off The OUTPUT key is disabled. Even if you press it, output is not generated. The external contact has been used to turn output on, so the OUTPUT key is enabled. To use the external contact to turn output on again, first turn the output off. Controlling the output on and off states (in this example, a high signal is used to turn the output on) External contact connection Use pins 18 and 19 of the J1 connector. 2-core shielded wire or twisted-pair wire The open-circuit voltage across pins 18 and 19 is approximately 5 V. The short-circuit current across pins 18 and 19 is approximately 0.5 mA. PWX J1 18 19 S Use external contacts that have a contact Output terminals rating of 0.5 mA or more at 5 Vdc. If two or more units are floating and you are using a single external contact to turn output on and off for all the units, use a relay or similar device for the external contact signal to isolate the signal transmitted to each unit. PWX 63 Controlling the Output On and Off States For long-distance wiring When you are wiring over a great distance, use a small relay and extend the coil side of the relay. S Extend this line. 64 Relay PWX Controlling Output Shutdown This section explains how to use an external contact to turn output off. WARNING Risk of electric shock. • The insulation of the external contact (S) and the connected cable must be greater than or equal to the isolation voltage of the PWX750ML (±250 Vmax). • When using shielded cables for the connection, protect the uncovered sections of the shielded cable by using insulation tubes whose withstand voltage is greater than the PWX750ML’s isolation voltage. If you use a shielded cable, connect the shield to the negative output terminal. If you apply a LOW (0 V to 0.5 V) or short-circuit to pin 6 of the J1 connector, the output turns off. To recover, set pin 6 of the J1 connector to HIGH (4.5 V to 5 V) or open the pin, and then turn the POWER switch off and then on. 3 External Control To reduce the influence of noise on the output, connect a 2-core shielded wire or a twistedpair wire across the external contact, and keep the wire as short as possible. If the wiring is long, it becomes easy for noise to influence the operation of the PWX750ML. Even if you use wires that are designed to suppress noise, the PWX750ML may not operate properly. Output shutdown connection Use pins 6 and 19 of the J1 connector. The open-circuit voltage across pins 6 and 19 is approximately 5 V. The shortcircuit current across pins 6 and 19 is approximately 0.5 mA. Use external contacts that have a contact rating greater than or equal to 0.5 mA at 5 Vdc. 2-core shielded wire or twisted-pair wire PWX J1 6 19 S Output terminals If two or more units are floating, and you are using a single external contact to turn output off for all the units, use a relay or similar device for the external contact signal to isolate the signal transmitted to each unit. For long-distance wiring When you are wiring over a great distance, use a small relay and extend the coil side of the relay. S Extend this line. PWX Relay 65 Controlling the Clearing of Alarms This section explains how to use an external contact to clear alarms. WARNING Risk of electric shock. • The insulation of the external contact (S) and the connected cable must be greater than or equal to the isolation voltage of the PWX750ML (±250 Vmax). • When using shielded cables for the connection, protect the uncovered sections of the shielded cable by using insulation tubes whose withstand voltage is greater than the PWX750ML’s isolation voltage. To reduce the influence of noise on the output, connect a 2-core shielded wire or a twistedpair wire across the external contact, and keep the wire as short as possible. If the wiring is long, it becomes easy for noise to influence the operation of the PWX750ML. Even if you use wires that are designed to suppress noise, the PWX750ML may not operate properly. If you use a shielded cable, connect the shield to the negative output terminal. If you apply a LOW (0 V to 0.5 V) or short-circuit to pin 5 of the J1 connector, the alarms will be cleared. Alarm clear connection Use pins 5 and 19 of the J1 connector. The open-circuit voltage across pins 5 and 19 is approximately 5 V. The shortcircuit current across pins 5 and 19 is approximately 0.5 mA. Use external contacts that have a contact rating greater than or equal to 0.5 mA at 5 Vdc. 2-core shielded wire or twisted-pair wire PWX J1 5 19 S Output terminals If two or more units are floating, and you are using a single external contact to clear alarms, use a relay or similar device for the external contact signal to isolate the signal transmitted to each unit. For long-distance wiring When you are wiring over a great distance, use a small relay and extend the coil side of the relay. S Extend this line. 66 Relay PWX External Monitoring External monitoring of the output voltage and output current The J1 connector has monitor outputs for the output voltage and the output current. CAUTION Signal name Description 10, 19, 23 A COM Remote control input common Output monitor common 25 V MON Monitor output of output voltage 0 to approx. 5 V (CF08: Lo) or 0 to approx. 10 V (CF08: Hi) for 0 to the rated output voltage 24 I MON Monitor output of output current 0 to approx. 5 V (CF08: Lo) or 0 to approx. 10 V (CF08: Hi) for 0 to the rated output current Shorting V MON and I MON to A COM may damage the PWX750ML. Monitor output rating 3 External Control Pin no. Output impedance: 1 kΩ or less. Maximum output current: Approximately 10 mA. The monitor output signals are used to monitor the DC voltage (mean value). They cannot be used to accurately monitor the AC components (such as ripple and transient response waveform) of the actual output voltage or current. External monitoring of the operation status The J1 connector has status outputs that can be used to externally monitor the operation status of the PWX750ML. The following five items make up the status outputs. The outputs are open collector outputs of photocouplers; they are isolated from the internal circuits of the PWX750ML. The status common is floating (that is, it has an isolation voltage of less than or equal to 60 V). If connected for master-slave parallel operation, STATUS COM (pin 1 of the J1 connector) of the master unit will be connected to A COM (pin 19 of the J1 connector) of the slave unit (it will no longer be floating). If the positive output terminal is connected to the chassis terminal in this condition, the status common will be at an electric potential that is lower than that of the chassis terminal by the output voltage. Because the positive output terminal is at ground potential, secure an insulation capacity greater than or equal to this product’s isolation voltage relative to the chassis. The maximum ratings of the signal terminals are as follows: Maximum voltage: 30 V. Maximum current (sink): 8 mA. PWX 67 Pin no. Signal name Description 1 STATUS COM This is the status output common. This is the photocoupler emitter output. 2 CV STATUS This is set to low level when the PWX750ML is in constant voltage mode. This is the photocoupler open collector output. 3 CC STATUS This is set to low level when the PWX750ML is in constant current mode. This is the photocoupler open collector output. 14 68 ALM STATUS This is set to low level when a protection function (OVP/ OVP2/ OCP/ OHP/ FAN/ SEN/ AC-FAIL/ SD) is activated. This is the photocoupler open collector output. 15 PWR ON STATUS This is set to low level when the PWX750ML is turned on (PWR ON STATUS). This is the photocoupler open collector output. 16 OUT ON STATUS This is set to low level when the output is turned on. This is the photocoupler open collector output. Circuit 1 2 3 14 15 16 PWX Parallel/Series Operation Parallel/Series Operation This chapter describes the functions of series operation and the master-slave parallel operations as well as the connection, setup, and operation procedures. Master-Slave Parallel Operation In master-slave parallel operation, one unit is the master unit, and all other units connected in parallel are slave units. The master and slave units must all be the same model. You can control the whole system by operating the master. You can use master-slave parallel operation to expand the output current (maximum output current: the rated output current of one unit × the number of units connected in parallel). You can connect up to four units, including the master, in parallel. The difference in the output voltage and output current between the master unit and the slave units is within approximately 5 % of the rating. CAUTION When using the PWX750ML independently or when there are units not using parallel operation, disconnect the parallel operation connections. Otherwise, the PWX750ML may not operate properly. Features of the PWX750ML during master-slave parallel operation The features of the PWX750ML during master-slave parallel operation are as follows: Voltage display and current display The voltmeter on the master unit displays the voltage. The last voltage that was set on the master unit is displayed. The voltmeters on the slave units display “SLAV.” The master unit’s ammeter displays the total of the currents of all the units connected in parallel. Each slave unit displays its own current. See p.24 See p.39 If the maximum output current exceeds 99.99, the maximum current is displayed as 999.9. You can switch the display so that it shows power. The master unit’s ammeter displays the total of the powers of all the units connected in parallel. Each slave unit displays its own power. If the number of units during master-slave parallel operation that has been specified in the CONFIG settings (CF01) does not match the actual number of units connected in parallel, the correct current will not be displayed. Master unit Lit Slave unit Example of the panel display during parallel operation (The output current is 56 A.) External control See Chapter 70 This is only available on the master unit. PWX Master-Slave Parallel Operation External monitoring CAUTION See p.67 During master-slave parallel operation, do not connect the monitor common cable of the master unit to the monitor common cables of the slave units. If the cables connected to the load are disconnected, the common cables will be damaged. • External monitoring of the output voltage (V MON) This can be monitored from the master unit. • External monitoring of the output current (I MON) You can monitor the output current of the master unit and each slave unit. Use the master unit to monitor the total output current. Status monitors You can monitor the status of the following items from the master unit and from each slave unit: constant-voltage mode (CV STATUS), constant-current mode (CC STATUS), output on, POWER switch on, and alarms. However, slave units always output the status of constant-current mode. Remote sensing See p.20 This is only available on the master unit. Alarm If an alarm is detected, the units behave as follows: • Master unit If an alarm is detected on the master unit, output of each slave unit is turned off, and then the output of the entire system is turned off. • 4 Parallel/Series Operation • Slave unit The slave unit independently enters the alarm state and turns its output off. The output does not turn off on the master and other slave units. See p.31 You can use the CONFIG settings to specify what happens when the output is turned off because an alarm is detected. You can select to turn the output on automatically when the problem that caused the alarm is fixed (CF03: Auto) or to leave the output turned off when the problem is fixed (CF03: SAFE). (This parameter only applies to the OHP, FAN, and AC-FAIL errors.) Clearing alarms See p.31, p.75 PWX To clear alarms, (1) press ALM CLR (SHIFT+SET); (2) set pin 5 of the J1 connector to LOW (0 V to 0.5 V) or shorted; or (3) turn off the slave units, turn off the master unit, fix the problem that caused the alarm, turn on the slave units, and then turn on the master unit. 71 Master-Slave Parallel Operation Connection (master-slave parallel operation) See p.14 You can connect up to four units, including the master unit. Connecting the signal cables (parallel operation) See p.54 See p.101 Use the J1 connector to make the connections for parallel operation. The cables that are required to make the connection are not included. For details, see “ About the J1 Connector.” If you are using the optional parallel operation signal cable (PC01, PC02, or PC03-PWX), the connector is already assembled, so you can use it as is. If connected for master-slave parallel operation, STATUS COM (pin 1 of the J1 connector) of the master unit will be connected to A COM (pin 19 of the J1 connector) of the slave unit (it will no longer be floating). If the positive output terminal is connected to the chassis terminal in this condition, the status common will be at an electric potential that is lower than that of the chassis terminal by the output voltage. Because the positive output terminal is at ground potential, secure an insulation capacity greater than or equal to this product’s isolation voltage relative to the chassis. Example of connecting two slave units Master unit Slave unit 1 J1 J1 PRL OUT+ 11 8 PRL IN+ A COM 10 7 PRL IN– PRL COMP OUT 12 9 PRL COMP IN STATUS COM 1 19 A COM OUT ON STATUS 16 18 OUT ON/OFF CONT I SUM 13 13 I SUM Slave unit 2 J1 Connections for parallel operation (two 1 2 8 PRL IN+ 7 PRL IN– 9 PRL COMP IN 19 A COM 18 OUT ON/OFF CONT 13 I SUM Decide which PWX750ML to use as the master unit. Connect the J1 connector on the rear panel of the master unit to the J1 connector on the rear panel of the first slave unit. If you are using the optional parallel operation signal cable (PC01, PC02, or PC03PWX), the connector is already assembled, so you can use it as is. 3 Connect the J1 connector on the rear panel of the first slave unit to the J1 connector on the rear panel of the second slave unit. If you are using the optional parallel operation signal cable (PC01, PC02, or PC03PWX), the connector is already assembled, so you can use it as is. If you have a third slave unit, connect it in the same manner. 72 PWX Master-Slave Parallel Operation Connecting the load (parallel operation) WARNING CAUTION Risk of electric shock. Turn the POWER switch off before you touch the OUTPUT terminals. Attach the OUTPUT terminal cover after you finish wiring the load. • When you connect the output terminals to the chassis terminals, be sure to connect the same polarity output terminals (positive or negative) of the master unit and the slave units to the chassis terminals. If you connect different polarity output terminals of the master unit and the slave units to the chassis terminal, the output will be grounded through the power cable’s GND wire. Not only will this make the output incorrect, it will also cause the chassis terminal cable to burn out. • When the load cables are distributed over longer distance, the phase shifting due to wiring inductance and capacitance may go beyond the limit and result in oscillation. To prevent such oscillation, connect an electrolytic capacitor with several hundreds to several tens of thousands μF across the load. Use an electrolytic capacitor that has a withstand voltage that is at least 120 % of the product’s rated output voltage. Output terminal Chassis terminal Master unit Relay terminal block Load Output terminal Chassis terminal Slave unit 1 Output terminal Chassis terminal Slave unit 2 See p.17 1 2 3 4 4 Parallel/Series Operation • Twist the positive and negative cables together, and make the connection to the load as short as possible. Oscillation may occur as a result of wiring inductance. Load connections for parallel operation (two slave units) (The negative side is connected to the chassis terminal in this example.) Turn off all the PWX750MLs that you want to connect in parallel. Remove the OUTPUT terminal covers. Connect the load cables to the output terminals of the master unit and the slave units. Connect the load cables of the master unit and slave units to the load through a relay terminal block. Use load cables that have sufficient current capacity. Use load cables of equivalent length and cross-sectional area to connect each power supply to the relay terminal block, and wire the cables so that they are as short as possible (50 cm or less). Also, make the connection from the relay terminal block to the load block as short as possible. Wire the J1 connector signal cables and the load cables as far apart as possible. 5 Connect the output terminals (positive or negative) of the master unit and the slave units to the chassis terminals. Connect the same polarity output terminals on the master unit and slave units. If you are using the units under floating conditions, do not connect the terminals. PWX 73 Master-Slave Parallel Operation 6 Attach the OUTPUT terminal covers. If you have a third and fourth slave unit, connect them in the same manner. Settings (master-slave parallel operation) Setting the master unit, the slave units, and the number of units in parallel operation (including the master unit) See p.39 Turn the output off, and then configure the master unit (CF01: 2 to 4) and the slave units (CF01: SLAV) in master-slave parallel operation. On the master unit, set the number of units in master-slave parallel operation (CF01: 2 to 4). In the factory default settings, the PWX750ML is set to independent operation (CF01: 1). Turn the POWER switch off and on to enable the setting. Be sure to set the number of units in master-slave parallel operation (CF01) to the actual number of units that are connected. If this parameter is incorrect, settings such as those for the current and the overcurrent protection (OCP) cannot be set correctly, and the measured current will not be displayed correctly. Setting the voltage and current See p.70 Use the master unit to set the voltage and current. The current that is output is the sum of the currents of the master unit and the slave units. When you set the number of units in master-slave parallel operation (CF01), the maximum output current (105 % of the rated output current of a single unit × the number of units in parallel) is set. If you switch to the setting display (when the SET key is lit), this value is displayed. The last voltage that was set on the master unit is used. When you press OUTPUT, the set voltage and current are output. You can set the voltage and current to any values. Setting the overvoltage protection (OVP) and overcurrent protection (OCP) of the master unit See p.32 When you are performing master-slave parallel operation, set the overvoltage protection (OVP) and overcurrent protection (OCP) of the master unit. When you set the number of units in master-slave parallel operation (CF01), the maximum overcurrent protection value (112 % of the rated output current of a single unit × the number of units in parallel) is set. If you switch to the OVP/OCP setting display (when the OCP•OVP key is lit), this value is displayed. The last overvoltage protection value that was set on the master unit is used. 74 PWX Master-Slave Parallel Operation CONFIG parameters that can be set on master units Resets the panel settings • CF02 Power-on status parameter • CF04 Memory content display parameter • CF05 CC control using an Vext or Rext • CF06 CV control using an Vext or Rext • CF07 CV/CC control range parameter • CF09 External control parameter for turning output on and off • CF10 External control logic parameter for turning output on and off • CF12 Output-on startup state parameter • CF14 Current setting limit • CF15 Voltage setting limit Starting master-slave parallel operation Turning power on 1 2 3 Turn the master unit’s POWER switch on. Turn the POWER switch of each slave unit on. Operate the master unit normally. 4 Parallel/Series Operation • CF00 You cannot perform panel operations on the slave units. Turn output on and off from the master unit. Turning power off CAUTION After you turn the POWER switch off, wait at least 10 seconds after the panel display turns off before you turn the POWER switch back on. Repeatedly turning the POWER switch on and off at short intervals can cause damage to the inrush current limiter. In turn, this will shorten the service life of the POWER switch, internal input fuse, and other components. 1 2 PWX Turn the slave unit’s POWER switch off. Turn the master unit’s POWER switch off. 75 Series Operation You can connect up to two units in series. You cannot perform master-slave series operation. The total of the output voltages of the two units is applied to the load. The voltage setting accuracy is the same as the accuracy of an individual unit. Features of the PWX750ML during series operation The features of the PWX750ML during series operation are as follows: Voltage display and current display The voltage and current are displayed on unit 1 and unit 2. To calculate the total output voltage, add the voltages of unit 1 and unit 2. You can switch the display so that it shows power. The power is displayed on unit 1 and unit 2. See p.24 Unit 1 Lit Unit 2 Lit Example of the panel display during series operation (The output current is 28 A.) External control This is available. See Chapter External monitoring WARNING See p.67 During monitoring, be careful of shorts and electric shocks. When monitoring the output voltage or output current during master-slave series operation, the electric potential of the commons of the master unit’s monitor signal and the slave unit’s monitor signal are different. • External monitoring of the output voltage (V MON) You can monitor the output voltage of each unit. To calculate the total output voltage, add the monitor values of the master unit and the slave unit. • External monitoring of the output current (I MON) This can only be monitored from the master unit. • Status monitors You can monitor the status of the following items from the master unit and from the slave unit: constant-voltage mode (CV STATUS), constant-current mode (CC STATUS), output on, POWER switch on, and alarms. 76 PWX Series Operation Remote sensing To perform remote sensing, connect the PWX750MLs in series, and then connect the sensing cables to them as shown in the following figure. See p.20 CAUTION • If the sensing cables are not connected properly, the load may be exposed to excessive voltage, and the PWX750MLs may be damaged. • When the load cables are distributed over longer distance, the phase shifting due to wiring inductance and capacitance may go beyond the limit and result in oscillation. To prevent such oscillation, connect an electrolytic capacitor with several hundreds to several tens of thousands μF across the load. Use an electrolytic capacitor with a withstand voltage that is 120% or more of the total of the rated output voltages of the PWX750MLs that are connected in series. Unit 1 Output terminal Sensing terminal +S + -S C Load – Unit 2 – Output terminal Chassis terminal Sensing terminal +S -S + Connect an electrolytic capacitor across the load as necessary. Connecting the sensing cables during series operation Parallel/Series Operation 4 Chassis terminal Alarm All the alarms that are detected on a single unit are also detected during series operation. See p.40 You can use the CONFIG settings to specify what happens when the output is turned off because an alarm is detected. You can select to turn the output on automatically when the problem that caused the alarm is fixed (CF03: Auto) or to leave the output turned off when the problem is fixed (CF03: SAFE). Clearing alarms See p.31, p.79 PWX To clear alarms, (1) press ALM CLR (SHIFT+SET); (2) set pin 5 of the J1 connector to LOW (0 V to 0.5 V) or shorted; or (3) turn off unit 1 and unit 2, fix the problem that caused the alarm, and then turn on unit 1 and unit 2. 77 Series Operation Connection (series operation) You can connect up to two units. See p.14 Connecting the load (series operation) Connect the load as shown below. WARNING CAUTION Risk of electric shock. Turn the POWER switch off before you touch the OUTPUT terminals. Attach the OUTPUT terminal cover after you finish wiring the load. When the load cables are distributed over longer distance, the phase shifting due to wiring inductance and capacitance may go beyond the limit and result in oscillation. To prevent such oscillation, connect an electrolytic capacitor with several hundreds to several tens of thousands μF across the load. Use an electrolytic capacitor with a withstand voltage that is 120% or more of the total of the rated output voltages of the PWX750MLs that are connected in series. Output terminal Chassis terminal Unit 1 Load or relay terminal block Output terminal Chassis terminal Unit 2 See p.17 1 2 3 Load connection in series operation (In this example, the negative terminal of unit 2 is connected to the chassis terminal.) Turn off all the PWX750MLs that you want to connect in series. Remove the OUTPUT terminal covers. Use load cables to connect unit 1 and unit 2 to the load or relay terminal block. Use load cables that have sufficient current capacity. Wire the load cables so that they are as short as possible. If the voltage drop in the load cable is large, the difference in electric potential between power supply units and the load effect become large. 4 5 6 78 Connect the cables to the output terminals of unit 1 and unit 2. Connect the output terminal (positive or negative) of unit 1 or unit 2 to the chassis terminal. Attach the OUTPUT terminal cover. PWX Series Operation Settings (series operation) Setting the voltage and current Set the voltage and current on each unit. The voltage that is output is the total of the voltages of the two units. Set the current to the same value on the two units. Setting the overvoltage protection (OVP) and overcurrent protection (OCP) In series operation, you have to set the overvoltage protection (OVP) and overcurrent protection (OCP) on both units. Specify the same values on the two units. Starting series operation Turning the power on and off Turn the POWER switch on unit 1 and unit 2 on or off. CAUTION After you turn the POWER switch off, wait at least 10 seconds after the fan stops before you turn the POWER switch back on. Repeatedly turning the POWER switch on and off at short intervals can cause damage to the inrush current limiter. In turn, this will shorten the service life of the POWER switch, internal input fuse, and other components. 4 Parallel/Series Operation See p.32 Turning the output on and off Press OUTPUT on unit 1 and unit 2 to turn the output on or off. PWX 79 This page is intentionally blank. 80 PWX !!!DELETE!!! Maintenance This chapter explains how to perform calibration. Calibration The PWX750ML is calibrated before shipment. To maintain long-term performance, we recommend periodic calibration. For calibration, contact your Kikusui agent or distributor. If you are going to calibrate the PWX750ML yourself, follow the procedures below. All of the calibration items of the PWX750ML are described. Calibration overview The following eight calibration items are available. Be sure to calibrate both the offset and full scale values. • Output voltage offset (10 %) • Output voltage full scale (100 %) • Voltmeter offset (0 %) • Voltmeter full scale (100 %) • Output current offset (10 %) • Output current full scale (100 %) • Ammeter offset (0 %) • Ammeter full scale (100 %) Required devices • DC voltmeter (DVM) with a measurement accuracy of 0.02 % or more • Shunt resistor Model PWX750ML Recommended shunt resistor Rating Tolerance 30 A / 50 mV (1.67 mΩ) < ±0.1 % Environment Perform calibration in the following environment. • Temperature: 23 °C ± 5 °C • Humidity: 80 %rh or less To minimize the calibration error due to initial drift, warm up the PWX750ML for at least 30 minutes before calibration. In addition, warm up the DVM and shunt resistor for as long as is necessary. 82 PWX Calibration Calibration procedure Use the “KIKUSUI PWX calibration” application software included on the CD-ROM to calibrate the PWX750ML. The system requirements for the “KIKUSUI PWX calibration” is below. OS • Windows7 (x86/ x64) • Windows Vista (x86/ x64) • Windows XP—SP2 (x86), .NET Framework 2.0 or later VISA library One of the following VISA libraries is required. Do not install multiple VISA libraries on the same PC. Doing so may cause errors. NI-VISA by National Instruments Corporation (Ver. 5.0.3 or later) • Agilent VISA by Agilent Technologies (Agilent IO Libraries Suite 16.0 or later) • KI-VISA Ver. 5.0.4 or later For details, see the PWX Calibration—Manual that is installed together with the application software for calibrating the PWX750ML. Be sure to go through all the calibration items. If you cancel the calibration item in progress to initiate a different item or if you turn the POWER switch off, the calibration will be invalid. Connection • 5 Maintenance • Voltage calibration PWX DVM Output terminal HI LO Chassis terminal • Current calibration PWX Output terminal Shunt DVM Chassis terminal HI LO PWX 83 This page is intentionally blank. 84 PWX Specifications This chapter contains the specifications and gives the dimensions of the PWX750ML. PWX750ML PWX750ML Unless specified otherwise, the specifications are for the following settings and conditions. • Loads are pure resistive loads. • The warm-up time is 30 minutes (with current flowing). • After the PWX750ML has been warmed up, it must be calibrated correctly in a 23 °C ± 5 °C environment according to the procedures given in the operation manual. • Values indicated by “TYP” are typical values. They are not guaranteed performance values. • Values indicated by “rtg” are rated values. • Values indicated by “rdng” are readout values. • The PWX750ML operates over a wide range of output voltage and output current within rated output power. However, the current that can be output with rated output voltage and the voltage that can be output with rated output current are limited by the rated output power. • The current that can be output with rated output voltage and the voltage that can be output with rated output current are as follows. Maximum output current with rated output voltage = Rated output power/rated output voltage. Maximum output voltage with rated output current = Rated output power/rated output current. • Rated load and no load are defined as follows: In constant-voltage mode (when the output current is set to a value greater than or equal to the maximum output current with rated output voltage) Rated load: Refers to a resistive load that, when the rated output voltage is applied, makes the flowing current 95 % to 100 % of the maximum output current with rated output voltage. No load: Refers to a load through which no output current flows. In other words, refers to an open load (no load being connected). In constant-current mode (when the output voltage is set to a value greater than or equal to the maximum output voltage with rated output current) Rated load: Refers to a resistive load that, when the rated output current flows, makes the voltage drop to 95 % to 100 % of the maximum output voltage with rated output current. Including the voltage drop in the load cables, the PWX750ML output voltage must not exceed the maximum output voltage with rated output current. No load: Refers to a resistive load that, when the rated output current flows, makes the voltage drop to 10 % of the maximum output voltage with rated output current or 1 V whichever is higher. • The specifications of the PWX750ML apply to the rear panel output terminals. AC input Nominal input rating 100 Vac to 240 Vac, 50 Hz to 60 Hz, single phase Input voltage range 85 Vac to 265 Vac Input frequency range Current (MAX)1 47 Hz to 63 Hz 100 Vac 10.5 A 200 Vac 5.25 A Inrush current (MAX)2 Power (MAX) Power factor (TYP)1 Efficiency (MIN) 1 Hold-up time for power interruption (MIN)3 1 2 3 86 70 Apeak 1100 VA 3 0.99 (input voltage: 100 V), 0.97 (input voltage: 200 V) 74 % or more 20 ms or greater With the rated load. Excludes the charge current component that flows through the capacitor of the internal EMC filter circuit immediately after the POWER switch is turned on (for approximately 1 ms). For all loads, with 100 Vac input. PWX PWX750ML Output Output voltage1 80 V 1 28 A Output current Output power Voltage 750 W Setting range 0 V to 84 V Setting accuracy ± (0.05 % of setting + 0.05 % of rtg) Line regulation2 ±10 mV ±10 mV Load regulation3 Transient response 5 Ripple noise Rise time Fall time Current 8 1 ms or less 4 (p-p) 80 mV (rms)7 8 mV Rated load 100 ms No load 100 ms Rated load 100 ms No load 450 ms 6 Maximum remote sensing compensation voltage (single line) 4V Temperature coefficient (MAX)9 100 ppm/°C (during external control) Setting range 0 A to 29.4 A Setting accuracy ± (0.5 % of setting + 0.1 % of rtg) Line regulation ±4.8 mA Load regulation 10 Ripple noise ±10.6 mA Temperature coefficient (TYP) 1 2 3 4 5 6 7 8 9 10 PWX 65 mA (rms)7 9 100 ppm/ °C The maximum output voltage and current are limited by the maximum output power. 85 Vac to 135 Vac or 170 Vac to 265 Vac, fixed load The amount of change that occurs when the load is changed from no load to rated load (rated output power/rated output voltage) with rated output voltage. The value is measured at the sensing point. The amount of time required for the output voltage to return to a value within “rated output voltage ± (0.1 % + 10 mV).” The load current fluctuation is 50 % to 100 % of the maximum current with the set output voltage. Measured using an RC-9131B 1:1 probe that conforms to the JEITA specifications. At the rated output current. When the measurement frequency bandwidth is 10 Hz to 20 MHz. When the measurement frequency bandwidth is 5 Hz to 1 MHz. When the breeder circuit on/off setting is on. When the ambient temperature is within 0 °C and 50 °C When the output voltage is 10 % to 100 % of the rating. At the rated output current. 6 Specifications Rating 87 PWX750ML Display function Voltage display Maximum display 99.99 (fixed decimal point) Display accuracy ±(0.2 % of rdng + 5 digits) Current display Maximum display 99.99 (fixed decimal point) Display accuracy ±(0.5 % of rdng + 5 digits) Power display Operation display The PWR DSPL key lights in red. 1 Maximum display 9999 Display accuracy Displays the result of multiplying the current and voltage OUTPUT ON/OFF Output on:OUTPUT LED lights in green. Output off:OUTPUT LED turns off. The output is on and a protection function has been activated: OUTPUT LED blinks in orange. CV operation CV LED lights in green. CC operation CC LED lights in red. Alarm operation ALM LED lights in red when a protection function has been activated. ALM LED blinks in red when the power limit (POWER LIMIT) has been activated. Remote operation REMOTE LED lights in green during remote control. LAN operation 1 88 LAN LED lights or blinks depending on the LAN communication status. No fault status: Lights in green. Fault status: Lights in red. Standby status: Lights in orange. WEB identify status: Blinks green. Key lock operation LOCK LED lights in green when the keys are locked. Preset memory When a preset memory entry is being used, the PRESET A, B, or C LED lights in green. Press PWR DSPL to display the power on the ammeter. Each time you press this key, the display switches between power and current. PWX PWX750ML Protection functions Overvoltage protection (OVP) Turns the output off, displays OVP, and lights ALM Setting range 8 V to 89.6 V (10 % to 112% of the rated output voltage) Setting accuracy ±(1.5 % of rtg) Overvoltage protection 2 (OVP2) Value (fixed) Overcurrent protection (OCP) Turns the output off, displays OVP2, and lights ALM 96 V (120 % of the rated output voltage) 1 Turns the output off, displays OCP, and lights ALM Setting range 2.8 A to 31.36 A (10 % to 112 % of the rated output current) Setting accuracy ±(3 % of rtg) Undervoltage limit (UVL) 0 V to 84 V (0 % to 105% of the rated output voltage) Overheat protection (OHP) Turns the output off,2 displays OHP, and lights ALM Fan failure protection (FAN) Turns the output off,2 displays FAN, and lights ALM Incorrect sensing connection protection (SENSE) Turns the output off, displays SENS, and lights ALM Low AC input protection (AC-FAIL) Turns the output off,2 displays AC, and lights ALM Shutdown (SD) Turns the output off, displays SD, and lights ALM Power limit (POWER LIMIT) Value (fixed) Communication monitoring (WATCHDOG) 1 2 Lights ALM 787.5 W (approx. 105 % of the rated output power) Turns the output off, displays DOG, and lights ALM This does not protect against the discharge current peak that is generated from the capacitors inside the PWX750ML output section when the load is changed suddenly. Use the CONFIG settings to specify what happens when a protection function is activated and the output is turned off. You can select to turn the output on automatically when the problem that caused the alarm is fixed (CF03: Auto) or to leave the output turned off when the problem that caused the alarm is fixed (CF03:SAFE). The specified protection operation is the same for the OHP, FAN, and AC-FAIL alarms. You cannot make separate settings for the OHP, FAN, and AC-FAIL alarms. Signal output Monitor Voltage monitor signal output1 (VMON) Setting accuracy Current monitor (IMON) Setting accuracy PWX Selectable monitor voltage range: 0 V to 5 V or 0 V to 10 V 2.5 % of rtg Selectable monitor voltage range: 0 V to 5 V or 0 V to 10 V 2.5 % of rtg Status signal OUTON STATUS Turns on when the output is on output1,2 CV STATUS Turns on during CV operation 1 2 6 Specifications Value Cannot be set to a value less than or equal to the set voltage CC STATUS Turns on during CC operation ALM STATUS Turns on when an alarm has been activated PWR ON STATUS Turns on when the power is turned on J1 connector on the rear panel Photocoupler open collector output; maximum voltage 30 V, maximum current (sink) 8 mA; isolated from the output and control circuits; status commons are floating (withstand voltage of less than or equal to 60 V); and status signals are not mutually isolated. 89 PWX750ML Control features External control 1 Output voltage control (VPGM) Accuracy Output current control (IPGM) Accuracy 1 0 % to 100 % of the rated output voltage Selectable control voltage range: 0 V to 5 V or 0 V to 10 V 5 % of rtg 0 % to 100 % of the rated output current Selectable control voltage range: 0 V to 5 V or 0 V to 10 V 5 % of rtg Output on/off control OUTPUT ON/OFF CONT Possible logic selections: Turn the output on using a LOW (0 V to 0.5 V) or short-circuit, turn the output off using a HIGH (4.5 V to 5 V) or open-circuit. Turn the output on using a HIGH (4.5 V to 5 V) or open-circuit, turn the output off using a LOW (0 V to 0.5 V) or short-circuit. Output shutdown control SHUT DOWN Turns the output off with a LOW (0 V to 0.5 V) or short-circuit. Alarm clear control ALM CLR Clears alarms with a LOW (0 V to 0.5 V) or short-circuit. J1 connector on the rear panel Other features Master-slave parallel operation Including the master unit, up to four units (all the same model) can be connected. Series operation Up to two units (all the same model) can be connected. Preset memory Up to three sets of the following settings can be saved: the set voltage, the set current, the set OVP, the set OCP, and the set UVL. Key lock Locks the operation of all keys other than the OUTPUT key. Multichannel (VMCB) 90 Between master unit and PC LAN, USB, RS232C Slave unit LAN PWX PWX750ML Interface Common specifications Software protocol IEEE Std 488.2-1992 Command language Complies with SCPI Specification 1999.0 Has a compatibility mode (switchable)1 • Genesys series made by TDK-Lambda • N5700 and N8700 made by Agilent Technologies • DSC series made by Sorensen • PAG series made by Kikusui RS232C Hardware Complies with the EIA232D specifications (excluding the connector) RJ-45 connector2 Baud rate:1200, 2400, 4800, 9600, and 19200 bps Data length: 8 bits, Stop bits: 1 bit, Parity bit: None No flow control USB Program message terminator LF during reception, CR/LF during transmission Hardware Complies with the USB 2.0 specifications. Baud rate:12 Mbps (full speed). Socket B type LF or EOM during reception, LF + EOM during transmission Device class Complies with the USBTMC-USB488 device class specifications Hardware IEEE 802.3 100Base-TX or 10Base-T Ethernet Complies with LXI Specification version 1.3 Class C IPv4, RJ-45 connector3 1 2 3 PWX Communication protocol VXI-11, HiSLIP, or SCPI-RAW Program message terminator VXI-11 and HISLIP:LF or END during reception, LF + END during transmission SCPI-RAW:LF during reception, LF during transmission This setting does not guarantee compatibility with all measuring instrument application software and drivers. The RD-8P/ 9P adapter cable is an option. Category 5; use a straight cable. 6 Specifications LAN Program message terminator 91 PWX750ML Isolated Analog Interface (Factory option) Isolated external control input (Voltage control) Isolated output voltage control (VPGM_IS) 0 % to 100 % of the rated output voltage Selectable control voltage range: 0 V to 5 V or 0 V to 10 V Isolated output current control (IPGM_IS) 0 % to 100 % of the rated output current Selectable control voltage range: 0 V to 5 V or 0 V to 10 V Isolated output control common Accuracy ±5 % of rtg Temperature coefficient ±100 ppm/°C Input impedance 1 MΩ Maximum absolute applied voltage 0 V to 15 V Isolated output on/off control Possible logic selections: Apply a LOW (0 V to 0.5 V) or short-circuit to set the OUT ON/OFF CONT (pin 18 of the J1 connector) to LOW. Apply a HIGH (4.5 V to 5 V) or open-circuit to set the OUT ON/OFF CONT (pin 18 of the J1 connector) to HIGH. Isolated shutdown control Apply a LOW (0 V to 0.5 V) or short-circuit to set the SHUTDOWN (pin 6 of the J1 connector) to LOW. Isolated monitor signal output (Voltage control) Isolated voltage monitor (VMON_IS) 0 V to 5 V, 0 V to 10 V Isolated current monitor (IMON_IS) 0 V to 5 V, 0 V to 10 V Isolated monitor common ±4 % of rtg Accuracy Isolated external control input (Current control) Isolated output voltage control (VPGM_IS) 0 % to 100 % of the rated output voltage / 4 mA to 20 mA Isolated output current control (IPGM_IS) 0 % to 100 % of the rated output voltage / 4 mA to 20 mA Isolated output control common Accuracy 5 % of rtg Temperature coefficient ±200 ppm/°C Input impedance 50 Ω Isolated output on/off control Possible logic selections: Apply a LOW (0 V to 0.5 V) or short-circuit to set the OUT ON/OFF CONT (pin 18 of the J1 connector) to LOW. Apply a HIGH (4.5 V to 5 V) or open-circuit to set the OUT ON/OFF CONT (pin 18 of the J1 connector) to HIGH. Isolated shutdown control Apply a LOW (0 V to 0.5 V) or short-circuit to set the SHUTDOWN (pin 6 of the J1 connector) to LOW. Isolated monitor signal output (Current control) 92 Isolated voltage monitor (VMON_IS) 4 mA to 20 mA Isolated current monitor (IMON_IS) 4 mA to 20 mA Isolated monitor common Accuracy 4 % of rtg Load impedance 500 Ω or less PWX PWX750ML General Weight (main unit only) Approximately 5 kg (11.02 lb) Dimensions See the outline drawing Environmental conditions Operating environment Indoor use, overvoltage category II Operating temperature 0 °C to +50 °C (32 °F to +122 °F) Operating humidity 20 %rh to 85 %rh (no condensation) Storage temperature -20 °C to +70 °C (-4 °F to +158 °F) Storage humidity 90 %rh or less (no condensation) Altitude Up to 2000 m Cooling method Forced air cooling using fan Grounding polarity Negative grounding or positive grounding possible Isolation voltage ±250 V max. Isolated Analog Interface1 ±60 V max Withstand voltage Between input and FG No abnormalities at 1500 Vac for 1 minute Between input and output No abnormalities at 2000 Vac for 1 minute Between output and FG No abnormalities at 500 Vdc for 1 minute Between input and Iso- No abnormalities at 2650 Vac for 1 minute lated Analog Interface1 Between output and Iso- No abnormalities at 500 Vdc for 1 minute lated Analog Interface1 Between input and FG 500 Vdc, 100 MΩ or more (70 % or less) Between input and output 500 Vdc, 100 MΩ or more (70 % or less) Between output and FG 500 Vdc, 40 MΩ or more (70 % or less) Complies with the requirements of the following standard. IEC61010-1:2001 Safety2 Class I3, Pollution degree 2 Accessories 1 2 3 PWX Power cord 1 pc. OUTPUT terminal cover 1 pc. Output terminal bolt set M6 bolts: 2 sets (Bolt, nut, spring washer, and washer for each bolt) Chassis connection wire 1 wire J1 connector plug kit 1 set (housing × 1, connector × 1, plug × 1, cable strain relief × 1, clip × 2, and two kinds of screws × 2) Packing list 1 copy Quick reference Japanese: 1 copy, English: 1 copy Safety precautions 1 copy CD-ROM 1 disc 6 Specifications Insulation resistance Factory Option. Does not apply to specially ordered or modified PWX750MLs. This is a Class I equipment. Be sure to ground this product’s protective conductor terminal. The safety of this product is only guaranteed when the product is properly grounded. 93 Outline drawing M3 screw holes × 4 Max. screw insertion depth: 8 mm (0.31 inches) 70 (2.76) 305 (12.01) 62 (2.44) MAX 490 (19.29) 65.8 (2.59) 15 (0.59) 437 (17.20) 92 (3.62) 92 (3.62) 21 (0.83) 21 (0.83) 12 (0.47) MAX 20 (0.79) 10 (0.39) MAX 55 (2.17) 214 (8.43) 43 (1.69) 9 (0.35) 196 (7.72) 9 (0.35) Diameter: 16 × 4 (Rubber foot diameter) M4 screw holes × 4 Max. screw insertion depth: 6 mm (0.31 inches). #10-32 screw holes × 6 (3 on each side) Max. screw insertion depth: 8 mm (0.31 inches). unit: mm (inches) PWX750ML outline drawing 94 PWX Isolated Analog Interface Isolated Analog Interface (Factory option) This chapter describes the setup and operations of the isolated analog interface. Introduction The isolated analog interface is an internal option card that makes it possible to use analog signals to control the PWX Series. This option is installed inside the PWX750ML before shipment. You can use a signal that is isolated from the reference potential of the PWX750ML to perform the following the following types of control. • • • • • • Output voltage control Output current control Turning output on and off using an external contact Output shutdown control using an external contact Output voltage monitoring Output current monitoring The following two types of isolated analog interface options are available. ■ Voltage control You can control by using an external voltage. You can set the output voltage, set the output current, and perform monitoring by using 0 V to 5 V signals or 0 V to 10 V signals. ■ Current control You can control by using an external current. You can set the output voltage, set the output current, and perform monitoring by using 4 mA to 20 mA signals. 96 PWX Isolated Analog Interface Connector CAUTION When using the isolated analog interface, do not apply signals to VPGM (pin 22) and IPGM (pin 21) of the J1 connector. If you do, the connected device may malfunction, or the PWX750ML may not operate properly. The other functions of the J1 connector can be used normally. For details on the J1 connector functions, see “About the J1 Connector” on page 54. When the PWX750ML series is shipped from the factory, connectors are attached to the Isolated Analog Interface terminals. If they are damaged or lost, contact your Kikusui agent or distributor. 84-61-8209 The isolated analog interface connector, which is on the rear panel, can be split into two parts: the socket (attached to the PWX750ML) and the detachable plug. To minimize the influence of noise, we recommend that you use shielded twisted pair wires to make connections. Socket MC1,5/9-G-3,5 (Phoenix Contact) Detachable plug for wiring MC1,5/9-ST-3,5 (Phoenix Contact) Cable AWG 28 to AWG16 Length of covering removed from the end of the cable 7 mm Screw tightening torque 0.22 N•m to 0.25 N•m Signal name Description 1 VPGM_IS Output voltage control 2 VPGM_RTN_IS3 Return for pin 1 3 IPGM_IS Output current control 4 IPGM_RTN_IS3 Return for pin 3 5 VMON_IS Output voltage monitor 6 IMON_IS Output current monitor 7 SHUTDOWN_IS Output shutdown control Isolated analog interface Voltage control 0 V to 5 V or 0 V to 10 V1 0 V to 5 V or 0 V to 10 V1 0 V to 5 V or 0 V to 10 V1 0 V to 5 V or 0 V to 10 V1 Current control 4 mA to 20 mA2 4 mA to 20 mA2 4 mA to 20 mA2 4 mA to 20 mA2 Turns the output off with a low signal.4 Use pins 7 and 9 of the connector. The open-circuit voltage across pins 7 and 9 is approximately 5 V. The short-circuit current is approximately 10 mA. Use external contacts that have a contact rating greater than or equal to 10 mA at 5 Vdc. 7 Isolated Analog Interface Pin no. Isolated programming/ monitoring connector Select the logic that is used when an external contact (the J1 connector) is being used to turn output on and off (CF:10). 8 OUTPUT_ON/OFF_IS Output on/off control 9 GND_IS3 Common for pins 5 through 8 1. 2. 3. 4. PWX Turns the output on with a low or high signal.4 Use pins 8 and 9 of the connector. The open-circuit voltage across pins 8 and 9 is approximately 5 V. The short-circuit current is approximately 10 mA. Use external contacts that have a contact rating greater than or equal to 10 mA at 5 Vdc. Control within the 0 % to 100 % range of the rated output voltage. Control within the 0 % to 100 % range of the rated output current. Pins 2, 4, and 9 are connected internally. LOW: 0 V to 0.5 V or shorted; HIGH: 4.5 V to 5 V or open 97 Setup and Operation CAUTION To prevent damage to the product, do not set the output voltage and output current to values that exceed the product’s ratings. Using the voltage control interface See p.36 1 Use the CONFIG settings to set the following parameters. CONFIG parameter CF05 on CF06 CV control using an external voltage or external resistance on CF09 External control parameter for turning on output on and off CF07 CC or CV control range Lo ( 0 V to 5 V) or Hi (0 V to 10 V) CF08 Range during voltage and current monitoring Lo ( 0 V to 5 V) or Hi (0 V to 10 V) CF10 External control logic parameter for turning output on and off 1. 2 Setting CC control using an external voltage or external resistance Lo (low level signal to turn the output on) or Hi (high level signal to turn the output on)1 LOW: 0V to 0.5 V or shorted, HIGH: 4.5 V to 5 V or open. Connect the external voltage source to the isolated analog interface connector. Check that the voltage polarity is correct. 3 Set the applied voltage to the appropriate level. Using the current control interface See p.36 1 Use the CONFIG settings to set the following parameters. CONFIG parameter CF05 on CF06 CV control using an external voltage or external resistance on CF09 External control parameter for turning on output on and off CF07 CC or CV control range Hi (0 V to 10 V) CF08 Range during voltage and current monitoring Hi (0 V to 10 V) CF10 External control logic parameter for turning output on and off 1. 2 Setting CC control using an external voltage or external resistance Lo (low level signal to turn the output on) or Hi (high level signal to turn the output on)1 LOW: 0V to 0.5 V or shorted, HIGH: 4.5 V to 5 V or open. Connect the external current source to the isolated analog interface connector. Check that the current polarity is correct. 3 98 Set the applied current to the appropriate level. PWX Appendix A Options B Troubleshooting A Options The PWX750ML has the following options. For information about options, contact your Kikusui agent or distributor. Rack mount option The PWX750ML can be used with JIS millimeter racks and EIA inch racks. Name Model Notes Rack mount adapter KRA1-PWX HALF SINGLE Rack mount bracket and blank panel Rack mount adapter For installing two devices side-by-side KRA1-PWX HALF PAIR Rack mount bracket and support board Rack mount bracket KRB1-PWX — Angled rack mount support angle KRB1-PWX SUPPORT ANGLE — 5 (0.2 462 (1 8.19) 482 (1 8.98) 5 (0.2 KRA1-PWX HALF SINGLE KRA1-PWX HALF PAIR 5 (0.2 0) 24.5 (0.96) 0) 6 (0.24) 32 (1.26) 0) 44 (1.73) 462 (1 8.19) 482 (1 8.98) 24.5 (0.96) 0) 44 (1.73) 5 (0.2 6 (0.24) 32 (1.26) Unit: mm (inches) KRB1-PWX KRB1-PWX SUPPORT ANGLE 100 PWX Options You can use rack mount slide rails CC3001-00-S160 to mount the PWX750ML to a rack. Slide rail for rack mounting CC3001-00-S160 (Made by General Devices) Use #10-32 screws with a maximum length of 0.38 inches to mount the slide rails. Tightening torque: 2.87 N•m to 3.58 N•m CC3001-00-S160 Power cord This is the power cord that is used to connect the product to the AC line. The following three types are available. AC2-3P3M-IEC320-UL Rated voltage: 125 V Rated current: 15 A Plug: NEMA5-15 AC1-3P2R5M-IEC320-EU Rated voltage: 250 V Rated current: 10 A Plug: CEE7/7 AC1-3P2R5M-IEC320-CN Rated voltage: 250 V Rated current: 10 A Plug: GB1002 App Adapter cable (RD-8P/ 9P) This is an adapter cable for connecting the product to an RS232C interface. 2 m in length (typ.) Parallel operation signal cable This cable is used when you perform parallel operations. The following three types are available. PC01-PWX (for operating two units in parallel) PWX PC02-PWX (for operating three units in parallel) PC03-PWX (for operating four units in parallel) 101 B Troubleshooting This section introduces troubleshooting measures. Typical symptoms are listed. Check whether any of the items listed below apply to your case. In some cases, the problem can be solved quite easily. See p.51 If none of the items apply to your case, we recommend that you initialize the PWX750ML to its factory default settings. If the remedy does not correct the problem, contact your Kikusui agent or distributor. The power does not turn on Symptom Items to Check Remedy The PWX750ML does not operate when the POWER switch is turned on. Is the power cord broken? Exchange the power cord with a new one. p.2 Is the power cord connected correctly? Connect the power cord correctly. See p.12 No output is generated Symptom Items to Check Remedy No output is generated even when the OUTPUT switch is turned on. Is the output voltage set to 0 V and the output current set to 0 A? Turn the knobs to set the output voltage and output current to the required values. Are you using an external contact to turn output on and off? Yes Use the external contact to turn output on. p.63 No Set the external control parameter for turn- p.41 ing output on and off to “off” (CF09: oFF). Has the overvoltage protection (OVP) function been activated? Limit the set output voltage (CF15: on). If p.42 you do not limit the set output voltage (CF15: oFF), set the OVP to a value that is higher than the set voltage. Has the overvoltage protection (OVP2) function been activated? A voltage that is greater than or equal to the rated output may be being applied to the PWX750ML. Check the voltage that is being applied. Has the overheat protection (OHP) function been activated? The internal temperature is abnormally p.34 high. Check the operating conditions. After you have removed the cause of the abnormal temperature, turn the power switch on. Even when the PWX750ML is configured so that output is turned on at power on, the output is turned off immediately after the power is turned on. Is a shutdown (SD) signal being applied? 102 See p.25 p.86 The air inlet (louver) may be clogged, or the fan may be broken. Check them. — Set pin 6 of the J1 connector to HIGH (4.5 V to 5 V) or open the pin, or eliminate the shutdown (SD) signal. p.65 PWX Troubleshooting Unable to set the output voltage or output current correctly Symptom Items to Check Remedy The output voltage cannot be set correctly. Have you tried to specify a value that is higher than the OVP trip point? You cannot set the output voltage to a value that is 95% of the OVP trip point or higher. Check the OVP trip point. p.32 Have you tried to set a voltage value that is lower than the voltage value that is specified by UVL? You cannot set the output voltage to a value that is lower than the voltage that is specified by UVL. Check the voltage that is specified by UVL. p.34 Have you tried to specify a value that is higher than the OCP trip point? You cannot set the output current to a value that is 95% of the OCP trip point or higher. Check the OCP trip point. p.32 The output current cannot be set correctly. See The output is unstable Symptom Items to Check When the output is on, turning Is the operation mode switching from CV the VOLTAGE knob or CURto CC or CC to CV? RENT knob results in unstable output. The output voltage or output current fluctuates. Remedy See Change the setting (output voltage or out- p.29 put current) that is limiting the output to a p.100 value greater than the present setting. If the setting is at maximum, you must use a power supply that has a larger output voltage or current. Are you using master-slave parallel opera- Compared to independent operation, the tion? performance degrades slightly during master-slave parallel operation. — Are the remote sensing cables and the sensing connectors connected? p.20 When you are not using remote sensing, connect the sensing connectors in local sensing mode. Are both the CV and CC LEDs turned on? If the output is oscillating when you are using remote sensing, insert a capacitor across the load. The circuit may be malfunctioning. Immediately stop using the PWX750ML, and have it repaired. p.20 Do the sensing cables or load cables have Turn the POWER switch off, and check poor contact, or are the cables broken? the wiring. p.12 App Does the load current have peaks, or is it pulse shaped? The peak values may be exceeding the p.29 set constant current. Increase the set constant current or increase the current capacity. The output voltage is offset from the voltage that the PWX750ML was generating when it was turned on. Has 30 minutes passed since the power was turned on? Warm up the PWX750ML for at least 30 minutes. — The output voltage does not decrease even when the fall time elapses. Is the breeder circuit on/off setting set to oFF? If the breeder circuit on/off setting is set to oFF, the voltage that was present when the output was on will remain. Set the breeder circuit on/off setting to on. p.41 PWX 103 Troubleshooting The output ripple is large Symptom Items to Check Remedy The ripple sometimes becomes large. Is the input voltage outside the range? Apply a voltage that is within the input volt- p.86 age range. See The ripple increased when the Is something nearby generating a strong PWX750ML was installed in a magnetic or electrical field? different location. Take measures such as moving the PWX750ML away from the field sources or twisting the cables connected to the PWX750ML. — The output ripple is large during external control. Take measures against noise. — When you are not using remote sensing, disconnect the remote sensing cables. p.20 Is there a large amount of external voltage noise? The ripple increased when the Are the remote sensing cables conload cable was changed. nected? The ALARM LED lights when the OUTPUT switch is turned on Symptom Items to Check Remedy The ALARM LED lights when the OUTPUT switch is turned on. Are the remote sensing cables and the sensing connectors connected? When you are not using remote sensing, connect the sensing connectors in local sensing mode. p.20 Are the polarities of the remote sensing cables connected in reverse? The polarities of the remote sensing cables may be connected in reverse, or the ends of the cables may be shorted. Check the load cables. p.20 Are you using remote sensing with long load cables? Set up the environment so that the voltage p.20 drop in each load cable is within the compensation voltage range (4 V for a single line). Are you using external control with a loose Connect the cable correctly. control cable? p.54 Is the external voltage excessive during external control? Apply the correct voltage. p.59 p.61 Is the internal temperature too high? The overheat protection function has been p.34 activated. Check the operating environp.93 ment. The louver may be clogged, or the fan may be broken. Check them. The ALARM LED lights when the load is changed. See Is a large external voltage—such as that of a battery load—being applied? The overvoltage protection function or the overcurrent protection function may have been activated. Check them. Is the actual output voltage higher than the The PWX750ML may be overloaded. set voltage that is displayed on the panel? Check the load. Is a special load connected? — p.50 Unable to perform panel operations Symptom Items to Check Unable to perform panel oper- Is the LOCK LED lit? ations. Is the REMOTE LED lit? Is the PWX750ML being controlled via the RS232C, USB, or LAN interface? The PWX750ML does not switch to local mode even when the LOCAL switch is pressed. 104 Was a local lockout (llo) command sent through the communication interface? Remedy See Release the panel operation lock. p.49 To control the PWX750ML from the panel, press the LOCAL switch to switch to local mode. p.50 Send the “SYST:LOC” communication command to clear the local lockout (llo) status. — PWX Troubleshooting Unable to perform remote control Symptom Items to Check Remedy Remote control through the communication interface cannot be performed. Have you selected the communication Select the remote control communication interface that you want to use in the CON- interface (CF20). FIG settings? When the LAN interface is in use, the IP address cannot be obtained from the DHCP server. Is the LAN LED lit in orange or red? See p.43 If it is lit in orange, the PWX series is wait- p.44 ing for a response from the DHCP server. If it turns red afterward, the PWX series may have timed out. Consult your network administrator. Unable to control functions properly Symptom Items to Check Remedy The breeder on/off function does not work. Are you using master-slave parallel opera- When using master-slave parallel operation or series operation? tion or series operation, set the breeder on/off settings (CF11) of all connected units to the same value. See p.41 App PWX 105 This page is intentionally blank. 106 PWX Index A accessories ................................................................ 2 AC-FAIL ................................................................... 35 alarm clearing ......................................................... 31 display .......................................................... 31 alarm occurrence ..................................................... 30 alarm signal ............................................................. 31 M MAC address display ............................................... 46 memory contents, display ........................................ 40 memory function ...................................................... 47 multichannel (VMCB) ................................................. 3 channel ......................................................... 44 domain ......................................................... 44 O B bleeder on/off ........................................................... 41 C CC control ................................................................ 40 CC mode .................................................................. 27 command language ................................................. 43 constant-current mode ............................................. 27 constant-current power supply ................................. 27 constant-voltage mode ............................................ 27 current monitoring, range ......................................... 41 current setting limit ................................................... 42 CV control ................................................................ 40 CV mode .................................................................. 27 CV/CC control range ................................................ 41 D DHCP ....................................................................... 44 E emulation during remote control .............................. 43 F factory default settings ............................................. 51 FAN .......................................................................... 34 firmware version ........................................................ 2 I initialization .............................................................. 51 IP address display ................................................... 45 IP address, auto ....................................................... 45 IP address, manual .................................................. 45 K key lock function ...................................................... 49 L LAN interface resetting ........................................................ 45 restart ........................................................... 45 PWX OCP ......................................................................... 32 OCP activation, detection time ................................ 42 OHP ......................................................................... 34 output on and off external control ............................................. 41 external control logic .................................... 41 output-on startup state ............................................. 42 OVP ......................................................................... 32 OVP2 ....................................................................... 32 P parallel operation ..................................................... 39 POWER LIMIT ......................................................... 35 power-on status ....................................................... 39 product ID display .................................................... 46 protection function alarm clearance method ............................... 40 fan failure protection ..................................... 34 incorrect sensing connection protection ....... 35 low AC input protection ................................ 35 overcurrent protection .................................. 32 overheat protection ...................................... 34 overvoltage protection .................................. 32 overvoltage protection 2 ............................... 32 power limit .................................................... 35 shutdown ...................................................... 35 undervoltage limit ......................................... 34 R remote interface ....................................................... 43 remote sensing ........................................................ 20 RS232C interface baud rate ...................................................... 46 S SCPI communication error display .......................... 44 SD ............................................................................ 35 SENSE .................................................................... 35 setting limit UVL .............................................................. 34 setting limits ............................................................. 31 settings, reset .......................................................... 39 107 U UVL ..........................................................................34 V vendor ID display ......................................................46 version ........................................................................2 VMCB (Virtual Multi Channel Bus) channel ..........................................................44 domain ..........................................................44 voltage monitoring, range .........................................41 voltage setting limit ...................................................42 108 PWX KIKUSUI ELECTRONICS CORP. 1-1-3 Higashiyamata, Tsuzuki-ku, Yokohama, 224-0023, Japan Tel: +81-45-593-7570 Fax: +81-45-593-7571 Website 110 Printed in Japan http://www.kikusui.co.jp KES4022