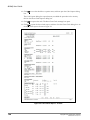
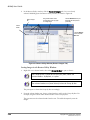
1
MOSAIQ User’s Guide MOSAIQ Version 2.0 Impac Medical Systems, Inc. Document ID: LUGMSQ0002 Language: English MOSAIQ User’s Guide MOSAIQ Oncology Management System Version 2.00 Copyright 2010 All Rights Reserved Elekta Impac Software PUBLISHED BY: Elekta Impac Software 100 Mathilda Place, Fifth Floor Sunnyvale, CA 94086 COPYRIGHT 2010 by Elekta Impac Software All Rights Reserved Document Design: Sherri Sotnick / Formatting: Robin Bonke Writers: Sherri Sotnick, Robin Bonke, Cynthia Hull, Diane Norris, and Kusuma Krishnamurthy LUGMSQ0002 — 4.0 — 9/23/2010 This manual contains proprietary information to be used exclusively by customers of ELEKTA/Impac Medical Systems. All rights reserved. No part of the contents of this book may be reproduced or transmitted in any form or by any means without the written permission of Elekta Impac Software. MOSAIQ User’s Guide Table of Contents Introduction...................................................................................................................................................... 1 About this Guide............................................................................................................................................................................................ 2 Intended Audience........................................................................................................................................................................................ 2 Disclaimer....................................................................................................................................................................................................... 3 Training........................................................................................................................................................................................................... 3 Patient/User Safety and Residual Risk ...................................................................................................................................................... 3 Document Conventions................................................................................................................................................................................ 4 Text Conventions.............................................................................................................................................................................................................. 4 Mouse Conventions ......................................................................................................................................................................................................... 6 Keyboard Conventions ................................................................................................................................................................................................... 6 Abbreviations and Acronyms ...................................................................................................................................................................... 7 CHAPTER 1: International Formats ........................................................................................................................ 9 International Numeric Data Settings ........................................................................................................................................................ 9 Entering Data in MOSAIQ .......................................................................................................................................................................................... 10 Display of Numeric Data in MOSAIQ..................................................................................................................................................................... 10 Configuring Department Setup ................................................................................................................................................................................ 11 What This Setting Does............................................................................................................................................................................... 12 Overriding the Numeric Data Setting...................................................................................................................................................... 13 CHAPTER 2: MOSAIQ Online Help..........................................................................................................................15 Finding Help Topics .................................................................................................................................................................................... 15 Using the Index to Find Help Topics....................................................................................................................................................................... 15 Using the Search Feature to Find Help Topics .................................................................................................................................................... 16 Printing Help Topics .................................................................................................................................................................................................... 16 CHAPTER 3: General Clinical Charting ...................................................................................................................17 Using eCHART Navigator ............................................................................................................................................................................ 17 Opening the eCHART Navigator............................................................................................................................................................................... 17 Adding Diagnosis and Staging Information ........................................................................................................................................... 21 Opening the Diagnosis and Staging Window...................................................................................................................................................... 21 Adding a Diagnosis ...................................................................................................................................................................................................... 22 Affirming a Diagnosis.................................................................................................................................................................................................. 24 Entering and Completing Course Information ...................................................................................................................................... 25 Assigning a Care Plan.................................................................................................................................................................................................. 25 Approving a Care Plan to Generate Orders.......................................................................................................................................................... 26 Changing Care Plan Dates......................................................................................................................................................................................... 27 Approving Care Plan Cycles....................................................................................................................................................................................... 27 Changing Cycle Dates .................................................................................................................................................................................................. 28 Adding Ad Hoc Order Sets to a Patient Care Plan............................................................................................................................................. 28 Waving Ad Hoc Order Sets ......................................................................................................................................................................................... 28 Statusing Order Sets..................................................................................................................................................................................................... 29 Changing Order Set Dates .......................................................................................................................................................................................... 29 Staging a Cancer Diagnosis ....................................................................................................................................................................................... 29 Using the Diagnosis and Staging Tabs .................................................................................................................................................................. 31 Copyright 2010, Elekta Impac Software LUGMSQ0002/4.0/23-Sep-2010 i MOSAIQ User’s Guide Entering Assessments.................................................................................................................................................................................. 34 Changing Assessment Views ...................................................................................................................................................................................... 34 Adding Assessments...................................................................................................................................................................................................... 35 Adding Assessment Notes ........................................................................................................................................................................................... 35 Reviewing Assessment Observations ...................................................................................................................................................................... 35 Printing All Assessments ............................................................................................................................................................................................. 36 Printing Charts............................................................................................................................................................................................................... 36 The Pharmacy Ordering List...................................................................................................................................................................... 37 Arranging the Order List Columns........................................................................................................................................................................... 40 Favorite Prescriptions................................................................................................................................................................................. 40 Adding a New Entry to Favorites............................................................................................................................................................................. 41 Using the Favorite Prescriptions Window Buttons ............................................................................................................................................ 42 Adding a Favorite While Creating a Pharmacy Order...................................................................................................................................... 43 Editing a Favorite Prescription................................................................................................................................................................................. 43 Removing a Favorite Prescription........................................................................................................................................................................... 44 Setting an Entry as Inactive in the Favorites List............................................................................................................................................... 44 Adding an Order to a Patient ................................................................................................................................................................................... 44 Viewing the Medications Formulary........................................................................................................................................................ 45 Medications Formulary Security.............................................................................................................................................................................. 45 Adding a New Formulary........................................................................................................................................................................................... 46 Adding Drugs to a Formulary List........................................................................................................................................................................... 47 CHAPTER 4: MOSAIQ Medical Oncology Clinical Charting.........................................................................................49 Using the Chart Workspace for Medical Oncology ................................................................................................................................ 49 Using the Pharmacy Workspace ............................................................................................................................................................... 50 Configuring the Pharmacy Workspace .................................................................................................................................................................. 50 Viewing Pharmacy Tabs ............................................................................................................................................................................................. 51 Viewing Pharmacy Order Detail ............................................................................................................................................................... 51 Adding a Medication Order Using Pharmacy Workspace .................................................................................................................... 52 Approving a Pharmacy Order................................................................................................................................................................................... 54 Batch Approving Orders ............................................................................................................................................................................................. 54 Voiding an Order........................................................................................................................................................................................................... 55 Completed Order Status.............................................................................................................................................................................................. 55 Pharmacy Order Security Rights............................................................................................................................................................... 55 Configuring Pharmacy Orders Security ................................................................................................................................................................. 55 Ordering Medications Using the Clinician Worksheet.......................................................................................................................... 56 Ordering Medications Using the Quick Orders Dialog Box.................................................................................................................. 57 Calculating Doses and Dose Changes ...................................................................................................................................................... 60 Adding Patient Height and Weight to Calculate the BSA................................................................................................................................ 60 Adjusting a Medication Dose.................................................................................................................................................................................... 61 Pharmacy Dispensing List.......................................................................................................................................................................... 62 Pharmacy Dispensing Detail Window ..................................................................................................................................................... 62 Customizing the Columns .......................................................................................................................................................................................... 62 Configuring the Pharmacy Label and Worksheet .............................................................................................................................................. 63 Setting Dispensing Statuses ....................................................................................................................................................................................... 64 Recording Medication Treatments from Medication Treatment (MAR)............................................................................................ 65 Recording a Medication Treatment........................................................................................................................................................................ 65 ii Copyright 2010, Elekta Impac Software LUGMSQ0002/4.0/23-Sep-2010 Table of Contents Adding a Co-Signer ....................................................................................................................................................................................................... 70 Printing Medication Administration Records ..................................................................................................................................................... 70 Correcting Medication Documentation Errors .................................................................................................................................................... 71 CHAPTER 5: MOSAIQ Radiation Oncology Clinical Charting ......................................................................................73 Defining Radiation Prescriptions ............................................................................................................................................................. 73 Adding Radiation Prescription Information ....................................................................................................................................................... 73 Defining Fractionation Patterns.............................................................................................................................................................................. 74 Appending Fractionation Phases ............................................................................................................................................................................ 75 Using Site Sequencing for Multiple Radiation Prescriptions ......................................................................................................................... 76 Viewing and Changing Radiation Prescriptions ................................................................................................................................................ 77 Approving Radiation Prescriptions......................................................................................................................................................................... 77 Approving Multiple Radiation Prescriptions....................................................................................................................................................... 78 Copying Radiation Prescriptions from Another Patient.................................................................................................................................. 78 Changing Prescribed Doses ....................................................................................................................................................................... 78 RTP Import ................................................................................................................................................................................................... 79 Importing Treatment Plans....................................................................................................................................................................................... 79 Importing Files for the Treatment Plan.................................................................................................................................................. 84 Viewing/Changing Treatment Plans....................................................................................................................................................................... 85 Manually Defining Simulation and Treatment Fields.......................................................................................................................... 87 Adding a Site Simulation ........................................................................................................................................................................................... 87 Adding a Simulation Field When a Prescription Exists.................................................................................................................................... 89 Adding a Simulation Field When a Prescription Does Not Exist................................................................................................................... 90 Capturing Geometric Settings/Parameters for a Simulation Field............................................................................................................... 91 Copying a Simulation Field ....................................................................................................................................................................................... 91 Manually Creating Treatment Fields ..................................................................................................................................................................... 92 Creating a Treatment Field by Copying a Simulation Field........................................................................................................................... 95 Creating a Treatment Field by Copying an Existing Treatment Field ......................................................................................................... 96 Changing a Treatment Field ..................................................................................................................................................................................... 98 Approving a Treatment Field.................................................................................................................................................................................... 99 Viewing the Field Delta View.................................................................................................................................................................................... 99 Reviewing IMRT...........................................................................................................................................................................................................101 Site Setup Definition................................................................................................................................................................................. 102 Adding Site Setup Definition...................................................................................................................................................................................102 Approving Site Setup Definition ............................................................................................................................................................................103 Setting Up Dose Tracking......................................................................................................................................................................... 105 Creating Primary Dose Tracking Sites..................................................................................................................................................................105 Adding Secondary Dose Tracking Sites................................................................................................................................................................107 Adding and Changing Dose Coefficients .............................................................................................................................................................108 Adding Prior Dose.......................................................................................................................................................................................................109 Defining Total Cumulative Dose and Dose Tracking Sites............................................................................................................................109 Using Dose Site Summary ........................................................................................................................................................................................110 Creating Dose Action Points....................................................................................................................................................................................110 Creating Dose Limit Dose Action Points..............................................................................................................................................................111 Using the Treatment Calendar ............................................................................................................................................................... 112 Scheduling Treatment Sessions ..............................................................................................................................................................................112 Deleting Treatment Sessions in the Treatment Calendar..............................................................................................................................115 Copyright 2010, Elekta Impac Software LUGMSQ0002/4.0/23-Sep-2010 iii MOSAIQ User’s Guide Working with Portal Images ...................................................................................................................................................................................116 Changing Treatment Session Due Dates .............................................................................................................................................................117 Working with Treatment Fields in the Treatment Calendar ........................................................................................................................119 Verifying and Recording Treatments.....................................................................................................................................................124 Using eCHART Chart Check ......................................................................................................................................................................124 Reviewing the eCHART Chart Check .....................................................................................................................................................................124 Reviewing eCHART Chart Check Notes.................................................................................................................................................................127 CHAPTER 6: MLC Fit ...........................................................................................................................................129 Using MLC Fit..............................................................................................................................................................................................130 Using MLC Fit ...............................................................................................................................................................................................................130 Creating an MLC Leaf Plan......................................................................................................................................................................................131 Changing an MLC Leaf Plan....................................................................................................................................................................................132 MLC Conversion ...........................................................................................................................................................................................................133 Digitizing a Treatment Field Shape .......................................................................................................................................................134 Beam’s Eye View Calibration Point Digitization..............................................................................................................................................135 Beam’s Eye View Shape Rotation ..........................................................................................................................................................................135 Beam’s Eye View Calibration Setup......................................................................................................................................................................136 Logical Context ............................................................................................................................................................................................................136 Packet Data ..................................................................................................................................................................................................................136 Digitizing a Treatment Field Shape......................................................................................................................................................................136 Printing and Saving Your MLC Leaf Plan...............................................................................................................................................137 MLC Leaf Plan Report................................................................................................................................................................................................137 Printing Your MLC Leaf Plan ..................................................................................................................................................................................138 Saving Your MLC Leaf Plan .....................................................................................................................................................................................138 CHAPTER 7: Image Management-ViewStation & Photos and Diagrams ....................................................................139 Assigning Image Security Attributes ......................................................................................................................................................139 Enabling Imaging Options in System Utilities .....................................................................................................................................139 Configuring the Digitized Film Import (DFI) Option........................................................................................................................... 140 Setting Beam’s Eye View Preferences in the Field Definition ........................................................................................................... 143 Setting Beam’s Eye View Preferences in the Image Window ............................................................................................................ 143 Scanning Simulation Films ......................................................................................................................................................................144 Acquiring Images from Electronic Sources...........................................................................................................................................146 Checking the Import Log and Import Status........................................................................................................................................147 Using the Photos and Diagrams Utility.................................................................................................................................................149 Importing Images Using Photos and Diagrams ...............................................................................................................................................149 Associating Images Using the Photos and Diagrams Utility........................................................................................................................150 Cropping Images .........................................................................................................................................................................................................151 Associating Images ....................................................................................................................................................................................151 Associating Medical Images ....................................................................................................................................................................................152 Associating Non-Medical Images...........................................................................................................................................................................152 Reticle Scaling Reference Images...........................................................................................................................................................153 Reticle Scaling a Reference Image.........................................................................................................................................................................153 Correcting Film Rotation Errors .............................................................................................................................................................................155 Clearing Reticle Scaling.............................................................................................................................................................................................156 Reticle Scaling Verification Images........................................................................................................................................................156 iv Copyright 2010, Elekta Impac Software LUGMSQ0002/4.0/23-Sep-2010 Table of Contents Reticle Scaling Verification Images with Graticules........................................................................................................................................156 Field Edge Image Center and Scaling (for Images without Graticules).....................................................................................................157 Displaying Treatment Geometry on the Image ................................................................................................................................... 158 Enabling the Image Underlay Option ................................................................................................................................................... 159 Using the Image List Window ................................................................................................................................................................. 160 Changing the View of the Image List window...................................................................................................................................................161 Tagging Images............................................................................................................................................................................................................162 Opening and Closing Images from the Image List Window .........................................................................................................................162 Deleting Images from the Image List Window..................................................................................................................................................163 Copying Images the Image List Window .............................................................................................................................................................163 Moving Images from the Image List Window....................................................................................................................................................163 Printing Non-Medical Images.................................................................................................................................................................................163 Scaling Medical Images............................................................................................................................................................................ 164 Image Scaling...............................................................................................................................................................................................................164 Print Scaling .................................................................................................................................................................................................................167 Printing Medical Images .......................................................................................................................................................................... 167 Setting up DICOM Print Options and Printing .................................................................................................................................................168 Setting up Standard Print Options and Printing .............................................................................................................................................168 Viewing and Enhancing Images ............................................................................................................................................................. 169 Magnifying Images.....................................................................................................................................................................................................169 Changing Image Color...............................................................................................................................................................................................170 Inverting the Image Contrast Scale.......................................................................................................................................................................170 Using the Window and Level Tool.........................................................................................................................................................................170 Using Filters ..................................................................................................................................................................................................................170 Using Image Controls for Multi-Slice Images.....................................................................................................................................................171 Annotating Images.................................................................................................................................................................................... 172 Using the Straight Line Tool....................................................................................................................................................................................172 Using the Rectangle ...................................................................................................................................................................................................172 Using Ellipse Tools......................................................................................................................................................................................................173 Using the Polygon Tool.............................................................................................................................................................................................173 Using the Freehand Drawing Tool ........................................................................................................................................................................174 Using the Text Tool.....................................................................................................................................................................................................174 Using the Arrow Tool.................................................................................................................................................................................................174 Using the Fill and Color Options ...........................................................................................................................................................................175 Setting and Saving Annotation Preferences.......................................................................................................................................................176 Adding Comments for Informal Communications ..........................................................................................................................................177 Changing Relative Object Position .......................................................................................................................................................................177 Saving Annotated Images ........................................................................................................................................................................................177 Working with Multiple Annotations at a Time.................................................................................................................................................177 Viewing Layers .............................................................................................................................................................................................................178 Changing the Orientation of Images....................................................................................................................................................................178 Working with Images Annotated Outside of MOSAIQ ....................................................................................................................................179 Using Edge Detection Options in MOSAIQ ............................................................................................................................................ 180 Extracting Treatment Field Edges..........................................................................................................................................................................180 Copy and Pasting Treatment Field Edges on Multi-Slice Images................................................................................................................181 Copy and Pasting Treatment Field Edges on a Separate Image .................................................................................................................182 Copyright 2010, Elekta Impac Software LUGMSQ0002/4.0/23-Sep-2010 v MOSAIQ User’s Guide Managing the Image Review Process – for Physicians....................................................................................................................... 182 Checking the Image Work List for Images Requiring Reviews .....................................................................................................................182 Reviewing/Approving Images from the Image Work List ..............................................................................................................................184 Opening the Image Review window from the Image List Window............................................................................................................186 Reviewing/Approving Images in the Image Window......................................................................................................................................186 Checking the Review Status in the Image Information window.................................................................................................................186 Managing the Image Review Process - for Therapists ........................................................................................................................ 187 Checking Changes Required from the Image Work List .................................................................................................................................187 Completing the Change Requests ..........................................................................................................................................................................188 Checking Changes Required from the Image List Window ...........................................................................................................................189 Checking the Review Status from the Image information window ...........................................................................................................190 Checking for Required Changes from the Port Film Status Window.........................................................................................................190 Planar Image Registration.......................................................................................................................................................................191 Preparing the System and Patient for Image Registration...........................................................................................................................192 Registering Images......................................................................................................................................................................................................197 Setup Intelligence .....................................................................................................................................................................................205 Site Setup .......................................................................................................................................................................................................................205 Session Offsets ..............................................................................................................................................................................................................207 Third Party Offsets......................................................................................................................................................................................................210 Distributed Registration Review ............................................................................................................................................................................211 Offset Couch Calculator ............................................................................................................................................................................................212 Localization Trend Review ......................................................................................................................................................................................213 Completing the Setup Offset....................................................................................................................................................................................217 CBCT Acquisition........................................................................................................................................................................................218 Importing Reference Structure Sets and CT Data.............................................................................................................................................218 Acquiring the CBCT Data..........................................................................................................................................................................................218 CHAPTER 8: MOSAIQ DICOM ...............................................................................................................................221 DCM Overview ............................................................................................................................................................................................221 DCM Permissions.........................................................................................................................................................................................................221 Opening DCM ...............................................................................................................................................................................................................222 Operation.......................................................................................................................................................................................................................222 Messages.........................................................................................................................................................................................................................222 DCM System Preferences..........................................................................................................................................................................223 Logging on to the System Preferences Window.................................................................................................................................................223 Setting Up DICOM Import with DCM......................................................................................................................................................223 Setting Up Auto-forwarding for a DICOM Device ................................................................................................................................225 Setting Up Auto-forwarding (Manual Retry).........................................................................................................................................228 Doing a Check on the Auto-forwarding Process ..................................................................................................................................229 Log File ...........................................................................................................................................................................................................................229 DICOM-Specific Staging Area ...................................................................................................................................................................230 DICOM AE Configuration ..........................................................................................................................................................................230 DICOM AE Edit .............................................................................................................................................................................................................231 Setting up DICOM Print Options .............................................................................................................................................................231 Export DICOM Images ...............................................................................................................................................................................232 Export Images...............................................................................................................................................................................................................232 DICOM Export: Advanced Options ........................................................................................................................................................................232 vi Copyright 2010, Elekta Impac Software LUGMSQ0002/4.0/23-Sep-2010 Table of Contents CHAPTER 9: MOSAIQ Oncology PACS.................................................................................................................... 235 Related Documentation........................................................................................................................................................................... 235 MOSAIQ Oncology PACS Components.................................................................................................................................................... 235 MOSAIQ Oncology PACS............................................................................................................................................................................................235 MOSAIQ Browser .........................................................................................................................................................................................................235 Standalone Workstation...........................................................................................................................................................................................236 DICOM Communication Module (DCM) ..............................................................................................................................................................236 MOSAIQ Oncology PACS Configuration.................................................................................................................................................. 236 MOSAIQ Oncology PACS Related Staff Security Rights...................................................................................................................................236 Department Level Configuration...........................................................................................................................................................................237 MOSAIQ Oncology PACS User Interface ................................................................................................................................................. 238 Archived Objects Window ........................................................................................................................................................................................238 EMR Viewer...................................................................................................................................................................................................................239 Manage Data................................................................................................................................................................................................................241 View Log.........................................................................................................................................................................................................................242 Retrieving Archived Images with MOSAIQ Restore ............................................................................................................................. 242 Doing a Check for Eligible Patients ......................................................................................................................................................................243 Selecting Patients........................................................................................................................................................................................................245 Putting Images into the Restore Queue...............................................................................................................................................................245 Selecting Images..........................................................................................................................................................................................................249 Putting Images into the Restore Queue (Using Image Lists).........................................................................................................................250 Managing the Restore Queue..................................................................................................................................................................................251 CHAPTER 10: SEQUENCER................................................................................................................................... 253 Before You Begin....................................................................................................................................................................................... 253 Work Environment .....................................................................................................................................................................................................253 What is a VMI?.............................................................................................................................................................................................................253 Security Requirements ..............................................................................................................................................................................................253 Approvals.......................................................................................................................................................................................................................253 QA Mode ........................................................................................................................................................................................................................255 SEQUENCER Workflows............................................................................................................................................................................. 256 Basic SEQUENCER Workflow...................................................................................................................................................................................256 Basic Interactive Interface Workflow...................................................................................................................................................................257 Using Auto-Setup without Console Setup ...........................................................................................................................................................257 Using Auto-Setup with Console Setup..................................................................................................................................................................258 Basic Static Interface Workflow .............................................................................................................................................................................258 Portal Images ...............................................................................................................................................................................................................259 Varian 4DITC Interface Workflow .........................................................................................................................................................................260 Select a Patient for Treatment................................................................................................................................................................ 261 Pre-Treatment Warnings ..........................................................................................................................................................................................261 Treatment Readiness Check ....................................................................................................................................................................................261 Treatment Chart ........................................................................................................................................................................................ 263 Treatment Delivery Table ........................................................................................................................................................................ 263 Field Delta View ..........................................................................................................................................................................................................263 Working with Treatment Fields on the Treatment Delivery Table.............................................................................................................263 Treatment Field Definition While in SEQUENCER ...........................................................................................................................................265 Copyright 2010, Elekta Impac Software LUGMSQ0002/4.0/23-Sep-2010 vii MOSAIQ User’s Guide Site Setup Verification ..............................................................................................................................................................................268 Recording a Site Setup...............................................................................................................................................................................................268 Patient Verification....................................................................................................................................................................................................269 Overrides........................................................................................................................................................................................................................270 Treatment Delivery ...................................................................................................................................................................................270 Field Sequencing .........................................................................................................................................................................................................270 Using the Verified Treatment Window ................................................................................................................................................................272 Recording Treatments ...............................................................................................................................................................................................273 Manually Recording a Treatment .........................................................................................................................................................................274 Reviewing the Treatment Chart after Treatment.............................................................................................................................................274 Historic Treatments....................................................................................................................................................................................................275 Using Machine Characterization ............................................................................................................................................................275 Adding a Machine Location ....................................................................................................................................................................................275 Troubleshooting ........................................................................................................................................................................................277 Abnormal Treatment Termination .......................................................................................................................................................................277 Completing Partial Treatments..............................................................................................................................................................................277 Appendix A: Contact and Regulatory Notifications ................................................................................................279 Regulatory Statement in MOSAIQ...........................................................................................................................................................279 Contacts and Regulatory Notifications..................................................................................................................................................279 Appendix B: Warnings and Cautions in MOSAIQ ....................................................................................................281 MOSAIQ Treatment Warnings..................................................................................................................................................................281 Pre-Treatment Warnings ..........................................................................................................................................................................................282 Post-Treatment Warnings ........................................................................................................................................................................................283 General Warnings .......................................................................................................................................................................................................283 Other Operational Warnings...................................................................................................................................................................................285 Pediatric Warning.......................................................................................................................................................................................................285 First DataBank Warnings.........................................................................................................................................................................................286 Warning Messages when Performing Tasks in MOSAIQ ..................................................................................................................... 286 MU per Segment Difference Warning....................................................................................................................................................288 Appendix C: Intended Use & Indications for Use...................................................................................................291 MOSAIQ........................................................................................................................................................................................................291 Intended Use.................................................................................................................................................................................................................291 Indications for Use .....................................................................................................................................................................................................291 SEQUENCER.................................................................................................................................................................................................292 Intended Use.................................................................................................................................................................................................................292 Indications for Use .....................................................................................................................................................................................................292 MLC Fit.........................................................................................................................................................................................................293 Intended Use.................................................................................................................................................................................................................293 Indications for Use .....................................................................................................................................................................................................293 ViewStation.................................................................................................................................................................................................293 Intended Use.................................................................................................................................................................................................................293 Indications for Use .....................................................................................................................................................................................................293 MOSAIQ Oncology PACS............................................................................................................................................................................293 Intended Use.................................................................................................................................................................................................................293 viii Copyright 2010, Elekta Impac Software LUGMSQ0002/4.0/23-Sep-2010 Table of Contents Indications for Use .....................................................................................................................................................................................................294 Appendix D: Measurement of Accuracy for Medical Devices................................................................................... 295 MLC Fit......................................................................................................................................................................................................... 295 ViewStation................................................................................................................................................................................................. 295 Index ............................................................................................................................................................. 297 Copyright 2010, Elekta Impac Software LUGMSQ0002/4.0/23-Sep-2010 ix MOSAIQ User’s Guide Introduction Welcome to MOSAIQ, your image-enabled electronic medical record (EMR) that provides a fully integrated clinical and administrative oncology management solution. The MOSAIQ product suite comprises: Full Practice Management capability, including features such as scheduling, billing, and management reporting and analysis. Medical Oncology features that provide a clear, fast and flexible means of documenting patient information throughout the medical assessment and chemotherapy administration process with the ability to include diagnostic images, lab results, and external documentation. Noting and documentation features that provide support for generating and importing documents created in Microsoft® Word® so that transcriptions are an integral part of the electronic chart, or a Structured Noting capability to minimize or even eliminate the need for costly transcription. Other document management features include an electronic patient assessment tool and support for document scanning and import. Radiation Oncology features that are designed specifically to manage complex treatments: Support for DICOM and DICOM RT so that you can import radiation oncology images and plans from multiple vendor imaging, virtual simulation, and treatment planning in to the EMR to generate an accurate treatment prescription, as well as document plan review and approval. Computerized physician order entry (CPOE), which includes template-based care plans that help automate the generation of complex radiation therapy prescriptions and supportive care. Treatment definition, setup and verification, which include customizable treatment calendars to drive machine set-up, verify machine parameters, record actual treatments, and facilitate the delivery of advanced treatment modalities, such as intensity modulated radiation therapy (IMRT), proton therapy, and image-guided radiation therapy (IGRT). Pre-treatment Quality Assurance (QA) Mode™, which allows full validation of the actual treatment plan without incurring dose to the patient record. Patient positioning during treatment and trend analysis across multiple patients and multiple technologies. Ability to conform to different types of machines as well as multiple modalities, including photon therapy, proton therapy, IMRT and the latest advances in IGRT. Image Management features: Can store and manage all the images required in the treatment process, making images acquired during the therapy process — CTs, MRIs, DRRs, port films, and more — readily accessible along side pertinent clinical data. Facilitate online review by providing tools to compare and analyze 2D and 3D reference and verification images to ensure accurate treatment setups, and validate IMRT and IGRT plans. Copyright 2010, IMPAC Medical Systems LTGMSQ0002/4.0/23-Sep-2010 1 MOSAIQ User’s Guide Streamline port film capture, review, and approval as part of the treatment verification process, and continue to support electronic portal imaging from all the major manufacturers, as well computed radiography. Support the latest in image-guided radiation therapy (IGRT) including support for cone beam CT. Offer a Setup Intelligence™ feature, which is a component of the ViewStation medical device. This feature extends the radiation oncology EMR to provide enhanced support for patient positioning verification and analysis. MOSAIQ Oncology PACS (Picture Archiving and Communication System), which allows you to archive, retrieve, and manage information necessary to support advanced IGRT techniques in radiation oncology, independent of planning or delivery system. HL7-compliant external systems interfaces (ESIs), which adhere to the latest Health Level 7 (HL7) communication standards to support the electronic exchange of patient information between MOSAIQ and other healthcare information systems. About this Guide This guide provides instructions on how to use Elekta Impac Software products MLC Fit, ViewStation, SEQUENCER, Charting (both Medical Oncology and Radiation Oncology), DICOM, and MOSAIQ Oncology PACS. The guide is a useful desk reference when you need a quick reminder about how to do something in MLC fit, Image Management, SEQUENCER, Charting (both Medical Oncology and Radiation Oncology), DICOM, and MOSAIQ Oncology PACS. We recommend that you keep this guide near your workstation so that you can find it easily when needed. Each chapter in the document is organized according to a basic workflow in an oncology department using MOSAIQ. Use the Index or the Table of Contents to find instructions on specific tasks quickly. The instructions in this guide assume that you have basic Windows™ skills. This guide is not intended to replace other MOSAIQ documentation on SupportPlus, the dedicated online support system for Elekta Impac Software, or contained in the MOSAIQ Help system. The MOSAIQ Help system provides in-depth information on all available MOSAIQ features. Intended Audience This user guide is written for trained users of MOSAIQ. The document is intended to assist users in the safe and effective use of the Elekta Impac Software products MLC Fit, ViewStation, SEQUENCER, Charting (both Medical Oncology and Radiation Oncology), DICOM, and PACS. The term user describes the person logged onto and using the MOSAIQ system. Typical MOSAIQ users are: -Administrator -Physician and Physician Assistant -Medical Physicist -Dosimetrist -Radiation Therapist 2 -Radiation Clinician -Nurse and Nurse Practitioner -Receptionist -Transcriptionist -Clinical Research Associate Copyright 2010, Elekta Impac Software LUGMSQ0002/4.0/23-Sep-2010 Introduction Disclaimer Elekta/Impac Medical Systems assumes no liability for use of this document if any unauthorized changes to the content or format are made. The information in this guide has been reviewed and validated for accuracy. The instructions and descriptions are based on MOSAIQ 2.0. Elekta/Impac Medical Systems reserves the right to update the document to improve the content and/or design. This guide is provided without warranty of any kind, implied or expressed, including, but not limited to, the implied warranties of merchantability and fitness for a particular purpose. Elekta/Impac Medical Systems assumes no liability for damages incurred directly or indirectly from not following the instructions, warnings, and cautions in the guide properly when using the MOSAIQ software. Training MOSAIQ is installed by a qualified Elekta Impac Software installer/engineer. The installer/engineer configures some components of MOSAIQ; however, the staff system administrators at your facility also configure settings in MOSAIQ according to the MOSAIQ system configuration guides. Users certify acceptance of validated product installation via Customer Acceptance Testing. MOSAIQ users must receive adequate training on safe and effective use of the software before attempting to work with it. Training requirements may vary from country to country. Users must make sure that training is received in accordance with local laws or regulations that have the force of law. Information on training is available from your local Elekta Impac Software sales representative. Patient/User Safety and Residual Risk ELEKTA/Impac consciously designs its products to minimize risk to patient and user safety.* ELEKTA/Impac incorporates extensive precautions to mitigate potential system hazards. Due to the nature of the product, a low level of residual risk may exist during use. All residual risks inherent to this product have been deemed to be as low as reasonably practicable. ELEKTA/Impac provides training and user documentation and expects users to operate the system with due diligence and strictly heed all messages and warnings. Because it is unable to protect against all misuses, faults and device failures, ELEKTA/Impac maintains that only personnel who have studied this material are qualified to use this product. This product shall be used in accordance with all applicable user, patient, and environmental safety guidelines by users with adequate training, experience, and qualification. * ELEKTA/Impac complies with ISO 14971, Application of Risk Management to Medical Devices. Copyright 2010, Elekta Impac Software LUGMSQ0002/4.0/23-Sep-2010 3 MOSAIQ User’s Guide Document Conventions This document uses specific conventions or rules in the instructions to help you perform the tasks correctly. This section explains the text, mouse, and keyboard conventions used in this document. Text Conventions The instructions in this guide are formatted to make them easy to read and to recognize when you should perform a particular task. The following text conventions are used in the instructions: Bold Print Indicates menu or list items that you select. Example: Click File | Register New Patient…. Example: In the Select Patient window, click Lamb, Mary. Example: Click Add, or click the Add button. Italics Indicates words or phrases that appear on the computer screen, references to text or a number as itself, or new terms that are being defined. Example: Position the insertion point to the left of p in patient. Example: Annotation is the process of adding customized notes to a Help topic. Highlighted Print Indicates something you must type. Example: Type 3000. Menus Menu commands that are executed one directly after the other are separated by a vertical line and in bold print. Example: Click File | System Utilities | Supplies… means from the menu bar, click File, from the File menu, point to the System Utilities command, and from the System Utilities menu, click the Supplies… command. Icons Icons on which you click show the in-line graphic. Example: Click 4 . Copyright 2010, Elekta Impac Software LUGMSQ0002/4.0/23-Sep-2010 Introduction Notes, Hints, and Warnings Notes, hints, cautions, and warnings are preceded by unique symbols and are presented in a box. Notes provide ancillary information. Hints provide tips to help you use the system. Cautions provide important information on the consequences of performing a particular action, and they tell you the security rights required to use the features. Warnings are directions which, if not followed, could constitute a health hazard or cause injury, including fatal or serious personal injury, or could cause clinical mistreatment. Note example: You can also display the eCHART Navigator window by pressing F5. Hint example: We recommend that you accept the options on the VXR-12 dialog box as they are. You should not need to modify them. Caution example: CAUTION Once you change the status of an order to Voided, you cannot change the status again. Warning example: Only use Auto Setup as an approximate method for positioning the treatment unit for a patient treatment. The operator cannot rely solely on the electronic readouts to position the treatment unit. You must verify the treatment unit position using an WARNING alternative method or methods. Failure to do so can result in injury to the patient during treatment. Copyright 2010, Elekta Impac Software LUGMSQ0002/4.0/23-Sep-2010 5 MOSAIQ User’s Guide Mouse Conventions The following terms are used to describe actions you perform with the mouse: Click Press and release the left mouse button. Double-click Click the left mouse button twice in rapid succession. Right-click Press and release the right mouse button. Drag Move the mouse while holding down the left mouse button. Highlight Drag the mouse pointer across data, causing the information to appear in reverse video. Keyboard Conventions Keys that do not produce a character appear in all upper case bold print. These keys include: Function Keys F1, F2, F3, F4, F5, F6, F7, F8, F9, F10, F11, and F12. Booster Keys ALT, CTRL, and SHIFT. Pointer Movement Keys HOME, PAGE UP, PAGE DOWN, END, TAB, and the arrow keys. Other Keys BACKSPACE, DELETE, INSERT, CAPS LOCK, ESC, ENTER, SPACEBAR, PRINT SCRN, SCROLL LOCK, PAUSE, and NUM LOCK. Two or more keys that should be pressed simultaneously are separated by a plus sign. Example: Press CTRL+F4. Example: Press ALT+N. 6 Copyright 2010, Elekta Impac Software LUGMSQ0002/4.0/23-Sep-2010 Introduction Abbreviations and Acronyms BEV Beam’s Eye View CBCT CT data generated using the Cone Beam CT Computerized Tomography D&I The MOSAIQ Diagnoses and Interventions window DCM The ELEKTA/Impac DICOM Communications Module DICOM Digital Imaging and Communications in Medicine IGRT Image Guided Radiotherapy IMRT Intensity Modulated Radiotherapy Treatment MLC Multi-Leaf Collimator MRI Magnetic Resonance Imaging PET Positron Emission Tomography PnD The MOSAIQ Photos and Diagrams feature RTP Radiotherapy Treatment Planning Rx Prescription SID Source to Image Distance SAD Source to Axis Distance SSD Source to Skin Distance TPS Treatment Planning System Tx Treatment VMI Virtual Machine Interface Copyright 2010, Elekta Impac Software LUGMSQ0002/4.0/23-Sep-2010 7 MOSAIQ User’s Guide 8 Copyright 2010, Elekta Impac Software LUGMSQ0002/4.0/23-Sep-2010 MOSAIQ User’s Guide CHAPTER 1: International Formats International Numeric Data Settings MOSAIQ supports international numeric formats based on local Windows settings. For example, in many countries, the comma is the decimal symbol (e.g., 4,50) and the dot is the digit grouping symbol (e.g., 4.500). You configure the region/country settings from the Regional Settings on the Windows Control Panel for your workstation. In MOSAIQ, you can enforce consistency across all workstations through an option in Department Setup. Crystal Reports that come with MOSAIQ do not support international numeric formats at this time, but you can customize Crystal Reports to show international numeric formats. For more information on how to configure international numeric settings in MOSAIQ, refer to the Configuring Department Setup section on page 11. MOSAIQ: Shows numeric data in accordance with the workstation Windows settings. (Imported Lab Results are an exception. They appear in the same format that they are received from the sending Lab Information System.) Does not let you enter numeric data in a different format. Maps the Decimal key on the numeric keypad to always enter the decimal character as configured in the Windows regional settings. If configured, MOSAIQ: Prompts you to change the Windows regional settings to the MOSAIQ configured format (if they are not the same). Does not start if the Windows regional settings and MOSAIQ settings are not the same. We do NOT recommend that you override this restriction. But, if a workstation cannot operate with this restriction, you can override it. If you do override this restriction, make sure users know that numeric data can appear differently on their WARNING workstations as compared to other workstations. Refer to Overriding the Numeric Data Setting on page 13 for more information. Copyright 2010, IMPAC Medical Systems LTGMSQ0002/4.0/23-Sep-2010 9 MOSAIQ User’s Guide Entering Data in MOSAIQ You must enter numeric data in MOSAIQ with the correct decimal symbol as configured in your workstation regional settings. If you enter numeric data in a different format, an error message appears. Figure 1: Error Message Click OK to close the message box. MOSAIQ does not change existing numeric data. It also does not add new data unless you type the numeric data in the correct format. In MOSAIQ, the Decimal key on the numeric keypad of an extended keyboard is mapped to always enter the decimal character as configured in the Windows regional settings. If the Shift or Caps Lock keys are pressed, a different character or function can be performed by the Decimal key. Display of Numeric Data in MOSAIQ MOSAIQ shows numeric data as configured in the workstation Windows settings. We recommend that you select the option to let MOSAIQ enforce the same settings across all workstations. Refer to the Configuring Department Setup section on page 11 for information on how to configure this option. Imported Lab Results appear in the same format that they are received from the sending Lab Information System. If the MOSAIQ option to make sure the same regional settings are the same is not used, there can be variation in the display of numeric data between different workstations. The display (or non-display) of the digit grouping symbol depends on the type and size of the numeric field. You cannot configure or change this. 10 Copyright 2010, Elekta Impac Software LUGMSQ0002/4.0/23-Sep-2010 CHAPTER 1: International Formats Configuring Department Setup MOSAIQ can enforce the use of consistent numeric symbols across all workstations that operate MOSAIQ. You can configure this option from the International tab of the Department Setup dialog box. This setting is global for all departments in the database. 1. Click File | System Utilities | Department Setup…, then click the International tab. 2. Click the Force All Workstations to use these Numeric Symbols checkbox. If selected, MOSAIQ makes sure that the Windows Regional Settings for all workstations are the same as the selected settings in MOSAIQ. Also, the Digit Grouping Symbol field is active. Figure 2: Department Settings – International Tab Configured 3. Select the applicable digit grouping symbol to automatically set the Decimal Symbol field. If you select Dot or Space as the Digit Grouping Symbol, the Decimal Symbol field is automatically set to Comma. If you select Comma as the Digit Grouping Symbol, the Decimal Symbol is automatically set to Dot. 4. Click OK to save your settings. Copyright 2010, Elekta Impac Software LUGMSQ0002/4.0/23-Sep-2010 11 MOSAIQ User’s Guide What This Setting Does If configured, MOSAIQ looks at the Windows regional settings of your users each time they open MOSAIQ. If the Windows regional settings and MOSAIQ settings are not the same, a warning message appears. An example is shown below. Figure 3: Invalid Regional Settings Message 1 It tells users that their workstation is not configured correctly to use the selected decimal and/or digit grouping symbols. It also asks users if they want MOSAIQ to change their settings to be the same as the MOSAIQ settings. Click Yes to change the Windows regional settings. The message box shown below appears. Figure 4: Start MOSAIQ Again Message It tells users that they must start MOSAIQ again. Click OK and start MOSAIQ again. If users click No because they do not want MOSAIQ to change their regional settings, the message box shown below appears. Figure 5: Invalid Regional Settings Message 2 It tells users that their workstation is not configured correctly, that they must change their settings, and that MOSAIQ will shut down. They must change their default Windows regional settings before they can start MOSAIQ. 12 Copyright 2010, Elekta Impac Software LUGMSQ0002/4.0/23-Sep-2010 CHAPTER 1: International Formats We do NOT recommend that you override this restriction. But, if a workstation cannot operate with this restriction, you can override it. If you do override this restriction, make sure users know that numeric data can appear differently on those WARNING workstations as compared to other workstations. Refer to Overriding the Numeric Data Setting below for more information. Overriding the Numeric Data Setting We do not recommend it, but you can override the setting for an individual workstation if necessary. 1. Open the impac.ini file in Notepad for the workstation. 2. In the [Global] section, add a new line, then type Do Not Force Numeric Regional Settings = 1. 3. Save your change. Copyright 2010, Elekta Impac Software LUGMSQ0002/4.0/23-Sep-2010 13 MOSAIQ User’s Guide 14 Copyright 2010, Elekta Impac Software LUGMSQ0002/4.0/23-Sep-2010 MOSAIQ User’s Guide CHAPTER 2: MOSAIQ Online Help The MOSAIQ Online Help is available only in English language. The Online Help system (hereupon referred to as Help) helps you find in-depth information about MOSAIQ. You can also print a shown Help topic. Help has three types of topics: Dialog Box or Window Shows an explanation of a dialog box or window in the software, and is usually context-sensitive. Context-sensitive help shows the topic related to the open window or dialog box. Press F1, click Help | Current in the Main Toolbar to use context-sensitive Topic..., or click help. A summary, field explanations, and button explanations appear in this type of topic. A good example of a dialog box or window topic is Daily Master Schedule. How To Click the left mouse button twice quickly. Reference Press and release the right mouse button. Most Help topics contain blue sub-headings that show the information in the topic. You can click the entry in the Click to jump to a heading at the top of the page to go directly to these headings. Finding Help Topics When you know the name of a Help topic, you can use the Index or the Find feature to find the topic. The Index or Find feature can save time over using hypertext links. Using the Index to Find Help Topics 1. In the MOSAIQ window, click Help | Search for Help On… to open the Help window. 2. In the Help window, click the Index tab. 3. In the Type in the keyword to find field, type the first letters of the topic for which you are searching. The index scrolls to the closest index topic. 4. In the Index box, click the topic, and then click the Display button to show the topic. Copyright 2010, IMPAC Medical Systems LTGMSQ0002/4.0/23-Sep-2010 15 MOSAIQ User’s Guide Using the Search Feature to Find Help Topics The Search feature is different from the Index because the words you type can be in the Help topic, not only an index entry. You can search for more complex system concepts. 1. In the MOSAIQ window, click Help | Search for Help On… to open the Help window. 2. In the Help window, click the Search tab. 3. In the Type in the keyword to find field, type the word(s) to search. 4. In the Search list, click the topic, then click the List Topics button to show a list of topics for that search criteria. Printing Help Topics You can print a Help topic. Although Elekta/Impac recommends that you use the Help system on-line, you can also print very important topics and keep them. 1. In the Help window, browse to the topic, then click dialog box. to open the Print Topics 2. Click the applicable radio button to print the selected topic or all topics for the selected heading. If you click Print the selected topic, only the shown topic prints. If you click Print the selected heading and all subtopics, all topics under that heading print, even though only the shown topic is selected. 3. Click OK to open the Print dialog box. 4. Click Print to print the topic(s). 16 Copyright 2010, Elekta Impac Software LUGMSQ0002/4.0/23-Sep-2010 MOSAIQ User’s Guide CHAPTER 3: General Clinical Charting Using eCHART Navigator The eCHART Navigator window lets you see patient information from one window. You can also add or update summary information from some areas of Navigator for the chosen patient. For example, you can add diagnoses or medication orders. You can create clinical notes about the patient and assign them to a clinical category. Opening the eCHART Navigator The eCHART Navigator shows recent information from the patient chart and contains features and buttons used to view and enter patient and treatment information. After you become familiar with its features, you can access most areas of the electronic patient chart from one window. 1. Open the chart of a patient. 2. In the toolbar, click to open the eCHART Navigator window, shown in Figure 6. You can also click eChart | Navigator… or press F5 to open the eCHART Navigator window. Figure 6: The eCHART Navigator Window – General View Copyright 2010, IMPAC Medical Systems LTGMSQ0002/4.0/23-Sep-2010 17 MOSAIQ User’s Guide When selecting a new patient, you do NOT need to close the eCHART Navigator window. The eCHART Navigator window can contain these features and components: 18 Patient Information Header Shows basic patient information such as patient name, referring physician, medical record number, and birth date. If the patient has more than one attending or referring appears on the right side of the Attending MD physician, and Referring MD fields. Place the mouse pointer over to show the names of the additional physicians. Summary Tabs Lets you change the category of notes in the Patient Clinical Summary box. To configure the tab names (on a global basis) right-click the tab and select Configuration… if you have the appropriate editing rights. To check your editing/security rights, click File | Directories |Staff Directory…, select your name in the Staff Directory window and click Change, then click Security in the Staff dialog box, and verify that both check boxes are checked in the Clinical field under the System Utilities section of the Admin tab in the Security dialog box. Patient Clinical Summary Box Shows brief notes typed in the Summary Writer box. The selected Summary tab changes the content. Summary Writer Box Lets you type a note relevant to the currently shown Summary tab. The button above the Summary Writer box (Add to Onc HX) reflects the currently shown tab. Flowsheets Opens the Flowsheet window, which shows vital signs, laboratory results, and patient assessments for the selected patient. Assessments Opens the Assessments tab of the Flowsheet window to view and add patient assessment information. CWS Opens the Clinician Worksheet window to manage patient's chemotherapy regimen. Images Opens the Image List window to view on-line patient images and add, change, or remove information related to each image. QCL Opens the Quality Checklist window in Patient view to view, add, change, or remove Quality Checklists for the selected patient. Copyright 2010, Elekta Impac Software LUGMSQ0002/4.0/23-Sep-2010 CHAPTER 3: General Clinical Charting Schedule Opens the Patient Schedule window to view, add, change, or remove appointments for the selected patient. Diagnoses and Interventions Box Shows the information entered for the patient in the Diagnoses and Interventions window. Diagnoses and Interventions Opens the Diagnoses and Interventions window to view and assign diagnoses, Care Plans, radiation prescriptions, and treatment fields. Orders Box Shows the most recent orders generated for the patient. Orders Opens the Orders Browse window to add, change, remove, view, and approve orders, even if they were not generated from approved Care Plans. Documents Header Box Shows the most recent documents for the patient Documents Opens the Documents window, which is used to view, add, or change your documents. Labs and Vitals Box Shows the most recent laboratory and vital sign information and assessments. Labs and Vitals Opens the Laboratory tab of the Flowsheet window to view and add laboratory information. Allergies and Alerts Box Shows the most recent allergy and alert information for the selected patient. Allergies and Alerts Opens the Allergies dialog box to add, change, remove, and view patient allergy information, and configure additional alerts specifically for your facility. Your system administrator can configure one of four different views of the eCHART Navigator on each workstation to meet individual needs. The eCHART Navigator window shown in Figure 7 is the view most commonly used at Radiation Oncology sites. Copyright 2010, Elekta Impac Software LUGMSQ0002/4.0/23-Sep-2010 19 MOSAIQ User’s Guide Figure 7: The eCHART Navigator Window - Radiation Oncology View The Dose Site Summary pane instead of the Other Medications pane appears in the Radiation Oncology view as shown in Figure 6. The Dose Site Summary pane shows a summary of the prescribed and current doses for each dose tracking site and all of the defined dose action points. The third view of the eCHART Navigator window is shown below. Figure 8: The eCHART Navigator Window – Alternate Radiation Oncology View 20 Copyright 2010, Elekta Impac Software LUGMSQ0002/4.0/23-Sep-2010 CHAPTER 3: General Clinical Charting The Alternate Radiation Oncology View displays expanded Dose Site Summary pane. This pane includes start and last treatment dates, actual and prescribed fractions, and other summary information on the dose tracking sites. The Treatment Field pane shows an overview of the treatment fields defined for the patient. This includes the MU, dose, energy, modality, and blocking/beam modifiers for each treatment field. Expanded views of the Dose Site Summary and Treatment Field panes replace the Orders, Documents, and Allergies and Alerts panes replace the Dose Site Summary and Treatment Field panes. 3. Click Close to close the eCHART Navigator window. Adding Diagnosis and Staging Information The Diagnosis and Staging window lets you add or change a diagnosis and to stage a cancer diagnosis. You can use the TNM staging procedure or other staging systems applicable to the diagnosis. You can also use Collaborative Staging from the Collaborative Staging tab. Opening the Diagnosis and Staging Window You can open the Diagnosis and Staging window from the Diagnoses and Interventions window. You can also use the Chart Workspace. 1. Open the chart of a patient, then click for the chosen patient. in the toolbar to open the Chart Workspace 2. In the Diagnosis and Problem List pane, click to open the Options menu. 3. Click Go To… to open the Diagnosis and Problem List dialog box. To change an existing diagnosis directly from the Diagnosis and Problem List pane, double-click the diagnosis. To add a new diagnosis, click , then click Add Diagnosis…. 4. Select an existing diagnosis, then click Change to open the Diagnosis and Staging window for the diagnosis. The Diagnosis and Staging window helps you stage the diagnosis. It lets you record more than three tumor measurements and add multiple diagnosis specific values (tumor markers). It also lets you stage the cancer diagnosis with Collaborative staging. 5. Click Tumor to show the Tumor tab. The Tumor tab lets you add tumor measurements. You can also add other information, such as the extent of the lymph node invasion. 6. Click Details to show the Details tab. The Details tab lets you add the basis of the staging or diagnosis and shows a history of changes to the diagnosis. Copyright 2010, Elekta Impac Software LUGMSQ0002/4.0/23-Sep-2010 21 MOSAIQ User’s Guide 7. Click Additional Classifiers to show the Additional Classifiers tab. The Additional Classifiers tab lets you add additional staging classifiers, if applicable to the diagnosis. 8. Click Collaborative Staging to show the Collaborative Staging tab. The Collaborative Staging tab shows how far a cancer has spread at the time of diagnosis. Adding a Diagnosis You can add a diagnosis from the Diagnosis and Problem List dialog box or the Diagnosis and Problem List pane in the Chart Workspace. You can also add a new diagnosis from the Clinician Worksheet. The diagnosis you select changes the available options for many of the fields. Make sure you select the diagnosis first so that the applicable options appear. Adding a Non-Cancer Diagnosis Non-cancer diagnoses can include complications from cancer or cancer treatment, as well as non-related conditions. on the upper-right of the Diagnosis and Problem List 1. In the Chart Workspace, click pane to open the Options menu. 2. Click Add Diagnosis… to open the Diagnosis and Staging window. Initial Diagnosis specifies when the diagnosis was made (defaults to blank). Consultation specifies the date of the consultation (defaults to the current date). 3. Click Non-Cancer from the Type field to inactivate the cancer-related tabs and fields. 4. Click adjacent to the Diagnosis field to open the Diagnosis field list tabs. You can select from different diagnosis coding systems, such as ICD-9, ICD-10, and ICD-O-3. The tab that appears is the default diagnosis coding system for your site. If necessary, you can select a diagnosis from another coding system. If a tab has no diagnoses configured for that coding system, No results found appears. 5. Click ICD-10 to show the diagnoses available for the coding system. You can also select ICD-0-3 or ICD-9 for your coding system. 6. Type part of a diagnosis description in the Diagnosis field to show the diagnoses that apply the description. 22 Copyright 2010, Elekta Impac Software LUGMSQ0002/4.0/23-Sep-2010 CHAPTER 3: General Clinical Charting 7. In the Diagnosis field, select the diagnosis description, then type part of a diagnosis to show only the applicable diagnoses. If you close the Diagnosis field list, then go back to it again, the most recent selections appear. The Morphology field also “remembers” your most recent selections. 8. Scroll through the diagnosis groups, then click to show the applicable diagnosis codes. adjacent to one of the diagnosis groups 9. Click a diagnosis. 10. Type information about the diagnosis in the Notes field. The information could include lab results or the name of the physician who made the diagnosis. 11. Click OK to save the diagnosis. Adding a Cancer Diagnosis Adding a cancer diagnosis is much the same as adding a non-cancer diagnosis. 1. In the Chart Workspace, click on the upper-right of the Diagnosis and Problem List pane to open the Options menu. 2. Click Add Diagnosis… to open the Diagnosis and Staging window. Keep the Type field at the default, Primary. Primary shows the disease is under treatment. 3. Type the current date in the Initial Diagnosis field to show the date of the initial diagnosis. You can also click adjacent to the Initial Diagnosis field to show a calendar from which you can select a date. The Dx at Age field shows the patient age. If you add the Initial Diagnosis date and the Birth Date in the Patient Demographic Data dialog box, MOSAIQ calculates the patient age. The Consultation field defaults to the current date and is the date of the diagnostic consultation. 4. Click the Diagnosis. If the diagnosis you select has an applicable Category, it automatically appears. If not, you can select the Category. 5. Click the Laterality of the cancer diagnosis. 6. Click in the Morphology field, then type part of a morphology description. You can also type part of a morphology code number to show only some morphology codes. Copyright 2010, Elekta Impac Software LUGMSQ0002/4.0/23-Sep-2010 23 MOSAIQ User’s Guide 7. Click the applicable Morphology code. 8. Type any additional information about the diagnosis in the Notes field. You can also type tumor marker results in the Tumor Marker field. Special tumor marker fields appear for prostate and breast cancer diagnoses. 9. Click OK. Adding a Related Diagnosis A related diagnosis can include a non-cancerous condition or metastatic cancers related to the primary tumor. on the upper-right of the Diagnosis and Problem List 1. In the Chart workspace, click pane to open the Options menu. 2. Click Add Diagnosis… to open the Diagnosis and Staging window. 3. Click Related in the Type field to open the Import diagnosis message box. This message box also appears if you select Recurrent or Restage. If adding a Recurrent diagnosis, Elekta/Impac recommends that you deactivate the current Primary diagnosis, then add the Recurrent diagnosis. 4. Click No so that MOSAIQ does not copy the current primary diagnosis information to the new diagnosis. 5. Show the Diagnosis field list tab, then click the applicable diagnosis. If you selected a cancer diagnosis, METASTASIS appears in the Category field and the Staging tab. The other cancer-related tabs also stay active. 6. Select the Laterality and Morphology for the chosen diagnosis. 7. Type more information about the diagnosis in the Notes field, then click OK. Affirming a Diagnosis Before you can assign a Care Plan to a patient, you must have an affirmed diagnosis. 1. In the Diagnosis and Problem List dialog box, double-click the diagnosis. 2. In the Diagnosis and Staging window, click Affirm. 3. Click OK. 24 Copyright 2010, Elekta Impac Software LUGMSQ0002/4.0/23-Sep-2010 CHAPTER 3: General Clinical Charting Entering and Completing Course Information Before you can add a prescription or assign a care plan, you must define the course of treatment. In most cases, when you add the course of treatment, you also assign the Care Plan. 1. Open the chart of a patient. 2. Click eChart | Diagnoses and Interventions… to open the Diagnoses and Interventions window. You can also open the chart for your patient, then click toolbar to open the Clinician Worksheet. in the 3. Click Care Plan to open the Patient Care Plan dialog box. The Patient Care Plan dialog box contains the course number, start date and time, the assigning physician, treatment intent, and modality indicators. It is designed as a working document that you can complete during the course of a patient work-up. The Course field is the only required field. 4. Type the course number in the Course field (otherwise, leave the course at its default of 1). 5. Leave the Care Plan field blank, then add the Start Date and Start Time for the course of treatment. 6. Select the Assigning MD if different from Attending Physician of the patient, then type the protocol information in the Protocol field. 7. Click next to the Intent field, then select the intent of the treatment. 8. In the Treatment Modalities group, add the appropriate treatment modalities. 9. Type any additional information in the Comment field, up to 60 characters. Assigning a Care Plan Care Plans let you standardize the delivery of patient care, monitor patient progress, forecast/measure use, monitor compliance, and improve patient care. Care Plans are predefined Order Sets that plan the delivery of care. Each Care Plan is constructed from one or more Order Sets. Order Sets consist of the procedures, supplies and/or medications necessary to deliver that patient course of treatment. Order Sets or Care Plan components can consist of medications, procedures, and/or supplies. The components of an order set are administered or performed at the same time. MOSAIQ comes with a list of standard Care Plan order sets. However, you can add, change, or remove Care Plan order sets at any time. Order sets or Care Plan components are the building blocks of Care Plans. Every Care Plan has one or more order sets. Typical Care Plan order sets can include: Radiation therapy specific orders such as immobilization or beam modifiers Standard laboratory tests Copyright 2010, Elekta Impac Software LUGMSQ0002/4.0/23-Sep-2010 25 MOSAIQ User’s Guide Nursing activities Radiology orders Other activities required during the course of treatment Medications typically administered to cancer patients, such as antiemetics A Care Plan contains recommended procedures, medications, resources, and supplies needed to treat a patient. In the previous section, you added the course of treatment, but did not assign a Care Plan. 1. In the Patient Care Plan dialog box, click Plans window. next to the Care Plan field to open the Care The Care Plans window shows the Care Plans approved for use by your facility. The header shows information about the disease that the Care Plan is intended to treat if configured to do so. The top pane shows the category, name, regimen, cycle days, cost, and status of the Care Plans. The bottom pane shows detailed activities from the Care Plan selected in the top pane. 2. Double-click the Care Plan. 3. In the Patient Care Plan dialog box, click OK to assign the Care Plan 4. In the Unsigned (Pending) Orders message box, click OK to generate the pending orders. Approving a Care Plan to Generate Orders Once you have assigned a Course/Care Plan, you can approve the course of treatment and create orders for supplies, procedures, and medications. When you approve the Course/Care Plan, the system automatically adds orders with a Pending or Approved status. Approving a Care Plan to Generate Pending Orders 1. In the Diagnoses and Interventions window, select the Course/Care Plan for which to create pending orders. 2. Click Status to open the Record Status dialog box. 3. In the New Status group, click Approved. 4. Leave the Generate Approved check box unchecked. 5. Type your user name in the User Name field. 6. Type your password in the Password field. 7. Click OK to approve the Care Plan and generate pending orders. Approving a Care Plan to Generate Approved Orders If you know that you do not need to make changes to the Care Plan components, you can approve the Care Plan, then generate approved orders. 1. In the Diagnoses and Interventions window, select the Care Plan for which to create approved orders. 2. Click Status to open the Status Record dialog box. 26 Copyright 2010, Elekta Impac Software LUGMSQ0002/4.0/23-Sep-2010 CHAPTER 3: General Clinical Charting 3 In the New Status group, click Approved. 4. Click the Generate Approved check box. 5. Type your User Name and Password, then click OK. 6. Click OK to approve the Care Plan and generate approved orders. Changing Care Plan Dates During the course of treatment, circumstances may require you to change the treatment dates for the Care Plan. For example, the patient may not tolerate the radiation treatment or may have a lower white cell blood count than expected. 1. Open the chart for the patient, then open the Diagnoses and Interventions window. 2. Double-click the Care Plan. 3. In the Patient Care Plan dialog box, type the new Start Date. 4. Click OK to save the new start date, then click Close to close the Patient Schedule window. Approving Care Plan Cycles The patient response to the medications and side-effects makes the decision about when to administer chemotherapy regimes. Because of this, you can only approve one cycle of a Care Plan at a time. When you approve a Care Plan cycle, MOSAIQ automatically adds unapproved pharmacy orders to that cycle. 1. In the Clinician Worksheet, click the cycle to approve. 2. Click Approve to open the Approve menu shown in Figure 9. Figure 9: Approve Menu 3. Click All Orders In This Cycle’s Date Range to approve the cycle. Copyright 2010, Elekta Impac Software LUGMSQ0002/4.0/23-Sep-2010 27 MOSAIQ User’s Guide Changing Cycle Dates If you have to postpone chemotherapy treatment for a patient, you can change the date of a cycle. When you change a cycle date, you can adjust the dates for one of or all of the subsequent cycles. For example, a patient WBC is too low to continue treatment after the first cycle in a four-cycle regimen. MOSAIQ lets you postpone the second cycle treatment for a week. When you change the date for the second cycle, you can also change the third and/or fourth cycle dates. 1. Write down the effective dates of the cycle(s) to change. 2. In the Clinician Worksheet, click an order in the cycle to change. 3. Click Change to open the Pharmacy Orders dialog box. 4. Type the new date of the cycle in the MM/DD/YYYY format in the Start Date field. 5. Click the applicable radio button in the Propagate Order Changes group to change (or not change) other Care Plan cycles. You can change the date of the order selected, all orders with the original start date, the entire cycle, or all cycles in the Care Plan. You can also change the start date for orders in other Care Plans if the orders have the same medication, dose, route, and start date. 6. Click OK. Adding Ad Hoc Order Sets to a Patient Care Plan 1. Open the chart for a patient, then open the Diagnoses and Interventions window. 2. Select the Course/Care Plan to which to add order sets (if applicable), then click Order set to open the Order set menu. 3. Click All to show all order sets regardless of type or another order set Type, such as Rad Tx, to filter the Order Sets window. 4. In the Order Sets window, double-click the order set to add to the Care Plan and open the Order Set — Add dialog box. 5. Type the Due Date (if needed), then click OK to add the new order set to the Care Plan. Waving Ad Hoc Order Sets When you add an order set to a patient course/Care Plan as in the previous section, only one instance is added. If you need to add multiple instances of the order set, you can wave the order set or create recurring instances. 1. In the Diagnoses and Interventions window, select the Care Plan for which to wave order sets, then click Order set. 2. In the Order Set menu, click All to show all order sets regardless of type or another order set Type, such as Rad Tx, to filter the Order Sets window. 3. In the Order Sets window, scroll down to the appropriate group, such as RTM, then double-click the order set, such as CBC. 4. In the Order Set — Add dialog box, click Wave to open the Wave Setup Form dialog box. 28 Copyright 2010, Elekta Impac Software LUGMSQ0002/4.0/23-Sep-2010 CHAPTER 3: General Clinical Charting Complete the Wave Setup Form dialog box to add multiple instances of a Care Plan order set, appointment, medication(s), or multiple instances of an order for a patient with a variety of patterns. 6 Type the date of the first instance in the Date field if different from the default. 7. In the End group, type the number of Times to administer the order set. 8. In the Times Per Day group, select how frequently to administer the order set each day. 9. In the Pattern group, select how often to administer the order set, such as Daily. 10. Click OK to save the wave pattern. 11. In the Order Set — Add dialog box, click OK to add the order sets. Statusing Order Sets In a previous section you approved an entire Care Plan. You can also approve (or change to another status) individual order sets. Approving an individual order set only adds Pending orders. 1. In the Diagnoses and Interventions window, select the order set to status. 2. Click Status to open the Record Status dialog box. 3. In the New Status group, click Approved. 4. Type your User Name and Password, then click OK to change the status of the order set. Changing Order Set Dates In a previous section, you changed the date of the entire Care Plan. You can also change the dates of individual order sets within the course/Care Plan. 1. In the Diagnoses and Interventions window, expand a Care Plan so that all Care Plan components appear, select one of the Care Plan components, then click Change to open the Order Set dialog box. You can specify the dates on which to perform these order sets. You can change the due date and determine which order set components change on or after this due date. 2. Type the new Due Date. 3. If the due dates of other Care Plan order sets also change, determine if only order sets having the same due date change or if all order sets occurring on or after this date (by pattern) change. 4. Click OK to change the order set date, then click Close to close the Patient Schedule window. Staging a Cancer Diagnosis MOSAIQ can automatically stage the cancer diagnosis from the Staging tab with the T, N, and M fields. You can also manually stage the cancer diagnosis. Copyright 2010, Elekta Impac Software LUGMSQ0002/4.0/23-Sep-2010 29 MOSAIQ User’s Guide Automatically Staging a Cancer Diagnosis 1. In the Diagnosis and Problem List pane, double-click a cancer diagnosis to open the Diagnosis and Staging window. The Staging tab contains two primary sections, Clinical and Pathologic. You can use them to stage the cancer based on both clinical and pathology findings. The N/A field that appears in the two sections is inactive unless you are staging placenta or testis cancer diagnoses. Also, your initials and the staging method automatically appear in the Staged By and Edition fields in each section. If a different staff member did the staging, click adjacent to the Staged By field to open the Physician Directory. Then, select the staff member. 2. In the Clinical group, click the T hyperlink to open the T Selection dialog box. The T Selection dialog box shows the primary tumor staging options, along with notes. You can open a dialog box for each of the staging criteria. 3. Select the Primary Tumor staging, then click Save Selection to close the T Selection dialog box. A message appears in the lower-left corner of the Diagnosis and Staging window. It shows the T staging was selected and MOSAIQ cannot stage the cancer based on that information. 4. Click the Lymph Node staging in the N field. 5. Type the Metastasis staging in the M field. The Stage field shows the staging from the T, N, and M values that you selected. A message in the lower left also shows the staging. Manually Staging a Cancer Diagnosis You can manually stage a cancer diagnosis if necessary. 1. In the Pathologic group of the Diagnosis and Staging window, click the Manually Stage check box 2. Select the T, N, and M field staging values. The Stage does not automatically appear, nor does a message appear in the lower left of the window. When you save the staging, a message does appear. 3. Click the manual staging in the Stage field. 4. Click the method by which you confirmed the diagnosis in the Confirm field. 5. Select the HP Grade of the tumor(s). 6. Save your changes. 30 Copyright 2010, Elekta Impac Software LUGMSQ0002/4.0/23-Sep-2010 CHAPTER 3: General Clinical Charting Using the Diagnosis and Staging Tabs Along with T, N, M staging, use the Diagnosis and Staging tabs to add Diagnosis Specific Values, tumor measurements. You can also use it to add information about patient diagnosis, additional classifiers (if applicable), and collaborative staging. Adding Diagnosis Specific Values DSVs or Diagnosis Specific Values are tumor markers or other test results that apply to the initial diagnosis of cancer. The Diagnosis Specific Values list shows the test results for tumor markers that can apply to the diagnosis. You can use the default tumor markers. You can also add or change tumor markers or DSVs. 1. In the Staging tab of the Diagnosis and Staging window, click Add Value to open the Add Diagnosis Specific Value dialog box. The Add Diagnosis Specific Value dialog box lets you add or change the DSVs or tumor marker results. The Date and time default to the current date and time, but you can change them. If the patient has test results, they appear in the Previous Values group when you select the tumor marker. 2. Click the Value cell for a tumor marker, then type in the lab result value. 3. Type the lab result value in the Value cell for a tumor marker, then click a different row (but do not enter a value). If you add a value not in the normal reference range of the tumor marker, the tumor marker is selected in red. This shows a warning condition. 4. Click OK to save the results. Red highlighting also appears in the Diagnosis Specific Values list of the Diagnosis and Staging window. 5. Click Flowsheet to open the Laboratory tab of the Flowsheet window. 6. Change the View to Tumor Markers. 7. Right-click, then click Detail View. 8. Double-click the column containing the tumor marker results to open the Flowsheet window in Entry/Edit mode. You can also click Add to add a new set of tumor marker results. 9. Click the tumor marker in the Date/Time column, then type the lab results in the text field. 10. Click OK, then click Cancel to close the Flowsheet window. Copyright 2010, Elekta Impac Software LUGMSQ0002/4.0/23-Sep-2010 31 MOSAIQ User’s Guide Adding Tumor Measurements MOSAIQ lets you add tumor measurements. The number of tumor measurements you can add has no limits. 1. In the Diagnosis and Staging window, click Tumor to open the Tumor tab of the Diagnosis and Staging window. The Tumor tab contains the Tumor list and other fields you can use to record tumors. 2. Click Add Tumor to open the Add Tumor dialog box. Use the Add Tumor dialog box to add or change tumor measurements. Date Measured shows the current date/time, but you can change it to the actual date/time of the biopsy. The other fields let you add or change the tumor dimensions, unit of measurement, and method of measurement/excision. 3. Type a description of the tumor in the Description field. The description is usually the approximate location. 4. Type the date when the tumor was measured in the Date Measured field if it is not the current date. 5. Type or select the dimensions of the tumor: Longest Diameter, Height, Width, and Depth. 6. Type or select cm as the Units field to specify that the tumor measurements are in centimeters (cm). Note that cm appears to the right of the measurement fields. 7. Type the method used to measure the tumor in the Method field. 8. Click OK to save the tumor measurement. The Edit Tumor and Delete Tumor buttons are active. You can use these buttons to change or remove tumors in the Tumor list. 9. Add the tumor measurements. The Move Up and Move Down buttons are active. You can use these buttons to sort the Tumor list. 10. Type the tumor extension in the Direct Extension field. 11. Type or select the values for the other fields: Lymph Invasion, Regional Nodes Examined, and Invasion Lesion Size. 32 Copyright 2010, Elekta Impac Software LUGMSQ0002/4.0/23-Sep-2010 CHAPTER 3: General Clinical Charting Adding Oncology Details The Details tab lets you add more information about the diagnosis, such as the basis of the cancer or the last follow-up date. 1. In the Diagnosis and Staging window, click Details to open the Details tab of the Diagnosis and Staging window. Use the Details tab to add more information about the diagnosis. For example, you can add the basis of the cancer diagnosis and the date of last follow-up. 2. Type the basis for the diagnosis in the Basis field. 3. Type or select any other necessary information. For example, add the date when the oncologist did the last follow-up appointment in the Last Follow Up field. The History text box shows the changes to the diagnosis, when those changes occurred, and who made them. Adding Additional Classifiers Some cancer diagnoses have additional classification systems. The Additional Classifiers tab lets you add the information from those classification systems. The additional classifiers that appear represent all possible additional classifiers, but not all classifiers may be applicable for a CAUTION patient. 1. In the Diagnosis and Staging window, click Additional Classifiers to open the Additional Classifiers tab of the Diagnosis and Staging window. Use the Additional Classifiers tab to add information from additional staging classifiers. These classification methods apply to a particular diagnosis and can apply to a particular morphology and/or histology. If a diagnosis does not have any additional classifiers, the message No additional classifiers available appears. The message Unknown can appear for some additional classifiers if you have not added sufficient information in the tabs. 2. Click the hyperlink of the additional classifier to show the applicable field(s). 3. Type or select the appropriate values for the fields. Copyright 2010, Elekta Impac Software LUGMSQ0002/4.0/23-Sep-2010 33 MOSAIQ User’s Guide Using Collaborative Staging If you use Collaborative Staging for your patient, the Collaborative Staging tab lets you add that information. Collaborative Stage is a Cancer Registry standard and is necessary in the U.S. and parts of Canada. The items in the drop-down lists are specific to the U.S. and parts of Canada and have not currently been translated. 1. In the Diagnosis and Staging window, click Collaborative Staging to open the Collaborative Staging tab of the Diagnosis and Staging window. Use the Collaborative Staging tab to show how far a cancer has spread at the time of diagnosis. Most data items are used by cancer registries, such as tumor size, extension, lymph node status, and metastatic status. Other fields are used for conversion algorithms, such as evaluation fields and site/histology-specific factors. These fields and factors are necessary to derive the final stage grouping for certain primary cancers. Information appears in some fields, such as Grade/Differentiation, because you added that information in previous tabs. 2. Type or select the collaborative staging fields: CS Tumor Size, CS Tumor Extension, and CS Tumor Size/Dist Eval. 3. Click OK to save your changes and close the Diagnosis and Staging window. Entering Assessments Assessments are an important part of total patient care. MOSAIQ supplies multiple default assessment views that you can use. In this document, you will change views, add assessments, add assessment notes, review assessments, and print observations and the Assessment Chart. Changing Assessment Views You can select from a number of default assessment views. 1. Click patient. on the MOSAIQ toolbar to open the Select Patient window, then select your 2. Click on the MOSAIQ toolbar to open the Flowsheet window, then click the Assesstments tab. next to the View field to show the Assessments View list. The Assessments View 3. Click list contains assessment views supplied by IMPAC or set up by your System Administrator. Click the desired view from this list. 34 Copyright 2010, Elekta Impac Software LUGMSQ0002/4.0/23-Sep-2010 CHAPTER 3: General Clinical Charting Adding Assessments Assessments can include configured drop-down items, checkboxes, and free text fields. 1. In the Assessments tab, click the Add button to open the Assessments window. 2. Click next to the Pain Intensity-Current field at the top of the window to open the Pain Intensity-Current list. Each list is specific to the item selected in the View field. 3. Click the correct item from the list. Do this step again as many times as necessary to complete the patient assessment. Adding Assessment Notes It is frequently important to include a note along with assessment items to clarify or expand on an item. 1. Click the Note button to open the Assessments note window. The Assessments note window operates the same as other note windows in MOSAIQ. 2. Type a subject into the Subject field, then press TAB. This adds the subject, then moves the insertion point to the note box. It is important that you type an accurate subject, because MOSAIQ uses the Subject field to filter notes in the Patient Notes window. 3. Type your note into the note box. 4. Click the OK button to save the note. In the Assessments window, Y appears next to the appears next to the Note button. Notes item in the assessment list and Reviewing Assessment Observations When you complete assessment observations, you must review them before you add them permanently into the patient chart. You can change some or all items in an observation, or remove a full observation, until you review it. 1. Click the Status button to open the Record Status dialog box. The Record Status dialog box contains a list of all the observation items you added in the Assessments window. You can also use it to review the items. 2. In the New Status group, click Reviewed to identify the observation status, then put the insertion point in the Password field. 3. Type your password, then click the OK button to close the Record Status window. 4. Click the OK button to save the assessment. Copyright 2010, Elekta Impac Software LUGMSQ0002/4.0/23-Sep-2010 35 MOSAIQ User’s Guide Printing All Assessments You can print all assessment data added for your patient. The Print All Observations Settings dialog box lets you select your printing options. 1. In the Assessments tab, right-click to open the Options menu, then click Print All Observations. 2. Type a date in the Primary Date field. All assessments added on this date print. This field defaults to the currently selected date. 3. Click OK to print the assessments. Printing Charts You can print a detailed report of the full chart for the currently shown Flowsheet view. To configure the chart, click Print Chart Settings from the Options menu. 1. In the Assessments tab, right-click, then click Print Chart Settings. 2. In the Print Chart Settings dialog box, click the orientation for your chart. 3. Click the Show Header Information check box if you want the header information to be included in the printed chart. 4. Click the Print Hidden Rows check box to include all hidden rows in the printed chart. 5. Click OK to accept and save your chart settings. 6. Right-click to open the Options menu, then click Print Chart to print your chart. 36 Copyright 2010, Elekta Impac Software LUGMSQ0002/4.0/23-Sep-2010 CHAPTER 3: General Clinical Charting The Pharmacy Ordering List When patients are recorded into the MOSAIQ system, and pharmacy orders are assigned to them, you can see those orders on the Pharmacy Order List. Add Click to show the list of ordering options: In House Treat, In House Pickup, External Pickup, From Favorites and Order Set. Change Click an order, then click this button to open the Pharmacy Order Detail window, which lets you change component(s) of that order. Delete You can click this button to erase the order selected. The Delete Order message appears. Click Yes to erase the order. Click No to see the order before erasing. Click Cancel to close the message. Dose Adj When clicked, the Change Authorization By dialog box opens. Type your password and click OK. The Dose Adjustments dialog box opens. Make the necessary changes, then click OK. Status Click to change the current status for an order. For example, to change a pending status to Approved, click a patient, with a status of Pending, from the Pharmacy Order List, then click Status. This opens the Order Status dialog box. Click Approved, or any other new status option. You must type your password. Click OK. When refreshing the Pharmacy Order List window, the status changes from Pending to Approved. The Ordering Dose, Frequency, Start Date, and Route fields must be completed before you can Approve a new order. Mark Verbal Click this button to open the Verbal Order/Telephone Order Form dialog box. Type the applicable information, type your password, then click OK. Only a Pending order can be marked verbal. Auth Verbal Click this button to open the approval screen and accept the username and password of a physician who can authenticate the verbal orders. Print Click this button to print an individual pharmacy order, or all selected orders. Copyright 2010, Elekta Impac Software LUGMSQ0002/4.0/23-Sep-2010 37 MOSAIQ User’s Guide Filters The Pharmacy Order List contains many filtering option to help you customize your order view. When all applicable filters are selected, all matches appear. Ordering MD Click to open the Physician Directory, then click the name of MD writing the order. VO/TO Given By Click to open the Physician Directory, then click the name of MD writing the VO/TO. Departments Click to open a list of departments. When a department(s) is selected, a right arrow appears adjacent to the field. With your mouse, hover above the arrow to show which department(s) is selected. An arrow appears at the end of the Department field when a department is selected. Hover with your mouse to see which department(s) is selected. Pharmacy Order Statuses To select the applicable criteria, click the check box(es). The filter examines the statuses using your selection(s). You can individually select as many check boxes to include in a filter, or you can select Show All Statuses, which includes all check boxes in this grouping. When Show All Statuses is selected, all other check boxes are automatically unchecked. Pharmacy Dispensing Statuses This grouping lets you select filters for pharmacy dispensing statuses. You can select all check boxes, or you can customize as necessary. Three check boxes must stay selected at all times. CAUTION When the order dispensing status is changed to In Prep, the system locks down the order. Users, not in pharmacy dispensing, and trying to change the order, get a message showing that the order is locked. In Prep orders cannot be treated until they are dispensed, or the In Prep status is removed. Pharmacy Order Types Click the check boxes in this grouping for the type of orders the search must filter through. A minimum of one Pharmacy Order Type must always stay selected. If an attempted to uncheck all boxes is made, all boxes are automatically re-checked. 38 Legacy Orders These order types show creation before the MOSAIQ 2.0 upgrade. In House Treat This order type adds an in house record, and also adds an order in MAR. Copyright 2010, Elekta Impac Software LUGMSQ0002/4.0/23-Sep-2010 CHAPTER 3: General Clinical Charting In House Pickup This order type does not add an order in MAR. The drug is dispensed at in house pharmacy. External Pickup This order type does not add an order in MAR, and drug is dispensed at an external pharmacy. Internal/External Pickup Orders — Take at Home (TAH) Internal and External Pickup Orders at this time appear as Take At Home (TAH) orders in the Clinician Worksheet. The acronym (TAH) is added adjacent to the ordering dose for the pick-up order. Printed Select your printing view filters from this section. By default, Labels Printed and Worksheet Printed are selected. Date Range Configuration You can select a date range to see orders. Select a date by clicking the left/right arrows, or click the down arrow to open a calendar, then navigate and select applicable date(s). The system always uses the current date, and then looks at the set date range. It is only necessary to set the From/To date range configuration 1 time. The date configuration stays the same each time you log on. From: This field is your starting point for a date range. For example, if the current date is 12/1/08 and you set your From: date (starting point) to be three days prior, then the system examines from three days before 12/1/08, which is 11/ 28/08. You can also set the From: date to look for a future date. For example, today’s date is 12/1/08, and your From: date (starting point) must be two days in the future. In this example, the system uses the current date and adds two days, which is 12/3/08. To: This field is your stopping point for a date range. For example, if the current date is 12/1/08 and you set your To: date (ending point) to be three days prior, then the system examines for a stopping date of 11/28/08. If you set your To: date to look for two days in the future, then your stopping date is 12/3/08. Refresh After you select a from/to date range, click this button to update the view. Example: Using the selected dates above, your date range will look like this: From: 11/28/08 — To: 12/3/08, which is a total of five days. Remember that the current date always initially appears. Copyright 2010, Elekta Impac Software LUGMSQ0002/4.0/23-Sep-2010 39 MOSAIQ User’s Guide Only Show Patients Ready to Treat Click this filter option to show only the patient orders that are flagged as ready to treat. Hide Filter Groupings You can hide or show the filter groupings by clicking adjacent to the word Filter, which is found at the top left corner of the tab. Click to unhide and show the filters. Arranging the Order List Columns The Order List columns can all be rearranged and configured to your preference. 1. Right-click anywhere in the column headers 2. Click Column Chooser from the list. By default, all columns are shown in the window. 3. To remove a column(s), click and drag the column header into the Customization dialog box. 4. To move a column, click and drag the column header to the new position, then release the mouse button. 5. To sort the information in a column, click the column header, which sorts alphabetically, or numerically. Favorite Prescriptions The Favorites Prescriptions feature offers two modes: Admin Mode and User Mode. In User Mode, users can save their pharmacy order(s) as a template. Saving a pharmacy order as a template decreases the time it takes to add new pharmacy orders. You access the Favorite Prescriptions window through the Pharmacy Ordering Workspace, and also through: eChart menu Chart Workspace | Orders window right-click option Clinician Worksheet Quick Orders The Favorite Prescriptions window always opens in the Pharmacy Ordering Workspace. In Admin Mode, administrators can configure a Master Favorites list, then assign it to all applicable staff members. Click File | System Utilities | Care Plan Authoring | Favorite Prescriptions…, to open the Master Favorites list. 40 Copyright 2010, Elekta Impac Software LUGMSQ0002/4.0/23-Sep-2010 CHAPTER 3: General Clinical Charting Adding a New Entry to Favorites Admin Mode 1. Click the Add button to add favorites to the Master Favorites section. 2. Select a prescription type of: In House Treat, In House Pickup, or External Pickup. 3. Record the applicable information into the fields on the New Favorite Order tab. You can add the full master list, or select individual drugs, and apply them to as many staff members as necessary. To add the list, click the name of the staff member from the Select Staff dropdown list, then click and drag the master favorites list, or individual drugs, into the My Favorites section. The Select Staff dropdown contains only staff members that belong to the current department. User Mode 1. Click eChart | Favorite Prescriptions…to open your My Favorites list. 2. Click the Add button, then elect a prescription type of: In House Treat, In House Pickup, or External Pickup. 3. Record the applicable information into the fields on the New Favorite Order tab. 4. Click the OK button. Add as many drug component(s) to your list as necessary. The My Favorites list is updated with the new information. If a duplicate item is found, the system shows this warning message “A favorite with the same information already exists”. Drugs added by your Administrator appear in your My Favorites list. Copyright 2010, Elekta Impac Software LUGMSQ0002/4.0/23-Sep-2010 41 MOSAIQ User’s Guide Using the Favorite Prescriptions Window Buttons 42 Admin Mode User Mode Add Click to add a new favorite prescription to the master favorites list. You must select from In House Treat, In House Pickup, or External Pickup. Click to add a new favorite prescription to the users my favorite list. You must select from In House Treat, In House Pickup, or External Pickup. Change Click to change favorite prescriptions in the master favorites. When an entry is changed in the master list, all users My Favorite lists that include this entry are also changed. Click to change favorite prescriptions in My Favorites list. The changes made in My Favorites list only apply to this users Favorites list. Change Group Click to change the group of the prescriptions that are selected in the My Favorites grid. This button opens the Change Favorite Prescription Group window. Click to change the group of the prescriptions that are selected in the My Favorites grid. This button opens the Change Favorite Prescription Group window. Select N/A Opens a new pharmacy order from the selected prescription favorites. The system opens the pharmacy order detail prefilled with the values from the selected favorite prescription. Inactive Click to set the selected prescription inactive. When a prescription becomes inactive from the master list, all users My Favorite lists that include the prescription show the prescription is inactive. N/A Master List N/A Click to show the master favorites grid. Show Inactive When this check box is unchecked, the grid only shows active prescriptions. Default is unchecked. When this check box is unchecked, the grid only shows active prescriptions. Default is unchecked. Copyright 2010, Elekta Impac Software LUGMSQ0002/4.0/23-Sep-2010 CHAPTER 3: General Clinical Charting Adding a Favorite While Creating a Pharmacy Order User Mode 1. Follow steps in Adding a Medication Order Using Pharmacy Workspace on page 52 for more information on ordering drugs. Users can add a new favorite prescription when making a new pharmacy order or when changing orders. 2. Fill in all the applicable fields, then click the Add Favorite button to duplicate the order information into a new favorite prescription in your My Favorites list. The Add Favorite button is disabled after you have successfully saved. This is an indicator that the prescription has been added to your Favorite List. You can see this button when you make a change to the order. If a duplicated prescription is found while saving the prescription, the system shows a warning message. 3. Open the Favorite Prescriptions window to see your saved My Favorites list. Editing a Favorite Prescription Admin Mode 1. To change a prescription from the master list, you must have Pharmacy Formulary Edit security rights. Click File | System Utilities | Care Plan Authoring | Favorite Prescriptions… to open the Favorite Prescriptions Setup window. 2. Click the correct prescription from the Master Favorites grid, then click the Change button to open the prescription information in the Modifying Favorite Order window. 3. Add your changes, then click the OK button to save. The Master Favorites grid is refreshed to show your changes. If other staff members are referencing this prescription in their personal My Favorites list, the changes made in the Master Favorites pane are also applied to their My Favorites list. Copyright 2010, Elekta Impac Software LUGMSQ0002/4.0/23-Sep-2010 43 MOSAIQ User’s Guide Removing a Favorite Prescription Admin Mode 1. To remove a favorite prescription from the master list, an administrator click File | System Utilities | Care Plan Authoring | Favorite Prescriptions…. The Favorite Prescriptions Setup window opens. 2. Click the correct prescription from the Master Favorites grid, then click the Delete button. The Delete Favorite Prescription message opens. 3. Click the YES button to continue with removal, or click the NO button to cancel. Setting an Entry as Inactive in the Favorites List Administrators can set an entry as inactive. When an entry is inactivated, it cannot be activated again. Admin Mode 1. To inactivate the entry, select an entry from the Master Favorites grid, then click the Inactive button. The entry is inactivated from the master list, and also from the staff member(s) using it in their personal My Favorites list. Click Show Active to show the entry’s designated as inactive. User Mode 1. Users can also set an entry from their My Favorites list as inactive. To inactivate the entry, select it from the My Favorites grid, then click the Inactive button. The entry is removed from the My Favorites grid. Adding an Order to a Patient User Mode 1. When entries are in Favorites, click the Add button to quickly add a pharmacy order to a patient, then click From Favorites. This opens the From Favorites window. 2. Select the applicable favorite entry, then click the Select button. The Details (New Order) tab opens with all values prefilled. 3. Make necessary changes/additions to the order, then click the Add Favorite button. The button is disabled after successful saving. 4. Click the OK button to save the new patient order. You must have order creation rights to add an order from Favorite Prescriptions. The Start Date must be provided in order to save. 44 Copyright 2010, Elekta Impac Software LUGMSQ0002/4.0/23-Sep-2010 CHAPTER 3: General Clinical Charting Viewing the Medications Formulary First DataBank is separately purchased and licensed. Interaction screening is only allowed when First DataBank is purchased and licensed. Interaction screening is only allowed when the product is WARNING configured by establishing the appropriate links. Interaction screening remains accurate only when the periodic First DataBank updates are applied, which are available through Impac. In Medications Formulary you can make and keep multiple formulary lists in one database. All formulary lists appear on the new Medications Formulary window. To open the Medications Formulary, click File | Libraries | Medications Formulary…. Medications Formulary Security You must have security rights to see and make changes to the medication formulary. 1. Click File | Directories | Staff Directory….you can see or adjust security rights from the Security tab. Modify rights let a user add, change and remove a formulary, and also add, change and remove individual drugs. View rights only let a user see a formulary list. When a user has no rights, they can only view the primary formulary list. View Opens the Formulary Edit window, which shows the complete list of formularies made for each department in the database. Add Opens the Formulary Edit (New Record) window where you can add a new formulary. Change Open the Formulary Edit window. Here you can make changes to the department formulary list. Delete Click this button to remove a formulary list. Copy Makes a duplicate of the selected formulary list. A duplicated formulary list contains the same name and description of the initial formulary, but shows ‘Copy of’. You can then rename “Copy of” to a department name. Each department should only have one formulary. Also, all drugs that are assigned in the initial formulary list are assigned to the new formulary. Departments do not move over during a copy. You must select the department manually. Copyright 2010, Elekta Impac Software LUGMSQ0002/4.0/23-Sep-2010 45 MOSAIQ User’s Guide Adding a New Formulary 1. Click the Add button to open the Formulary Edit window. Here you can specify new formularies, do maintenance on current formularies, or remove drugs from a formulary list. 2. Move through the Available Drugs list, click a drug name, then click drug to the Formulary Drugs list. to move the 3. To select multiple drugs at the same time hold down the CTRL key and click a drug name. Formulary Drugs The Formulary Drug list shows the Generic Name, Brand Name, and Classification of all drugs assigned to the current formulary. To sort this list, click the header name. Drugs that have an asterisk adjacent to them show that they are not attached to the First DataBank database. Available Drugs The Available Drug list shows the Generic Name, Brand Name, and Classification of drugs that are in the system database but not assigned to the current formulary. OK Click to save your changes. Add Drug Click to add a drug to the formulary. Edit Drug Click to change a drug on the formulary. Delete Drug This button is only enabled when the user has Formulary Modify security rights and the selected drug is not being used in the system. When changes are made to a drug, a reminder message appears telling you that changes are also applied to the base drug and are applicable across all formularies. 46 Copyright 2010, Elekta Impac Software LUGMSQ0002/4.0/23-Sep-2010 CHAPTER 3: General Clinical Charting Adding Drugs to a Formulary List 1. Click the Add Drug button to open the Drug Edit window where you can add a new drug to a formulary list. You must have Formulary Modify security rights to change a drug. 2. Type a minimum of 3 letters in the Search for drug field to search all drug records in the First DataBank. Only dispensable drugs appear. You can record multiple instances of the same drug by selecting different drug strengths. If First DataBank is not installed, this field is disabled. Formularies This list contains all current formularies in the database. You can select a single or multiple formularies in the list. When the new drug is saved, it is automatically added to the drug list of all the selected formularies. Generic Name This is a required field. Trademark or Brand This is a required field. Route This is a required field. Click to open a list from which to choose. This field is not editable in the Drug Edit window. Strength You can record strength when recording a drug without First DataBank. Note Click to open and record a note for the drug. Clear Clicking this button resets all editable screen elements Copyright 2010, Elekta Impac Software LUGMSQ0002/4.0/23-Sep-2010 47 MOSAIQ User’s Guide 48 Copyright 2010, Elekta Impac Software LUGMSQ0002/4.0/23-Sep-2010 MOSAIQ User’s Guide CHAPTER 4: MOSAIQ Medical Oncology Clinical Charting MOSAIQ Medical Oncology is an electronic medical record (EMR) designed to give an efficient means of documenting patient information during the medical assessment and chemotherapy administration process. MOSAIQ Medical Oncology helps you better the quality of patient care, standardize treatment regimens, and track/forecast medication use. Using the Chart Workspace for Medical Oncology The MOSAIQ user interface quickly accesses the information that you use most frequently. It consists of the Home view, the Chart Workspace, and the Pharmacy Workspace. 1. In the toolbar, click to open the Chart Workspace. The Chart Workspace shows information about the patient at a glance. It shows the chart of the currently chosen patient. You can see the information on one window without having to open multiple windows and dialog boxes. Depending on how your site configured the Chart Workspace, you can have multiple tabs, each with its own panes. In the Chart Workspace, typical panes include: Diagnosis and Problem List Orders Other Medications Documents Lab Results Vital Signs The Chart Workspace has additional tabs: Appointments, Notes, and Facesheet. The Appointments tab shows the patient’s appointments and corresponds to the Patient Schedule. The Notes tab shows the patient’s clinical notes. The Facesheet tab corresponds to the Facesheet tab on the eCHART Navigator window and gives demographic information on the patient. 2. In the Diagnosis and Problem List pane, double-click a diagnosis to open the Diagnosis and Staging window for that diagnosis. From the Diagnosis and Staging window, you can change or review the diagnosis for the patient and the cancer staging. 3. In the Diagnosis and Problem List pane, click to open the Options menu. The Options menu lets you change the layout, add a diagnosis, and open the Diagnosis and Problem List dialog box. Each pane has different options. 4. Right-click a column in a pane to open the Column Options menu. This menu lets you sort, size, and group columns, as well as add and delete columns. Copyright 2010, IMPAC Medical Systems LTGMSQ0002/4.0/23-Sep-2010 49 MOSAIQ User’s Guide Using the Pharmacy Workspace The Pharmacy Ordering Workspace contains a list of pharmacy orders which can be filtered and sorted by many different configurable criteria that pertain to the pharmacy order. From the Workspace, you can add and keep medication orders with a variety of activities, such as: Print Status Screen Change VO handling Dose Adjustment. By default, the Workspace only shows the Pharmacy Ordering List. The Pharmacy Ordering Workspace can be configured by each individual user. When users configure their preferences, they are saved and appear on all subsequent logins. to open the Pharmacy Workspace. You must initially configure 1. In the toolbar, click the MOSAIQ toolbar to show the Pharmacy icon. 2. Right-click in the toolbar to open the Options menu. 3. Click Customize to open the MOSAIQ Toolbar Editor dialog box. 4. From the MOSAIQ Toolbar Editor dialog box, click Workspaces from Categories. 5. From Commands, click and drag Pharmacy to the toolbar and release the mouse button. Configuring the Pharmacy Workspace The Pharmacy Orders List window is the only window to initially appear when you open the Pharmacy Workspace. You can configure the Pharmacy Workspace to include the Pharmacy Dispensing List. 1. To open the Pharmacy Dispensing List, click the down arrow on the Pharmacy Ordering header. 2. From the Options menu, click Configure Workspace to open the Pharmacy Orders dialog box. 3. From the Pharmacy Orders dialog box, double-click the Pharmacy Dispensing List. 50 Copyright 2010, Elekta Impac Software LUGMSQ0002/4.0/23-Sep-2010 CHAPTER 4: MOSAIQ Medical Oncology Clinical Charting Viewing Pharmacy Tabs When you first open the Pharmacy Workspace, one tab labeled as TabPage#1 is shown. You can add more tabs, rename existing tabs, remove a tab, and reposition tabs. Adding a New Pharmacy Tab 1. Right-click the existing tab to open the Options menu, then click Add Tab to add a new tab. 2. Type a name for the new tab, then press ENTER to save the name. Optional: You can drag and drop the Pharmacy Ordering List or Dispensing List onto the new tab. Rename a Tab 1. Right-click an existing tab to open the Options menu, then click Rename Tab. This lets you change the name of the tab. 2. Press Enter to save the new tab name. Removing a Tab 1. Right-click on an existing tab to open the Options menu, then click Remove Tab. The tab is removed. Moving a Tab 1. Right-click on an existing tab to open the Options menu, then click Move Tab Left/Right. The tab is moved to the left/right. Viewing Pharmacy Order Detail 1. To see order detail for an order, double-click a patient name, or a patient order to open the Order Detail window. Component detail can contain more than 1 drug. If an order has more than 1 drug, each drug component has its own tab. 2. To move through the fields, press the TAB key on your keyboard. The detail shows drug level information for the selected pharmacy order. Drugs have rules in regard to Route, Start Date, and Frequency. Pharmacy Order Rules: You can mix drugs in the same solution only when all the drugs in the order have the same Route, Frequency, and Start Date. If order is an IV order, they must have the same Solution, Rate, and Duration. Copyright 2010, Elekta Impac Software LUGMSQ0002/4.0/23-Sep-2010 51 MOSAIQ User’s Guide Adding a Medication Order Using Pharmacy Workspace MOSAIQ lets you add pharmacy or medication orders. Medications can include prescription and OTC (over the counter) drugs. 1. In the toolbar, click to open the Pharmacy Workspace. 2. Click the Add button and chose a prescription type: In House Treat, In House Pickup, External Pickup, From Favorites, and Order Set. First DataBank is separately purchased and licensed. Interaction screening is only allowed when First DataBank is purchased and licensed. Interaction screening is only allowed when the product is WARNING configured by establishing the appropriate links. Interaction screening remains accurate only when the periodic First DataBank updates are applied, which are available through Impac. If your site is not licensed for First DataBank, the system can only look through the department formulary. No drug-to-drug interaction occurs. 3. Select a patient from the Select Patient window. 4. In the Pharmacy Ordering Detail window, type a medication name in the Medication Search field, then press ENTER. If a match is not found, <Drug Not Found> appears. All results appear in a dropdown list. The drug name with the most equivalent characters are recorded at the top of the list (but not selected). 5. Double-click the drug name to record it into the field. 6. The Vitals/Lab Data window automatically opens when the system is missing and/or has expired data that is necessary, such as drug dose calculation with the dose basis units. Enter the applicable information, then click the OK button. 7. Click the Include Strength check box if you want the system to also look for the drug strength. Not all drugs in the system contain a strength. 52 Copyright 2010, Elekta Impac Software LUGMSQ0002/4.0/23-Sep-2010 CHAPTER 4: MOSAIQ Medical Oncology Clinical Charting Formula of the Agent Volume = Dose (mg) / mg/ml Agent Volume Calculation happens automatically for medications added when using the Pharmacy Ordering window, if the following conditions are met: If the medication has the strength included from First DataBank and the Include Strength check box is selected, prior to drug search, in the Pharmacy Ordering Details window; Where the strength unit of measurement is: Dose/Volume (where Dose = mg and Volume = mL). The format is mg/ml or mg/2ml; If the selected Drug requires one of the following calculations, such as mg/m*2, AUC, or mg/kg, where the Ordering Dose Units must be ‘mg’ with the strength mg/ml (mg/2ml, mg/5ml, etc.), then selected and saved to the Pharmacy Ordering Details window. 8. The classification search is equivalent to searching for a drug. To start a classification search, click the classification search link, then type a minimum of 3 characters in the Medication field. Press ENTER. If a match is not found, <Classification Not Found> appears. After you select the correct classification, a list of drug names appears. Select the correct drug, then click the done link to save the classification and continue with your order. 9. Click the Dose Adj button to open the Dose Adjustments screen. This button is only applicable when the Dose Calculation Required check box is selected. The check box is selected for you if the unit of the measure in Dose Basis is dose/kg. You can also manually select the check box. 10. The Confirm BSA button is only enabled when the Dose Calculation Required check box is selected. Click this button to open the Confirm BSA Calculation dialog box. You can then enter a new calculation. By default, the system shows the most recent calculated BSA based on the most recent, correct, and measured weight and height. You can also record a BSA manually. A manual BSA entry is automatically invalidated at the end of a day. The Confirm BSA Calculation dialog box contains the following components. Use First BSA from Current Regimen This is the BSA value used for dose calculation for the current Care Plan. Use Last used BSA from Current Regimen This is the BSA value that was used for dose calculation the last time doses were calculated for the current Care Plan. Adjusted or IBW When an adjusted or IBW is recorded in Vital Signs, the BSA that was calculated appears. Copyright 2010, Elekta Impac Software LUGMSQ0002/4.0/23-Sep-2010 53 MOSAIQ User’s Guide 11. If you click the buttons above, in the Confirm BSA Calculation window, the system adds the related value into the BSA to be Used field. You can change the BSA to be Used field manually as necessary. Click the OK button. The system shows the BSA used and automatically calculates the dose. 12. Add the remaining medication information, such as adding a data field for ordering dose in a range, and frequency of order. When manually recording the frequency, Elekta/Impac recommends typing commonly used abbreviations. For example, if you type BID, the system supplies the frequency as “twice a day”. Learning Tip: Make sure you type common frequency sentences (e.g. TID for 7 days); in return, the system generates a sentence (3 times a day for 7 days). The patient information panel gives you a summary of patient information. You can hover with your mouse above the text to show more information, when available. Click any link in the panel to open that window and see more information. 13. Click the OK button to add the medication order. Approving a Pharmacy Order When you have created pharmacy orders, MOSAIQ automatically adds a pending status. You must approve all orders. A pharmacy order can be approved from the Pharmacy Ordering List, Clinician Worksheet, and from the Chart Workspace. 1. In the toolbar, click to open the Pharmacy Workspace. 2. Click the pending order, then click the Status button to open the Order Status dialog box. 3. Click the Approved radio button in the New Status group. 4. You must enter your password, then click the Ok button to save your status. These fields must be complete in order to approve an order: Drug, Ordering Dose, Route, Start Date and Frequency. Batch Approving Orders If you have multiple orders to approve, you can approve the orders at the same time. 1. In the Pharmacy Workspace, hold down the CTRL key and with your mouse click each pharmacy order to approve. The Route and Ordering Dose fields must be provided. 2. Click the Status button to open the Order Status dialog box. 3. In the New Status group of the Record Status dialog box, click the Approved radio button. 4. Type your password, then click the OK button to save your status. 54 Copyright 2010, Elekta Impac Software LUGMSQ0002/4.0/23-Sep-2010 CHAPTER 4: MOSAIQ Medical Oncology Clinical Charting Voiding an Order If you approve an order with an error, you can void the order. 1. In the Pharmacy Workspace, select the order to void, then click Status. 2. In the New Status group of the Record Status dialog box, click Voided. 3. Type your password, then click the OK button. Completed Order Status MOSAIQ automatically shows a status as Completed when the order is treated In House and when the full ordering dose is given. When adding External or Internal Pick Up orders, Elekta/Impac suggests that you use a status of Treated Elsewhere. A status of Treated Elsewhere shows on the Status column of the Pharmacy Ordering List. Pharmacy Order Security Rights To perform certain Pharmacy Ordering functions, you must configure the applicable security rights. See the Modify Level table below for a description of each modify level. Configuring Pharmacy Orders Security 1. Click File | Directories | Staff Directory…to open the Staff Directory window. 2. Click a staff member from the list. 3. Click the Change button to open the Staff dialog box. 4. Click the Security button to show the security settings for the staff member. 5. Click the Orders tab to see the settings for Pharmacy Orders. 6. Click the level of security necessary for this staff member. Copyright 2010, Elekta Impac Software LUGMSQ0002/4.0/23-Sep-2010 55 MOSAIQ User’s Guide Modify Level Level 1 You can change the Start Date/Time, Department, and Diagnosis for an approved order. Level 2 Lets you modify pending pharmacy order and includes Level 1, plus Administration Instructions, MD, Status, Folder, Duration, Base Solution, Rate, Priority, Quantity and Form. Level 3 Lets you modify pending pharmacy order and includes Level 1 and 2, plus Medication, Dose Basis, Ordering Dose, Route, Substitutions, Refills, Frequency, and PRN. Level 4 This level only applies to the Pharmacy Dispensing List and the Dispensing Detail List. When Level 4 is selected, modifications to orders previously marked “Approved” can be made without have to re-status the order. When a user has Pharmacy Modify rights Level 2 and higher (Level 1 excluded), the Record Status window can be opened for approved pharmacy orders. These options are available for selection: Outside Facility Treated Elsewhere Comments Disabled: Pending, Approved, Approved (Provisional), Closed, Completed, Sig. Required, On Hold, Exclusive, Voided. When a pharmacy order has been marked Approved (Provisional), a user with Chemo Admin Modify rights can open the Record Status window and sign off the provision. Ordering Medications Using the Clinician Worksheet 1. Click eChart | Clinician Worksheet to open the Clinician Worksheet Login box. 2. Type your password, then click the OK button. 3. Chose a patient from the Select Patient window to open a patient’s chart. 4. Click the Drug button, then choose a prescription type: In House Treat, In House Pickup, External Pickup, and From Favorites. 5. Add the new medication, then click OK. 56 Copyright 2010, Elekta Impac Software LUGMSQ0002/4.0/23-Sep-2010 CHAPTER 4: MOSAIQ Medical Oncology Clinical Charting Ordering Medications Using the Quick Orders Dialog Box Use the Quick Orders dialog box to add orders for frequently used medications and tests/labs. Your System Administrator configures the tabs and the sequence in which medications or tests/labs appear on each tab. Ordering Medications Using the Tabs You can order the medications that appear on a tab. 1. Open the chart of the patient, then click dialog box. on the toolbar to open the Quick Orders You can also click eChart | Orders… to open the Orders dialog box, click Add, then click Quick Orders. 2. Type the Date of the order if it is not the current date. 3. Select the physician ordering the medication if not the Attending Physician of the patient. Click next to the MD field, then double-click the ordering physician from the Physician Directory window. 4. Type more information in the Comments field. 5. Type or select a Diagnosis if different from primary diagnosis. Or you can click adjacent to the Diagnosis field, then select the new diagnosis from the Select Diagnosis Code dialog box. When you add an order, all fields but the Diagnosis and MD fields revert to their defaults. 6. Click the Medication tab. 7. To see if the medication was administered to the patient, click Hx next to the medication. If the medication was administered and then recorded using the MAR dialog box, the Dose History dialog box appears. If the patient has not had the medication administered and recorded, the Dose History message box appears. 8. Click the checkmark next to the medication. 9. To record a dosage other than the default, type the correct dosage in the first field after the Hx button. 10. To change the units of measurement and the route of administration, type the route adjacent to the field, then double-click (such as PO) or unit of measurement. Or click the applicable route of administration and/or unit of measurement. 11. Click Generate Approved to give the order a status of Approved rather than Pending. The check box stays selected if you close and re-open the Quick Orders dialog box. Copyright 2010, Elekta Impac Software LUGMSQ0002/4.0/23-Sep-2010 57 MOSAIQ User’s Guide If you have to approve ordered medications individually, make sure that you click Generate each time you select a medication. 12. Click Generate to add the order. The medications appear in the Quick Rx group. Medications appear individually, even if you ordered them as a group. You can select multiple medications on different tabs, then make one order. If you select both medications and observations, MOSAIQ adds two orders. One order contains the medications and another contains the observations. 13. Click Close to close the Quick Orders dialog box. Ordering Medications Using Quick Orders If the medication or observation does not appear in the tabs, use the Quick Obs group to order the medication. 1. In the Quick Orders dialog box, click a medication tab to show the Quick Rx group. 2. Click next to the Drug field in the Quick Rx group to open the Medications Formulary window. 3. Click next to the View field, then click By Brand Name to sort the Medications Formulary by the brand name of the medication. 4. Type the first two or three letters of the medication to show the first medication starting with those letters. The text you type appears in the Find field at the top of the window. The Find feature shows only the medication(s) with the text you type. You do not have to scroll down the full medication list. Press BACKSPACE to “erase” the text you typed. 5. Double-click the medication. 6. In the Quick Orders dialog box, type a dosage in the first Dose field to change the default. 7. Type the route of administration in the field to the far right of the Dose field. Or you can next to the field to open the Select Route of Administration window, then click double-click the route. 8. Type the Date, MD, Diagnosis, and Comments for the order if not the defaults. 9. Click Generate Approved to give the order a status of Approved rather than Pending. 10. Click Add to create the medication order. 58 Copyright 2010, Elekta Impac Software LUGMSQ0002/4.0/23-Sep-2010 CHAPTER 4: MOSAIQ Medical Oncology Clinical Charting Waving Orders from Quick Orders You can also add recurring or wave orders for medications. 1. In the Quick Orders dialog box, enter the Date, MD, Comments, Priority, and Diagnosis for the order if different from the defaults. 2. Click Wave to open the Wave Setup Form dialog box. 3 Type the date of the first instance in the Date field if different from the default. 4. In the End group, type the number of Times to administer the order. 5. In the Times Per Day group, select how frequently to administer the order each day. 6. In the Pattern group, select how often to administer the order, such as Daily. 7. Click OK to save the recurring appointment. Note that a green checkmark appears adjacent to the Wave button in the Quick Orders dialog box. 8. Select the medication(s) or observation(s) from the tab(s) (or use Quick Rx). 9. Click Generate Approved to give the order a status of Approved rather than Pending. 10. Click Generate to create the recurring order. (Click Add for Quick Orders.) The green checkmark no longer appears next to the Wave button. Copyright 2010, Elekta Impac Software LUGMSQ0002/4.0/23-Sep-2010 59 MOSAIQ User’s Guide Calculating Doses and Dose Changes To generate medication orders from Care Plans that require an mg/m*2 calculation, you must, at a minimum, enter the patient height and weight to calculate the body surface area (BSA). MOSAIQ uses the patient height and weight to calculate BSA. You enter data such as height and weight in the Vital Signs tab of the Flowsheet window. If you are using the Area Under the Curve (AUC) for your chemotherapy doses, you need to enter the BUN and Creatinine for the system to calculate Creatinine Clearance. Creatinine Clearance is required to calculate doses based on the AUC. You must also enter the patient age and gender for this calculation. Adding Patient Height and Weight to Calculate the BSA The patient height and weight let you calculate the patient BSA, which you can then use to calculate medication dosages. 1. Click eChart | Vital Signs… to open the Vital Signs tab of the Flowsheet window. 2. Select the View from which you can add the patient height and weight. 3. Click Add to open the Flowsheet Data Entry/Edit mode. The vital sign view you selected appears, along with a text field, the Data Entry field. If you can only type a value, the field is a simple text box. If you can select from a number of choices, the text field appears with a button arrow. Click the arrow button to show the list. You can only type or select values that appear in the list. 4. Press TAB until the highlight bar moves to Height, then type the patient height in inches in the Data Entry field. You can also click in the Date/Time column next to the vital sign, then add the vital sign information in the Data Entry field above. You can also use the UP and DOWN arrows on your computer keyboard to move between vital signs. 5. Press TAB to move the highlight bar to Weight. 6. Type the patient weight. 7. Click the OK button to open the Observation Status dialog box. By default, the information you typed, called an observation, has a status of Pending. 8. Optional. Click Info, type the date and time of the observation (if different from the current) in the Observation At fields, then click OK. 9. In the New Status group, click the Approved radio button, then type your Password. 10. Click the OK button to open the Observation Status dialog box. 60 Copyright 2010, Elekta Impac Software LUGMSQ0002/4.0/23-Sep-2010 CHAPTER 4: MOSAIQ Medical Oncology Clinical Charting Adjusting a Medication Dose When you approve a Care Plan cycle, MOSAIQ adds unapproved pharmacy orders. If the cycle has prescriptions that use mg/m*2, you must calculate the total dose. You can use BSA (Body Surface Area) to automatically calculate the dose. To use the BSA, you can adjust/calculate the pharmacy order. You can also approve the order and MOSAIQ automatically uses BSA to calculate the dose. 1. Open the Orders dialog box. 2. Click the medication order, then click Change to open the Pharmacy Orders dialog box. Use the Pharmacy Orders dialog box to add information about the prescription and approve the orders. You can also calculate the total dose for each medication. 3. Click Adj/Calc to open the Confirm BSA Calculation dialog box. The Confirm BSA Calculation dialog box shows the height, weight, and adjusted weight you typed in the Flowsheet. It also shows the date you added them. If you must adjust the BSA, type a new number in the BSA field. MOSAIQ uses the DuBois and DuBois method to calculate the BSA. If you do not use the Adjusted Weight option, your System Administrator can remove it. 4. Click the OK button to open the Dose Adjustments dialog box. Always make sure all calculated doses are accurate. CAUTION Use the Dose Adjustments dialog box to adjust the calculated dose for each medication. You must add a patient weight into the system every seven days when calculating Creatinine clearance using the Cockroft-Gault formula. 5. Click +25% to change the percent in the Adjust Pct field to 125, indicating a 25% raise in medication level. 6. Click the check box to the left of the calculated dose for a medication to recalculate the dose to 125% of the original calculated dose. Copyright 2010, Elekta Impac Software LUGMSQ0002/4.0/23-Sep-2010 61 MOSAIQ User’s Guide 7. Click the check box to the left of the calculated dose the same medication to restore the dose to the original calculated amount. You can also manually adjust dose. Put the mouse pointer in the calculated dose text box, and the pointer changes to . Drag the mouse pointer over all or part of the number in the text box, and either type the new dose or press BACKSPACE to remove the numbers. 8. Click the OK button. Pharmacy Dispensing List The Pharmacy Dispensing List shows appointments listed by Patients. This window gives the Pharmacist/Pharmacy Technician access to set-up, mix, and/or dispense medications to administer to patients in a center location in MOSAIQ where pharmacy tasks are managed. Patients must first be added into the MOSAIQ systems with assigned orders in the specified date range and/or have an appointment scheduled in the selected locations. This list also shows patients with/without scheduled appointment. The list is supplied by using the selected filters. The orders with related start dates in the selected date range appear for each patient. This list does not initially appear in the Pharmacy Workspace, it must be configured. When you see a plus sign to the left of a patient name, you can click it to expand the detail(s) for that patient. Pharmacy Dispensing Detail Window When orders are shown in the patient table, a checkmark appears in the Rx column. A plus sign also appears next to the patient name. Click the plus sign to expand and see the pharmacy orders list and information in the selected date range (maximum date range is up to 7 days). Customizing the Columns The columns on the Pharmacy Dispensing List can be reorganized, removed, and/or sorted alphabetically. Removing a Column 1. Right-click a column header to show the options menu. 2. Click Column Chooser, which shows the Customization dialog box. 3. Click, hold and drag a column header name from the pane into the Customization dialog box, then release the mouse button. The column header name appears in the Customization dialog box. 4. Click 62 to close the dialog box. Copyright 2010, Elekta Impac Software LUGMSQ0002/4.0/23-Sep-2010 CHAPTER 4: MOSAIQ Medical Oncology Clinical Charting Configuring the Pharmacy Label and Worksheet These Pharmacy Label and Worksheet configuration options are available when you rightclick on the blue bar of the Pharmacy Dispensing List. Print Preferences The Print Preferences editor window lets you specify label/worksheet printing preferences. Your preferences are kept in the database. Some preferences are general and apply to all types of label/worksheet printing, while other preferences only apply to categories (Worksheet, PO (Oral) Label, Non-PO (Non-Oral) Label). Label/Worksheet Designer This option opens the Label/Worksheet Designer window. When an order is not first selected, the label designer tab appears as Non-PO Label Designer with a blank canvas. The designer lets users make or change reports by dragging and dropping controls and fields on the design panel. Reports can be saved as .repx files to use with label/worksheet printing. Formerly added .repx files can be imported. Viewing Dispense Detail 1. Select an order. 2. Click the Dispense Detail button to examine and record dispensing information for that medication order, drug/allergy interactions, patient allergies, lab results and other clinical information. Medication orders must first be approved to see the details. 3. If an order is pending, click the Status button and approve. From this window, Pharmacists can choose if orders are In Prep, Verified, and/or Dispensed. While in the Dispensing Medication Detail window, the pharmacist can update fields such as Assembly User, Syringe Checked By, and Final Check By; the staff ID is recorded for each procedure. The date and time for these staff specified fields can also be updated. If a drug with a specified strength is selected, the Agent Volume is automatically calculated. Other fields such as Batch/Lot, Waste, Container, Dispense Comments, and Storage Condition can also be shown. Order must be approved to open Dispense Detail. When an order is not approved, the Dispensing Order opens in view only mode. Dispense Comments Pharmacy can use the Dispense Comments field to record more comments that must be communicated with Nurses in the MAR. Storage Condition The source of Storage Condition comments come from the Medications Formulary. You can record more comments/notes. Copyright 2010, Elekta Impac Software LUGMSQ0002/4.0/23-Sep-2010 63 MOSAIQ User’s Guide Administration Instructions The initial order is the source for these comments. You can record more comments/notes if you choose. Patient Information Panel The patient information panel gives a summary of patient information. You can hover with your mouse above the text to show more information, when available. You can also click a link to open the patient chart and navigate to that window for extended information. When you open a patient’s chart, it is important to remember that the Pharmacy Dispensing List becomes patient specific. Setting Dispensing Statuses In Prep Status Select In Prep to show that the medication order is locked by Pharmacy and all other steps against the order must be communicated directly to Pharmacy. Selecting In-Prep locks the order and does not let other users change the order while the pharmacist is preparing and/or dispensing. When In Prep is clicked, user initials and date appear adjacent to Marked In Prep by in the Dispensing Details window. Only the user in the Pharmacy Dispensing List or Dispensing Detail screen can remove the In-Prep status and make changes. This dispensing status appears in the Select Orders To be Treated window. Verify Status 1. Click the Verify button to communicate in Pharmacy that the Pharmacist has verified the order and the Pharmacy Technician can go forward with their procedure(s). Dispensing Medication Orders Status After orders have been verified, and labels and perhaps a worksheet is printed, you can dispense the medication order. 1. Click the Dispense button to show an order as dispensed. 2. Click the OK button to update the dispensing status user, date and time, and statuses the medication as Dispensed. The dispensed status also appears on the Select Orders to be Treated window. Printing the Medication Labels Medication order labels can be printed directly from the Dispense Detail view. You can print labels and set-up the medication component(s) for dispensing. 1. Select 1 or more pharmacy orders from the Worklist. 2. Click the Print Label button to print the applicable labels at the assigned workstation label printer. The print user, date, and time are logged on the database. 64 Copyright 2010, Elekta Impac Software LUGMSQ0002/4.0/23-Sep-2010 CHAPTER 4: MOSAIQ Medical Oncology Clinical Charting Printing the Pharmacy Worksheet 1. Click the Print Worksheet button. The system prints a sheet for each order at your workstations default printer. The print user, date, and time are logged on the database. Editing an Order 1. Click the Change Order button to open the Order Detail window. Changes can be made and saved. Viewing the Order History 1. Click the Order History button to open the Order History window where you can see all order history recorded. User name and time appears. Recording Medication Treatments from Medication Treatment (MAR) You can record the dose supplied, start date/time, stop date/time, and the system calculates the duration of medication administration. To document the administration of a patient medication, the medication must be approved in MOSAIQ. WARNING Make sure that you approve the order before treatment to make sure that it is clinically applicable for the patient. Recording a Medication Treatment When you record a treatment, you record the dose, time, and IV details. If the information is not complete or incorrect, you can save the information you have. You can then get the previous documentation and record the medication treatment at a different time. Documenting the Dose 1. Click on the toolbar to open the Select Orders to be Treated dialog box. The Select Orders to be Treated dialog box shows a list of all approved orders for the current date. You can access orders from previous dates through the Previous Orders button. You can select multiple orders using the CTRL and SHIFT keys. To select two or three individual orders, select an order, press CTRL, then click the other orders with CTRL pressed. To select a group of orders, select the first order, press SHIFT, then click the last order in the group with SHIFT pressed. Copyright 2010, Elekta Impac Software LUGMSQ0002/4.0/23-Sep-2010 65 MOSAIQ User’s Guide 2. Select the medication order(s) to record, then click the OK button to open the Administration tab of the MAR dialog box. The Medication Administration dialog box lets you record the administration of a medication, such as dose given, route, date, and time. Some medications can have more fields: Stop Date and Stop Time, and Duration. These fields apply to medications infused over a period of time, such as chemotherapy. The Start Date defaults to the current date even if the order occurred in the past. You can click Order to see the orders in the Pharmacy Orders dialog box. 3. Type the administered dose for the first medication in the Dose field, then press TAB. Elekta/Impac recommends that you click Default to ordered dose from the Options menu. If selected, the ordered dose for each medication appears in the Dose field. When the ordered dose automatically appears, documentation errors decrease. 4. Type the correct date in the Start Date field, then press TAB. 5. Type the Start Time, then press TAB. If the order has a duration, the duration appears in the Duration field. The duration is specified in the Care Plan or ad hoc order. You can also specify it when you add the order. 6. Type the correct date in the Stop Date field if necessary, then press TAB. MOSAIQ lets you record medication administration durations greater than 24 hours. 7. Type the Stop Time, then press TAB. 8. Keep the Staff field at its default (your initials) unless you were not the staff member administering the medication. 9. Complete the dose and time details for any other medications. CAUTION 66 Do NOT press ENTER at this time. If you do, the MAR dialog box closes without recording IV/VAD details. Copyright 2010, Elekta Impac Software LUGMSQ0002/4.0/23-Sep-2010 CHAPTER 4: MOSAIQ Medical Oncology Clinical Charting Documenting IV Details You can record specifics about the medication delivery, including vesicant information, in the Route 1, Route 2, and Route 3 tabs of the MAR dialog box. You can copy the IV and VAD information to medications administered in the same session or on the same day. Right-click, then click Copy IV/VAD information forward. 1. In the MAR dialog box, click Route 1 to show the Route 1 tab of the MAR dialog box. The Route 1, 2, and 3 tabs of the MAR dialog box let you record details for three IVs. You can use three labels for each tab to show the anatomical location into which the IV/vesicant is infused. An illustration of the IV location that you selected appears to the right of the tab. This illustration helps you specify the area of the arm where the IV was put. 2. In the IV 1 group, click the side into which the IV is inserted in the Side field. 3. Click next to the Type field, click the type of IV. 4. Click next to the Size field, then click the size of the IV needle. 5. Click the anatomical location into which to infuse the IV in the IV1 Location group. 6. Type the name of the IV site in the first text box of the Label field, then click label you type appears in the Drag field. . The 7. Click the label in the Drag field, and holding down the left mouse button, drag the label to the corresponding location on the anatomical illustration. When dragging the text to the illustration, appears until you release the mouse button. The label no longer appears in the Drag field. Make sure you record IV problems with a patient note. If you must start an IV again, use the IV 1 group note to record the details of the interruption. Also, make sure you record the second IV in one of the unused Route tabs. Copyright 2010, Elekta Impac Software LUGMSQ0002/4.0/23-Sep-2010 67 MOSAIQ User’s Guide Saving and Completing Medication Documentation If you do not have sufficient information to complete the documentation of the medication, use the Save feature. The Save feature lets you record the information you have, but does not close the medication order. You can complete recording the medication administration at a different time. 1. In the MAR dialog box, click the Save button to save the medication order. The MAR dialog box closes. 2. To complete the medication documentation, click Treated dialog box. to open the Select Orders to be The orders you select continue to appear in the dialog box. You saved the information you added, but did not complete the documentation. 3. Select the order(s) that you saved, then click the OK button to open the MAR dialog box. 4. Complete the medication documentation, then click the OK button. If you typed a dose other than the default for a medication, the Dose Mismatch message box appears. If you intend to administer the remaining dose, click No, then click Save to save, but not close, the medication administration record. 5. If the Dose Mismatch message box appears, click the Yes button to record the medication administration or click the No button to cancel the message. 6. If a message box shows you have more medications to record, click the Yes button to open the Select Orders to be Treated dialog box. 68 Copyright 2010, Elekta Impac Software LUGMSQ0002/4.0/23-Sep-2010 CHAPTER 4: MOSAIQ Medical Oncology Clinical Charting Documenting VAD Details If your patient has a vascular access device (VAD), you can document medication administration with the VAD/Bld Prod tab. , select the remaining order(s) to treat, then click the OK button to open the 1. Click MAR dialog box. If you have only one medication order left to document, the MAR dialog box opens automatically. 2. Document the dose and time for the medication. 3. Click VAD/Bld Prod to show the VAD/Bld Prod tab of the MAR dialog box. Use the VAD/Bld Prod tab to document the type of vascular access device and the flush used. You can also use it to add default comments and longer notes. If the patient got a blood transfusion, you can record the information about the transfusion in the Blood Products group. 4. Click adjacent to the Type field, then click the type of VAD. 5. Click adjacent to the Flush field, then click the VAD flush. 6. Click adjacent to the Comment field, then click a standard comment. You can select a default comment or click the Note button to add a longer note. Your administrator can change the Type, Flush, and Comment lists. 7. Click the Non-Coring check box. 8. Click the Note button to open the MAR Note dialog box. 9. Type the Subject of the note, then press TAB. 10 Type the content of the note, then click the OK button to close the MAR Note window. A green checkmark appears by the Note button in the MAR dialog box. 11. Click the OK button to record the medication administration. Copyright 2010, Elekta Impac Software LUGMSQ0002/4.0/23-Sep-2010 69 MOSAIQ User’s Guide Adding a Co-Signer If another nurse or physician needs to co-sign the treatment, use the co-sign option to add their initials to the administration record. 1. In the Select Orders to be Treated dialog box, click a medication order, then click the OK button to open the MAR dialog box. 2. Add the information for the medication(s) administered. 3. Click the top CoSign button to open the Select who will co-sign this order dialog box. 4. Type the user name of the co-signer in the Name field, then press TAB. 5. Type the user password in the Password field, then press ENTER. Co Sign changes to JFG. The button changes so that you can easily see if there are cosigners on the MAR. Since you can have more than one co-signer, there are two Co-Sign buttons. 6. Click the OK button to record the medication administration. Printing Medication Administration Records You can view and print the Medication Administration Record (MAR). 1. In the Clinician Worksheet, click MAR Sum to open the MAR Treatment Summary window. The MAR Treatment Summary window shows the medication administration record for the date in the Date field. The MAR includes information about all medications administered on the specified date. 2. Right-click in the MAR Treatment Summary window, then click Print MAR Summary Report to open the MAR Summary dialog box. The MAR Summary dialog box lets you select the date range to print. You can also print medications for all, current, or some patients. 3. Accept the defaults, then click the OK button to open the Print dialog box. 4. Select your Print Report setting, then click the OK button to print the Medication Administration Record Summary report. 5. Click the Cancel button to close the MAR Summary dialog box. 6. Click the OK button to close the MAR Treatment Summary window. 70 Copyright 2010, Elekta Impac Software LUGMSQ0002/4.0/23-Sep-2010 CHAPTER 4: MOSAIQ Medical Oncology Clinical Charting Correcting Medication Documentation Errors If you add information about medication administration in error, then approve the record, you cannot change or remove it. You must void the record, then add the correct information. 1. Right-click anywhere in the Flowsheet window to open the Flowsheet Options menu. 2. Click the Detail View button to show the Flowsheet window in Detail view. Each component of the chemotherapy treatment appears in its own column. 3. Click medication for which you entered a partial dose, right-click, then click Treatment Review to open the MAR dialog box for the chosen treatment. 4. Click the Status button to open the Record Status dialog box. Closed and Voided are the only options available in the Status group. 5. Click the Voided check box. 6. Type your password, then press ENTER to void the medication administration record. 7. In the MAR dialog box, click the OK button to save the voided status with the record, then open the Correct Medication Administration message box. 8. Click the Yes button to open the Copy of Voided Medication message box. 9. Click the Yes button to open the MAR dialog box with a copy of the voided record. 10. Enter the correct dose. Keep all other fields at their default values. 11. Click the Note button to open the MAR note window. 12 Type the Subject of the note, then press TAB. 13. Type the content of the note, then click the OK button to close the MAR Note window. 14. Click the OK button to save the new medication administration record and open the Flowsheet window. Copyright 2010, Elekta Impac Software LUGMSQ0002/4.0/23-Sep-2010 71 MOSAIQ User’s Guide 72 Copyright 2010, Elekta Impac Software LUGMSQ0002/4.0/23-Sep-2010 MOSAIQ User’s Guide CHAPTER 5: MOSAIQ Radiation Oncology Clinical Charting MOSAIQ Radiation Oncology Clinical Charting is a comprehensive electronic medical record (EMR) that includes core charting features specific to radiation oncology. It includes template-based care plans that help automate the generation of complex treatment protocols and customizable treatment calendars to schedule their delivery. When configured with other radiotherapy products, Radiation Oncology Clinical Charting streamlines the entire therapy process from initial diagnosis and staging through planning, treatment, and subsequent follow-up. Defining Radiation Prescriptions The radiation prescription defines physician treatment intentions and is the source of direction for defining beams and scheduling treatment sessions. To add or change a radiation prescription, you must have Clinical | Prescription | Modify rights. To approve a radiation prescription you must have Approve rights. CAUTION To change an approved radiation prescription you must also have Approve rights. Adding Radiation Prescription Information 1. Open the chart of the patient, then open the Diagnoses and Interventions window. 2. Create a new course of treatment or select an existing course of treatment, then click Add Rad Rx and then click Conventional to open the Radiation Prescriptions dialog box in add mode. If there is already one or more prescription sites in the course, the Radiation Prescription Sequencing dialog box appears. You may add the Radiation Prescription Sequencing for the new prescription relative to an existing prescription. The Radiation Prescriptions dialog box lets you add detailed information about the patient’s prescription and manage a related set of prescription sites in the same course of treatment. The upper section of the dialog box displays the diagnosis for the selected course and provides a table that displays a summary of all the prescription sites defined for this course. The lower section has multiple views, enabling you to enter a prescription for a new site in an existing or new course, to edit the prescription for any of the sites in the course, delete an existing prescription, and to display the prescription for each site in the course. Copyright 2010, IMPAC Medical Systems LTGMSQ0002/4.0/23-Sep-2010 73 MOSAIQ User’s Guide 3. Type a name of the radiation prescription in the Rx Site field. This radiation prescription name must be unique for the selected patient. 4. Click to select the radiation technique, such as Obliques from the Technique list. to select the treatment modality to use in the radiation prescription from the 5. Click Modality list. 6. Click to select the dose specification, such as Depthdose from the Dose Spec list. This is the calculation point or volume for the prescribed dose (for example, D-Max, to select from the list or type the first midplane, or per treatment plan). Click character(s) of the known specification. The Dose Spec field has three parts: the type of calculation specification, a numeric value for the calculation point or isodose level, and a unit for the numeric value. Depending on what you select for the first field, you may not need to fill in the other two fields. 7. Press TAB and type the second dose specification value in the Rx Depth field (text field to the right of the Dose Spec field). 8. Press TAB and click to select a unit for the value you typed. For example, select cm. 9. Type the total dose in the Rx Dose field. Defining Fractionation Patterns The Fractionation Pattern identifies the pattern of treatment sessions the patient is to be treated. 1. In the Radiation Prescriptions dialog box, type the fractional dose in the Fractional Dose field, then press TAB. The Number of Fractions field is automatically calculated. For example if the Rx Dose is 5040 with a Fractional Dose of 180, the Number of Fractions shows 28. This indicates that, to deliver the prescribed dose, the patient needs 28 treatment sessions. The calendar view on the right side of the fractionation phase field shows 28FxPattern?, indicating that the fractionation pattern has not been added. 2. Type the fractionation pattern description in the text field, for example, Daily, BID etc., bypassing the Wave Setup Form or click adjacent to the Fractionation Pattern field to open the Wave Setup Form dialog box. You can add more complex fractionation patterns, such as BID using the Wave Setup Form dialog box. 74 Copyright 2010, Elekta Impac Software LUGMSQ0002/4.0/23-Sep-2010 CHAPTER 5: MOSAIQ Radiation Oncology Clinical Charting The Wave Setup Form dialog box enables you to determine when to treat the patient with the fractional dose. Typical fractionation patterns are: Type For Daily Every day Every Other Day Every other day BID Twice daily 3. In the Times Per Day group, select the number of fractions per day. 4. In the Pattern group, select a pattern, such as Daily, Every Other Day, or, Weekly pattern 5. Click OK to close the Wave Setup dialog box and return to the Radiation Prescriptions dialog box. A text description of the configured fractionation pattern then displays in the Fractionation pattern field. 6. Click OK to save the radiation prescription with the fractionation pattern. Appending Fractionation Phases You can append a prescription to add fractions to an existing prescription site. Once you have appended a prescription, you can change the total prescribed dose, fractional dose, and the fractionation pattern, or remove entire fractionation phases. 1. In the Radiation Prescriptions dialog box, select the radiation prescription to which to append a radiation prescription, then click Change. This activates the radiation prescription fields so that you can make changes. 2. In the Fx Phase group, click Append to open the Radiation Prescription Phase Start dialog box. The Radiation Prescription Phase Start dialog box sets the time interval between fractionation phases in a prescription site. 3. Type the time interval between fractionation phases, then click OK to save the phase sequencing start date. 4. In the Radiation Prescriptions dialog box, type the total fractionation dose for the phase sequence in the Rx Dose field. 5. Type the Fractional Dose. 6. Type the Fractionation Pattern, such as Daily. 7. Click OK to append the new radiation prescription. Copyright 2010, Elekta Impac Software LUGMSQ0002/4.0/23-Sep-2010 75 MOSAIQ User’s Guide Using Site Sequencing for Multiple Radiation Prescriptions Radiation Prescription Sequencing (also called site sequencing) lets you set up a start session of the new prescription site in relation to other prescription site(s) in the same course of treatment. 1. In the Radiation Prescriptions dialog box, click Add to open the Radiation Prescription Sequencing dialog box. The Radiation Prescription Sequencing dialog box only displays when you are adding prescription sites to the same course. If you click Cancel, Sequencing? displays in the second column of the calendar view in the Radiation Prescriptions dialog box. This indicates that there is no site sequencing. The Radiation Prescription Sequencing dialog box contains these options: Treat this Rx Site Concurrent with beginning of Specifies to deliver the first fraction for the prescription site in the same treatment session as the first fraction of the selected prescription site. Overlapping with Specifies to deliver the first fraction for the prescription site after a prior site has started but before it has been completed. The overlap is defined in the Treat the first fraction of this Rx Site at least section of this dialog box. After Specifies to deliver the first fraction for the prescription site after completion of the selected prescription site in the Site field. This is the default setting. Site Specifies the prescription site to use in site sequencing. The list only contains the prescription sites in the same course, which precede the prescription site for which you are defining site sequencing. Treat the first fraction of this Rx Site at least 76 Number of days or hours Specifies how long after the specified fraction of the prescription site in the Site field to begin the first fraction for the prescription site. Days or hours Specifies the unit of time (days or hours). For example, if you type 7 and select hours, the first fraction begins seven hours after the specified fraction of the prescription site in the Site field. After Fraction Specifies one of the fractions for the selected prescription site in the Site field. This is the last fraction delivered when you begin treating the first fraction of the prescription site for which you are defining site sequencing. This field defaults to the number of fractions in the preceding prescription. Of Site Shows the prescription site selected in the Site field. Copyright 2010, Elekta Impac Software LUGMSQ0002/4.0/23-Sep-2010 CHAPTER 5: MOSAIQ Radiation Oncology Clinical Charting 2. Select when to start the new radiation prescription, such as Concurrent with beginning of. 3. Click OK save and close the Radiation Prescription Sequencing dialog box. 4. Complete the Radiation Prescriptions dialog box with the new radiation prescription information. 5. Click OK to save the new radiation prescription site. A plus sign (+) in the calendar indicates that more than one prescription applies to the date. Viewing and Changing Radiation Prescriptions With the appropriate security rights, you can change any prescription before or after it is approved. When you change an approved prescription, the approval is removed. You must therefore re-approve any prescriptions that you change. You can continue to work in eCHART with a prescription that has not been approved. You may also have to set up phase or site sequencing again if the fractions change. The Radiation Prescription Sequencing dialog box is used to set up site sequencing. You can enter or modify the start of this Prescription Site relative to a fraction in a Prescription Site listed in the same course. The Radiation Prescription Phase Start dialog box is used to set up phase sequencing. You can enter or modify the minimum time interval between the last fraction of the previous treatment phase and the first fraction of the new or selected phase in the prescription. You have to define phase sequencing when adding new fractions to a prescription site. 1. In the Diagnoses and Interventions window, double-click the prescription to view and/or change. 2. In the Radiation Prescriptions dialog box, click Change to change the Radiation Prescription dialog box to edit mode. 3 Make your changes. 4. Click OK to save your changes. 5. Approve the radiation prescription again if needed. Approving Radiation Prescriptions Once the information in the radiation prescription is accurate and complete, you can approve the radiation prescription. You can still make changes to an approved radiation prescription, but if you do, the approval is removed. 1. In the Radiation Prescriptions dialog box, select the radiation prescription to approve, then click Status to open the Record Status dialog box. 2. In the New Status group, click Approved, then type your Password. 3. Click OK to approve the radiation prescription. Copyright 2010, Elekta Impac Software LUGMSQ0002/4.0/23-Sep-2010 77 MOSAIQ User’s Guide Approving Multiple Radiation Prescriptions You can also approve multiple radiation prescriptions at the same time. 1. In the Radiation Prescriptions dialog box, tag the radiation prescriptions by clicking each in the upper pane next to the left margin. A “»” appears adjacent to the radiation prescriptions. This indicates that they are tagged/selected. 2. Click Status to open the Record Status dialog box. 3. In the New Status section, select Approved, type your Password, then click OK to approve the radiation prescriptions. Copying Radiation Prescriptions from Another Patient You can use the Radiation Prescription Copy option to quickly and efficiently enter data for patients, whose prescriptions are nearly identical; thus providing a faster way to enter a set of prescription sites. If one patient has a radiation prescription that is essentially similar to one you could create for another patient, you can copy that first radiation prescription of the patient. 1. In the Radiation Prescriptions dialog box, right-click anywhere or press F4 to open the Radiation Prescriptions Options menu. 2. Click Copy Rxs from Another Patient… to open the Select Patient window. 3. Double-click the patient with the radiation prescription(s) to copy. Changing Prescribed Doses You can change the total prescribed dose and the fractional dose or any dose in an approved or any prescription. Elekta/Impac recommends that an applicable staff member reapprove the prescription after any changes to create a historical record of the change. 1. Open the chart for your patient. 2. Open the Diagnoses and Interventions window. The Radiation tab should appear by default. 3. Double-click a prescription. 4. Click the prescription site in the table in the top section of the Radiation Prescriptions dialog box, then click Change. 5. To change the total prescribed dose, double-click in the Rx Dose field of the fractionation phase for the remaining dose, type the new total prescribed dose, then press TAB. 6. To change the fractional dose, double-click in the Fractional Dose field of the fractionation phase for the remaining dose, type the new fractional dose, then press TAB. 78 Copyright 2010, Elekta Impac Software LUGMSQ0002/4.0/23-Sep-2010 CHAPTER 5: MOSAIQ Radiation Oncology Clinical Charting 7. If you receive the error message box for total dose calculation, click OK, then do step 5 or 6 again to correct the total prescribed dose or fractional dose. 8. Click OK in the Radiation prescription dialog box. The applicable staff member must reapprove the prescription after you change the dose. Do the same steps when you change the fractional dose in the radiation prescription. Make sure that you receive a whole number for the number of fractions when you divide the fractional dose by the total prescribed dose. CAUTION When you change the fractional dose, change the dose in the Treatment Field Definition dialog box for all of the treatment fields associated with the radiation prescription. RTP Import RTPConnect lets you import treatment plans. DCM translates DICOM data into RTPConnect format, which you can import into MOSAIQ. Importing Treatment Plans CAUTION To use RTP Import, you must have Clinical | Dosimetry General | Modify and Clinical | Action Points | Approve security rights. Editing Import Data If there is file data that conflicts with the patient’s data in the system, the conflicting data displays as errors in the Import Treatment Plan window. You cannot import the RTP file until you correct the errors. You can, however, edit the file data in the Import Treatment Plan window to correct errors or change the action before importing the file. In this exercise, you will review editing options for RTP file data and make the changes necessary to import the RTP file in the next exercise. 1. Click File | Import/Export | RTP Import... to open the RTP Import window. If the new import path does not appear in the Look in: field, click path. , then select the Before importing files via RTP Import, the RTP import area must be setup. If there are no RTP import areas when you click in the Look in: field, contact your system administrator. Copyright 2010, Elekta Impac Software LUGMSQ0002/4.0/23-Sep-2010 79 MOSAIQ User’s Guide 2. Click the patient for whom you wish to import the RTP file, then click Select to open the Import Treatment Plan window. At the bottom of the window, RTP Import validates the control points and other contents of the plan as the file information appears in the appropriate fields. Once validation is complete, Plan Will Be Imported appears at the bottom of the window. Import Plan is disabled. This button is only active when no errors appear. Errors are highlighted in red. The color codes in the Import Treatment Plan window are: Red Indicates the import data contains errors. You cannot import the plan when errors are highlighted. Yellow Indicates the import data contains warnings, but you can still import the plan. The warning message displays in the Edit Import Data window. Green Indicates that the import data can be imported. Blue Indicates that the import data does not contain any errors, but will not be imported. 3. Click the radiation prescription in the Import Data column, then click Contents. This opens the Edit Import Data dialog box for the course data in the system and RTP file. The title bar of the window shows Prescription Site, and the error message shows in the Error/Warning Message column. If you scroll to the right, you can read the entire error message highlighted in red. 4. Click in the Import Data column for the data item highlighted in red to change the field to the editing mode. You can click in the Import Data column of the Edit Import Data window for courses, prescriptions, treatment fields, and control points to change the file data. 5. Type the new data to fix the error, then click in the window. 6. Click in the Import Data column for a data item highlighted in red or any data item you wish to change and set the field to the editing mode. 7. Type another value for the data item, then click in the window. Note the text appears in green to indicate that you can import the date without a conflict as shown in Figure 10. 80 Copyright 2010, Elekta Impac Software LUGMSQ0002/4.0/23-Sep-2010 CHAPTER 5: MOSAIQ Radiation Oncology Clinical Charting Figure 10: Edit Import Data Window – Fixed Data Item 8. Click OK to close the Edit Import Data window. 9. Click a treatment field, then click Contents to open the Edit Import Data. 10. Click in the Import Data column for the data item highlighted in red to change the field to the editing mode. Figure 11: Edit Import Data Window for Treatment Field 11. Type a valid value for the data item, then click in the window. If the text appears in green, you can import the data without any conflicts. You can change or ignore data in the Edit Import Data window when the file data and system data conflict. Copyright 2010, Elekta Impac Software LUGMSQ0002/4.0/23-Sep-2010 81 MOSAIQ User’s Guide Changing Data Field or Folder Status to Ignore 1. In the Import Treatment Plan window, click in the Action column and data item you want to ignore to display the Action Error drop-down menu, shown in Figure 12. This lets you change the Error action to Ignore. Figure 12: Action Error Drop-Down Menu You can import a file with errors if you change the Action to Ignore, but the file data marked Ignore is not imported. 2. Click XX – Ignore. Changes the ?? error indicator to XX, the indicator for Ignore. The Ignore radio button to the right is also selected. Viewing IMRT Control Point Data You can view and change if necessary the RTP import data for IMRT controls. 1. Click File | Import/Export | RTP Import... to open the RTP Import window. 2. Double-click an RTP file with IMRT fields to open the Import Treatment Plan window, shown in Figure 13. Figure 13: Import Treatment Plan Window with IMRT Fields 82 Copyright 2010, Elekta Impac Software LUGMSQ0002/4.0/23-Sep-2010 CHAPTER 5: MOSAIQ Radiation Oncology Clinical Charting 3. Double-click one of the IMRT treatment fields to open the Edit Import Data window for the treatment field, shown in Figure 14. Figure 14: Edit Import Data Window for IMRT Field The Display Child Data button is only available when you are in the Simulation Field or Treatment Field view of the Edit Import Data window. The Edit Import Data — Control Point window shows all of the control point data for the treatment field selected in the Import Treatment Plan window. 4. Click Display Child Data to open the Edit Import Data — Control Point window. 5. Click in the Control Point field to show the data for a specific control point. 6. Close the Edit Import Data — Control Point window and the Edit Import Data — Treatment Field window. Importing the RTP File 1. Click Import Plan. If configured, this opens the Delete/Move Imported File message box. You can move the imported file to a new subdirectory instead of just removing it from the RTP Import Area. 2. Click Yes to import the file into the system, remove the file and close the Import Treatment Plan window. If you click No, the system creates an Imported subdirectory and moves a copy of the imported file to this location. 3. Click View Log to show the contents of the log file for the imported RTP file. to close the Contents of Log File dialog box, then Close to close the RTP 4. Click Import window. Copyright 2010, Elekta Impac Software LUGMSQ0002/4.0/23-Sep-2010 83 MOSAIQ User’s Guide Importing Files for the Treatment Plan You can import PDF documents and JPEG or TIFF image files to add a treatment plan in the Import Tx Plan window. You can import PDF documents and JPEG images, which were generated during treatment planning, into the Diagnoses and Interventions window. You can also print, save, and navigate through multiple-page documents in this window. The imported treatment plan can include multiple PDF or JPEG files, so multiple-page treatment plans can be multiple files and/or multiple pages of one or more files. CAUTION To use the Import Tx Plan window, you must have Clinical | Tx Plans | View and Modify rights. 1. Open the patient chart and click eChart | Diagnoses and Interventions… to open the Diagnoses and Interventions window. 2. Click Tx Plan. You can also press F4 or right-click, then click Add New Tx Plan to open the Import Tx Plan window. adjacent to the folder in the Documents Available pane to show files available 3. Click for import. 4. Click a PDF document, which appears in the Preview pane to the right side of the window. If you click an image file, the upper toolbar does not appear. However, the lower toolbar always appears and lets you navigate, zoom, and adjust the page. 5. Right-click the selected document in the Documents Available pane, then click Add. The PDF document or image file appears in the Document Saved pane after you click Add. You also can use your mouse to drag and drop files between the Documents Available and Documents Saved panes. Select a file, right-click, then click Delete to remove the PDF document or image file from the Documents Available pane. 6. Repeat Step 5 until you have added all of the files for the treatment plan. 7. Click one of the files you added to the Document Saved pane, then click Import to open the Import Tx Plan dialog box. If you import multiple files, MOSAIQ merges the files into one multiple-page treatment plan document. The Import Tx Plan dialog box lets you change the name of the PDF document(s) and/or image file(s). This is especially useful if multiple documents and files make up a treatment plan. The default treatment plan name is the same as the name of the first file that appears in the Documents Saved pane. 8. Type the treatment plan name for the imported file(s) in the Tx Plan Name field. 84 Copyright 2010, Elekta Impac Software LUGMSQ0002/4.0/23-Sep-2010 CHAPTER 5: MOSAIQ Radiation Oncology Clinical Charting 9. Click OK to import the file(s). The imported treatment plan appears in a Tx Plans folder in the Diagnoses and Interventions window. The imported treatment plans appear in the order you import them into the MOSAIQ. The most recent or last treatment plan you imported appears first in the Tx Plans folder of the Diagnoses and Interventions window. Viewing/Changing Treatment Plans You can use the Treatment Plan Editor window to view and change treatment plans. When you have imported the treatment plan file(s), you can view the plan, change its name, add and remove image and text files. You can also add notes, approve, print, and associate treatment courses and prescriptions to the treatment plan. 1. Open a patient chart and click eChart | Diagnoses and Interventions… to open the Diagnoses and Interventions window. 2. Double-click the imported treatment plan in the Tx Plan folder to open the Treatment Plan Editor window. The Treatment Plan Editor window uses the same toolbars as those in the Import Tx Plan window. The upper toolbar lets you save, print, move the page in the viewer, navigate through multiple pages, and change the page layout of multiple-page documents. The lower toolbar lets you navigate through multiple-page treatment plans and change the dimensions of the page with the zoom tools. 3. Type a new name for the treatment plan in the Tx Plan Name field if you want to change it. You can also change the name if you did not name it when you imported the files. 4. Type a short description of the plan in the Tx Plan Description field. 5. Click Associations to associate the treatment plan or image with radiation prescriptions and/or courses. The Tx Plan Association window shows the courses and prescriptions for the selected patient. 6. Click the prescription or course, then click Select. The associated prescription appears in the Treatment Plan Editor window. If you do not want the treatment plan or image associated with a prescription, click None in the Tx Plan Association window. If the patient has multiple prescriptions and/or courses, press SPACEBAR to tag the prescriptions and/or courses to associate with the treatment plan. 7. Click Note and add notes or comments about this treatment plan. Copyright 2010, Elekta Impac Software LUGMSQ0002/4.0/23-Sep-2010 85 MOSAIQ User’s Guide 8. Click Edit to open the Edit Tx Plan window, shown in Figure 15. Figure 15: Edit Tx Plan Window This window lets you remove or add PDF and image files with the same options available in the Import Tx Plan window. next to the folder in the Documents Available pane that contains the image file 9. Click or PDF document you wish to add. 10. Right-click the file, then click Add. 11. Repeat steps 8 and 9 until you have added all of the files you wish to add to the imported treatment file. Right-click the file, then click Delete to remove files from the Documents Available or Documents Saved panes. 12. Click OK to add the new file(s) to or remove files from the imported treatment plan and open the Treatment Plan Editor window. 86 Copyright 2010, Elekta Impac Software LUGMSQ0002/4.0/23-Sep-2010 CHAPTER 5: MOSAIQ Radiation Oncology Clinical Charting 13. Click Status to change the status for the imported treatment plan. 14. Click the status of the imported treatment plan, such as Approved to approve the plan. 15. Type your user name and password, then click OK to approve the document. Your Staff Type must match one of the configured and available staff types under Approvals. Your signature is automatically associated with the correct Staff Type. The Treatment Plan Editor window closes and the Diagnoses and Interventions window shows the approved treatment plan. Manually Defining Simulation and Treatment Fields Should you chose not to import a treatment plan, you can add simulation or treatment fields for the patient once you have added basic information on the patient, such as a diagnosis. You add and display simulation field information in the Simulation Field dialog box. You can add as many Simulation Field definitions as necessary throughout the patient’s course of therapy. You can also add treatment fields. The Treatment Field Definition dialog box lets you specify treatment field information used during external beam therapy. You can add treatment field definitions manually, by copying simulation fields, copying other treatment fields, automatically capturing treatment unit settings, or by importing them from your treatment planning system. Adding a Site Simulation You can use the Site Simulation dialog box to record patient setup information at the Site level when performing a virtual simulation. A site simulation (virtual simulation) is the first phase of the treatment planning process. The setup information gathered for a radiation prescription site during a virtual simulation is used in Site Setup. Refer to Site Setup in Chapter 6, Image Management —ViewStation & Photos and Diagrams, on page 205 for more information on Site Setup. MOSAIQ does not keep historical versions of site simulations. To view a site simulation, you must have Clinical | Simulation | View rights. To add or change a site simulation, you must have Modify CAUTION rights. 1. In the Diagnoses and Interventions window, select the radiation prescription to associate with the new site simulation. 2. In the Add group, click Simulation, then click Site to open the Site Simulation dialog box, shown in Figure 16. Copyright 2010, Elekta Impac Software LUGMSQ0002/4.0/23-Sep-2010 87 MOSAIQ User’s Guide Figure 16: Site Simulation Dialog Box 3. Click adjacent to the Patient Orientation field, then click the patient orientation, such as Head In, Prone. 4. In the Accessories group, click of patient support. adjacent to the Pt Support field, then select the method 5. Select the positioning device(s) from the Positioning Device 1 — 4 fields. 6. Add a patient note or view simulation images, if necessary. The Simulation Image List pane shows any non-portal medical images associated with the selected treatment site. To view an image, click the image in the Simulation Image List pane, then click View to open the Image List window. The Site Setup Note box shows notes added to the site simulation. To add a note, you can click in the Site Setup Note box, then type your note. You can also add a note with the Note button. 7. Click OK to save the site simulation. 88 Copyright 2010, Elekta Impac Software LUGMSQ0002/4.0/23-Sep-2010 CHAPTER 5: MOSAIQ Radiation Oncology Clinical Charting Adding a Simulation Field When a Prescription Exists Once you have a radiation prescription, which is usually added by a physician, you can begin adding the simulator settings that require manual input. CAUTION To view a simulation, you must have Clinical | Simulation | View security rights. To add a simulation, you must have Modify rights. 1. In the Diagnoses and Interventions window, select the radiation prescription to associate with the new simulation field. 2. In the Add group, click Simulation, then click Field to open the Simulation Field dialog box, shown in Figure 17. Figure 17: Simulation Dialog Box Use the Simulation Field dialog box add detailed information about the simulation setup for the field and contains basic header information, measurement, and geometric setting fields. The General tab of the Simulation Field dialog box lets you add detailed information about the simulation setup for the field and contains basic header information, measurement, and geometric setting fields. You can add simulation settings manually, or capture them directly from the simulator. The Radiography tab lets you add KVp, and mA, and the time that was used to acquire the simulation film. 3. Type an identifier/ID for the simulation field in the first Sim Field text box. Copyright 2010, Elekta Impac Software LUGMSQ0002/4.0/23-Sep-2010 89 MOSAIQ User’s Guide 4. Type a name for the simulation field, up to 20 characters, in the second Sim Field text box. 5. Click adjacent to the Machine field, then double-click the treatment machine. 6. In the Measurements group, type the Source to Skin Distance in the SSD field. 7. Type the Source to Film Distance in the SFD field. 8. Type the Source to Axis Distance in the SAD field. 9. Type the gantry angle for the simulation in the Gantry field. 10. Set the other geometric parameters, such as the X and Y jaws. 11. Set the geometric parameters for the couch. You can add a field setup note, if necessary. Click Field Note to open the Simulation Note dialog box. Add, then save, your note. If a simulation has a note, a green checkmark appears next to the Field Note button. 12. Click Radiography to show the Radiography tab of the Simulation Field dialog box. Radiography settings enable you to enter radiographic settings for a specific simulation film. You can enter the kVp and mA values, the number of seconds to expose the field, and the blade positions during exposure. 13. Add the radiography information. 14. Click OK to save the simulation field. Adding a Simulation Field When a Prescription Does Not Exist In most cases, you add a simulation field with an associated radiation prescription. In some instances, you want to simulate a treatment where no radiation prescription is associated. 1. In the Diagnoses and Interventions window, right-click in the window or press F4. 2. In the Diagnoses and Interventions Option menu, click Add Simulation without Rad Rx…. Because you are adding a simulation field without a radiation prescription, the Rx Site and Rx Note display fields are blank. 3. In the Simulation Field dialog box, type the simulation field ID in the first Sim Field text box. 4. Type the name of the simulation field in the second Sim Field text box. 5. Click adjacent to the Machine field, then double-click the treatment machine. 6. Add all appropriate parameters, such as the gantry angle. 7. Add a field setup note or radiographic information. 8. Click OK to save the new simulation field. 90 Copyright 2010, Elekta Impac Software LUGMSQ0002/4.0/23-Sep-2010 CHAPTER 5: MOSAIQ Radiation Oncology Clinical Charting Capturing Geometric Settings/Parameters for a Simulation Field You can also use SIM-SET to capture and record field information from your radiotherapy simulator. You can then use the resulting field information for auto-setup and verification. CAUTION To view capture settings directly from a simulator, you must have Clinical | Simulation | Modify rights. 1. Position your patient and machine in the simulation position. 2. In the Diagnoses and Interventions window, double-click the simulation field to open the Simulation Field dialog box. 3. Right-click in the dialog box or press F4 to open the Simulation Field Options menu. 4. Click Capture Settings to add the settings from the simulator. 5. Click OK to save the captured settings. Copying a Simulation Field To add a simulation field, copy an existing simulation field, then change only those parameters that are different between the two fields. CAUTION To copy a simulation field, you must have Clinical | Simulation | Modify rights. 1. In the Diagnoses and Interventions window, select the simulation to copy, then click Simulation, then click Field. 2. In the Confirm Field Copy message box, click Yes to confirm that you want to copy the simulation field and open the Simulation Field dialog box. 3. Type the ID for the new simulation field in the first Sim Field text box. 4. Click the second Sim Field, text box, then type the name of the new simulation field. 5. Capture the geometric parameters. Type the measurements, geometric parameters, and radiographic parameters, if necessary. 6. Click OK to save the copied simulation field. Copyright 2010, Elekta Impac Software LUGMSQ0002/4.0/23-Sep-2010 91 MOSAIQ User’s Guide Manually Creating Treatment Fields To create treatment fields, you copy simulation fields or other treatment fields. However, you can also create a treatment field “from scratch” — for example, if the patient treatment does not import from your treatment planning system using DICOM. Manually Creating a Treatment Field Most treatment fields are imported from a treatment planning system, but you may sometimes need to add a treatment field manually. CAUTION To add a treatment field, you must have Clinical | Field Defs | Modify rights. 1. In the Diagnoses and Interventions window, click the radiation prescription for which to create a treatment field. 2. Click TX Field to open the Treatment Field dialog box. Figure 18: Treatment Field Definition Dialog Box The Treatment Field Definition dialog box contains the header information and geometric parameters from the Simulation Field dialog box, plus additional fields to define the dose. You must, at minimum, complete the Field, Machine, Tolerance,Type and Modality fields, and apply a tolerance table. 92 Copyright 2010, Elekta Impac Software LUGMSQ0002/4.0/23-Sep-2010 CHAPTER 5: MOSAIQ Radiation Oncology Clinical Charting 3. Type the number of the treatment field in the first Field text box. 4. Type the name of the treatment field in the second Field text box. adjacent to the Machine field, then double-click the linear accelerator used to 5. Click treat the patient with the field. adjacent to the Tolerance field, then select the tolerance table for the anatomical 6. Click area to treat. This defines the degree of tolerance within which the treatment unit parameters must remain when setting up the patient. 7. Type the dose in Dose field. Dosimetry lets you calculate dose site coefficients and define the dose contributions from each applicable prescription site. 8. Click adjacent to the Type field, then select the type of beam. 9. Click adjacent to the Modality field, then select the method of treatment. 10. In the Beam Configuration dialog box, select the Mv in the Energy column, select the dose rate in the Doserate column, then click OK. The energy and dose rate options that appear are defined in the machine characterization of the selected linear accelerator. If an energy level or doserate was not defined in the machine characterization, it does not appear in the Beam Configuration dialog box. 11. In the Treatment Field Definition dialog box, type the monitor units in the MU field. The Wedge MU field is only significant for sites with Elekta or GE linear accelerators. If you have a Varian or Siemens linear accelerator, never use the Wedge MU field. 12. Type the treatment delivery time in the Time field. Manually Creating Accessory Information You can specify parameters for accessories such as wedges, compensators, and blocks. If you choose electrons for the treatment modality, the Applicator field appears instead of the Wedge field. The drop-down list shows cones for the selected machine. 1. In the Wedge group of the Treatment Field Definition dialog box, click the Wedge field, then select the wedge to be used in treatment. adjacent to 2. Type the name of the compensator required for treatment in the Compensator field. Copyright 2010, Elekta Impac Software LUGMSQ0002/4.0/23-Sep-2010 93 MOSAIQ User’s Guide 3. Type the block required for treatment in the Block field. 4. Type the bolus required for treatment in the Bolus field. If you are using barcode verification of accessory devices, type the word ‘Custom’. Manually Creating Geometric and Couch Settings Most of the time, you transfer treatment field geometric settings from the treatment planning system that you use. You can also add the geometric and couch settings manually if necessary. 1. In the Gantry/Collimator group of the Treatment Field Definition dialog box, type the gantry angle in the Gantry Angle field. 2. Type the collimator angle in the Collimator Angle field. 3. Type the width and length of the X jaws in the Field Size X field. 4. Type the width and length of the Y jaws in the Field Size Y field. 5. If the X jaws are asymmetrical, click the Asy check box adjacent to the X jaw fields, then type the width/length of each X jaw in the Jaw X1 and Jaw X2 fields. 6. If the Y jaws are asymmetrical, click the Asy check box adjacent to the Y jaw fields, then type the width/length of each Y jaw in the Jaw Y1 and Jaw Y2 fields. 7. Type the couch settings in the Couch group, such as the Angle field. Manually Creating Portal Image Information You can specify MU and other parameters specifically for portal images. 1. In the Portal Image group of the Treatment Field Definition dialog box, type the planned portal image monitor units in the Planned MU field. You must type a MU value less than the maximum portal image MU characterized for the selected machine. If you type a value greater than the maximum portal image MU, an error message appears. 2. Type the open field portal image monitor units in the Open MU field. You can use the Dose Coeff field if your facility adds the dose from portal images to the total dose. 3. Type the incremental number of centimeters the collimator field size opens from the treatment field size for an open field portal image exposure in the Delta field. The EPID and SID check boxes are required fields for the Varian 4D and Siemens Coherence machines. 94 Copyright 2010, Elekta Impac Software LUGMSQ0002/4.0/23-Sep-2010 CHAPTER 5: MOSAIQ Radiation Oncology Clinical Charting Adding Field Setup Information You can use the Field Setup pane of the Treatment Field Definition dialog box to add information therapists need to know when setting up the patient for treatment, such as patient position or accessories not listed in the Accessories group, such as angle cushions or breast boards. 1. In the Treatment Field Definition dialog box, click <<<Field Setup. 2. In the Field Setup pane of the Treatment Field Definition dialog box, type the field setup information in the Field Setup text field. If your note is an alert, click the Display Field Setup First when Treating this Field check box. When this box is checked, the Field Setup view automatically appears when the therapist selects the field for treatment. If it is not an alert, the default view appears. 3. Click OK to save the new treatment field. Creating a Treatment Field by Copying a Simulation Field To save time and effort, you can copy simulation fields to add treatment fields. 1. In the Diagnoses and Interventions window, select the simulation field, then click Tx Field to open the Confirm Field Copy message box.. 2. Click Yes to confirm that you want to copy the simulation field and open the Treatment Field Definition dialog box. If you copy a simulation field to add a new treatment field, only the field number and name, the linear accelerator, and the geometric settings copy over. You can keep the copied information or type new information. 3. In the Treatment Field Definition dialog box, type the dose for the treatment field in the Dose field. adjacent to the Tolerance field, then select the tolerance table for the anatomical 4. Click area to be treated. 5. Click adjacent to the Type field, then select the type of beam. 6. Click adjacent to the Modality field, then select the method of treatment. 7. In the Beam Configuration dialog box, select the MV in the Energy column, select the dose rate in the Doserate column, then click OK. 8. Type the monitor units for the treatment field in the MU field. 9. Type the back-up time in the Time field. 10. Add any Accessories information, such as Wedge or Bolus, as well as Portal Image information. 11. Change any geometric and couch settings if necessary. 12. Click OK to save the new treatment field. Copyright 2010, Elekta Impac Software LUGMSQ0002/4.0/23-Sep-2010 95 MOSAIQ User’s Guide Creating a Treatment Field by Copying an Existing Treatment Field You can copy another treatment field to add a treatment field. This is similar to the way that you copy a simulation field to add a treatment field. However, since you have already added all the beam and accessory parameters for the first treatment field, you can copy that treatment field, then change only those parameters necessary for the second treatment field. When you copy a treatment field, not only do you copy the geometric settings, but also its MLC shape (if applicable). 1. In the Diagnoses and Interventions window, select the treatment field. 2. Click Tx Field to open the Confirm Field Copy message box. 3. Click Yes to confirm that you want to copy the treatment field and open the Treatment Field Definition dialog box. 4. If the Machine Characterization message box appears, click OK. 5. Type the treatment field number in the first Field text box. 6. Type the name of the new treatment in the second Field text box. 7. Change the accessory, geometric, couch, and other setup information if necessary. 8. Click OK to save the new treatment field. Capturing Parameters from the Machine As with simulation fields, you can automatically capture geometric settings from your linear accelerator. If your System Administrator checked the Disable Capture Console check box in the File | System Utilities | Department Setup… | Clinical (RO) tab, MOSAIQ only captures the settings for the Gantry/Collimator and Couch groups. 1. Set the linear accelerator to the correct parameters. If you capture parameter settings from the linear accelerator, the parameter settings on the linear accelerator overwrite any settings you manually added in MOSAIQ or previously captured. Make sure the settings on the linear accelerator are correct. 2. In the Diagnoses and Interventions window, double-click the treatment field for which you want to capture parameters. 3. In the Treatment Field Definition dialog box, right-click in the dialog box or press F4. 4. In the Options menu, click Capture Settings to open the Capture All Parameters message box, shown in Figure 19. 96 Copyright 2010, Elekta Impac Software LUGMSQ0002/4.0/23-Sep-2010 CHAPTER 5: MOSAIQ Radiation Oncology Clinical Charting Figure 19: Capture All Parameters Message Box When you capture settings from the machine, all values, including console (such as Energy) and accessory information (such as a Wedge) are captured. MOSAIQ overwrites the information in the treatment field definition with this new information. If the console or accessory information captured differs from the treatment field definition in MOSAIQ, a warning message displays. 5. If you are sure the settings on the linear accelerator are correct, click Yes to capture the settings. 6. If the Console Rx Warning message box opens, click Yes. This indicates that one or more parameter settings on the linear accelerator do not match the treatment field definition as shown in Figure 20. Note that the mismatches are highlighted in red. Figure 20: Treatment Field Definition with Highlighted Fields If you click Yes, the existing parameters are overwritten, including parameter settings that do not match. If you click No, MOSAIQ does not capture the console parameter settings, but it does capture other settings, such as the gantry/collimator. Copyright 2010, Elekta Impac Software LUGMSQ0002/4.0/23-Sep-2010 97 MOSAIQ User’s Guide If the MU differs, the MU Information message box opens, shown in Figure 21. Figure 21: MU Information Message Box This indicates the MU on the treatment machine does not match the MU for the treatment field definition in MOSAIQ. 7. If the MU Information message box displays, click OK. Note that the MU in the treatment field did not change. If the MU value on the linear accelerator is the correct value, you must manually change the MU in the treatment field definition. 8. Click OK to save parameters to the treatment field definition or click Cancel to keep the original parameter settings. Changing a Treatment Field You may need to change a treatment field definition if, for example, some element of the linear accelerator characterization changes or if the patient treatment plan changes. CAUTION To change a treatment field, you must have Clinical | Field Defs | Modify rights. 1. In the Diagnoses and Interventions window, double-click the treatment field to change. 2. In the Treatment Field Definition dialog box, change the treatment field. Any changes you make to the treatment field definition apply when you treat the patient. Elekta/Impac recommends that you review any CAUTION changes to make sure they are correct BEFORE treatment. 3. Click OK to save your changes. 98 Copyright 2010, Elekta Impac Software LUGMSQ0002/4.0/23-Sep-2010 CHAPTER 5: MOSAIQ Radiation Oncology Clinical Charting Approving a Treatment Field Once you add and change a treatment field, approve the treatment field before you treat the patient. In fact, depending on how you have configured MOSAIQ, you may not be able to treat the patient using an unapproved field. Once you have approved a field, you cannot remove it, though you can make changes to the field. If you change an approved field, the status of the field automatically changes to Unapproved. CAUTION To approve a treatment field, you must have Clinical | Field Defs | Approve rights. Always review all data before you approve a treatment field. WARNING 1. In the Diagnoses and Interventions window, double-click the treatment field to approve. 2. In the Treatment Field Definition dialog box, right-click in the dialog box or press F4 to open the Options menu. 3. Click Approve… to open the Approve Treatment Field Definition dialog box. 4. Type your password in the Password field, then click OK to approve the treatment field. 5. In the Treatment Field Definition dialog box, click OK to save the change to the treatment field. Viewing the Field Delta View The Field Delta window lets you view recent changes to a treatment field. 1. Double-click the treatment field in the Diagnoses and Interventions window. 2. Right-click or press F4 in the Treatment Field Definition dialog box. 3. Select Field Delta. The Field Delta View window opens in read only mode, shown in Figure 22. Copyright 2010, Elekta Impac Software LUGMSQ0002/4.0/23-Sep-2010 99 MOSAIQ User’s Guide Figure 22: Field Delta View for a Treatment Field Changes between versions are highlighted in yellow. You can go back to a previous version of the field by clicking Rollback. You cannot use the Roll Back option if the field was approved or treated. You cannot edit fields in the Field Delta View dialog box. Refer to Field Delta View in Chapter 9, SEQUENCER, on page 263 for the interactive mode. 4. In Field Delta View dialog box, click Close. 100 Copyright 2010, Elekta Impac Software LUGMSQ0002/4.0/23-Sep-2010 CHAPTER 5: MOSAIQ Radiation Oncology Clinical Charting Reviewing IMRT Intensity Modulated Radiotherapy Treatment lets you deliver multi-control point treatments. Control points are specific points during a beam-on at which the linac changes position or collimation. MOSAIQ supports 2 IMRT types, Step and Shoot, and Sliding Window. Step and Shoot plans beam-off briefly between linac movements. Sliding Window fields keep the initial beam-on during the treatment. You can see controls in the Treatment Field Definition dialog box when you select a field with multiple control points. You can show and browse through all control points for both Arc and dynamic dose MLC treatment fields. You can zoom the BEV and still use the navigation controls. 1. In the Diagnoses and Interventions window, double-click the treatment field to open the Treatment Field Definition dialog box for the selected IMRT treatment field. Notice the IMRT section displays instead of the MLC check box and Enlarge/Edit Beam’s Eye View. Also, the Asy check boxes for Jaw X1 and Jaw Y1 do not display because they do not apply to this treatment field. 2. Click in the IMRT section to show a list the control points for this treatment field, as shown in Figure 23. Figure 23: Control Point List for a sliding window IMRT Field 3. Click in the IMRT section to show the IMRT sequence in the viewer as if the treatment machine is executing the plan. 4. Click to stop the test run of the IMRT sequence in the viewer. 5. Click , then to navigate to other control points, displaying an image of the plan for the selected control point in the viewer, and the point, index, and MU data in the IMRT section. to show an image of the plan for the last control point in the viewer and the 6. Click point, index, and MU data in the IMRT section. 7. Click to show an image of the plan for the first control point in the viewer and the point, index, and MU data in the IMRT section. Copyright 2010, Elekta Impac Software LUGMSQ0002/4.0/23-Sep-2010 101 MOSAIQ User’s Guide 8. Right-click, then click Enlarge/Edit Beam’s Eye View…, or click in the viewer, to open the Beam’s Eye View dialog box for the IMRT plan. Notice the same IMRT section in the Treatment Field Definition dialog box displays in the Beam’s Eye View dialog box. You cannot change an imported IMRT plan in Beam’s Eye View. 9. Click Cancel to close the Beam’s Eye View dialog box. 10. Right-click, then click Display Shaped Port… to open the Beam’s Eye View for the IMRT shaped port. The Shaped Port is the outermost leaf positions for the IMRT treatment field. It is also called the CIAO, completely irradiated area outline. 11. Click Cancel to close the Beam’s Eye View dialog box. 12. Right-click, then click Import… to open the Treatment Field Definitions window. The Treatment Field Definitions window enables you to import parameters from another treatment field definition into the current definition. Notice that only plans with MLC fields are listed, including MLC fields that are not IMRT. If any of the MLC fields include a field shape, it is indicated in the Shape section. 13. Click Close to close the Treatment Field Definitions window. Site Setup Definition You use the site setup feature to add a new site setup definition. Your facility must have eCHART registered to use Site Setup. Adding Site Setup Definition You use the Site Setup Definition window to add patient positioning and image reference data into a treatment site for subsequent treatment verification. Patient orientation is necessary to communicate shifts/offsets in patient coordinates and translate isocenter changes from patient coordinates to machine coordinates for couch calculations. Site Setup Definitions can be imported or manually created. CAUTION To add or change an unapproved site setup, you must have Clinical | Site Setup Def | Modify rights. 1. Open the chart for your patient, then open the Diagnoses and Interventions window. 102 Copyright 2010, Elekta Impac Software LUGMSQ0002/4.0/23-Sep-2010 CHAPTER 5: MOSAIQ Radiation Oncology Clinical Charting 2. Select the radiation prescription folder to which you want to add a site setup, and then click Site Setup to open the Site Setup Definition window. The Setup Name is the name of the site setup definition and this is same as the name of the radiation prescription. 3. Select a valid patient orientation on the couch from the Patient Orientation drop-down list. For e.g., Head In, Supine. 4. Select the linear accelerator or proton machine to which the site setup applies from the Machine drop-down list. 5. Select the appropriate tolerance table to apply to the site setup definition from the Tolerance drop-down list. There are separate tolerance tables for Proton Site Setups and Conventional Site Setups. 6. Click Setup tab. In the Setup Instructions text box you can add free-form text that identifies setup information that is not covered elsewhere such as which treatment sites the setup is valid for. You can type a maximum of 2000 characters. 7. Click the Images/Reference Data tab. The Reference Images group shows DRR or simulator images that belong to the currently selected patient. 8. In the Volume Reference Data group, select the structure set that you want to associate with the Prescription Site from the Structure Set drop-down. 9. Click Set Isocenter check box and set the X, Y, and Z isocenters to the values from the structure set you selected. 10. Click the Exclude from treatment check box so that it is not checked. 11. Click OK to add site setup definition into the treatment site and close the Site Setup Definition window. Approving Site Setup Definition You use the Approve dialog box to authenticate and approve the site setup definition. CAUTION To change an approved site setup, you must have Clinical | Site Setup Def | Approve rights. 1. Open the chart for your patient, then open the Diagnoses and Interventions window. 2. Select the Site Setup definition you want to approve, and then click Change to open the Site Setup Definition window. 3. Enter all the information in the required fields and click Approve to open the Approve dialog box. 4. Enter your user name in the User field. Copyright 2010, Elekta Impac Software LUGMSQ0002/4.0/23-Sep-2010 103 MOSAIQ User’s Guide 5. Enter your password in the Password field. 6. Click OK to complete the approval process and close the Site Setup Definition window. 104 Copyright 2010, Elekta Impac Software LUGMSQ0002/4.0/23-Sep-2010 CHAPTER 5: MOSAIQ Radiation Oncology Clinical Charting Setting Up Dose Tracking Once you have added the diagnosis, Care Plan, prescription, and treatment fields, you use the Dosimetry feature to create primary dose tracking sites. This feature also assigns default coefficients for field contributions to the primary dose tracking sites. You can not only track doses from the current prescription site, but also doses from other past or current prescription sites. Dose tracking sites enable you to monitor and track cumulative dose delivered to sites when treating prescription sites and treatment fields. The Dosimetry Setup window automatically displays Primary Dose Tracking sites and Cumulative Primary Dose Tracking Sites. You can also add Secondary Dose Tracking Sites and Secondary Cumulative Dose Tracking sites to the Dosimetry Setup window. This enables you to monitor and track dose to all sites related to the prescribed site. Creating Primary Dose Tracking Sites The Dosimetry feature creates dose tracking sites from the field and prescription information. Primary Dose Tracking Sites are defined automatically. The Primary Dose Tracking Site dialog box enables you to enter or change the prior dose and add a note for the selected dose tracking site. CAUTION To create a primary dose tracking site, you must have Clinical | Coefficients | Modify rights 1. Open the chart for your patient, then open the Diagnoses and Interventions window. 2. Click Dosimetry or right-click in the Diagnoses and Interventions window, then click Dosimetry… to open the Dosimetry Setup Information window. The Dosimetry Setup Information window appears if you select Dosimetry option for the first time after a prescription site has been added. The Dosimetry Setup Information shows the prescription sites, treatment fields, and cumulative dose sites that have not been setup before or those that have been changed. Dose tracking is automatically set up for the prescription, and dose coefficients are automatically assigned for each treatment field, with a default coefficient of 1.000. Dose coefficients define the relative dose contribution of a treatment field or radiation prescription to a volume of interest. This window also shows details of any missing information for newly defined prescription sites or treatment fields, as well as identifying those fields for which coefficients have already been generated. If you change the prescription site or add/change treatment field(s), you can click the Dosimetry… button again and MOSAIQ automatically changes primary dose tracking sites, and recalculates dose coefficients. Copyright 2010, Elekta Impac Software LUGMSQ0002/4.0/23-Sep-2010 105 MOSAIQ User’s Guide 3. Click OK to open the Dosimetry Setup window. The Dosimetry Setup window has two sections. The table in the top section shows cumulative dose tracking site information, assigning the relative contribution of prescription site doses to cumulative dose tracking sites. The table in the bottom section shows direct dose tracking site information, assigning the relative contribution of treatment field doses to direct dose tracking sites. Cumulative Primary Dose Tracking Sites (in the upper section) and Primary Dose Tracking Sites (in the lower section) are defined in the prescriptions. You cannot remove or edit the names of Cumulative Primary or Primary dose tracking sites in the Dosimetry Setup window. Use the buttons in the Dose Site and Coefficient groups to add, change, and remove dose site and coefficient information in the top and bottom sections of the Dosimetry Setup window. Or Highlight a cell and double-click to insert, change, or delete dose coefficient. Or Click on list box header in a particular column to edit dose tracking site information. 4. Double-click near the Prior: field in the CumRx: dose site column. 5. Click Note to add information about the prior dose delivered to this site outside of the department’s EMR. 6. Click OK to save the note and show the Dosimetry Setup window. 7. Double-click near the Prior: field for Rx: dose site column. 8. Click Note to add information about the prior dose delivered to this site outside of the department EMR. 9. Click OK to save the note and show the Dosimetry Setup window. 10. Click Close to close the Dosimetry Setup window. 106 Copyright 2010, Elekta Impac Software LUGMSQ0002/4.0/23-Sep-2010 CHAPTER 5: MOSAIQ Radiation Oncology Clinical Charting Adding Secondary Dose Tracking Sites You can have MOSAIQ track dose delivered to non-prescription or secondary sites, such as critical structures. This also enables you to make sure patients receive the exact dose that is necessary. There are Cumulative Secondary Dose Tracking Sites and Secondary Dose Tracking Sites. Although you can define an unlimited number of sites, a maximum of 21 dose tracking site columns can appear at a time. This includes 21 CumRx: and Cum: dose tracking site columns. You can configure them to show the most applicable dose tracking sites. 1. In the Diagnoses and Interventions window, click the radiation prescription, then click Change to open the Radiation Prescriptions dialog box. 2. Click Dosimetry. 3. Double-click Add New Dose Tracking Site in the upper section of the Dosimetry Setup window, or click in the Add New Dose Tracking Site column, then click Add. 4. In the Cumulative Secondary Dose Tracking Site dialog box, type a name for the Cumulative Secondary Dose Tracking Site in the Site Name: field. Cumulative Secondary Dose Tracking Sites track the dose contribution to another site, such as a critical structure, that is accumulating from the prescription site. Secondary Dose Tracking Sites track dose contributions to any point or volume (not prescribed) within the field. These include off-axis points and critical structures. 5. Click OK. 6. Double-click Add New Dose Tracking Site in the lower section of the Dosimetry Setup window, or click in the Add New Dose Tracking Site column, then click Add. 7. In the Secondary Dose Tracking Site dialog box, type a name for the Secondary Dose Tracking Site in the Site Name: field. 8. Click OK to save the secondary dose tracking site. Copyright 2010, Elekta Impac Software LUGMSQ0002/4.0/23-Sep-2010 107 MOSAIQ User’s Guide Adding and Changing Dose Coefficients Dose coefficients define the relative dose contribution of a treatment field or radiation prescription to a volume of interest. As stated earlier, a default dose coefficient of 1.000 is automatically assigned to each treatment field when dose tracking is set up for the prescription. This indicates a 1:1 relationship between the dose tracked to the treatment field and the secondary site. You can set up multiple coefficients for a single field. For example, if you start the first day of treatment delivering a specified dose to a site, then add a block to the setup halfway through the treatment schedule, you can specify a different coefficient to be effective on the day you start using the block. You can also change the coefficient for secondary sites, which normally do not receive the same dose as the prescription site. 1. In the Dosimetry Setup dialog box, double-click the first field under the Sec: dose site column, then press TAB, or click in the column, click Add, then press TAB. 2. Double-click 1.000 that you just entered in the Sec: dose site column, or click 1.000, then click Change. 3. Type the new dose coefficient, then press TAB. 4. Click in the Cum dose site column, right-click, then click Edit Coefficients… to open the Dose Coefficient dialog box. You can use the Dose Coefficient dialog box to add and change coefficients. You can specify the date to start the dose calculation if it differs from the treatment start date. You can also add an effective date to an existing coefficient. 5. Click adjacent to the Start Date field. 6. In the Calendar dialog box, select a date, then click OK. 7. Type a dose coefficient, then press ENTER to open the Dose Coefficients window. You can use the Dose Coefficients window to set up new dose coefficients for a field and to edit the effective date of existing fields. 8. Click Add to open the Dose Coefficient dialog box. 9. Click adjacent to the Start Date field. 10. In the Calendar dialog box, select a date, then click OK. 11. In the Dose Coefficient dialog box, type the new coefficient, then press ENTER. 12. Click Close. 108 Copyright 2010, Elekta Impac Software LUGMSQ0002/4.0/23-Sep-2010 CHAPTER 5: MOSAIQ Radiation Oncology Clinical Charting Adding Prior Dose If you know the quantity of dose administered to a site before you record the site in MOSAIQ, you can record the prior dose in the Dosimetry Setup window. Prior dose may be, for example, from a patient treatment at another facility. 1. In the Dosimetry Setup window, double-click the Prior: column header for any of the primary or secondary dose tracking site columns. This includes Cumulative Primary and Cumulative Secondary dose tracking site columns. The Cumulative Secondary Dose Tracking Site window appears. 2. In the dialog box for the selected dose tracking site, type the dose delivered to this site outside of the department EMR in the Prior Dose field. 3. In the Cumulative Secondary Dose Tracking Site window, Click Note. 4. Enter a note regarding the prior dose if needed, then click OK. 5. Click OK. Defining Total Cumulative Dose and Dose Tracking Sites Once you have assigned the course/Care Plan and created the radiation prescription(s), you can use the Dosimetry feature to create dose tracking sites from treatment field and radiation prescription information. 1. In the Radiation Prescriptions dialog box, click Change. 2. Enter the total dose for the prescription site, including the dose being administered to this site from other prescriptions in the Total Cum field under Dose Limits section. 3. Click OK. 4. Click Dosimetry. 5. In the Dosimetry Setup Information window, click OK. 6. In the Dosimetry Setup window, double-click each row of the CumRx: column to add the dose coefficient. 7. In the Radiation Prescriptions dialog box, click Change and enter the total dose for the prescription site, including the dose being administered to this site from other prescriptions. Copyright 2010, Elekta Impac Software LUGMSQ0002/4.0/23-Sep-2010 109 MOSAIQ User’s Guide Using Dose Site Summary CAUTION You must have Clinical | Tx Status View security rights to view the Dose Site Summary window. Click eChart | Radiotherapy Treatment... | Summary, or eChart | Diagnoses and Interventions…, press F4 or right-click, then select Dose Site Summary... to open the Dose Site Summary window. The Dose Site Summary shows the radiation dose administered to each treatment site defined as a dose tracking site. You can add secondary dose tracking sites to the table list from the Dosimetry Setup window and the Secondary Dose Tracking Site dialog box. You can add/change/delete Dose Actions Points with the Action button. Creating Dose Action Points Once you have created dose tracking sites, you can add Dose Action Points. When you use eCHART to track dose to patients under treatment, you can use the Dose Action Points feature to automatically warn you when a specified dose is approaching at a specified site. 1. In the Dosimetry Setup window, click Action to open the Dose Action Points window. The Dose Action Points window lists all past and current Dose Action Points created for the patient. Depending on the View selected, you can view all Dose Action Points, only acknowledged Dose Action Points, or only unacknowledged Dose Action Points. 2. Click Add to open the Dose Action Point dialog box. You can add a new Dose Action Point or change an existing one. The only two required fields are Dose Site and Comment. While it is not a required field, also type the Action Dose or the dose at which the action entered in the Comment field should be performed. If you do not type the Action Dose, then it is zero. adjacent to the Dose Site field, then select the dose site for which to create a 3. Click Dose Action Point. 4. Type the Action Dose field or the dose at which the Dose Action Point is triggered. 5. The Lead Dose field displays the dose quantity that is subtracted from the Action Dose and the Dose Action Point becomes active. Active Dose Action Points trigger notification at treatment delivery that an Action Point is approaching. If Use Default check box is checked, the default lead dose specified in the Department Setup dialog box is entered. 6. In the Dose Action Point Type group, click the option button to specify the type of Dose Action Point: Standard, or Mandatory, or Dose Limit. A standard Dose Action Point shows an alert after the Action Dose is reached, but you do not have to acknowledge it to continue with treatment. You must acknowledge a mandatory Dose Action Point to continue with treatment. Dose Limit Dose Action Points (DAP) are mandatory and continue to trigger warning notes during treatment delivery even after acknowledgment. 7. Type the action in the Comment field. 110 Copyright 2010, Elekta Impac Software LUGMSQ0002/4.0/23-Sep-2010 CHAPTER 5: MOSAIQ Radiation Oncology Clinical Charting 8. Click OK. 9. In the Dose Action Points window, click Close, then click Close. Creating Dose Limit Dose Action Points There are three types of Dose Action Points: Standard, Mandatory, and Dose Limit. Dose Limit dose action points are mandatory dose action points that make a duplicate dose action point each time you acknowledge them. This makes sure therapists see the alert each time they treat the patient. To close a Dose Limit dose action point and stop the alert, you must change it to a Standard or Mandatory dose action point, then acknowledge it. Mandatory dose action points do not appear after you acknowledge them. You do not have to acknowledge a Standard dose action point. MOSAIQ can track dose delivered to critical structures, such as the heart or spine, called secondary sites. You can specify maximum doses to critical structures and make sure patients receive the exact dose necessary. 1. In the Radiation Prescriptions dialog box, select the radiation prescription for which to add a Dose Limit Dose Action Point, then click Change. 2. In the Dose Limit group, click Other to open the Dose Limits window. The Dose Limits window shows all of the Dose Limit Dose Action Points for the selected patient and lets you to create, change, or remove Dose Limit Dose Action Points. You can create one of the three different types of Dose Action Points namely: Standard, Mandatory, or Dose Limit. 3. Click Add to open the Dose Limit dialog box. You can create a dose action point from the Radiation Prescription dialog box. Dose Limit Dose Action Points are mandatory Dose Action Points which produce a duplicate Dose Action Point on acknowledgement, maintaining an alert to users. 4. Type a new cumulative dose tracking site name to create a new dose tracking site or select the Dose Tracking Site from the list. 5. Type the maximum dose for the dose tracking site in the Dose Limit field. 6. Type a mandatory Comment for the Dose Limit Dose Action Point. 7. Click OK. 8. In the Dose Limits window, click Close. 9. In the Radiation Prescriptions dialog box, right-click in the dialog box or press F4, then click Dose Action Points…. 10. Click Close. 11. In the Radiation Prescriptions dialog box, click Cancel, then click Dosimetry. Copyright 2010, Elekta Impac Software LUGMSQ0002/4.0/23-Sep-2010 111 MOSAIQ User’s Guide Using the Treatment Calendar The Treatment Calendar is a powerful tool that you can use to create treatment sessions so your therapists can see which fields to treat on which days, and when to take portal images. You can do more than just schedule and treat. You can also use its layout to better track treatments — doses, portal images and more. You can easily assign multiple prescription treatments or single prescriptions with alternating field patterns, schedule portal images, and more. Scheduling Treatment Sessions You can do more than schedule treatment sessions for a single radiation prescription. You can schedule treatment sessions for multiple prescriptions, single prescriptions with alternating patterns, and BID treatment sessions. In addition, you can schedule portal images, move treatment sessions, change treatment field order, and more. Scheduling Treatment Sessions for a Single Prescription Single prescription treatment sessions are the simplest of sessions to insert and schedule. 1. Click , then click Tx Calendar to open the Treatment Calendar window. The Treatment Chart window has two views: the Treatment Calendar for planning radiation therapy treatments, and the Treatment Chart for reviewing historic and planned treatments and initiating treatment delivery or QA Mode sessions. The Insert Sessions tab enables you to add new sessions and appears first if the patient has no planned treatment sessions. You can schedule the sessions based on the patient prescribed fractionation or use the Wave Setup Form instead. 2. In the Insert Sessions tab, click For Course n Prescription(s) if it is not already selected. 3. Click adjacent to the field to the right of the For Course n Prescription(s) radio button, then click the prescription site for which to schedule sessions. If you had selected another care plan, for example, Course 3, the radio button would have read: For Course 3 Prescription(s). 4. Type the date on which to start treatment for this prescription in the Start Date field. 5. Click Insert Sessions for Course 1. 6. In the Results of Insert Sessions message box, click OK. 7. In the Insert Sessions tab of the Treatment Calendar window, click Schedule All Fields >> to open the Fields To Be Scheduled dialog box. The Fields To Be Scheduled dialog box shows all the radiation prescriptions associated with the Course you selected from the Diagnoses and Interventions window and its treatment fields. 8. Click the prescription site or individual treatment fields, then click Add >>. 112 Copyright 2010, Elekta Impac Software LUGMSQ0002/4.0/23-Sep-2010 CHAPTER 5: MOSAIQ Radiation Oncology Clinical Charting 9. Click OK. The Schedule Fields tab is active and shows the fields you just selected. You can define a set and sequence of fields to schedule in the selected session(s). If you have not yet defined the field sets when you click this tab, the Fields To Be Scheduled dialog box opens. 10. In the Schedule Fields tab of the Treatment Calendar window, click Schedule Fields. Scheduling Treatment Sessions for Multiple Prescriptions Frequently patients have more than one radiation prescription site. For example, a primary radiation site and a boost or cone down prescription site follows the primary prescription site. 1. In the Treatment Calendar window, click Select Sessions tab. 2. In the Select Sessions tab, click For Course n Prescription(s) if it is not already selected. 3. Click adjacent to the field to the right of the For Course n Prescription(s) radio button, then click All. 4. Type the date on which to start treatment for this prescription in the Start Date field. 5. Click Insert Sessions for Course 1. 6. In the Results of Insert Sessions message box, click Yes, then OK. 7. In the Insert Sessions tab of the Treatment Calendar window, click Schedule Multiple Field Sets >>. The Select Sessions tab lets you select all or a subset of the planned sessions by entering a set of criteria. The tab appears first if the patient has planned treatment sessions. Once you select your sessions, you can schedule fields for the selected sessions, change fields, change sessions, remove sessions, schedule or change portal imaging, or change the status of sessions. 8. In the Select Sessions tab, click the Prescription check box, click to the right of the check box, then click the prescription site. adjacent to the field 9. Click Schedule Fields To Be Treated in These Sessions >>. 10. In Fields To Be Scheduled dialog box, click the prescription site or treatment fields, then click Add>>. 11. Click OK. 12. In the Schedule Fields tab of the Treatment Calendar window, click Schedule Fields. 13. Click << Next Sessions. 14. Repeat Steps 8 to 13 for the each additional prescription site. Copyright 2010, Elekta Impac Software LUGMSQ0002/4.0/23-Sep-2010 113 MOSAIQ User’s Guide Scheduling Treatment Sessions for a Single Prescription with an Alternating Pattern Patients can have a single prescription site with an alternating treatment field pattern. For example, one set of fields uses a bolus or wedge and the other set does not. 1. In the Treatment Calendar window, insert treatment sessions for the prescription site. 2. In the Insert Sessions tab, click Schedule Multiple Field Sets >>. 3. In the Select Sessions tab, click the Repeating check box. 4. Type the number of treatment fields that comprise the ON pattern in the On field. 5. Type number of treatment fields that comprise the OFF pattern in the Off field. 6. Click Schedule Fields To Be Treated in These Sessions >>. 7. In the Fields To Be Scheduled dialog box, add the treatment fields for the ON pattern to the Fields to be Scheduled panel, then click OK. 8. In the Schedule Fields tab of the Treatment Calendar window, click Schedule Fields. 9. Click << Next Sessions. 10. In the Select Sessions tab of the Treatment Calendar window, click the Repeating check box, then click the Invert check box. 11. Click Schedule Fields To Be Treated in These Sessions >>. 12. In the Fields To Be Scheduled dialog box, add the treatment fields for the OFF pattern to the Fields to be Scheduled panel, then click OK. 13. In the Schedule Fields tab of the Treatment Calendar window, click Schedule Fields. Scheduling Treatment Sessions for Overlapping Treatments Overlapping or concomitant treatments involve overlapping treatment by different radiation prescriptions. For example, a secondary prescription, such as a cone down or boost, may overlap the primary radiation prescription by five or ten days. 1. In the Treatment Calendar window, insert the first prescription of the site treatment sessions. 2. Click Insert Sessions tab, then click For Course n Prescription(s) if it is not already selected. 3. Click adjacent to the field to the right of the For Course n Prescription(s) radio button, then click the prescription site. 4. Type the date on which to start the overlapping treatment sessions in the Start Date field. 5. Click Insert Sessions for Course 1. 6. In the Results of Insert Sessions message box, click OK. 7. In the Insert Sessions tab of the Treatment Calendar window, click Schedule Multiple Field Sets >>. 114 Copyright 2010, Elekta Impac Software LUGMSQ0002/4.0/23-Sep-2010 CHAPTER 5: MOSAIQ Radiation Oncology Clinical Charting 8. In the Select Sessions tab, click the Prescription check box, then click the prescription site of the overlapping treatment. 9. Click Schedule Fields To Be Treated in These Sessions >>. 10. In the Fields To Be Scheduled dialog box, add the overlapping treatment fields to the Fields to be Scheduled panel, then click OK. 11. In the Schedule Fields tab of the Treatment Calendar window, click Schedule Fields. Scheduling BID Treatment Sessions 1. In the Treatment Calendar window, click Insert Sessions tab. 2. In the Insert Sessions tab, click For Course n Prescription(s) if it is not already selected. 3. Click adjacent to the field to the right of the For Course n Prescription(s) radio button, then click the BID prescription site. 4. Type the date on which to start treatment in the Start Date field. 5. In the Insert Sessions tab of the Treatment Calendar window, click Insert Sessions for Course 1. 6. In the Results of Insert Sessions message box, click OK. 7. In the Insert Sessions tab of the Treatment Calendar window, click Schedule All Fields >>. 8. In the Fields To Be Scheduled dialog box, add the treatment fields to schedule, then click OK. 9. In the Schedule Fields tab of the Treatment Calendar window, click Schedule Fields. Deleting Treatment Sessions in the Treatment Calendar If you make a mistake in the patient Treatment Calendar or have treatment sessions scheduled that are not necessary, you can remove treatment sessions and their fields. You cannot remove treatment sessions that you have already treated, approved, or changed to QA mode sessions. 1. In the Treatment Calendar window, click Select Sessions tab, then click All or click the treatment session(s) to delete. 2. Click Delete to open the Confirm Delete message box. 3. Click Yes to open the Information message box. 4. Click OK to delete the treatment session(s). Copyright 2010, Elekta Impac Software LUGMSQ0002/4.0/23-Sep-2010 115 MOSAIQ User’s Guide Working with Portal Images You can schedule and change portal images for a patient treatment in the Treatment Calendar. You can schedule portal images before, during, or after you treat the patient with the field. You can add a portal image and a series of portal images to an existing Treatment Calendar, add portal images while inserting treatment sessions and fields for a patient, and remove portal images. Adding a Series of Portal Images to an Established Treatment Calendar You can schedule or add a series of portal image exposures to treatment field(s) in single or multiple treatment sessions. 1. In the Treatment Calendar window, click Select Sessions tab. 2. In the Select Sessions tab, click a pattern, i.e., weekly on Tuesday, to select the treatment sessions to which to add the portal image series. 3. Click Change to open the Treatment Calendar Session dialog box. 4. Click a treatment field, then click the Pre check box in the Portal Image group to schedule a portal image before the field is treated. 5. To schedule a portal image during treatment, click a treatment field, then click the During check box in the Portal Image group. 6. To schedule a portal image after the field is treated, click a treatment field, then click the Post check box in the Portal Image group. 7. To change the scheduled treatment field to take a portal image only, click a treatment field, then click the Only check box in the Portal Image group. 8. Click OK to open the Confirm Selected Sessions Changed message box. 9. Click Yes to add the portal images. Changing a Portal Image in an Established Treatment Calendar Session In the Portal Image section you can schedule portal imaging for the selected treatment field. The check boxes can be checked if portal imaging is scheduled for the selected treatment field. You can uncheck the boxes to change the portal imaging schedule. 1. In the Treatment Calendar window, click + adjacent to the treatment session to which to change a planned portal image. 2. Click the treatment field to which to add the portal image, then click the Pre, During, Post, or Only check box in the Portal Image group to the right of the Planned and Historic Treatment List. 116 Copyright 2010, Elekta Impac Software LUGMSQ0002/4.0/23-Sep-2010 CHAPTER 5: MOSAIQ Radiation Oncology Clinical Charting Changing Treatment Session Due Dates If a patient misses a treatment session or encounters a delay in treatment, you can change the treatment session dates. You can change the dates of all treatment sessions, change just the session you select, or move the affected treatment session to the end of the treatment. Changing All Treatment Sessions’ Due Dates You can change the due date of all treatment sessions. 1. In the Treatment Calendar window, click the first treatment session, then click Change. 2. In the Treatment Calendar Session dialog box, type the new due date for the treatment session in the Due field. 3. In the Due Date Shift group, click All session after this one by. 4. Type the number of sessions in the field adjacent to the All session after this one by radio button. 5. Click Preview Shift button to open the Treatment Calendar Preview Shift dialog box. The asterisk (*) identifies the first calendar session that you want to move. An ‘X’ identifies the sessions after it. In the Shifted group, weekday dates may not have sessions scheduled if the number of shift days is excessive. In this case you can change the shift in the Days field so that weekend days are not counted. You can change the Days field in the Shift after First group until the days line up. You can also click an individual session in the Shifted group Calendar view, then drag and drop it to a different day in the Shifted group Calendar view. In the Shift After First group, the Days field is now disabled and the Ad Hoc check box appears. If you click the Ad Hoc check box so that it is not checked, the Treatment Calendar Shift Preview dialog box returns to the original Days. 6. Make any changes necessary, then click OK button to save the changes. If you used an Ad Hoc shift preview, a new check box appears in the Treatment Calendar Sessions dialog box, Ad Hoc per Preview. The Due Date Shift of All sessions after this one Day(s) field is disabled because the ad-hoc due date changes are not a strictly a shift by a certain number of days. To clear your ad-hoc changes, click Ad Hoc per Preview so that it is not checked. Preview Recommended appears and the Day(s) field is enabled with the original number of shift days and your ad-hoc changes are lost. Whether you choose to shift by a certain number of days or ad-hoc, due date changes to the Treatment Calendar are effective when you click the OK button. 7. Click OK to change the due date. Copyright 2010, Elekta Impac Software LUGMSQ0002/4.0/23-Sep-2010 117 MOSAIQ User’s Guide Changing the Due Date of One Treatment Session You can also change the due date of one treatment session so that it does not change or move the due dates of other treatment sessions. For example, you can reschedule a missed treatment to a Saturday, which would not change the due dates for other treatment sessions. 1. In the Treatment Calendar window, click the treatment session, then click Change to open the Treatment Calendar Session dialog box. You can create treatment sessions and schedule or change treatment fields and portal imaging within sessions. You can also schedule QA Mode sessions to check field accuracy before or during a course of therapy, create notes for the session(s), and change the approval status of a treatment field. 2. Type the new due date for the treatment session in the Due field. 3. In the Due Date Shift group, click No other sessions if it is not already selected. 4. Click OK to change the due date of the treatment session. Moving a Treatment Session to the End of the Treatment Calendar You can move a treatment session to the end of the patient Treatment Calendar. This is almost the same as the Add to End feature in the Wave Edit Form. A treatment session can have more than one prescription, such as a primary followed by a boost or cone down. If you move this treatment session for the primary to the end, it moves to the end of the treatment sessions. It does not move to the end of the primary’s treatment sessions. 1. In the Treatment Calendar window, click the treatment session to move to the end. 2. Click Change to open the Treatment Calendar Session dialog box. 3. In the Due Date Shift group, click Move this session to the end. 4. Click OK to move the treatment session. The Treatment Calendar automatically schedules around weekends if you move the date to the end of the treatment sessions. If your System Administrator schedules your holidays in MOSAIQ, the Treatment Calendar also automatically schedules around them. 118 Copyright 2010, Elekta Impac Software LUGMSQ0002/4.0/23-Sep-2010 CHAPTER 5: MOSAIQ Radiation Oncology Clinical Charting Working with Treatment Fields in the Treatment Calendar You can manage treatment fields within treatment sessions. For example, if you need to replace one scheduled treatment field with another, you can use the Replace Field… command of the Treatment Calendar Options menu. Adding a Treatment Field to an Established Treatment Session If necessary, you can add a treatment field to an already established treatment session using the Treatment Calendar. 1. In the Treatment Calendar window, click Select Sessions tab, then click All to select the session(s) to which to add the treatment field(s). 2. Click Change to open the Treatment Calendar Session dialog box. 3. Click Define to open the Fields To Be Scheduled dialog box. 4. Click the treatment field(s) you want to add to the treatment session(s), then click Add >>. 5. Click OK to open the Treatment Calendar Session dialog box. 6. Click OK to show the Confirm Selected Session Changes dialog box. 7. Click Yes to add the treatment field(s) to the treatment session(s). Changing the Treatment Order in the Treatment Session The order you added the treatment fields to the radiation prescription may not be the order you want to treat. You can change the treatment order from the Treatment Calendar Session dialog box. 1. In the Treatment Calendar window, click Select Sessions tab. 2. In the Select Sessions tab, click All to select the treatment session(s) whose order you want to change. 3. Click Change to open the Treatment Calendar Session dialog box. 4. Click a treatment field, then click field. or to change the order of the treatment 5. Click OK to show the Confirm Selected Session Changes message box. 6. Click Yes to change the treatment order. Copyright 2010, Elekta Impac Software LUGMSQ0002/4.0/23-Sep-2010 119 MOSAIQ User’s Guide Removing a Treatment Field from All Treatment Sessions To remove a treatment field that from all treatment sessions for a prescription field, you can use the Remove Field… command of the Treatment Calendar Options menu. You do not have to press Delete for each treatment field. 1. In the Treatment Calendar, click the treatment field that you want to remove. 2. Right-click anywhere in the Treatment Calendar to open the Treatment Calendar Options menu. 3. Click Remove Field… to open the Confirm Remove message box. 4. Click Yes to remove the treatment field. Replacing a Treatment Field for All Treatment Sessions You can replace a treatment field with a different treatment field. You use the Replace Field… command of the Treatment Calendar Options menu. 1. In the Treatment Calendar, click the treatment field that you want to replace with different treatment field. 2. Right-click in the window, then click Replace Field…. 3. In the Confirm Replace message box, click Yes. 4. In the Treatment Field Definitions window, click the treatment field to replace the other field. 5. Click Select to replace the treatment field. Working with treatment sessions from the Treatment Calendar, you can do more than insert sessions and schedule fields in the Treatment Calendar. Scheduling Treatment Sessions with Incomplete Information You can add treatment sessions and schedule treatment fields when you have no radiation prescription, or you have a radiation prescription but no treatment fields. For example, the physician has not written the radiation prescription. Or, the physician has written the radiation prescription but not the treatment fields. Or, the physician has written one radiation prescription, but not the second boost/cone down radiation prescription. 1. Right-click in the Diagnoses and Interventions window, then click Add Tx Field without Rad Rx…. 2. In the Treatment Field Definition dialog box, add field information for the new field. 3. Repeat steps 1 and 2 to add all of the fields you do not want associated with a prescription. 4. Click , then click Tx Calendar to open the Treatment Calendar window. 5. Remove the existing treatment sessions in the Treatment Calendar window, if any. 120 Copyright 2010, Elekta Impac Software LUGMSQ0002/4.0/23-Sep-2010 CHAPTER 5: MOSAIQ Radiation Oncology Clinical Charting 6. Click Insert Sessions tab, click Other, then click Wave to open the Wave Setup Form dialog box. 7. In the End group, double-click in the Times field, then type the number of sessions you want to insert. 8. Click OK to save the wave setup and show the Treatment Calendar window. 9. Click Insert Sessions for Course 1. 10. In the Results of Inserts Sessions message box, click OK to schedule the treatment sessions. Defining a Field Group First When Scheduling Treatment Sessions You can define the field group, then schedule the treatment fields and treatment sessions. 1. In the Treatment Calendar window, click Schedule Fields tab. 2. In the Fields To Be Scheduled dialog box, right-click, then click Show Treatment Fields for All Courses. 3. Add the treatment fields to make up the field group to the Fields to be Scheduled pane. 4. In the Fields To Be Scheduled dialog box, click OK. 5. In the Treatment Calendar window, Insert Sessions tab. 6. Click the Assign Fields Defined on “Schedule Fields” to each Inserted Session check box. 7. Double-click in the Start Date field, then type the date for tomorrow or keep the default date. 8. Click Other, then click Wave to open the Wave Setup Form dialog box. 9. In the End group, double-click in the Times field, then type the number of sessions you want to insert. 10. Click OK to save the number of sessions to insert and show the Treatment Calendar window. 11. Click Insert Sessions for Course 1. 12. In the Results Insert Sessions message box, click OK to insert the sessions into the treatment calendar. Copyright 2010, Elekta Impac Software LUGMSQ0002/4.0/23-Sep-2010 121 MOSAIQ User’s Guide Scheduling AFS Treatment Sessions You can specify the treatment fields you want included in treatment sessions. You can also schedule Automatic Field Sequencing (AFS) or Manual Field Sequencing (MFS) for the selected treatment session or specific field(s) in the selected treatment session. AFS automatically shows the next treatment field during the treatment session, and records all fields after treatment. Siemens Primus and Elekta Synergy: The gantry and collimator move to the next field parameters before the beam turns on. Make sure CAUTION that you correctly define the AFS treatment fields. 1. In the Treatment Calendar window, add treatment sessions for the prescription site, then click Schedule All Fields >>. 2. In the Fields To Be Scheduled dialog box, click <<AFS Group>>, then click Add >>. 3. Add the treatment fields to include in the AFS group to the Fields to be Scheduled pane. and arrows to specify which of the scheduled fields to include You can use and in what order in the AFS group. Elekta Composite Field Sequencing (CFS) delivers multiple treatment fields using a single beam-on. You can use AFS to define a CFS, which consolidates a series of separate fields into a single control point sequence. When treated as a CFS, the AFS group consists of a group of fields intended for delivery as a single composite field. 4. Click OK to close the Fields To Be Scheduled dialog box. 5. In the Schedule Fields tab of the Treatment Calendar, click Schedule Fields to schedule the AFS treatment sessions. Scheduling MFS Treatment Sessions MFS automatically shows the next treatment field during the treatment session, but you must record the treatment manually before you can treat the next field. 1. In the Treatment Calendar window, insert treatment sessions for the prescription site, then click Schedule All Fields >>. 2. In the Fields To Be Scheduled dialog box, click <<MFS Group>>, then click Add >>. 3. Add the treatment fields to include in the MFS group to the Fields to be Scheduled pane. and arrows to specify which of the scheduled fields to include You can use and in what order in the MFS group. 4. Click OK to close the Fields To Be Scheduled dialog box. 5. In the Schedule Fields tab of the Treatment Calendar window, click Schedule Fields to schedule the MFS treatment sessions. 122 Copyright 2010, Elekta Impac Software LUGMSQ0002/4.0/23-Sep-2010 CHAPTER 5: MOSAIQ Radiation Oncology Clinical Charting Scheduling a QA Mode Treatment Session In QA Mode, you can run a quality check on a treatment field without contributing to dose or fractions in the patient chart. QA mode recordings do not change field fraction counts, field dose, dose site fractions, dose, or elapsed days. When you treat a QA mode treatment session from the Treatment Chart, a message tells you that QA mode treatments do not contribute to patient dose tracking. You can schedule QA mode sessions from the Treatment Calendar or the Treatment Chart. You must have Clinical | QA/Calibration: | Modify security rights to go into QA Mode. 1. Double-click the treatment session to schedule as a QA mode treatment session in the Treatment Calendar window. 2. In the Treatment Calendar Session dialog box, right-click or press F4 to show the Options menu. 3. Click QA Mode. 4. Click OK to change the session to a QA mode session and close the Treatment Calendar Session dialog box. Approving a Treatment Session Some sites make it necessary to approve treatment fields before you can treat the scheduled treatment sessions. For added security, you can also configure MOSAIQ to make it necessary that you approve a field before treatment. 1. In the Treatment Calendar window, click the treatment session that you want to approve, then click Status. 2. In the New Status group of the Record Status dialog box, click Approved. 3. Type your password in the Password field. 4. Click OK to approve the treatment session and close the Record Status dialog box. 5. Click Select Sessions tab. 6. If you want to approve all sessions, click All, then do steps 2 through 4 again. 7. If you want to approve a specific group of sessions, click the Range check box, then do steps 8 and 9. 8. Double-click in the From field, type the number of the first treatment session you want to select, double-click in the To field, then type the number of the last treatment session you want to select. 9. Do steps 2 through 4 again. Copyright 2010, Elekta Impac Software LUGMSQ0002/4.0/23-Sep-2010 123 MOSAIQ User’s Guide Closing an Incomplete Treatment Session If you did not fully treat a patient for a session with the Treatment Calendar, you can close the incomplete session. You must first approve the treatment session before you can close it (change the status to Closed). 1. In the Treatment Chart, click Tx Calendar, then click a treatment field that you not fully treated before. 2. Click Status to open the Record Status dialog box. 3. In the New Status group, click Approved. 4. Click in the Password field, type your password, then click OK. 5. Click the treatment session you just approved, then click Status. 6. In the Record Status dialog box, click Closed. 7. Click in the Password field, type your password, then click OK to close the incomplete treatment session. Verifying and Recording Treatments Refer to Using the Verified Treatment Window in Chapter 9 on page 272 for how to verify and record treatments. Using eCHART Chart Check The eCHART Chart Check feature reports changes made to your electronic charts since the last chart check. This supports your weekly chart reviews. CAUTION To use eCHART Chart Check, you must have Clinical | Dosimetry Gen | View and Modify security rights. Reviewing the eCHART Chart Check You can run the eCHART Chart Check to review changes made to the radiation treatment chart over a selected time period. CAUTION To view the Chart Check window, you must have Administrative | General | View Security rights. 1. Open the patient chart. 2. Click eChart | Chart Check… to open the Chart Check Options dialog box. You can use the Chart Check Options dialog box to identify whether to charge for the chart check, chart check printing options, and the date from which to check the chart. 124 Copyright 2010, Elekta Impac Software LUGMSQ0002/4.0/23-Sep-2010 CHAPTER 5: MOSAIQ Radiation Oncology Clinical Charting 3. Click Current in the Patient(s) to Check group. 4. Click Prompt in the Charge group. adjacent to the Activity field and select the activity to charge for when running 5. Click the chart check. The code appears in the Activity field, with a description below it. 6. Click Prompt in the Print group if not already selected. 7. Click OK to do the chart check and then open the Chart Check window, shown in Figure 24. Figure 24: Chart Check Window The Chart Check window has 2 sections. The top section contains the information you added in the Chart Check Options dialog box. The text box shows the electronic charting information of the selected patient in blue text. You can click the blue text, then click Go There to open the applicable window or dialog box for the selected information. 8. Click Lung in blue text under the Diagnosis Checked category to select the entire line of information in the Diagnosis Checked category. 9. Click Go There to open the Diagnosis and Staging window for the selected blue text in the Chart Check window. You can also double-click the blue text. 10. Click Cancel to close the Diagnosis and Staging window. 11. Use the scroll bar to scroll through the chart check. The diagnosis, prescription, and simulations for the patient are automatically added in the table. Copyright 2010, Elekta Impac Software LUGMSQ0002/4.0/23-Sep-2010 125 MOSAIQ User’s Guide 12. Click OK to save the checklist as a patient note, and then open the Code Capture dialog box. The Code Capture dialog box opens because you added the procedure in the Activity field on the Chart Check Options dialog box. 13. Click OK to capture the code. The Print Chart Check message box opens. 14. Click Yes to print the chart check report, and then close the Chart Check dialog box. An example of the report is shown in Figure 25. Figure 25: Chart Check Report – Printed 126 Copyright 2010, Elekta Impac Software LUGMSQ0002/4.0/23-Sep-2010 CHAPTER 5: MOSAIQ Radiation Oncology Clinical Charting Reviewing eCHART Chart Check Notes You can generate an electronic patient note when you perform a Chart Check. This is a configurable feature, which you can enable in Department Setup. Such notes appear as viewonly, Admin-General notes in the Patient Notes window; however, they are automatically locked and cannot be unlocked, edited, or deleted. CAUTION To view the Patient Notes window, you must have Administrative | Notes | View Security rights. 1. Open the patient chart. 2. Click eChart | Notes… to open the Patient Notes window. The Patient Notes window enables you to view and attach notes to the electronic patient record. 3. Click All Patient Notes from the View field to show the eCHART Check note. The eCHART Check note type is automatically locked, as shown by the asterisk (*) adjacent to eChart Check in the Type column. You cannot change or remove the note. 4. Double-click the eChart Check note to open the Patient Note window. 5. Use the scroll bar to scroll through the note. 6. Right-click in the Patient Note window to open the Patient Note options menu. You can use the Patient Note options menu to send eCHART check note to the staff member or location from the MOSAIQ mail feature. You can also print a copy of the eCHART check note. 7. Click in the Patient Note window, outside of the Options menu to close the Options menu. Copyright 2010, Elekta Impac Software LUGMSQ0002/4.0/23-Sep-2010 127 MOSAIQ User’s Guide 128 Copyright 2010, Elekta Impac Software LUGMSQ0002/4.0/23-Sep-2010 MOSAIQ User’s Guide CHAPTER 6: MLC Fit The MLC Fit feature provides you with the ability to create, view, and edit geometric information that is ultimately used to generate treatment field shapes. The required implementation steps for an MLC leaf plan include: Characterizing your treatment machine - Because multi-leaf collimators are manufactured by several vendors, the system lets you pre-define the physical limits and geometric parameters of each type of multi-leaf collimator used by your center. MLC Fit then fits the leaves around the shape based on the specified machine and its associated characterization record. Calibrating your digitizer and digitizing (entering) the treatment field shape - The film digitizer provides a grid on which to place a simulation film for digitization. After using a hand-held cursor to calibrate, effectively “trace” the area you want to treat, the system provides a beams-eye view of the resulting shape based on your machine’s parameters. For additional information on digitizing an image, refer to Chapter 6, Image Management —ViewStation & Photos and Diagrams, on page 139. Creating the MLC leaf plan (specifies leaf, jaw, collimator, and gantry position information) - MLC Fit uses color to clearly indicate the defined treatment area, leaves, jaws, and any exposed area or regions of overlap, then numerically displays all the critical information and controls you need to adjust the fit. Individual leaf and jaw positions can be edited manually with the mouse or keyboard, or all the leaves can be automatically positioned using the flexible fit features. Saving and printing your plan - The system enables you to save all or a portion of the MLC leaf plan you generated and provides printed output if desired. Using your plan with the verify & record system - Upon completion, the plan is saved as part of the electronic treatment record and can therefore be used by the verify and record system to automatically set up the multi-leaf collimator during treatment, verify that the leaves are positioned according to plan, and record the actual leaf positions during treatment. MLC Leaf resolution may be characterized to 0.10 cm or 0.01 cm. MLC Fit calculates the leaf positions for a machine to a resolution of either 0.10 cm or 0.01 cm based on this MLC resolution setting in the machine characterization. MLC area calculations have sufficient internal precision to achieve the output resolution required by the characterization regardless of the computational methods CAUTION employed. MLC leaf positions are stored in the MOSAIQ database in units of 0.01 cm and displayed in MOSAIQ to a precision of 0.01 cm. Refer to your MLC manufacturer for more information. Copyright 2010, IMPAC Medical Systems LTGMSQ0002/4.0/23-Sep-2010 129 MOSAIQ User’s Guide Using MLC Fit The MLC Fit feature provides you with the ability to create, view, and edit geometric information that is ultimately used to generate treatment field shapes. To do so, MLC Fit enables you to digitize treatment field shapes, derive Multi-leaf Collimator (MLC) leaf plans from these digitized shapes, and modify those shapes within MOSAIQ. Using MLC Fit Selecting the Fit option instructs the MLC Fit feature to perform the following operations: 1. Extract the leaf sizes and position limits from the Machine Characterization record for the specified (selected) machine. 2. Automatically perform a Fit, fitting the leaves to the digitized shape using the constraint specified in the Fit Method group of the Beam’s Eye View window. 130 If the Fit Method specified is Intrusive, then the leaves are positioned so that the leading edge of each leaf is completely within the shape. Additionally, the leaf position is rounded to the resolution specified in the Machine Characterization record. If the Fit Method is Centered, then the leaves are positioned so that the center of each leaf’s leading edge crosses an edge of the shape. The leaf position is rounded to the resolution specified in the Machine Characterization record. If the Fit Method is Non-Intrusive, then the leaves are positioned so that no part of a leaf intrudes within the shape. The leaf position is rounded to the resolution specified in the Machine Characterization record. If there is no leaf position that satisfies the Fit Method constraint, then the leaf is driven to butt up against its opposing leaf. If a fitted leaf position exceeds its positional limit, then the leaf is set to the positional limit. The position of opposing, touching leaf pairs is adjusted in order to prevent opposing adjacent leaves from extending beyond each other. The Y-jaws are set to the position determined by the recommended jaw function specified in the Machine Characterization record. If a recommended jaw function is not specified in the record, then, for all fit methods, the Y-jaws are driven to their most extended position so long as they do not intrude into the shape. The X-jaws are set to the position determined by the recommended jaw function specified in the Machine Characterization record. If a recommended jaw function is not specified in the record, then, for all fit methods, the X-jaws are driven to their most extended position providing they do not extend past the end of any leaf. If a fitted jaw position exceeds its positional limit, then the jaw is set to the positional limit. The Fit is performed at the collimator angle specified in the Angle field of the Collimator group in the Beam’s Eye View window. Copyright 2010, Elekta Impac Software LUGMSQ0002/4.0/23-Sep-2010 CHAPTER 6: MLC Fit Creating an MLC Leaf Plan 1. Click eChart | Diagnoses and Interventions... to open the Diagnoses and Interventions window. If a patient is not currently selected, the Select Patient window opens. In the Select Patient window, double-click a patient, then open the Diagnoses and Interventions window. 2. Double-click the treatment field requiring an MLC definition, or click the treatment field, then click Tx Field to open the Treatment Field Definition dialog box. 3. If you want to use settings associated with another treatment field for the selected field, use the Import option to do so. Right-click or press F4 in the Treatment Field Definition dialog box, then click Import… to open the Treatment Field Definitions window. The Import option provides a list of Treatment Field Definitions having MLC fields. 4. Click the field whose settings you want to import (by double-clicking it or clicking Select in the Treatment Field Definitions window). The Treatment Field Definitions window closes and the Treatment Field Definition dialog box appears. Importing the MLC leaf plan can change the parameters of the selected treatment field. MOSAIQ changes the jaw, collimator, leaf and shape data of the current treatment field to the parameters of the treatment field you imported. After the import, you can make any necessary changes manually. 5. Select the treatment machine name from the Machine field. MLC Fit automatically applies the corresponding MLC type when you select a machine. The MLC type consists of the physical constraints and parameters controlling the behavior of MLC Fit and is part of the Machine Characterization record for the selected machine. If the parameters of the imported MLC leaf plan (or other parameters) exceed the machine characterization limits of the selected machine, an error message appears. 6. Click BEV in the Viewer group in Tx Field view of the Treatment Field Definition dialog box. 7. Click the viewer or Enlarge/Edit Beam’s Eye View to open the Beam’s Eye View dialog box. 8. Use the Collimator Angle group controls to reposition the collimator as required to obtain the desired fit. Any change made to this angle causes the leaves to automatically refit. 9. Use the Jaw group controls to manually reposition the jaws as required to obtain the desired fit. The leading edge of the currently selected jaw appears in red for editing. The value showed in the Position field reflects the position of the jaw selected for editing. 10. Use the Leaf group controls to manually reposition leaves as required to obtain the desired fit. The currently selected leaf appears in blue for editing. The selected Side indicates which side of the leaf is being edited. The Number field indicates which leaf is selected for editing. The Position field shows the position of the leaf selected for editing. You can also use Auto Fit to automatically set the collimator angle, jaws, and leaves. Copyright 2010, Elekta Impac Software LUGMSQ0002/4.0/23-Sep-2010 131 MOSAIQ User’s Guide 11. Select the desired Fit Method. If you select Intrusive constraint, then a fit is performed with an intrusive constraint and all subsequent Fits are performed with an intrusive constraint - likewise for the Centered and Non-Intrusive constraints. Intrusive changes the parameters so that more of the shape is covered and the leaves intrude into the MLC shape. Non-intrusive changes the parameters and leaf positions so that the leaves do not intrude into the MLC shape. Centered changes the parameters and leaf positions so that they partly intrude into the MLC shape. 12. Click OK to save your changes and close the Beam’s Eye View dialog box. The Treatment Field Definition dialog box opens. 13. Type the desired gantry angle in the Gantry Angle field. 14. Save your changes to the treatment field. Changing an MLC Leaf Plan Changing an MLC leaf plan is a simple process. You simply click the leaf you want to move and drag it to the desired position. Bear in mind that you are constrained by your Machine Characterization. Mouse Functions 132 Clicking the left mouse button on a leaf activates the leaf for editing. Clicking the left mouse button at a location where the active leaf could be placed moves the leading edge of the active leaf to that position. Clicking the left mouse button on a leaf and dragging the mouse within the area where the active leaf can be placed moves the leading edge of the active leaf as you move the mouse. Dragging the mouse into the leaf opposing the edit leaf butts the edit leaf into the opposing leaf (in accordance with Machine Characterization). Dragging the mouse beyond a positional limit for that leaf moves the active leaf to the positional limit. Shift-clicking the left mouse button within the area of a jaw activates the jaw for editing. For best results, always choose the central area of a jaw. Shift-clicking the left mouse button at a location where the active jaw could be placed moves the leading edge of the active jaw to that position. Shift-clicking the left mouse button and dragging the mouse to a location at which the active jaw can be placed drags the leading edge of the active jaw as you move the mouse. Shift-dragging the mouse to the edge of the opposing jaw butts the active jaw against the opposing jaw. Shift-dragging the mouse beyond a positional limit for that jaw moves the active jaw to the jaw positional limit. Copyright 2010, Elekta Impac Software LUGMSQ0002/4.0/23-Sep-2010 CHAPTER 6: MLC Fit MLC Conversion MOSAIQ Intelligent [MLC] Conversion attempts to convert a static MLC leaf plan for a particular machine to an equivalent plan for a different machine by mapping the leaves. In general, if the source and target machines have equivalent leaf widths, then MOSAIQ can map the leaves. Leaf mapping preserves manual edits as long as they remain within positional limits. If the leaves cannot be mapped, then MOSAIQ will attempt to fit the leaves if the following conditions are met: the field is a Static MLC (dynamic fields cannot be converted), MLC Fit is a registered feature, and Shape record is present and a fit method is available. When a fit is performed, any manual edits to the leaf positions are lost. If neither leaf mapping (Intelligent Conversion) nor a fit can be performed in conjunction with a machine change, then a simple 1:1 mapping will occur, and in most cases results in an inappropriate MLC leaf field. Warning messages will appear in all cases in which direct leaf mapping cannot be performed. In the case in which the source machine is equipped with a 120 leaf MLC and the target machine has either a 52 or 80 leaf MLC, MOSAIQ provides 3 options to handle the 2 to 1 mapping required by the 0.5 cm leaves. Intrusive The relative positions of adjacent 0.5 cm leaves are mapped to match the leaf that is extended furthest. Average The relative positions of adjacent 0.5 cm leaves are averaged. Retracted The relative positions of adjacent 0.5 cm leaves are mapped to match the leaf that is most retracted. If it is necessary to use MLC Fit and you want to preserve manual edits, you must copy the field before changing machines. When MOSAIQ is connected to the new machine, you can then run MLC Fit on the original plan and recover your edits from the copied field. Copyright 2010, Elekta Impac Software LUGMSQ0002/4.0/23-Sep-2010 133 MOSAIQ User’s Guide Digitizing a Treatment Field Shape While the verify and record system supports machines equipped with MLCs by automatically setting up leaf positions according to a pre-defined plan and recording their positions during treatment, MLC Fit streamlines the process by enabling you to generate the actual multileaf collimator data as well. Using MLC Fit, you can digitize treatment field shapes and generate MLC leaf plans using these digitized shapes. MLC Fit uses leaf, jaw, collimator, and gantry position information to specify geometry. For additional information on digitizing a treatment field, Chapter 6, Image Management — ViewStation & Photos and Diagrams, on page 139. Graphical Elements and Controls The following display conventions are followed: Green the leaves Yellow the treatment field shape Turquoise the jaws Blue the leaf currently active for editing Dark Blue Leading Edge the jaw currently active for editing Red the isocenter crosshairs Window and Level Control Use to adjust the darkest and lightest values in the displayed image to obtain the desired contrast and/or detail. Click anywhere in the control and drag to the left or right to make adjustments. Image Underlay You must have at least Clinical | Field Defs | View and Image | ViewStation | Images | View Security rights for the image to CAUTION appear. You can enable Image Underlay by checking the Enable Image Underlay check box in Department Setup. When enabled and the criteria described below are met, the current reference image for the patient appears beneath the shaped field or, for historical views, the reference image that was viewable at the time of treatment. The Display Image option must be enabled from either the Treatment Field Definition dialog box, or the Beam’s Eye View dialog box. If you disable this option from either dialog box, the image is hidden. You must also click the Use for Tx Definition check box in the Image dialog box. This check box is only available after the simulator image or DRR has been reticle scaled. 134 Copyright 2010, Elekta Impac Software LUGMSQ0002/4.0/23-Sep-2010 CHAPTER 6: MLC Fit The display may be affected by the current image state: If you change the gantry angle, couch angle, or couch top using edit controls, capture settings, or import, the Reference Image becomes unavailable. Geometry display in Image: Check to show the treatment geometry on the image, and uncheck to hide the treatment geometry layer. This check box is only available when the following ten conditions occur: The image is for the currently selected patient. The image is a Simulator or DRR image. The image is not an image series. The image is enabled for Tx Definition. The image is a reference image and is reticle-scaled and has square pixels. The image is associated with the currently selected field, and the treatment machine assigned to the field is characterized. The treatment geometry comes from the associated treatment field definition. The Shadow filter is not applied. The image does not have an incomplete Re-Image change request. The image is not voided. The image is not archived. MOSAIQ alerts you when the image is archived. MOSAIQ alerts you when you manually display reference image for the first time because it did not automatically appear. MOSAIQ alerts you when another user edits the image between the time you opened the Beam’s Eye View dialog box and attempt to save, aborting the save and keeping the Beam’s Eye View dialog box open. You can only close the dialog box by canceling. You can change the Vertical, Lateral, and Longitudinal couch parameters, and the reference image remains available. Beam’s Eye View Calibration Point Digitization The Beam’s Eye View Calibration Point Digitization dialog box prompts you to digitize a point and gives the coordinates of the point digitized. After digitizing each point, a “beep” sounds and you are prompted to enter the next point. Upon digitizing the second point the transformation parameters are computed. After digitizing the third and fourth points, the scaled digitized values are compared with the specified values. If the scaled value is not within the specified tolerance of the desired value, the calibration process terminates. Beam’s Eye View Shape Rotation This dialog box enables you to enter a new angle to rotate the treatment shape. If the orientation of the reticle angle was incorrect when you digitized the treatment shape, you can simply rotate the shape using this dialog box instead of digitizing a new shape. Copyright 2010, Elekta Impac Software LUGMSQ0002/4.0/23-Sep-2010 135 MOSAIQ User’s Guide Beam’s Eye View Calibration Setup You can digitize a treatment field shape using your mouse or a digitizer tablet that is connected to your workstation. If you choose the latter, you must calibrate your digitizer before digitizing each shape entered into MLC Fit. This process begins when you open the Beam’s Eye View Calibration Setup dialog box. The Beam’s Eye View Calibration Setup dialog box is where you select your digitizing device, choose a fit method for the placement of the leaf edge, and if you are using a digitizer tablet, set up the calibration points. In order to account for scaling, translation, and rotation of the film coordinate system relative to the digitizer coordinate system, you must digitize four calibration points with known film coordinates. Logical Context The Logical Context dialog box enables you to verify that the digitizer software is loaded properly. If the digitizer software is loaded properly, click View Packet to verify that MOSAIQ is receiving data from the digitizer. Packet Data If the digitizer software is loaded properly, the Packet Data dialog box enables you to verify that MOSAIQ is receiving data from the digitizer. Digitizing a Treatment Field Shape 1. Click eChart | Diagnosis and Interventions.... If a patient is currently selected, the Diagnoses and Interventions window opens. If a patient has not been selected, the Select Patient window opens. Click a patient, after which the Diagnoses and Interventions window opens. 2. Open the Treatment Field Definition dialog box for the treatment field. 3. Click Enlarge/Edit Beam’s Eye View to open the Beam’s Eye View dialog box. 4. Position the digitizer puck cross hairs over the first point on the film to digitize, then click Digitize to enter the point. MLC Fit beeps to indicate that the point is accepted. 5. Move the puck and position the cross hairs over the second point you want to digitize, then click Digitize. Again, as the point is digitized, MLC Fit beeps to indicate that the point is accepted. The line segment defined by the points appears in the Beam’s Eye View window. The line segment appears in yellow. 6. Continue digitizing the treatment field shape. If you make a mistake, use the Undo button to erase the last-digitized point or group of points. Making the line segments small increases the display accuracy of the treatment field shape. 7. When you are about to “re-enter” the first point digitized, the treatment field shape is almost completely outlined in yellow. Rather than re-entering the first point to close the shape, click Done. Clicking Done completes the digitizing process. The points you entered before clicking Done and the final line segment inserted by MLC Fit define the new shape. In addition to closing the shape, the shape area fills in yellow, and the MLC leaves appear and butt up to the field according to the specified Fit Method. 136 Copyright 2010, Elekta Impac Software LUGMSQ0002/4.0/23-Sep-2010 CHAPTER 6: MLC Fit 8. In the Treatment Field Definition dialog box, click OK to save your work. You are now ready to complete the remainder of your MLC leaf plan. Printing and Saving Your MLC Leaf Plan Once you have completed an MLC Fit treatment field plan, you can output an MLC leaf plan report to your printer. Use the Beam’s Eye View Print Setup dialog box to set the Output Scaling for your report. Once the scaling is set, click the Print button to output the report to the default printer. Click the Setup button to open the Windows Print Setup dialog box if you want to specify a different printer, etc. MLC Leaf Plan Report Header Patient Prints the patient name (Last, First, MI) and primary ID. Field Prints the treatment field ID, field Name, and the Date and Time the field was last edited. Angles Prints the Collimator and Gantry angles. Graphical Display Area The graphical MLC leaf plan information is centered in the page below the report header. The orientation is a beam’s eye view (picture the gantry positioned on top of the page). Isocenter is indicated by a + symbol. The graphical MLC leaf plan information includes the shape perimeter, leaf outlines, and Y Jaw leading edges. Each leaf is labeled with its leaf number and position (24= -1.40). The top-most leaf on each side of the page is labeled with the leaf side name (B1, B2). Footer Prints the scaling information. This information includes the scaling option selected in the Beam’s Eye View Print Setup dialog box (STD, SAD, SFD, or Print To Page) as well as the actual scale (0.56 cm = 1.00 cm). Copyright 2010, Elekta Impac Software LUGMSQ0002/4.0/23-Sep-2010 137 MOSAIQ User’s Guide Printing Your MLC Leaf Plan 1. Click eChart | Diagnoses and Interventions.... to open the Diagnoses and Interventions window. If a patient is currently selected, the Diagnoses and Interventions window opens. If not, the Select Patient window opens. In the Select Patient window, double-click a patient, then open the Diagnoses and Interventions window. 2. Open the Treatment Field Definition dialog box for the treatment field that needs an MLC definition. 3. Click BEV in the Viewer group of the Tx Field view. 4. Click the viewer window or Enlarge/Edit Beam’s Eye View to open the Beam’s Eye View dialog box. 5. Click the right-mouse button in the Beam’s Eye View dialog box (or press F4). The options menu appears. 6. Click the Print option. The Beam’s Eye View Print Setup dialog box opens. 7. Use the Beam’s Eye View Print Setup dialog box to set the Output Scaling for your report. STD (Source to Tray Distance) prints an MLC Plan report scaled to the block tray distance projection as specified in the Machine Characterization. SAD (Source to Axis Distance) prints a report scaled to the isocenter distance projection if the SAD is less than or equal to the SFD and greater than 0 for measurement plane conversions. SFD (Source to Film/Image Distance) prints a report scaled to film distance projection if it is greater than or equal to the SAD and greater than 0 for measurement plane conversions. Fit To Page prints a report scaled to the dimensions of the paper used by the printer. 8. Click Print to output the report to the default printer. Alternatively, click Setup to open the Windows Print Setup dialog box if you want to specify a different printer, etc. Saving Your MLC Leaf Plan 1. In the Beam’s Eye View dialog box, add or change the MLC leaf plan. 2. Click OK to save the MLC leaf plan. 3. In the Treatment Field Definition dialog box, click OK to save all changes to the treatment field. 138 Copyright 2010, Elekta Impac Software LUGMSQ0002/4.0/23-Sep-2010 MOSAIQ User’s Guide CHAPTER 7: Image ManagementViewStation & Photos and Diagrams The image management system in MOSAIQ has two components: ViewStation and the Photos and Diagrams utility; hereafter referred to as ViewStation and Photos and Diagrams. Using the Photos and Diagrams Utility is the only section for Photos and Diagrams in this chapter. All other sections are instructions for ViewStation features. Assigning Image Security Attributes 1. Click File | Directories | Staff Directory… to open the Staff Directory window. 2. Click Add to open the Staff dialog box. 3. Type your last name in the Last Name field, then press TAB. 4. Type your first name in the First Name field, then press TAB. 5. Type your middle initial in the Mdl Initial field, then press TAB twice. 6. Type your username in the User Name field. 7. Click adjacent to the Type field, then select your position within your department. adjacent to the Category field, then select the work category that describes the 8. Click peer group of individuals to which you belong (such as Physician, Dosimetrist, Nurse, etc.). This is a non-configurable field, and is associated with ViewStation functions. You must select Resident or Physician to populate the image review drop lists in the Image and Image Review windows. 9. Click Security. 10. Click the Imaging tab. 11. Click the check boxes to assign the image security attribute, then click OK. Enabling Imaging Options in System Utilities 1. Click File | System Utilities | Department Setup… to open the Department Setup dialog box. 2. Click the Clinical (RO) tab. 3. In the Inbound Tx Checks group, click the Portal Image Check check box if it is not checked. Copyright 2010, IMPAC Medical Systems LTGMSQ0002/4.0/23-Sep-2010 139 MOSAIQ User’s Guide 4. In the Sequencer SL ID group, click click Patient or Isocenter. adjacent to the Setup Offset Reference field, then 5. In the Tx Images group, click the Enable Image Underlay check box if it is not checked. 6. Click OK to close the Department Setup dialog box. Configuring the Digitized Film Import (DFI) Option Power on the scanner before you power on your MOSAIQ workstation. If you fail to do so, MOSAIQ will not detect the scanner. 1. Launch MOSAIQ on a workstation connected to a film scanner. 2. Log on with your username and password. 3. Click File | Import/Export | DFI Configuration… to open the DFI Configuration dialog box. The General tab appears by default. 4. Click in the Machine field. 5. Click the name of the machine on which the film may have originated. Click Unspecified if the images were not taken on a machine defined in your system. 6. Type the source-to-axis distance in centimeters for the selected machine in the SAD field. 7. Type the source-to-film distance in centimeters for the selected machine in the SFD field. in the Pixel Size Type field, then click SFD, which is typically for simulator or 8. Click other films, or Actual if you wish to specify the actual pixel size on the film as the type of pixel size. in the Image Type field, then click the type of images acquired at the selected 9. Click machine. 10. Click the Review Required check box if images acquired on the selected machine should be reviewed by the physician. 11. Click Setup to save the Film Information Settings you have configured for the selected machine. Click Reset to use the system default values as the Film Information Settings for the selected machine. 140 Copyright 2010, Elekta Impac Software LUGMSQ0002/4.0/23-Sep-2010 CHAPTER 7: Image Management-ViewStation & Photos and Diagrams 12. In the DFI Destination Staging Area field, type the network path to the directory for the digitized film images on your workstation. This field should default to the correct path, which is configured in the Staging Areas window. Your ELEKTA/Impac installer or systems administrator configures the staging areas. If the path does not appear, you must type in the correct path. 13. Click the Advance tab to review the digitizer settings and/or to calibrate the digitizer. Notice that in the Toolkit Version group, the Vidar Toolkit software version appears. This is the software MOSAIQ uses to interact with the digitizer. If your version of this software is no longer supported, the version number appears in red text. MOSAIQ supports the following scanners: DosimetryPRO Advantage: 71, 75, 142, and 150 VXR-16 DosimetryPRO: 71 and 142 VXR-16, VXR-12, and VXR-12 plus: 75 and 150 VXR-8 and VXR-8 plus: 75 and 150 The other options and fields on this tab are as follows: Digitizer Settings Model Shows the model of the digitizer connected to your workstation. Reference Specifies the resolution for digitizing films. The higher the resolution, the larger the image size. Bits per Pixel Specifies the pixel bit depth for digitizing films. For the four digitizer models supported, the pixel bit depths available are as follows: DosimetryPRO Advantage: 8, 12, and 16. VXR-16 DosimetryPRO: 8 and 16. VXR-16, VXR-12, and VXR-12 plus: 8 and 12. VXR-8 and VXR-8 plus: 8. Dimensions Specifies the dimensions of the film. The list contains standard film dimensions, and the default is 14 x 17 (inches). Image Size Shows the resulting image size. You can use this number to determine storage size requirements for your department. Translation Table Specifies a translation table to use for digitizing. The default is Log. Copyright 2010, Elekta Impac Software LUGMSQ0002/4.0/23-Sep-2010 141 MOSAIQ User’s Guide Exposure Specifies an exposure time to use for digitizing. The greater the exposure time, the longer the film takes to digitize. Values are in milliseconds. The valid range is 4 - 20 for the DosimetryPRO Advantage, and 10 - 20 for all other digitizer models. The default is the minimum value for the digitizer model. If you change the exposure time, you must calibrate your digitizer. If you change the exposure time, do not recalibrate, and click OK, you can still calibrate the digitizer and keep the new exposure time. Or you can skip the calibration and discard the new exposure time. If you choose to skip calibration at that point, all changes except the exposure time that you made on the Advanced tab are saved. Digitizer Information When your workstation is connected to a digitizer, this group shows the digitizer serial number, firmware version, and hardware version. Calibrate Digitizer Button Calibrates the light source of the digitizer. For older digitizer models, you should do this calibration once per day, preferably 1 hour or longer after powering on the digitizer. Newer models, such as the VXR-16 DosimetryPRO with firmware version 13.0 or greater, and the DosimetryPRO Advantage, have the Automatic Digitizer Calibration (ADC) feature, sometimes called background or drift tracking. ADC does periodic calibration while the digitizer is powered on and not in use. You can still do a manual calibration at any time. 14. Click OK to save your changes, then close the DFI Configuration dialog box. 142 Copyright 2010, Elekta Impac Software LUGMSQ0002/4.0/23-Sep-2010 CHAPTER 7: Image Management-ViewStation & Photos and Diagrams Setting Beam’s Eye View Preferences in the Field Definition 1. If you wish to set the viewing preferences for the MLC beam geometry and graticule in the Beam’s Eye View, click eChart | Diagnoses and Interventions… to open the Diagnoses and Intervention window. 2. Double-click the MLC treatment field associated with the image to open the Treatment Field Definition dialog box. 3. Right-click or press F4, then place your mouse pointer over Preferences. 4. Click the MLC beam geometry viewing preference you wish to set. The preferences are as follows: View MLC Edge Shows the MLC edge only, providing the clearest view of surrounding anatomy. This is the default view. View MLC Aperture Shows the MLC aperture, which shows the MLC interleaf lines within the jaw boundaries. View MLC All Shows all the MLC leaves. 5. Click View Graticule if you want the graticule shown when you open the Image window and/or Beam’s Eye View dialog box. 6. Click OK in the Treatment Field Definition dialog box to save the preference you set, then click Close in the Diagnoses and Interventions window. Setting Beam’s Eye View Preferences in the Image Window 1. If you wish to set the viewing preferences for the MLC beam geometry and graticule in Image window, click eChart | Images… to open the Image List window. 2. Double-click an image associated with an MLC treatment field to open the Image window. 3. Right-click or press F4, then place your mouse pointer over Preferences. 4. Click View Graticule if you want the graticule shown when you open the Image window and/or Beam’s Eye View dialog box. 5. Right-click or press F4, place your mouse pointer over Preferences, then click the MLC beam geometry viewing preference you wish to set. Refer to Step 4 of Setting Beam’s Eye View Preferences in the Field Definition for more information on MLC beam geometry viewing preferences. 6. Click OK to save your changes and close the Image window. Copyright 2010, Elekta Impac Software LUGMSQ0002/4.0/23-Sep-2010 143 MOSAIQ User’s Guide Scanning Simulation Films Before beginning, make sure you configure the applicable settings in the DFI Configuration dialog box. CAUTION You must power on the scanner before you power on your MOSAIQ workstation. If you fail to do so, MOSAIQ will not detect the scanner. 1. Click File | Import/Export | Digitized Film Import to open the Digitize Film Import dialog box. The Status field shows Waiting for film. The other scanning statuses are as follows: "Waiting for film" when no film is loaded. "Digitizer not ready..." when a film is loaded and while the digitizer performs Automatic Digitizer Calibration (ADC). "Digitizing…" while the film is being digitized. "Processing image…" after the film has been digitized and while the image is being processed. "Done" when image processing is complete and a thumbnail of the image is displayed. "Ready to digitize" when digitizing is complete and another film is loaded. "Saving image…" while writing the image file. "Image saved" when the image file is written to the staging area. adjacent to the Machine field, then click the machine used to create the image 2. Click on the simulator film. If the film was acquired on a machine in your department and you configured default settings for that machine, the default Film Information settings for the machine automatically appear when you select the machine name. 3. Verify or type the source-to-axis distance in the SAD field, press TAB, then verify or type the source-to-film Distance in the SFD field. This specifies image distances for specific planes so that measurements may be made from ViewStation. You bypassed the Pixel Size Type field to accept the default, SFD. Use SFD for standard films taken from a simulator or accelerator. You select Actual when you do not know the SFD. 4. Click 144 adjacent to the Image type field, then click the type of image. Copyright 2010, Elekta Impac Software LUGMSQ0002/4.0/23-Sep-2010 CHAPTER 7: Image Management-ViewStation & Photos and Diagrams 5. Click that the Review Required check box if the image requires a physician’s review. If the film is already signed by the physician, do not select this check box. 6. Place the film in the scanner. The scanning process starts immediately. The scanning status changes for each step in scanning process and the image appears in the thumbnail box when the scanning is done. If you scan an image upside down or backwards, you can cancel the process and scan the image again, or you can flip or rotate the image later. 7. If you wish to associate the scanned image with a treatment field, click Field in the Association group. You must associate the simulation image with a treatment field to show the image with the treatment geometry in the Image window, Treatment Field Definition dialog box, and Beam’s Eye CAUTION View dialog box. 8. Click adjacent to the Field list, then click the field with which to associate the image. Figure 26 shows an example of treatment fields listed in the Field list. Figure 26: Field List The fields must already exist for the patient. You cannot create them at this time. 9. If you wish to associate the scanned image with a prescription site, click Site in the Association group. adjacent to the Site list, then click the prescription site with which to associate 10. Click the image. 11. If you wish to associate the scanned image with a patient, click Patient in the Association group. Copyright 2010, Elekta Impac Software LUGMSQ0002/4.0/23-Sep-2010 145 MOSAIQ User’s Guide 12. Type a name for the image in the Image Name field. 13. Click Save to save the image and your configurations. The Status field shows Saving image… while MOSAIQ writes the image file, then Image saved when the image file is written to the staging area. 14. Click eCHART | Images… to open the Image List window and verify that the scanned image was imported. Acquiring Images from Electronic Sources You can capture images directly from your simulator, electronic portal imager, or other electronic devices. When you acquire an image from an electronic source, the image is imported into MOSAIQ, and you can automatically associate it with the correct treatment field, prescription site, or patient name. If the imported image is not associated or you wish to change the association, you must associate the image to use it effectively during treatment planning. CAUTION To associate an image with a patient, you must use the same patient ID in both the image acquisition system and MOSAIQ. 1. Prepare your simulator or accelerator for imaging. 2. Capture an image using your device, then export the image to the Namer staging area set up for the device. 3. Open the chart for your patient. 4. Click eChart | Images… to open the Image List window. The image is imported directly into the patient chart and added to the Image List window. 5. If you wish to associate the image with a treatment field or prescription site, click the image captured from your imaging device, then click Open to open the Image window. 6. Right-click or press F4, then click Image Information to open the Image Information window. 7. If you wish to associate the image with a treatment field, click the Field radio button, then click the field you wish to associate with the image. You must associate the simulation image with a treatment field to see the image with the treatment geometry in the Image window, Treatment Field Definition dialog box, and Beam’s Eye View dialog CAUTION box. 146 Copyright 2010, Elekta Impac Software LUGMSQ0002/4.0/23-Sep-2010 CHAPTER 7: Image Management-ViewStation & Photos and Diagrams 8. If you wish to associate the image with a prescription site, click Site, click in the drop list that appears, then click the prescription site you wish to associate with the image. 9. Click OK twice to associate the image with the selected treatment field or prescription site, then close the Image Information and Image windows. Checking the Import Log and Import Status Images normally are imported with no problems. However, if you have a question about whether an image was imported properly or was assigned to the wrong patient, you can check the Import Log and the Namer Status dialog box. 1. Click File | System Utilities | Image Maintenance | Review Import Log… to open the Import Log window. The Import Log window shows the imported images, with the most recent image at the top of the list. The list shows the date and time an image was imported, the patient with which it was associated, and optionally the field or location. 2. Click Close to close the Import Log window. 3. Click File | System Utilities | Image Maintenance | Namer Status… to open the Namer Status dialog box. The Namer Status window enables you to check the status of the Namer application in any department from MOSAIQ without having to go to the Namer workstation. Descriptions of the statuses are as follows: Database Access Appears green if the database specification is valid (path exists and known database files exist) and red if the database specification is invalid (path and known database files do not exist). Staging Areas Appears green if all accessible staging areas are available, yellow if at least one accessible staging area is available, and red if none of the accessible staging areas are available. Storage Locations Appears green if all accessible storage locations are available, yellow if at least one accessible storage location is available, and red if none of the accessible storage locations are available. Copyright 2010, Elekta Impac Software LUGMSQ0002/4.0/23-Sep-2010 147 MOSAIQ User’s Guide Image Scan Appears green when all of the following are true: The Scan for Images preference is set. The database can be accessed. At least one accessible staging area is available. At least one accessible storage location is available. Appears yellow when any one of the following are true: There are no available staging areas from the pool of accessible staging areas. There are no available storage locations from the pool of accessible storage locations. Appears red when any one of the following are true: The Scan for Images preference is clear. The database can't be accessed. There are no accessible staging areas. There are no accessible storage locations. 4. Click Refresh if you imported more than one file and the Images Imported field only shows 1. 5. Click Close to close the Namer Status dialog box. 148 Copyright 2010, Elekta Impac Software LUGMSQ0002/4.0/23-Sep-2010 CHAPTER 7: Image Management-ViewStation & Photos and Diagrams Using the Photos and Diagrams Utility You can acquire and display digital photos and diagrams as part of the electronic chart, using a digital camera or any of the wide variety of industry-standard devices to capture images that you can enter into the system. The Photos and Diagrams utility does not interface directly with image sources such as digital cameras. The camera or scanner you use must be able to save images to disk in JPEG, PCX, BMP, or TIFF format. TIFF compatibility is limited, so we do not recommend devices that only support TIFF format. JPEG works best in most situations. We recommend that you set the camera resolution to the lowest resolution available (640x480 recommended). We also recommend that you use the compressed JPEG image format to keep the file sizes to a minimum. JPEG compression is variable CAUTION and some camera settings can have different levels of control. Test different settings to find the optimal configuration for your facility. After importing the images, you must associate them with a treatment field or prescription site before you can use the images in the treatment set-up process. Importing Images Using Photos and Diagrams 1. Scan or create using a scanner or digital camera, then save those images to the appropriate directory. 2. Click File | Import/Export, then click Photos and Diagrams Import… to open the Photos and Diagrams Import dialog box. The Photos and Diagrams Import dialog box shows all the images in the specified directory. For this reason, you can work on multiple images at one time. For example, if you have five images for one patient and six images for another patient, you can process the five images for the first patient, then process the six images for the second patient, all without leaving the Photos and Diagrams Import dialog box. 3. If the Directory field does not show the correct path to the directory with the images, click , select the appropriate directory, then click OK. 4. In the Mark All as group, click Import if you wish to import all of the images. This changes the status indicators to green. 5. In the Mark All as group, click Delete if you wish to remove all of the images. This changes the status indicators to red. 6. If all the images are the same type, click adjacent to Image Type Selector field (located below the buttons) in the Mark All as group, then click the image type. 7. In the Mark All as group, click Ignore if you wish to ignore all of the images. This changes the status indicators to yellow. Copyright 2010, Elekta Impac Software LUGMSQ0002/4.0/23-Sep-2010 149 MOSAIQ User’s Guide 8. In the Mark All as group, click adjacent to the Image Type Selector field, then click Unknown if you do not know any of the images’ types, click Fld Setup if you wish to mark all of the images as field setup, or click Diagram if you wish to mark all of the images as diagrams. 9. If you are working with different types of images, click in each of the photo image groups, then click the image type —Unknown, Fld Setup, or Diagram. 10. If you want to import specific images only, click image you wish to import. 11. If you want to remove specific images, click you wish to remove. in the photo image group of every in the photo image group of the images 12. If you do not want to import specific images, click images you wish to ignore. in the photo image groups of the 13. Click OK to import or remove the images. The images you marked Ignore will still appear in the Photos and Diagrams Import dialog box next time you open it. 14. Click , or click Cancel to close the Photos and Diagrams Import dialog box. 15. Click eChart | Images… to open the Image List window and verify that the images were imported into the system. 16. Click Close to close the Image List window. Associating Images Using the Photos and Diagrams Utility You can also associate non-medical images with treatment fields and prescription sites from the Image List window. Refer to Associating Non-Medical Images in this chapter on page 152. 1. Click File | Import/Export | Photos and Diagrams Import… to open the Photos and Diagrams Import dialog box. 2. Change the image type to field setup or diagram by clicking the photo image group for each image you wish to associate with a prescription site or treatment field, then click Fld Setup or Diagram. 3. Double-click the image you wish to associate with a prescription site to open the Photos and Diagrams Image Edit dialog box. 4. In the Association group, click the Site radio button. 5. Click adjacent to the Site list, then click the name of the prescription site. 6. Click OK to closes the Photos and Diagrams Image Edit dialog box, then return to the Photos and Diagrams Import dialog box. 7. Double-click the image you wish to associate with a treatment field to open the Photos and Diagrams Image Edit dialog box. 150 Copyright 2010, Elekta Impac Software LUGMSQ0002/4.0/23-Sep-2010 CHAPTER 7: Image Management-ViewStation & Photos and Diagrams 8. In the Association group, click the Field radio button. 9. Click in the drop list adjacent to the Field radio button. 10. Click the treatment field to associate with the image. 11. Click OK to close the Photos and Diagrams Image Edit dialog box. Cropping Images 1. From the Photos and Diagrams Import dialog box, double-click the image you wish to crop. 2. Click Crop to add a yellow cropping border to the image. 3. Position the mouse pointer on the lower right corner of the image, on the yellow border. . The mouse pointer changes to 4. Click and hold the left mouse button, then drag the mouse pointer to align the yellow outline with the edge of the image you want to keep. Only the part of the picture within the yellow outline will be saved. 5. Position the mouse pointer anywhere within the yellow border to change the mouse pointer to a + arrow, then drag it by holding down the left mouse click and dragging the yellow border into the desired position . 6. Continue re-sizing and moving the yellow border to align it with the edge of the image. 7. Click OK to crop the image, save the change, and close the Photos and Diagrams Image Edit dialog box Associating Images Before you can use images in key areas of the system during the therapy process, you must associate the image with a treatment field, a prescriptions site, or the patient. For example, you associate an image with a treatment field to show the image behind the field geometry and field shape for precise treatment planning in the Treatment Field Definition and Beam’s Eye View dialog boxes and the Image window. You can associate both medical images (simulator, portal, and DRR images) and non-medical images (digital photos and diagrams). To associate images with a treatment field or prescription site, you must have Clinical | Field Defs | View and Modify rights. CAUTION Copyright 2010, Elekta Impac Software LUGMSQ0002/4.0/23-Sep-2010 To open the Diagnoses and Interventions window, you must have Clinical | General | View rights. 151 MOSAIQ User’s Guide Associating Medical Images You associate or change the association of medical images in the Image Information dialog box. You can also associate scanned medical images in the Digitized Film Import dialog box. Refer to Scanning Simulation Films in this chapter on page 144. 1. Click eCHART | Images to open the Image List window. 2. Click a DRR or simulation image that does not have an association, then click Open to open the image in the Image window. 3. Right-click or press F4, then click Image Information to open the Image Information dialog box. in 4. If you wish to associate the image with a field, click the Field radio button, click the drop list that appears, then click the treatment field with which to associate the selected image. 5. If you wish to associate the image with a site, click the Site radio button, click drop list that appears, then click the prescription site. in the 6. If you wish to associate the image with the selected patient, click the Patient radio button, then type a name for the image in the Image Name field. 7. Click OK twice to close the Image Information dialog box and Image window. Associating Non-Medical Images You can associate or change the association of non-medical images in the Image Viewer window. You can also associate non-medical images in the Photos and Diagrams Image Edit dialog box when you import them using the Photos and Diagrams utility. Refer to Associating Images Using the Photos and Diagrams Utility in this chapter on page 150. 1. Click eCHART | Images to open the Image List window. 2. Double-click the non-medical image that you wish to associate with a prescription site or treatment field to open the image in the Image Viewer window. 3. In the Image Viewer window, click Associate to open the Image Association dialog box. 4. If you are associating the image with a prescription site, click the Site radio button, then click OK. 5. In the Prescription Site window, click the prescription site you wish to associate with the image, then click Select. 152 Copyright 2010, Elekta Impac Software LUGMSQ0002/4.0/23-Sep-2010 CHAPTER 7: Image Management-ViewStation & Photos and Diagrams 6. If you are associating the image with a treatment field, click the Field radio button, then click OK. 7. In the Treatment Field Definitions window, click the field you wish to associate with the image, then click Select. 8. Click OK to close the Image Viewer window to save your changes and close the window. Reticle Scaling Reference Images Reticle scaling reference images is the process that defines the magnification (scaling) factors, beam center, and rotation of a reference image (DRR or Simulation), so that MOSAIQ can accurately show the treatment geometry on the image. You cannot display images in the Treatment Field Definition dialog box until the image has been reticle scaled. Before reticle scaling, you must associate the image with a prescription site or treatment field. Images exported from electronic sources using DICOM RT Image can include scaling data that can be used in MOSAIQ. Therefore, you do not have to reticle scale these images. To manually reticle scale an image you must have a visible reference such as a “burned-in” graticule that represents the central axis and relative scale of the image. The reference image must have square pixels, must NOT have a Shadow filter applied, must not have already been used in a CAUTION treatment field that has been treated, and must not have an associated offset. You must also associate the image with a treatment field, prescription site, or patient before reticle scaling. Reticle Scaling a Reference Image 1. Click a reference image that has already been associated a treatment field, then click Open. There must be a red outline in the viewer of the Image window. 2. Right-click or press F4, then click Reticle Scale Image. A red reticle tool appears in the center of the image in the Image window. The major ticks on the reticle tool equal 5 cm, and the magenta arrow always points toward the gantry stand with respect to the image. 3. Click until the image is large enough to align the red reticle tool easily with the reticle on the image. If you zoom in too much, click image. Copyright 2010, Elekta Impac Software LUGMSQ0002/4.0/23-Sep-2010 to decrease the size of the 153 MOSAIQ User’s Guide Figure 27 shows an image enlarged for reticle scaling. Figure 27: Enlarged Image for Reticle Scaling 4. Click the reticle tool and drag it to place it relative to the reticle on the image. Use the sizing handles (small boxes) at the middle and ends of each arm of the reticle tool to rotate and stretch the reticle tool to align it with the “burned in” graticule on the image. The center of the reticle remains fixed when dragging a sizing handle. If you hold the CRTL key down while dragging a sizing handle, the opposing sizing handle remains fixed instead of the tool center. 154 Copyright 2010, Elekta Impac Software LUGMSQ0002/4.0/23-Sep-2010 CHAPTER 7: Image Management-ViewStation & Photos and Diagrams 5. Either verify that the correct source-to-axis distance is entered in the SAD field, or double-click in this field and type the correct SAD. If the source-to-axis distance is not entered in the SAD field, you must type the correct value for SAD in this field. The tick marks of the “burned-in” graticule on the reference image are calibrated to the SAD defined at the treatment machine. The tick marks therefore correspond to the tick marks of the graticule used by the machine when the image was created. CAUTION When reticle scaling, you must enter the correct SAD in the Image window, and precisely align the center and tick marks of the MOSAIQ reticle tool with the center and tick marks of the “burned in” graticule on the image. This must be done correctly to enter accurate image scaling information and a central axis position for the image in MOSAIQ. 6. Double-click in the SID field, then type the source-to-image distance if needed. Entering the SID is optional. 7. Click OK to save the reticle scaling data, then return to the Image List window. Correcting Film Rotation Errors If, for example, the simulation film was crooked when scanned or the film holder was crooked during the exposure, the image may be rotated when imported into the system. If so, the image either appears crooked in the Image window, and/or the reticle angle appeared in the Axis Relative Angles section of the Image window is not equal to the collimator rotation used to create the image. 1. In the Image List window, click the image with a film rotation error, then click Open. 2. Right-click or press F4, then click Reticle Scale Image. A red reticle tool appears in the center of the image in the Image window. until you can clearly see the ticks of the graticule on the image, then click and 3. Click drag the red reticle tool to align it with the graticule on the image. 4. In the Reticle field, type the relative angle at which the collimator was positioned with respect to the gantry when the film was created. 5. Press TAB to enter the film rotation error in the Film field and show the film rotation error on the image in the Viewer of the Image window. Make a note of the alignment of the purple reticle axis vector. The reticle scale axis identifies the planned gantry axis in the image. The arrow points toward the gantry stand (gantry up position). When you save the reticle scaling, the image is rotated to align the reticle axis vector and the gantry axis. 6. Either click OK to save the reticle scaling information and close the Image window, or right-click or press F4, then click Reticle Scale Image to save the reticle scaling information and return to normal view of the Image window. Copyright 2010, Elekta Impac Software LUGMSQ0002/4.0/23-Sep-2010 155 MOSAIQ User’s Guide Clearing Reticle Scaling 1. In the Image List window, click the image for which you wish to clear reticle scaling, then click Open. 2. Right-click or press F4, then click Clear Reticle Scaling. You cannot clear reticle scaling of an image already used in a treatment field that was treated. The Image window shows Historic for these images. 3. Click OK to close the Image window. Reticle Scaling Verification Images Reticle scaling verification images is the process of defining the isocenter and magnification (scaling) factors of verification images. This section provides instructions for reticle scaling verification images with and without graticules. Reticle Scaling Verification Images with Graticules You can only use the instructions in this section to reticle scale verification images that already had a graticule on them before being imported into MOSAIQ. This “burned-in” graticule on the image represents the central axis and relative scale of the image. 1. Click Tools | Image Work List to open the Image Work List dialog box. To generate a specific list of images, refer to Checking the Image Work List for Images Requiring Reviews in this chapter on page 182 or Checking Changes Required from the Image Work List on page 187. 2. In the Image Work List dialog box, click the patient name listed in the table to the right of the Criteria group. This shows the images for the selected patient in the image information table at the bottom of the dialog box. 3. In the lower section of the Image Work List dialog box, click the image you wish to review, then click Review to open the image(s) in the Image Review window. You can also open the image pair in the Image Review window from the Image List window, refer to Reviewing/Approving Images from the Image Work List on page 184. 4. Click the Isocenter Offset tab, then click Register to open the images in the Image Registration window. 5. Click the verification image to make it active. 156 Copyright 2010, Elekta Impac Software LUGMSQ0002/4.0/23-Sep-2010 CHAPTER 7: Image Management-ViewStation & Photos and Diagrams 6. Click to open the Reticle Scaling dialog box, shown in Figure 28. Figure 28: Reticle Scaling Dialog Box 7. Click Auto Detect to automatically detect the beam isocenter and calculate distances. The Reticle Scaling dialog box lets you correct film rotation. When you align the graticule and the beam isocenter, the reticle angle should be the same as the collimator angle of the image. When these values do not match, which is often caused by film/cassette rotation, you can type the actual collimator angle to correct the film rotation. 8. After you reticle scale the verification image, you can click to zoom all images together. Move your mouse to the left to decrease the magnification and to the right to increase the magnification. 9. Click your mouse again to return to the regular view. 10. You can also click to show only one image. Field Edge Image Center and Scaling (for Images without Graticules) Field edge image center and scaling lets you automatically or manually attach isocenter and scale information to a single exposure verification image that does not have a “burned in” graticule. 1. In the Image Work List dialog box, click the image pair, and click Review. 2. Click the Patient Offset tab in the Image Review window, and click Register. 3. Click the verification image to activate it, then click dialog box. to open the Reticle Scaling 4. Click the Field Edge radio button to show treatment field edges on the verification (teal) and reference (red) images. The isocenter and any field aperture imported annotation curves show on the reference image. The Field Edge radio button is unavailable when you apply the AHE filter. 5. If the field edge automatically extracted from the verification image is unacceptable, click the Extract Field Edge check box to manually adjust the extraction threshold, then move the threshold bar in the Field Edge Threshold group to extract a new field edge from the treatment image. The treatment field edge changes automatically when you change the threshold. Copyright 2010, Elekta Impac Software LUGMSQ0002/4.0/23-Sep-2010 157 MOSAIQ User’s Guide 6. Right-click in the Image Registration window. Use the Rotation, Translation, or Scaling options to match the verification image field edges with the reference image field aperture. 7. Alternatively, click Match to automatically match (register) a field aperture on the reference image with the field edge on the verification image. The Match button is available when the Field Edge radio button is selected and the reference image has an imported field aperture curve. 8. Click OK after you align the field edge on the verification image with the aperture on the reference image. The red crosshairs show the verification image isocenter. Displaying Treatment Geometry on the Image Once you have associated the image with the correct treatment field and reticle scaled the image, you can display the treatment geometry of the associated field overlaid on the image in the Image window. This option is not available for reference images that have no scaling information or are not associated with a treatment field. You must have the Image Underlay option enabled to link the treatment geometry with the reference image. Refer to Enabling Imaging Options in System Utilities on page 139. 1. Click a reference image that has been associated with a treatment field, then click Open to open the image in the Image window. CAUTION The Geometry and Use for Tx Definition options are NOT enabled until you have enabled the Image Underlay option in the system utilities, associated the image with a field, and reticle scaled the image. If you have already done the latter and the Geometry and Use for Tx Definition options are disabled, contact your system administrator to check the machine characterization of the machine selected for the associated treatment field. 2. Click the Geometry check box in the View group of the Image window. Following are the conventions for the treatment geometry in the Image window: 158 Red The isocenter crosshair (reticle) Turquoise The jaw Yellow The field shape Green The MLC leaves Copyright 2010, Elekta Impac Software LUGMSQ0002/4.0/23-Sep-2010 CHAPTER 7: Image Management-ViewStation & Photos and Diagrams Enabling the Image Underlay Option In the Image window, you can also configure the image to appear in the Treatment Field Definition dialog box. This enables you to view the reference image behind MLC parameters and/or leaf and jaw setup in Beam’s Eye View. You must associate the image with the correct treatment field and reticle scale the image to use this image underlay option. To use the Image Underlay feature, you must have Image | ViewStation | Images | View security rights. To open the Diagnoses and Interventions window, you must have Clinical | General | View CAUTION security rights. 1. Click eCHART | Images to open the Image List window. 2. Click a reference image that has been associated with a treatment field, then click Open to open the image in the Image window. 3. Click the Use for Tx Definition check box in the Image group. 4. Click OK to save the new setting, then close the Image window. 5. Click Close to close the Image List window. 6. Click eChart | Diagnoses and Interventions… to open the Diagnoses and Interventions window. 7. In the Diagnoses and Interventions window, double-click the treatment field associated with your image. Notice the image in the viewer. 8. In the Treatment Field Definition dialog box, click Enlarge/Edit Beam’s Eye View. The Beam’s Eye View dialog box provides an expanded graphical display of the jaws, isocenter, and outer field boundary for the treatment field as viewed from the perspective of looking down through the collimator. In this dialog box, you can change these treatment field parameters, digitize a treatment field shape, and/or manipulate an MLC plan for the treatment field with image underlay. 9. Click Cancel to close the Beam’s Eye View dialog box. 10. Click OK in the Treatment Field Definition dialog box. Committed changes to the beam or beam parameters will invalidate the Use for Tx Definition status. Applicable beam parameters include the gantry angle, source angle for kV setup fields, couch angle, and couch top. Temporary, unsaved Field Definition changes do not change the validity of the Use for Tx Definition status. Copyright 2010, Elekta Impac Software LUGMSQ0002/4.0/23-Sep-2010 159 MOSAIQ User’s Guide Using the Image List Window The Image List window provides a list of all the images in the system for the selected patient, along with important information on each image. Images appear in the Image List window as soon as they are imported into the system. This window is the core of the MOSAIQ Image Management features. You must first open the Image List window to accomplish a variety of tasks, such as associating medical images, reticle scaling images, reviewing images, annotating images, and configuring images to appear with the field geometry and field shape for precise treatment planning. You use the Image List window to manage the list of images in your system. In this window, you can delete, copy, move, and print images. Descriptions of the fields in the image information table are as follows: Status Specifies whether the medical image is archived, open, or marked to Use for Tx Definition. Date Shows the study date of the image. Time Shows the study time of the image. Association ID If the image is associated with a treatment field, displays the treatment field ID number with which the image is associated, or Site if the image is associated with a prescription site. Name Displays the treatment field name if the image is associated with a treatment field or the site name if the image is associated with a prescription site. Type Shows the image type, such as simulator, portal, and so on. Imager Shows the name of the image acquisition source (treatment or kV) when provided in the image file. Proj. Shows the Gantry Angle attribute value, which MOSAIQ reads from certain DICOM images. Not all DICOM images contain this attribute, but when provided by the image source (treatment, kV, or treatment planning), MOSAIQ records the value and displays it as the Projection Angle. The DICOM standard specifies that the value must conform to the IEC Standard 61217 definition. MOSAIQ does not convert the value to the coordinate system in use by the associated treatment machine. Cp 160 Shows the copy number if the medical image is a copy. Copyright 2010, Elekta Impac Software LUGMSQ0002/4.0/23-Sep-2010 CHAPTER 7: Image Management-ViewStation & Photos and Diagrams Request Fld Shows Yes if a request is pending and Done if the request is completed. Blk Shows Yes if a request is pending and Done if the request is completed. Oth Shows Yes if a request is pending and Done if the request is completed. Img Shows Yes if a request is pending. Off Shows Yes if an offset request is active, No if the offsets equal zero, Cmpl if the request is completed, and Excl if the offset has been excluded. Review Status Physician Shows Approved, if the image was approved, Rejected if the image was rejected, Not Rvw if the image has not been reviewed, Void App if the image was approved and voided, Void Rej if the image was rejected and voided, or NA if the image is a non-medical image or a medical image for which review is not required. Resident Shows Approved, if the image was approved, Rejected if the image was rejected, Not Rvw if the image has not been reviewed, or NA if the image is a non-medical image or a medical image for which review is not required. Comment Shows any comments added in the Comment field of the Image or Image Review dialog box. Changing the View of the Image List window In the Image List window, you can show all types of images, medical images only (DRR, Portal, and Simulator), non-medical images only (field setup photos, diagrams), or DICOM Export Images, which include only medical images eligible to be converted into clinically relevant DICOM Image objects. 1. Click to open the drop list of Image Type filters, as shown in Figure 29. Figure 29: Image Type Filters 2. Click the Image Type filter to show those images only in the image information table. Copyright 2010, Elekta Impac Software LUGMSQ0002/4.0/23-Sep-2010 161 MOSAIQ User’s Guide Tagging Images You cannot tag non-medical images. 1. In the Image List window, click the image you wish to tag in the image information table. 2. Press the SPACE BAR to tag the image. For tagged images, appears in the Status column of the image information table. You can also press CTRL, then click the image to tag it. 3. Repeat steps 1 and 2 until you have finished tagging the images. Opening and Closing Images from the Image List Window Opening and Closing Medical Images 1. To open one image, click the image you wish to open. To open multiple images at a time, press CTRL, then click the images to tag them. 2. Click Open to open the image(s). Closing Images 1. If you opened multiple images, click Close All in the Image List window to close all of the Image windows. 2. If you only opened one image, click Cancel in the Image window. Opening and Closing Non-medical Images 1. Click the non-medical image, then click Open to open the Image Viewer window. 2. Click 162 , or click Cancel in all of the Image Viewer windows opened. Copyright 2010, Elekta Impac Software LUGMSQ0002/4.0/23-Sep-2010 CHAPTER 7: Image Management-ViewStation & Photos and Diagrams Deleting Images from the Image List Window CAUTION You cannot delete multiple tagged images, reviewed images, images for which the treatment history is set, or images with offsets. 1. In the Image List window, click the image you wish to delete, then click Delete. The Delete Image message box appears to confirm that you are deleting the correct image. 2. In the, click Yes to delete the image. Copying Images the Image List Window 1. Click the image you wish to copy, then click Copy. 2. Click Yes in the Copy Image message box. Moving Images from the Image List Window 1. Open the patient chart that has the image you wish to move, then click eChart | Images… to open the Image List window. 2. Select the image you wish to move, then click Move. adjacent to the To Patient field, then double-click 3. In the Move Image dialog box, click the name of patient whose chart will be the recipient of this image. 4. Click OK in the Move Image dialog box to move the image from the current patient’s Image List to the Image List of the new patient, then close the Move Image dialog box. If the image you are moving is associated with a treatment field or prescription site, the system deletes the association when the image is moved to the new Image List. 5. Open the patient chart that is the recipient of the image, then click eChart | Images… to confirm that the move was successful. Printing Non-Medical Images Refer to Printing Medical Images in this chapter on page 167 for print scaling and printing medical images in the system. 1. In the Image List window, click a field setup photo or diagram, then click Print. 2. In the Image Viewer window, click Print. Copyright 2010, Elekta Impac Software LUGMSQ0002/4.0/23-Sep-2010 163 MOSAIQ User’s Guide Scaling Medical Images There are three scaling processes for images: print scaling, reticle scaling, and image scaling. Print scaling is setting the print scaling options in the Standard Print and DICOM Print dialog boxes to fit the medical image to the print medium (paper or film). The print scaling options (particularly SAD, SID and Custom SID) depend on image scaling data, such as the pixel type, pixel size, SAD value, and SID value. Images must therefore have accurate image scaling data before you set the print scaling options in the print dialog boxes. Reticle scaling is the process that defines the magnification (scaling) factors, beam center, and rotation of a reference image (DRR or Simulation). Refer to Reticle Scaling Reference Images on page 153. Image scaling (sometimes called calibrating the ruler) is entering calibration data to define the size of the pixels in the image so that you can make subsequent measurements. If you cannot reticle scale images, you follow the image scaling process. Image Scaling Image scaling entails manually entering the scaling data using the ruler annotation tool and the Image Measurements dialog box. The image scaling process is slightly different for images imported with some scaling data and images imported with no scaling data. Entering Scaling Data for Verification Images Imported with Some Scaling Data 1. Click a verification image in the Image List window, then click Open to open the Image window. 2. Click until you can clearly see the graticule or BB on the image. , then click a large BB on the image and drag the mouse in a straight line to the 3. Click next large BB. Refer to Figure 30. Figure 30: Straight Line Drawn with Ruler Tool-Imported Data Shown 164 Copyright 2010, Elekta Impac Software LUGMSQ0002/4.0/23-Sep-2010 CHAPTER 7: Image Management-ViewStation & Photos and Diagrams Notice in Figure 30 that the measurement is for SID. This indicates that the pixel size type is SID, and that the image was imported with a defined pixel size. 4. Right-click or press F4, then click Measurements to open the Image Measurements dialog box. If a pixel size is entered for either SAD or SID, the image was imported with a defined pixel size. 5. Click in the Plane field of the Calibration section, then click SAD. 6. Click the check box near the Distance field. 7. Double-click in the Distance field, type the known SAD for the treatment machine from which the image originated, then press TAB. 8. Click Apply to specify the distance for SAD in centimeters. 9. Click the check box near the Ruler Length field. 10. Double-click in the Ruler Length field, type the actual ruler length for the ruler line you drew for a SAD of 100 cm and BBs that are 1 cm apart, then press TAB. 11. Click Apply to specify the actual ruler length for the ruler line you drew for a SAD of 100 cm and BBs that are 1 cm apart. 12. Click OK to enter the scaling data in the system, then close the Image Measurements dialog box. 13. Click OK to save the scaling data, then close the Image window. Entering Scaling Data for Verification Images Imported with No Scaling Data 1. In the Image List window, double-click a verification image that does not have any scaling data, or click the image, then click Open. 2. Click until you can clearly see the graticule or BB on the image. , then click a large BB on the image and drag the mouse in a straight line to the 3. Click next large BB. When there are no tick marks and ruler length shown for a ruler line, the image was not imported with a defined pixel size. Refer to Figure 31. Copyright 2010, Elekta Impac Software LUGMSQ0002/4.0/23-Sep-2010 165 MOSAIQ User’s Guide Figure 31: Straight Line Drawn with Ruler Tool-No Imported Data 4. Right-click or press F4, then click Measurements to open the Image Measurements dialog box. 5. Click in the Plane field of the Calibration group, then click SAD. 6. Click the check box near the Distance field to enable the Distance field for the SAD plane. 7. Double-click in the Distance field, type 100, which is typically the known SAD for the treatment machine from which the image originated, then press TAB. 8. Click the check box near the Ruler Length field. 9. Double-click in the Ruler Length field, type 10, which is the actual ruler length for the ruler line you drew for a SAD of 100 cm and BBs that are 1 cm apart, then press TAB. 10. Click Apply the distance for SAD in centimeters and the actual ruler length for the ruler line you drew for a SAD of 100 cm and BBs that are 1 cm apart. 11. Click OK to enter the scaling data in the system, then close the Image Measurements dialog box. 12. Click OK to save the scaling data, then closes the Image window. 166 Copyright 2010, Elekta Impac Software LUGMSQ0002/4.0/23-Sep-2010 CHAPTER 7: Image Management-ViewStation & Photos and Diagrams Print Scaling 1. In the Image List window, double-click an image you wish to print, or click the image, then click Open. 2. Click Print, or right-click or press F4, then click Print. 3. Verify that the Fit to Image Box radio button is selected if you wish to scale the image to fit it in the image viewer of the Standard Print dialog box. 4. Click the Scale (%) radio button if you wish to enter the percentage to which you wish to enlarge or reduce the image for printing. 5. Double-click in the Scale % field, type the percentage to which you wish to enlarge or until the value appears in the reduce the image for printing, then press TAB, or click field. 6. Click the SAD radio button if you wish to scale the image based on the SAD value. 7. Click the SID radio button if you wish to scale the image based on the SID value. 8. Click the Custom SID radio button if you wish to enter or change the SID value for printing only. 9. Double-click in the Custom SID field, type the SID value, then press TAB, or click until the desired value appears in the field. Printing Medical Images You can print medical images on both a standard and a DICOM (Digital Imaging and Communications in Medicine) printer. Your system should be configured to print to a standard printer by default. If your facility purchased the DICOM option, an ELEKTA/Impac installer or your system administrator sets up the DICOM print option. In doing so, they also install the Merge application and grant you Image | DICOM | DICOM Configuration | Modify security rights. Whether you are using the Standard or DICOM print option, you can use the same print interface for both paper and film print functionality. CAUTION Before printing, you must enter accurate scaling information for the image. Refer to Scaling Medical Images in this chapter on page 164. To print images, you must have Administrative | General | Modify security rights. To view and work with images, you must have Image | ViewStation | Image Information | View and Image | ViewStation | Images | View CAUTION and Modify security rights. To print images on a DICOM printer, you must have Image | DICOM | DICOM Configuration | Modify security rights. Copyright 2010, Elekta Impac Software LUGMSQ0002/4.0/23-Sep-2010 167 MOSAIQ User’s Guide Setting up DICOM Print Options and Printing 1. In the Image List window, click Print to open the Standard Print dialog box. 2. Click the Dicom Print radio button to open the DICOM Print dialog box. 3. In the Image ID group of the Standard Print dialog box, verify that the Patient Name check box is selected if you wish to have the patient’s name printed on the image. 4. Verify that the Patient Med Rec # check box is selected if you wish to have the patient’s medical record number printed on the image. 5. Verify that the correct DICOM printer is selected in the Format group. If you need to , then click the name of the printer. change the printer, click 6. Click adjacent to the Type field in the Media group, then click the medium on which you wish to print. 7. Click adjacent to the Priority field in the Session group, then click the priority of printing this image in case there are other print jobs in the queue. 8. Verify or change if necessary the number of copies you wish to print of this image is entered in the Number of Copies field. 9. Click Status in the Film Printer group to show the status of the printer in blue text adjacent to the Status button. 10. Click Print. Setting up Standard Print Options and Printing 1. In the Image ID group of the Standard Print dialog box, verify that the Patient Name check box is selected if you wish to have the patient’s name printed on the image. 2. Verify that the Patient Med Rec # check box is selected if you wish to have the patient’s medical record number printed on the image. 3. In the Print Overlay group, click the White radio button if you do not want the treatment geometry and other data overlaid on the image to print in color (if you are printing to a color printer). 4. Click Print Setup verify that the correct printer and printing properties are selected. 5. Click Print. 168 Copyright 2010, Elekta Impac Software LUGMSQ0002/4.0/23-Sep-2010 CHAPTER 7: Image Management-ViewStation & Photos and Diagrams Viewing and Enhancing Images The Image window provides tools for enhancing and changing the view of images. To apply basic image viewing options, you must have Image | ViewStation | Basics | Enable security rights. To view and change images, you must have Image | ViewStation | Images | View and Modify security rights and Image | ViewStation | Image Information | View and Modify security rights. CAUTION To save and print images, you must have Administrative | General | Modify security rights. To copy and remove images, you must have Image | ViewStation and Maintenance | Copy/Move Images | Enable and Delete Images | Enable security rights. Magnifying Images 1. Open the patient’s chart. 2. Click eChart | Images… to open the Image List window. 3. Double-click the image, or click the image, then click Open to open the image in the Image window. 4. In the toolbox, click to zoom in on the image. Notice the zoom tools and zoom factor at the top of the Image window. You cannot change the zoom factor field. 5. Click twice to zoom out on the image. 100% identifies a 1:1 mapping of image pixels to monitor pixels. When the zoom ratio is reduced below 100%, a single monitor pixel shows multiple image pixels that have been combined by resampling. 6. If you wish to magnify a specific area of the image, click and drag the scroll bar at the bottom of the image viewer to show the area you wish to magnify, then click and drag the scroll bar on the side of the image viewer to best position the area you wish to magnify. 7. In the toolbox, click twice. 8. Click Cancel, then double-click the same image if you wish to reset the image magnification to the original settings and cannot remember the original zoom factor. Copyright 2010, Elekta Impac Software LUGMSQ0002/4.0/23-Sep-2010 169 MOSAIQ User’s Guide Changing Image Color 1. In the toolbox, click 2. Click to change the image tint to green. to restore the image to grayscale. Inverting the Image Contrast Scale 1. Click to reverse the image intensity map, basically reversing the colors. Reversing the image intensity map changes the image from positive to negative and vice versa, much like looking at a photograph and then looking at its negative. 2. Click to restore image intensity map to its original configuration. Using the Window and Level Tool You can also manually change the contrast (window) and brightness (level) of an image using the Window and Level tool. Changes to image window and level do not change the image pixel data, just how the data appears. 1. Position your mouse pointer over the red bar on the left to change the mouse pointer to . 2. Click and drag the red bar slowly all the way to the left to lengthen the image contrast, adding darker shades of grey, but keeping the brightest pixels constant. 3. Click and drag the red bar on the right side of the tool slowly to the far right to lengthen the image contrast again, adding brighter shades of grey. 4. Click and drag each of the red bars back to their original position to shorten the contrast, showing fewer shades of grey. 5. Click and drag the yellow bar slowly all the way to the right to change the window center, increasing the brightness. 6. Click and drag the yellow bar slowly all the way to the left to change the window center, decreasing the brightness. 7. Experiment with the brightness and contrast controls to obtain your desired contrast or detail. Using Filters 1. Click adjacent to the Filter field. 2. Click Sharpen to apply the sharpen filter, defining the edges of the image. adjacent to the Filter field, then click Reduce Noise to remove noise in the 3. Click image. adjacent to the Filter field, then click AHE to apply the Adaptive Histogram 4. Click Equalization filter. 170 Copyright 2010, Elekta Impac Software LUGMSQ0002/4.0/23-Sep-2010 CHAPTER 7: Image Management-ViewStation & Photos and Diagrams 5. Click adjacent to the Filter field, then click Shadow Filter to apply the Shadow filter. Notice that the image appears 3-D embossed and that the image shifts in the window as filter is applied (and removed). 6. Click adjacent to the Filter field, then click None to remove the applied filters. 7. Click OK to save your changes, or click Cancel to close the Image window without saving the changes. Using Image Controls for Multi-Slice Images When viewing and enhancing images that have multiple slices (called multi-slice images), additional window and level and display controls are available. Refer to Figure 32. Figure 32: Image Controls for Multi-Slice Images Notice that the Apply to W/L to all check box is checked. When the check box is checked, the image slices have the same contrast (window) and brightness (level). Uncheck this check box to change the window and leveling for the image slice shown only. 1. In the Image List window, double-click a multi-slice image. 2. Click the Apply W/L to all check box to de-select it. 3. Click and drag the right red bar of the Window and Level tool slowly to the far right to lengthen the grayscale and brighten the center of the image for the slice displayed only. 4. Click and drag the yellow bar to attain the desired brightness or detail to change the brightness in the window center. 5. Click 6. Click to automatically start showing the slices in the sequence. 7. Click to increase the speed of the display sequence. 8. Click to decrease the speed of display sequence. 9. Click to stop the automatic display. Copyright 2010, Elekta Impac Software LUGMSQ0002/4.0/23-Sep-2010 in the slice series display controls to show the next slice in the sequence. 171 MOSAIQ User’s Guide Annotating Images You can add annotations to images to communicate instructions or other information. For annotated images, the image viewer in the Image window shows two layers: Image Layer — contains the actual image. Object Layer — contains objects that you add to an image, such as rulers, lines, rectangles, text, and so on. When you change the brightness and contrast, you are working on the image layer, but when you add objects to the image, you are working on the object layer. The Toolbox also provides you with tools which you can use to draw shapes and lines, and enter text on your image. Using the Straight Line Tool 1. In the Toolbox, click to activate the straight line tool. 2. Drag the mouse pointer across the image to create a straight line. 3. If you wish to change the size or angle your line, click in the Toolbox, then click the line you created to activate the line object and show the sizing handles (the small boxes at either end of the line). 4. Position the mouse pointer on one of the sizing handles, then click and drag the sizing handle to change the length or angle of the line. 5. If you wish to move the line to another location, click to activate it, then drag the line to the desired location. 6. To delete the line, click DELETE. , click the anywhere on the line , click the anywhere on the line to activate it, then press 7. Click OK to save your changes. Using the Rectangle 1. In the Toolbox, click to turn on the rectangle tool. 2. Drag the mouse pointer across and down to the desired size of your rectangle. 3. To delete the rectangle, click , click the rectangle, then press DELETE. 4. To change the size of the rectangle, click to activate the selection tool. 5. Place the mouse pointer on one of the sizing handles of the rectangle, then drag the sizing handle to the desired size of the rectangle. 6. Click OK to save your changes. 172 Copyright 2010, Elekta Impac Software LUGMSQ0002/4.0/23-Sep-2010 CHAPTER 7: Image Management-ViewStation & Photos and Diagrams Using Ellipse Tools 1. In the Toolbox, click to activate the ellipse tool. 2. Drag the mouse pointer down and to the right to draw the desired size of your oval or circle. 3. To delete the oval or circle, click , click the object, then press DELETE. 4. To change the size of the oval or circle, click to activate the selection tool. 5. Place the mouse pointer on one of the sizing handles of the object, then drag the sizing handle to the desired size. 6. Click OK to save your changes. Using the Polygon Tool 1. In the Toolbox, click to activate the polygon tool. 2. Identify a shape in the image with at least six sides. 3. Choose a point on the edge of the shape with the mouse pointer, then click the left mouse button to anchor the first point of the polygon. 4. Move the mouse pointer to another point on the edge of the shape, then click the left mouse button to anchor the second point. 5. Continue drawing sides to the polygon, clicking at each point. You can add as many points to a polygon as you need to create a shape. 6. When you create the last side, click the first point you created in the polygon or press SPACEBAR to close the polygon. You can leave a polygon open by pressing END instead of creating the last side. 7. In the Toolbox, click . 8. To change the shape of the polygon, position the mouse pointer on any sizing handle in the polygon, then drag the sizing handle away from the other points in the polygon. 9. Experiment moving the points of the polygon to see how it affects the shape and size of the object. 10. Return the polygon to its approximate original shape and size. 11. To delete the polygon, click , click the object, then press DELETE. 12. Click OK to save your changes. Copyright 2010, Elekta Impac Software LUGMSQ0002/4.0/23-Sep-2010 173 MOSAIQ User’s Guide Using the Freehand Drawing Tool 1. In the Toolbox, click . 2. Identify a shape within the image, drag the mouse pointer around the outline of the shape, ending up at the starting point. Before releasing the mouse, press the SPACE BAR to close the freehand shape. You must press the SPACE BAR before releasing the mouse button to close the freehand object. Otherwise, you will not be able to fill the object with a pattern. 3. Click OK to save your changes. Using the Text Tool 1. In the Toolbox, click to activate the text tool. 2. Click the left mouse button in the location on the image where you wish to type the information. 3. Type the information you wish, such as Move 0.5 cm. 4. In the Toolbox, click to open the Annotation Settings dialog box. in the first drop list in the Font group, then click a font type, such as Times 5. Click New Roman. 6. Click in the second drop list in the Font group, then click a font size, such as 12. 7. Click the Selected radio button in the Bold, Italic, and/or Underline fields of the Text Style group to apply a text style. 8. Click a color square in the Color section to apply the desired color for the text. 9. Click OK to save your changes. Using the Arrow Tool 1. In the Toolbox, click object. if you wish to add an arrow pointing the text to a specific 2. Drag the mouse pointer from the text to the object. 3. Click OK to save your changes. 174 Copyright 2010, Elekta Impac Software LUGMSQ0002/4.0/23-Sep-2010 CHAPTER 7: Image Management-ViewStation & Photos and Diagrams Using the Fill and Color Options You can enhance any object using the fill and color options in the Annotation Settings dialog box. The options are shown in Figure 33. Figure 33: Fill and Color Options in the Annotation Settings Dialog box 1. Make sure the selection tool, 2. In the Toolbox, click , is turned on, then click the edge of an object. to open the Annotation Settings dialog box. 3. In the pattern bar, click , then click OK to add a fine dotted pattern to the object. 4. Draw a rectangle, then click . 5. Click the edge of the rectangle to activate it, then click 6. In the Pattern group, click rectangle. , then click OK to add a fine hatch pattern to the 7. Draw a circle inside the rectangle, click 8. Click . , then click the edge of the circle to activate it. to open the Annotation Settings dialog box. 9. In the pattern bar, click , then click OK to create a cutout hole through the rectangle, so that the image is shown within the perimeter of the selected object. In order to create a cutout hole, the object used to create the hole must be on top of the other object; that is, it must be created second. If it was not created second, you can change the positioning by right-clicking or pressing F4, then clicking Bring to Front or Send to Back commands. Refer to Changing Relative Object Position on page 177. 10. Click the edge of another object, then click box. 11. In the Pattern group, click object. , then click OK to add a coarse dotted pattern to the 12. Click the edge of another object, then click box. Copyright 2010, Elekta Impac Software LUGMSQ0002/4.0/23-Sep-2010 to open the Annotation Settings dialog to open the Annotation Settings dialog 175 MOSAIQ User’s Guide 13. Click a color square in the Color group, click apply a different color and a striped pattern. 14. Click the edge of a filled object, then click box. 15. Click in the pattern bar, then click OK to to open the Annotation Settings dialog in the pattern bar, then click OK to remove the pattern from the object. 16. Click OK to save your changes. Setting and Saving Annotation Preferences You use the Annotation Settings dialog box to apply text attributes, object patterns, and color. You can set defaults for all of these attributes by clicking on the desired styles in the Annotations Settings dialog box before selecting any objects. Once you set the defaults, subsequent text objects will automatically be assigned the default styles. You can also revert to the original default annotation settings in MOSAIQ. Refer to Figure 34. Figure 34: Annotation Settings Dialog Box 1. In the Toolbox, click to open the Annotation Settings dialog box. 2. In the Color group, click the desired color, then click a pattern, such as pattern bar. , in the 3. In the Font group, click in the first drop list, click the font you wish to use, click in the second drop list, then click font size you wish to apply. 4. In the Text Style group, click the Selected or Deselected radio buttons for Bold, Italic, and Underline to specify text styles. 6. Click OK to save your settings and close the Annotation Settings dialog box. 7. Draw an object on the image to see all of your settings applied. 176 Copyright 2010, Elekta Impac Software LUGMSQ0002/4.0/23-Sep-2010 CHAPTER 7: Image Management-ViewStation & Photos and Diagrams 8. Click , then click Reset to change the annotation settings back to the default settings in MOSAIQ. These are the original settings selected when MOSAIQ was installed, not the settings previously specified in the Annotation Settings dialog box. 9. Click OK to save the default settings, then close the Annotation Settings dialog box. Adding Comments for Informal Communications 1. Click anywhere in a free area of the Comment field. 2. Type your informal note, such as Blocks should be cut from shapes indicated on the image. 3. Click OK in the Image window to save the comment. The Comment field is designed for informal notes and is not part of the clinical record. You cannot lock the notes entered in this CAUTION field. Changing Relative Object Position 1. In the Image window, click the edge of an object that is inside another object, such as a circle inside a rectangle. 2. Right-click or press F4, then click Send to Back to send the object to the back. 3. Right-click or press F4, then click Bring to Front to bring the object to the front. Saving Annotated Images When you have finished annotating the image in the Image window, click OK. CAUTION If you click Cancel or in the title bar of the Image window, your changes in the Image window are not saved. Working with Multiple Annotations at a Time 1. Right-click or press F4, then click Select All Annotations. 2. Click one of the objects and continue to press the mouse button, then drag the objects to the location you wish in the image viewer. 3. Click to open the Annotation Settings dialog box. 4. Change the color, pattern, font, and text style as you wish, then click OK to apply the new settings to all of the selected objects. 5. Click anywhere in the image viewer to de-select the objects. Copyright 2010, Elekta Impac Software LUGMSQ0002/4.0/23-Sep-2010 177 MOSAIQ User’s Guide 6. Right-click or press F4, then click Delete All to delete all of the annotations in the image viewer of the Image window. 7. Click Cancel or to close the Image window without saving the changes. 8. Open the same image again from the Image List window. 9. Click one of the objects, press and hold the SHIFT or CTRL key, then click text or another object to select two objects. You can press and hold the SHIFT or CTRL keys, then click as many objects as you wish to select. 10. Press DELETE to delete the selected annotations. 11. Click OK to save your changes, or click Cancel to close the Image window without saving the changes. Viewing Layers 1. Open an image that is associated with a treatment field and has annotations in the Image window. 2. Right-click or press F4, point to Preferences, then click View Annotations to hide the annotations and show only the image in the image viewer. 3. Click the Annotations check box to show both the object and image layers again. Changing the Orientation of Images 1. Open an image with annotation from the Image List window. 2. Right-click or press F4, then point to Image Orientation. 3. Click Flip Horizontally in the Image Orientation sub-menu. A message appears, letting you know that annotations and scaling information will be lost. 4. Click Yes in the message box to flip the image in the Image window. 5. Right-click or press F4, point to Image Orientation, then click Restore Orientation. Changes the image to its original position, but does not restore the annotations and scaling information. 6. Click OK. 178 Copyright 2010, Elekta Impac Software LUGMSQ0002/4.0/23-Sep-2010 CHAPTER 7: Image Management-ViewStation & Photos and Diagrams Working with Images Annotated Outside of MOSAIQ You can import images that already have annotations into MOSAIQ. In the Image window, you can view and hide the imported annotations and descriptive labels, and add new annotations to the image. In MOSAIQ, DICOM curves are synonymous with imported annotations. DICOM curves consist of two parts: a curve or line and a label. 1. In the Image List window, double-click an image that has imported annotations and is associated with a treatment field. You cannot change or remove imported annotations. 2. Click the Imported Annotations check box to hide the imported annotations. The Imported Annotations check box only appears under the following conditions: The image has imported annotations. The image is not reoriented. The Imported Annotations check box appears but is grayed out when you are reticle scaling the image. 3. Click the Imported Annotations check box again to show the imported annotations again. 4. Right-click or press F4, then point to Preferences. 5. Click View Annotation Labels to show descriptive labels for the imported annotations on the image. You can add annotations to images with imported annotations. 6. Click OK to save the changes, then closes the Image window. Copyright 2010, Elekta Impac Software LUGMSQ0002/4.0/23-Sep-2010 179 MOSAIQ User’s Guide Using Edge Detection Options in MOSAIQ MOSAIQ ViewStation provides an automatic edge detection feature, and options for manually producing a field edge polygon if the automatic edge detection feature does not achieve the desired results. Extracting Treatment Field Edges 1. Click eChart | Images… to open the Image List window. 2. Double-click a portal image that is associated with a treatment field. 3. Right-click or press F4, then click Lock Tx Field Edge to unlock the treatment edge for editing. The Tx Field Image option is only available when the following conditions are met: The image is part of the selected patient’s treatment history. The portal image can be edited. The source of the portal image is Varian Portal Vision version 5.x or 6.x. The image is associated with a treatment field. The image does not have a locked field edge. The image has not been approved, voided, or rejected. The image is not in VS Format. The Shadow filter has not been applied to the image. 4. Right-click or press F4, then click Tx Field Image to mark the verification image as a treatment field image. 180 Copyright 2010, Elekta Impac Software LUGMSQ0002/4.0/23-Sep-2010 CHAPTER 7: Image Management-ViewStation & Photos and Diagrams The Tx Field Edge Extraction option is only available when the following conditions are met: The Tx Field Image option is selected, so the image is marked as a treatment field image. The image is part of the selected patient’s treatment history. The portal image can be edited. The source of the portal image is Varian Portal Vision version 5.x or 6.x. The image is associated with a treatment field. The image does not have a locked field edge. The image has not been approved, voided, or rejected. The image is not in VS Format. The AHE or Shadow filter has not been applied to the image. 5. Right-click or press F4, then click Tx Field Edge Extraction to show the extracted treatment field edge on the image. 6. Click and drag the center bar on the Window and Level tool until you attain the optimal view of the extracted edges. 7. Click anywhere on the extracted edge to select the edge. 8. Click any of the sizing handles, then drag the extracted edge to adjust it as needed. Copy and Pasting Treatment Field Edges on Multi-Slice Images You must verify that a pair of portal images consists of a matching open/shaped port before you copy a field edge from WARNING one image to a different one. 1. Open an open field portal image with extracted field edges. 2. On the first image slice of the open field portal image, right-click or press F4, then click Copy Tx Field Edge. 3. Click in the slice series display controls. 4. Right-click or press F4, then click Paste Tx Field Edge. 5. Click OK. Copyright 2010, Elekta Impac Software LUGMSQ0002/4.0/23-Sep-2010 181 MOSAIQ User’s Guide Copy and Pasting Treatment Field Edges on a Separate Image 1. Open an open field portal image with extracted field edges. This is called the source image. The image must be associated with a treatment field. 2. Right-click or press F4, then click Copy Tx Field Edge. 3. Click and drag the Image window with the source image to the side, so that you can see the Image List window. Do not close the Image window for the source image. If you close the Image window with the source image, you cannot paste the copied field edges. 4. In the Image List window, double-click the portal image on which you wish to paste the treatment field edges. This is called the target image. 5. Right-click or press F4, then click Paste Tx Field Edge. 6. Click OK in the Image window for the target image. 7. Click OK in the Image window for the source image. Managing the Image Review Process – for Physicians Once the films are acquired or images are imported into MOSAIQ and the therapists or dosimetrists have completed their tasks, the images are ready for the physician’s review. To apply basic image viewing options, you must have Image | ViewStation | Basics | Enable security rights. To view and modify images, you must have Image | ViewStation | Images | View and Modify security rights and Image | ViewStation | Image Information | View and Modify security rights. CAUTION To save and print images, you must have Administrative | General | Modify rights. To copy and remove images, you must have Image | ViewStation and Maintenance | Copy/Move Images | Enable and Delete Images | Enable security rights. Checking the Image Work List for Images Requiring Reviews 1. Log on to MOSAIQ using the username and password of a physician. 2. Click Tools | Image Work List to open the Image Work List dialog box. 182 Copyright 2010, Elekta Impac Software LUGMSQ0002/4.0/23-Sep-2010 CHAPTER 7: Image Management-ViewStation & Photos and Diagrams 3. Click adjacent to the Images requiring field, then click Review. Physicians most often select the Review filter. Therapists and dosimetrists use mostly the change filters. The Review filter limits the patient list generated to those patients with images requiring reviews only. 4. Click adjacent to the Attending field, then click one of the following filter options: Your name if you are a physician reviewing your patients’ images. The name of the physician whose images you need to review. Attending to generate a list of all images requiring reviews for all attending physicians entered in the system. Other if your name or the physician whose images you must review is not on the list. Residents must select the name of the physician whose patient images they are reviewing. adjacent to the Resident status field, then click Any Status to generate a list of 5. Click patient images regardless of the resident’s review status, or click one of the filters described below: Not Reviewed To include patient images that the resident did not review yet in the list generated. Reviewed To include patient images that that the resident approved or rejected in the list generated. Approved To include only images that the resident approved in the list generated. Physicians can use this search filter to check the changes the Resident made to the review status. 6. If you wish to see a list of patients with images for a specific time frame, click the Taken weeks check box, then type the number of weeks in to within the past specify the time frame in weeks, or click to specify the number of weeks in the time frame. 7. Click a patient name listed in the table to the right of the Criteria group in the Image Work List dialog box. This shows the images for the selected patient in the image information table at the bottom of the dialog box. Copyright 2010, Elekta Impac Software LUGMSQ0002/4.0/23-Sep-2010 183 MOSAIQ User’s Guide Reviewing/Approving Images from the Image Work List 1. Click Tools | Image Work List to open the Image Work List dialog box. 2. Use the search filters to generate the list of patient images you need to review. Refer to Checking the Image Work List for Images Requiring Reviews on page 182. 3. In the Image Work List dialog box, click the patient name listed in the table to the right of the Criteria group. This shows the images for the selected patient in the image information table at the bottom of the dialog box. 4. In the lower section of the Image Work List dialog box, click the image you wish to review, then click Review to open the image(s) in the Image Review window. If you are reviewing an image pair, click the verification image, then click OK. 5. Click the viewer of the image you are reviewing to activate the viewer. In the Image Review window, you must click the image in the viewer to activate it before you can annotate or enhance the image. 6. If you wish to show the treatment geometry on the image, click the Geometry check box in the View section of the window. 7. If you wish to show a graticule on the image, right-click, point to Preferences, then click View Graticule. 8. On the Changes tab, click the Field check box under Requested to request a field change. 9. If you wish to request a block change, click the Block check box under Requested. 10. If you wish to specify that a new image must be taken after completing the change request, click the Re-image check box under Requested. 11. If you wish to specify a change other than a field, block, or re-image change, click the Other check box under Requested. 12. Click , then type your review comment for the Other change request on the image. We do not recommend typing important information about change requests in the Comment field because if someone deletes the information, it is no longer part of the clinical record. CAUTION The Comment field is designed for informal notes. You cannot lock the notes entered in this field. 184 Copyright 2010, Elekta Impac Software LUGMSQ0002/4.0/23-Sep-2010 CHAPTER 7: Image Management-ViewStation & Photos and Diagrams If you wish to annotate or enhance images during your review, refer to Annotating Images on page 172. 13. In the Review Status section, click the Physician radio button if it is not selected. If you are a Resident, click Resident. The Physician’s review status supersedes the Resident’s review status. 14. If you did not log on with your username and password, click in the drop list below the Physician and Resident radio buttons, then click your name. 15. If you are requesting changes to the image, click the Rejected radio button. 16. If you are satisfied with the image, click the Approved radio button. 17. If you wish to void an approved or rejected image, click the Void check box. The Void check box is only enabled for rejected or approved images. Only Physicians can use this option. If you reject an image, you must request a change on the Changes tab in order to void the image. 18. Click another image you wish to review in the image information table in the lower section of the Image Review window. 19. Repeat steps 5 — 18 until you have reviewed all of the images for the patient. We recommend that you review and select the review status for all of the patient images in the image information list of the Image Review window. Then, click OK once when you have completed your changes. This enables you to save your review of all the images at the same time. 20. Click OK, which opens the Review Approval dialog box. Your username automatically appears in the Name field. 21. Type your password in the Password field, then click OK to save the review statuses and change requests for all of the images you reviewed. Copyright 2010, Elekta Impac Software LUGMSQ0002/4.0/23-Sep-2010 185 MOSAIQ User’s Guide Opening the Image Review window from the Image List Window 1. Open the patient chart. 2. Click eChart | Images… to open the Image List window. Refer to Using the Image List Window on page 160. 3. Click the image you wish to review, then press the SPACE BAR to tag the image. 4. Repeat step 3 until you have tagged all of the images you wish to review. 5. Click Review to open the Image Review window. Refer to Reviewing/Approving Images from the Image Work List on page 184 to complete your review. Reviewing/Approving Images in the Image Window 1. Click the image you wish to review, then click Open to open the Image window. If you wish to review an image pair, tag the images, then click Open. This opens the Image window for the verification image, then opens an Image window for the reference image. You can click on either window as needed when completing your review. If you are reviewing multiple images, we recommend reviewing images from the Image Work List dialog box. The review process is much more efficient using the search criteria in the Image Work List and the options in the Image Review window. 2. Complete steps 6-17 in Reviewing/Approving Images from the Image Work List to review the images. 3. Click OK, which opens the Review Approval dialog box. Your username automatically appears in the Name field. 4. Type your password in the Password field, then click OK to save the review status and change request for the image. Checking the Review Status in the Image Information window 1. In the Image window, right-click, then click Image Information. 2. Click the Review/Request Status tab, which shows the review status and change requests for the image in the Image window. 3. Click Cancel to return to the Image window. 186 Copyright 2010, Elekta Impac Software LUGMSQ0002/4.0/23-Sep-2010 CHAPTER 7: Image Management-ViewStation & Photos and Diagrams Managing the Image Review Process - for Therapists After the Physician completes the review, the images requiring changes are automatically placed in the Image Work List for the Therapist or Dosimetrist to check and complete the changes. To apply basic image viewing options, you must have Image | ViewStation | Basics | Enable security rights. To view and modify images, you must have Image | ViewStation | Images | View and Modify security rights and Image | ViewStation | Image Information | View and Modify security rights. CAUTION To save and print images, you must have Administrative | General | Modify rights. To copy and remove images, you must have Image | ViewStation and Maintenance | Copy/Move Images | Enable and Delete Images | Enable security rights. To view the Treatment Delivery Table, you must have Clinical | Tx Delivery | View security rights. Checking Changes Required from the Image Work List 1. Log on to MOSAIQ using the username and password of a therapist. 2. In the menu bar, click Tools, then click Image Work List to open the Image Work List dialog box. adjacent to the Images requiring field, then click the appropriate change filter to 3. Click generate a list of patient images requiring the specific change, or click Any Change to generate a list of all patient images with change requests. Therapists and dosimetrists use mostly the change filters. Below is a description of the change filters. Any Change Limits the patient list to those patients with images requiring changes. Block Change Limits the patient list to those patients with images requiring block changes. Field Change Limits the patient list to those patients with images requiring field changes. Re-image Change Limits the patient list to those patients with images that must be taken again. Copyright 2010, Elekta Impac Software LUGMSQ0002/4.0/23-Sep-2010 187 MOSAIQ User’s Guide Other Change Limits the patient list to those patients with images requiring changes. 4. Click adjacent to the Attending field, then click Any Attending if you wish to generate a list of all patients with images that are assigned change requests, or click the physician name to generate a list of patient images with change requests for the selected physician. adjacent to the Machine field, then click Any Machine to generate a list of 5. Click patient images acquired on any treatment machine, or click a specific machine to list patients with images acquired on the specified machine only. 6. If you wish to see a list of patients with images for a specific time frame, click the Taken weeks check box, then type the number of weeks in to within the past specify the time frame in weeks, or click to specify the number of weeks in the time frame. 7. Click a patient name listed in the table to the right of the Criteria group in the Image Work List dialog box to show the images for the selected patient in the table in the lower section of the dialog box. Completing the Change Requests 1. Log on to MOSAIQ with the username and password of a therapist. 2. In the menu bar, click Tools, then click Image Work List to open the Image Work List dialog box. 3. Generate a list of patient images with change requests you need to complete. Refer to Checking Change Requests Required from the Image Work List on page 187. 4. In the table in the lower section of Image Work List dialog box, click an image with a change request, then click Review. 5. On the Changes tab, click the check box under Completed to mark the change request as Completed. You do not need to clear the Re-image check box. When the new images are imported by Namer, this check box automatically clears. 6. In the image information table, click the subsequent image for which you must complete a change request to open the image in the Image Review window. 7. Click the check box under Completed for the change requested for this image. 8. Repeat steps 3 and 4 until you have completed all of the change requests 9. Click OK to save your changes, then close the Image Review window. The change requests no longer appear in the Image Work List dialog box. 188 Copyright 2010, Elekta Impac Software LUGMSQ0002/4.0/23-Sep-2010 CHAPTER 7: Image Management-ViewStation & Photos and Diagrams Checking Changes Required from the Image List Window We recommend checking for images with change request from the Image Work List dialog box, as described in Checking the Change Requests from the Image Work List and Completing the Change Requests. The process is much more efficient using the search criteria in this dialog box. 1. Open the patient chart, then click eChart |Images… to open the Image List window. 2. Click the image for which you must complete a change request, then press the SPACE BAR to tag the image. 3. Repeat step 2 until you have tagged all of the images with change requests that you wish to check. 4. Click Review to open the Image Review window. Notice that all of the images you tagged appear in the image information table of the Image Review window. 5. Click the check box under Completed to mark the change request Completed. 6. In the image information table, click the next image for which you must complete a change request. 7. Repeat steps 5 and 6 until you have marked all of the completed change requests Completed. 8. Click OK to save your changes, then close the Image Review window. Notice the change requests are marked Done in the Image List window. 9. In the Image List window, click another image with a change request you must complete. This opens the image in the Image window. Notice that the Review Status and the Change Request Status sections are exactly the same as in the Image Review window. 10. Click the check box under Completed to mark the change request Completed. 11. Click OK to save your changes, then close the Image window. Copyright 2010, Elekta Impac Software LUGMSQ0002/4.0/23-Sep-2010 189 MOSAIQ User’s Guide Checking the Review Status from the Image information window 1. Open the patient chart, then click eChart |Images… to open the Image List window. 2. Click the image for which you wish to check its review status, then click Open to open the Image window. 3. Right-click or press F4, then click Image Information. 4. Click the Review/Request Status tab to show the review status and change requests for the image that appears in the Image window. Notice the review status, initials of the Physician or Resident who reviewed the image, and the date and time of his/her review appear in the Review Status group. The Change Request group shows the initials of the therapist and the date and time the change request was marked Completed. 5. Click Cancel to return to Image window. 6. Click OK to close the Image window. Checking for Required Changes from the Port Film Status Window 1. Click eChart | Radiotherapy… to open the Treatment Chart window. You can also click the RO Treat icon to open the Treatment Chart window. 2. Click Treat to open the Treatment Delivery Table window. 3. Right-click, then click View Portfilms… to open the Port Film Status window. All the fields with images requiring changes or reviews appear in this window. If you are treating a field that has associated images requiring reviews or changes, the Port Film Status window only shows images for the field. 4. Click the image that requires changes, then click View to open the Image Review window. 5. Click the check box under Completed to mark the change request Completed. You can complete all of the change requests for the images listed in the image information table of the Image Review window. Refer to Completing the Change Request on page 188. 6. Click OK to return to the Port Film Status window. 190 Copyright 2010, Elekta Impac Software LUGMSQ0002/4.0/23-Sep-2010 CHAPTER 7: Image Management-ViewStation & Photos and Diagrams 7. Click Close twice to close the Treatment Delivery Table dialog box and Treatment Chart window. If you are treating a field, when you click Select in the Treatment Delivery Table dialog box, the Port Film Status window opens if the field has associated images that require changes or reviews or has a Voided or Rejected review status. The system only issues the alert to open the Port Film Status window if the Portal Image Check check box is selected in the system utilities. Click File | System Utilities | Department Setup…, then click the Clinical (RO) tab to make sure that this CAUTION check box is selected. If the Portal Image Check check box is not selected, contact your system administrator. Planar Image Registration Image Registration is the process that you use to fuse a verification (portal/treatment) image with a reference (DRR or simulator) image then calculate positional offsets for patient positioning. Given the two images with their corresponding beam isocenters, MOSAIQ computes the translational shifts required to align the patient to match the anatomy in the verification image with the anatomy in the reference image. The difference between the beam isocenters of these images yields the computed positional shifts. (The computed positional shifts are shifts required to move the patient so that he/she is properly aligned with respect to the planned treatment setup.) The verification (portal) image lets you review current beam position relative to intended position as shown on the reference (DRR or simulator) image. In the registration process, make sure that the reference and treatment images are in Beam's Eye View coordinates. That is, the anatomy in the images appears as if the gantry axis is perpendicular to the top of the image viewer and the gantry stand is at the top of the window (gantry-up position). Use applicable caution when you flip images to be used by the registration process. (If you CAUTION flip an image, it does not have the same effect as if you rotated the same image 180˚.) It is your responsibility to review calculated shift direction and magnitude before you save images. We recommend that you make modifications if clinically necessary. You must have Image | ViewStation | Review Images | Enable and Image | ViewStation | Image Information | Modify security rights to CAUTION register treatment images for planar (2D) shift analysis. Copyright 2010, Elekta Impac Software LUGMSQ0002/4.0/23-Sep-2010 191 MOSAIQ User’s Guide Preparing the System and Patient for Image Registration Make sure that your treatment machine gantry, collimator, SAD, and all couch sections are properly characterized. Your ELEKTA/Impac installer typically does this. The Image Registration process will not work properly if your machine is not properly CAUTION characterized. Contact ELEKTA/Impac to assist you with proper machine characterization. Configuring Setup Offset Reference 1. Click File | System Utilities | Department Setup…, then click the Clinical (RO) tab in the Department Setup dialog box. 2. Click adjacent to the Setup Offset Reference field. Shows the two Setup Offset Reference options, as shown in Figure 35. Figure 35: Setup Offset Reference Options These options specify whether to move the isocenter or patient in the direction of setup correction. The settings are opposite each another. If you move the patient in the inferior direction, the isocenter moves in the superior direction. 3. Click Isocenter to configure MOSAIQ for isocenter movement. The offset is 5cm in the superior direction for the isocenter setting. Error! Reference source not found. shows a 5 cm shift. 4. Click Patient to configure MOSAIQ for the direction of the patient motion. The offset would be 5mm in the inferior direction for this setting. Entering Site Setup for the Prescription MOSAIQ uses the machine coordinates from the machine characterization and the patient orientation specified in the Site Setup Definition window to provide set-up corrections in patient coordinates. The ELEKTA/Impac installers or your system administrator characterizes the machines in MOSAIQ, but you must add the patient orientation setting in the Site Setup Definition window if it was not imported with your treatment plan. Image Registration also requires a site setup for all prescription sites. 1. Click eChart | Diagnoses and Interventions… to open the Diagnoses and Interventions window. 2. Click the Radiation Prescription in the Diagnoses and Interventions window, then click Site Setup. 192 Copyright 2010, Elekta Impac Software LUGMSQ0002/4.0/23-Sep-2010 CHAPTER 7: Image Management-ViewStation & Photos and Diagrams 3. Click adjacent to the Patient Orientation field, then click the applicable patient orientation setting. Figure 36 shows the drop list of patient orientation settings in the system. Figure 36: Patient Orientation Settings For safety purposes, there is no default patient orientation. Configuring Treatment Field Definition Data Before using Image Registration, you must enter the gantry and couch angles in the Treatment Field Definition dialog box With regard to the gantry angle, 2D Image Registration is only available for images at cardinal angles. Cardinal angles are 0°, 90°, 180°, and 270°. With regard to the couch angle, the couch must be perpendicular to the gantry. This angle will be either 0.0° or 180° depending on your machine characterization. Figure 37 shows the Gantry/Collimator and Couch sections in the Treatment Field Definition dialog boxes. Figure 37: Gantry and Couch Angles in the Treatment Field Definition Copyright 2010, Elekta Impac Software LUGMSQ0002/4.0/23-Sep-2010 193 MOSAIQ User’s Guide If your site has purchased and registered Setup Intelligence, you can also register stereoscopic and 3D image sets. Using the Image Registration Editor MOSAIQ gives you the choice of four image registration methods: Point, Curve, Grayscale, and Manual. Point Registration applies to images with Gold Seed or Fiducial markers to align the images. Curve Registration uses lines and shapes to show visible anatomy. Grayscale Registration uses a specified region of interest with distinguishable anatomy on the verification image to match against the reference image. Manual registration requires you to align the anatomy in the images. For Image Registration, you must use a reference image that is associated with a treatment or setup field. Refer to Associating Images on page 151. The reference image must also be reticle scaled. You can reticle scale images in the Image window or the Image Registration Editor window. Refer to Reticle Scaling Reference Images on page 153 and Reticle Scaling Verification Images on page 156. Some reference (simulator or DRR) images are already reticle scaled when they are imported into MOSAIQ. In the Image Registration Editor window, you can specify reference (fiducial) points and curves for image registration and review. You can also reticle scale images in the Image Registration Editor window. Refer to Reticle Scaling Verification Images on page 156. MOSAIQ uses reference images throughout the course of treatment and locks images after recording a registration. Applying Points or Curves 1. Open the patient chart, then click eChart | Images… to open the Image List window. 2. Click a DRR to which you want to apply points or curves, then click Open to open the Image window. Do not click Review. 3. Right-click or press F4, then click Registration Editor… to open the Image Registration Editor window. Figure 38 shows the Image Registration Editor window. 194 Copyright 2010, Elekta Impac Software LUGMSQ0002/4.0/23-Sep-2010 CHAPTER 7: Image Management-ViewStation & Photos and Diagrams Figure 38: Image Registration Editor Window In this window, you must first specify the curves, fiducial points, or registration region by selecting the Image Registration method you want to use before you register the images. The remaining steps explain how to do this for the Point and Curve Registration methods. If you need to change points or curves on a locked reference image, you can copy the image in the Image List window. Refer to Copying images from the Image List window on page 163. The copied image is unlocked. Make your changes to the new image, then click the Use for Tx Definition check box in the Image window. Make sure to consider your maximum portal image exposure area. Add your points and curves within this area. 4. Click the Point Registration check box in the Image Registration Methods group to apply points to the image. 5. Click from the tool palette. 6. Put the red X where you want a point and click to set the first point. MOSAIQ automatically gives points labels. Copyright 2010, Elekta Impac Software LUGMSQ0002/4.0/23-Sep-2010 195 MOSAIQ User’s Guide 7. Repeat step 7 until you have all the points you want. 8. If you want to move a point, select . Notice that the points turn green when you place 9. Click and drag the point with over them. to the position you want. 10. Click the Curve Registration check box to draw curves with the Points, Curves, or Registration Region tool. 11. Put the red X where you want to start the curve, then click and drag curve. to draw the Refer to Figure 39 for example of the curve drawn on the image. Figure 39: Example of Curve 12. Continue drawing curves until you have all the curves you want. 13. Right-click and drag it back over a point or curve to erase them. 14. Click Save in the Image Registration Editor window. 15. Click OK to save your changes in the Image Registration Editor window and close the Image window. 196 Copyright 2010, Elekta Impac Software LUGMSQ0002/4.0/23-Sep-2010 CHAPTER 7: Image Management-ViewStation & Photos and Diagrams Promote Curve Layer Annotations For images imported into MOSAIQ with annotations, you can select and copy imported annotations to the patient positioning curve layer for curve matching as follows: in the Image Registration window to open the Curve Layer Selection dialog 1. Click box, as shown in Figure 40. Figure 40: Curve Layer Selection Dialog Box 2. Click the check boxes for the annotation curves that you want to show on the reference image. 3. Click OK to copy the selected annotation(s) to the patient positioning curve layer. Registering Images Reticle scale images before attempting to register them. Image registration requires an isocenter on both images to calculate offsets, regardless of the registration method. Refer to Reticle CAUTION Scaling Reference Images on page 153 and Reticle Scaling Verification Images on page 156. The Image Registration process has the following requirements: Your linac must be properly characterized, including SAD and couch sections. You must specify a Patient Orientation. You must specify the couch and gantry positions for the treatment and setup fields in the Treatment Field Definition. 1. Open the patient chart, then click Tools | Image Work List to open the Image Work List dialog box. 2. In the Image Work List, set the search criteria to show a list of all images requiring review. Refer to Checking the Image Work List for Images Requiring Reviews on page 182. 3. Click the image pair you wish to register, then click Review to open the images in the Image Review window. Copyright 2010, Elekta Impac Software LUGMSQ0002/4.0/23-Sep-2010 197 MOSAIQ User’s Guide 4. Click the Isocenter Offset tab, then click Register to open the Image Registration window. If the Register button is not available, at least one of the registration requirements was not met. 5. Follow the instructions in one of the four subsections below for the Image Registration method you wish to use. Manual Registration 1. Make sure that your reference and verification images are reticle scaled. 2. Click the Manual Registration check box. 3. Click Calculate Shifts in the Image Registration window to open the Isocenter Shifts window. If you selected Patient for the Setup Offset Reference setting in the system utilities, this window is labeled Patient Shifts, instead of Isocenter Shifts. Refer to Configuring Setup Offset Reference on page 192. MOSAIQ registers the central axis of each image to the other and fuses the images. Refer to Figure 41 below. Figure 41: Isocenter Shifts Window 198 Copyright 2010, Elekta Impac Software LUGMSQ0002/4.0/23-Sep-2010 CHAPTER 7: Image Management-ViewStation & Photos and Diagrams 4. Make sure the Image Fusion check box is selected in the Visualization Type group. Image Fusion is selected by default. Refer to Figure 42 below. Figure 42: Image Fusion Check box Image fusion shows the images overlaid. 5. Press and hold the CTRL key and click the left mouse button to show the Spyglass tool. The Spyglass tool appears superimposed over the reference image, and only shows a portion of verification image in the 1.5cm X 1.5cm red square, which changes as you drag the Spyglass tool over the reference image. This tool lets you see the corresponding anatomy at a particular location. 6. To enlarge the spyglass area, press and hold the CTRL key, then press the Right Arrow key. Refer to Figure 43 below for an example. Figure 43: Enlarged Spyglass Area 7. To reduce the spyglass area, hold the CTRL key down, then press the Left Arrow key. 8. Use the Image Fusion controls as follows to change the translucence of the images and the colors. You can distinguish between images by the image colors and varying opacity levels. To change the translucence of the reference image, click and drag the Reference slider to the desired percentage. To change the translucence of the verification image, click and drag the Treatment slider to the desired percentage. Copyright 2010, Elekta Impac Software LUGMSQ0002/4.0/23-Sep-2010 199 MOSAIQ User’s Guide To change the color of the reference image, double-click . To change the color of the verification image, double-click . To save the new color or the reference or verification image, right-click the new color, then click Save Settings. 9. Click the Show Beam Isocenters check box to show the beam isocenters of both images. 10. Click the Show Points check box to show the points to better see important landmarks. 11. Click the Show Curves check box to show the curves to better see important landmarks. 12. Click the Checkerboard Pattern check box in the Visualization Type group to show alternating areas of each fused image. The default setting is four areas. 13. Click and drag the sliders for the Checkerboard Pattern controls to change the number of areas on the checkerboard. Refer to Figure 44. Figure 44: Checkerboard Pattern Controls 14. Leave the Lock check box selected, which is selected by default, to set the same number of horizontal and vertical areas when you move either slider. Click the Lock check box to deselect it, so that you can set the vertical or the horizontal areas independently. This method can be helpful to register fields with several bony landmarks such as the pelvis, head, or spine. 15. Press and hold the CTRL key, then click and drag your mouse over the image viewer to move the checkerboard. 16. Right-click in the image viewer to show the Rotate, Translate, and Scale options. When you use Manual Registration, you must align the anatomy in both images yourself, so you use these options to improve your alignment. These options are available regardless of the option selected in the Visualization Type group. 17. To move the verification image, right-click, then click Translate. You can then drag the image in any direction you want to identify isocenter position corrections. As you move the verification image, MOSAIQ calculates the offsets, which you can see on the Isocenter Shifts tab in the Isocenter Shifts window. 200 Copyright 2010, Elekta Impac Software LUGMSQ0002/4.0/23-Sep-2010 CHAPTER 7: Image Management-ViewStation & Photos and Diagrams 18. To rotate the verification image in relation to the reference image, right-click in the image viewer, then click Rotate. 19. To rotate the verification image in relation to the reference image, right-click, then click Scale to scale the verification image in relation to the reference image. The reference and verification images are scaled independently to SAD. Variation in anatomic projection between the two images can indicate a difference between the planned and current isocenter positional depth. The Scale option lets you correct for this difference. 20. Use the number pad on your keyboard to make small adjustments to registration results. Press and hold the CTRL key, then press a number pad arrow key (2, 4, 6, 8) to move the verification image in half pixel increments. Press and hold the CTRL key, then press the 7 key to decrease the scale of the verification image by a factor of 0.0016. Press and hold the CTRL key, then press the 9 key to increase the scale of the verification image by a factor of 0.0016. Press and hold the CTRL key, then press the 1 key to rotate the verification image clockwise in 0.02° increments. Press and hold the CTRL key, then press the 3 key to rotate the verification image counterclockwise in 0.02° increments. Press and hold the CTRL key, then press the - key to return the verification image to its original location. These options are available regardless of the option selected in the Visualization Type section. 21. Click OK when you have the offset you want on the Isocenter Shifts tab. Point Registration 1. Click the Point Registration check box in the Image Registration window. 2. Set points on the verification image in the Image Registration window that correspond with those on the reference image. Refer to Applying Points or Curves on page 195. 3. Click Calculate Shifts. Copyright 2010, Elekta Impac Software LUGMSQ0002/4.0/23-Sep-2010 201 MOSAIQ User’s Guide Figure 45: Point Registration in the Isocenter Shifts Window MOSAIQ automatically calculates the offset for Point Registration. 4. Click Start Search on the Isocenter Shifts tab to run the matching algorithm. MOSAIQ automatically matches the points on the reference and verification images. Click the Stop Search button to stop the matching algorithm. You can see the shift that MOSAIQ calculated on the Isocenter Shifts tab. Refer to Figure 46. Figure 46: Isocenter Shifts Tab for Point Registration 5. Follow steps 16-20 under Manual Registration to align the anatomy in both images. 6. Click OK when you have the offset you want on the Isocenter Shifts tab. 202 Copyright 2010, Elekta Impac Software LUGMSQ0002/4.0/23-Sep-2010 CHAPTER 7: Image Management-ViewStation & Photos and Diagrams Curve Registration 1. Click the Curve Registration check box in the Image Registration window. 2. Draw curves on the verification image in the Image Registration window that correspond with those on the reference image. Refer Applying Points or Curves on page 195. Unlike Point registration, you do not have to draw every curve that you see on the reference image. 3. Click Calculate Shift to open the Isocenter Shifts window. Refer to Figure 47. Figure 47: Isocenter Shifts Window - Curve Registration MOSAIQ automatically calculates the offset when you select Curve registration. 4. Click Start Search on the Isocenter Shifts tab to run the matching algorithm. MOSAIQ automatically matches the curves on the reference and verification images. Click the Stop Search button to stop the matching algorithm. You can see the shift that MOSAIQ calculated on the Isocenter Shifts tab. Refer to Figure 48. Figure 48: Isocenter Shifts Tab - Curve Registration Copyright 2010, Elekta Impac Software LUGMSQ0002/4.0/23-Sep-2010 203 MOSAIQ User’s Guide 5. Follow steps 16-20 under Manual Registration to move the verification image. 6. Click OK when you have the offset you want on the Isocenter Shifts tab. Grayscale Registration 1. Click the Grayscale Registration check box in the Image Registration window. 2. Click and drag your mouse diagonally across the registration area on the verification image. This draws a box to specify the area that MOSAIQ uses to match the corresponding area on the reference image. 3. Click Calculate Shifts to open the Isocenter Shifts window. Refer to Figure 49. Figure 49: Isocenter Shifts Window - Grayscale Registration MOSAIQ automatically matches the anatomy on the reference and verification images. 4. Click Start Search on the Isocenter Shifts tab to run the matching algorithm. Grayscale Registration seeks an optimal solution. Click the Stop Search button to stop the calculation. You can see the shift that MOSAIQ calculated on the Isocenter Shifts tab. Refer to Figure 50. 204 Copyright 2010, Elekta Impac Software LUGMSQ0002/4.0/23-Sep-2010 CHAPTER 7: Image Management-ViewStation & Photos and Diagrams Figure 50: Isocenter Shifts Tab – Grayscale Registration 5. Follow steps 16-20 under Manual Registration to correct the registration. 6. Click OK when you have the offset you want on the Isocenter Shifts tab. After you record an offset, you can click Register in the Image Review window to see the merged images with that offset applied. The offset values are part of the image record. When you approve or reject the verification image, image review is complete. This locks the offset values. Setup Intelligence Setup Intelligence is the patient positioning verification system in MOSAIQ Image Management. With Setup Intelligence, you can examine reproducible patient positioning and treatment localization. Setup Intelligence helps you accurately reproduce treatment positioning with sophisticated online and offline quantitative analysis tools. You can examine positional shift information calculated by the Setup Intelligence image registration and fusion functions or a third-party positioning product. Setup Intelligence includes these decisions with the treatment workflow and in the patient’s treatment record. You must have Clinical | Site Setup Defs | Modify security rights to change an unapproved Site Setup. You must have Clinical | Site Setup CAUTION Defs | Approve security rights to change an approved Site Setup. Site Setup Setup Intelligence helps you set up the patient with Setup Alerts. These tell you to move the patient from the positioning marks before treatment or setup verification imaging. You specify Setup Alerts in the Site Setup Definition window as you specify the Patient Orientation. Setup Intelligence registration activates the Setup Offsets group in the Site Setup Definition window. You specify adjustments to the planned treatment isocenter position relative to simulation landmarks, like tattoos, in the Setup Offsets group as a Prescribed Relative Offset. The Localization Offset (LO) is the setup adjustment that Setup Intelligence calculates to correct for systematic setup variation. This is described in Localization Trend Review. Copyright 2010, Elekta Impac Software LUGMSQ0002/4.0/23-Sep-2010 205 MOSAIQ User’s Guide Prescribed Relative Offset Protocols that use offsets (shifts) between the simulation isocenter position (zero point) and the treatment isocenter are common. You can specify these offset values from the treatment planning system in the Site Setup Definition window. These values appear with the other setup parameters when you setup the patient for treatment. 1. To open the Site Setup Definition window, click eChart | Diagnoses and Interventions… , click the radiation prescription folder, then click Site Setup. Or, if you have the Treatment Field Definition dialog box open, right-click or press F5, then click Site Setup. Refer to Figure 51. Figure 51: Site Setup Definition Window Prescribed Relative Offsets are also shown in the Treatment Definition, Verified Site Setup, and Verified Treatment dialog boxes. 206 Copyright 2010, Elekta Impac Software LUGMSQ0002/4.0/23-Sep-2010 CHAPTER 7: Image Management-ViewStation & Photos and Diagrams Setup Alerts When you set up the patient, Setup Intelligence can alert you if you need to shift the beam isocenter (also called the zero point) from initial setup marks. 1. Click the first treatment field associated with a prescription site that contains an offset value (Prescribed Relative Offset and/or Localization Offset) to open the Setup Alert dialog box and show the offset. Or, if you have the Treatment Delivery Table window open, right-click or press F4, then click View Setup Alert… to open the Setup Alert dialog box. Refer to Figure 52. Figure 52: Setup Alert Dialog Box After you set up the patient and align his/her setup references with the lasers and light field, you then apply the Total Offset. You should apply these offsets before treating or imaging. Session Offsets MOSAIQ collects setup error data during each treatment session that you can use patient positioning before treatment. MOSAIQ also records Session Offsets calculated with images on the Isocenter Offset tab of the Image Review window. You can record Session Offsets from external systems in the Third Party Offset dialog box. MOSAIQ Image Review and Session Offsets Setup Intelligence lets you register stereoscopic and 3D CBCT images. The planes of a stereoscopic pair of images must be separated by at least 30°. ELEKTA/Impac recommends a separation between 50° and 90°. A 90° (orthogonal) separation always gives the most accurate results when using planar imaging for setup verification. Refer to Figure 53. Copyright 2010, Elekta Impac Software LUGMSQ0002/4.0/23-Sep-2010 207 MOSAIQ User’s Guide Figure 53: Planes of a Stereoscopic Pair of Images The following instructions provide one example of the workflow when registering images at the linac with Setup Intelligence. 1. Right-click or press F4 on the Treatment Delivery Table, then click Image Review… to open the Image Review window. 2. Click the Isocenter Offset tab, then click Register to register a stereoscopic pair of images. MOSAIQ automatically looks for any potential stereoscopic pair images on the work list. These images must meet gantry separation requirements and be taken within 10 minutes of the original image. For example, when viewing the PA image and a lateral or oblique image was taken within 10 minutes, you have the option to apply a stereoscopic registration. When more than one image meets these criteria, the Stereoscopic Image Selection dialog box opens. Refer to Figure 54. Figure 54: Stereoscopic Image Selection Dialog Box 208 Copyright 2010, Elekta Impac Software LUGMSQ0002/4.0/23-Sep-2010 CHAPTER 7: Image Management-ViewStation & Photos and Diagrams 3. Click the image to use in the Stereoscopic Image Selection dialog box. If you click Cancel, the Image Registration window opens for the initially selected image. 4. In the Image Registration window, reticle scale the verification images, then click the check box for registration method you wish to use. You can use different methods for each image except for grayscale matching, which you must use on both images. Refer to Registering Images on page 197. 5. After you have completed the tasks for your registration method in the Image Registration window, click Calculate Shifts to see the fused image pair. The stereoscopic registration calculates offset information in 3 dimensions, which is shown on the Isocenter Shifts tab of the Isocenter Shifts window. The magnitude shown is the linear distance of the correction in 3D space (the diagonal of the 3 correctional directions). 6. Click OK in the Isocenter Shifts window when you have the offset you want on the Isocenter Shifts tab. If you are doing offline image registration using Setup Intelligence, open the image pair from the Image Work List dialog box, then follow steps 2-6 above. Refer to Managing the Review Process – for Physicians on page 182 and Managing the Review Process – for Therapists on page 187 for instructions on how to use the Image Work List dialog box. The Active Check box in the Image Review Window In the Image Review window, the Active check box on the Isocenter Offset tab is selected when the Session Offset is included in the Localization Trend Review. To include a zero value in analysis, you must manually enter 0 in each orientation and save (zero ≠ null). Refer to Figure 55. Figure 55: Active Check box on Isocenter Shifts Tab Copyright 2010, Elekta Impac Software LUGMSQ0002/4.0/23-Sep-2010 209 MOSAIQ User’s Guide Clear the Active check box when the offset should not be included in the Localization Trend Review. If the check box is not selected before saving the offset, the tab information is not saved. An inactive offset does not show in the Localization Trend Review dialog box, but you can see it on printed reports. After a physician reviews the image, you cannot change the offset status. When a reviewer rejects an image with an active offset, the “Offset may be invalid” message appears. Refer to Figure 56. Figure 56: Offset May Be Invalid Message This is a reminder to make the decision to include or exclude the associated offset from the Localization Trend Review. Third Party Offsets Setup Intelligence is an open system application. It is not limited to charting its own image registration results. The Third Party Offset dialog box lets you record offsets calculated by any non-ELEKTA/Impac system, such as Acculoc, BAT, Calypso, iView, OBI, or XVI. You can record positioning verification results in MOSAIQ for distributed Localization Trend Review on any workstation in the department. These results become part of the patient’s treatment record rather than staying on the positioning device workstation at the treatment machine. 1. Right-click or press F4 in the Treatment Delivery Table window or the Verified Port or Verified Treatment dialog boxes, then click Record Third Party Offset… to open the Third Party Offset dialog box. Refer to Figure 57. Figure 57: Third Party Offset Dialog Box 210 Copyright 2010, Elekta Impac Software LUGMSQ0002/4.0/23-Sep-2010 CHAPTER 7: Image Management-ViewStation & Photos and Diagrams 2. Click the Offset was applied during treatment check box in the Offset group. This indicates that you applied the shift before treating the patient. 3. Click the check box adjacent to the direction of the shift you want to apply, then click the direction. 4. Type the shifts in the Known Components group. If you type a negative value the shift direction will change. If you want to record known zero values, click the check box to distinguish the zero value from an unknown, or blank value. 5. Type the date and time, then click the source in the Offset group. If you specify a source, that source appears in the Description column of the Localization Trend Review dialog box. This is useful if your department uses more then one type of patient positioning device. If your third party source is not on the list, you or an ELEKTA/Impac administrator can select the <Edit List> menu item to add the source. 6. If you have a six degree couch, type the coronal, sagittal, and transverse angle information in the Known Components group. On a Varian 4DITC, right-click in the Treatment Session In Progress window after you send the plan to open the Third Party Offset dialog box. The shifts you specified in the Image Review window or Third Party Offset dialog box are now part of the patient’s treatment record. You can use them immediately to calculate new couch targets and later to find systematic setup variation, or Localization Offsets. Distributed Registration Review When you review images, you can assign a recorded third party offset to the images. MOSAIQ then shows the images registered with the chosen offset. The Third Party Offset Selection dialog box opens after you select the images to be registered. Refer to Figure 58. Figure 58: Third Party Offset Selection Copyright 2010, Elekta Impac Software LUGMSQ0002/4.0/23-Sep-2010 211 MOSAIQ User’s Guide CAUTION Valid Third Party Offsets must be within a time constrained by study date/time of image(s) ( +/- 60 minutes). Offset Couch Calculator When you specify a Prescribed Relative Offset, calculate an offset in MOSAIQ, or record a Third Party Offset, the Offset Couch Calculator feature calculates new couch targets. You have 10 minutes from the time at which you took the first image until you open the Offset Couch Calculator dialog box to calculate the Current + Average Session Offset. Right-click or press F4 in the Verified Treatment or Verified Port dialog box then click Calculate Offset Couch…. You have three options in the couch position group, which are explained in this section. The Current Option The Current option shows the position of the couch when you opened the Offset Couch Calculator dialog box. The Current + Total Offset Option The Current + Total Offset option shows the couch targets for moving the patient from marks into the setup position. You can do pre-treatment imaging or other patient positioning verification (PPV) after this step, or deliver the treatment. The Current + Average Session Offset The Current + Average Session Offset option shows the couch targets for moving the patient from the setup position to the treatment position. You can use any available PPV method. You must open the Offset Couch Calculator dialog box within 10 minutes of imaging or recording the session offset. After you adjust the couch, you can do positioning verification if required. If you want to take another set of images, you can open the Offset Couch Calculator dialog box again to calculate new couch positions. MOSAIQ averages multiple session offsets recorded within the 10 minutes and adjusts for differences in a shared plane (usually sup/inf). For example, if you took 2 planar images but registered them independently of one another. If the offsets include images taken at different couch settings, close and reopen the Offset Couch Calculator dialog box. In this case, you do not want to average the results. The initial offsets expire 10 minutes after taking the first image set. The Offset Couch Calculator is not available with the Varian 4DITC interface. 212 Copyright 2010, Elekta Impac Software LUGMSQ0002/4.0/23-Sep-2010 CHAPTER 7: Image Management-ViewStation & Photos and Diagrams Localization Trend Review Localization Trend Review lets you examine the patient setup correction and session offset history. When you complete an image registration and click OK in the Image Review window, the Localization Trend Review dialog box opens. The Localization Trend Review dialog box shows active patient offset data. You can quickly examine the history of recorded setup corrections for past treatment sessions and not open a series of images. You can open the Localization Trend Review dialog box from the Treatment Delivery table, Diagnoses and Interventions window, and the Localization Review Worklist. Interfraction setup variation, as measured with setup imaging, consists of random and systematic components. You can examine Session Offsets for patterns and correct systematic setup variation during setup prior to verification imaging. When you remove systematic error from treatment setup, the daily workflow efficiency increases and may reduce dependency on daily setup imaging for many treatment sites. The systematic component of a treatment course is equal to the average setup variation over a course of treatment. You can closely determine this variation with measurements from the first several treatment sessions. Setup Intelligence refers to systematic variation correction as a Localization Offset. You include only the initial Session Offset for a series of treatment sessions when you calculate a Localization Offset. The constant is the isocenter position relative to the localization references (tattoos). You should assign any offsets you record when you verify a new couch position after positional verification a status of Inactive or Excluded. The Localization Trend Review dialog box opens, and shows offsets with an Active status only. The Localization Trend Review Report lets you select filters such as Show History. The report can show the current and/or historic offset information. Refer to Figure 59. Figure 59: Localization Trend Review Dialog Box Copyright 2010, Elekta Impac Software LUGMSQ0002/4.0/23-Sep-2010 213 MOSAIQ User’s Guide Excluding Session Offset You might reject a recorded treatment session offset for trend analysis based on the following reasons: Do not include offsets recorded from post correction or confirmation imaging when you calculate a Localization Offset. Do not include offsets recorded at different setup positions. Other reasons might include rejection of the image set by the physician, known poor patient positioning, patient motion, or other setup complications. Click the Exclude check box in the Localization Trend Review dialog box to remove a Session Offset from trend analysis. Localization Offset Derive Localization Offset Button When you correct for systematic variation, you set up the patient more precisely and can reduce the frequency of repeat imaging. When you see a trend in the shift data, you can manually specify an offset in the Additional group of the Localization Trend Review dialog box. You can also click the Derive Localization Offset button to calculate the average session offset of all tagged Session Offsets. The calculated average is shown in the Additional group. You can manually change the calculated values before you click OK to save them. You can see recorded results of five image registrations for the same treatment site for this patient. No Current Localization Offset shows. 1. Click the offsets you want to include in the calculation, then press the SPACEBAR to tag them. You can also click in the far left margin of each offset row. 2. Click Derive Localization Offset to calculate the average offset of the tagged sessions. The data appears in the Additional group of the Localization Trend Review dialog box. The “new” Localization Offset shows in the Setup Alert dialog box after you save pending changes. The data shows a superior/inferior offset value of 0.0. Since the average is Inf average is 0.1 and the offset is 0.1. The data shows left and right offset values from Lt 0.3 to Lt 0.8 for each treatment day. The average is Lt 0.5. The data shows posterior offset values from Pos 0.6 to Pos 1.2. The average is Pos 0.9. The Current group shows any Localization Offset in use. These offset values are for reference MOSAIQ adds the entries in the Additional column to create a New Localization Offset. The Additional group is for changes to the existing Localization Offset. The New group shows what the Localization Offset will be after you click OK. Setup Intelligence lets you change the Localization Offsets as often you need to over the course of treatment. Saved Localization Offsets appear next to the Prescribed Relative Offsets in the Treatment Field Definition dialog box, pre-treatment Setup Alert, and the Setup view of the Verified Treatment dialog box. The Total Offset apply after you align the patient 214 Copyright 2010, Elekta Impac Software LUGMSQ0002/4.0/23-Sep-2010 CHAPTER 7: Image Management-ViewStation & Photos and Diagrams with setup marks and before verification imaging is the combined Prescribed Relative and Localization Offsets. Offset Graphing You can show a graph of offsets for your trend analysis. Click Graphs in the Localization Trend Review dialog box to open the Offset Graphical Analysis window. Refer to Figure 60. Figure 60: Offset Graphical Analysis The Offset Graphical Analysis window shows offset values graphed on a chart. You can see a patient’s offset history including completed and excluded offsets. Offset point information appears when you place your mouse cursor over a point. You can right-click to open the Options menu from which you can select Exclude Points, Show History, or open the Chart Preferences dialog box. The Exclude Points option is available when an offset point is a Session or Third Party Offset and the status is active or temporarily set to excluded. Click OK to change the offset point status to excluded, remove that point from trends, refresh all charts, and mark that point with a red triangle. You can right-click an offset point to open the Session Offset History window, which shows the history of that point. Refer to Figure 61. Copyright 2010, Elekta Impac Software LUGMSQ0002/4.0/23-Sep-2010 215 MOSAIQ User’s Guide Figure 61: Session Offset History Right-click, then click the Chart Preferences option to open the Chart Preferences dialog box, in which you can configure your display preferences. Refer to Figure 62. Figure 62: Chart Preferences 216 Copyright 2010, Elekta Impac Software LUGMSQ0002/4.0/23-Sep-2010 CHAPTER 7: Image Management-ViewStation & Photos and Diagrams Completing the Setup Offset When you reach the point at which the Setup Alert and shifts from surface reference marks are no longer required, you can complete those offsets. This typically occurs when you remark or tattoo a patient at some time after the first treatment day. 1. Complete the Setup Offsets group in the Site Setup Definition window. 2. From the Diagnosis and Interventions window, double-click the Site Setup or select it and click Change. 3. Click the Completed check box. Figure 63: Site Setup Definition Window 4. After you click OK in the Site Setup Definition window, a Question dialog box appears. Click Yes to exclude the remaining active offsets. Figure 64: Question Box Copyright 2010, Elekta Impac Software LUGMSQ0002/4.0/23-Sep-2010 217 MOSAIQ User’s Guide Typically, you analyze the Session Offset trends from the same setup position. When you complete the setup correction, you now have a new setup position. You would usually not want to include Session Offsets from an older starting position in trend analysis with offsets calculated from new landmarks. If you change the site setup after you recorded a positioning verification from new landmarks, you could click the No button and manually select which session offsets to exclude. CBCT Acquisition Importing Reference Structure Sets and CT Data You must import the patient's reference CT, Structure Set, DRRs, and the RT Plan via DCM (this is done automatically if the CT and Structure Set are sent from your TPS to the configured ELEKTA/Impac DCM workstation on your network). All CTs, MRs, and Structure Sets are sent to DCM and saved directly to the DB. They do not go through Namer. The RT Plan goes through DCM and is available for RTP Import. A raw copy is stored in the \\MOSAIQ_app\nonimage folder. DRRs go through DCM and then to NAMER for import. You can also import acquired CBCT images into MOSAIQ using a mapped network drive. All Treatment Calendar Sessions, for which you want to perform CT based matching, must include the CT field, along with the desired treatment fields. All these fields must have the exact same couch parameters. Acquiring the CBCT Data 1. Import the RTP plan. Double-click the Site Setup that is available for import. The isocenter values of the plan and the structure set UID show (there will not be any data for Frame Of Reference UID). If there are no Isocenter values, you must manually type them to acquire a CBCT. 2. Open the Diagnoses and Interventions window and open the Site Setup. Make sure that the Patient Orientation, structure sets, and isocenter are specified, and then approve the Site Setup. 3. Open the image list to view the reference CT. When highlighted, it lists the number of images (slices) in the lower left. It does not show a thumbnail view. You can delete the reference CT. The reference CT always has Review Required selected. 4. Click Open or Review to open the reference CT. This opens the 3D Image Review window. Your hardware, specifically the video card, must meet the requirements specified in the MOSAIQ System Requirements under Workstation Requirements; Image Review. An isocenter error appears if the CT is not associated with the site. The Structure Set list is not available if the site setup for the Rx is not specified and approved. 5. Click in the 3D Image Review window to open the Image Information dialog box. 6. Change the review status if desired. 218 Copyright 2010, Elekta Impac Software LUGMSQ0002/4.0/23-Sep-2010 CHAPTER 7: Image Management-ViewStation & Photos and Diagrams 7. Associate the CT with a site, then click OK. 8. Click OK to close the 3D Image Review window. 9. Open the CT and the Structure Set list again, which will now be available in the 3D viewer. Select the Structure Sets that you want to show. Changes are not saved when you close the 3D Image Review window. The SEQUENCER-specific instructions are in Chapter 9. Please refer to CBCT Instructions on page 267. Copyright 2010, Elekta Impac Software LUGMSQ0002/4.0/23-Sep-2010 219 MOSAIQ User’s Guide 220 Copyright 2010, Elekta Impac Software LUGMSQ0002/4.0/23-Sep-2010 MOSAIQ User’s Guide CHAPTER 8: MOSAIQ DICOM The function of this chapter is to tell you how to use the DICOM auto-forwarding, DICOM AE configuration, DICOM import or export, and the DICOM printing features. This document also gives the access permissions that are necessary to use these features. The background of these features is given in the paragraph that follows. MOSAIQ gives you a standards-based, full fidelity storage, archiving, and restoration of medical images in DICOM format. MOSAIQ also lets you easily import medical images and other DICOM data into the local MOSAIQ database. With the auto-forwarding feature, MOSAIQ reads a type of medical image or other DICOM data made in the clinic. Then, MOSAIQ automatically exports the DICOM data to an external DICOM device, for example, MOSAIQ Oncology PACS or a treatment planning system (TPS). You can use the DICOM data immediately on the DICOM device. MOSAIQ gives you flexibility in your workflows because it can manage a large span of DICOM data. DICOM data includes, for example: medical images, radiotherapy (RT) structure sets, and RT plans. This document tells you how to set up the DICOM Communications Module (DCM). DCM is a gateway when you import DICOM data into the local MOSAIQ database, or automatically forward DICOM data to DICOM device (auto-forwarding). DCM Overview DCM is a gateway between DICOM devices on a DICOM based TCP/IP network and the oncology management system’s network. DCM is a Service Class Provider (SCP) that gives Storage Service Class (C-STORE) services as specified in the DICOM Version 3.0 Standard. DCM monitors and imports DICOM messages that are sent over a TCP/IP network from various Service Class Users (SCUs). DCM associates each message with a modality-specific import area, and saves the message as a DICOM file. Once properly configured, DCM is completely automatic, and needs no user input. For a detailed description of the Storage Service Class (C-STORE) services provided by DCM, refer to the DICOM Conformance Statement. DCM Permissions You need to make sure that you have access to the DCM application and a DCM administrative password. Copyright 2010, IMPAC Medical Systems LTGMSQ0002/4.0/23-Sep-2010 221 MOSAIQ User’s Guide Opening DCM 1. On your DICOM workstation, double-click Module window. to open the DICOM Communication DCM shows a copyright screen upon startup. If DCM is not configured, an alert message appears and the application closes. If the system is configured, then the application performs a system status check. DCM tests to make sure that the import areas can be written to and updates the Status Display appropriately. The import process starts after DCM reads configuration information. Operation DCM has two basic operational states: Waiting Mode and Import Mode. In Waiting Mode, DCM does not make any import scans. In Import Mode, DCM scans the TCP/IP port for a valid request for an association from an SCU. If an association is valid, DCM follows this processing sequence: Message Validation DCM identifies individual DICOM messages received through the TCP/IP port and validates them against the DICOM standard. Import Area Association DCM uses the modality extracted from the DICOM message to associate the message with a specific import area. File Creation DCM saves the original DICOM message in a DICOM file. Messages DCM records the communication module’s events and their times of occurrence in the Activity Log. The window helps to verify that the communication module operates in its intended manner. Any unanticipated behavior due to inadvertent preference settings, database difficulties, network problems, and so on is shown here. A daily log file of all log entries is kept in a logs directory on the network volume. The name of the log file shows the date with which it is associated. 222 Copyright 2010, Elekta Impac Software LUGMSQ0002/4.0/23-Sep-2010 CHAPTER 8: MOSAIQ DICOM DCM System Preferences The System Preferences window is a graphical user interface for configuring DCM. It has five tabs: General, Scan, Import Areas, Auto Forward, and Password. Changing tabs does not save or cancel any changes on another tab. If you click the Cancel button to close the System Preferences window with pending changes, a message box opens. It asks you to make sure that you want to exit the window without saving the changes. Logging on to the System Preferences Window The System Preferences window is password-protected. The purpose is to limit access to only those users with the privilege to change the DCM configuration. If a new password is not configured, type CAPMI to open the System Preferences window. After a new password is configured and confirmed on the Password tab, the import scanning configuration options are enabled. 1. From the File menu, click File | Utilities | System Preferences to open the Login dialog box. 2. In the Password field, type your DCM administrative password in the text box, then click the OK button. If you do not know your password, contact your system administrator. MOSAIQ opens the System Preferences window. Setting Up DICOM Import with DCM 1. Open DCM. For more information, refer to the procedure—Logging on to the System Preferences —on page 223. 2. In the System Preferences window, click the Import tab to open it. 3. At the top of the System Preferences window, click the Enable Import check box to make the Import IODs field available. By default, all of the Import IODs check boxes are selected. Copyright 2010, Elekta Impac Software LUGMSQ0002/4.0/23-Sep-2010 223 MOSAIQ User’s Guide 4. In the Import IODs field, found below the Enable Import check box, select either one type of DICOM data or a set for DICOM importing. Do one or more of the steps in the table that follows. Do this… To clear or select… Click an Import IODs check box one type of DICOM data. Note: Click a check box again to select or clear it. OR Click each Import IODs check box that is not adjacent to another check box a set of DICOM data. Note: Click a check box again to select or clear it. OR a. Click the first DICOM data name. a set of DICOM data. b. Press SHIFT + click the last DICOM data name. c. Click one of the Import IODs check boxes in the selected range. Note: While the range of check boxes is selected, click (again) only one Import IODs check box in the range to select or clear the entire DICOM data (IOD) set. 5. At the bottom of the System Preferences window, click the OK button to set up DCM to automatically DICOM import the selected type of DICOM data or DICOM data set. 224 Copyright 2010, Elekta Impac Software LUGMSQ0002/4.0/23-Sep-2010 CHAPTER 8: MOSAIQ DICOM Setting Up Auto-forwarding for a DICOM Device 1. Open DCM. For more information, refer to the procedure—Logging on to the System Preferences —on page 223. 2. Click the Auto Forward tab to open it. 3. At the right side of the Device Name: field, click the Add/Delete button to open the Add/Delete DICOM Device dialog box. 4. In the Add/Delete text box, type the device name. As you type in the text box, MOSAIQ makes the Add button available. 5. Click the Add button to put the device name into the Device Name field. The Device Name field shows the device name. 6. In the Destination AE group, click device name. , adjacent to the Device Name field, then select the For example, you can select MOSAIQ Oncology PACS or an external treatment planning system. 7. Above the Destination AE group, click the Enable Auto Forward check box to start the auto-forwarding setup for the selected device name. The device name is set, but the DICOM device is not (yet) fully set up for autoforwarding. The AE Title, Host Name, and Port Number fields are available. The Auto Forward IODs dialog box is available at this time. Copyright 2010, Elekta Impac Software LUGMSQ0002/4.0/23-Sep-2010 225 MOSAIQ User’s Guide 8. Do all of the steps in the table that follows to set up the AE title, hostname, and port number of the DICOM device. Do this… To set the DICOM device… In the AE Title: field, type the AE title in the text box destination Application Entity (AE) title (for example, the AE Title for MOSAIQ Oncology PACS is MOP_SCP). In the Host Name: field, type the hostname in the text box hostname or IP address (for example, for MOSAIQ Oncology PACS). In the Port Number: field, type the port number in the text box port number. For example, type 4000 for the MOSAIQ Oncology PACS port number. 9. In the Auto Forward IODs field, click one or more Auto Forward IOD check boxes to select a type of DICOM data or a DICOM data set for auto-forwarding. By default, none of the Auto Forward IOD check boxes are selected. Do one or more steps in the table that follows. Do this… To select… Click an Auto Forward IODs check box one type of DICOM data (for example, you can autoforward a standard CT image to MOSAIQ Oncology PACS). Note: Click an Auto Forward IODs check box again to clear it. Example: OR Click each non-adjacent Auto a DICOM data set. Note: Click any Auto Forward IODs check boxes again to clear it/them. Example: Forward IODs check box 226 Copyright 2010, Elekta Impac Software LUGMSQ0002/4.0/23-Sep-2010 CHAPTER 8: MOSAIQ DICOM OR Do this… To select… a. Click the first name of the DICOM data set. a DICOM data set. b. Press SHIFT + click the last name of the DICOM data set. Example: Adjacent Auto Forward IOD check boxes in a range. c. Click one of the Auto Forward IODs check boxes in the selected range. Note: While the range of check boxes is selected, click an Auto Forward IODs check box again to clear them. 10. Below the Auto Forward IODs field, in the Number of Auto Retries field, type a numeric value (integer) in the text box. If you type a value of zero in the text box, this feature becomes unavailable. When this feature is available, after an auto-forwarding failure, DCM tries to autoforward the DICOM data again. DCM has a limit on the number of attempts, set by the Number of Auto Retries field. 11. In the Auto Retry Frequency (in seconds) text box, type a non-zero, numeric value (integer). If there is an auto-forwarding failure, after this number of seconds, DCM tries to autoforward the DICOM data again. The default value is 5 seconds. 12. At the bottom of the System Preferences window, click the OK button to complete the auto-forwarding setup. Copyright 2010, Elekta Impac Software LUGMSQ0002/4.0/23-Sep-2010 227 MOSAIQ User’s Guide Setting Up Auto-forwarding (Manual Retry) It is possible that DCM fails to automatically forward DICOM data to a DICOM device. In this case, DCM saves the DICOM data (files) in an orphaned folder with a given filename. You can manually forward these files on a different date through the AutoForward (Manual Retry) window in MOSAIQ. The DICOM AutoForward (Manual Retry) window has the fields that follow: device name, patient name, patient ID, and DICOM object modality (for example, CT image). Do the steps that follow to set up auto-forwarding of DICOM data to a DICOM device, for example, to MOSAIQ Oncology PACS or to a treatment planning system (TPS). 1. In MOSAIQ, click File | Import/Export | DICOM AutoForward (Manual Retry)... to open the DICOM AutoForward (Manual Retry) window. 2. Do the procedures in the table that follows. In the… To… Click select the destination DICOM device(s) that you set up in DCM (or in MOSAIQ). adjacent to the Device Name field, then select the devicename 228 Note: Only DICOM SCP devices with a corresponding <Orphaned Path>\Manual Retry\<Device Name> folder that has one or more DICOM files are listed in this field, where: Orphaned Path is the path specified in the orphaned path key below the [DCM Orphan] section in the merge.ini file. Device Name is the name of the device that you set up in MOSAIQ or DCM. Patient Name (DICOM) field examine the patient name related to the DICOM data. Patient ID field examine the patient medical record ID related to the DICOM data. Modality field examine the modality of the DICOM data (for example, CT images, MR images, RT Plan, RT structure sets). Study ID field examine the user or equipment-generated study identifier for the DICOM data related to the patient name. Copyright 2010, Elekta Impac Software LUGMSQ0002/4.0/23-Sep-2010 CHAPTER 8: MOSAIQ DICOM In the… To… File Name field examine the filename related to the DICOM object. File Date field examine the date and time of the filename related to the DICOM object. 3. At the bottom of the DICOM Auto Forward (Manual Retry) window, click the Send button to transmit the selected DICOM files to the DICOM device. The Send button is available only if a device name is set up and available. Doing a Check on the Auto-forwarding Process 1. Do an inspection of the information in the table that follows. If DCM… successfully transfers the DICOM file or files to the DICOM device does not transfer the DICOM file or files to the DICOM device Then… A Process Status message at the bottom of the window briefly shows success. MOSAIQ updates the AutoForwardSessionCtrl.log file. MOSAIQ deletes transmitted files from the orphan directory. A Process Status message at the bottom of the window indicates FAILURE. MOSAIQ updates the AutoForwardSessionCtrl.log file. MOSAIQ keeps the files in the orphaned directory, so that you can send them later. Log File There is a log file–AutoForwardSessionCtrl.log–that has a record of the activities for the DICOM autoforwarding (Manual Retry) process. The AutoForwardSessionCtrl.log log file has a LOG subfolder in the MOSAIQ application folder. The log file has a time and date stamp of (MM/DD/YYYY hh:mm:ss), with a 12-hour clock format. The actual log message comes after a dash symbol (-). Copyright 2010, Elekta Impac Software LUGMSQ0002/4.0/23-Sep-2010 229 MOSAIQ User’s Guide DICOM-Specific Staging Area A DICOM Specific Staging Area accepts images from DCM, which receives images sent from other machines and makes image files for Namer in any format (most likely DICOM-CT, DICOM-MR, and DICOM-RT). A department can have only one DICOM Specific Staging Area. DICOM AE Configuration The DICOM AE Configuration window shows a list of the configured Application Entities (AEs). It lets you open the DICOM AE Edit dialog box, in which you can add/change/delete AEs. The Merge application must also be installed. Please contact ELEKTA/Impac if you have problems with DICOM AE configuration, or if the Merge application is not properly installed and configured. You must have Image | Maintenance | DICOM Configuration | View security rights to see the DICOM AE Configuration or DICOM AE Edit dialog box. You must have Modify security rights to make or change CAUTION DICOM application entities. You must have Admin security rights to add/change/delete DICOM AE configurations. 1. Open the MOSAIQ application. 2. In the MOSAIQ application, click File | Import/Export | DICOM Configuration | DICOM Maintenance... to open the DICOM AE Configuration dialog box. 3. Click the Add button to open the DICOM AE Edit dialog box and configure a new Application Entity. 4. Select a configured device in the DICOM Application Entities group, then click the Change button to open the DICOM AE Edit dialog box and change a configuration. The Device Name appears in the Film Printer field, the AE Title in the Application Entity field, and the Host Name in the Host Name field of the DICOM Print dialog box. 230 Copyright 2010, Elekta Impac Software LUGMSQ0002/4.0/23-Sep-2010 CHAPTER 8: MOSAIQ DICOM DICOM AE Edit The DICOM AE Edit dialog box lets you configure an Application Entity (AE). An AE is necessary to use the DICOM Print feature, the Varian 4D interface, and MOSAIQ Oncology PACS. The Merge application must also be installed and properly configured. Please contact ELEKTA/Impac if you have problems with DICOM AE configuration, or if the Merge application is not properly installed and configured. 1. In the MOSAIQ application, click File | Import/Export | DICOM Configuration | DICOM Maintenance.... 2. Click the Add button, or select an AE, then click the Change button. 3. Type the Device Name, Host Name, AE Title, and Scanning Port number, then select the appropriate check boxes in the SCU and SCP groups. Please contact ELEKTA/Impac if you do not know which port to use, or if you need any other assistance. The Device Active check box applies to only DICOM Print and Varian 4D Console support. It does not apply to MOSAIQ Oncology PACS. For MOSAIQ Oncology PACS, the Device Name must be MOSAIQ Oncology PACS, the AE Title must be MOP_SCP and the Scanning Port must be 4000. Setting up DICOM Print Options The Merge application must be installed before you can configure a DICOM printer. You must have Image | Maintenance | DICOM Configuration: | Modify security rights to configure a DICOM printer. Please contact CAUTION ELEKTA/Impac for assistance. 1. Open the DICOM AE Configuration dialog box. 2. Click the Add button to create a new AE, or select one then click the Change button. 3. Type the Device Name, Host Name, AE Title, and Scanning Port number the DICOM AE Edit dialog box. 4. Select the Print box in the SCP Group, then click the Print Formats button. Copyright 2010, Elekta Impac Software LUGMSQ0002/4.0/23-Sep-2010 231 MOSAIQ User’s Guide 5. In the Select Formats dialog box, select the format(s) that you want this AE to support . If you want to support all formats, click . If you do not see and click the format you want to add, please contact ELEKTA/Impac for assistance. 6. Click the OK button in the DICOM AE Edit dialog box. 7. Click the Close button in the DICOM AE Configuration dialog box. Please contact ELEKTA/Impac if you are unable to print from the DICOM Print dialog box. Export DICOM Images Export Images The DICOM Image Export dialog box lets you export copies of medical images in an industry standard DICOM format from the MOSAIQ database. You can configure and select export destinations in the DICOM AE Edit dialog box. Open the Image List window and select images to export. Tag the file(s) that you want to export (You can tag multiple images using the SPACEBAR) and click Export. This dialog box opens, enabling you to select an export destination. CAUTION You must have Image | ViewStation | Images | View security rights to export DICOM images. Opening DICOM Image Export 1. In the Image List window, set the View to Medical Images. 2. Select the image you want to export, then click the Export button. Export DICOM Formatted Copies of Selected Image(s) to: This shows the export to file destination and configured DICOM Image Export-relevant Service Class Providers (SCPs). You can highlight one or more destinations. Please contact ELEKTA/Impac if you need to configure additional SCPs. DICOM Export: Advanced Options The DICOM Image Export: Advanced Options dialog box lets you configure advanced DICOM image export options. MOSAIQ saves your changes, other than to select the DeIdentify DICOM header check box, when you click the OK button. Opening DICOM Image Export: Advanced Options 1. Open the Export Images dialog box in MOSAIQ. 2. Click the Advanced Options button. 232 Copyright 2010, Elekta Impac Software LUGMSQ0002/4.0/23-Sep-2010 CHAPTER 8: MOSAIQ DICOM For DICOM Images Group These controls apply to exports of full fidelity DICOM images Overrride existing header with MOSAIQ patient demographics (check box) Select to use recent (updated) patient demographics contained within the MOSAIQ database instead of the original DICOM header without altering the original file. The default is the last saved setting. Keep Original DICOM UID (check box) Select to export the existing UID contained within the DICOM header (not recommended). The default is the last saved setting. This box becomes active when you select the Override existing DICOM header with MOSAIQ patient demographics check box. Export To File Options Group These controls apply to exporting to file only and do not apply to exports to DICOM SCPs. Export as DICOM Stream (radio button) Select to export the raw DICOM data, which populates an image level list in the destination directory. The default is the last saved setting. Export as DICOM File (radio button) Click to export the file(s) with a Part 10 header, which updates the DICOMDIR in the destination directory. The default is the last saved setting. De-identify DICOM header (check box) Select to remove the patient ID and medical record number from the exported file(s). This lets you make anonymous DICOM files. Applicable to both stream and file exports, the default is the last saved setting. You must select this box every time you want to export anonymous DICOM files. Status Bar View Options Group Open status control minimized (check box) Copyright 2010, Elekta Impac Software LUGMSQ0002/4.0/23-Sep-2010 Select to open the DICOM Export Status dialog box in a minimized state. You have the option to restore when minimized. If not selected, you have the option to minimize. The default is the last saved setting. 233 MOSAIQ User’s Guide Auto Retry Options Group Only applicable when a transfer error occurs. 234 Number of Retries Type the number of times that you want MOSAIQ to retry a DICOM image export before returning a message stating that the export failed. The default is the last saved setting. Retry Interval (Seconds) Type the number of seconds you want MOSAIQ to wait between tries. The default is the last saved setting. Copyright 2010, Elekta Impac Software LUGMSQ0002/4.0/23-Sep-2010 MOSAIQ User’s Guide CHAPTER 9: MOSAIQ Oncology PACS As Image Guided Radiotherapy (IGRT) grows, the amount of data and images that must be managed, stored, and readily accessible throughout therapy increases. MOSAIQ Oncology PACS (MOP) seamlessly integrates the patient’s MOSAIQ Electronic Medical Record (EMR) with archived images, plans and supporting documentation. Access points within MOSAIQ let you send a query to retrieve a listing of the selected patient’s archived DICOM studies and series, regardless of the actual storage location. You can see objects archived within MOSAIQ Oncology PACS alongside those contained within the EMR. You can also select these data and send them to other devices in standard DICOM formats. MOSAIQ Oncology PACS gives you standards-based, full fidelity storage for all DICOM Information Object Definitions (IODs), including DICOM RT and DICOM RT Ion (Proton). Patient-specific non-DICOM storage support is also available for a variety of file formats. Flexible, user-defined storage rules make the data organization highly configurable to best meet your needs. Related Documentation For more information refer to the MOSAIQ Oncology PACS User Interface Guide, Version 4.6. MOSAIQ Oncology PACS Components MOSAIQ Oncology PACS MOSAIQ Oncology PACS is the core product designed to manage the volume of oncology data and seamlessly integrate with MOSAIQ. MOSAIQ Oncology PACS runs on a dedicated server (or servers or cluster) and manages DICOM and Non-DICOM, Image and Non-Image data archival and retrieval from sources within and outside an oncology department. The installation engineer does the initial MOSAIQ Oncology PACS configuration and there are many user-configurable aspects. MOSAIQ Browser The MOSAIQ Brower is a Microsoft Internet Explorer shell or skin with only , , , and . The MOSAIQ Browser runs MOSAIQ Oncology PACS and the EMR Viewer. Workstations configured to run MOSAIQ Oncology PACS have a desktop icon that points at the MOSAIQ Browser and the web address of MOSAIQ Oncology PACS. Click the View button in the MOSAIQ Archived Objects window to launch the EMR Viewer in the MOSAIQ Browser. Click the Manage Data button in the MOSAIQ Archived Objects window to start MOSAIQ Oncology PACS. Copyright 2010, IMPAC Medical Systems LTGMSQ0002/4.0/23-Sep-2010 235 MOSAIQ User’s Guide Standalone Workstation You can get a MOSAIQ Browser desktop shortcut icon to MOSAIQ Oncology PACS on a non-MOSAIQ workstation (typically used by the System Administrator, IT Department, etc. responsible for maintaining the system). Please contact ELEKTA/Impac if you want access to MOSAIQ Oncology PACS from a non-MOSAIQ workstation. Standalone workstations must have Microsoft Internet Explorer v6 or higher and Microsoft .NET Framework 2.0 installed prior to MOSAIQ Oncology PACS configuration. DICOM Communication Module (DCM) Before the installation engineer installs MOSAIQ Oncology PACS, you must configure all DICOM sources to send data to DCM. The installation engineer can configure DCM to Auto-Forward some or all of this DICOM data to MOSAIQ Oncology PACS. The installation engineer configures DCM during installation but you can make changes after the installation. Specifically, you can change the IOD filters that specify the type of DICOM data to be Auto-Forwarded to MOSAIQ Oncology PACS. Refer to Chapter 7 for procedures relating to DCM. MOSAIQ Oncology PACS Configuration MOSAIQ Oncology PACS Related Staff Security Rights System Utilities Security Modify Rights CAUTION You must have System Utilities | Security | Modify security rights in MOSAIQ to change MOSAIQ users’ security rights. 1. Click File | Directories | Staff Directory…, select the user whose rights you want to change and click the Change button to open the Staff dialog box. 2. Click the Security button and on the Admin tab, verify that Security: | Modify in the System Utilities group is selected. Administrative General View Rights CAUTION In order to activate the Archived Objects buttons in MOSAIQ, users must have Admin | Administrative | General: | View security rights. 1. Click File | Directories | Staff Directory…, select the user whose rights you want to change and click the Change button to open the Staff dialog box. 2. Click the Security button, then verify on the Admin tab that (at least) General: | View in the Administrative group is selected. 236 Copyright 2010, Elekta Impac Software LUGMSQ0002/4.0/23-Sep-2010 CHAPTER 9: MOSAIQ Oncology PACS DICOM Configuration Admin Rights CAUTION In order to modify DICOM Devices in MOSAIQ, you must have Image Maintenance DICOM Configuration Admin security rights. 1. Open the Security dialog box, then select the Image tab to open it. 2. Click Maintenance | DICOM Configuration: | Admin. 3. Click the OK button. Department Level Configuration You can click Archived Objects to query the MOSAIQ Oncology PACS database from MOSAIQ. Once the query returns results you can send one or more series to a Send Destination. Follow the steps below to fill in the list of Send Destinations. Refer to New DICOM Devices as Data Receivers in this section for more details. This list of devices should include MOSAIQ, and other devices that can receive and store DICOM objects, such as Treatment Planning Systems. Adding New DICOM Devices as Data Receivers You must have Image | Maintenance | DICOM Configuration: | Admin rights to change DICOM Maintenance. 1. Click File | Import/Export | DICOM Configuration | DICOM Maintenance… to open the DICOM AE Configuration dialog box. The DICOM AE Configuration dialog box will already contain a list of configured devices, completed as part of the MOSAIQ and MOSAIQ Oncology PACS configuration. 2. Click the Add button to open the DICOM AE Edit dialog box and type DICOM connectivity information for your new DICOM source. 3. Type a descriptive name as the Device Name, such as Nomos Corvus Server. The Host Name can be either the host name or the IP address of the DICOM source. Type the AE Title and the Scanning Port as specified by the device vendor. Select the Device Active box to enable the device. The Device Active check box lets you disable a device and retain the configuration. 4. Click the Verification and Storage check boxes in the SCP group. Do not select any options in the SCU group. Copyright 2010, Elekta Impac Software LUGMSQ0002/4.0/23-Sep-2010 237 MOSAIQ User’s Guide The SCP Storage option is reserved for DICOM devices that appear on the Send Destination list. 5. Click the OK button to save changes. Repeat this process to enter DICOM connectivity information for each device to include on the Send Destination list in the Archived Objects window. 6. For each Send Destination device, type a user-readable/recognizable Device Name. Get the Host Name, AE Title, and Scanning Port from the device vendor’s documentation and your site’s network administrator. Click the Device Active check box to enable the device. 7. Do not select any options in the SCU group. Select Verification and Storage in the SCP group and click the Export Formats button. Move any applicable available formats to the supported formats list for this DICOM Send Destination device and click the OK button. The Varian 4D Console interface requires the available Varian 4D related formats. Storage devices configured with these formats will not appear on the Send Destination list. 8. Click the Close button in the DICOM AE Configuration dialog box after you configure all of the DICOM devices. MOSAIQ Oncology PACS User Interface Archived Objects Window The Archived Objects window is the graphical user interface between MOSAIQ, the Query/Retrieve Service and MOSAIQ Oncology PACS. There are several ways that you can on the toolbar, click open the Archived Objects window in MOSAIQ. You can click Tools | Archived Objects…, click the Archived Objects button in the Diagnoses and Interventions (D&I) window, or click the Archived Images button in the Image List window. Only image modalities show when you click Archived Images from the Image List window. Study and Series Level Queries Select your patient and open the Archived Objects. MOSAIQ automatically sends a Study Level and Series Level Query/Retrieve (Q/R) request to MOSAIQ Oncology PACS when you open the Archived Objects window. Studies in MOSAIQ Oncology PACS for the patient that are within the desired study date range appear as study folders in the Archived Objects window. If available, each study is has a Study Description and Study Date. Click the to the left of the study that you want to open that study folder. Series in MOSAIQ Oncology PACS for the patient, to which the specified Series Modality constraint applies, appear in their expanded study folder in the Archived Objects window. If available, each series has a Series Description, Series Date, Modality, and Series Number. 238 Copyright 2010, Elekta Impac Software LUGMSQ0002/4.0/23-Sep-2010 CHAPTER 9: MOSAIQ Oncology PACS The initial default Q/R Study Date Range is All (every study from the inception of the archive to the present). You can select the appropriate radio button in the Archive Objects window to specify one of the other preset ranges (Today, Last Week, or Last 8 Weeks) or make a custom range in the From and To fields. Click the Refresh button to send the Q/R request with the new date range. The initial default Q/R Series Modality Constraint setting is ALL. to select one of the other preset constraints (modality grouping or individual Click modality). Click the Refresh button to send the Q/R request with the new selection as the Series Level Query Constraint. MOSAIQ remembers the last selected setting for each user and it becomes the default the next time that user opens the Archived Objects window. If “No Series Found” appears instead of a list of series, set the Series Modality to ALL and Refresh the Q/R request. If “No Studies Found” appears instead of study folders, increase the size of the Study Date Range and Refresh the Q/R request. You can have 1 or more study folders open at a time. You can click the - to the left of that study to close an open study folder. Send Destination Click to select a site configured DICOM Send Destination from the available options on the list. When you highlight either an entire study or 1 or more series within a study, the Send Destination Send button becomes active. Click the Send button to send a copy (the original remains in place) of the selected series to that Send Destination. MOSAIQ remembers the last selected setting for each user and it becomes the default the next time that user opens the Archived Objects window. EMR Viewer View When you select a single study or a single image series within a study in the Archived Objects window, the View button becomes active. Click the View button to open a MOSAIQ Browser based EMR Viewer. The independent EMR Viewer lets you view the current patient images and documents in MOSAIQ Oncology PACS within the MOSAIQ workflow. The MOSAIQ Browser is a limited version of Internet Explorer. From a browser perspective, only the Back, Forward, Stop, and Refresh buttons are available. No other functionality is available. You can only use the EMR Viewer to see image series. The View button is disabled when you select a non-image series (RT Plan, RT Dose, RT Structure Set, etc.). The EMR Viewer automatically shows thumbnails of the selected image series. You can click to the left of the description to show thumbnails of additional image series. Click to hide the thumbnails for that series. Copyright 2010, Elekta Impac Software LUGMSQ0002/4.0/23-Sep-2010 239 MOSAIQ User’s Guide If you select a study that contains 1 or more image series, the EMR Viewer automatically shows the thumbnails for each image series. You can browse through the thumbnails with the scroll bar to see additional images within the series. You can also click a thumbnail to show a larger, review only (non-diagnostic) image. If the Additional Studies list is available, you can also switch to one of the other patient studies (if present). This lets you review any image series it may contain and not go back to the Archived Objects window. From the Single Image View, you can expand or contract additional patient information with and , respectively. You can browse through the images in the series with the scroll bar or go directly to a particular image. You can also show a Slide Show (cine mode) of the images at a Fast, Medium, or Slow speed. Click along with basic patient information. The buttons just to the left of the next image series, respectively. Click to open a separate window to print the image button let you browse to the previous or to return to the thumbnail view. The corresponding Study and Patient Level non-DICOM documents stored in MOSAIQ Oncology PACS (if available and configured for viewing) appear listed below the image series folders in the EMR Viewer Thumbnail View. MOSAIQ Oncology PACS can store a variety of non-DICOM file formats, including BMP, JPEG, PDF, TIFF, TXT, DOC, ZIP, etc. Click either the file name or the icon to its left to open or save the document. The application required to open a given file format (Microsoft Word for DOC files, Adobe Reader for PDF files, etc.) must be installed and available on the client workstation. MOSAIQ Oncology PACS can store Non-DICOM documents. You can store files that you import from your Treatment Planning System in the supported formats. MOSAIQ Oncology PACS automatically imports and stores single patient TAR files created by Pinnacle™ Treatment Planning Systems. 240 Copyright 2010, Elekta Impac Software LUGMSQ0002/4.0/23-Sep-2010 CHAPTER 9: MOSAIQ Oncology PACS Manage Data The Manage Data button in the MOSAIQ Archived Objects window starts MOSAIQ Oncology PACS within a MOSAIQ Browser. MOSAIQ Oncology PACS runs as a separate application independent of MOSAIQ. When you start MOSAIQ Oncology PACS from MOSAIQ, it shares the MOSAIQ Oncology PACS login. The current user gets their functional access based on their configured Level 1-4 or named account setting. The availability of the following menu options depends on the department-specified and user configured MOSAIQ Oncology PACS security rights for a given user. Figure 65: MOSAIQ Oncology PACS Main Menu Options Figure 66: MOSAIQ Oncology PACS Tools Menu Options Copyright 2010, Elekta Impac Software LUGMSQ0002/4.0/23-Sep-2010 241 MOSAIQ User’s Guide Figure 67: MOSAIQ Oncology PACS Setup Menu Options Typically, some or all of the Main menu options are available to advanced MOSAIQ users. The Tools and Setup menu options are usually for the System Administrator. View Log The View Log button in the Archived Objects window lets you review the history of the Study and Series Q/R and the Send Destination Find/Move requests made for the current patient. You can see the Date/Time Stamp, Operation Requested, Study or Series Description/Identifier (as applicable), Send Destination (as applicable) and the Operation’s Success or Failure Statuses. The View Log button becomes the Close Log button while the log is expanded for review. Click the Close Log button to collapse/hide the log. Retrieving Archived Images with MOSAIQ Restore The MOSAIQ Restore feature integrates with the MOSAIQ Archive feature. You must have archived images in MOSAIQ Oncology PACS to put them in the local MOSAIQ database. With MOSAIQ Restore, you import the medical images for a patient from MOSAIQ Oncology PACS. Then, MOSAIQ re-attaches the images to the initial patient record in MOSAIQ. Then, you can use the images. For example, when a patient goes for a 6 month follow-up, the physician examines the CT images from the last treatment. The physician can immediately retrieve the CT images from MOSAIQ Oncology PACS. If necessary, the physician can see the CT images from all MOSAIQ workstations that are connected to the clinical network. After MOSAIQ starts the restore process, it continues without your intervention and operates independently. MOSAIQ restore You can restore only medical images in DICOM format. After you restore the images, they are not eligible for re-archiving for a minimum of 30 days (or the number that your system administrator sets). 242 Copyright 2010, Elekta Impac Software LUGMSQ0002/4.0/23-Sep-2010 CHAPTER 9: MOSAIQ Oncology PACS Doing a Check for Eligible Patients The first step in the restore procedure is to make sure that you know which patients have medical images that are eligible for retrieval. When you open the Restore Worklist window for the first time, the default patients are shown. A table shows the eligible patients in a list. You can filter and sort the patient list to find other patients that are eligible. You can use the filters that follow: attending physician, medical department, or selection status of a patient (for example, whether a patient record is active or inactive). Also, the Restore Worklist window can sort by the patient name, date of birth, social security number (SSN), or medical record number. To see which patients are eligible, do the steps in the procedures that follow. Opening the Restore Worklist Window 1. Click File | Import/Export | DICOM Archive/Restore | Restore Utility to open the Restore Worklist window. A table shows the eligible patients. All of the patients that are shown in the table have archived images. Filtering Patients in the Restore Worklist Window 1. On the right side of the pane, in the Filter By: group, click adjacent to the Attending MD field to select the attending physician who is requesting the retrieval of the medical images. If you are logged on as the attending physician, the Attending MD field shows your name. 2. At the bottom of the Filter By: group, click the Refresh button to update the table. 3. If you want to select all attending physicians, clear the Attending MD field and click the Refresh button. 4. In the Filter By: group, click adjacent to the Department field, then select the clinical department in which you or the attending physician works. To select all departments, in the Department field, select Global then click the Refresh button. Copyright 2010, Elekta Impac Software LUGMSQ0002/4.0/23-Sep-2010 243 MOSAIQ User’s Guide 5. Click the Refresh button to update the table. 6. Do you want to set the filter to show all clinical statuses? If yes, below the Patient Clinical Status field, click the All button. Click the Refresh button to update the table. If no, below the Patient Clinical Status field, click the One button. Click adjacent to the One button, then select the applicable clinical status. Click the Refresh button to update the table. After you select a one clinical status, the Patient Selection Status field shows the clinical status as opposed to a blank box. 7. Do you want to set the filter to show all patient selection statuses? If yes, below the Patient Selection Status field, click the All button. Click the Refresh button to update the table. If no, below the Patient Selection Status field, click the One button. Click adjacent to the One button, then select the applicable patient status. Click the Refresh button to update the table. Sorting Patients in the Restore Worklist Window 1. In the Sort by group, select one of the items that follows: patient name (Name), social security number (SSN), and date of birth (DOB), for example. The Sort by group is found at the bottom, right side of the pane, below the Refresh button. The table sorts the patients automatically. You do not have to click the Refresh button to update the table. The sort selection is kept as a user preference for the subsequent time that you open the Restore Worklist window. 244 Copyright 2010, Elekta Impac Software LUGMSQ0002/4.0/23-Sep-2010 CHAPTER 9: MOSAIQ Oncology PACS Selecting Patients The second step in the restore procedure is to select patients to put their images into the restore utility for final processing and restore selection. 1. Click File | Import/Export | DICOM Archive/Restore | Restore Utility to open the Restore Worklist window. MOSAIQ shows a list of eligible, archived images. 2. In the table, tag the applicable patient or patients. For more information about how to tag patients, refer to the “How to Restore Archived Images” procedure in online Help. You can press F4 to open online Help. 3. In the top, right of the pane, click the Select button to make the images available in the Restore Utility window. MOSAIQ opens the Restore Utility window and puts the images in a table. Putting Images into the Restore Queue The third step in the restore procedure is to put images into the restore queue. You can put images into the queue through the Restore Utility window. The filters and sorting in the window lets you first narrow down the list of images. The Restore Utility window has a Restore Images tab. The tab shows a table of images for each patient. You can sort the images. To sort the images, you drag column headers to a rectangular area, or Group By Box. Also, you can use the filters that follow: the type of image (for example, CT or MR), or a range of dates when the image was made in the clinic. To put images into the restore queue, do the steps in the procedures that follow. Opening the Restore Utility Window 1. Do one of the steps that follow. Click File | Import/Export | DICOM Archive/Restore | Restore Queue, then click the Restore Images tab to open the Restore Utility window. OR Copyright 2010, Elekta Impac Software LUGMSQ0002/4.0/23-Sep-2010 In the Restore Worklist window (described in the previous procedure), select a patient, then click the Select button to open the Restore Utility window. 245 MOSAIQ User’s Guide 2. In the Restore Utility window, click the Restore Images tab, if it is not already selected. MOSAIQ opens the Restore Utility window, as shown in Figure 68. Restore Images tab Drag column headers to the Group By Box to set up a group for sorting images Click the Restore button to put the images into the queue for processing. Column header Click the Refresh button to update the table. Figure 68: Restore Utility Window (Restore Images Tab) Sorting Images in the Restore Utility Window 1. Right-click on a column header, then select Group By Box to open or close it. The Group By Box is found at the top of the pane, above the column headers. By default, it is open. The column headers are found directly below the Group By Box. The pane opens or closes the Group by Box accordingly. 2. From the column header row, drag a column header to add it to the Group By Box. For example, drag the Patient Name column header to the Group By Box. The pane removes the column header from the row. The table subsequently sorts the images. 246 Copyright 2010, Elekta Impac Software LUGMSQ0002/4.0/23-Sep-2010 CHAPTER 9: MOSAIQ Oncology PACS 3. In the Group By Box, right-click a column heading, then select UnGroup to remove it from the Group by Box. You can also drag a column header back into its initial position to remove it from the Group By Box. The table re-sorts the images. 4. In the Group by Box, click a group to change the sort to an ascending or descending sequence. In the Group By Box, there is an arrow on each group (column heading). An up arrow shows an ascending sequence, and a down arrow shows a descending one. For example, if there is an up arrow on the Patient Name group, then the table sorts the patient, in an ascending sequence. Clearing the Sorting 1. Right-click the Group by Box, then select Clear Grouping to clear the group from the Group By Box. The pane keeps the Group By Box open and puts all column headers back into the header row. The table clears the sorting of the images. Filtering Images in the Restore Images Tab 1. Click the Restore Images tab to make sure that the DICOM Image Restore pane is opened. 2. On the right side of the pane, in the Filters: group, click field to open the drop-down list. 3. Select one or more check boxes, then click adjacent to the Image Type again to set the types of medical images. 3. Click the Refresh button to update the table. 4. In the Filters: group, click the Study Date Range check box adjacent to the Image Age field. The pane makes the From and To fields available for selection. 5. Click adjacent to the From field to open the calendar. 6. Set the start date. 7. Click Copyright 2010, Elekta Impac Software LUGMSQ0002/4.0/23-Sep-2010 adjacent to the To field to open the calendar. 247 MOSAIQ User’s Guide 8. Set the end date. 9. Click the Refresh button to update the table. If you do not set a correct range of study dates, MOSAIQ shows an “Invalid Date Range” message. An example is when the start date occurs after the end date. Expanding or Closing the Table 1. Click the Restore Images tab to make sure that the Restore tab is open. 2. Make sure that you set a group for sorting. For more information, refer to the “Sorting Images in the Restore Utility Window” procedure on page 246. 3. Do one of the three procedures that follow to expand or close the table: Right-click on the Group by Box, then click Full Expand or Full Collapse. In the Display Options field, found in the bottom right corner of the pane, select the Expand check box or again to clear it. Make sure that you have set up a minimum of one group for sorting to correctly use the Expand check box. Without a specified group, you cannot expand the table. OR On the left side of an image, click the plus sign to expand it or the minus sign to close it. Setting the Query Threshold 1. Click the Restore Images tab. 2. Do the steps that follow. a. In the Query Results Threshold field, found at the bottom, right corner, click the up or down arrows to set the value. The default value is 50,000. The maximum number is 150,000. 248 Copyright 2010, Elekta Impac Software LUGMSQ0002/4.0/23-Sep-2010 CHAPTER 9: MOSAIQ Oncology PACS b. Click the Refresh button to update the table. The table shows the images if the number is less than the threshold value. If it is more, a message tells you to make a decision. If it is necessary to truncate the display, accept the message to truncate the display to the query threshold. MOSAIQ truncates the display, but images of a specified patient are always kept together to prevent a division of the images. Selecting Images 1. Click the Restore Images tab. 2. Do one of the steps that follow. Click one image. Click the first applicable image, then press CTRL + click other images to select multiple, non-sequential images. Click an image, then press CTRL + A to select all images in the table. In the Display Options field, click the Select All check box to select all images in the table. OR The table shows the selected images, which are highlighted in a light-blue color. 3. Click the Refresh button to clear all selected images in the table, or clear the Select All check box. To select images again, refer to step 2 above. Putting Images into the Restore Queue 1. Click the Restore Images tab. 2. Click one or more images to restore. 3. Click the Restore button, found in the top right corner of the pane, then wait for a few minutes. MOSAIQ puts the images in the restore queue and starts processing the images. 2. Click the Close button, found in the top right corner of the pane, to close the Restore Utility Window, if desired. If you close the window too early, then MOSAIQ displays a message that tells you to make a decision. Click the Yes button to stop the queuing. Otherwise, click the No button to keep the window open and continue the queuing. Copyright 2010, Elekta Impac Software LUGMSQ0002/4.0/23-Sep-2010 249 MOSAIQ User’s Guide 5. Continue to the Managing the Restore Queue on page 251 to see if the restore process completed successfully. Putting Images into the Restore Queue (Using Image Lists) 1. In the main MOSAIQ window, select a patient of interest. 2. Click eChart | Images to open the Image List window. 3. Find a patient record that has an A in the Status field. 4. Select a patient record as shown in Figure 69. Figure 69: Image List Window 5. On the right side of the window, click the Restore button. MOSAIQ sends the tagged image to the restore queue. MOSAIQ does not open any windows. MOSAIQ only adds the image or images to the Restore Queue. 6. Continue to the Managing the Restore Queue on page 251 to see if the restore process completed successfully. 250 Copyright 2010, Elekta Impac Software LUGMSQ0002/4.0/23-Sep-2010 CHAPTER 9: MOSAIQ Oncology PACS Managing the Restore Queue You work in the Restore Utility window, specifically within the Manage Queue tab, to manage the restore process. Opening the Manage Queue Pane 1. Click File | Import/Export | DICOM Archive/Restore | Restore Queue to open the Restore Utility window. Sorting Images For more information, refer to the “Sorting Images in the Restore Utility Window” procedure on page 246. Doing a Check of the Restore Progress For all filters, the selection that you make is saved as a user preference for the next time that you open the Manage Queue pane. 1. On the right side of the Manage Queue pane, in the Queue Settings group, click adjacent to the Job State field to open the job state list. 2. In the job state list, select one or more job states: Queued, In Progress, Cancelled, Fail. Click again to close the list. 3. Above the Queue Settings group, click the Refresh button to update the images to do a check of their status in the restore process. Removing an Image from the Restore Queue 1. Do the steps that follow. a. Select the applicable image or images. b. Click the Remove button, found in the top, right corner of the pane. c. Click the Refresh button, found in top, right corner of the pane. MOSAIQ removes the image or images from the restore queue. Expanding the Table For more information, Refer to the procedure, “Expanding the Table” on page 251. Copyright 2010, Elekta Impac Software LUGMSQ0002/4.0/23-Sep-2010 251 MOSAIQ User’s Guide Retrieving an Image that Failed 1. Do the steps that follow. a. Click the up or down arrows adjacent to the Maximum Retries field to set the maximum number of tries that MOSAIQ makes to retrieve an image. The default value is 3. b. Click the Refresh button, found in the top right corner of the pane, to update the table. c. Select one or more images that failed during the restore process. d. Click the Retry button to let MOSAIQ try to retrieve the failed images. Setting the Query Threshold For more information, refer to the “Setting the Query Threshold” procedure on page 248. 252 Copyright 2010, Elekta Impac Software LUGMSQ0002/4.0/23-Sep-2010 MOSAIQ User’s Guide CHAPTER 10: SEQUENCER SEQUENCER, the Verify and Record feature of MOSAIQ, is one of the most critical features of the system. SEQUENCER makes sure that the linac is set according to the prescription, the geometric values are within tolerances, and that the necessary accessories are in place. SEQUENCER lets you record treatments in the EMR. Before You Begin Work Environment A typical Radiotherapy department configuration includes one SEQUENCER workstation for each linac. Therapists use the SEQUENCER workstation to select a patient, send the Rx parameters to the machine, provide verification (except for the Varian 4D and Siemens Syngo), and record imaging and treatments. If your department uses the Remote Treatment Room feature, you can use the SEQUENCER workstation while you setup patients from within the room. If your department uses barcoding, you can also use the SEQUENCER to scan a patient and to scan accessory barcodes. What is a VMI? A Virtual Machine Interface is the basis of communications between SEQUENCER and your linac. ELEKTA/Impac has a VMI for each type of linac. The VMI, in conjunction with the .ini and .cfg files, lets SEQUENCER communicate with your linac. Security Requirements You must have Clinical | Tx Delivery | Modify Security rights to verify and record delivered treatments with SEQUENCER. You must have Approve security rights to approve treatment delivery information and override out-of-tolerance parameters (you must have Clinical | CAUTION General | Approve security rights to go into standby mode), approve machine characterizations, and Complete a Partial Field Delivery. Approvals You can specify the required approvals you want in the Inbound Tx Checks group on the Clinical (RO) tab in Department Setup. MOSAIQ tells you when it requires an approval to continue. Require Rx Approval for Treatment (check box) Select so radiation treatment prescriptions must be approved before MOSAIQ permits treatment. Require Field Approval for Treatment (check box) Select so radiation treatment fields must be approved before MOSAIQ permits treatment Copyright 2010, IMPAC Medical Systems LTGMSQ0002/4.0/23-Sep-2010 253 MOSAIQ User’s Guide Require Session Approval for Treatment (check box) Select so radiation treatment sessions must be approved before MOSAIQ permits treatment. MOSAIQ interprets all treatments delivered within three hours of the first treatment in any given session as part of the same session. Also, if a portal image has no associated treatment field, MOSAIQ makes a chart entry, but the session number is not incremented. Require Tx Plan Approval for Treatment (check box) Select so radiation treatment plans must be approved before MOSAIQ permits treatment. Require Tx Calibration Approval for Treatment (check box) Select so radiation treatment calibration must be approved before MOSAIQ permits treatment This is specific to Particle Delivery Portal Image Check (check box) Select to activate an alert that appears before MOSAIQ opens a treatment field or delivers a treatment if the portal image was not reviewed or if a physician rejected the portal image. This only applies if your department has Image Management registered. Dose Tracking Check (check box) Select to show dose check warnings. These warnings appear whenever you select a field for treatment that will not contribute dose to the prescription site or it is not associated with a prescription site. The warning messages are as follows: Treatment field dose is zero. Do you want to treat the field with no dose defined? Treatment field is not associated with prescription site. Continue? A dose site coefficient has either not been defined or set up so that the treatment of this field will not contribute any dose to the prescription site. Continue? Refer to Pre-Treatment Warnings in Appendix B on page 282. 254 Copyright 2010, Elekta Impac Software LUGMSQ0002/4.0/23-Sep-2010 CHAPTER 10: SEQUENCER Field Change Warnings (check box) Select to show a warning message if a field was changed since the last time the patient was treated. If selected and a field was changed, the "This field has changed since the last treatment. Do you wish to view the details?” warning appears before the Treatment Delivery Table opens. Click Yes to open the Field Delta View dialog box. Click No to continue treatment. This does not apply to QA Mode treatments. Dose Action Setting Type the default dose amount prior to a specified dose action point at which you want MOSAIQ to alert you that a dose action is necessary. The dose amount you type becomes an approximate notification time. For example, the average fractional dose for a field is 200 cGy. You want 2-3 days notice before you get to the dose action point, so you type 500 in this field. A message will appear to tell you that you are within 500 cGy of the specified dose action point. Total Dose Tolerance Type the total dose tolerance. This helps to prevent delivering more than the prescribed dose. MOSAIQ tells you when the calculated dose plus the field dose (minus the value in the total dose tolerance field) is greater than the prescribed total dose. Refer to Warning Messages when Performing Tasks in MOSAIQ in Appendix B on page 286. Fractional Dose Tolerance Type a fractional dose tolerance value to prevent deviations from the prescribed fractional dose. MOSAIQ tells you when the actual dose delivered during a treatment session plus the projected additional fractional dose does not equal the prescribed fractional dose. MOSAIQ also tells you when the actual dose plus the projected additional fractional dose is greater than the tolerance value that you specified. Refer to Warning Messages when Performing Tasks in MOSAIQ in Appendix B on page 286. QA Mode You can click QA Mode in the Treatment Chart window to start QA Mode (refer to Scheduling a QA Mode Treatment Session in Chapter 4 on page 123). QA Mode lets you deliver the exact plan that will be treated without counting accumulated dose. You can start QA Mode to deliver treatments (that do not add dose to the chart), take portal images, open the Treatment Chart, calculate dose, and run reports. You can use QA Mode to deliver a patient’s plan without the patient present to check the plan. Copyright 2010, Elekta Impac Software LUGMSQ0002/4.0/23-Sep-2010 255 MOSAIQ User’s Guide SEQUENCER Workflows SEQUENCER connects to your linac interactively or statically, depending on the interface. An interactive interface lets SEQUENCER communicate directly with the linac in real time. SEQUENCER must wait for data transfers when the interface is static. An example of an interactive interface is the interface to an Elekta Synergy linac. An example of a static interface is the interface to a Siemens Coherence linac. SEQUENCER sends the treatment field to the linac and verifies that the linac is correctly moded up before you can beam-on. The Varian 4DITC and Siemens Syngo is a special case because the interface only lets SEQUENCER record geometric machine and treatment data. Basic SEQUENCER Workflow The steps below apply to any SEQUENCER interface configuration after you select the patient and open the patient chart. Refer to Select a Patient for Treatment on page 261 in this section. 1. Select the Treatment Calendar session that you want. SEQUENCER sends the treatment field data to the linac and opens the Verified Treatment window. You can use the Auto Setup option to setup the linac to deliver the selected treatment field. 2. Select the first field to treat, then click Select If the Treatment Readiness Check dialog box opens, you must respond before you can continue. 3. Setup the patient on the couch. If your department uses accessory barcodes, you must scan the accessory barcodes now to avoid an interlock. 4. Make pre-treatment portal images if necessary. 5. Mode up the linac. SEQUENCER compares the prescribed parameter values against the machine parameter values. SEQUENCER prevents treatment if one or more parameters is out of tolerance. 6. Beam-on the linac. ***Treating*** appears below the header. The Record Treatment dialog box opens when the treatment is complete. 7. Treat the first field and make during and or post-treatment portal images if necessary. 8. Type any relevant comments in the Note field of the Record Treatment dialog box. 9. Click Record. The Verified Treatment window opens for the next field because you set the treatment order earlier. If you had not set the treatment sequence, the Treatment Delivery Table window will open after you record the treatment. 256 Copyright 2010, Elekta Impac Software LUGMSQ0002/4.0/23-Sep-2010 CHAPTER 10: SEQUENCER 10. Click Close in the Treatment Delivery Table window. 11. Click OK in the Code Capture dialog box. Basic Interactive Interface Workflow SEQUENCER constantly communicates with the linac over an Ethernet or a serial connection. Actual geometric values from the linac show in the Verified Treatment window. The steps below begin at the point when you mode up the linac. The preceding steps are the same as the Basic SEQUENCER Workflow above. 1. Mode up the linac. SEQUENCER compares the prescribed parameter values against the machine parameter values. SEQUENCER prevents treatment if one or more parameters are out of tolerance. 2. Treat the first field and make during and or post-treatment portal images if necessary. 3. Click Record in the Record Treatment dialog box or Record Port dialog box (or Composite Record Treatment dialog box). 4. Select the next treatment field, then mode up the linac. 5. Change the patient position if necessary. 6. Treat the next field and make portal images if necessary. 7. Continue to treat the remaining fields or end the session if necessary. 8. Capture charges. Using Auto-Setup without Console Setup If you use a linac other than an Elekta Precise, a Varian EXCI or a Varian 4DITC, you can Auto-Setup the parameter values. The difference is that you cannot manually change values from MOSAIQ in the same way as Console Setup, which is in the subsequent section. 1. In the Treatment Delivery Table dialog box, double-click the field to treat. 2. In the Verified Treatment window, click Auto Setup. 3. In the Auto-Setup Parameters message box, click Yes. 4. Go into the treatment room to make sure the Auto-Setup parameters are correct. On Varian non-EXCI linacs, you have two minutes from the time you click Yes until you hold the enable bars and press the Auto button on the pendant. If you take longer than two minutes, you must re-do the Auto-Setup. Also, the gantry and collimator move only as long as you hold the enable bars. You must continue to hold the enable bars until the gantry and collimator are at the desired angles. 5. Use the Auto Motion feature for your linac as directed by your linac manufacturer. Copyright 2010, Elekta Impac Software LUGMSQ0002/4.0/23-Sep-2010 257 MOSAIQ User’s Guide 6. Manually change the remaining out-of-tolerance values on the linac to match the MOSAIQ values, and then verify the accessories. Using Auto-Setup with Console Setup If you have a Varian EXCI or Elekta Precise linac, you can use the Console Setup option to adjust the linac settings from MOSAIQ. 1. Double-click the field that you want to treat in the Treatment Delivery Table window. 2. Click Auto Setup in the Verified Treatment window to open the Console Setup dialog box. You can make temporary, “plan level” as opposed to “prescription level” changes to fields and send them to the linac. Console Setup is only available for Varian EXCI and Elekta Precise linacs. Radio buttons at the bottom of the screen are a “shortcut,” for you to choose between the parameters you specified in the treatment field definition (Rx) or the currently modeled (Actual) values. 3. Click Setup Mechanical Parameters with Rx Values or manually change the parameter values. Select the check box next to the parameter and select or type the new parameter value that you want. 4. Click OK. On Varian linear accelerators, you must also press the Auto button on the pendant. 5. Go into the treatment room to make sure that the Auto-Setup parameters are correct, and then verify the accessories. Basic Static Interface Workflow Throughout the following process, SEQUENCER sends data to the linac, and then waits to receive data from the linac. 1. Select the first field. SEQUENCER sends the treatment field data to the linac and opens the Verified Treatment window. You can use the Auto Setup option to change the values on the linac. 2. Accept the field on the linac console. 3. Set the patient up on the couch. If your site uses accessory barcodes, you must scan the accessory barcodes now to prevent an interlock. 4. Make pre-treatment portal images if necessary. 5. Mode up the linac. 6. Treat the first field and make during and post-treatment portal images if necessary. 258 Copyright 2010, Elekta Impac Software LUGMSQ0002/4.0/23-Sep-2010 CHAPTER 10: SEQUENCER 7. Click Record in the Record Treatment dialog box or Record Port dialog box (or Composite Record Treatment dialog box). 8. Select the next field and mode up the linac. 9. Change the patient position if necessary. 10. Treat the next field and make portal images if necessary. 11. Repeat steps 2-10 until you treat all fields or must end the session. 12. Capture charges. Portal Images You can schedule and change portal images for a patient treatment on the Treatment Calendar. You can schedule portal images before, during, or after treating the field. SEQUENCER verifies and records portal images before, during, and after treatment. You can also restore treated fields to record a post-portal image. Pre and Post Treatment Portal Images You can specify a portal image before, during, or after a treatment. 1. Click Pre Portfilm… from the options menu of the Treatment Delivery Table to make a portal image before treatment. Click Post Portfilm… to make a portal image after treatment. 2. Select the Plan or Open radio button in the Select Port dialog box (typically you select Plan first, unless you only want an open field image). 3. Click OK. The Verified Port dialog box opens. 4. Correct any out of tolerance parameters and click Record. 5. Select the Open radio button in the Select Port dialog box. The Verified Port dialog box opens. 6. Correct any out of tolerance parameters and click Record. The Record Port dialog box opens. 7. You can type a note in the Note field if necessary, then click Record. 8. Capture the charges. Portal Image During Treatment Click Port During Only… from the options menu of the Treatment Delivery Table to make a portal image during the treatment. Portal Image Only Click Portfilm Only… from the options menu of the Treatment Delivery Table to make a portal image, but not treat the field. Copyright 2010, Elekta Impac Software LUGMSQ0002/4.0/23-Sep-2010 259 MOSAIQ User’s Guide Varian 4DITC Interface Workflow The interface to the Varian 4DITC is a special kind of DICOM interface. SEQUENCER sends and receives data via TCP-IP. SEQUENCER sends the plan to the 4D and the 4D performs the validation. At the completion of imaging and treatment the 4D returns all images and beam records for Sequencer to record. 1. Click open patient on the 4DITC. 2. Select the patient in MOSAIQ, select a field, and click Treat on the Treatment Delivery Table, the Treatment Readiness Check dialog box opens. You must use the Treatment Calendar Session dialog box to schedule portal images or add ad hoc portal images on the 4DITC workstation. Ad-hoc portal imaging is not available from within MOSAIQ. If you schedule a Snapshot portal image during treatment, the exposure completes within the first few MU, then the beam continues until it delivers all prescribed MU. Setup fields that you add as part of the Tx Calendar Session only require a status change when you treat them. 3. Click Continue, then click Send Plan on the Treatment Delivery Table. SEQUENCER sends the plan to 4DITC. 4. Click Mode Up on the 4D console. Verify that the field loaded on the 4DITC. 5. Select RV Mode Up on the Varian EXCI console. 6. Set the field size on the Varian EXCI console. 7. Deliver the treatment on the Varian EXCI Console. The interface sends the treatment data to the SEQUENCER workstation. The Composite Record Treatment dialog box opens on the SEQUENCER workstation when treatment is complete. 8. Click Record to record the treatment. 9. Capture charges. 260 Copyright 2010, Elekta Impac Software LUGMSQ0002/4.0/23-Sep-2010 CHAPTER 10: SEQUENCER Select a Patient for Treatment You can open the Treatment Chart from the eChart menu or the Location Schedule window. Normally, you select patients for treatment from the Location Schedule. 1. Click Schedule | Location…, to open the Location Schedule window. 2. Click adjacent to the Location field. 3. Double-click your linac to show the linac location whose appointments you want to see. Typically, all patients scheduled for treatment on a given day appear on the schedule. You can configure eCHART to automatically queue patients for treatment when they arrive. If not, you can queue patients manually. You can also click Select Patient to open a patient chart. 4. Select the appointment, then right-click or press F4. 5. In the Location Schedule Options menu, click Chart/Capture… to open the Treatment Delivery Table window. The Treatment Delivery Table shows all treatment fields that are currently available for treatment. It also lets you schedule portal images and more. 6. Select the Treatment Calendar session to be treated. 7. Click Treat on the Treatment Chart. Pre-Treatment Warnings SEQUENCER makes a series of checks after you click Treat. SEQUENCER informs you when you change the field size, jaws, gantry angle, collimator angle, mode, type, and arc start and stop positions of IMRT fields. You cannot change the leaf positions (at any control point) of IMRT fields. To prevent treating hidden fields within a Treatment Calendar session, you must change that session and specify the set of fields that you want to treat. You should change all sessions that have the wrong set of treatment fields. Treatment Readiness Check SEQUENCER performs routine pre-treatment checks every time you select a field for treatment, and send a treatment field or a plan to the treatment machine. These checks take place before the Treatment Delivery Table opens. For example, after you click Treat in the Treatment Chart window, before the Treatment Delivery Table opens. The Treatment Readiness Check dialog box opens whenever SEQUENCER finds issues with any prescription sites or treatment fields to correct or acknowledge/override before you treat. You must respond to the highlighted site and/or field information before you can continue to treat You must have Clinical | Field Defs | Approve and Clinical | Tx Delivery | Approve security rights to override parameters in the CAUTION Treatment Readiness Check dialog box. Copyright 2010, Elekta Impac Software LUGMSQ0002/4.0/23-Sep-2010 261 MOSAIQ User’s Guide 1. Follow the instructions in the Treatment Readiness Check dialog box. If the highlight color is yellow or green, click Continue. If the highlight color is red, you must override or change any field for which SEQUENCER prevented treatment. 2. Click Continue after you override. If your linac is a Varian 4DITC or Siemens Syngo, SEQUENCER makes an outbound check after you click Send Plan from the Treatment Delivery Table. This is to make sure that any changes made (when you change or hide fields, etc.) do not cause additional issues. Field Sequencing Verification Checks The Treatment Readiness Check does the same validations as the Treatment Calendar. If MOSAIQ finds errors in any field in the CFS (Consolidated Field Sequencing) during the standard Treatment Readiness Check treatment delivery with either a CFS or an AFS (Automatic Field Sequencing) session is prevented. You must treat the fields on the Treatment Calendar separately. You must acknowledge warnings or override parameters as noted by the Treatment Readiness Check to deliver treatment. You can manually stop the CFS session to work around unresolved errors requiring acknowledgements or overrides. A valid CFS must include the following: All fields must have the same treatment machine. All fields must be of Type Static or StepNShoot. All fields must be of Modality X-Rays. All fields must have an MLC defined. No fields may have a physical wedge. No fields may have the text “CUSTOM” for compensator, block, or bolus. All fields must have the same defined text in the block code, if a block code is present in any of the fields. All fields must have the same defined text in the bolus code, if a bolus code is present in any of the fields. All fields must have the same defined text in the compensator code, if a compensator code is present in any of the fields. All fields must have the same couch positions or be within +/- 1mm tolerance of the first field in the session. The CFS sequence may pass initial Treatment Calendar CFS checks, but one or more fields within the CFS session may not pass the additional treatment readiness checks. In that case, you can either resolve an outstanding error during the session or skip those unresolved errors in order to treat the eligible fields separately. Port Film Status The Port Film Status window shows the results of the pre-treatment portal image check. 1. Click View to open the Image Review window. 2. Click OK or Cancel to open the Verified Treatment window. 262 Copyright 2010, Elekta Impac Software LUGMSQ0002/4.0/23-Sep-2010 CHAPTER 10: SEQUENCER Treatment Chart The Treatment Chart keeps an electronic record of past and planned radiotherapy treatments. On the Treatment Chart, you can see historic, treated fields or treat fields. On the Treatment Delivery Table, you can change the treatment order and log on a second therapist. You open the Verified Treatment window to start the treatment of a field. From the Treatment Chart, you can open the Treatment Calendar (refer to Using the Treatment Calendar in Chapter 4 on page 112). You can set up Field Sequencing (refer to Scheduling AFS Treatment Sessions on page 122 and Scheduling MFS Treatment Sessions on page 122 in Chapter 4) from the Treatment Calendar. You must use the Treatment Calendar to deliver particular treatment regimens refer to SEQUENCER Workflows on page 256 and Field Sequencing on page 270 in this section. Treatment Delivery Table Field Delta View If you selected the Field Change Warnings check box in Department Setup, this dialog box opens when you select a treatment field for treatment if treatment parameter have changed since the last treatment. Refer to Approvals on page 253 of this section. 1. Click Yes when the Field Change Warning appears. You can view the details in the Field Delta dialog box. You can configure this warning to appear or not appear in Department Setup, the default setting is selected. 2. Examine the field changes and click Close or Rollback, depending on whether or not you want to treat with the changes. Working with Treatment Fields on the Treatment Delivery Table You must have Clinical | Tx Delivery | View security rights to view the Treatment Delivery Table. You must have Modify security rights to treat. You must have Approve security rights to approve treatment delivery information, complete partial treatments, and override out CAUTION of tolerance parameters. You must also have Clinical | General | Approve security rights to start standby mode. The Treatment Delivery Table window shows all treatment fields that are currently available for treatment. Treatment fields appear in the order you configured on the Treatment Calendar, the Treatment Order you set, or as they appear in the Diagnoses and Interventions window (refer to Using the Treatment Calendar in Chapter 4 on page 112). You cannot change any of the information that appears. If any of the information is incorrect, you must change that information at the point of origin. You can add, change, or hide a treatment field in the Treatment Delivery Table window. In addition, MOSAIQ automatically notifies you of any upcoming Dose Action Points. You may have to review patient information before you treat the patient. In such cases, you can open the Diagnoses and Interventions window or the Treatment Field Definition dialog box (refer to Defining Simulation and Treatment Fields in Chapter 4 on page 84). The patient orientation is very important, and MOSAIQ imports this if provided by the treatment Copyright 2010, Elekta Impac Software LUGMSQ0002/4.0/23-Sep-2010 263 MOSAIQ User’s Guide planning systems. Select the radiation prescription and click Site Setup (refer to Site Setup in Chapter 6 on page 205) to open the Site Setup dialog box. You must only specify the patient orientation once. The Treatment Field Definition dialog box shows the field information that you imported from your TPS, or manually typed. The Dose and Fractions fields show the current amounts delivered at a given time. Using a Secondary Therapist Login When more than one therapist works on a linac, you can log in the second therapist. MOSAIQ records the second therapist’s user initials with those of the therapist who is logged in as the primary MOSAIQ user. 1. Right-click or press F4 in the Treatment Delivery Table window. 2. Click Secondary Therapist Login… on the Treatment Delivery Table Options menu. 3. In the Secondary Therapist dialog box, type the user name of the secondary therapist in the Name field. 4. Type the password of the secondary therapist in the Password field. 5. Click OK. MOSAIQ records the initials of the second therapist for all treatments until the primary therapist logs out of MOSAIQ or you click Secondary Therapist Logout… on the options menu. The initials of the secondary therapist also appear in the lower right corner of the MOSAIQ screen. Changing the Treatment Order When you start to treat the patient, you can change the order of the fields if necessary. Your linac may have limitations with regard to the treatment field order. Refer to Changing the Treatment Order in the Treatment Session in Chapter 4 on page 119. Hiding a Treatment Field You can hide treatment fields in the Treatment Delivery Table window. This is useful for fields to be treated at a later time, such as boost fields. You can only unhide fields from the Diagnoses and Interventions window. 1. Select the treatment field to hide in the Treatment Delivery Table dialog box, then press F4 or right-click to open the menu. You can also press CTRL+H to hide the field and skip Step 2. 2. Click Hide Field. The field number appears in the Hidden Fields field at the bottom of the dialog box. The number that shows in the Hidden Fields field is not the number of hidden fields, but the actual Field ID of the hidden field. For example, if the hidden field ID is 3ap, then 3ap appears in the Hidden Fields at the bottom of the window. 264 Copyright 2010, Elekta Impac Software LUGMSQ0002/4.0/23-Sep-2010 CHAPTER 10: SEQUENCER Unhiding a Treatment Field If you need to see a hidden treatment field, you can unhide it. 1. Click eChart | Diagnoses and Interventions… or click the D&I icon on the toolbar. 2. Select the hidden treatment field in the Diagnoses and Interventions window, then press F4 or right-click to open the menu. You can also press CTRL+H to unhide the field and skip Step 3. 3. Click Hidden Tx Field. Restoring a Treated Field After you treat a field, it no longer appears in the Treatment Delivery Table dialog box. You can restore treated fields to see them all or make a portal image. 1. Right-click or press F4 in the Treatment Delivery Table dialog box to open the menu. 2. Click Restore Fields. Treatment Field Definition While in SEQUENCER You must have Clinical | Field Defs | View security rights to view the Treatment Field Definition dialog box. You must have Modify security rights to specify/change/copy treatment field definitions (except for MU and dose), capture machine parameters, associate field setup photos and diagrams, and use the treatment field definition in CAUTION ViewStation. You must have Approve security rights to approve (lock) treatment field definitions, machine characterizations, and delete setup photos and diagrams. Copyright 2010, Elekta Impac Software LUGMSQ0002/4.0/23-Sep-2010 265 MOSAIQ User’s Guide Setup Fields (Setup=MV or kV Setup=kV) Setup fields are special treatment fields for IGRT. They do not contribute to the overall dose and are specifically for imaging. You must specify setup fields in MOSAIQ. You must also characterize setup fields in machine characterization to make them available on the Type list in the Beam group of the Treatment Field Definition dialog box. At this time, MOSAIQ only lets you import setup fields from Eclipse treatment planning systems. For other treatment planning systems, you must manually add setup fields. Copy a treatment field in the Treatment Field Definition dialog box and then change the treatment type from Fixed to Setup or kV Setup. Portal Images You can specify ad-hoc portal images from the Treatment Delivery Table or from the Verified Treatment window. You can also specify ad-hoc portal images from the Treatment Calendar window. 1. Open the Treatment Field Definition dialog box. 2. Complete any of the fields that were not filled in with data from the treatment plan. 3. Type the portal image MU value in the Planned and Open group MU fields. 4. If you want to track dose, type the dose coefficient in the Planned and Open group Dose Coeff fields. If your linac is a Varian 4DITC, you must select the image quality in the Planned and Open group Image Quality fields. 5. Type the delta value in the Open group Delta field. The Delta field applies to doubleexposure images. For example, if you type 8, the field is opened 4+4. 6. Click the EPID check box if you use an Electronic Portal Imaging Device. 7. Type the SID in the SID field. Adding a Treatment Field While you can add treatment fields from the Diagnoses and Interventions window, you can also use the Treatment Delivery Table dialog box. 1. Right-click or press F4 in the Treatment Delivery Table dialog box to open the menu. 2. Click Insert Field…. When you select Insert Field…, a blank Treatment Field Definition dialog box opens. 266 Copyright 2010, Elekta Impac Software LUGMSQ0002/4.0/23-Sep-2010 CHAPTER 10: SEQUENCER 3. In the Treatment Field Definition dialog box, configure the field definition for the new field. The new field you made appears in the Diagnoses and Interventions window above the diagnosis. Because you made it from the Treatment Delivery Table dialog box, it was not assigned to a radiation prescription site. You must drag and drop this field to the desired Rx for dose and fractions to be tracked. Make sure you click the Dosimetry button. 4. Click OK. Changing a Treatment Field Before you treat a patient, you can change one or more of the treatment fields without closing the Treatment Delivery Table dialog box. 1. Select the treatment field to change in the Treatment Delivery Table dialog box, then right-click or press F4 to open the menu. 2. Click Change Field….and the Treatment Field Definition dialog box opens for the selected field 3. Change the treatment field in the Treatment Field Definition dialog box. If you have an interactive interface, you can capture actual machine settings. You can also add portal images at this time. If you change the linac, SEQUENCER tells you that the machine characterization is different. 4. Click OK and the Field Delta View dialog box opens. The Field Delta View shows all changes highlighted in yellow. The Field Delta View helps you make sure that you do not save a change that you did not intend to make. You can configure the Field Delta View to appear or not appear from the Field Edit Rules group in the Clinical (RO) tab of the Department Setup. 5. Click Accept to save your changes. If you click Return, the changes are not saved, the Field Delta View dialog box closes and the Treatment Field Definition dialog box opens again. 6. Approve the treatment field definition if that is necessary for your department. CBCT Instructions Refer to CBCT Acquisition in Chapter 6 on page 218 for more information on CBCT acquisition. This section applies to Elekta machines with Synergistiq. 1. Make a new treatment field, in which the field type is CT or MVCT for Siemens Syngo machines. You can copy a current field and change the Type field value (not a required change for Varian or Siemens). All fields must have identical table values. If have an Elekta XVI, you must select a preset. XVI will prompt you for a preset at the time of acquisition. 2. When a patient has multiple prescription sites with different CTs/Structure Sets, on the Treatment Delivery Table, select a field from site 1. Copyright 2010, Elekta Impac Software LUGMSQ0002/4.0/23-Sep-2010 267 MOSAIQ User’s Guide 3. Right-click, then click Load Reference Data. If have an Elekta XVI, the DICOM transfer to XVI begins after you select a site. 4. Select a field from site 2. 5. Right-click, then click Load Reference Data. 6. Do this for all sites. Site Setup Verification You use the Site Setup Verification window to set up and verify patients for treatment delivery and imaging before treatment. You can also verify the patient setup while in QA mode. Site Setup Verification also lets you confirm the correct patient is at the machine with Patient Verification. When in a verified mode, MOSAIQ compares actual values to the defined values to check for any mismatches. You cannot complete the site setup until you have cleared all mismatches. MOSAIQ indicates whether each parameter is within tolerance or out of tolerance. If a parameter is out of tolerance, it is highlighted in red. Recording a Site Setup You can configure how you verify the patient and site setup parameters from the Clinical (RO) tab of the Department Setup. Your system administrator can help you with this. CAUTION To use Record Site Setup, you must have Clinical | Tx Delivery | Modify or Approve rights. 1. Open the chart for your patient, click eChart | Radiotherapy Treatment..., then click Treat to open the Treatment Delivery Table window. 2. Select a treatment field and click Treat OR right-click, then click Perform Site Setup to open the Site Setup Verification window. 3. Clear all interlocks. Refer to Overrides below for more information. 4. Verify the patient. Refer to Patient Verification for more information. 5. Click Record to open the Record Site Setup dialog box. The Record Site Setup dialog box shows the course of treatment, the prescription site to which the site setup definition applies, the initials of the primary and secondary logged on therapists, the date and time on which you opened the Site Setup Verification window, and the name of the linear accelerator or proton machine to which the site setup definition applies. 268 Copyright 2010, Elekta Impac Software LUGMSQ0002/4.0/23-Sep-2010 CHAPTER 10: SEQUENCER 6. Click the In-Patient check box to change inpatient or outpatient status for this treatment session from the inpatient/outpatient status defined in Patient Demographic Data. 7. Type your notes in the Note group. 8. Click Record to complete recording of the site setup. Patient Verification You can use Right Patient, Right Site, Right Technique in Site Setup Verification. When you verify the patient, you can use a patient barcode or enter one or more electronic signatures. You can configure how many and which signatures are necessary from the Department Setup. CAUTION To use Site Setup Verification, you must have Clinical | Tx Delivery | Modify or Approve rights. 1. In the Site Setup Verification window, click Patient Verification hyperlink to open the Manual Patient Verification window. This window lets you verify the patient setup with staff approvals. The Manual Patient Verification window shows information about the Patient and the Patient ID Photo to make sure you treat the correct patient. You can add comments for this treatment session in the Note group. The Approval group shows the required and optional site setup approvals, up to a maximum of 3. Optional approvals appear in italics. 2. In the Patient Verification Approval group, the logged in user name appears by default. Type your password, then click Approve. Your signature appears in the Approvals group. 3. Click Close to close the Manual Patient Verification window. The Manual Patient Verification remains open until all required signatures are entered. Copyright 2010, Elekta Impac Software LUGMSQ0002/4.0/23-Sep-2010 269 MOSAIQ User’s Guide Overrides The Site Setup Verification window shows all the parameter mismatches in red color. A mismatch occurs when the actual value of a parameter is either out of tolerance or is not an exact match to its prescribed value. The Overrides window lets you to clear all the parameter mismatches to continue with the current treatment workflow. CAUTION To override a parameter mismatch, you must have Clinical | Tx Delivery | Approve rights. 1. In the Site Setup Verification window, click Override to open the Overrides window. The Override Parameters group shows all parameters that you can override. 2. Click the parameter check box or press SPACEBAR for the highlighted selection to override the parameter that is out of tolerance. 3. Type your notes in the Note group. 4. In the Override Approval group, the logged in user name appears by default. Type your password, then click OK. 5. Click Close to close the Overrides window. Treatment Delivery Field Sequencing MOSAIQ lets you sequence treatment fields on the Treatment Calendar (refer to, Scheduling AFS Sessions and Scheduling MFS Treatment Sessions in Chapter 4 on pages 122. You can configure Automated Field Sequences (AFS) and Manual Field Sequences (MFS). Automatic Field Sequences and Manual Field Sequences The Treatment Delivery Table dialog box shows AFS or MFS sequences. Each field that is part of a sequence shows the current field number in the sequence and the total number of fields in the sequence. When multi-segmented IMRT fields are part of an AFS, each segment in the treatment field becomes a single segment in the overall sequence. If you change a field in an AFS from the Treatment Delivery Table, then the AFS sequence becomes invalid for that session. You can treat the fields in the sequence as non-sequenced fields in the session. Select the first field in the sequence to start an AFS or MFS sequence treatment. If you do not select the first field in an AFS sequence, MOSAIQ shows a "Treat Sequence Out of Order?" message. If you click Yes, then the Verified Treatment window opens for that field. If you treat the field, then the AFS sequence becomes invalid for that session. You can treat the remaining fields in the sequence as non-sequenced fields in the session. 270 Copyright 2010, Elekta Impac Software LUGMSQ0002/4.0/23-Sep-2010 CHAPTER 10: SEQUENCER Consolidated Field Sequences (CFS) You specify CFS sequences on the Treatment Calendar the same as standard AFS sequences. MOSAIQ validates the AFS/CFS when you save the session. MOSAIQ validates it again as part of the Treatment Readiness Check before you treat. Also refer to Field Sequencing Verification Checks on page 262 for more information. MOSAIQ supports some parameter changes during a CFS session. You can change gantry, collimator, jaws (X & Y), energy, motorized Wedge position, dose rate, and MLC positions. For these parameters, verification is done with the first field of the CFS session. No additional verification is done on subsequent fields. When the sequence starts delivery, the Desktop console handles validation for the movement of the subsequent segments in the consolidated field (after beam on). All field parameters not listed in Field Sequencing Verification Checks must stay constant during the control point sequence. All fields in a CFS session must belong to the same parent prescription site. You cannot include portal images in a CFS session. But, you can select a field on the Treatment Delivery Table, right-click, and select a portal image option. For treatment delivery, keep the considerations below in mind: You must select the first field of the CFS on the Treatment Delivery Table. The Treatment Readiness Check validates the same as the Treatment Calendar. The tolerance table selected in the first treatment field of the CFS gives the verification tolerances for the CFS. Console Edit is limited to couch parameters. Console Edits apply to all segments and all control points. Every field and subsequent controls points will have the same couch position applied. You can only override couch parameters. If one or more parameters that you cannot override are out of tolerance when you open the Overrides window, a message appears. The message tells you that only couch parameters will appear in the list for you to override. MOSAIQ only validates the initial positions for the first field before initial beam on. Once the delivery begins validation, the Desktop console manages the movement of the subsequent segments in the CAUTION consolidated field. Copyright 2010, Elekta Impac Software LUGMSQ0002/4.0/23-Sep-2010 271 MOSAIQ User’s Guide Using the Verified Treatment Window The Verified Treatment window shows all prescription parameters as well as the actual parameter values as read by the machine interface (if available). Parameters that are out of tolerance appear highlighted in red. You can change between the two display modes with the Tx Field/Field Setup button. This dialog box is the point in the process from which to start a treatment. You must have Clinical | Tx Delivery | Modify security rights to record treatments. You must have Clinical | Tx Delivery | Approve to approve treatment delivery information, complete partial CAUTION treatments, and override out of tolerance parameters. You must also have Clinical | General | Approve rights to start standby mode. Once you record the treatment, the system adds the dose delivered and shows the cumulative amount in the Dose Site Summary. If the Dose Site Summary is open, then the dose information is updated the next time the summary appears. Using the Different Verified Treatment Views The Verified Treatment window has different views. 1. In the Verified Treatment window, click Field View >. The In-Room view has large fonts so that the information is easier to see. The information that a therapist is most likely to need appears in the larger font size. It also shows the treatment parameters and set up instructions. 2. From the In-Room view of the Verified Treatment window, click Field View >. You can also right-click or press F4, then select Setup View. The information in the Setup view matches what you would see in the Tx Field view of the Treatment Field Definition dialog box. It shows notes from the radiation prescription and field setup. Diagrams and/or field setup images, appear to the left of the Field Setup and Rx Site groups (this depends on your Photos and Diagrams configuration, refer to Using the Photos and Diagrams Utility in Chapter 6 on page 149. 3. In the Setup view of the Verified Treatment window, click Field View >. You can also right-click or press F4, then select Full Field View. This shows the Full Field view of the Verified Treatment window. This is the same view as when you selected the field for treatment. Your System Administrator can configure MOSAIQ so that one of these views appears by default, such as the In-Room view. 272 Copyright 2010, Elekta Impac Software LUGMSQ0002/4.0/23-Sep-2010 CHAPTER 10: SEQUENCER Using the Override Feature You can override the out-of-tolerance interlock and treat a patient with settings different from those in the prescription. SEQUENCER keeps a record of overrides and the credentials of the user who approved them. Out of tolerance parameters appear highlighted in red. Overrides are temporary changes. 1. Double-click the field to treat in the Treatment Delivery Table window. 2. Right-click press F4 in the Verified Treatment window, then click Override…. You can also press CTRL+O to open the Overrides dialog box. 3. Select the out of tolerance parameter that you want to override in the Overrides dialog box, then press the SPACEBAR to tag it. 4. Type the reason for the override(s) in the Note field. 5. Type your password in the Password field. 6. Click OK. The out of tolerance values that you overrode appear highlighted in yellow. Temporary field changes, such as changing the couch geometric parameters, do NOT invalidate the reference image for the selected treatment field, which you can show behind the treatment geometry in the Beam's Eye View dialog box. Recording Treatments Always examine all information in the Record Treatment dialog box, Composite Record dialog box, or Record Port before you save. Make sure that the correct patient and treatment field shows. Make sure that the correct number of monitor units appears as compared to the electronic and/or mechanical monitor units readout on the linac. CAUTION If the monitor units value on the linac is not the same as in SEQUENCER, then type the linac monitor units value in the Notes field of the Record Treatment dialog box. Contact your department physicist immediately before continuing treatment. Record Treatment Dialog Box The Record Treatment dialog box lets you record treatments. Verify that the information that appears in the Record Treatment dialog box is correct before you click Record. You can type notes in the Note field if necessary. Copyright 2010, Elekta Impac Software LUGMSQ0002/4.0/23-Sep-2010 273 MOSAIQ User’s Guide Composite Record Treatment Dialog Box The Composite Record Treatment dialog box is the Record Treatment dialog box for AFS, CFS, and the 4DITC interface. As with other interfaces, you can review multiple beam entries that were delivered for one or more fields including all portal images and setup field images to verify that the treatment information is correct. Manually Recording a Treatment SEQUENCER lets you manually record treatments. You can also manually record Treatment Calendar sessions. 1. In the Location Schedule window, select the appointment whose treatment you want to record. 2. Right-click or press F4. 3. Click Chart/Capture… or press CTRL+P to open the Treatment Chart window. 4. Click Treat to open the Record Manual Treatment dialog box. 5. Verify that the date and time shown for the treatment that you want to record are when the treatment was delivered. 6. Click Record. 7. Capture the charges. Manually Recording Portal Images 1. Click Portfilm… or Post Portfilm… in the Manual Treatment dialog box. The Manual Portfilm dialog box opens. 2. Type the MU values in the MU field of the Treat Port or Open Port group. 3. Make sure that the date and time are correct. 4. Type a note in the Note field. 5. Click Record. 6. Capture the charges. Reviewing the Treatment Chart after Treatment When you finish treatment delivery, you can review the treatment or add additional comments to the Note field. 1. In the Treatment Delivery Table dialog box, click Close. 2. Double-click the field you treated in the Treatment Chart window. The Projected Rx Mismatches dialog box and Not All Fields Treated message box may open. 3. In the Historic Treatment dialog box, change the original note you typed in the Record Treatment dialog box. 274 Copyright 2010, Elekta Impac Software LUGMSQ0002/4.0/23-Sep-2010 CHAPTER 10: SEQUENCER The prescription and actual geometric and other values appear. If you immediately click the field, this same information appears in the Historic Treatment section above the Historic Treatment Record section. A small yellow asterisk appears adjacent to the settings that were overridden from the Verified Treatment window. 4. Click OK. Historic Treatments Each line item on the Treatment Chart in black type that has been treated is a Historic Treatment field. The data in the Course, Site, Staff, Override, Field, Tx, MU, Dose, Field Tx, and Elapsed fields appear in Navy text and cannot be changed. This is information recorded during treatment. Double click an already treated field on the Treatment Chart to open the Historic Treatment window. The data in the Beam, Accessories, Gantry/Coll, and Couch groups appear in Navy text and cannot be changed. You can only change the Dose/MU field, Inpatient check box, Machine field, and the Tx Note fields. If you select a treatment field that has an associated reference image with a shadow filter applied, the shadow filter does not show in the Historic Treatment window. Using Machine Characterization Machine characterization serves several purposes: Data conversion between fields. Data conversion on RTP import (requires source characterization). Field setup validation: o Specifies the physical limits of a linac. o Specifies console parameters. MOSAIQ lets you characterize treatment machine locations, sources, and create characterization templates, using a wide variety of parameters and options. A comprehensive list of “stock” templates is available, which you can use as is, or modify to create your own site-specific templates. The Machine Characterization Editor dialog box lets you specify geometric information about your treatment machine and accessories. The information about your treatment machine that you specify is required to ensure proper communication between MLC Fit, eCHART, SEQUENCER, and your treatment machine. Because the templates are for generic machine types, you should refer to the manufacturerprovided information about your treatment machine or MLC. Make sure you correctly characterize your machine. Elekta/Impac strongly recommends that you contact Elekta/Impac Client Services for help with machine characterizations. Adding a Machine Location Treatment machine definitions are entered using the Location window in File | Directories | Location Directory. Copyright 2010, Elekta Impac Software LUGMSQ0002/4.0/23-Sep-2010 275 MOSAIQ User’s Guide 1. Click File | Directories | Location Directory… to open the Location Directory window. The Location Directory window shows the locations specified in your system. You can see machine locations or other locations at your facility. 2. If necessary, click on Locations. next to the View drop-down list, then click Machine 3. Click Add to open the Location dialog box. The Location dialog box lets you add or change the name and type of location. Notice that since you accessed the dialog box from the Machine Location view in the Location Directory window, MOSAIQ automatically sets the location as a machine location. 4. Type the name of the linac in the Name field. 5. Press TAB twice, then type an abbreviation for the linac in the Abbreviation field. 6. Click next to the Category field, then click Accelerator. Elekta/Impac recommends that you select a Chart Destination. The default destination is the Diagnoses and Interventions window. 7. Click OK to save the new machine location. 276 Copyright 2010, Elekta Impac Software LUGMSQ0002/4.0/23-Sep-2010 CHAPTER 10: SEQUENCER Troubleshooting Abnormal Treatment Termination The Abnormal Termination dialog box opens whenever there is an interruption to or loss of communication between SEQUENCER and the linac. The message, “An error in machine or software communication has occurred. Please verify treatment information and select correct recording option below.” appears. You must acknowledge the message and click Continue before you can either continue treatment or change screens. Make sure to write down the MU on the linac. Field Sequences If an AFS or CFS session ends prematurely, SEQUENCER does not attempt to resume the session with the partially treated field and any remaining untreated fields. The sequence becomes invalid for that session. SEQUENCER shows a message to that effect, but you can complete the partial field delivery and treat the remaining fields separately. Completing Partial Treatments CAUTION You must have Clinical | Tx Delivery | Modify security rights to see the Complete Partial Delivery dialog box, and you must have Approve rights to complete a partial field delivery. The Complete Partial Field Delivery dialog box lets you complete treatments that were not completed as originally scheduled. Type the delivered MU and SEQUENCER will then send the remaining MU to the linac with the field parameters for delivery. SEQUENCER then verifies and records the completed treatment as normal. This is particularly useful for IMRT fields in which you cannot change the linac setup and do an override to complete a partial treatment. SEQUENCER logs an audit entry to show whether you chose to complete the partial treatment or cancel it. Copyright 2010, Elekta Impac Software LUGMSQ0002/4.0/23-Sep-2010 277 MOSAIQ User’s Guide 278 Copyright 2010, Elekta Impac Software LUGMSQ0002/4.0/23-Sep-2010 MOSAIQ User’s Guide Appendix A: Contact and Regulatory Notifications Regulatory Statement in MOSAIQ The MOSAIQ application must not be copied in whole or in part for any purpose. The application includes the following regulatory statement: Professional Responsibility Customer acknowledges that the professional duty to the patient in providing healthcare services lies solely with the healthcare professional providing patient care services. Customer takes full responsibility for the use of information provided by the licensed/ sublicensed products in patient care and acknowledges that the use of the licensed/sublicensed products in no way is intended to replace or substitute for professional judgment. First DataBank and ELEKTA/Impac do not assume any responsibility for actions of Customer which may result in any liability or damages due to malpractice, failure to warn, negligence or any other basis. Customer shall ensure that all healthcare professionals using the licensed/sublicensed products are aware of the limitations of the use of the licensed/sublicensed products. Sax Comm and Sax Zip components© 1991-2001 Sax Software Corp. Sax Basic Engine components© 1993 — 2000 Sax Software Corp. ad Polar Engineering and Consulting. TX Text Control components © 1991-2002 The Imaging Source Europe GmbH. Portions of this product were created using LEADTOOLS ©1991-2001, LEAD Technologies, Inc. ALL RIGHTS RESERVED. Contacts and Regulatory Notifications Food and Drug Administration (FDA) (United States) The following product modules are regulated and subject to premarket notification requirements by the FDA: SEQUENCER, MLC Fit, and ViewStation. CE Marking (Compliance with the MDD) (European Community) ELEKTA/Impac maintains a Quality System that complies with all essential requirements of the Medical Device Directive (93/42/EEC) and all other standards applicable thereunder. A Technical File is maintained for review via the Authorized Representative and ELEKTA/Impac directly. Copyright 2010, Elekta Impac Software LUGMSQ0002/4.0/23-Sep-2010 279 MOSAIQ User’s Guide Authorized Representative: CEpartner4U, 3951DB; 13.NL Tel: +31 (0) 6-516.536.26, or CEpartner4U, Esdoornlaan 13, 3951DB Maarn. The Netherlands Tel: +31 (0) 6-516.536.26 EC Certificate: CE 77310 BSI Certificate: FM 78409, FM 77312 Notified Body ID number: 0086 Health Canada (Canada) Medical Device License numbers: ViewStation 6504 SEQUENCER 13100 MLC Fit 6510 Therapeutic Goods Administration (TGA) (Australia) List of regulated product modules and TGA identification numbers: ViewStation 160653 SEQUENCER 160655 MLC Fit 160656 AQAS Australian Business Number (ABN): ABN 16 208 594 687 Authorized Representative: Andromeda Quality Assurance Systems 22 Railway Street Rooty Hill. New South Wales 2766 Australia ELEKTA/Impac Regulatory Affairs Contact Thomas H. Faris Management Representative Vice President of Regulatory Affairs & Quality Assurance Chief Privacy Officer Elekta Impac Software 100 Mathilda Place, 5th Floor Sunnyvale, CA 94086 408.830.8007 [email protected] 280 Copyright 2010, Elekta Impac Software LUGMSQ0002/4.0/23-Sep-2010 MOSAIQ User’s Guide Appendix B: Warnings and Cautions in MOSAIQ MOSAIQ Treatment Warnings The SEQUENCER verify and record system is primarily a quality assurance and recording tool. The purpose of SEQUENCER is to help therapists deliver treatments to patients. SEQUENCER checks setup parameters and records actual treatment data. SEQUENCER is not a substitute for the many checks that a therapist or the linac makes before and during treatment to make sure that the patient is setup and treated according to plan. During the course of treatment, SEQUENCER shows appropriate warning messages that alert the user to situations in which improper use of the system could result in potential safety hazards. Whenever you see a warning message, carefully read the description of the potential safety hazard and the actions to take to avoid compromising the quality of the treatment. Remember the following when reading SEQUENCER Messages: SEQUENCER only verifies field parameters within the tolerances established by the department and selected for the field. Do NOT rely on SEQUENCER to verify the patient and linac setup position. Check the treatment setup against the parameters in the Treatment Field Definition. SEQUENCER receives the actual position and console setting information from the electronic readouts on the treatment machine. If the electronic readouts are incorrect, then the information SEQUENCER receives is also incorrect. Never override a treatment field parameter before you know why the parameter must be overridden. An out-of-tolerance parameter does not necessarily mean that the treatment setup is incorrect. Always verify the treatment setup using an alternative method or methods in addition to SEQUENCER. After beaming on the linac, SEQUENCER cannot turn the beam off. You must closely monitor the linac and the patient during treatment and should not look at the SEQUENCER screen. Copyright 2010, Elekta Impac Software LUGMSQ0002/4.0/23-Sep-2010 281 MOSAIQ User’s Guide Pre-Treatment Warnings Every time you start treatment delivery, SEQUENCER makes a series of initial checks. The following is a description of each check, in the order that SEQUENCER makes them, and the warning message that appears if the system finds a discrepancy. 282 Field Treated Today! Continue? This message appears as a warning if you are about to treat a patient field that was already treated today. Click Yes if you still want to treat the field(s) Fractions will be Exceeded! Continue? This message appears when you are about to exceed the number of fractions prescribed. Field dose is undefined. Continue? This warning appears if the selected field does not have a dose value greater than zero (0) and your department is configured to receive dose check warnings. You can either cancel the approval or continue with the approval process and not change the dose value. Treatment field is not associated with prescription site. Continue? This warning appears if the field selected is not associated with a parent Rx site and your department is configured to receive dose check warnings. A dose site coefficient has either not been defined or set up so that the treatment of this field will not contribute any dose to the prescription site. Continue? This warning message appears if the field is associated with a parent Rx site, but does not have an effective dose site coefficient. Dose Will Be Exceeded by #! Override? This warning message appears when you are about to exceed the prescribed total dose. If you still want to treat the field, click Yes, then type your user name and password in the approval dialog box and press Enter to override the warning. Only users with override privileges can exceed the prescribed total dose. Treatment Machine Mismatch! Override? This warning message appears when you are about to treat a patient on any linac other than the one defined in the patient's Treatment Field Definition. If you still want to treat the field, click Yes, then type your user name and password in the approval dialog box and press Enter to override the warning. Only users with override privileges can treat on a linac that is not specified in the setup. If SEQUENCER still does not recognize the linac you are about to use, the message "Unknown Machine. Exiting." appears and you must exit the dialog box. You cannot treat on a linac that is not characterized. The machine mismatch check is userconfigurable at installation. Copyright 2010, Elekta Impac Software LUGMSQ0002/4.0/23-Sep-2010 Appendix B: Warnings and Cautions in MOSAIQ Treatment Field Note Before the Verified Treatment dialog box opens, each field note typed and marked Alert (for any active field) will immediately appear - one by one. The Treatment Field Note will appear at the bottom of the screen. Portal Image Dose Compensation You can configure SEQUENCER to automatically change the treatment field dose on days when you make portal images, to keep the fractional dose constant. You can easily track portal image dosages as part of the daily treatment. SEQUENCER can accomplish this regardless of whether you make portal images before or after you treat the field. Capture Settings For emergency patients, or patients who have not been simulated, you can setup the patient on the linac and then capture the setup parameters in a Treatment Field Definition dialog box. Post-Treatment Warnings Actual MU Less Than Set MU. Record? SEQUENCER shows this warning message when you are about to record a treatment without delivering the monitor units as they were set to be delivered when the treatment began (beamon). Actual MU GREATER THAN Set MU! SEQUENCER shows this message when you have delivered more monitor units than the number set to be delivered when the treatment began (beam on). If you receive this message, contact your supervisor. All Fields Not Treated! Exit? If you start Treatment Delivery and treat at least one field, after you click Exit, this message appears. This is to prevent you from inadvertently exiting before you treat all of the prescribed fields. All Fields Treated. Exit? SEQUENCER gives you the flexibility to return to the Treatment Delivery Table and select another field for treatment. General Warnings In addition to the warning messages appearing on-screen, familiarize yourself with all the following general warnings before you treat patients. Capture Settings Copyright 2010, Elekta Impac Software LUGMSQ0002/4.0/23-Sep-2010 Before you use the Capture Settings option, make sure that you selected the correct patient, that the linac geometric parameters are set up according to plan with the patient in the correct treatment position, and that the correct console parameters show on the treatment unit console. MOSAIQ receives the incorrect or missing information from the linac. 283 MOSAIQ User’s Guide 284 Auto-Setup You should only use Auto Setup as an approximate method to position the linac to treat a patient. You cannot rely solely on the electronic readouts to position the linac. You must verify the linac position with an alternative method or methods. Improper use of the auto setup feature could result in serious injury to the patient. You should be in the treatment room, and constantly monitor the treatment unit while you use Auto Setup. You must be thoroughly familiar with the emergency procedures to stop motions (disengaging motion enable switches, pressing emergency off, etc.) before you use the autosetup feature. If a collision condition appears likely, it is your responsibility to stop motion and disengage the motion enable switch or take other recommended action to stop motion as recommended by the linac manufacturer (press the emergency off). Geometric Tolerances SEQUENCER only verifies geometric setup parameters to within the specified tolerances. Do NOT rely on SEQUENCER to verify the patient and linac setup position. Check the treatment setup using the parameters specified in the Treatment Field Definition dialog box. Treatment Setup You cannot use SEQUENCER as the sole method to verify and record the treatment setup. You must use an alternative method or methods to verify and record the treatment setup in addition to SEQUENCER. Recording Treatments Always review all information in the Record Treatment dialog box before saving it. Make sure that the correct patient and treatment field appears. Make sure that the correct number of monitor units appears as compared to the electronic and/or mechanical monitor units readout on the linac. If the monitor units value is not the same in SEQUENCER and the linac, then record the monitor units value on the linac as a Note and contact your department physicist immediately before you continue the treatment. Copyright 2010, Elekta Impac Software LUGMSQ0002/4.0/23-Sep-2010 Appendix B: Warnings and Cautions in MOSAIQ Partial Treatments Make sure that the correct monitor units delivered value for the partial treatment gets properly recorded. Overrides Overriding out-of-tolerance parameters can result in mistreating the patient. You should only override parameters after you make sure that the linac geometric parameters and console parameters are set up correctly by a method other than SEQUENCER and that the correct patient and treatment fields are selected. Other Operational Warnings Verified Treatment mode is unavailable Appears if a workstation is configured as a treatment workstation, but verification is unavailable (the machine interface is not operating). If you choose to continue administering the treatment, then the Treatment Delivery Table opens in manual treatment recording mode. Prescription is not approved. N fractions remain before treatment is prevented Appears when you select Rx Approval for Treatment in Department Setup (prescription sites must be approved prior to allowing treatment) and the following are true: Beam is not approved. N fractions remain before treatment is prevented <Beam ID Name> was treated today at <time last treated> the delivered fractions for the associated prescription site plus the fractions to be delivered by this treatment do not exceed the specified fractions the prescription is not approved Appears when you select Field Approval for Treatment in Department Setup (treatment fields must be approved prior to allowing treatment) and the following are true: if the delivered fractions for prescription site for the selected treatment field plus the fractions to be delivered by this treatment do not exceed the fractions defined if the beam has not been approved Appears if the field selected is not part of a treatment calendar session and if that treatment field was already treated in the current session. Pediatric Warning MOSAIQ Medical Oncology Charting Product is designed for the adult patient and calculates all doses accordingly. Failure to take this into account could potentially lead to mistreatment of pediatric patients. When calculating a medication's dose for a pediatric patient, carefully review the BSA and the resulting dose, adjusting either as needed. Copyright 2010, Elekta Impac Software LUGMSQ0002/4.0/23-Sep-2010 285 MOSAIQ User’s Guide First DataBank Warnings First DataBank is separately purchased and licensed. Interaction screening is only allowed when First DataBank is purchased and licensed. Interaction screening is only allowed when the product is configured by establishing the appropriate links. Interaction screening remains accurate only when the periodic First DataBank updates are applied, which are available through Impac. Warning Messages when Performing Tasks in MOSAIQ The following message appears when you try to specify a Care Plan when no Diagnosis was specified for the patient. Click OK to continue. The following message appears when you try to specify an Order Set when no Care Plan was specified for the patient. Click OK to continue. The following message appears when you try to add a treatment field by copying another in Diagnoses and Interventions. Click Yes to copy the field, or click No to open a blank Treatment Field Definition dialog box. 286 Copyright 2010, Elekta Impac Software LUGMSQ0002/4.0/23-Sep-2010 Appendix B: Warnings and Cautions in MOSAIQ The following message appears when you try to add a simulation field by copying another field in the Diagnoses and Interventions window. Click Yes to copy the field, or click No to open a blank Simulation Field dialog box. The following message appears when the Total Dose does not equal the Fractional Dose times the number of fractions. See Dose and Fraction Review, or the Radiation Prescription to correct the number of fractions. The following message appears when the Rx Site limit of 100 fractions is exceeded. You must change the number of fractions before you can save the field. The following message appears the first time you open a field in MOSAIQ after import. Click OK to continue. The following message appears the first time you open a field after you change the Machine Characterization. Click OK to continue. The following message appears the first time you open a field after you change treatment machines. Click OK to continue. Copyright 2010, Elekta Impac Software LUGMSQ0002/4.0/23-Sep-2010 287 MOSAIQ User’s Guide The following message appears after a successful document import. Click OK to continue. The following message appears to warn you that MOSAIQ is about to delete a record. Click Yes to delete the record. MU per Segment Difference Warning This warning appears to alert you that the difference between Plan and Delivery MU on one or more segments of the field that you selected goes beyond the tolerance specified for treatment. You can configure these tolerances in Machine Characterization, using the Rounding Error keys. Depending on whether you were editing a treatment field or treating a field, one of the messages specified below appears. This warning also appears when you import, or change a step and shoot IMRT field in the Treatment Field Definition. The difference between the Plan and Delivery MU cannot go beyond the minimum tolerance specified for treatment. 288 Copyright 2010, Elekta Impac Software LUGMSQ0002/4.0/23-Sep-2010 Appendix B: Warnings and Cautions in MOSAIQ When Rounding Error 2 is exceeded: Editing a field The difference between Plan and Delivery MU on one or more segments exceeds the tolerance specified for treatment. Unless approved, you can only deliver this field in QA mode. Click Details to review the MU per segment. Approving a field The difference between Plan and Delivery MU on one or more segments exceeds the tolerance specified for treatment. Approve this field to treat it not receive a warning for segment MU differences. Click Details to review the MU per segment. Treating a field The difference between Plan and Delivery MU on one or more segments exceeds the tolerance specified for treatment. You cannot treat the field on this linac. Click Details to review the MU per segment. Note: the Continue button will be disabled. Completing a partial treatment The difference between Plan and Delivery MU on one or more segments in the defined field exceeds the tolerance specified for treatment. You cannot treat the field on this linac. Click Details to review the MU per segment. Note: the Continue button will be disabled. Treating a field in QA Mode The difference between Plan and Delivery MU on one or more segments exceeds the tolerance specified for treatment. Unless you approve it, you cannot treat the field outside of QA mode on this linac. Click Details to review the MU per segment. Completing a partial treatment in QA Mode The difference between Plan and Delivery MU on one or more segments in the defined field exceeds the tolerance specified for treatment. Unless you approve it, you cannot treat the field outside of QA mode on this linac. Click Details to review the MU per segment. When Rounding Error 1 is exceeded, but not Rounding Error 2: Editing a field The difference between the Plan and Delivery MU of one or more segments exceeds the minimum tolerance specified for treatment. Until you approve the field, a warning will appear at treatment. Click Details to review MU per segment. Approving a field The difference between the Plan and Delivery MU on one or more segments exceeds the minimum tolerance specified for treatment. Approve this field to treat it without the warning for segment MU differences. Click Details to review the MU per segment. Treating a field The difference between the Plan and Delivery MU of one or more segments exceeds the minimum tolerance specified for treatment. Click Details to review the MU per segment. Copyright 2010, Elekta Impac Software LUGMSQ0002/4.0/23-Sep-2010 289 MOSAIQ User’s Guide 290 Completing a partial treatment The difference between the Plan and Delivery MU of one or more segments in the defined field exceeds minimum tolerance specified for treatment. Click Details to review the MU per segment. Treating a field in QA Mode The difference between the Plan and Delivery MU of one or more segments exceeds the minimum tolerance specified for treatment. Until you approve the field, a warning will appear at treatment. Click Details to review the MU per segment. Completing a partial treatment in QA Mode The difference between the Plan and Delivery MU of one or more segments in the defined field exceeds the minimum tolerance specified for treatment. Until you approve the field, a warning will appear at treatment. Click Details to review the MU per segment. Copyright 2010, Elekta Impac Software LUGMSQ0002/4.0/23-Sep-2010 MOSAIQ User’s Guide Appendix C: Intended Use & Indications for Use MOSAIQ Intended Use MOSAIQ is an image-enabled electronic medical record system (EMR) used for oncology workflow management. It lets users: Supply electronic patient charts and assemble care plans, order diagnostic tests, and prescribe medications. Import, view, annotate, manipulate, enhance, manage, and archive images. Import, keep, and export information related to patient treatments to monitor treatment progress from a central location. This includes orders, documents, lab information, and other related information from compatible programs. Generate and keep medication and formulary lists and calculate applicable medication dosages for medical oncology. Design leaf plans for operation with radiotherapy treatment machines that have multileaf collimators. Users can give, view and change geometric data related to treatment fields, including the MLC accessory. Ensure plans imported from treatment planning systems agree with treatment machine constraints. Additionally, MOSAIQ: Supplies other administrative functionality necessary to operate medical and radiation oncology departments. Shows reference images for setup purposes, refers to predefined settings to help treatment machine setup, and tells clinicians of necessary steps before treatment. Reads actual settings from the treatment machine through the machine’s communication interface. It compares these settings with predefined values. If a mismatch occurs between the planned values and the actual machine settings, the system inhibits treatment. Verifies the actual treatment against radiation treatment plans. At applicable points during the treatment, it records the actual delivered values to provide treatment tracking. Indications for Use MOSAIQ supports information flow among healthcare facility personnel. It can be used wherever radiotherapy and/or chemotherapy are prescribed. MOSAIQ is not intended for use in diagnosis. Medical oncology dose calculation functions are designed for use with patients 18 years or older only. Copyright 2010, Elekta Impac Software LUGMSQ0002/4.0/23-Sep-2010 291 MOSAIQ User’s Guide SEQUENCER Intended Use The intended use of SEQUENCER (generically referred to as a verification system) is to assist in the process of patient treatment on a radiotherapy treatment machine. SEQUENCER provides the capability to notify the users of actions that need to take place prior to treatment, to display reference images for se up purposes, and to auto setup the machine to predefined settings. The actual settings are read from the treatment machine, via the machine’s communication interface, and compared to the predefined values. If a mismatch occurs between the planned values and the actual machine settings, treatment is prohibited. At appropriate points during the treatment, the actual delivered values are recorded to provide treatment tracking. Treatments are initiated by the operator, via the machine control system, only after the user has verified that the treatment setup is correct. SEQUENCER does not bypass any checks put in place by the machine’s control system. The intended benefit of a computer based verification system is to eliminate the errors which occur in treatment setup when the only means of verification is the user’s manual comparison of the handwritten chart against the machine settings and to record actual treatment parameters, directly from the machine, again eliminating the errors which occur from manual recording and calculation. Thus, a verification system is an adjunct to the normal treatment regimen intended to enhance total treatment quality. Indications for Use SEQUENCER is to be used to facilitate the delivery of defined radiotherapy treatment plans. SEQUENCER verifies the settings on a radiotherapy treatment machine prior to treatment and records the actual parameters after treatment. SEQUENCER can be used whenever radiotherapy treatment is prescribed. 292 Copyright 2010, Elekta Impac Software LUGMSQ0002/4.0/23-Sep-2010 Appendix C: Intended Use & Indications for Use MLC Fit Intended Use The intended use of MLC Fit is to provide cancer therapy personnel a means of defining leaf plans for use with radiotherapy treatment machines equipped with multileaf collimators. MLC Fit allows users to create, view, and edit geometric information associated with treatment field definitions, including the MLC accessory. A treatment area is defined and leaf positions and other geometric parameters are fit to that target shape to form a treatment definition. The target shape and treatment definition are stored in a database which can be accessed by other personnel on a workstation on a network. MLC Fit facilitates the generation of the geometric parts of treatment field definitions, but it is the responsibility of the user to verify that the desired treatment area is achieved. As should always be the case, the parameters should be reviewed by qualified personnel prior to the definition being used for treatment. Indications for Use MLC Fit is to be used to define leaf plans for use with radiation treatment machines equipped with multileaf collimators manufactured by Siemens Medical Systems, Varian Associates, and Elekta Oncology Systems, Inc. This method of defining the geometric parameters associated with treatment fields can be used whenever a conformal treatment field is desired. ViewStation Intended Use The intended use of ViewStation is to provide health care facility personnel with an efficient and effective means to utilize patient images during the course of therapy or treatment. ViewStation allows users to import, view, annotate, manipulate, enhance, manage, and archive patient images. Indications for Use ViewStation supports image and information flow among healthcare facility personnel. ViewStation can be used whenever digital images and associated data are the means for communicating information. ViewStation is not intended for use in diagnosis. The images and associated information are stored in a database, providing users access to the information necessary to perform their functions. MOSAIQ Oncology PACS Intended Use MOSAIQ Oncology PACS is intended to provide an efficient means of providing size capable storage, organized handling and availability, and final archival of the large volumes of image and image data associated with image-intensive radiation oncology treatment practices. Seamlessly embedded into the radiation therapy workflow and the use of the MOSAIQ Oncology Information System, MOSAIQ Oncology PACS permits treatment personnel to quickly and easily store and avail continuing accessibility to substantial quantities of images and image data. MOSAIQ Oncology PACS provides permanent data storage and archival, Copyright 2010, Elekta Impac Software LUGMSQ0002/4.0/23-Sep-2010 293 MOSAIQ User’s Guide while ensuring image and image data availability and retrieval whenever and wherever needed by radiation treatment providers using the MOSAIQ Oncology Information System. Indications for Use MOSAIQ Oncology PACS provides a database that is capable of storing, managing, and archiving substantial volumes of radiation oncology related treatment images and image data. Via Digital Imaging and Communications in Medicine (DICOM) compliant image communication technology, radiation oncology treatment personnel can use MOSAIQ Oncology PACS to provide storage for and ensure timely retrieval of image and image data to and from the MOSAIQ Oncology Information System. MOSAIQ Oncology PACS can be used for image data management and archival wherever digital medical images and associated image data are used for radiation planning or treatment. 294 Copyright 2010, Elekta Impac Software LUGMSQ0002/4.0/23-Sep-2010 Appendix D: Measurement of Accuracy for Medical Devices Appendix D: Measurement of Accuracy for Medical Devices MLC Fit MLC Leaf resolution may be characterized to 0.10 cm or 0.01 cm. MLC Fit calculates the leaf positions for a machine to a resolution of either 0.10 cm or 0.01 cm based on this MLC resolution setting in the machine characterization. MLC area calculations have sufficient internal precision to achieve the output resolution required by the characterization regardless of the computational methods employed. MLC leaf positions are stored in the MOSAIQ database in units of 0.01 cm and displayed in MOSAIQ to a precision of 0.01 cm. The precision of measurement or margin of error of MLC Fit is in addition to the precision or margin of error throughout the entire system of use, including the MLC itself. Refer to your MLC user’s manual for information regarding the accuracy of your particular equipment. Some examples of additional factors affecting overall precision of leaf fit to shape are the accuracy of user digitization (if used), user variation in leaf position dragging (if used), fit to shape variation due to leaf shape, and so on. ViewStation The measurements of the ViewStation ruler are calculated based on the pixel size (mm/pixel) of the underlying image. The units of measurement for the ViewStation ruler length are displayed in centimeters (cm), with a precision or margin of error of one-tenth of a millimeter (.1 mm). Precision of measurements are directly proportional to the applied zoom factor (for example, at 200% zoom, a measurement twice as fine can be achieved at 100% zoom). Copyright 2010, Elekta Impac Software LUGMSQ0002/4.0/23-Sep-2010 295 MOSAIQ User’s Guide 296 Copyright 2010, IMPAC Medical Systems LUGMSQ0002/4.0/23-Sep-2010 Index Index A Abbreviations/Acronyms, 7 Abnormal Treatment Termination, 277 About this guide, 2 Accuracy of Regulated Products, 295 Acquiring CBCT data, 218 Acquiring images from electronic sources, 146 Adding accessory information to treatment fields, 93 additional staging classifiers for a diagnosis, 33 Approved orders for Care Plans, 26 cancer diagnoses, 23 co-signer to MAR dialog box, 70 diagnoses, 21, 22 Diagnosis Specific Values, 31 Dose Action Points, 110 dose coefficients, 108 Dose Limit Dose Action Points, 111 field setup information to treatment fields, 95 fractions to radiation precriptions, 75 geometric settings to treatment fields, 94 height/weight for patients, 60 image annotations, 177 machine locations, 275 medication orders, 57 MLC leaf plans, 130 non-cancer diagnoses, 22 oncology details, 33 order sets to Care Plans, 28 orders for Care Plans, 26 Pending orders for Care Plans, 26 portal image information to treatment fields, 94 portal images, 116 primary dose tracking sites, 105, 268, 269, 270 prior doses, 109 radiation course information, 25 radiation prescriptions, 73 related diagnoses, 24 secondary dose tracking sites, 107 simulation fields, 87, 89, 90, 91 site simulation, 87 total cumulative doses, 109 treatment fields, 87, 92, 95, 96, 266 treatment fields to treatment sessions, 119 treatment sessions, 114, 121 tumor measurements, 32 waved order sets for Care Plans, 28 Additional classifiers for a diagnosis, adding, 33 Adjusting medication doses, 61 Affirming a diagnosis, 24 AFS treatment session, 122 Annotating images, 172 Copyright 2010, Elekta Impac Software LUGMSQ0002/4.0/23-Sep-2010 adding comments, 177 changing image orientation, 178 changing relative object position, 177 imported images, 179 multiple images, 177 saving, 177 setting/saving preferences, 176 viewing image layers, 178 Appending a radiation prescription, 75 Approving batch approval, 54 Care Plan cycles, 27 Care Plan order sets, 29 Care Plans, 26 images from Image List, 186 images from the Image Work List, 184 multiple radiation prescriptions, 78 radiation prescriptions, 77 treatment fields, 99 treatment sessions, 123 Arrow tool, 174 Assigning Care Plans, 25 radiation Care Plans, 25 security attributes, 139 Associating images, 151 medical images, 152 non-medical images, 152 using Photos and Diagrams, 150 Automatically staging a cancer diagnosis, 30 Auto-Setup, 257, 258 B Batch approving orders, 54 Beam’s Eye View, setting preferences, 143 Beam's Eye View Calibration Point Digitization, 135 Beam's Eye View Calibration Setup, 136 Beam's Eye View Shape Rotation, 135 BSA (Body Surface Area), 60, 61 C Calculating a medication dose, 60 Cancer diagnosis adding, 23 staging, 29 staging automatically, 30 staging manually, 30 Capturing geometric settings, 96 geometric settings for simulation fields, 91 Care Plan, 34 adding Approved orders, 26 adding order sets, 28 297 MOSAIQ User’s Guide adding Pending orders, 26 approving, 26 approving cycles, 27 assigning, 25 assigning radiation Care Plans, 25 changing cycle dates, 28 changing order set dates, 29 changing treatment dates, 27 entering course information, 25 status order sets, 29 waving order sets, 28 Cautions, see also Warnings, 281 CBCT, 218 acquiring data, 218 SEQUENCER, 267 Changing all treatment session due dates, 117 Care Plan cycle dates, 28 dose coefficients, 108 image color, 170 Image List views, 161 image orientation, 178 import file status, 82 imported data, 79 medication doses, 60, 61 MLC leaf plans, 132 order set dates for Care Plans, 29 radiation prescriptions, 77 relative object position, 177 single treatment session due dates, 118 status for Care Plan order sets, 29 treatment dates for Care Plans, 27 treatment field order in treatment sessions, 119 treatment fields, 98, 267 treatment order, 264 treatment session due dates, 117 Chart Workspace Medical Oncology, 49 Checking image changes required, 189, 190 image review status, 186, 190 Image Work List, 182 images changes required, 187 import log or status for images, 147 Clinical Charting Medical Oncology, 17, 49 Radiation Oncology, 73 Closing images, 162 incomplete treatment sessions, 124 Collaborative staging, using for a diagnosis, 34 Completing image change requests, 188 medication administration, 68 setup offsets, 217 Completing Partial Treatments, 277 Compliance, safety, 3 Configuring Beam’s Eye View preferences, 143 DFI for image management, 140 DICOM AEs, 230 298 DICOM printing options, 168 Oncology PACS, 236 standard print options, 168 Contract Notifications, 279 Conventions document, 4 keyboard, 6 mouse, 6 text, 4 Copying images, 163 radiation prescriptions from another patient, 78 simulation fields, 91 simulation fields to add a treatment field, 95 treatment fields to add a treatment field, 96 Copying/pasting image treatment field edges, 182 multi-slice image treatment field edges, 181 Correcting film rotation errors, 155 medication administration errors, 71 Cropping images, 151 D DCM, 221, 236 configuring DICOM AEs, 230 DICOM AE Edit, 231 DICOM-specific staging areas, 230 exporting DICOM images, 232 messages, 222 print options, 231 system preferences, 223 using, 222 Defining fractionation patterns, 74 Diagnosis adding, 21, 22 additional classifiers, 33 affirming, 24 automatic staging, 30 cancer diagnoses, 23 collaborative staging, 34 Diagnosis Specific Values, 31 manually staging, 30 non-cancer diagnoses, 22 oncology details, 33 related diagnoses, 24 staging, 29 tumor measurements, 32 Diagnosis and Staging window, 21 Additional Classifiers tab, 33 Collaborative Staging tab, 34 Details tab, 33 Staging tab, 22, 29, 31 tabs, 31 Tumor tab, 32 Diagnosis Specific Values, 31 DICOM, 221 configuring Image List printing options, 168 DICOM AE Configuration, 230 Copyright 2010, IMPAC Medical Systems LUGMSQ0002/4.0/23-Sep-2010 Index DICOM AE Edit, 231 DICOM Communication Module, 236 DICOM Export Advanced Options, 232 DICOM Image Export, 232 Digitized Film Import, configuring, 140 Digitizing a treatment field shape, 134, 136 Disclaimer, 3 Distributed Registration Review, 211 Document conventions, 4 keyboard, 6 mouse, 6 text, 4 Documenting a medication treatment, 65 Dose Action Point, 110 Dose coefficient, 108 Dose Limit Dose Action Points, 111 Dose Site Summary, 110 Dose tracking, 105 adding Dose Action Points, 110 adding primary sites, 105, 268, 269, 270 adding secondary sites, 107 dose coefficients, 108 Dose Limit Dose Action Points, 111 prior doses, 109 total cumulative dose, 109 Dosimetry, 105 E eCHART Navigator, 17 opening, 17 Edge detection options, 180 Ellipse tool, 173 EMR viewer, 239 Enable Image Underlay dialog box, 134 Enabling Image Underlay, 159 Enabling imaging options in System Utilities, 139 exporting DICOM images, 232 Extracting treatment field edges, 180 F Field Delta View, 99, 263 Field groups for treatment sessions, 121 Field sequencing, 270 Fill and Color options, 175 Filtering images, 170 Finding help topics, 15 help topics using an index, 15 help topics using Search feature, 16 Fractionation pattern defining, 74 Freehand tool, 174 G General warnings, 283 Copyright 2010, Elekta Impac Software LUGMSQ0002/4.0/23-Sep-2010 Getting images from electronic sources, 146 H Help finding topics, 15 printing topics, 16 Help system, 9 Treatment fields, 264 Hiding treatment fields, 264 I Image, 170 Image List window associating medical images, 152 associating non-medical images, 152 Beam’s Eye View preferences, 143 changing image color, 170 changing views, 161 checking for required changes, 189 checking image review status, 190 checking review status, 186 closing images, 162 configuring standard print options, 168 copying images, 163 deleting images, 163 enhancing/viewing images, 169 extracting treatment field edges, 180 inverting image contrast scale, 170 magnifying images, 169 moving images, 163 multi-slice images, 171 opening Image Review, 186 opening images, 162 print scaling, 167 printing images, 163 reviewing/approving images, 186 scaling images, 164 tagging images, 162 using, 160 Window and Level tool, 170 Image management, 139 acquiring CBCTs, 218 acquiring images from electronic sources, 146 annotating images, 172 associating images, 151 Beam’s Eye View preferences, 143 checking import log or status, 147 configuring DFI, 140 edge detection options, 180 enabling Image Underlay, 159 enhancing images, 169 Image List window, 160 imaging options, 139 physician review of images, 182 printing medical images, 167 registering images, 191 reticle scaling images, 153 299 MOSAIQ User’s Guide reticle scaling verification images, 156 scaling images, 164 scanning simulation films, 144 security, 139 Setup Intelligence, 205 therapist review of images, 187 using Photos and Diagrams, 149 viewing images, 169 viewing treatment geometry, 158 Image registration, 191 preparation, 192 registering images, 197 Image toolbox Arrow tool, 174 Ellipse tool, 173 fill and color options, 175 Freehand tool, 174 Polygon tool, 173 Rectangle tool, 172 Straight line tool, 172 Text tool, 174 Image Work List checking for images requiring review, 182 checking for required changes, 187 completing image change requests, 188 reviewing/approving images, 184 Importing checking status for images, 147 photos and diagrams, 149 RTP file, 83 treatment plans, 79 IMRT, 101 Index for help topics, 15 Intended audience, 2 Intended Use, 291 Introduction, 1 abbreviations/acronymns, 7 about this guide, 2 disclaimer, 3 document conventions, 4 intended audience, 2 safety compliance, 3 training, 3 Inverting image contrast scale, 170 K Keyboard conventions, 6 L Localization Trend Review, 213 Logical Context, 136 M Machine characterization, 124 adding locations, 275 Magnifying images, 169 Manually recording a treatment, 274 300 Manually staging a cancer diagnosis, 30 MAR dialog box, 65 Measurement of accuracy for regulated product areas, 295 Medical Oncology, 17, 49 Adding a Medication Order Using Pharmacy Workspace, 52 Adding a New Pharmacy Tab, 51 adding diagnosis/staging, 21 Approving a Pharmacy Order, 54 Arranging the Order List Column, 40 assigning Care Plans, 34 changing medication doses, 60 Chart Workspace, 49 Configuring the Pharmacy Ordering Workspace, 50 dose adjustments, 60 Medications Formulary, 45 Medications Formulary Security, 45 Pharmacy Ordering Dispensing Statuses, 38 Pharmacy Ordering List, 37 Pharmacy Ordering List Date Range, 39 Pharmacy Ordering List Filters, 38 Pharmacy Ordering List Only Show Patients Ready to Treat, 40 Pharmacy Ordering List Order Statuses, 38 Pharmacy Ordering List Order Types, 38 Pharmacy Ordering List Take at Home, 39 Pharmacy Ordering Workspace, 50 recording medication treatments, 65 Viewing Pharmacy Order Detail, 51 Medication administration, 65 adding co-signers, 70 correcting errors, 71 doses, 65 IV details, 67 printing, 70 saving, 68 VAD details, 69 Medication orders, 52 batch approval, 54 changing doses, 60, 61 Completed Order Status, 55 Quick Rx Ad Hoc Orders, 57 recording treatment, 65 voiding, 55 wavings, 59 Medications Formulary Adding a New Formulary, 46 Adding Drugs to a Formulary List, 47 Available Drugs, 46 Formulary Drugs, 46 MFS treatment session, 122 MLC conversion, 133 MLC Fit, 129 adding leaf plans, 130 changing leaf plans, 132 conversion, 133 digitizing treatment field shapes, 134, 136 Logical Context, 136 Packet Data, 136 printing leaf plans, 138 saving leaf plans, 138 Copyright 2010, IMPAC Medical Systems LUGMSQ0002/4.0/23-Sep-2010 Index using, 130 MLC leaf plan report, 137 MOSAIQ Chart Workspace, 49, 50 DICOM, 221 image management, 139 Intended Use, 291 Oncology PACS, 235 SEQUENCER, 253 warnings, 281 MOSAIQ Browser, 235 Mouse conventions, 6 MLC Fit, 132 Moving images, 163 treatment sessions, 118 MU per Segment Difference Warning, 288 Multi-slice images, 171 copying/pastiong treatment field edges, 181 N Non-cancer diagnosis, adding, 22 Notification contract/regulatory, 279 O Offset Couch Calendar, 212 Oncology details, adding to diagnosis, 33 Oncology PACS, 235 Archived Objects, 238 components, 235 configuring, 236 department level configuration, 237 EMR viewer, 239 Manage Data, 241 MOSAIQ Browser, 235 staff security rights, 236 View Log, 242 Online help, 9 finding topics, 15 printing topics, 16 Opening Diagnosis and Staging window, 21 eCHART Navigator, 17 Image Review, 186 images, 162 Operational warnings, 285 Order set adding to Care Plans, 28 approving, 29 changing dates, 29 waving, 28 Ordering medications, 52 Ordering Medications Clinician Worksheet, 56 Quick Rx Ad Hoc Orders, 57 Orders Approved orders for Care Plans, 26 Copyright 2010, Elekta Impac Software LUGMSQ0002/4.0/23-Sep-2010 batch approving, 54 Pending orders for Care Plans, 26 Quick Rx Ad Hoc Orders, 57 recording treatment, 65 voiding, 55 P Packet Data, 136 Pharmacy Dispensing Administration Instructions, 64 Comments, 63 Customizing the Columns, 62 Detail Window, 62 Dispensing Status, 64 Editing an Order, 65 In Prep, 64 Label Designer, 63 Patient Information Panel, 64 Pharmacy Label and Worksheet, 63 Print Preferences, 63 Printing Medication Labels, 64 Printing Pharmacy Worksheet, 65 Removing a Column, 62 Setting Statuses, 64 Storage Condition, 63 Verify Status, 64 Viewing Dispense Detail, 63 Viewing Order History, 65 Pharmacy Dispensing, 62 Pharmacy Ordering Workspace Medical Oncology, 50 Pharmacy Orders Adding a Favorite While Creating a Pharmacy Order, 43 Adding a New Entry to Favorites, 41 Adding an Order to a Patient, 44 Configuring Security, 55 Editing a Favorite Prescription, 43 Favorite Prescriptions, 40 Inactive Entry, 44 Removing a Favorite Prescription, 44 Security, 55 Using Favorite Window Buttons, 42 Photos and Diagrams associating images, 150 cropping images, 151 importing photos and diagrams, 149 Photos and Diagrams utility, 149 Polygon tool, 173 Port Film Status window, 190 Portal image, 116, 259, 266, 274 adding series to treatment sessions, 116 adding to treatment session, 116 Post-treatment warnings, 283 Preparing for image registration, 192 Pre-treatment warnings, 261, 282 Primary dose tracking site, 105, 268, 269, 270 Print options, 231 Print scaling images, 167 Printing configuring DICOM options, 168 301 MOSAIQ User’s Guide configuring standard options, 168 help topics, 16 medical images, 167 Medication Administration (MAR) records, 70 MLC leaf plans, 138 non-medical images, 163 Printing and saving an MLC leaf plan, 137 Prior dose, 109 Q QA Mode, 255 QA Mode treatment session, 123 Quick Rx Ad Hoc Orders, 57 Quick Rx section, 58 waving orders, 59 Quick Rx section adding orders, 58 R Radiation Oncology, 73 assigning Care Plans, 25 changing doses, 78 dose tracking, 105 eCHART Navigator, 17 machine characterization, 124 radiation prescriptions, 73 RTP Import, 79 Treatment Calendar, 112 Radiation prescription, 73 adding, 73 appending, 75 approving, 77 approving more than one, 78 changing, 77 changing doses, 78 copying from another patient, 78 defining fractionation patterns, 74 dose tracking, 105 scheduling treatment sessions, 112 simulation fields, 87 site sequencing, 76 treatment fields, 87 Recording medication administration, 65 adding co-signers, 70 correcting errors, 71 doses, 65 IV details, 67 printing, 70 saving, 68 VAD details, 69 Recording radiation treatments, 273 Rectangle tool, 172 Registering images, 191, 197 Regulatory notifications, 279 Related diagnosis, adding, 24 Removing images, 163 302 reticle scaling, 156 treatment fields from treatment sessions, 120 treatment sessions, 115 Replacing a treatment field in a treatment sessions, 120 Restoring a treatment field, 265 Reticle scaling, 153 clearing reticle scaling, 156 correcting film rotation errors, 155 field edge image center/scaling, 157 graticules, 156 verification images, 156 Reviewing images by physicians, 182 images by therapists, 187 images from Image List, 186 images from the Image Work List, 184 IMRT, 101 Treatment Chart, 274 RTP Import, 79 changing file data, 79 changing file status, 82 importing file, 83 S Safety compliance, 3 Saving annotated images, 177 medication administration documentation, 68 MLC leaf plans, 138 Scaling images, 164 Scanning simulation films, 144 Scheduling BID treatment sessions, 115 MFS treatment sessions, 122 multiple prescription treatment sessions, 113 QA Mode treatment sessions, 123 single prescription treatment sessions, 112 treatment sessions, 114, 122 treatment sessions, 112 treatment sessions, 120 Secondary dose tracking site, 107 Secondary therapist login, 264 Security, 139 SEQUENCER, 253 Selecting patients for treatment, 261 SEQUENCER, 253 adding treatment fields, 266 approvals, 253 Auto-Setup w/Console Setup, 258 Auto-Setup w/o Console Setup, 257 CBCT, 267 changing treatment fields, 267 historic treatment, 275 portal images, 259, 266 Pre-treatment warnings, 261 QA Mode, 255 recording treatments, 273 reviewing after treatment, 274 security, 253 Copyright 2010, IMPAC Medical Systems LUGMSQ0002/4.0/23-Sep-2010 Index selecting patients for treatment, 261 Treatment Chart, 263 treatment delivery, 270 Treatment Delivery Table, 263 Treatment Field Definition, 265 treatment fields, 263 Treatment Readiness Check, 261 troubleshooting, 277 Varian 4DITC interface, 260 Verified Treatment, 272 work environment, 253 Session Offsets, 207 Setup Intelligence, 205 completing setup offsets, 217 Distributed Registration Review, 211 Localization Trend Review, 213 Offset Couch Calendar, 212 Session Offsets, 207 Site Setup, 205 Third Party Offsets, 210 Simulation field, 87 adding, 89, 90, 91 capturing geometric settings, 91 Site sequencing, 76 Site Setup, 192, 205 Site simulation adding, 87 Staging a cancer diagnosis, 29 automatically, 30 manually, 30 Staging area, DICOM, 230 Straight Line tool, 172 T Tagging images, 162 Text conventions, 4 Text tool, 174 Third Party Offsets, 210 Topic (help) finding, 15 finding using the index, 15 finding with Search feature, 16 Total cumulative dose, 109 Training, 3 Treatment Calendar, 112 approving treatment sessions, 123 changing treatment session due dates, 117 closing incomplete treatment sessions, 124 moving treatment sessions, 118 portal images, 116 removing treatment sessions, 115 scheduling, 120 scheduling treatment sessions, 112 treatment fields, 119 Treatment Calendar Sessions dialog box, 119 Treatment Chart, 263 historic treatments, 275 reviewing after treatment, 274 Treatment delivery, 270 Treatment Delivery Table, 263 Copyright 2010, Elekta Impac Software LUGMSQ0002/4.0/23-Sep-2010 changing treatment order, 264 hiding fields, 264 restoring fields, 265 secondary therapist login, 264 unhiding fields, 265 Treatment field, 87 accessory information, 93 adding, 92 adding by copying, 95, 96 adding to treatment sessions, 119 approving, 99 capturing geometric settings, 96 changing, 98 changing order in treatment sessions, 119 Field Delta View, 99 field setup information, 95 geometric settings, 94 portal image information, 94 removing from treatment sessions, 120 removing treatment fields, 120 replacing in treatment sessions, 120 reviewing IMRT, 101 scheduling, 112 Treatment Calendar, 119 Treatment Field Definition, 265 Beam’s Eye View preferences, 143 Treatment fields, 265 adding, 266 changing, 267 unhiding, 265 treatment plans importing, 79 Treatment Readiness Check, 261 Treatment sessions adding field groups, 121 adding treatment fields, 119 AFS, 122 all due dates, 117 alternating pattern prescriptions, 114 approving, 123 BID, 115 changing due dates, 117 changing treatment field order, 119 closing incomplete sessions, 124 MFS, 122 moving, 118 multiple prescriptions, 113 overlapping treatment sessions, 114 portal image series, 116 portal images, 116 QA Mode, 123 removing, 115 replacing treatment fields, 120 scheduling, 112, 120 single prescriptions, 112 single treatment session due dates, 118 treatment fields, 119 Treatment warnings, 281 Troubleshooting SEQUENCER, 277 Tumor markers, 31 Tumor measurements, adding, 32 303 MOSAIQ User’s Guide U Unhiding a treatment field, 265 Using Chart Workspace for Medical Oncology, 49, 50 Dose Site Summary, 110 eCHART Navigator, 17 image filters, 170 Image List window, 160 machine characterization, 124 MAR dialog box, 65 MLC Fit, 130 online help, 9 Photos and Diagrams, 149 Treatment Calendar, 112 V Varian 4DITC interface, 260 Verified Treatment, 272 View Chart, 49, 50 Viewing 304 Field Data view, 99 image layers, 178 images in Image List window, 169 radiation prescriptions, 77 treatment geometry on an image, 158 Viewing the Pharmacy Tabs, 51 VMI, 253 Voiding an order, 55 W Warnings, 281 general, 283 messages, 286 MU per Segment Difference, 288 operations, 285 pediatric, 285 post-treatment, 283 pre-treatment, 282 Waving order sets for a Care Plan, 28 orders, 59 Window and Level tool, 170 Copyright 2010, IMPAC Medical Systems LUGMSQ0002/4.0/23-Sep-2010 Index Copyright 2010, Elekta Impac Software LUGMSQ0002/4.0/23-Sep-2010 305 Elekta Impac Software – Regional Offices Sunnyvale, California 100 Mathilda Place, Fifth Floor Sunnyvale, CA 94086 Phone: +1 408 830 8000 Fax: +1 408 830 8003 Email: [email protected] Henderson, Nevada 2310 Corporate Circle, Suite 275 Henderson, NV 89074 Phone: +1 702 992 5000 Fax: +1 702 992 5001 Europe, Latin America, Africa and Middle East Contact Information Elekta Limited, Linac House, Fleming Way, Crawley, West Sussex RH10 9RR Phone: +44 1293 544 422 Fax: +44 1293 654 321 Support Phone Support: Email Support: Online Support: Training Calendar: Country free phone listings at www.support.com/support/contact [email protected] supportplus.impac.com www.impac.com/training www.elekta.com Human Care Makes the Future Possible Corporate Head Office: Regional Sales, Marketing and Service: Elekta AB (publ) Box 7593, SE-103 93 Stockholm, Sweden Tel +46 8 587 254 00 Fax +46 8 587 255 00 [email protected] North America Atlanta, USA Tel +1 770 300 9725 Fax +1 770 448 6338 [email protected] Europe, Latin America, Africa, Middle East & India Tel +44 1293 544 422 Fax +44 1293 654 321 [email protected] Asia Pacific Hong Kong, China Tel: +852 2891 2208 Fax: +852 2575 7133 [email protected]