1
SLAC-370tREV.4)
A VALIANT LITTLE TERMINAL
A VLT User’s Manual
Amanda
Weinstein
SLAC-Report-370cREV.4)
Revised August
1992
Prepared for the Department of Energy
under contract number DE-AC03-76SF00515
I?
This document and the material and data contained therein, was developed under sponsorship of the United States Government.
Neither the
United States nor the Department of Energy, nor the Leland Stanford
Junior University, nor their employees, nor their respective contractors,
subcontractors,
or their employees, makes any warranty, express or implied, or assumes any liability or responsibility
for accuracy, completeness or usefulness of any information,
apparatus, product or process
disclosed, or represents that its use will not infringe privately-owned
rights.
Mention of any product, its manufacturer,
or suppliers shall
not, nor is it intended to, imply approval, disapproval, or fitness for
any particular
use. A royalty-free,
nonexclusive right to use and disseminate same for any purpose whatsoever, is expressly reserved to the
United States and the University.
I
;ft,;70(
REV.4)
Pi
A VALIANT LITTLE TERMINAL
A VLT User’s Manual
Amanda Weinstein
Stanford Linear Accelerator Center
Stanford University, Stanford, CA 94309
August 1990
Revised
December 1990
July 1991
September 1992
Prepared for the Department of Energy
under contract number DE-AC03-76SF00515
Printed in the United States of America. Available from the National Technical
Information Service, U.S. Department of Commerce, 5285 Port Royal Road,
Springfield, Virginia 22161
\-
A Valiant Little
A VLT
Terminal
User’s Manual
bY
Amanda
Fourth
Weinstein
Edition-August
\//
1992
Trademarks
and Copyrights
IBM and VM/CMS
are trademarks
of International
Business Machines.
Ann Arbor and Ambassador
are trademarks
of Ann Arbor, Inc..
Modgraph
is a trademark
of Modgraph,
Inc..
Digital,
DEC, DECnet,
VAX, and VMS are trademarks
of Digital Equipment
Corporation.
Micom is a trademark
of Micom Systems, Inc..
TEX is a trademark
of the American
Mathematical
Society.
TxEd, TxEd Plus, FastFonts,
and FunKeys are trademarks
of Microsmiths,
Inc..
Amiga, AmigaDOS,
and Amiga Workbench
are trademarks
of Commodore-Amiga,
Inc..
PostScript
is a trademark
of Adobe, Incorporated.
Tektronix
is a trademark
of Tektronix,
Inc..
ARexx, WShell, ConMan
are copyright
Wishful Thinking,
Inc..
AmigaTEX
is copyright
Radical Eye Software, Inc..
ProVector
is copyright
Stylus Inc..
It’s-It is a registered trademark
of It’s-It Ice Cream Co..
Acknowledgements
Many thanks to Willy Langeveld,
the creator of VLT, for assistance, discussion, and explanation, as well as the writing of Appendices
C and D of this manual. Thanks as well to Marvin
Weinstein,
author of the original VLT manual,
VLT, the Story, for the use of his efforts, his TEX
as&stance, and the new VLT logo. We are also grateful to the BIX users whose questions formed
the basis for the Troubleshooting
section and to Suzanne Weinstein for the creation of the limited
edition VLT T-shirt.
Table of Contents
........................
Introduction
................
An Introduction
to VLT
.....
What It Does At SLAC: Terminal
Emulation
....................
File Transfer
..................
ARexx and VLT
FastFonts and VLT .................
VLT Jr. ......................
.................
The VLT Manual
2.
Getting Started .......................
......................
Installation
...........
Installing
VLT From An Archive
.....................
Other Files You May Need
Installation
for SLAC Users .....................
Installation
Notes for 1.3 Users ....................
......................
Installation
for 2.0 Users
................
Upgrading
from older versions of VLT
Testing VLT ............................
....................
VLT’s Method of Searching Paths
Starting Up ..............................
...................
Starting Up VLT From the CL1
................
Starting
Up VLT From the Workbench
..............................
3. ,;The User Interface
.........................
Parameters
and Menus
Text Screen Menus ...........................
..........................
The VLT Menu
.....................
The Communications
Menu
..........................
The Paste Menu
The Transfer Menu .........................
The Script Menu ..........................
.........................
The Screen Menu
........................
The Operation
Menu
............................
User Menu
........................
The Graphics Menu
Fifo Pipes in Detail .........................
The Console Window In Detail ....................
.......................
View History in Detail
......................
Program Mode In Detail
......................
Mouse Support In Detail
.........................
Graphics Screen Menus
The Image Menu ..........................
The Zoom/Pan
Menu ........................
.........................
The Cursor Menu
..........................
The Screen Menu
........................
The Operation
Menu
.........................
The Control Menu
................
The Color Options Requester In Detail
...............................
4.
Writing
Scripts
.................
Introduction
To VLT’s Scripting
Facility
1.
.
.
.
.
.
.
.
.
.
.
.
.
.
.
.
.
.
.
.
.
.
.
.
.
.
.
.
.
.
.
.
.
.
. . . . 1
.
.
.
.
.
.
.
.
.
.
.
.
.
.
.
.
.
.
.
.
.
.
.
.
.
.
.
.
.
.
. 3
. 3
. 4
. 5
. 5
. 6
. 6
. 7
. 9
. 9
10
11
11
11
11
13
14
17
17
20
23
25
27
27
28
31
32
35
36
40
42
42
43
44
45
48
49
51
51
52
52
52
53
57
57
61
63
5.
6.
Syntax
. . , . . . . . . . , . . . . . . .
Schedules
. , . . . . . . . . . . . . . . .
Important
script commands
. . . . . . . . .
Mixing VLT and ARexx . . . . . . . . . . .
Quick Reference Section . . . . . . . . . . . . .
Some Conventions
. . . . . . . . . . . . .
The Script Commands
. . . . . . . . . . .
Conditions
Recognized by the IF Command
. .
The Review Command
. . . . . . . . . . .
Troubleshooting
. . . . . . . . . . . . . . . . . .
Troubleshooting
. . . . . . . . . . . . . . . .
Syntactical
Questions, Tricks, and Bloopers
. .
Programming
Problems
. . . . . . . . . . .
Directory
Dilemmas
. . . . . . . . . . . .
Data Flow Difficulties
. . . . . . . . . . . .
Review Buffer Riddles
. . . . . . . . . . .
Miscellaneous
Musings
. . . . . . . . . . .
Appendices
. . . . . . . . . . . . . . . . . . . .
Appendix
A The file requester
. . . . . . . . . .
Using the Requester
. . . . . . . . . . . .
File Requester Menus . . . . . . . . . . . .
The Control Menu
. . . . . . . . . . . . .
Special Notes
. . . . . . . . . . . . . . .
Appendix
B Parity
. . . . . . . . . . . . . . .
I
Bits, .Bytes, and Nybbles
. . . . . . . . . .
Even Parity
. . . . . . . . . . . . . . . .
Odd Parity
. . . . . . . . . . . . . . . .
Mark and Space Parities
. . . . . . . . . .
Stop Bits
. . . . . . . . . . . . . . . . .
Parity Abbreviations
. . . . . . . . . . . .
Appendix
C VLT’s Emulations
. . . . . . . . . .
Introduction
. . . . . . . . . . . . . . . .
VLT’s modes
. . . . . . . . . . . . . . .
Sequences related to the Tektronix
emulation
.
Differences compared to standard VT100
. . .
Additional
escape sequences . . . . . . . . .
Sending commands to VLT from the host . . .
Device Status Reports and Device Control String
Appendix
D Tektronix
Programmer’s
Manual
. . .
Overview
. . . . . . . . . . . . . . . . .
Sequences that change supermode
. . . . . .
Alpha mode . . . . . . . . . . . . . . . .
Vector and point-plot
(marker) mode . . . . .
Incremental
Plot mode
. . . . . . . . . . .
GIN mode . . . . . . . . . . . . . . . . .
Tektronix4105/4107
. . . . . . . . . . . .
Reports to the host . . . . . . . . . . . . .
Table of ASCII control characters
. . . . . .
Appendix
E ARP Escape Sequences
. . . . . . .
The Escape Character and SET ESCAPE comand.
.
.
.
.
.
.
.
.
.
.
.
.
.
.
.
.
.
.
.
.
.
.
.
.
.
.
.
.
.
.
.
.
.
.
.
.
.
.
.
.
.
.
.
.
.
.
.
.
.
.
.
.
.
.
.
.
.
.
.
.
.
.
.
.
.
.
.
.
.
.
.
.
.
.
.
.
.
.
.
.
.
.
.
.
.
.
.
.
.
.
.
.
.
_
.
.
.
.
.
.
.
.
.
.
.
.
.
.
.
.
.
.
.
.
.
.
.
_
.
.
.
.
.
.
.
.
.
.
.
.
.
.
.
.
.
.
.
.
.
.
.
.
.
.
.
.
.
.
.
.
.
.
.
.
.
.
.
.
.
.
.
.
.
.
.
.
.
.
.
.
.
.
.
.
.
.
.
.
.
.
.
.
.
.
.
.
.
.
.
.
.
.
.
.
.
.
.
.
.
.
.
.
.
.
.
.
.
.
.
.
.
.
.
.
.
.
.
.
.
.
.
.
.
.
.
.
.
.
.
.
.
.
.
.
.
.
.
.
.
.
.
.
.
.
.
.
.
.
.
.
,
.
.
.
.
.
.
.
.
.
.
.
.
.
.
.
.
.
.
.
.
.
.
.
.
.
.
.
.
.
.
.
.
.
.
.
.
.
.
.
.
.
.
.
.
.
.
.
.
.
.
.
.
.
.
.
.
.
.
.
.
.
.
.
.
.
.
.
.
.
.
.
.
.
.
.
.
.
.
.
.
.
.
.
.
.
.
.
.
.
.
.
.
.
.
.
.
.
.
.
.
.
.
.
.
.
.
.
.
.
.
.
.
.
.
.
.
.
.
.
.
.
.
.
.
.
,
.
.
.
.
.
.
.
.
.
.
.
.
.
.
.
.
.
.
.
.
.
.
.
.
.
.
.
.
. .
. .
.
. .
. .
. .
. .
. .
. .
. .
. .
. .
. .
. .
. .
. .
. .
. .
. .
. .
. .
.
.
.
.
.
.
.
.
.
.
.
.
.
.
.
.
.
.
.
.
.
.
.
.
.
.
.
.
.
.
.
.
.
.
.
.
.
.
.
.
.
.
.
.
.
.
.
.
.
.
.
.
.
.
.
.
.
.
.
.
.
.
.
.
.
.
.
.
.
.
.
.
.
.
.
.
.
.
.
.
.
.
.
.
.
.
.
.
.
.
.
.
.
.
.
.
.
.
.
.
.
.
.
.
.
.
.
.
.
.
.
.
.
.
.
.
.
.
.
.
.
.
.
.
.
.
.
.
.
.
.
.
.
.
.
.
.
.
.
.
.
.
.
.
.
.
.
.
.
.
63
64
66
71
78
78
78
91
91
95
97
97
99
100
101
102
103
107
109
109
111
111
111
112 .
112
112
113
113
113
113
114
114
114
114
115
115
116
117
118
118
119
120
121
123
124
124
127
130
132
132
7.
.................
Escape Sequences
Appendix
F ......................
............
The ARexx Phonebook facility
...............
The lJeatStuf f Script
.............
The SetHiscFlags
Program
...........................
Index
Index .........................
......
......
......
......
......
......
......
132
133
133
134
136
137
139
1
Introduction
/I
An Introduction
to VLT
LT came to be used at SLAC (Stanford
Linear Accelerator
Center), because SLAC wanted
to assess the Amiga’s usefulness as a color graphics terminal
and ‘I$$ workstation.
Before
the project
could really begin, the people at SLAC needed a terminal
emulator
which could
successfully
talk to the IBM 3081 (now the IBM ES9000-580)
and all the VAXes on the site.
Moreover,
it had to compete in quality with the Ann Arbor Ambassador
GXL terminals
which
were already in use at the laboratory.
Unfortunately,
at the time there was no commercial
program which fit the bill. Luckily, Willy Langeveld had been independently
hacking up a public
domain VT100 emulator
written
by Dave Wecker et al. and the result, VLT, suited SLAC’s
purposes.
V
Over the years, as the program was debugged and rewritten,
the original code disappeared,
so that now, in the present version of VLT, none of the original VT100 code remains.
Despite
this, we nevertheless
owe a debt of gratitude
to the authors of the original program because it
kept VLT on the air and functioning
while the changes were taking place. Kudos also go to
Joanne Dow, who allowed us to use her code for handling the serial port, Charlie Heath, for the
use of his file requester, which turned into the ARP library, Carolyn Scheppner for the palette
tool, and Dave Betz for his Bmodem
code. Having this stuff to fall back upon made the job
of creating VLT much easier and helped things run faster and more smoothly.
Thanks, too, to
Marvin Weinstein,
Jim Kent, Jim Mackraz, Tom Rokicki, and others for various little snippets
of code, to Rick Huebner, Steve Walton, Marco Papa, the Software Distillery,
and Marc Boucher
for writing
the XPR file transfer protocols used by VLT, and to the many people, too numerous
to name, who have served as beta testers.
What
It Does At SLAC:
Terminal
Emulation
A good terminal
program was one of the crucial links in establishing
the Amiga as a feasible,
cost effective terminal
+ TEX Workstation
at SLAC. Therefore,
VLT had to satisfy certain
requirements.
1. First, it had to allow one to log onto IBM and VAX mainframes
over various communications.
This meant that various parity
links, telephone lines, the Micom Switch and the Bridge.
modes and protocols had to be supported and that it should be easy to switch between these
modes. VLT supports
baud rates from 110 to 57600, 15 parity modes, and four different
handshaking
protocols.
2. The terminals
most in use at SLAC were Ann Arbor Ambassadors.
These had 24 function
keys and allowed the system to reprogram
various attributes
of the terminal
in order to automatically
switch between 24, 32 and 43 line modes on the IBM. Since the Amiga keyboard
only has 10 function
keys along the top of the keyboard,
SLAC needed an alternative
way
of getting the same functionality.
The solution to this problem was to provide the user with
several choices:
(a) First, an ever-growing
number of keyboard sequences and
including
the numeric keypad on the right hand side of
and shift-alt-ed
keypad and cursor keys, the ten function
both alone and in combination
with the shift, alt, and
options.
(h)
menu options are programmable,
the Amiga keyboard,
the alt-ed
keys at the top of the keyboard,
ctrl keys, and the User Menu
At the bottom
of the screen, a total of 30 function
gadgets can be displayed.
These
gadgets are on-screen software objects which may be activated
by moving the mouse
3
pointer over them and clicking the left mouse button.
They are programmed
by default
to emulate the way in which the function keys on an Ambassador
work, but they can be
user-programmed
in a variety of ways which will be explained later. For those users who
do not wish to have these function gadgets displayed at the bottom of the screen, there
is a means for removing and restoring them at will.
(c) VLT also allows you to program any key on the keyboard and command sequences using
a special keymap (for use of the Program
Mode
and Special
Keymap
options, see
The User Interface:
Text Screen Menus).
3. It was important
that the terminal allow the mainframe
to send escape sequences in order
to tell the Amiga to use different colors. VLT supports these features; the escape sequences
which should be sent by the host in order to activate them are documented
in Appendix
C.
4. VLT is designed to provide the same sort of Tektronix
emulation that is used by the Ambassador GXL terminal:
it opens a second screen for graphics, independent
of the alphanumeric
screen. This second screen provides color support. It is also possible to display graphics and
text on the same screen. The details of the Tektronix
emulation
are given in Appendix
D.
5. The Amiga is naturally
a mouse + keyboard oriented machine. Once a person gets used to
this he or she often wishes to have a way to use the mouse to handle cursor positioning
and
interactive
graphics support.
VLT allows you to program the mouse’s behavior in a variety
of ways using the Mouse
Support
menu option (see The User Interface:
Text Screen
Menus).
_
FiC Transfer
File transfer protocols are used to transfer files between two different computers.
A version
of the file transfer protocol must be run on both machines, which means that, to use the Amiga
for file transfer, the terminal
program has to support these file transfer protocols.
Usually, the
file transfer protocols are built into the terminal program.
Since only so many protocols can be
included in this manner, this limits the user’s choices. VLT, however, offers a better solution.
VLT supports what are known as ecternal file transfer protocols.
This means that the file
transfer protocols are not part of VLT itself, but are accessed by VLT from special XPR (ezternal
protocol) libraries.
VLT will let you use any file transfer protocol, as long as an Amiga version of
the protocol, written according to the XPR specification,
has been stored in the appropriate
place
in the form of an XPR library. When you obtain VLT, you should also obtain at least two XPR libraries: xprkermit
. library
and and xprxmodem. library:
These libraries contain, respectively,
the file transfer protocols Kermit
and XMODEM.
Among the other XPR’s currently
available
xprquickb.library.
are xprascii.library
(included with VLT), x p rzmodem.library,and
KERMIT
IBM mainframes
do not, in general, like to talk to non-IBM
hardware.
special file transfer protocols had to be developed in order to make it
transfer files from an IBM mainframe
to a desktop computer such as
The most popular protocol for carrying on such transfers with an IBM
is named Kermit
(yes, for the frog). Kermit
is also supported
on
SLAC systems.
Therefore,
possible to
the Amiga.
mainframe
many other
-k If you are a SLAC user, you will receive these libraries with VLT. Otherwise,
you will need
to obtain the protocol libraries from their creators, since they don’t normally
come with
VLT.
4
In any file transfer process of this type there are two separate programs which
must be run together, one on the mainframe
and one on the local (desktop) computer.
In the beginning,
you will probably have to do everything
by hand; that
is, first run the mainframe
transfer protocol and then use the Amiga keyboard or
menu options to handle the Amiga end of the process. This of course necessitates
that you know how Kermit
works on both the Amiga and the mainframe.
At
SLAC, you can learn how the mainframe
version works by logging onto VM and
typing
HELP KERMIT
Obviously, a general file transfer mechanism of this type had to be included, since
it allows you to handle file transfers using Kermit
with any Kermit-supporting
machine. The disadvantage of this mechanism is that you have to carry out many
repetitive
steps.
Since VLT interfaces to AmigaREXX
(ARexx), it is possible to write macros (also
called scripts or execs) which handle the entire file transfer. These ARexx macros
take care of running both the mainframe Kermit
and the Amiga Kermit
for you.
Since each host supports Kermit
in a slightly different manner, these macros are
host-specific;
it is not, however, all that difficult to alter these macros to suit another host. Macros of this type have already been written
at SLAC; to obtain
them, contact Marvin Weinstein (NIVQSLACVM).
XMODEM
ARexx
-Another
protocol which has come into wide use is the XMODEM
protocol (and
its derivatives such as YMODEM
and ZMODEM).
As with Kermit,
it requires
that .a pair of programs be run together, one on the mainframe
and one on the
desktop computer.
Although
this protocol cannot be used with IBM mainframes,
it can be used with VAXes. Again, as with Kermit,
two modes of operation
are
possible.
First, file transfer can be carried out entirely by hand by starting the
mainframe
program and then handling the Amiga’s end of the deal from the menu
options.
On the other hand, it is a simple chore to rewrite the ARexx scripts
which handle Kermit
file transfers to handle XMODEM
transfers to and from
the VAX.
and VLT
ARexx is a programming
language based on the IBM mainframe
language Rexx. ARexx is
a full implementation
of Rexx on the Amiga, with extra features which allow access to many of
the Amiga’s special capabilities.
A discussion of the way in which VLT interfaces to the general
Amiga multi-tasking
environment
and ARexx in particular
will be given later. Throughout
this
manual, we will often assume that you have a setup which includes ARexx. This will indeed be
true for all 2.0 users, since ARexx comes with the 2.0 operating system, but it may not be true
for those still using AmigaDOS
1.3. If you don’t have this program, you should obtain it, since
VLT is really designed to function in conjunction
with ARexx. This product can be ordered from
William
S. Hawes
P.O.Box 308
Maynard,
MA 01754
(508) 568-8695
Although
VLT will run perfectly well without ARexx, the full scripting capabilities
will not
be available to you unless you are operating within the environment
created by this program.
5
FastFonts
and VLT
If you are still running under AmigaDOS
1.3, you should also run FF (FastFonts),
which
comes with the Amiga 1.3 operating system. FastFonts allows you to replace the system font with
a more attractive
font that speeds up the writing of text to the screen by a significant
amount,
thus making for much smoother terminal
operation
(in fact, FastFonts are even nicer than some
2.0 fonts).
Unfortunately,
the 1.3 operating
system only includes the FastFonts
(FF) program,
not the fonts themselves.
At one time, the fonts could be purchased
as part of the program
TxEd-Plus,
but this program is no longer available.
At SLAC, the fonts are part of the TxEd
Site License, so you can still get them.
VLT
Jr.
There is a version of VLT known as VLT Jr.. VLT Jr. is basically the same as VLT, except
that it doesn’t do Tektronix
emulation-that
is, it doesn’t handle graphics. In return, it is about
50 kilobytes smaller, which is an advantage for those with limited memory.
The VLT
Manual
VLT has changed a great deal since it was first developed, and even experienced
users may
find unfamiliar
features in the most recent version. Those familiar
with versions of VLT older
than version 4.846 will discover that, among other things, the VLT scripting
language has been
redesigned and menu options have been added, removed, or moved to different menus. Hopefully,
this’manual
will clarify confusing issues and explain the new version of VLT to your satisfaction.
For those familiar
with VLT version 5.045, the most important
changes have been made to
the menus, which, in addition
to being rearranged,
have acquired some new options, and to the
scripting language, which has acquired some new syntax features and quite a few new commands.
6
I
:
2
Getting
Started
Installation
At present, if you are not a SLAC user, you will have obtained VLT in the form of an archive
file. SLAC users should get VLT directly from Willy Langeveld.
Both SLAC and non-SLAC
users
have a wide variety of setups. If you have a hard disk, you will be able to run VLT with all of
the frills you are accustomed
to having on Workbench.
If you have two floppy drives but no hard
disk, you should still be able to do this, since you can run Workbench
from one drive and VLT
from another. If you have only one drive and must run Workbench
and VLT from a single floppy,
however, you will have to delete some of the Workbench’s
“frills,” simply because VLT takes up
so much space on the floppy.
Installing
VLT
From
An Archive
If you have obtained VLT as an archive file, then you will have
vlt5p576.
lha, which is the VLT archive, or vlt j576. lha, which is
only explain how to decode the VLT archive and install it, as the
Jr. is exactly the same. Note, however, that some files only needed
the archive for VLT Jr.
Decoding
the
Archive
obtained one of two archives,
the VLT Jr. archive. We will
procedure for installing
VLT
for VLT are not included in
File
1. Change to a directory
where you have at least 610K of disk space (this could be rad:
or
Use the info command
to find out how much
ram: if you have a great deal of memory).
-space you have on a given device (see your Amiga manual for details).
2.. Next, let us suppose, for the sake of convenience,
floppy disk in df 0 : .
that
the archive
file vlt5p576.
lha is on a
3. Go to your CL1 and type
lha
--I[ -a
x dfO:vlt5p576.lha
Please do not omit
Installing
VLT
either
the -x,
on a Hard
-a,
or x qualifiers
in this command.
Disk
After de-archiving
all these files, you should see, from the Workbench,
a drawer called VLT.
For the sake of simplicity,
let’s say that you want to install VLT on the work: partition
of your
hard disk!
Double-click
on the little disk icon labeled work:
to open a work:
window,
then
grab the VLT drawer icon with your mouse and drag it into the work:
window.
Your Amiga
will automatically
copy the VLT directory,
along with its subdirectories
and their contents, into
work:.
If you don’t like using the mouse, issue the following
commands in the CLI:
makedir
work:VLT
copy VLT work:VLT all.
If you wish to make VLT a resident program,
or if you are still running under AmigaDOS
1.3,
then you must assign the logical device name VLT: to the directory
which contains VLT. For
instance, if you copied the VLT drawer to your work:
partition,
then you must assign VLT: to
work:VLT. To do this, add the line:
assign
VLT: work:VLT
to your user-startup
file (or your startup
sequence
* We’re assuming that you have unarchived
VLT would be already installed on work:
under
1.3).
VLT on someplace other than work :-otherwise
and you wouldn’t
need to do anything further.
9
If you tend to run from a shell most of the time, you will also want
(this is true for people running with AmigaDOS
1.3 as well as AmigaDOS
the line:
path
add work:VLT
to your startup
sequence.
Note that using the procedures outlined above, you can install
tion, even inside any directory or subdirectory
that you choose.
Installing
to add a path to VLT
2.04). To do this, add
VLT
on a Floppy
VLT
on any hard disk parti-
Disk
If you have two floppy drives, you can run Workbench
from one drive and VLT from the
other. In that case, you won’t have any problems, since VLT just fits on a floppy disk. If you
only have one floppy drive, however, you’ll need to install VLT and Workbench
on the same
floppy. You may find this rather difficult,
because VLT is a rather large program.
So, in order
to get rid of excess baggage, we recommend
that you make copies of the VLT docfiles, as well
as those . rexx and . scp files which, as examples, you won’t need, and then delete all of these
files from the VLT directory that you plan to install. If you don’t intend to use some of the frills
included with VLT, such as the phonebook
facility, you can also get rid of the VLTPhonebook,
NeatStuff,
SetHiscFlags
files that exist in your rexx and scp directories.
Even so, in order to
free up enough space (a little over 610K), you’ll need to get rid of any unnecessary system files
on the Workbench;
especially since you’ll probably need extra room for the files discussed in the
following section.
O ther
Files You May Need
‘VLT uses certain other files that are not distributed
with VLT, some of which are essential to
VLT’s operation, others of which support and provide various frills. First-and
this is extremely
important-VLT
uses arp. library
whether or not it is running under AmigaDOS
1.3; in other
words, 2.04 users need it too. Under 2.04, VLT uses ARP considerably
less, but can’t do without
it. Therefore, you must have this file in your libs : directory (you don’t, however, need the other
files that usually come with ARP). You will need arp.library
version 39.1 (commonly
known
as ARP 1.3).
Those running under AmigaDOS
1.3, unless they have WShell2.0,
must install ConMan 1.3e
in order to use the console window. Under AmigaDOS
2.04 you can use the console handler that
comes with the system, but you will need WShell 2.0 if you want to use the VLT-ConsoleMenus
file in s/ (the console menus only work under AmigaDOS
2.04). N one of these files are absolutely
required, but if you don’t have them, you may not be able to open the console window or get it
to behave properly.
Next, if you intend to play with FifoBBS.rexx
and similar Fifo:
For more details, see The
install the Fifo: handler by Matt Dillon.
Screen Menus
for the discussion of Fifo Pipes.
based utilities,
you must
User Interface:
Text
VLT will complain if it cannot find the external file transfer protocol library (XPR) you have
currently
selected. Please note: although it may appear that the XMODEM
and Kermit
file
transfer protocols are part of VLT;they
actually depend on external protocols.
While VLT’s other
features work perfectly without external file transfer protocols, you will need them if you intend
to do file transfers (and you probably do). We suggest that you acquire the freely distributable
XPR libraries of your choice. Currently,
XPR’s for the XMODEM,
Kermit,
ZMODEM,
YMODEM,
CISQuickB,
and Jmodem
protocols are available.
An ASCII
XPR is included with
VLT (xprascii.
library).
10
Some of the ARexx programs that come with VLT require that you have rexxarplib.
library
version 3.0 (earlier versions of rexxaxplib.
library
will not work correctly).
Rexxarplib.
library,
like most other files discussed in this section, is available on BIX and on the anonymous FTP site
unixhub.
slat . stanf ord. edu, as well as various other online services and BBS’s. In addition,
floppy-based
systems will not automatically
run ARexx upon startup; if you have a floppy-based
system and want to use ARexx macros, you’ll need to either drag the RexxMast
icon over to
your WBStartup
drawer or add RexxMast
to your user-startup
file.
Finally, several files included with VLT implement
useful “extras,” including
a phonebook
facility; these facilities are documented
in Appendix
F. There are also quite a few interesting
and useful VLT scripts that have been written by other users. Some implement
phone books,
while others automate up/download
facilities for on-line services.
Installation
for SLAC
SLAC users should
need, from him.
Installation
call Willy
Notes
Users
Langeveld
and get their VLT
setup, with
all the files that
they
for 1.3 Users
Since VLT now uses, by default, 2.0-style icons, users will notice a new directory,
Icons-For-l .3. This directory
contains special 1.3-style icons for those users with a 1.3 operating
system. Copy-the relevant . info files from this directory over the ones that you copied during
the installation.
Installation
for 2.0 Users
Under 2.0, you can use the system’s standard console handler to support the console window.
Even if you want to use a ConMan console, you do not want to run ConMan in your startup
sequence; when mounted as CON:, ConMan
replaces the regular system console handler in all
cases, which will irritate
2.0. Instead, you should issue the command mount CNC: and program
VLT’s console window to use CNC: instead of CON: (see The User Interface:
Text Screen
Menus).
In this case, ConMan
will only be used by VLT and won’t interfere with ordinary
On the other hand, you may choose instead to purchase WShell 2.0 (see the
2.0 functions.
Introduction,
ARexx
and VLT).
Upgrading
from
older versions
of VLT
Those of you
VLT has changed
This is not entirely
copying devs files
probably want to
upgrading from older versions of VLT will notice that the method of installing
significantly,
since VLT can now keep all the files it needs in its own directory.
necessary; you can, if you wish, install VLT as you have previously
done, by
to devs : , libs files to libs : , etc.. If you want to install VLT this way, you’ll
put all the scp files and rexx files that come with VLT into rexx: .
On the other hand, you might want to clean up your system and change over to the new
method of installing
VLT. In principle,
you should be using the same method of installation
as
new users, but there will probably be one important
difference: you’ll have files of your own, such
as script and configuration
files, that you’ll want to keep. You can copy these into subdirectories
in the new VLT directory, but be careful not to overwrite the new files with old material, or to
overwrite your own configuration
files with the new standard configurations
that come with VLT.
11
Here’s a sample
1. Unpack
2. Make
upgrading
the VLT
archive
a directory
called
sequence.
as described
earlier.
work: vltnew,
as well
as the directories
work:
vltnew/rexx
and
work:vltnew/scp.
3. Issue the following commands:
vlt work:vltnew/rexx
copy rexx:#?.
copy rexx:#?.scp
work:vltnew/scp
4. From the Workbench,
drag the VLT drawer created when you unpacked the archive to your
work: partition.
You should now have a VLT and a VLTnew drawer on work: (you can also
do this from a CL1 as shown earlier).
5. Issue the following
command:
copy work:VLT
work:VLTnew
6. Now delete work:VLT
delete
work:VLT
all
by typing the following
all
command:
VLTnew to VLT by issuing the following
rename work:VLTnew work:VLT
7. Now rename
8. Now copy the configuration
copy s:VTPrefs.dat
copy s:TekPrefs.dat
command:
files by typing:
work:VLT/s
work:VLT/s
If you made changes to s :TekProlog .ps, make the same changes again to
Iwork:VLT/s/TekProlog.ps.
Then delete the files just mentioned from your s: directory.
9. If you have other programs
that need access to the XPR libraries,
you should probably
Otherwise, copy all the XPR libraries you have to
leave them in your libs:
directory.
work: VLT/libs,
then delete these files from libs : . You should also delete libs : review.
rary,libs:strokefont.1ibrary,libs:simplexfont.library,and1ibs:duplexfont.library.
10. If you wish, you can now delete all VLT
the command:
delete
fonts:vlt#?
specific fonts from your fonts
: directory
lib-
by issuing
all
11. If you intend to make VLT a resident* program, or if you are still running under AmigaDOS
1.3, assign VLT: to VLT’s directory of residence, just as a new user would. For all users,
if you tend to run VLT from a shell, add VLT’s directory
of residence to your path (see
Installing
VLT on a Hard
Disk).
12. If you find that VLT is often unable to find needed files in specific situations,
you may be
able to fix the problem by making more assignments,
or by consolidating
files in certain
directories, or by eliminating directories you don’t need which VLT looks for anyway (see
Getting
Started:
VLT’s
Method
of Searching
Paths).
* A resident program is a program which has been permanently
This
means that
a resident
program
is always
loaded
installed in true memory.
into memory,
even when you’re
not
using it; on the other hand, if you run the program several times, the computer will use the
same copy instead of loading the program into memory several times, as it would with a
non-resident
program.
To make VLT resident, issue the command resident
VLT:VLT from
a shell.
12
Flushing
review.library
13. In order to use the new review.
library,
you must flush the old version from memory.
To
do this, make sure the old version is not in libs:
(delete it if it is) and then reboot. If you
go to the CL1 and give the command version
review.
library,
you should see the response
review.
library
I .31 (or a higher number).
Otherwise,
you have the wrong version.
Testing
VLT
Insert the VLT boot floppy you just created into one of your disk drives. Reboot.
In half
a minute or so, you should see a screen with a number of icons. Click twice on the icon called
Work:. A window with a bunch of icons in it should appear; one of these icons is the VLT drawer
icon. Double-click
on this icon; a new window will appear, containing,
among other icons, the
VLT icon (you can’t miss it). Increase the size of the window,
drag the icons around so that
they aren’t overlapping
anymore, and make a snapshot of the window (See your Amiga manual).
In the process you should have discovered another icon called TestScriptscp.
If you click twice
on either icon, VLT should start up. For those who clicked on the TestScript
icon, a little story
will be told and VLT will exit automatically
after thirty seconds. If you followed the installation
procedure correctly,
then you won’t have any trouble with this. If you do find problems,
go back
over the installation
procedure
and check for mistakes.
If you installed
disk insertion,
VLT
on your hard disk, follow
13
the procedure
outlined
above, minus
the floppy
VLT’s Method of Searching Paths
As of version 5.517, VLT
in several places, instead of
of having to install the files
together in a single directory
finds these files by checking
both useful and effective, it
how VLT looks for files and
know.
has acquired a new ability: the ability to search for the files it needs
looking only in a single place as it used to do. This is why, instead
VLT needs in various directories,
a user can now gather them all
or put them in scattered directories
according to his choice. VLT
what are known as “paths,” and while this method of finding files is
can occasionally
be confusing as well. In this section, we’ll explain
what aspects of this new feature are necessary for you, the user, to
When VLT is looking for a file, it will search through a set of likely directories,
in sequence,
until the file is found. This set of likely directories,
plus the order in which they are searched,
constitute
a path. These paths will vary depending on whether VLT is looking for a file or putting
up a file requester; they will also vary depending on the type of file that VLT is looking for. VLT
will search through
these paths until it finds the file it needs, then stop. This means that if
you have slightly different copies of a file in different directories,
you need to make sure that the
version you want VLT to use is in the directory
highest on VLT’s priority
list; otherwise,
VLT
will find a different version of the file early in its search and use that instead.
Understanding
these paths can be useful, especially if you are a long-time
VLT user with
lots of baggage, such as handy scripts you absolutely
can’t live without.
In that case, when
you install your VLT upgrade, you’ll probably be making some judgment
calls on where to store
such- files; understanding
the paths VLT uses can help you make those decisions. In addition,
if
you. have (as you very well may), multiple
versions of files floating around, you may have some
frustrating
moments where VLT just refuses to load your configuration
file instead of some weird
configuration
file you haven’t used in ages. The solution is probably that you have an old version
of the file floating
around in a high-priority
directory;
knowing the paths makes this type of
problem much easier to solve. The paths VLT uses when searching for specific types of files are
listed below, with the various directories
listed in order of priority
from left to right.
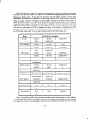
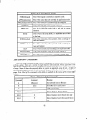
NOTE:
executable.
In the tables which
Files(s)
follow,
stands for
progdir:
Path
1
that
the directory
containing
is searched
TekProlog.ps
I current
dir
v1ts:
v1t:s
progdir:s
s:
TekPrefs.dat
I current
dir
v1ts:
v1t:s
progdir:s
s:
v1ts:
v1t:s
progdir:s
s:
v1tscp:
v1t:scp
progdir:scp
I
vlt:rexx
I progdir:rexx
I rexx:vlt
vlt_rexx:
the VLT
I rexx. 4s:
I
fonts
current
dir I vltfonts:
I
vlt:fonts
I progdir:fonts
I fonts:
I
libraries
current
dir I
I
vltlibs:
I
I vlt:libs
I
I
I
VltxDr:
progdir:xpr
progdir:libs
I
- devices
current
dir
vlt-devs:
vlt:xDr
libs:
I
vlt:devs
14
progdir:devs
devs:
I
When VLT puts up a requester, it may not yet know where to look, so it will point to the first
directory it can find in the path. The paths VLT follows when bringing up requesters for various
filetypes are shown below.
Notice that the directory
with the highest priority
is shown first,
regardless of its contents; for example, if all your script files are in s : while a rexx : directory
directory
will appear in the requester (without
your files) because rexx:
is
exists, the rexx:
higher on the priority list. VLT can’t know ahead of time that your scripts aren’t there (of course,
if you don’t have a rexx:
directory, you won’t have a problem).
So, for convenience, store your
scripts in the first place on the path that exists (this holds true for other types of files as well).
Note that you can always fool VLT by assigning vlt-scp:
to the directory
containing
your VLT
scripts, no matter how many other directories exist, because vlt_scp
has the highest priority
in
the VLT script search path. You can pull a similar trick for the other paths, too.
Path
Item
vlt-devs:
devices
libraries
I
current
scripts
progdir:devs
dir
vlt-xpr:
vlt-libs:
vlt:xpr
vlt:libs
progdir:xpr
progdir:libs
libs:
VLT
is searched
vlt:devs
devs:
XPR
that
current
dir
vltscp:
v1t:scp
progdir:scp
vlt-rexx:
vlt:rexx
progdir:rexx
rexx:vlt
rexx:
s:
progdir:rexx
ARexx
macros
vltrexx:
vlt:rexx
rexx:vlt
rexx:
current
vlt:devs/keymaps
devs:keymaps
current
VT100
current
vltarchive:
Tek “archive”
progdir:devs/keymaps
dir
progdir:archive
vlt:archive
dir
v1t:s
v1ts:
prefs file
s:
dir
vlt-devs:keymaps
keymaps
progdir:rexx
I
progdir:s
s:
v!ts:
Tek prefs file
I
v1t:s
progdir:s
s:
Now, it is perfectly possible that you have previously saved certain things in your configuration Iiles which will appear to alter VLT’s path priorities without actually doing so. For example,
you might have saved libs:xprzmodem.library
as your default file transfer protocol.
In that
15
case, when you select a new protocol to use, the XPR protocol requester will point to libs:
,
with xprzmodem.library
in the file gadget. In that case, just type the real location of the XPR
libraries into the drawer gadget, hit return, and select the desired XPR.
16
Starting Up
There are two ways to start VLT-from
starting up VLT, we need to briefly explain
the Workbench
a few terms.
or from
a CLI.
Before
we discuss
Initialization
Files - When VLT starts up, it first reads the file VTPref 8. dat, which contains
default values of all its internal parameters.
VTPref s . dat can be in any directory
in the appropriate search path (see Getting
Started:
VLT’s
Method
of Searching
Paths).
Afterwards,
it looks first for a file called vlt_startup.vlt,
and then, if this file doesn’t exist, for a file called
vlt . init.
These files, which are known as intialization
files, are no different from other script
files except that they are run at startup time before the VLT screen has been opened.
Since
it basically overwrites
the settings in your VTPrefs.dat
file, an initialization
file is a good place
files are really for people who log on
for changing your color settings and so on. Initialization
regularly
to two or more different hosts, each of which requires different default settings.
Serial Devices
and Unit
Numbers
- Normally,
your Amiga comes with one serial port (the
piece of hardware which handles the transmission
of signals/information
to and from your Amiga
from and to your host). You may, however, choose to install extra serial ports. Serial ports are
run by pieces of software known as serial devices. Depending
what hardware you are using, you
may have to run each serial port with a different serial device, or you may have to run all your
serial ports with the same device and differentiate
the ports using ‘unit numbers’ (Typically,
unit
numbers are assigned beginning with 0).
Starting
To start
Up‘ VLT
up VLT
from
From
the CL1
the CL1 environment,
type
RUN VLT
(assuming that you have stored VLT in a directory belonging to the current “path’‘-that
is, the
group of directories
that the Amiga will search for the specified program).
You can provide the
command with several parameters
that affect the way in which VLT is invoked. The parameters
are specified using special subcommands.
A discussion of these subcommands
and their syntax
? into your CL1 will bring up a special message window
follows; if you forget them, typing VLT
with a brief description
of these commands and their syntaxes.
RUN VLT +I
startup.file
If you type the command
with the +I option, then you are telling VLT that it should use an
initialization
file with a name other than VLTstartup.vlt
or vlt . init.
In the above example
Moreover,
the file specified with this option is automatically
that would be startup.
f ile.
checked to see if it is written, in either ARexx or VLT’s scripting language and run upon startup
when it is. On the other hand, if you type:
RUN VLT -1
17
then you indicate
that the program
RUN VLT +S
(serial
should be run without
looking
for vlt
. init
or vlt_startup.
vlt.
device)
If you type the command with +S and a serial device name, you indicate that you want VLT to
use the specified serial device. You must specify the serial device’s full name, e.g. tsstrm.device.
RUN VLT +U
(unit
If you type the command
the specified unit.
RUN VLT +N
number)
with
+U and a unit
number,
you indicate
that
you want
VLT
to use
(VLT name)
If you type the command with +N and a name, VLT will be given a new name on startup.
VLT’s
ARexx port will also be given this new name. This option is useful when you have several serial
ports and want to run multiple copies of VLT with each one talking to a different serial port (You
will, of course, also have to use either the +S or +U option to specify the different ports). Since
you want each copy of VLT to have a different name and a distinguishable
ARexx port, you will
need to use the +N option to rename the different copies.
RUN VLT -N
If you type the command with -N, each invocation
of VLT will be started with a different name.
For instance, the first time you invoke the command with -I, VLT will be given the name VLT.l;
the second time you invoke VLT with this option, VLT will be given the name VLT.2, and so on.
So you can have different sessions of VLT running at the same time, each marked as different by
the number appended to its name. If you have VLT come up on the Workbench,
each successively
invoked session will have its titlebar ten pixels lower than the previous invocation.
RUN VLT +P (VTPrefs
f ilenarne)
If you type the command with +P, VLT will start up using the specified VT100 configuration
file. By default, VLT loads a file called VTPref s .dat.
This file deals with parameters
for the
VT100 emulation,
or text, part of VLT.
RUN VLT +T (TekPrefs
filename)
,
If you type the command with +T., VLT will start up using the specified Tektronix
configuration
file. By default, VLT loads a file called TekPref s . dat. This file deals with parameters
for the
Tektronix
emulation,
or graphics, part of VLT.
RUN VLT +C (Quickie
Script)
18
If you type the command with +C, you can type a short VLT script, bounded by double quotes
(see Writing
Scripts:
Introduction
To VLT’s
Scripting
Facility)
immediately
afterwards
(separate the +C and the script by one or more spaces). This script will then be executed upon
startup.
RUN VLT -B
If you type the command with -B, VLT starts up without opening the VLT
if, for some reason, you want VLT to be running in the background.
screen.
This is useful
Any other file names specified on the command line are the names of script files that the
program should run after startup is completed.
Note: see Getting
Started:
VLT’s
Method
of Searching
Paths for a description
of where VLT looks for these files. Names of script files
should be specified last, after the parameter
specifications
that you have made.
In fact, the
complete syntax of the RUN VLT command is
RUN VLT
[+I..
. C-1..
. [script11
[script21..
...
where the [+] and [-] represent one or more of the parameters previously
the [ ] indicate that the parameter is optional; they should not be typed).
As an example of how to run VLT from a CL1 environment,
initialization
f&s called IBM.INIT
and VAX.INIT
and two scripts
VAXLOGON.SCP.
If you type
RUN VLT +I
IBH.INIT
discussed.
(Note
let us say that you have two
called IBMLOGON.SCP
and
IBHLOCON.SCP
VLT will setup according to the defaults specified in the file IBM.INIT
and then execute
logon sequence specified in the script file IBMLOGON.SCP.
If, on the other hand, you type
RUN VLT +I
VAX.INIT
it will set up the defaults
LOGON.SCP.
AmigaDOS
commands
specified in VAX.INIT
and run the logon procedure specified in VAX2.0 users and 1.3 users who own WShell or ARPShell
can add the
ALIAS
IBHVLT
“VLT
+I
IBM. INIT
IBMLOCON. SCP”
ALIAS
VAXVLT “VLT
+I
VAX. INIT
VAXLOGON. SCP”
startup
sequences
the
VAXLOCON.SCP
and
to their
that
and save themselves
a lot of typing.
19
Starting
Up VLT
From
the Workbench
To start up VLT from the Workbench,
double-click
on the appropriate*
disk icon (to doubleclick: move your mouse cursor over the icon and quickly click the left mouse button twice). This
will cause a window to open; in this window you will find a VLT drawer icon. Double-click
on this
icon too. Another
window will appear, this one containing
the VLT program icon. Double-click
on the program icon. At this point a clock will appear (unless you have the 1.3 operating system)
to tell you that the program is loading.
In a few moments, the appearance
of your screen will
will disappear)
because you are now under the control of the
change dramatically
( everything
terminal
program.
It is possible, from the Workbench,
to have VLT execute script files at startup
time. For
those of you who are unfamiliar
with script files, they will be fully discussed in the chapter titled
Writing
Scripts.
At this juncture,
the only thing you need to know is that such scripts exist
and that you can tell VLT to execute any number of them, in a specified order, at startup time.
Since the procedure for running one script at startup time is slightly different from the procedure
used for running multiple
scripts at startup time, we will discuss them separately.
Running
One
Script
Before you can tell VLT to run a script at startup time, the script needs its own icon. There
is a special script icon provided with VLT; this is a project icon titled TestScript.
scp. info.
A sample script file called TestScript.scp
is included
with the .info file. To make an icon
for a different-script,
duplicate
the TestScript.
scp file from the Workbench
(the icon file will
duplicated
automatically)
by selecting the Copy option from one of the Workbench
menus. Using
the Workbench
Rename
option, rename the script file; then edit the script file and change it to
what you want.
If you would like to make your own script icons, then make sure that
icon and not a tool icon. Its default
tool should be VLT.
the icon is a project
To have VLT run the script at startup, you double-click
on the script icon. VLT will start
up automatically
and run the script.
Note: If f or some reason you have created an iCon whose
associated script file is not in the icon’s directory,
VLT will look for the script file elsewhere. See
VLT’s
Method
of Searching
Paths.
Running
Multiple
Scripts
Getting VLT to run multiple
scripts in a specified order at startup time requires a slightly
different procedure.
First, create icons for all of your scripts using the procedure outlined above.
Then click once on the icon belonging
to the first script you want VLT to run and hold down
the shift key. While holding down the shift key, click once, in sequence, on the icons of all the
other scripts you want VLT to run. Then, still holding down the shift key, click twice on VLT’s
own icon. Phew! Now you can release everything
and let your fingers have a rest. VLT will start
running and execute all your scripts in the order that you clicked on them.
Tool
Types
When starting
up VLT from the CLI, there are various parameters
which can be included
with the RUN VLT command.
What if you want to specify the values of these parameters,
but
also want to start VLT up from the Workbench?
Tool Types are the solution.
Using Tool Types,
* There will be several disk icons to one side of the Workbench
screen, representing
different
partitions
of your hard disk (if you have one) and the floppy(s)
currrently
in the floppy
drive(s).
Click on the icon named for the disk where VLT is stored.
20
you can specify the parameters
you want VLT to start up with; then, whenever you start up
VLT from the Workbench,
VLT will start up using those parameters.
Note: If you direct VLT to
run multiple script files at startup time using extended select (see Running
Multiple
Scripts,
above), then VLT will start up using the Tool Types of the first script icon.
If you click once on the VLT icon or any script
Workbench
screen, three menu names will appear.
icon, then go up to the menu bar of the
Move your cursor over the menu named
Icons; then, when the menu drops down, select the Information
option!
A window with all
sorts of gadgets will appear. One of these gadgets will be labeled TOOL TYPES, and it will have
up and down arrow gadgets, a button gadget labeled NEW, and a button gadget labeled DEL.
When you want to specify an execution parameter for VLT from the Workbench,
you click on
the NEW gadget, type in a parameter,
such as -B, and click on the SAVE gadget at the bottom
of the window.
You can specify as many parameters
as you want in this fashion, but be sure to
specify each parameter
separately.
For example, if you want to specify the parameters
-B and
-1, you would click on NEW, type in -B, then click on NEW again and type in -I. Then you
would click on SAVE. Don’t click on SAVE until you have finished entering all your parameters,
since selecting SAVE closes the Information
window. If you want to specify a parameter
which
requires an argument, such as +S or +C, you have to enter the parameter in the following fashion:
+S=tsstrm.device
Make sure that you don’t begin the above command with a space or surround
the equals
Moreover, when using the +C option, don’t
sign with spaces; such spaces will cause problems.
surround the command string with quotes.
If you want to get rid of an already specified parameter, click on
to delete, click on DEL, and then click on the SAVE gadget. Again,
the ‘Information
window, don’t select SAVE until you have finished
you want to take a look at all of the parameters
you’ve specified,
The down arrow moves you forward in the list of parameters;
the up
Under 1.3, the procedure for handling tool types is similar; see your
the parameter that you wish
since selecting SAVE closes
making changes. Finally, if
you use the arrow gadgets.
arrow moves you backward.
Amiga manual.
No matter what procedure you use to get VLT up and running, once your screen goes blank
you have entered the domain of VLT and the time has come to become acquainted with what we
refer to as its user interface.
t Under AmigaDOS
1.3, the Workbench
has fewer menus.
is found in the Workbench
menu and is called Info.
21
So under
1.3, this particular
item
3
The User Interface
Parameters and Menus
Assuming that you have followed our instructions
in the previous chapter, you will now find
yourself staring at a blank screen (this emulates what an ordinary
terminal
looks like when you
turn it on) and wondering
what you should do. If you have hooked up your modem or cable to
the Amiga’s serial port according to the instructions
in your Amiga manual, all you really have
to do is hit return once or twice. Everything
might go very smoothly
after that, in which case
you will be ready to log on to your favorite host. Of course, Murphy’s
Law being what it is, you
will probably
not be so fortunate:
you will have to reset some of VLT ‘s defaults so that it will
The question we will address in this section is
work with your modem and host combination.
how you go about doing this and how, when you are finished doing this, you save the results of
your efforts.
If you are an Amiga novice, the first step is to get acquainted
with Amiga menus in general
and VLT ‘s in particular.
To display a menu put your hand on your mouse and hold down the
right mouse button.
At the top of the screen the following
words will appear:
VLT
Comm
Paste
Transfer
Script
Screen
Operation
User
Graphics
I
These are the-names
of the nine menus which belong to VLT ‘s alphanumeric
screen (i.e. the
screen on which text is displayed).
Moving the cursor over any one of these names (while you
are holding the right mouse button down) causes the menu associated with that name to drop
down from the menu bar. Each of these menus has several items, or options, displayed on it.
Some of these options even have sub-options
(or sub-items)
associated with them. Sub-items are
revealed only when you slide the mouse cursor down along the menu and point at the correct
item. To select a menu option you slide the mouse cursor over the option until the choice you
wish is highlighted
and then holding the mouse steady you release the right mouse button.
For
keyboard oriented individuals,
we have also provided keyboard shortcuts
for selecting most of
these options.
To select an option from the keyboard, hold down the Right-Amiga
key (i.e., the
key to the right of the space bar with the letter A on it) and type the letter you found shown
to the right of the item text in the menu. Thus, to start a capture you can select the Capture
Session option in the VLT menu using the mouse, or alternatively
hold down the Right-Amiga
key and hit the letter 0. You can change these shortcuts if you like (see The User Interface:
Text Screen Menus,
Program
Mode).
In this chapter, the keyboard abbreviations
indicated
are the default abbreviations.
There are also some shorthand
symbols in the menus which need to be explained.
You
be familiar
with the practice of writing the keyboard equivalent
of the menu option to the
of the option in the menu. In addition,
the )) symbol to the left of a menu option indicates
the option has a submenu,
while three periods following
a menu option’s name indicates
selecting the option opens up some sort of window.
may
left
that
that
There are a great many menu.options;
some of these options allow you to change the default
If you discover that you need to change some of these
parameters
with which VLT opened.
parameters
before logging on to your host, check with a local expert or documentation
about
the special parameter
settings your host requires. Then flip through the following
section, which
discusses the various menus and menu options in detail, until you find the option(s)
that will
Once you have done this, turn to the dicussion of the Save
let you reset those parameters.
25
Configuration
option of the VLT
Menu.
Read this section carefully, as it explains
make your new parameters
the default parameters that VLT will use whenever it starts
how to
up.
We will devote the remainder of this chapter to listing each of the menu options and explaining what they do. Since there are separate menus associated with the text and graphics screens,
Menus
and Graphics
Screen
the chapter is divided into two main sections: Text Screen
Menus.
Within those sections, the menu options are organized according to the the menu which
contains them.
26
Text Screen Menus
The VLT
Menu
The Capture
Session opCapture
Session
tion can be selected from the menu as shown, or by using the alternate keyboard command m 0 (hold down
the right amiga key and type 0). All commands
that
have keyboard alternatives
are indicated
in the menu
in this way. This option allows you to capture to a file
all information
received from the host. If you select
this option a file requester will appear. You will need
to give it the necessary drawer and directory specifications as well as a filename for VLT to capture to. If the
file already exists, a requester will appear, asking you
whether you want append the new material to the end
of the current file, overwrite the current file, or cancel
the operation
altogether.
I
VLT
Capture
Session...
@lo
End Capture
Ew
Fifo Pipes
>>
Open Console..
View
History..
.
El
.
Change
Directory..
Program
Mode
.
BID
>>
Save Configuration
Note that we recommend capturing to RAM: (or RAD:)
since it is faster than capturing
to a floppy disk. Also,
should a system crash occur for some reason while VLT
is writing to a disk, there is a chance that you will wind
up with an unreadable
floppy.
Save Configuration
As...
About...
Exit
ELI)
Selecting the Capture
Session option from the VLT
menu a second time will suspend file capture. A message box will appear on your screen saying
that this has happened.
This message box will go away as soon as you hit any key or click on
one of your mouse buttons.
When capture is suspended nothing that comes to the screen goes to
the capture file. Reselecting
Capture
Session toggles capture on again and everything
coming
to the screen is again being saved into the previously
defined file. You can toggle capture on and
off as many times as you wish.
Note: The use of the file requester is discussed
again and again when you save things to files from
file requester, you should read this appendix.
End
Capture
End
Capture
Fifo
Pipes
To shut down
file capture
in Appendix
A. The file requester appears
VLT, so if you are unsure of how to use the
completely
and close the capture
file select the
option.
We will discuss the Fifo
Pipes
option
in considerable
detail later in this chapter.
Selecting the Open Console
item opens a console window at the bottom
Open Console
of the screen. The console window, which allows you to send both ordinary
text to the host and
script commands
to VLT, will be discussed in detail later in this chapter.
View
History
We will
discuss the View
History
option
in considerable
detail
later
in
this chapter.
Change
Directory
provides you with a way of setting and/or changChange Directory
ing the default directory from which VLT is operating.
When you choose this option, a directory
requester (or a string requester under 1.3) will appear which contains a single string gadget. The
current default directory
will be displayed in this gadget. Replace the displayed directory
with
27
another of your choice. Note on string requesters: after you have entered the desired string, you
press the return key to proceed. Unlike the file requester, string requesters have no ‘Okay’ button,
only a ‘Cancel’ button.
Program
Mode
keys, menu options,
The Program
Mode option allows you to program a number of function
and keyboard abbreviations.
Details are discussed later in the chapter.
Save Configuration
The Save Configuration
command is very important
in that it
allows you to save the settings you have changed, such as baud rate, number of lines, macro
key settings, colors, etc.. You configure VLT the way you want and then select this option.
The settings will be saved in a configuration
file, such as VTPref s .dat.
If you already have
a VTPrefs.dat
file, the current settings will replace the ones in that file. If you don’t have a
VTPrefs.dat
file yet, VLT will create one and store it in the current directory.
Note that VLT looks for the specified initialization
see Getting
Started:
VLT’s
Method
of Searching
file using VLT’s path search procedures;
Paths for more details.
Selecting Save Configuration
As allows you to save your
Save Configuration
As
current configuration
without
overwriting
your current configuration
file. This would be useful
for a user who deals with many different hosts, each having specific configuration
requirements,
and who therefore needs several different
configuration
files. When you select this option, a
file requester will appear; using this requester, you can give the configuration
file you create
any name you choose. In order to have VLT use a configuration
file created this way instead
of VTPrefs .dat, you invoke VLT using the +P command line option (see Getting
Started:
Starting
Up>.
About
About
brings up a message telling
You should include. this in any correspondence
may already be fixed in a more recent version.
Exit
off from
you what version of the program you are using.
about problems you may encounter
as the bug
Exit does exactly what it says: it shuts down the terminal
your mainframe
before selecting this option.
This ends the list of commands
The Communications
available
from
program.
It is best to log
the first menu on the text screen.
Menu
Normally,
your Amiga comes with one serial port (the
Select Device,
Select Unit
piece of hardware which handles the transmission
of signals/information
to and from your Amiga
from and to your host). You may, however, choose to install extra serial ports. Serial ports are
run by pieces of software known as serial devices. If you run each serial port with a different
serial device, then you will want to tell VLT which serial device to use. This is done using the
Select Device
option.
You may also, however, run several serial ports using the same serial
device. When you are running several serial ports with one device, the ports are assigned what
are known as ‘unit numbers’ in order to differentiate
them (typically,
unit numbers are assigned
beginning
with 0). VLT, in this case, will not know which serial port the serial device should
talk to unless you specify a port unit number; this is done using the Select Unit option. Note:
After you select a device using the Select Device
option, a string requester will appear, asking
that you enter a unit number. The default number is 0 and unless advised otherwise, you should
leave it that way.
Cl&e
Device
The Close
Device
option
closes the device currently
port.
28
being used as a serial
Baud
If you select the Baud*
option a submenu will appear that shows the choices 110, 300, 1200,2400,
4800, 9600,
19200, 38400, 57600, and Midi.
These are the baud rates
which VLT
supports.
If you are using a modem and a telephone line to connect with your host, you will probably have a
1200 or 2400 baud modem, and so should probably
select one
of these two choices. If you are working with a mainframe
that
you are hooked up to directly,
you will probably
be able to
use either the 4800 or 9600 baud settings, depending
on your
setup (check with a local expert).
Important
Note: Even if
your setup supports it, you may have trouble using the 19200,
38400, 57600 and Midi baud options when using the Amiga’s
built-in serial port, due to hardware limitations
on a standard
A500 or A2000.
Comm
Select Device.. .
Select Unit...
Close Device
Baud
>>
Parity
>)
Handshake
>)
Error
>)
Checking
Echo
Parity is an outmoded
technique for error detecStrip 8th Bit
tion which most non-IBM
computers
pretty much ignore unless the user insists upon it. Unfortunately
IBM mainframes
Reset
still insist on getting
a specific parity and if this is not set
Send Break
correctly you will not be able to log on to the mainframe.
If
you select the Parity
item in the Comm
Menu
you will be
Hangup
presented witha
submenu which will allow you to choose the
Set Break Time...
parity settings that the Amiga supports.
In addition
to the
more common even and odd parity settings, you will find the
Set Buffer Size...
less common mark and space parities.
To log onto an IBM
mainframe
always select 7El.
To log onto Tymnet
and bulletin boards with modems you will often have to use 8Nl.
For a more comprehensive
of parity, see Appendix
B.
Parity
>>
>)
El?
FIB
CZIH
discussion
Handshake
This item refers to the type of handshaking
that the Amiga does with a host
in order to guarantee
that one computer
does not transmit
data too fast for the other to keep
up. Both the host and the terminal
have buffers which, in order to handle temporary
overloads,
store the characters
coming from their correspondent;
however, if, as in the case of graphics, a
huge amount of information
is coming down the wire, there has to be a way for one device to
tell the other to shut up until it has finished handling
what it already has gotten.
The Amiga
provides several choices of commonly
used ‘handshaking
protocols,’ which appear in a submenu
when the Handshake
option is selected. The most commonly
used protocol is the one known as
Xon/Xoff,
which is the one you will use when dealing with most IBM and VAX mainframes
as
well as networks.
The CTS/RTS
protocol (also known as 7Wire) is for use when the Amiga and
its host are connected together with a set of wires, one of which is used for handshaking;
7Wire/X
allows the user to use both the 7Wire protocol
and the Xon/Xoff
protocol
simultaneously.
The
None option on the submenu means exactly what is says; it tells VLT not to handshake
at all
with the host.
Error
Checking
Checking
allows
Prior to version 5.034, VLT ignored all serial
you to specify which serial device errors VLT should
device errors.
Error
check for by selecting
* While the terms baud and bps (bits per second), technically
speaking,
refer to entirely
different things, in current and common usage they both refer to the number of data bits
transferred
per second.
29
When a particular
type of error
various options in its submenu.
check will appear beside the corresponding
suboption.
checking
has been selected,
a
When VLT detects an error for which you’ve told it to check, it will post a message to that
effect. Moreover, if the error is a read error-that
is, an error in the information
being sent to
VLT-VLT
will flush the serial device.
Serial
Device
Busy,
the first suboption,
tells VLT to check for cases in which data flow to
your Amiga has been turned off by an Xoff character from the host. Baud
Rate Mismatch
checks to see if VLT and the host are set to send/receive
at different baud rates. Line Error
checks for a generic error, while Parity
Error
checks for a parity mismatch
between VLT and
the host. Buffer
Overflow
checks for an overfull buffer-that
is, too much information
being
sent to your Amiga for your serial device’s buffer to handle. No DSR (DSR = Data Set Ready),
when set, notifies you if the other side (e.g., the host) is not ready to send or receive data. Break
Received
tells you if VLT has received a break signal.
Echo
Terminals
tend to operate in one of two possible modes depending
upon what the
mainframe
is doing. Either you type a character at the keyboard and the terminal puts it up on
the screen (‘ethos’ it) and sends it to the mainframe
simultaneously,
or the terminal
sends the
character to the mainframe
and the mainframe
sends back a signal telling the terminal
what to
put up on the screen. The first alternative
is called local echo, the second remote echo. When
you have selected the Off option in the submenu, you will immediately
recognize that you have
made the wrong choice if none of your commands appear on screen. If you have selected the
On option, on the other hand, you will know that you have made the wrong choice if everything
the submenu there are
you type appears doubled on the screen. As you will see by examining
alternative
keyboard commands for turning local echo on and off.
Strip 8th Bit
Strip 8th Bit is used when you are dealing with bulletin boards or networks
that use something
known as mark parity.
These networks tend not to care whether the stuff
that you send them has mark parity or not; your Amiga, on the other, does care that everything
the network sends you has mark parity, because unless VLT is set for mark parity, anything sent
The reason this command
is called Strip
8th
to it with mark parity will seem like garbage.
Bit is that information
is sent back and forth between the terminal and host computers in sets
of eight bits, one of which is used for parity (when you are using parity, that is). Strip 8th Bit
strips the parity bits from anything sent to VLT from the host computer,
making information
sent to VLT with mark parity intelligible
to VLT. While you could also set VLT for mark parity,
this can be a nuisance, so the Strip
8th Bit option can be very useful. Note: See Appendix
B for a more comprehensive
discussion of parity.
Reset
a disconnect
you.
Reset resets the serial device to the current settings. Normally
this should not cause
from the host; some modems, however, are picky enough to notice and disconnect
The Break signal is a special signal which is useful when dealing with some
Send Break
hosts. Since the Break signal means different things to different hosts, you will need to find out
what a Break signal means to whatever host you are dealing with. Since there is no break key on
This command has the alternative
the Amiga keyboard we have it included as a menu option.
keyboard sequence T;rl B ( i.e. hold down the Amiga key to the right of the space bar and type
B). This key is sometimes necessary on Tymnet
and in IBM line mode but has no use in IBM
full. screen mode.
Hang
Sometimes you want to drop your connection with the host (or Modem, Micom
Up
Switch, Bridge Box, etc.) without leaving the terminal program. This menu choice does that by
shutting down the serial port for about a second. Its keyboard alternative
is m H.
30
The break signal is sent as a pulse along the data line. Most hosts
Set Break
Time
recognize the break signal as a break signal only if it endures for a specified length of time,
known as the break time.
For most hosts, a break time of 75 thousand
microseconds
will be
sufficient
for the host to recognize it as a break signal, but some hosts may demand a longer
break time.
Furthermore,
some hosts consider the break signal a disconnect
command
if the
break signal endures too long, so you will want to shorten the break time when dealing with
these hosts. The Set Break
Time option allows you to do this.
When you select the Set Break
Time option,
time in terms of microseconds
and hit return.
a string
It is important
not to confuse
Set Buffer
Size
buffer.
The buffer discussed here is the flow-control
temporary
overloads of incoming
data. Set Buffer
buffer larger or smaller.
Selecting this item will bring
size will appear in the requester; replace it with your
terms of bytes.
The Paste
will appear.
Specify
the break
the buffer mentioned
here with the history
buffer, a buffer the Amiga uses to handle
Size allows you to make this flow control
up a string requester.
The default buffer
own value. Specify the size of the buffer in
Menu
The Paste from ClipPaste from Clipboard
board
option will send the current clipboard
contents
to VLT and thence to the host.
Edit/Paste
requester
Clipboard
The Edit/Paste
Clipboard
option resembles Paste from
Clipboard,
except that it gives you the opportunity
to edit each line
before it is sent. When you select this option, a string
requester will appear, containing
the first line of text in
the clipboard.
Edit the line to your satisfaction,
then hit
return. Another string requester will appear, containing
the next line of text. You can abort this process at any
time by clicking on the Cancel button of one of the string
requesters, or by selecting the Cancel
Paste option.
Paste
Paste from
Clipboard
Edit/Paste
Clipboard...
Paste from
File...
Edit/Paste
File...
Cancel
El)
Paste
Set Character
Delay...
Set Line Delay...
Set Line Prefix...
,
The Paste from
File option
sends the contents of a specified file to VLT and thence
to the host. When you select this option, VLT will bring up a file requester.
Select the file that
you want “pasted” and click on the Okay button, or click on Cancel to abort the process. You
can abort the process at any time by selecting the Cancel
Paste option.
Paste
from
Edit/Paste
File
File
The
it gives you the opportunity
option).
Cancel Paste
Set Character
Selecting
Edit/Paste
File option resembles Paste from
File,
to edit each line before it is sent (see the Edit/Paste
the Cancel
Paste
option
aborts
the current
except that
Clipboard
paste operation.
After sending a character
to the host, the
Delay, Set Line Delay
paste facility will wait a specified amount of time before sending the next character.
The Set
Character
Delay option allows you to set the size of the delay, in milliseconds.
When you select
this option, a string requester will appear, containing
the current character
delay setting.
Type
in the desired setting and hit return (optimum
settings may vary from host to host and may also
depend on the baud rate that you are using).
31
After sending a line to the host, the paste facility
sending the next line. The Set Line Delay option
milliseconds.
When you select this option, a string
character delay setting. Type in the desired setting
vary from host to host and may also depend on the
also waits a specified amount of time before
allows you to specify the size of this delay in
requester will appear, containing
the current
and hit return (again, optimum
settings may
baud rate that you are using).
If you want the paste facility to send a string to the host before every
Set Line Prefix
line of text, you can specify that string using the Set Line Prefix
option. When you select this
option, a string requester will appear; the requester is blank by default.
Enter the desired line
prefix and hit return.
The Transfer
Menu
Send File
VLT supports three different kinds of file
transfer.
The send and receive commands discussed here
are general commands which behave differently
depending
on the file transfer protocol you have chosen (e.g. Kermit,
XMODEM,
etc.). The Send File menu item is the one
you choose to initiate a file transfer from the Amiga to your
host. What will happen after you select this menu option
depends upon the choices which are checked in items three
through six of this menu. In any event, after you have selected this item a requester will appear and you can use it
to find the file which you wish to send. Once the path and
filename are in their appropriate
string gadgets click on OK
and the file transfer will start. While file transfer is going
on a message box will appear and it will keep you apprised
of how the transfer is proceeding.
.
Transfer
Send File...
izls
Receive
E!lR
File.. .
Protocol
Kermit
)>
Options
XMODEM
External
Options
>>
))
Options...
File Transfer
Mode
)>
In general, in order to send a file to or from your host, a program has to be run at both ends.
These menu options only control what is happening at the Amiga end of the process. Never select
the Send File option before directing your host to prepare to receive a file. If you select the
Send File option first, you will not be able to get to your host to direct it to receive the file. In
that case, the file transfer will either spontaneously
abort or hang up.
NOTE: in order to abort a file transfer which has hung up (i.e. you see nothing happening
in the message window) hit the ESC key or click on CANCEL
ALL in the transfer status window
(see later). In the case of Kermit an abort signal is sent each time you hit the escape key and it
takes several such signals to abort a transaction.
After you have aborted a transaction
you should
hit return a few times to make sure you have either left the transfer program, or at least gotten
its attention.
In the latter case, you will have to type in some sort of quit command.
_
As you have to direct your host to send or receive a file before you tell the Amiga to receive
or send the file, you will need to learn how to run the file transfer protocol that you are using by
reading its documentation.
Receive
File performs the file transfer in the opposite direction,
Receive File
the mainframe
to the Amiga.
Once again this option controls what the Amiga does,
is going on on the mainframe.
Always tell the mainframe
to send the file before you
Amiga to receive the file. Again, to abort a transfer hit the ESC key (several times in
Kermit,
and not too fast) or click on CANCEL
ALL.
32
i.e. from
not what
direct the
a row for
Protocol
Protocol
is the menu item which allows you to choose the basic file transfer
protocol
to be used by the Send File and Receive
File commands.
When you select this
option you will be presented with a submenu displaying
seven options:
XMODEM,
Kermit,
ASCII,
CISQuickB,
ZMODEM,
YMODEM,
and Other.
Each option can be selected by
entering the indicated
alternate
keyboard
commands shown next to the subitem names.
VLT uses external file transfer protocols,
which are specially written
programs
in the form
of libraries on the Amiga.
These protocols may be written by anyone, but they must be written
according
to a special format
outlined
by the XPR specification.
VLT will recognize and use
any protocol
which fits this specification;
in fact, all file transfer protocols
in VLT are external,
including
those which pretend to be built-in,
such as Kermit
and XMODEM.
Kermit
transfer is the protocol of choice for sending files to and from the IBM mainframe.
If you use this protocol,
then you may set your various options using the Kermit
Options
item.
XMODEM
transfer is not available for transfer to and from the IBM; it can, however, be
If you select this protocol
then you have to set
used for transferring
files to and from VAXes.
your XMODEM
default parameters
using the XMODEM
Options
item.
All the other options come under the subheading of External.
ASCII,
CISQuickB,
ZMODEM,
and YMODEM
are the four currently
known external file transfer protocols other than
Kermit
and XMODEM.
While not explicitly
supported
(there is no ASCII Options menu option, for example),
they have been given their own submenu options.
The Other
option allows
you to access any external file protocol,
including
the ones mentioned
above. When you select
Other,
a file requester
appears, showing the names of available XPR libraries.
Give it the name
warning:
as we said before,
of the library containing
the protocol of your choice. An important
all file transfer protocols
supported
by VLT are in fact external.
You may notice xprkermit,
xprxmodem,
xprquickb,
xprascii,
and xprzmodem libraries listed in the file requester.
Do not
erase them. Without
them, VLT will not let you use these file transfer protocols,
not even if you
select them from the menu instead of from the external protocol requester.
Kermit
Options
When you select Kermit
Options
a submenu will appear. The first two
submenu options allow you to select which of Kermit’s
two modes you want it to run in. Selecting
the Send/Receive
option allows you to run in Send/Receive
mode. In Send/Receive
mode,
whenever you want to transfer a file, you first tell the mainframe
to run Kermit.
Then you
select either the Send File or the Receive
File option from VLT’s Transfer
Menu.
Selecting
the Host is Server
option allows you to run Kermit
in something
known as server mode. In
this mode, the mainframe
Kermit
is continuously
running,
which means that the Amiga can
control the entire file transfer from its end. As a matter of fact, the entire file transfer must be
controlled
from the Amiga, because Kermit,
when in server mode, blocks all keyboard
input to
the mainframe.
When you are running in server mode, selecting Receive
File will bring up a
requester requesting
the name of a file on the mainframe.
The third submenu option, Downcase
File Names,
tells VLT whether or not to automatically convert filenames on the mainframe
to lower case on the Amiga. A check next to this option
means the filenames are being converted to lower case; no check means that they are not.
If you are running
the mainframe
The fourth
option in the submenu
is Kermit
Bye.
Kermit
in server mode, you need Kermit
Bye in order to tell Kermit
that you want it to
terminate
itself and return control of the terminal
to you. Remember,
while Kermit
is in server
You should know, however, that with
mo.de all keyboard
input to the mainframe
is blocked.
many hosts, Kermit
Bye will also log you off the host.
The fifth option in the submenu is Kermit
Finish.
Kermit
Finish
like Kermit
Bye, except that it does not, under any known circumstances,
33
behaves a great deal
log you off the host
when it terminates
Kermit.
The sixth option in the submenu
Kermit transfers your file to or from
as packets.
Each packet is checked
computer tells the sending computer
this automatically,
so you don’t need
allows you to specify packet sire. What are packets? Well,
the mainframe
a piece at a time. These pieces are known
for errors; if an error is found in a packet, the receiving
to send the packet over again (the sending computer
does
to worry about it).
If you are using a modem and sending information
over a noisy telephone line, use short
packets. Noisy telephone lines tend to increase the number of errors and short packets minimize
the amount of information
that needs to be resent when an error is discovered. If you are using a
different setup and don’t tend to get many file transfer errors, go ahead and use long packets-the
file transfer will take somewhat less time. Some hosts don’t support long packets; in that case
choose a packet size of 94.
When you select Set Packet
Size, a string requester will
packet size in bytes. Enter the new packet size and hit return.
appear,
containing
the default
XMODEM
Choosing XMODEM
Options
brings up a submenu that allows
Options
you to choose file transfer packet size and the type of XMODEM
error checking to be used in file
transfers. Selecting the first option tells XMODEM
to use a simple check sum for error checking
and to use short packets for file transfer.
When the second choice is selected, XMODEM
uses
the same simple error checking but transfers packets which have a length of one kilobyte.
The
third and fourth choices call for a more complicated
form of error checking (CRC),
with the
third choice specifying short packets and the last choice specifying long packets. Again, use short
packets in situations where you may have many file transfer errors and long packets in situations
where you usually encounter very few file transfer errors.
External
Options
External
Options,
when selected, will bring up a requester that asks
you to enter options for the external protocol that you have selected. This option should only
be used when an external protocol other than Kermit
or XMODEM
has been selected. Each
external protocol has its own options requester; since these requesters are always documented
along with the protocol, we will not discuss them here.
File Transfer
Mode
the way in which
binary
Selecting File
files are transferred.
Transfer
Mode
brings
up a submenu
that
controls
The first option, Binary,
is only selected when a binary file is being transferred
(examples
of binary files are executable programs and graphics files on either the mainframe
or the Amiga).
In order to carry out a binary file transfer you have to set up both the mainframe
and Amiga
properly.
Let us take as an example a binary file transfer from the Amiga to an IBM mainframe.
Then
First go to the Transfer
Menu and select Binary
set up the IBM mainframe
Kermit
by typing
from the File
Transfer
Mode
submenu.
KERMIT
and then wait for the prompt
to appear,
at which
point
type
SET FILE BINARY
and
RECEIVE filename
filetype
filemode
Note: Don’t make the mistake of taking this command literally.
You’re supposed to type
in RECEIVE, a filename-such
as foo-a filetype-such
as xofsimp-and
a filemode-that’s
the
mini-disk
where the file is stored, such as a.
34
When the screen clears you are ready to go to the menu and select Send File. When the
file transfer completes you have to leave Kermit
by hitting RETURN
once or twice to get its
attention
and then type
CjUIT
To get a binary file from the IBM
you give the IBM the command
SEND filename
filetype
after setting the file to be binary,
to the Amiga
you proceed
filemode
and you select the Receive
When transferring
a text file, choose the Text option.
be stored in slightly different ways. If you transferred
a text
you might end up with some peculiar-looking
characters in
translates between text file formats so that the transferred
characters.
To verify that this option is switched on, look
item on the submenu.
The
Transfer
Status
in the same way except
File
option
that
on the Amiga.
On different computers, text files can
file with the Binary
option selected,
the transferred
file. The Text option
text file doesn’t contain these funny
for a check mark to the left of this
Window
Whenever you send or receive a file, the transfer status window comes up. This window
has several gadgets. When you click on the CANCEL
ALL gadget, VLT attempts to shut down
When you click on the CANCEL
FILE gadget,
any and all file transfers as soon as possible.
in a multi-file
transfer, the file transfer
VLT attempts
to abort only the current file transfer;
currently
in p?ogress would be aborted and VLT would start sending or receiving the next file
to be transferred.
You can also abort a file transfer by typing [Esc], but only if the transfer
status window is active. Clicking on the third gadget, SHOW WORKBENCH,
puts VLT behind
all other screens or windows and brings the Workbench
to the front. Typing a character in the
status window after a transfer is completed causes the window to close and the character to be
sent on to the host.
The Script
Menu
You can program VLT to perform highly specialized operations
on two levels. At a lower
level, you can write scripts in VLT’s own simple command language. On a higher level, you can
combine this simple command language with the more powerful AmigaREXX.
These scripts can
be executed by using the ARexx
Macro
and VLT Script
menu options or by assigning one of
128 programmable
keyboard sequences to call and execute the script file.
When you select this menu option the
ARexx
Macro
file requester appears and displays all files found in the appropriate search path with the file extension
.vlt.
To execute
one of these files double-click
on its name, or single-click on
its name and then click on the OK gadget. A brief explanation of ARexx scripts will be given in the next chapter, which
is an introduction
to writing scripts.
I
I
VLT
Abort
Script...
Em
All Scripts
Remove All Traps
There is a set of commands which VLT
I
understands
and which can be used to write VLT scripts.
When these scripts are saved as files, they should have the file extension
.scp.
Examples of
script files will appear in the next chapter. The file requester which appears when you select this
menu option automatically
assumes that these files will be found in a certain set of directories
VLT
Script
35
(see Getting
Started:
VLT’s
Method
of Searching
Paths);
you can, however, direct the
requester to look in other directories for your file. Again, to execute one of these files, double-click
on its name, or single-click on its name and then click on the OK gadget.
The difference between ARexx scripts-macros-and
VLT script files is that ARexx is a
more powerful language.
Furthermore,
while ARexx macros can be called from VLT and can
send directions to VLT, the macro itself runs independently
of VLT. ARexx macros have great
flexibility
and power; you can write ARexx macros to go through a specific logon sequence or
to handle, at both ends, a file transfer between the Amiga and a mainframe,
preparing
the
mainframe
to receive/send
the file at the same time as it directs VLT to send/receive
it. VLT
scripts, on the other hand, have only limited capabilities
and run under the control of the VLT
program itself.
Abort
All Scripts
Since ARexx macros run independently
of VLT, they do not interfere
with its operation;
when they abort, the error messages are usually sent to an Amiga CLI. Since
VLT scripts run under VLT’s control, you need a way to abort a script once it has started, and
selecting Abort
All Scripts
accomplishes
this. As of VLT version 5.045, a new convention
allows you to a create an “uninterruptable”
script, which would be invulnerable
to the Abort
All Scripts
option (see Writing
Scripts
for more details).
Note: If yozl select Abort
All
Scripts
when a VLT script command has been sent to VLT by an ARexx macro and that script
command is still pending, VLT will abort the script command and try to abort the ARexx macro
as well.
Remove
There is a set of VLT script commands known as ‘traps’: the wait
A_11Traps
command,
the on command,
and the trap command.
These ‘trap’ commands
tell the script
to wait for a certain set of characters to be sent from the mainframe
before executing the next
script clause. Sometimes,
however, one of these ‘traps’ will be hanging around waiting for the
mainframe
to send it the right set of characters when you don’t want it hanging around and
waiting at all. Remove
All Traps basically aborts all wait, on, or trap commands.
The Screen Menu
The menu options provided in the Screen Menu are concerned with setting various properties of the text screen. You should know that, in addition to being able to open multiple windows
on the Workbench
screen, the Amiga supports the concept of multiple custom screens. Following
the desktop metaphor you can think of the screen as the desktop and the windows, which belong
to a given screen, as pieces of paper, or file folders, which can be placed anywhere on a given
desktop but which cannot be moved from one desk to another. Multiple
windows can be opened
on a given screen; when a window is opened, we are looking inside a given folder.
Although
windows have different contents, all of the windows which open on a given screen
share certain display characteristics.
For example, all windows on a given screen have the same
number of colors available to them.
All windows which open on the Workbench
screen, for
instance, use the same four, eight, or sixteen colors, depending
the version number of your
operating system: In addition, changing the characteristics
of a screen changes the characteristics
of its associated windows.
For example, if you change a screen from non-interlace
to interlace
mode, then all the windows which open on it will also be in interlace mode.
* Under 1.3, the Workbench
Screen (this is the screen which you see when you first boot) can
.display only four colors. You can use the Preferences tool to set these four colors to be any
four chosen out of a palette of 4096 possible colors.
36
Screens and windows differ in a very important
way. In general, most windows can be resized
and moved around on their screen by using the mouse to grab their drag and resizing gadgets.
Screens don’t have close gadgets (they open and close only under the control of a program)
and
they cannot be resized. Also, screens must occupy the full width of the display, although they
can slide up and down to reveal anything which lies behind them. Thus, like windows, screens
can overlap one another and also, like windows, they can have front-to-back
gadgets. In other
words, if a screen has a drag bar at the top you can grab it with a mouse and slide it down to
reveal a screen in back of it, or you can click on its front-to-back
gadget to place it in back of
any other screen which is open; however you cannot move it to the right or left. If there are
back-to-front
gadgets on the screen they will be located in the top right-hand
corner of the drag
bar.
VLT allows you to open both the text and graphics windows either on the Workbench
screen,
screen then your Workbench
. or on separate custom screens. If you open on the Workbench
windows can be moved in front of the terminal window. This can be very useful if, for example,
you wish to shrink a CLI or application
window to a small size and keep an eye on what is going
on in that window while you are doing something on the mainframe.
It does, however, clutter up
the Workbench
with one more window. If you open VLT on a custom screen then you can have
up to eight colors on the text screen (to provide for full color highlighting
by the mainframe)
and
up to sixteen colors on the graphics screen. You can also set all the colors for that screen while
you are running the program and save these values to your configuration
files.
VLT provides menu options which allow you to change your current screen characteristics.
Also,
since the VLT-custom
screen opens without a drag bar, front-to-back
gadgets, close gadgets, etc.,
in order to be able to display the maximum
number of lines, VLT provides keyboard and menu
options to control the positioning
of the VLT screen relative to the Workbench
screen.
The Clear
Screen command does
Clear Screen
just what it says, it clears the screen (without
informing
the mainframe).
Refresh
Screen
The Refresh
redraws the VLT screen. Since it uses
to do so, however, the text on the
‘monochrome’
(see View History
In
Screen
Screen command
the history buffer
restored screen is
Detail).
to Back
The Screen to Back command
does different things depending upon whether the VLT
text window is on the Workbench
screen or a custom
screen. If you are on the Workbench
screen then it simply puts the VLT text window behind all other windows
on the Workbench
screen. If you have VLT opened on a
custom screen, this command will move VLT’s screen in
back of the Workbench
screen.
You select the Select Screen
Select Screen Type
Type item in order to change the current status of the
VLT text window and move it to and from the Workbench screen. When you select this item a submenu appears with the following choices: Custom,
Workbench,
Interlaced
and Non-Interlaced.
If you select Workbench then the text window will be opened on the Workbench screen. In that case it inherits the number of col37
Screen
Clear Screen
Refresh
E!l‘
Screen
Screen to Back
@lJ
Select Screen Type
)>
Number
))
of Colors
Select Colors.. .
EilL
Number
of Lines...
IXIL
Number
of Columns.
..
ml2
Select Fonts.. .
Special
Keymap..
Scrolling
Cursor
.
Speed.. .
height. . .
Rendering
Mode
Close Screen
))
ors and display characteristics
of the Workbench screen and the Interlaced
and Non-Interlaced
options will do nothing
(if Workbench
is currently
in Interlace
mode, then VLT will be in
Interlaced
mode, if Workbench
is currently
in Non-Interlaced
mode, then VLT will be in
Non-Interlaced
mode). If you select Custom
then VLT opens a custom screen, independent
of the Workbench
screen, for the text window, and you may then choose this screen to be either
interlaced or non-interlaced.
Number
The Number
of Colors option allows
of Colors
colors that can be displayed on the terminal text screen. Since the
be displayed on a Workbench
screen is fixed, this option only works
your Screen Type to be Custom.
If you are on a custom screen
using 2, 4 or 8 colors on your text screen.
you to select the number of
number of colors which can
if you have already selected
then you have the option of
When you choose the Select Colors
option, a palette requester appears
Select Colors
on your screen. This gadget works just like the one in Workbench
preferences and allows you to
interactively
change the colors on your screen by moving the sliders with the mouse. To change
a color click on the square showing that color and then move the R (red), G (green) and B (blue)
sliders until you get the color you want. If, for example, the red slider is moved all the way to
the left than there will be no red in the color that you are making; if, on the other hand, the red
slider is all the way to the right, then you will have added the maximum
amount of red to the
color.
Number
of Lines
There will probably be commands specific to your host that allow you
to alter the number of lines of text that are displayed on your terminal screen. If the number of
lines to be displayed is too large, VLT will do its best to display as many as it can. You may,
however, wish to change the number of lines to be displayed without
relying upon your host to
When you do this, a string requester will
do it for you. In this case select this menu option.
appear and the number of lines which are currently
being displayed will be shown in the string
gadget. Simply modify this number and hit RETURN;
the new default number of lines will be
established.
If you choose too large a number of lines, VLT will display as many lines as possible.
VLT in principle
allows you to set the screen to display any
Number
of Columns
number of columns (each column has a width of one character).
The limitations
upon what can
actually be displayed are the size of the screen and the size of the font being used. VLT can
screen; otherwise,
VLT can display a
display a maximum
of 140 columns on an “overscanned”
maximum
of 128 columns. You can also use the Number
of Columns
setting to affect where
the text appears in the VLT window.
If you use 80 columns, then it will be roughly centered;
if you use a setting higher than 80-85,
for example-it
will be moved to the left on the screen.
Note that for some applications
on your host, 80 columns may be required, so check with a local
expert. The procedure for setting the number of columns is the same procedure used for setting
If you specify too large a number of
the number of lines with the Number
of Lines option.
columns, VLT will display as many columns as it can using the smallest font available. Note: On
the Workbench, extra room is taken up by the window borders, so the number of columns that fit
using a certain font on the Workbench may not be the same as the number that fits on a custom
screen. If this is the case, you will notice that VLT uses the small font.
The Select Fonts option allows you to select your favorite font for use with
Select Fonts
VLT. To use a font with VLT, the font must exist in both eight and eleven point tall forms, must
have an eight point width, and must be monospaced.
VLT checks the font you specify for these
attributes
and won’t load your font if it doesn’t conform.
When
under
you select this option, a special font requester will appear (or a string requester
1.3); select the font you want to use and either hit return or select Okay.
38
if you are
The Special
Keymap
option, by using a special keymap, allows you
Special Keymap
to completely
customize your keymap setup without
rewriting
your entire keymap.
The special
keymap should consist mainly of NULL entries; where the entry is not a NULL,
VLT will use
that entry instead of the corresponding
entry in the default keymap (Note: default keymaps are
country specific). These entries can be strings, and if these strings begin with a - or a -@, they
will be treated as if they were function keys; that is, they will execute commands
or scripts. You
do need a keymap editor to create the special keymap, however; the one we would recommend
is
KeymapEd,
which is widely available on fish disks and bulletin
board systems.
The Scrolling
Speed option is of interest primarily
to users who want
Scrolling
Speed
to use VLT in scrolling mode and want it to scroll as fast as possible. Since scrolling the screen
is a fairly time consuming
process, listing files with many short lines may be slow and tedious if
VLT scrolls only one line at a time. VLT’s solution is to look ahead in the text that came from
the mainframe;
if there are many carriage returns, VLT simply scrolls a number of lines in one
step. Scrolling
Speed determines
the maximum
number of lines which will be scrolled at once.
We have found 8 to be a number which provides fairly smooth scrolling without
sacrificing
much
in the way of speed. Setting the prescroll variable proceeds in exactly the same way as setting
the number of lines, or the number of columns.
If you set the scrolling speed to be a negative
number,
like -2, then VLT will scroll that number of pixels at a time (this is called smooth
scrolling).
Note: Even numbers work better when your screen is in Interlace
mode.
The Cursor
Height
option allows you to set the ‘height’ of your cursor,
Cursor
Height
that is, make it thinner or thicker in the vertical direction.
When you select the Cursor
Height
option, a string requester will appear and the present height in pixels of the cursor will be shown
in the string gadget. Modify this number and hit RETURN
to establish the new cursor height.
If you set the cursor height to zero pixels, your cursor will disappear altogether.
Furthermore,
if
you’set the cursor height greater than or equal to eight, the cursor size will always be equal to
the height of the font.
Rendering
The Rendering
Mode
option allows you to affect the way in which
Mode
VLT handles special text modes (italics, boldface,
reverse video, etc.)
as it is sent from the
mainframe.
If you select a custom, eight color screen and select the Color
option from the
Rendering
Mode submenu, then bold, underlined,
reverse video and italic text will be displayed
in different colors. If you select the Normal
option, then normal text will be displayed
in one
color, boldfaced
text will be displayed in another color, and reverse video and italic text will be
displayed as is. If you select the Quick option, then instead of displaying
boldfaced
material
in
a different color it will be displayed in bold face type, and reverse video, italic, and underlined
text will also be displayed as is. This mode is provided in order to speed up scrolling still further,
since in this mode text is being rendered only onto what is effectively
a two color screen. This
option, together
with a prescroll
setting of 8, is sufficient
to provide scrolling
which keeps up
at 9600 baud on a standard
Amiga.
A further speed increase can be gained by using no more
mode, the
than four colors on your text screen. Finally, if you prefer to live in non-interlaced
text update speed (scrolling
speed) is increased by another factor of two. If you select the last
option, Ansi Color
mode, special color escape sequences for foreground
and background
colors
are recognized;
Ansi Color
mode, unlike the other three options, is not a mode in and of itself,
rather, it is an optional
addition
to Color
mode.
The Close
Screen
option closes down VLT’s screen, checking before it
Close Screen
does so that the screen is not locked. While the screen is closed, VLT will continue to interpret
incoming
data: the review buffer is updated and escape sequences from the host, including
those
containing
Amiga commands,
will continue to work normally.
As a result, if you reopen the
screen at a later time, you will see the most recent data received by VLT.
39
To reopen the screen, simply run VLT again-the
already there-or
send an ARexx message with
screen again.
The Operation
screen will open with the message that VLT is
the command window open, which opens VLT’s
Menu
The Operation
Menu controls some of the terminal’s
display
way in which keys on the keypad behave. It also controls whether
beep.
characteristics
as well as the
you get an audible or visual
Wrap
Wrap
controls whether or not the terminal
automatically
handles wrapping
at the
end of a line. Wrapping
text is needed when a word runs over the end of a line; instead of
ignoring all further characters, VLT will start on a new line. The default setting is off, as your
host usually takes care of this for you. Note: With Wrap
set to be on, you can wrap buck to the
end of the previous line when using or-row keys and/or the backspace key.
Key Repeat
Key Repeat
allows you to set your
keys to automatically
repeat when you hold them down.
A check by this option means that key repeat is on, no
check means that it is off.
Numeric
Keypad
Ordinarily
the numeric keypad is set up- to operate in function
key mode-that
is, instead of behaving like ordinary
keys do, they direct VLT or the host to do special things, like quit, or
send a file, or clear the screen, etc.. On the VAX the
keypad is used in the same manner as it is used on a
VTlOO. When logged onto the IBM, the keypad is used
to access the 24 PFkeys available on various terminals
used with the IBM mainframes,
such as the Ambassador, IBM 3270, etc.. To use the numeric keypad so
that unshifted characters provide numbers and symbols,
select the Numeric
Keypad
option.
Operation
Wrap
mw
Key Repeat
Numeric
Keypad
Application
Swap BS<
Destructive
Cursor
- >Delete
m
BS
Help Key = LF
Shift-Tab
= ESC TAB
Function
Key Gadgets
@lp
CR Key: Echo CR/LF
The Application
Cursor feature is there in order to give the user control
CR Key: Send CR/LF
over the way in which the cursor keys (the ones with
Display CR as CR/LF
arrows on them arranged in a T between the alphabetic
and numeric keypad) operate. When the Application
Display LF as CR/LF
Cursor
option is deselected, these keys behave as exAuto-Screen
to Back
pected on an IBM mainframe:
up-arrow
is up, downarrow is down, right-arrow
moves right, and left-arrow
Mouse Support.. .
El\
moves left.
When you are dealing with a VAX, you
Beep Volume...
would normally leave this option deselected, since VAX
editors will set these keys as necessary. When dealing
with other hosts, you will have to consult with host help
files or a local expert to find out whether or not you need to reprogram
these keys. These cursor
keys are often referred to as arrow keys.
Application
Swap
Cursor
BS< - >Delete
who wish to interchange
key with the arrow just
Swap BS< - >Delete
the function of the backspace
to the left of the delete key).
40
is provided as a courtesy to VAX users
and delete key (the backspace key is the
Destructive
Destructive
BS makes the backspace key destructive;
in other words,
BS
after selecting this option, when you backspace using this key, it erases the text it backspaces over
character
by character.
Selecting this option also affects the behavior
of backspace characters
received from the host.
Since the Amiga keyboard does not provide a labelled linefeed (LF) key,
Help Key = LF
VLT allows the user, if he so desires, to program the Help key to perform this function.
Selecting
the same function
as
the Help
Key = LF option allows you to use the Help key to perform
the LF key on a VTlOO.
Note: the Amiga 1000 has a diflerent
numeric keypad layout from the
users, the help key has the sume function
as
500’s, 2000’s, and 3000’s. As a result, for Al000
the numeric
keypad + key on Amiga 500/2000/3000’s,
unless the Help
Key = LF option is
selected. If you own an Amiga 1000, you cun program the function
keys 1 through 4 to play the
numeric keypad (VT100
PFl through PF4).
role of the top four keys on the A500/2000/3000
is selected, the shifted TAB
= ESC TAB
When Shift-Tab
= ESC TAB
Shift-Tab
key (the one with the two arrows at the left hand side of the keyboard,
just above the Ctrl
and Caps Lock keys) will send the sequence ESC TAB to the mainframe.
For SLAC VM, this
effectively
means back tab. When not selected, the shifted TAB key behaves like an unshifted
TAB key.
Function
Key
Gadgets
function
key gadgets
a greater area, VLT
are working with the
them back on screen,
CR
Key:
Since some users would prefer not to have the mouse operated
on the screen, and would rather spread a large number of lines of text over
provides an option which turns the function
key gadgets on or off. If you
function
key gadgets turned off, selecting Function
Key Gadgets
brings
and vice versa.
Echo. CR/LF
Echo CR/LF
tells VLT to display
will not be sent to the host.
CR
Key:
Send
and linefeed
CR/LF
(as opposed
to just
When you have set the Echo option to be on, the CR Key:
an extra linefeed after every line you type. The extra linefeed
when ON, sends a carriage
CR Key:
Send CR/LF,
a carriage return) to the host every time you hit return.
return
Display
Display
CR as CR/LF
causes VLT to display a carriage reCR as CR/LF
turn received from the host as a carriage return and linefeed. Some hosts-Macintosh
computers,
for instance-will
only send back a carriage return without
a linefeed.
This can be a problem,
because without
the linefeed, the host will overwrite
part of the text that it has just sent you.
By selecting Display
CR as CR/LF,
you eliminate
this difficulty.
Display
LF as CR/LF
is needed because of the Fifo Pipes
Display
LF as CR/LF
option described earlier. When you connect to another Amiga, you usually get linefeed characters
to signal the end of a line. Setting Display
LF as CR/LF
ensures that VLT will display a
carriage return as well as a linefeed.
Auto
Screen
to Back
bench screen to the front
Mouse
Support
During file transfers, Auto-Screen
and displays the status window.
The Mouse
Support
option
Beep
is discussed
to Back
in detail
brings
later
the Work-
in the chapter.
Unless you are using the commodore
1080 or 1084 monitor,
it is unlikely
Volume
that the monitor
you are using has a built-in
speaker, so you will either have to go out and
purchase a small speaker with a built-in
amplifier
or hook up the Amiga to your stereo in order
to get an audible beep. If you have a speaker available you can set the volume of the beep by
selecting this item and typing a number from 1 to 64 in the string gadget which appears (1 is low
volume, 64 is high volume).
Using negative numbers (-1 to -64) will provide you with a somewhat
higher-pitched
beep. If you do not have a speaker available, then setting this number to zero will
41
provide
you with
a visual
beep; i.e., the screen will flash instead.
In addition,
this option is programmable
using Program
Mode.
Entering
a standard
VLT
command
string in the programming
requester will cause that command
to be executed in
lieu of sounding the VLT bell. A common command
is -rx “address
‘PingServer’
BEEP”,
which causes the BEEP command to sent to the “PingServer”
(See the documentation
for the
“PingServer”
program).
You can also reprogram the Beep Volume
option using the BEEPFunction script command.
User Menu
There are ten options in the User Menu, each indicated by their keyboard
abbreviations
(a
n where n stands for a number from 0 to 9). Selecting
one of these options is equivalent to entering the listed keyboard sequence,
which can be programmed
using Program
Mode to perform a special operation of your choice. The program can consist of a VLT script command,
a command
that calls a VLT or ARexx script, or an ARexx command
(prefaced by a - and the rx command).
I
An especially nice feature of the User Menu is the ability to add explicatory taglines to its various options.
To do this, go into Program
Mode
and select the option to which you want to add a tagline. When the program string requester appears, add the desired tagline as a comment string
(preface it by a few spaces and the character #) just following the program
string.
The G raphics
User
El5
Q6
lxl7
Menu
Both of the commands
in this Graphics
Menu
deal with the
graphics screen, a special window or screen that is used to display graphics.
The To Graphics
command
is basically selfexplanatory,
as it puts you on the graphics screen. If this screen
is not already open, this command
will open the screen, then
switch you to it.
To understand
the Lock Graphics
command, you have to know that VLT supports a set
of special characters and escape sequences which the mainframe
can send in order to switch you
to the graphics screen for subsequent output.
It also supports a second set of sequences which
switch you back to the text screen. Unfortunately,
if you are on a noisy line, or if, while you
are logged on the host, you leave your terminal for a long time, VLT may receive some kind of
garbage which will throw you onto the graphics screen. Selecting the Lock Graphics
option
prevents you from being thrown onto the graphics screen by accident, because VLT disables the
escape sequences which throw you onto the graphics screen.
This completes a discussion of the text
certain important
menu options in detail.
menus
42
themselves.
The following
sections
discuss
Fifo Pipes
Before
f if o . library
and install
in Detail
we begin, please note that Fifo Pipes
won’t work unless you have Matt Dillon’s
and fifo-handler.
So before you use this option, you need to obtain these programs
them.
So what are Fifo Pipes? They’re
basically input/output
control alternatives
to the serial
port; as such, they are very useful. There are two types of Fifo Pipes in VLT: local and remote.
The local pipes are called (VLT-name)L
and the remote pipes are called (VLT-name)R.
Since
VLT by default is called VLT, the default pipe names are VLTL
and VLTR.
Both VLTL
and
VLTR consist of two pipes each: one to handle input and one to handle output.
What do the Fifo Pipes do? You can use them to hook up to a CL1 on your Amiga while
VLT is running
(especially
useful when you want to preview a Tektronix
file), or to set up a
primitive
bulletin-board
service and hook up to another Amiga.
Hooking
up to a CL1
To use Fifo Pipes to hook up with
commands.
a CL1 from
neucli
f ifo:VLTL/rukecs
(you can use newwsh,
run VLT (if VLT isn’t already running)
VLT,
go to your
etc. instead
Then set VLT to no echo, close the serial device
set the Display
LF as CR/LF
option to be on (you
Menu;
it causes incoming
linefeeds to be displayed
Pipes on using the menu option Fifo Pipes.
You
VLT’s screen. Type any command,
such as dir, cd,
on VLT’s screen.
CL1 and issue the following
of newcli)
(see the Communications
Menu),
and
will find that last option in the Operation
as returns plus linefeeds).
Switch the Fifo
should see the cli/shell
prompt
appear on
info, etc. and the response should appear
While hooked up to the CLI, you can preview any Tektronix
files you happen to have lying
around on the Amiga. This only works, of course, if you’re using VLT, not VLTjr,
and you have
switched Graphics
Lock off (see the Graphics
Menu
later on). To preview a file, hook up to
the CL1 and issue the command
type
(filename)
VLT will automatically
by the Tektronix
file.
Tektronix files, but an
Load From
Archive
switch you to the graphics screen and begin drawing the picture encoded
Note: Any files that you have saved from VLT in graphics mode are not
You can, however, still view such files using the
internal
binary form.
option of the Image
Menu.
You can also use Fifo Pipes to gain access to a remote
Amiga.
Here’s
how to go about
1. Take the two Amigas and hook the serial ports together using a null modem.
hookup procedure
outlined
earlier on the remote Amiga, substituting
VLTR
VLTL.
it:
Use the CL1
(remote)
for
2. Now, run a “normal”
VLT on the local Amiga, but use no echo, and set Display
CR/LF
to be on. Do not close the serial device.
LF
as
You should now see the CL1 prompt on your local Amiga, but the CL1 will be running on the
remote Amiga. This procedure will also work if you hook up to the remote Amiga with a modem.
VLT
their
as a BBS
Of course, it is a little dangerous to let someone
Amiga, because such a person could do whatever
43
hook up to the CL1 of your Amiga from
he or she liked to your system, including
erasing all your files. So included with VLT is a little BBS program, Fif oBBS . rexx, which, along
with VLT and Fifo Pipes, can be used to set up a bulletin board service. Using this BBS, you
can give remote Amigas access to your Amiga, but you can also control who has that access and
what kind of commands they can give.
To install this bulletin board service, first create a directory somewhere and assign Fif oBBS :
to it. FifoBBS will do the rest. To run the program, go to your CL1 and type FifoBBS
with
either the remote or local
argument.
When invoked without arguments, a fake BBS will be run
from the current CLI. When invoked with the local
argument,
the BBS will run with a local
VLT, bypassing the serial port. Use this argument when you want to log into the BBS from the
Amiga on which it is running.
In neither of these cases will the FifoBBS commands UPLOAD
or
DOWNLOAD
work. When invoked with the remote argument, the BBS will run as a real BBS,
through the serial port, and people can dial in from the outside.
When
FifoBBS
is run for the first time, there will be only one account: that of SYSOP. Hit
Username:
prompt.
Log in as SYSOP and change your password.
When you are logged on, hit return to see the list of supported
commands.
The commands
prefaced by an asterisk can only be used by SYSOP. Now log on as someone else by logging on as
NEW, and register. Then try logging on again; you will find that you are not yet validated.
Log
on as SYSOP, and use the VALIDATE
command to change the access code of the new user from
2 to 3. The new user can now log on but does not have access to the commands prefaced by an
asterisk. However, as SYSOP ( or if you have access code 5 or larger) you can use the “SYSTEM”
command.
This will bring you to a $ prompt, from which you can type any system command
(dir, cd, list, info, avail, anything
that produces text output).
You can even run Ed! (That’s
the editor that comes with the Amiga, and you can do this only under AmigaDOS
2.0 with the
WINDOW
* and WIDTH
and HEIGHT
settings).
There are some programs
(like More) that
should work but don’t. You can type return
to get back into the BBS system.
return to get to the FifoBBS
FifoBBS currently
has a single listings section, a single message section, and private mail
between everybody.
It detects the “NO CARRIER”
string sent by the modem, and if that string
is present will log the current user off, so that the next user can’t intrude on someone else’s
account.
Capture
To Fifo:
You can capture files to the Fifo Pipes by using the Capture
Session option of the VLT
file
Menu
and capturing
to the device f if 0:. When doing so, it is wise to use unbuffered
transfer. Since file transfer is normally buffered, you will need to switch the buffering off. See the
Scripts:Quick
Reference
Section)
for
discussion of the MSCFlags option (found in Writing
an explanation
of how to switch off buffering of file transfers; you can also use the ARexx macro
SetHiscFlags . vlt, discussed in Appendix
F.
The Console
W indow
In Detail
Selecting the Open
Console
item opens a console window at the bottom of the screen.
text, typed in the console window, will be
This console functions
in two ways. First, ordinary
sent through VLT to the host as a command after you hit return.
This is useful because VLT
itself, when you are logged on to’s mainframe
or network, provides only those command
line
features present on the host. The console window, however, acts as an intermediary,
giving the
user the advantages of an AMIGA
CL1 window even when issuing commands to the host. More
specifically,
the console window provides command history and editing, which means that the
user, using the up-arrow and down-arrow
keys, can range through the commands recently entered
in the CL1 until he finds the command he wants to use. The user can then, using the right- and
44
left-arrow
keys, the delete key, and the backspace key, edit the command:
Command history and
editing are particularly
advantageous
when the user wants to issue a series of commands which
are basically alike except for one or two small differences.
Using the up-arrow key, the user can
bring the most recent command to the screen, modify it, and hit return, without
having to type
the entire command again.
The console window has a second usage; by prefixing the command with the VLT key script
character, which defaults to -, the user can write, in the console, short VLT scripts that will be
executed when he or she hits return (see Writing
Scripts).
While it pays to use this option for
short, “quickie” scripts, if you are writing longer scripts, it is easier to use the methods outlined
in Chapter 4. The console can also serve as the output window for tracing information
when
debugging scripts (see Writing
Scripts).
The console window does have some drawbacks; for instance, it is line-oriented.
In addition,
it only functions
under certain setups. Those running under AmigaDOS
1.3, unless they have
WShell 2.0, must install ConMan
1.3e in order to use the console window.
Under AmigaDOS
2.04 you can use the console handler that comes with the system, ConMan, or WShell 2.0, but
you will need WShell 2.0 if you want to use the VLT-ConsoleMenus
file in s/ (please note that
the console menus only work under AmigaDOS
2.04).
Programming
the
Open
Console
Option
Selecting the Open Console
item under Program
Mode lets you specify the console string
you would like VLT to use when it opens the console. Editing this string is especially useful if
you want to use CNC: instead of CON: to power the console window (which is likely the case if you
are using AmigaDOS
2.0 and don’t want to run ConMan in your startup sequence. Note that
you will also have to add a mountlist
entry for CNC: if it isn’t already in the devs:mountlist
file,
and.that
you will have to add a mount CNC: statement
in your s:user-startup
file. For the full
scoop on this, see the ConMan documentation).
Your
default
command
string
probably
looks like
CON:%d/%d/%d/'/,/VLTConsole/c
unless you are a long-time
case your command string
VLT user who worked
probably looks like
and/or
works
under
AmigaDOS
1.3, in which
CON:S*/%d/%d/yd/d/%d/VLTConsole/c
The second form
under AmigaDOS
is only needed for those dependent
2.04 for use with both the normal
on ConMan 1.3e; the first form is preferred
Amiga console-handler
and WShell 2.0.
If you only want to use CNC: instead of CON:, just change CON: to CNC: in the console string,
hit return and save the configuration.
If you also don’t like the position and size of the console
window as it comes up by default, you can replace the %d's in the above by x-position,
y-position,
width and height, respectively.
Otherwise they will be filled in by VLT with the default values,
which are saved in the configuration
file.
View
History
in Detail
The View History
option uses the History Buffer, also called the review buffer. The History
Buffer is an area in memory that stores the text that the host sends to VLT; the size of the area
can be specified by the user. Whenever the buffer becomes full, the oldest parts of the text “scroll
t The console recognizes all editing keys recognized
handler’s documentation
for further details.
45
by your console-handler.
See your console-
off the top,” i.e. are lost. The buffer operates in a slightly different manner depending on which
kind of host VLT is dealing with. Line oriented hosts such as VAXes and BBSes ususally send
lines of text followed by a return character.
With these hosts, the review buffer simply appends
the new lines of text to the bottom of the buffer as they come in, discarding
lines if necessary
from the top of the buffer. On the other hand, with page oriented hosts, such as IBM mainframes
running VM/CMS,
the buffer keeps a record of what is on each page, scrolling a page at a time.
Page oriented hosts present the buffer with a problem; this problem will be explained in detail
later in this section, when the New Page option of the Buffer menu is discussed.
An important
thing to remember is that the review buffer tries to keep track of all text
it appears on the screen. Text must appear on the screen to appear in the review buffer.
as
The history buffer does not remember
the color of any text or if the text used graphics
fonts. Since the history buffer is also used to restore VLT’s screen contents when you change
the number of lines or columns, refresh the screen, or change the properties
of the screen (e.g,
changing from two to four colors, or from interlace to non-interlace
mode), the restored screen
will be “monochrome”
and may look peculiar in places if the original contents used any of the
graphics fonts. This can be fixed, however, by directing the host to redraw the screen. On the
IBM, this may be accomplished
by hitting the ‘Enter’ key on the numeric keypad.
When you save your configuration
(Save Configuration
option, VLT
size of the history buffer is also saved, as well as the dimension and location
display window (known as the review window) when it was last opened.
Menu)
the current
of the history buffer
If you want to take material from the review buffer and send it back to the host, you should
select it, copy it to the clipboard,
and then use the Paste facility (see the Paste Menu)
to paste
the clipboard
contents into VLT.
Review
Window
Menus
The Clear command clears the buffer, wiping out
Clear
all the contents.
Don’t use this command unless you want
to get rid of everything
in the buffer.
Save,
Save As
The Save As command saves all selected (see the Select Menu explanation)
lines to a file you
specify. This command brings up a file requester in which
you specify the file you want to save to. If the file already
exists, clicking on the Okay button will bring up a second
requester.
This requester informs you that the file already
exists and asks if you wish to append the new material (tack
it on to the end of the file), overwrite the old file, or cancel
the whole operation.
The Save command saves all selected
lines to the file specified in the most recent Save As command. This overwrites
what was previously in that file.
Save to
When you select
Clipboard
Clipboard
option, all selected lines within the
are saved to the Amiga clipboard.
If you then
Wo.rkbench and enter your favorite editor, you
editor’s text.
Append,
history
Append
window
Append
To
to the end of an already
Buffer
Clear
Save
lxlw
Save As
BIA
Save to Clipboard
lzlc
Append
mz
Append
To...
El0
Yew Page
E!lp
Buffer Size
BIB
the Save to
&it
review buffer
return to the
can insert the contents
IZIQ
of the clipboard
into the
To allows you to append all selected material
in the
existing file. Selecting this option brings up a file re-
46
quester.
Choose the file to which
The Append
To or Save
command appends
As command.
you wish to append
and hit return.
all selected lines to the file specified
in the most recent Append
New Page
The New Page command, which is for use with page-oriented
hosts, tells the
history buffer to start a new page. This command is important
because of the way the History
Buffer operates on page-oriented
hosts. While the most recent screen, or ‘page,’ will appear in
the review window, the contents of this most recent page can, unlike all the other pages in the
buffer, be overwritten.
That is, the last page in the buffer reflects all alterations
that occur on
the terminal screen, including the erasure of text. VLT recognizes full screen erasures as the start
erases the screen
of a new page, but not partial erasures of the screen. Since the host partially
all the time to make room for new text, this means that some of the screen contents, if the user
is not careful, will disappear from the buffer and be lost. The only way to avoid this is to inform
either the host or VLT that a new page has been started. There are two ways to do this; first, by
directing the host to redraw or erase the screen, signifying the start of a new page, or by using
the New Page option in the VLT
Menu.
Buffer
Size allows you to resize the review buffer.
When you select this
Buffer
Size
option, a string requester will appear, asking for the new buffer size in bytes. The default value
will already be displayed in the requester. Replace it with your new value.
Quit
Closes the review
window.
Select All
The Select
All command selects all lines in
the buffer. Since only selected lines can be saved to a file, this
command is useful when you wish to save the contents of the
entire buffer. Selected lines are highlighted.
Deselect
All
The Deselect
All command
selected lines in the buffer to become unselected.
Invert
causes all the
Select
Select All
Deselect
Invert
CZIS
All
ECID
Selection
@II
Selection
The Invert
Selection
command causes
all selected lines in the buffer to become unselected and all unselected lines to become selected. You should be able to see the effects of the Invert
command;
all highlighted
lines should lose their highlighting
and all unhighlighted
become highlighted.
Selection
lines should
Aside from using the menu options in the Review Window’s
Select Menu,
you can also use
the mouse to select and drag-select lines. To select a line, just click on it with the left mouse
button.
To deselect it, click on it again. To drag select, first click on a line you want to select
or deselect, then hold down the left mouse button, and drag the mouse up or down. When the
first line you clicked on was a selected line, it becomes deselected, and all other lines you move
the mouse across also become deselected: the line you click on first determines whether you will
select or deselect in the drag-select operation.
When you move the mouse over the top or bottom line, the display will start to scroll (a line
at a time). If you drag the mouse a little higher or lower, the scrolling speed will become higher
(a quarter page at a time). To select most of the buffer except for a few lines, use drag-select in
combination
with the menu options for selecting lines.
47
Moving
The options in the menu to the
Around
Move
right allow you to move around in the buffer window.
Line Up and Line
Down
move the window text one
Left Margin
Line Up
line up or down, respectively;
Page Up and Page Down
move the window text one ‘page’ up or down, with a page
Column Right
Page Up
being defined as the number of lines of text displayed in
Page Right
Top of Buffer
the window.
Column
Left and Column
Right
scroll
to the left and right one character at a time. Page Left
Line Down
Right Margin
and Page Right
scroll to the left and right one page at a
Page Down
time, with a page defined to be the the length of a line in
the review window.
Left Margin
and Right
Margin
End of Buffer
scroll to the left and right margins, respectively,
and Top
Column Left
of Buffer
and End of Buffer
move you to the top of
the buffer or the end of the buffer, respectively.
In all
Page Left
these cases, you can accomplish
the same thing by using
the scroll bars at the right-hand
and bottom sides of the review window or by using the keyboard
alternatives.
When you look at this menu in VLT, you will notice entries in brackets to the right of each
command
option.
These entries correspond
to the keyboard
alternatives
for each menu option;
as a result, the menu can be used as a quick reference table for people who want to know the
keyboard
commands.
If you are using the menu this way, however, it is necessary to note that
when the bracketed entry is of the form < +ctrl > or < +shift
>, this does not mean to press
the ctrl or shift key. and then the + key. It means instead to press the ctrl or shift key and then
the ‘arrow key mentioned
in one of the previous bracketed entries.
h
The Search
Forward
command
tells
Search Forward
VLT to search from the top of the buffer down to a certain
string after requesting this search string from the user (a search
string can be any combination
of letters and numbers).
For
instance, say you want to go to the set of telephone numbers you
know were listed on your terminal
screen earlier, and you know
that this set of numbers was prefaced by the word ‘Telephones.’
Instead of scrolling
endlessly up and down your buffer review
window, you can select the Search
Forward
option. A string
requester will appear, asking you for the string you wish to search for.
word ‘Telephones’ and hit return, the window will automatically
scroll
the string. Of course, if the word ‘Telephones’ occurs more than once in
not find yourself in the right place, in which case you will need to use
command
until you do.
When you type in the
down to the location of
the buffer file, you may
the Repeat
Forward
Search
buffer
string
Search
Reverse
tells the computer
to search from the bottom
of the
Reverse
backwards to a certain string. As with Search
Forward,
this option will request a search
from the user.
Repeat
Search forward
for another occurrence
of the search string specified
Forward
in the most recent Search
command
(it makes no difference whether the most recent Search
command
is Search
Forward
or Search
Reverse).
Repeat
the most
Reverse
recent
Search
Search backward
command.
for another
48
occurrence
of the search string
specified
in
Program
Selecting
Keys/Menus,
Mode
In Detail
this menu option reveals a submenu which gives you three choices: Off,
and Menu
Shortcuts.
By default, Program
Mode
is turned Off.
Reprogramming
Function
Keys
and Menu
Function
Options
If you wish to reprogram
the behavior of the function keys, on-screen PFkey gadgets or any
User Menu
item, set the Program
Mode
to be Function
Keys/Menus
and then select the
A requester will appear and display the command
which is
item that you wish to reprogram.
currently assigned to this key. Change this command to the one you want and then hit RETURN;
the requester will disappear.
You can use the Function
Keys/Menus
option to reprogram
the
thirty on-screen, mouse-operated
PFKey gadgets, the User Menu
items, the function
keys by
themselves,
the function
key-SHIFT,
function
key-CTRL,
and function
key-ALT
combinations,
the shifted keypad and cursor keys, the shift-alt-ed
keypad and cursor keys, the Delete key, and
the Help key. Also programmable
are the menu options Mouse
Support,
Beep
Volume,
and Open
Console.
When you are finished reprogramming
the keys that you wish to change,
return the Program
Mode
to Off so that the keyboard
sequences, et al., stop bringing
up
reprogramming
requesters.
As an example, let’s say that you wanted to program function
key 6 to send the command
‘gone’ to your host. You would select Program
Mode
to be Function
Keys/Menus,
then
enter F6 from your keyboard.
When the string requester appeared, you would type in:
gone
and hit return.
*R
Then
you would
turn
Program
Mode
off.
When you want a key to send a command to your host, it is enough to enter the command as
is. If you want the key to execute a VLT script command, you will have to preface the command
by the VLT key script character.
When you want the key to call and run a VLT or ARexx script,
preface the name of the script with the VLT key script character and the @ command.
Note:
VLT uses the ARP conventions for embedding escape, control, linefeed, etc. characters in strings;
this is explained in Appendix
E.
Menu
Shortcuts:
Changing
Keyboard
Equivalents
The third suboption,
Program
Menu
Shortcuts,
allows you to change the keyboard
sequence which VLT considers equivalent
to a given menu option (or to add such an equivalent
if none exists). When you select this option, a message window will appear, asking you to select
the menu option whose keyboard equivalent
you would like to change. After you select a menu
option, a requester will appear, with the option’s
keyboard
equivalent
(minus the ubiquitous
msymbol)
shown in its string gadget. Replace this character with the desired symbol and hit
return. To cancel this process, click on cancel; to turn Program
Menu
Shortcuts
off, click in
the main window with the right mouse button.
As an example, say you wanted to change the keyboard equivalent
of the Screen
menu option to m B. First, you would turn Program
Menu
Shortcuts
on, then
Screen to Back option.
A requester would appear; you would enter the letter B in
gadget, then hit return.
If another menu option already had T;nl B as its keyboard
(Send Break,
for instance), a message would appear, informing
you that this keyboard
was already in use and that, if you continued
the process, the keyboard equivalents
options would be swapped. If you clicked on the Continue button, you would then see
49
to Back
select the
the string
equivalent
equivalent
of the two
that m B
was now the keyboard equivalent
have Screen to Back’s original
Mouse
Support
of the Screen to Back
keyboard equivalent.
option,
while
Send
Break
would
now
In Detail
Selecting the menu option Mouse
Support
causes a panel of string gadgets to appear.
These string gadgets allow you to program the left mousebutton’s
behavior in sixteen different
ways, since you can program, not only the mouse by itself, but the mouse in combination
with
the shift, ctrl, alt, shift-ctrl,
shift-alt,
and shift-ctrl-alt
keys; you can also program the mouse to
respond differently
depending on whether the left mouse button has been pressed or released.
If you enter the word auto into the first string gadget in the lefthand column,
on the left mouse button will tell the host to move your cursor to that position
Therefore,
in auto mode, Mouse
Support
provides a substitute
for using the
the cursor keypad.
This is very useful on an IBM mainframe
when in Xedit,
not necessarily work on all hosts. You can also use the auto string to program
combination
with the qualifier keys.
If you want to
containing up to 7
certain arguments,
request a different
%X=
%Y=
%x=
%y=
%l =
%c =
%q =
then clicking
on the screen.
arrow keys on
etc. but does
the mouse in
program your mouse in more complicated
ways, you can use command strings
C-style % escapes. The C-style escapes allow your mouse program to receive
such as the location of the mouse, and each % style escape allows you to
type of information,
as shown below.
current mouse X position (in
current mouse Y position (“)
current cursor X position (“)
current cursor’Y
position (“)
number of lines currently
on
number of columns currently
the qualifiers (shift, ctrl, alt,
All of the coordinates received
lefthand corner of the screen.
character
coordinates)
the screen
on the screen
etc.) pressed at the same time
this way will be character
coordinates,
as the mouse (bit pattern)
with
(1,l)
being the upper
The simplest example of using this feature is the case where the host can accept unsolicited
cursor position reports. In that case, a possible command string might be:
*E c%X; %YR
This string starts with *E, which will be interpreted,
using ARP escape conventions,
as an
escape character (decimal 27), and then a square opening bracket (these two together are also
known as the (csi) sequence). Next is a %X: this means that at this point the current mouse X
position will be substituted.
Then follows a semi-colon, and then a %Y. Here the current mouse
Y position is substituted.
The sequence ends with a capital R.
If you entered this string in the no qualifiers
gadget of the mouse selectdown:
column
and clicked on Use, this sequence would be sent to the host, with current values substituted
(e.g.
(esc) [ZS; 68R), whenever the left mouse button was depressed.
Note that VLT guarantees that left-mousebutton
release (up) events will be treated the same
way as the preceding left-mousebutton
down press. That is, if you press the mouse button down
while ctrl is also pressed, and then let go of the ctrl button before releasing the mouse button,
VLT will still execute the program that went along with the left-mousebutton/ctrl
program.
turn
This completes
to a discussion
our discussion of the menu options associated with the text screen. Now we
of the menu options which are associated with the graphics screen.
50
Graphics Screen Menus
When you are on the graphics screen and hold down the right mouse button,
a menu bar
appears, showing the names of six menus. In this section of the manual we will provide a fairly
non-technical
discussion of the items appearing in each of the menus. A technical discussion of
D.
the Tektronix
emulation
provided by VLT appears in Appendix
The Image
Menu
Save To Current
File, Save To New
File
The Save To Current
File and Save
To New File options are concerned with saving
the currently
displayed
picture as vector graphics to either an archive file you have already chosen or a new archive file of your choice. Save to
New File brings up a file requester in order to
get the name of the graphics file that you wish to
save.
Load
From
Archive
Load From Archive
allows you to load a graphics file that had been
saved to an archive and view it on the graphics
screen. This option, when selected, brings up a
file requester.
Enter. the name of the file that you
want to load, then click on the Okay button or hit
return.
I
Image
Save To Current
File
Save To New File...
Load
From
Archive..
Quit
Archive
Save Bitmap
Print
as IFF
.
File...
Bitmap
Save/Print
as PostScript...
Save As Script
Commands...
ms
@IA
E!lL
ECIQ
E!lI
>)
IZIE
IAIM
It is possible to display, on the graphics screen, an old file that had been saved to an archive
without
losing the current screen display-to
return to the current display, Quit the archive file.
Quit Archive
gets rid of the archive graphics file that you have displayed
Quit Archive
on your screen and, if another picture was displayed there earlier, displays that picture again.
Save Bitmap
as IFF
File
image on your screen as an IFF
Save Bitmap
bitmapped
graphics
as IFF
file.
File
does just
that;
it saves the
Print Bitmap
Print
Bitmap
lets you print the image currently displayed on your graphics
screen using a printer attached to your Amiga.
You can print this image in one of four sizesMaximum
Size, l/3 Page, 2/3 Page, and Full Page. Specify the size of the printed image
using the submenu that appears when you select the Print
Bitmap
option.
Save/Print
as PostScript
Save/Print
as PostScript
allows you to save the picture
currently
on-screen as a PostScript
file; if a PostScript
printer is attached to your Amiga, you
can then, using this option, print the picture by saving the file directly to the par: device.
Save As Script
Commands
allows you to save the
Save As Script
Commands
picture currently on-screen as a file of VLT script commands.
An ARexx program called VLT2Provet . pvrx is provided with VLT that can translate these script commands into Provector ARexx
instructions
(Provector
is a drawing program for the Amiga).
Not all of the VLT script commands
are‘supported
by VLTZProvec.pvrx,
but the most usual things (lines, colors, fills) are. Start it
from Provector
using Rexxecute.
A requester will come up asking you for the VLT file name to
import into Provector.
51
The Zoom/Pan
Menu
Select Zoom Area
VLT supports
true zoom. This
means that when you have downloaded
a picture to the graphits screen, you can magnify any section of that picture to an
Select
arbitrary
degree without losing the resolution that was present
in the original picture. To select the area to be magnified, first
Select
select this option, then position the cursor at the upper left
Reset
hand corner of the region of interest and hold down the left
mouse button.
When you move the mouse down and to the
right, a rectangle will appear; adjust the rectangle until it outlines the
release the left mouse button.
Zoom/Pan
Zoom
Area
Pan Area
IZIP
Zoom/Pan
IXIR
desired
Select Pan Area
Once you have zoomed in on a region of a picture,
slide the viewport
over so that another region of the picture is magnified.
allows you to move your magnifying
glass, so to speak, without having to first
picture and then zoom in on a new region. Once you’ve selected this option,
mouse button
and move the mouse in the direction
that you wish to have
move. A frame will appear as you do this in order to show you how your new
be positioned
relative to the picture currently
being displayed on the screen.
Reset
Zoom/Pan
to be displayed
upon
The Cursor
The Reset
the screen.
Zoom/Pan
item
elz
causes the original,
zoom
area, then
you might want to
Select
Pan Area
redraw the original
hold down the left
the display region
display region will
unzoomed
picture
Menu
Switch
Graphic
Cursor
On makes a cursor apCursor
pear on the graphics screen; Switch
Graphic
Cursor Off will make the cursor disappear.
Display
Switch Graphic Cursor On
m X
Cross Hair
Only attaches cross hairs to your cursor (the cross hairs are two perpendicular
lines interSwitch Graphic Cursor Off
mY
setting in the middle of the cursor). Under ordinary
Display Cross Hair Only
IJIH
circumstances,
the graphics cursor will be turned on
and off under the control of the host. Sometimes,
Display Cross Hair + XY
BIN
however, it is convenient
to be able to display the
cross hairs in order to make it simpler to read the coordinates of a point off a graph, and you will
need the ability to toggle the graphics cross hairs on and off under local control. If you select the
Display
Cross Hair + XY option, the coordinates of the cross hairs relative to the bottom left
hand corner of the screen are also displayed (in Tektronix
coordinates).
This feature is useful if
you are using the cross hairs to interact with a mainframe
graphics program and want to position
the cursor very accurately.
You can position the graphic cursor using the mouse or the cursor keys and shifted
keys; clicking on the left mouse button is equivalent
to hitting a key on the keyboard.
The Screen
Most
Ciear
Menu
of these commands
Screen
Screen
of all other
cursor
Clear
To Back
screens which
behave exactly
Screen
allows
Screen To Back
are open.
like their
counterparts
on the text
you to erase the screen under
moves the VLT
52
screens and/or
screen.
local control.
windows
to the back
Select Screen
Type lets you
Select Screen Type
select the screen type: Custom or Workbench,
Interlace or
Non-Interlaced
(Remember
that if you select the Workbench
Clear Screen
lzlc
screen, you cannot specify Interlace or Non-Interlaced
mode
from any VLT menu, or change any of the screen settings
Screen To Back
E!lJ
from VLT). There are, however, two screen types available
Select Screen Type
))
on the graphics
Screen
Menu
that are not available on
the text Screen
Menu:
Main VLT Screen and DoubleNumber of Colors
)>
Sized Custom.
Selecting
the first option kills the special
Select Colors.. .
mu
graphics screen and redraws the current graphics display in
the text screen, which then becomes a combination
graphicsColor Options...
lz!lK
text screen. All subsequent
graphics files will be drawn on
Close Screen
this combination
screen, and graphics and text can be mixed.
El\
Selecting the second option, ‘Double-Sized
Custom,’ changes
the screen to a Custom screen that has twice the width and height of the usual custom screen.
You can scroll around this screen either by dragging
the mouse to the screen edges currently
not shown or by holding down the left Amiga key and dragging the screen using the left mouse
button.
The ‘Double-Sized
Custom’ option is a toggle; if you select the option a second time, the screen
reverts to the regular screen size. The option also has the keyboard
abbreviation
m D. Note:
This last option only works under AmigaDOS
2.0, and then only if you have suficient
graphics
memory.
An g-color, 1400 by 960 screen takes about half a Megabyte of graphics memory.
If you
get a message saying the screen couldn’t be opened, first try changing to fewer colors.
Select
Select No. of Colors lets you choose the number of colors which
No. of Colors
can be used to display graphics on a Custom Screen. While the custom text screen is limited
to eight colors, the custom graphics screen can display up to 16 colors out of a palette of 4096.
These colors are selected using the same palette requester that is used for changing the colors of
the text screen.
Color
Options
in detail
later
Selecting
in this chapter.
Color
Options
brings
up a requester
which
will
be discussed
If you are finished displaying
graphics and wish to recover the memory being
Close Screen
used to keep the graphics screen open, select the Close Screen option. If, at any later time, you
wish to display more graphics, selecting the To Graphics
Option from the text screen Graphics
Menu will automatically
reopen the graphics screen as long as there is enough memory available.
The Operation
Menu
Tek Emulation
The Tek Emulation
option deals with the type of Tektronix
emulation
that you want VLT to use. You see, once upon a time, when Tektronix
4010 was first developed,
it didn’t really do all that much...it
didn’t support
color, it only recognized
a very limited
set
of escape sequences, and it only supported
a 1024 by 1024 coordinate
system. Then along came
Tektronix
4014, which was a little bit better-it
recognized more escape sequences and supported
a 4096 by 4096 coordinate
system as well as a 1024 by 1024 coordinate
system. Yet Tektronix
4014 wasn’t perfect-it
still didn’t provide color. So along came Tektronix
4105, which provided
color. After Tektronix
4105 came Tektronix
4107, which had even more features.
Tek Emulation,
when selected, provides you with two choices: a 4010/4014
emulation
The 4010/4014
emulation
recognizes all the escape sequences and
and a 4105/4107
emulation.
53
provides all the features of the early 4010 and 4014 emulations.
The 4105/4107
emulation,
on
the other hand, has all of the features of the Tektronix
4105 emulations
with a few of the 4107
features thrown in. Unless your host can’t deal with the 4105/4107
option, select it-it’s
much
easier to work with.
To explain what the GIN
GIN Report
Style
Report
Style
option does, we first need to explain
what cursor reports are. Suppose that a mainframe
application
has brought
up the cross hairs (i.e., the
graphics cursor) and you are expected to position the
cursor over some point on the screen and then hit a
key. The mode that you are currently
in is called the
graphics input (GIN) mode and the cursor report is
the information
that is sent back to the mainframe
after you hit a key. In general, this information
consists
of the key which you hit, the location of the cursor on
and then some
the screen (i.e., its XY coordinates),
end-of-report
sequence to tell the mainframe
that you
have completed
the operation.
The cursor report uses the units of the Tektronix
XY
coordinate
system. When the GIN Report
Style option is selected, a submenu with two options will appear: 4010 and Extended.
Select the 4010 report option when you are using a 1024 by 1024 coordinate
system, the Extended
report option when you are using a 4096 by 4096 coordinate
system. Note: Tektronix
4105’s use 4010 reports.
Operation
Tek Emulation
GIN
Report
Style
Report
EOL
Bypass
Cancel
Character
Mouse
Report
Character
Incremental
String
Mode
Adjust
Display
Switch
Screens
Step
Size
Use Duplex
Stroke
Font
Set Default
Parameters
Save Tek Configuration
Save Tek Configuration
As...
Sometimes,
the host will ask questions of VLT, such as ‘Who are
Report
EOL String
they are
you’ and ‘how much memory do you have. 7’ You will not be aware of these questions;
asked and answered ‘behind the scenes’ so to speak. In these cases, the EOL (end-of-line)
string
is used to end VLT’s replies to the host. The Report
EOL String
option gives you the following
choices for an EOL String.
CR-a
carriage
CR/EOT-a
LF-a
CR/LF-a
None-no
return.
carriage
return
and an end-of-tape
character.
linefeed.
carriage
EOL
Set By Host-the
return
String
and a linefeed.
specified.
host will specify
the EOL
String.
You will usually want to use CR (a carriage return)
difficulty,
try allowing your host to set the EOL String.
Bypass
as your
EOL
String.
If you experience
Bypass
Cancel
Character
also deals with those
Cancel Character
thescenes
question-and-answer
sessions VLT and the host engage in. In order for VLT’s
not to come to your screen, VLT, when it receives one of these questions, enters something
as Bypass mode. The bypass cancel character is a character that is sent from the host
has received the answer to its question; this character tells VLT to quit bypass mode. This
54
behindreplies
known
when it
option
is important,
mode forever
because if VLT doesn’t receive the bypass cancel character, it will stay in bypass
and nothing the host sends you will ever be shown on your screen.
Selecting Bypass
Cancel
bypass cancel character.
CR-a
carriage
LF-a
linefeed.
None-None:
gives you a submenu
with
the following
choices for a
return.
VLT
Set By Host-let
Character
does not enter Bypass
mode.
the host set the Bypass
Cancel
Character.
The default setting of the Bypass
Cancel
Character
option is CR. If your host didn’t like
a carriage return for your EOL String, set Bypass
Cancel
Character
to be the last character of
your EOL String instead. In case of trouble, try letting the host set the bypass cancel character.
Mouse
Report
Character
Generally, host graphics programs don’t support the use of
a mouse. On an ordinary Tektronix
terminal, when a graphic cursor is used, it is positioned using
the cursor keys, although VLT lets you move the cursor around using the mouse. Furthermore,
when a host graphics program wants you to specify a specific point, it usually asks you to position
your cursor over that point and then hit a key on your keyboard.
Mouse-oriented
users, however,
would rather be able to click on their mouse button. VLT allows the user to do this by a simple
strategy;
when you click on your left mouse button, VLT receives a mouse signal. VLT then
sends a keybogrd character to the host, who thinks that you have hit a key on the keyboard
and is perfectly
happy. In order to carry out this strategy, however, VLT needs you to tell it
which keyboard character to send to the host; that is what Mouse
Report
Character
is for.
Selecting this optioh will bring up a string requester-enter
the keyboard
character that you
want VLT to send to the host and hit return. Note: When you bring up this string requester, the
string gadget will probably appear empty. That’s all right, because the string gadget isn’t really
empty-it
contains a space, which means that VLT will send a space character to the host.
Incremental
Mode
Step
The Incremental
Mode
Step option has to do with how far the cursor moves each time
it receives a “move up/down/left/right
one pixel” command from the mainframe.
This option
allows you to choose between two settings: l/1024 and l/4096. Although
it is likely that you will
want to choosse the l/1024 setting, you may have to experiment
to make certain which setting
you should use.
Adjust
Display
allows you, using its suboptions
Width
and Height,
Adjust
Display
to select the horizontal
and vertical extent of the display region on the screen, and, using its
suboptions
Left Edge and Bottom Edge, to select the location of of the left and bottom edges of
the display. Adjusting
these values allows you to correct for faulty aspect ratios in some plots and
also allows you to set up a sort of global magnification.
In general the default settings provided
with VLT provide reasonable values for your display size. You may, however, play around with
your Width, Height, Left Edge, and Bottom Edge settings to see if you prefer values which are
slightly different.
If you have a very different screen size, you may wish to delete the default
settings entirely, i.e. delete TekPrefs.dat,
and have VLT recalculate the best values for you.
When you select any of Adjust
Display’s
four suboptions,
a string requester will appear; enter
the‘desired
value in pixels and hit return. Width and Height are specified by positive numbers.
Left Edge is counted inwards from the left edge of the screen, with the extreme left edge of the
screen set to zero pixels; Bottom Edge is counted upwards from the bottom of the screen, with
the very bottom of the screen set to zero pixels.
55
Switch
Screens
There are various special escape sequences used to switch VLT between
VT100 and Tektronix
mode; Switch
Screens
and its suboptions
allow you to adjust, to some
extent, VLT’s response to these sequences (see Appendix
D for more explanation
of these escape
sequences).
these sequences will cause VLT to switch between text and graphics
0 r d inarily,
screens as well as between text and graphics modes. This can cause a kind of flickering,
however,
because the host sends at least one of these sequences whenever it sends text to VLT (even if
you’re in the graphics screen, VLT can be receiving text behind the scenes). As a result, VLT
is constantly
and rapidly switching
between the text and graphics modes so that it can get the
text and go back to the graphics screen; when it is switching
between screens as well, you get the
flicker effect. By selecting one of these sequences from the submenu, you cause VLT to respond to
that sequence by switching
modes and screens; by deselecting one of these sequences (removing
the checkmark
next to the option),
you cause VLT to respond to that sequence by switching
modes only, thereby eliminating
the flicker effect.
By default,
VLT
is set to ‘switch
screens as well as modes
in response
to these sequences.
NOTE:
In previous versions of VLT, only one of these sequences, On Select
Code,
was
adjustable in this fashion.
When you install the new VLT, you may find that the setting of this
switch has been lost and that, like the other sequence switches,
VLT has given it the default
setting.
Use Duplex
Using the duplex stroke font as a matter of course is usually
Stroke Font
a trifle slow. Therefore,
you may wish to choose Never,
the first option on the Use Duplex
Stroke
Font item’s submenu.
If you do so, the duplex stroke font will never be used. When,
however, the graphics that you have brought to your screen have text on them (e.g. graph titling,
captions) and you zoom this text, the duplex stroke font looks nicer than the simplex stroke font.
In that case, you may wish to choose this option’s second subitem, In Zoom,
which allows use of
the duplex stroke font in zoom mode and in cases where text needs to be displayed in extra-large
type.
Set Default
Parameters
The Set Default
Parameters
option allows you to reset your
default parameters.
This option gives you two choices: you can restore all default parameters
to
the last default parameters
saved using the Save Tek Configuration
option, or you can restore
all default parameters
to the original settings that came with VLT.
All graphics screen settings will be saved to the file TekSave Tek Configuration
Pref s .dat (or your current configuration file if your configuration file is not TekPref s .dat)
when you select the Save Tek Configuration
option. These settings then become the default
settings
used whenever
the graphics
screen is opened.
Save Tek
The Save Tek Configuration
As option behaves like
Configuration
As
Save Tek Configuration,
except that it allows you to save your current configuration
into a file
with a different name, instead of overwriting
your current configuration
file. This would be useful
for a user who deals with many different hosts, each having specific configuration
requirements,
and who therefore
needs several different
configuration
files. When you select this option,
a
file requester
will appear; using this requester,
you can give the configuration
file you create
any name you choose. In order to have VLT use a configuration
file created this way instead
of TekPref s . dat, you invoke VLT using the +T command
line option (see Getting
Started:
Starting
Up).
56
The Control
Menu
Lock
Lock
Graphics
does just
Graphics
what its counterpart
on the text screen does, except
that it not only disables the escape sequence that
throws you onto the graphics screen, it also kicks
you out of the graphics screen and puts you back in
the text screen.
Cl e
Return
To Alpha-Numeric
sends you back to the
Return
To Alpha-Numeric
text screen.
If you have selected your screen type to be Main
VLT
Screen,
however, this
option will change the set of menus at the top of the screen to be the text menus instead of the
graphics menus.
The Color
Options
Requester
In Detail
The Color
Options
requester allows you to do some unusual things; to understand
how to
use this requester you must first understand
how the Amiga deals with color as well as how the
Amiga display works.
When computers talk to each other about colors, they don’t talk in terms of ‘vermilion
print,
They deal with color in terms of color
a gold background,
pink menus, and purple highlighting.’
registers, which are numbered from 0 on upwards; the color assigned to each color register can
be redefined by the user. As a result, computers
are effectively
color-blind.
For example, one
computer sending a graphics file to another would inform the second computer
that the text was
to be drawn in ‘color 1,’ the background
in ‘color 0,’ and the rest of the drawing in ‘color 3.’
Computer
B has no way of knowing what color Computer
A considers ‘color 1’ to be; Computer
A’s ‘color 1’ might be
B only knows what color i2 considers ‘color 1’ to be. Thus, Computer
defined as deep blue, while Computer
B’s ‘color 1’ is defined as bright yellow. Even though the
text on the original graphics file sent by Computer
A was blue, Computer
B will show the text
in bright yellow. Computer
B doesn’t know that it has drawn the text what we would consider
to be the ‘wrong’ color; as far as it is concerned, it’s drawn everything
in the right colors.
Pixels (smallest picture
element)
make up
the Amiga screen display.
The number of
W bit 2
pixels on a screen varies depending
on the
resolution of the display. In order to display
W bit 1
color, the Amiga uses what is referred to as
bit 0
bitmapped
graphics.
Every screen display
consists of a number of bitplanes,
one behind the other.
Each pixel on the display
2
that we see has a pixel component,
or bit,
in each bitplane.
Bitplanes
are numbered
1
Pixel
beginning
with O-O, 1, 2...-and
the numbitplane
0
ber of bitplanes
used to make up a display
varies. The color of a particular
pixel in a
display is determined
by the state of the corresponding
bits in each bitplane.
For instance, take
the pixel in the display to the right. Its component
bit in bitplane 0 is off, while its component
bits in bitplanes
1 and 2 are on. The Amiga then takes the component
bits and their status (Off
Since the bit in bitplane
0 is off, the
or On) and combines them into a single binary number.
number in the 2”s place is zero; since the bits in bitplanes
1 and 2 are on, the number in the 2l’s
57
place and the 22’s place are both one. The resultant binary number is the number 110, which,
converted into base ten, is the number 6. The Amiga then gives this particular
pixel the color
stored in color register 6.
Remapping
color
registers
Normally,
VLT displays every color on your graphics screen according to the mainframe
program’s
instructions.
On occasion, however, you may object to the mainframe’s
choice of
colors. Let us say, for instance, that you are in the graphics screen, looking at a picture of flowers
that the host has sent you. For some peculiar reason, the flowers are green and the leaves are
red. To you, this seems completely
ridiculous-you
want the leaves to be green and the jIowers
to be red. Since you only want to swap the two colors without
actually changing them, using
the Select Colors option isn’t quite what you want. The remapping option on the color options
requester is.
When
you select Color
Options,
the requester
that
Erase
Map
color
Hap
color
Hap
colorMap
color
Map.color
Map
color
Map
color
Map
color
Cancel
I
:
4.
::
to
Map
Map
Map
Hap
Map
Map
Map
Hap
B
p-
7topJ
I
1
appears
looks like this:
Mask
color
color
color
color
color
color
color
color
Use
11s
:
18
::
to
m
-
11
to
-
12
13
14
15
to
to
to
to
112
113
114
)151
I
You’ll notice that the bottom half of the requester contains sixteen string gadgets preceded by
These string gadthe words Map
color
R to: where n is a number from zero to fifteen.
How do you use it? Well, normally,
each color reggets constitute
the remapping
option.
ister will map to itself, so that the number in each string gadget corresponds
to the numIf you change the number in the string gadget to the
ber mentioned
in the previous text.
then the color register will be mapping to a differnumber of some other color register,
Let’s return to our example of the green flowers and red leaves.
The
ent color register.
color green used by the flowers is stored in, say, color register 3, the color red used for
To swap the two colors, we bring up our color
the leaves is stored in color register 4.
options requester,
then tell it to map color register 3 to color register 4 and color registhe colors will have been
ter 4 to color register 3. Now, if we have the screen redrawn,
swapped.
This is because, when the Amiga went to draw pixels in ‘color register 3,’ it was
told by VLT that it should go find the color stored in color register 4 and use that color
instead.
The reverse happened whenever there were pixels to be displayed in ‘color register
4.'
Most of you are probably wondering
in which color register.
There’s a trick
how you can be expected to know which color is stored
that lets you find out quickly, easily, and intuitively.
58
I
Return to the Screen Menu and choose the Select Colors option. When the palette requester
comes up, look at the top. You’ll see one or more rows of little boxes, each in a different color;
you know already that clicking on one of these boxes lets you select the color in the box as the
one you want to change. Counting from left to right and from top to bottom,
you can also use
this row of boxes to find out the color register in which each color is stored. The color in the
first box on the left is stored in color register 0 (note that the color stored in color register 0
is the background
color), while the color shown in the box to its immediate
right is stored in
color register 1. Proceeding from left to right in this fashion will tell you the number of the color
register associated with each color being used in the display. If there are multiple
rows, when
you reach the end of a row, continue counting from the far lefthand box of the next row. Note:
the number of colored boxes at the top of the palette requester will vary depending on the number
of colors you have chosen to use-two,
four, eight, or sixteen.
If you want the picture to be in one color (barring a different background
color, of course),
you map all the color registers, except for color register 0, to one color register. It is important
to understand
that remapping
color registers does not affect how and where the various colors
are stored; remapping
only affects how the colors stored in the registers are used.
Lock
Colors
Computers
are usually color-blind;
they do, however, have a way to talk about color that
Every color is defined in terms of how much red,
is more exact than discussing color registers.
blue, and green is in it. The proportions
of red, blue, and green can be reduced to numbers, and
the computers-can
send these numbers back and forth. Sometimes, the host will tell the graphics
screen ‘set color register 0 to so much red, so much blue, so much green’ and so on down the line.
You may not mind this, but then again, you may have just set your colors to something you like
and.not want the host to interfere.
Setting Lock Colors
to be on will tell VLT to ignore the
host’s directions to reset your colors.
Mask
Colors
There is, as we mentioned,
a special screen type which can be selected using the Screen
When you choose Main
VLT
Screen as your
Type option on the graphics Screen
Menu.
screen type, you are returned to the text screen, where the present graphics display is redrawn and
all subsequent graphics displays are drawn as well. Choosing this option creates a screen where
you can work with both graphics and text at the same time. There are, however, drawbacks.
If you input or receive text that goes over your graphics display-an
overlay, so to speak-the
As a result of this interference,
whenever you erase either text
text and graphics will interfere.
or graphics, you will discover that the display now has ‘holes’ in it.
The Mask Colors
option provides a partial solution to this problem.
Selecting this option
to be ON causes VLT to draw pixels of a particular
color only in those bitplanes in which the
pixel’s bits should be ON-it
leaves those bitplanes where the pixel’s bits are OFF alone. This
means that if the pixels associated with the graphics display occupied one set of bitplanes,
and
text display pixels another, text and graphics would not interfere.
While the graphics and text
are both present, however, the overlapping
portions will be rendered in another color entirely,
since the computer will use the combined ON bits of both graphics and text to decide the color
of the pixel.
If the color of the graphics and the color of the text share
using the Mask
Colors
option will not solve your problem.
you will either get ‘holes’ in your graphics or portions of
different color. This is because you are erasing bitplane 2,
the color of both text and graphics. When the text is being
59
bitplanes-bitplane
2, for exampleWhen you erase the overlaid text,
the graphics will be rendered in a
which was being used to determine
rendered in Color mode, it uses all
bitplanes for text. As a result, Mask Colors won’t work with your screen in Color mode. Quick
mode, on the other hand, uses only bitplane 0 for text, while Normal mode uses only bitplanes
0 and 1. Thus, if you use Quick or Normal mode, you can ensure that text and graphics will not
share bitplanes and Mask Colors will be a great help. Note: Using Quick or Normal mode only
aflects the text; if your graphics is using bitplanes 0 and/or 1, you will still get interference.
You
also have to map all colors to color registers which use bitplane 2.
Erase
Mask
Using Mask Colors is sufficient to prevent interference when text and graphics overlap and
the text is then erased. When the graphics is erased, however, Mask
Colors
is not sufficient.
Although
text and graphics, while Mask Colors is on, will not interfere when one is drawn over
the other, portions of the text will be erased when the graphics is erased. As a result, you also
have to set the Erase Mask before erasing overlaid or underlaid graphics.
Setting the Erase Mask tells VLT to only erase a pixel in specified bitplanes.
You specify
these bitplanes by giving Erase Mask a color register number, such as 4. VLT converts this
number into the binary number 100; it then observes that this number has a one in the 22’s
place. This tells VLT that you want it only to erase in bitplane 2. All other bitplanes will remain
untouched.
If graphics is rendered in color register 4, while text is rendered in color register 2,
then to keep VLT from erasing the text underneath
the graphics you set your erase mask to be
4. VLT will erase bitplane 2 only, and leave bitplane 1 alone.
VLT
The
Note: the reason that you don’t need to reset the Erase
automatically
masks the erasure of text for you.
Use and Cancel
Mask
when the text is erased is that
Gadgets
.The Use and Cancel
gadgets at the bottom of the color options requester behave as you
might expect; clicking on the Use gadget tells VLT to use the modifications
that you have made,
while clicking on the Cancel gadget aborts the entire process, just as clicking on the requester’s
close gadget would do.
60
4
Writing
/\II
Scripts
Introduction To VLT’s
Scripting Facility
Syntax
VLT’s scripting
language is a very specific sort of computer
programming
its own grammar,
or language syntax.
Familiarity
with this syntax is extremely
incorrect syntax can lead to all sorts of errors in your scripts.
language with
important,
as
String delimiters
surround a string and tell VLT that it is dealing with
String delimiters
a string instead of a command.
Delimiters
can be double quotes “, single quotes ‘, curly braces
( ). Delimiters
are also used in
{ }, pointed brackets ( ), s q uare brackets [ 1, or parentheses
conjunction
with certain commands,
such as the schedule
command.
On the whole, anywhere
that double or single quotes are used, the other delimiters
can be used also.
Whenever text in a script is prefaced by a # character, VLT ignores it. This
Comments
is because the # character tells VLT that what follows is a comment, meant for the benefit of
the user. If a comment
runs over several lines, each line must be preceded by a # character.
Comments
are used to explain the purpose of a script, or the purpose of a particular
command.
They help make scripts more readable.
The
When a set of script commands
are issued from the VLT
Keyscript
Character
Console window,
from the program
for any function
key, or from the program
for any programmable
item, they must be prefaced by the VLT keyscript character.
By default, this character is the tilde, -. Although
you can choose a different keyscript character, we advise against
this, as it may lead to confusion.
The combinations
)), }}, I], or )) act as a “universal
quote.” If
The Universal
Quote
one of these combinations,
(without
corresponding
open brackets) is placed in a line, all text from
there to the end of the line will be treated as a string and the reserved symbols ignored by VLT’s
script parser, including
quotes and so forth which would otherwise have been processed. This is
particularly
valuable when you want VLT to send text without
processing it first. For example,
if you’re reading text in and then having VLT send it, you may run into problems, because you
won’t know if the text contains reserved symbols. So you would issue the send command as follows
“send
This
syntax
))‘I
sometext
is only valid
as of VLT
version
5.045.
Use of Semicolons
Whenever a set of commands are written on the same line, they must
be separated by semicolons.
The semicolons tell VLT that a new command
is beginning
and an
old command
is ending.
Writing
each command
on a new line serves the same purpose, but it
may sometimes be necessary to write commands on the same line-when
you are running a script
from the VLT console window, for instance.
A name, followed
Use of Colons
uses of labels will be discussed later.
by a colon,
63
tells VLT
to consider
the name a label. The
Schedules
Schedules:
What
Are
They
and How
Do You
Run
Them?
VLT’s scripting
facility
is based on the notion of a “schedule.”
A schedule is a set of
commands written
in VLT’s scripting
language and sent to VLT. VLT script files are schedules,
as are scripts run from the console window and script commands executed when a programmable
function
key is pressed. Finally, if an ARexx script sends one or more commands
to VLT, the
set of commands sent by the ARexx script lo VLT is considered a schedule too.
Schedules may have names. As a rule, VLT will assume that a schedule is named after the
first label in the schedule.
Therefore,
it may be a good idea to start all schedules with a label
that conveys some information
about its purpose, even if you never need the label for use with a
goto command.
blink
A simple example
constantly.
is is the file
L
#
blinker:
cursorheight
0
delay
0,3
cursorheight
I
delay
0.3
goto blinker’
of a schedule
would
be this brief script
file, which
programs
the cursor
to
blinker.scp
To run the above schedule, you would select VLT
Script
from the Script
Menu
and enter
You could, however, just as easily run the same schedule
blinker.
scp in the file requester.
from the console window inside VLT. Inside the console window, we could start this schedule by
typing:
‘blinker:
cursorh
If you wanted
WShell by typing
I)
“Address
0;
delay
0.3;
to run this schedule
VLT schedule
’ [blinker:
cursorh
from
I;
outside
cursorh
delay
of VLT,
0.3;
goto
you could
0. . . .goto
blinker]
blinker
start
the schedule
from
’
If you do run a script from WShell, don’t forget to type schedule
after “Address
VLT. The
schedule
command is there to tell VLT to turn control of WShell back over to you even though
the blinker schedule runs in an infinite loop. If you only type “Address
VLT ’ [blinker.
. . .,
‘blinker’ will run just fine, but WShell will be tied up forever and you’ll have to cancel the
schedule to regain control of it. The extra [ ] are needed because ARexx eats the first level of
quotes.
Cancelling
Schedules
You also need to know how to get rid of
Knowing
how to run schedules isn’t enough.
rid of unwanted
schedules is
schedules when you don’t want them around any more. Getting
called cancelling the schedule.
There are several ways to cancel schedules.
First, if you select
“Abort VLT Scripts” from the Script
Menu,
then all currently
pending schedules are cancelled.
You can also cancel a schedule from ARexx by typing in a WShell
64
1) “Address
VLT cancel
(schedulename)
Since cancel is a VLT script command, it can be called from inside a schedule. The ability
to cancel other schedules from inside a schedule can be very useful at times. For instance, if you
wanted a particular
schedule to stop your cursor from blinking whenever it ran, you could cancel
the ‘blinker’ from inside this new schedule by including the command cancel
blinker.
There is an even more important
use for the ability to cancel a schedule from inside another
schedule.
If we ran the blinker schedule, for instance, from a script file, then from the VLT
console window, and then from WShell, we would really be running three separate, independent
All of these blinker schedules have the same name, but are
copies of the blinker schedule.
nevertheless considered separate schedules by VLT. When you use the cancel
command from
inside a schedule, it will only abort other schedules, never the schedule that the cancel command
is issued from. We can therefore ensure that only one copy of the blinker schedule is running at
any given time by modifying
the schedule as shown below:
#
#
This
#
cancel
is
the
file
blinker.scp
blinker
blinker
:
cursorheight
delay
0.3
cursorheight
delay
0.3
goto blinker
0
1
Note that this particular
copy of blinker was the blinker.
scp schedule, that is, the copy of
blinker run from the script file. If we wanted to run blinker from the console window or WShell
and still ensure that only one copy of blinker was running, we would have to add the cancel
blinker
command to the schedule that we ran from there.
A new convention,
valid as of VLT version 5.045, allows you to create an uninterruptable
script.
Such a script cannot be cancelled by selecting Abort
VLT
Scripts
or by issuing the
cancel
all script command.
An uninterruptable
script can, however, be canceled if specified by
name; it is only protected from nonspecific script cancellations.
Thus, if you want a particular
script, such as the cursor blinker, to continue running after a general script cancellation,
you can
now make it an uninterruptable
script-but
you can still cancel it by name if necessary. To make
a script uninterruptable,
precede the first label in the script with a $. For example, in the case of
the blinker
script, you would type $blinker
: instead of just blinker:
to make blinker.
scp
uninterruptable.
Note, however, that the label you must refer to then becomes $blinker
instead
of just blinker.
Expiration
of Schedules
Schedules can cancel themselves, or ‘expire.’ This may happen for a number of reasons. First,
schedules can expire when there are no more commands to be executed, or if an exit command
is encountered in the schedule. Schedules also expire whenever a ‘fatal’ error is encountered;
that
is, if a command you gave VLT from the schedule is illegal, nonexistent,
or improperly
issued.
At.this time, all errors are considered fatal.
65
Important
script
commands
There is a group of VLT script commands
which form the backbone
of the VLT script
language.
Among these commands
are the emit command,
the send command,
the exit command, the delay command,
the schedule
command,
the goto command,
the trap commands,
the paste command,
and the @ command.
When writing schedules, you will find yourself using
these commands
a great deal, so they deserve special attention
and explanation.
The
Emit
Command
The emit command
tells VLT to display a character string on the screen at the current
cursor position.
The character string is not sent to the host. Enclose the character string with
quotes or some other string delimiter
(brackets, parentheses, etc.).
This command
is useful when you want your program to give a piece of information
user without
telling the host. For instance, the command emit “Please
tell
me what
will result in your screen showing
Please
tell
me what
to
do.
the string
If you issue the command
emit raw “some string”,
VLT
style escape sequences and will be displayed as is. Otherwise,
displaying
it.
The
to the
to do”
will not be parsed for ARP
will parse the string before
Send Command
The send command sends a character string to the host. For instance, the command
send “gone” is equivalent
to your typing gone in the command line. If you issue the command
senti raw (character
string),
the string will not be parsed for ARP style escape sequences
before it is sent to the host.
The
Exit
Command
The exit command tells VLT to exit the current schedule; in other words, the exit command
tells VLT to cancel the script that the exit command was issued from. The command
exit
VLT
will cause VLT to shut down completely,
while the command exit
(next
script)
will tell VLT
to execute the specified schedule after exiting the current one. Consider the command
exit
blinker.
scp, issued from the schedule hello.
Hello will be cancelled and blinker.
scp will be
run.
The
.
Delay
Command
The delay command
causes a schedule to pause for a specified amount of time before executing the next command.
The length of the pause, or timeout,
is specified in hours, minutes,
seconds, tenths of seconds, and hundreths
of seconds (See Some Conventions,
earlier, for the
syntax of timeouts).
Delays allow you to keep your script from going too fast and getting ahead
of itself; they can also be used to insert pauses for the user’s benefit at any point in the program.
For instance, a delay command allows you to specify the amount of time a message window stays
open.
The
Schedule
Command
The schedule
command
tells VLT that the lines associated with the schedule
command
are part of a different schedule. In the script file below, the schedule command is used to create
a second schedule within the same script file.
66
#
#
is is to show you that
there
can be more than one schedule
in the same script
file
if you use
# the
#
schedule
schedule
‘hello:
greeting:
emit
‘Hi,
command.
emit
I’m
“Hi,
I’m
a different
a schedule”;
beep’
schedule’
Notice that all commands associated with the schedule
and that within these delimiters,
commands are separated
The
Goto
Command
and Infinite
command are enclosed by delimiters,
by semicolons.
Loops
The goto command allows you to execute
Let’s look again at blinker.
scp.
a certain
set of commands
in an infinite
loop.
#
#
This
is
#
cancel
the
file
blinker.scp
blinker
blinker:
-
cursorheight
0
.delay 0.3
cursorheight
delay 0.3
1
goto
blinker
The last command in this schedule is goto blinker.
Goto blinker
tells VLT to go back to the
line with blinker:
on it and execute all subsequent commands.
The line saying blinker:
is
known as a label; as we mentioned earlier, any name with a colon after it is considered a label
by VLT. To use a goto command, you must have a label for the goto to return to.
When VLT reaches the goto blinker
command again, it goes back to blinker:
As long as the schedule isn’t cancelled,
and executes all subsequent commands.
commands will continue eternally.
Such a cycle is known as an ‘infinite loop.’
once more
this cycle of
Infinite loops are not the only kind of loops used in programming.
There are a variety of
loops which let you loop through a set of commands a specified number of times, or until a certain
answer is reached, etc. VLT’s script language only has the goto command,
which means that
it doesn’t recognize these other kinds of loops. There are, however, sneaky ways of making the
goto command a timed loop, that is, a loop that expires after an elapsed period of time.
The
Goto
Command
as a Timed
Loop
Currently,
if we run the schedule blinker.
scp, our cursor will blink until we cancel the
schedule. You may, however, want your cursor to blink for twenty seconds and then stop of its
To turn the infinite goto loop into a timed loop, you
own accord, without
your intervention.
need to use the delay, schedule, and cancel commands as shown below.
#
# A blinker
with
a timed
loop
called
blinky.scp
67
#
schedule
‘delay
20;
blinker:
cursorheight
delay
0.3
cursorheight
delay
0.3
goto blinker
cancel
blinker;’
0
I
By using schedule,
we have made the delay
20 and cancel
blinker
commands part of a
different schedule than the blinker
goto loop; since one schedule can be cancelled from inside
another schedule, this means that you can cancel the blinker
loop from within the script file
using the cancel command.
The delay
20 tells VLT to wait 20 seconds before cancelling the
blinker loop.
Other
Uses of the Goto
Command
When you instruct VLT, using the goto command, to return to a label earlier in the schedule,
you create an infinite loop. If the goto command is going to a label laterin the program, however,
you won’t have a loop-you’ll
just execute the commands following the label once.
Trap
Commands:
Waits,
Ons,
and Traps
The wait command, the on command, and the trap
known as traps. These commands wait for a particular
before executing the next line in the program.
command belong to a class of commands
string to be sent from the host to VLT
Wait-The
wait command waits for a particular
string to be sent from the host; the rest of the
schedule is put on hold until the wait command receives this string. A time limit, specified in
seconds, can be attached to the wait. For example, the command
wait
“Ready”
3.5
will wait for 3.5 seconds and then permit the rest of the schedule to continue (If it receives the
string “Ready” within that time, the schedule will continue immediately).
If no time limit is
attached to the wait, then the schedule will wait until “Ready” is received; if “Ready” is never
received from the host, then the schedule will just sit there until it is cancelled.
On-The
on command
watches for a particular
string; whenever this string
host, the command associated with the on command is executed. For example,
command
on “Ready”
emit
“Host
is
is sent from
the following
the
on
ready”
tells VLT to wait until it receives the string “Ready” from the host and then tell the user “Host
is ready.” Unlike wait traps, on traps do not put the schedule on hold; after the on trap is set,
the rest of the schedule is executed even if the trap string isn’t received. As a consequence, on
traps exist from the moment they are called until the schedule is finished running; each time the
trap string is received, the associated command is executed. In order to rid yourself of an on trap
before a schedule is finished running, you will have to cancel the on trap, which you do by issuing
an.011 command with the same character string and an empty command string. For instance, to
cancel the trap on “Ready” emit “Host
is ready”,
issue the command on “Ready” *‘I’.
Only one command,
such as emit “Host is ready, I’ can be associated with the on command. If you use a goto command
as the associated command,
however, you can tell VLT to
68
execute more
shown below.
#
#
than
Simple.scp
one command
each time
the trap
receives
the trap
string.
An example
is
script
#
simple:
on {Ready}
goto
gotit
delay
3.5
emit (I guess
exit
we timed
gotit:
emit
exit
ready’
‘Host
is
out:
Host
croaked.)
Trap-the
trap command
is the most flexible
possible subcommands,
discussed below.
of the three
trap
commands.
It has a several
trap add : Add a trap to the system.
Depending
on which option you specify,
behave differently.
The syntax of the trap
add command is as follows:
trap
add [(trap-ID)]
[(options)]
(match-string)
(actions)
the trap
will
A trap-ID only has to be given if the trap is to be referenced specifically by a later command
(such as trap
activate).
Trap-ID’s
are integer numbers between zero and 32767. You may also
want to use one of the (options) strings explained below.
-(options)
case: Make matching of trap string with received string case sensitive.
defer:
Intialize trap as inactive.
autodeactivate:
Deactivate trap after first occurrence.
install:
Install this trap permanently,
which will keep it alive beyond
schedule.
All traps must have a (match-string)
string (a trap string),
be the keyword nothing.
Traps must also have an (actions)
separated by semicolons and bounded by string delimiters.
trap cause: Causes trap(s) with specified ID(s) to be sprung,
been received. The syntax of this command is as follows:
trap
cause (trap-ID)
[(trap-ID)].
the duration
although the (match-string)
may
string, a set of VLT commands
even if the (match-string)
trap
mtid
with
specified
ID(s)
{ (trap-ID)
remove: Removes trap(s) with specified
is as follows:
trap remove { (trap-ID)
to be deactivated.
[(trap-ID)].
ID(s)
69
...
f rom the trap
[(trap-ID)].
has not
. ..
trap activate:
Causes trap(s) with specified ID(s) to be activated; this command
a trap has been deferred and you want to activate it. The syntax of this command
trap
activate
{ (trap-ID)
[(trap-ID)].
. . . 1 all}
trap deactivate:
Causes trap(s)
command is as follows:
trap deactivate
of the
...
The
is used when
is as follows:
syntax
of this
1 all}
list.
The syntax
1 all}
of this com-
The
PASte
Command
The PASte command
is a major new command,
which is actually
used internally
by the
Paste Menu
options.
It has a slew of subcommands,
among them clip,
file,
and string,
which indicate what type of material
is to be pasted. Using the PASte command
requires a few
peculiar constructions,
since actually pasting something
requires using the command
in a loop,
and the actual operation
requires several steps.
First, the contents of the clipboard,
buffer.
You can accomplish
this using
command
paste
clip
retrieves the Amiga clipboard
fashion, the command
paste
file
contents
and stuffs
it into
VLT’s
internal
buffer.
In a similar
work:foo/bar.txt
tells VLT to retrieve
while the command
paste
file, or string, must be loaded into VLT’s internal paste
the clip,
file,
or string
options.
For example,
the
"This
string
causes VLT
the contents
is
of work : f oo/bar
. txt
and to put it in VLT’s
internal
buffer,
a test”
to put the words
“This
is
a test”
into the internal
buffer.
Once we have something
in the internal buffer, we need to paste it into VLT’s input stream.
The paste command,
by itself, can only send a single line at most; if used with character delays,
the full
it will send only one character
at a time. This is why a loop is needed to accomplish
paste operation,
so that your script can loop over the buffer contents until everything
has been
sent. to the host.
Such a loop can be created
paste
automatically
by using
the command
AUTO
which causes your program
effect by using the following
Ifclipprog:
paste
to loop until
code:
everything
has been pasted.
You can achieve
the same
clip;
$1:
paste
if not
got0 $1
clip
exit
As you can see, this clipprog
script uses the if command;
buffer, the loop continues; otherwise the program exits.
In this
similarly
to
text before
edit
auto,
time.
context, you can also use the edit subcommand.
The paste
paste, except that it brings up a string requester which allows
it is actually pasted into VLT’s input stream. You can also use
which allows you to send an entire file, etc. to the host while
Only one paste
issuing the command
buffer and indirectly
paste
if anything
The paste
prefix,
is left in the internal
edit command
acts
you to edit a line of
the command
paste
editing it a line at a
operation
can be active at a time, and you can abort a paste operation
by
paste
cancel.
This command empties and deallocates the current internal
causes any paste operation
currently
in progress to abort.
command
followed
has two more subcommands,
by a string, will cause VLT
70
prefix
and delays.
to preface whatever
Issuing the command
you are pasting with
that string. For example, if you were sending a list of female nobility,
of the file you were pasting prefaced by the word “Lady”, you would
and you wanted
type
every line
“Lady”
prefix
file
kingdom:nobles.txt
auto
Paste
Paste
Paste
Issuing the command paste
delays,
followed by a specified line delay and then (optionally)
a
specified character delay (in milliseconds),
allows you to choose the amount of time VLT takes
between pasting lines and between pasting characters.
For example, the command
paste
delays
300 40
would cause VLT to delay
pasting each character.
The
300 milliseconds
after
pasting
each line
and 40 milliseconds
after
@ Command
An @ sign, followed by a scriptname,
such as blinker.scp,
tells VLT to run the specified
script.
If the @ sign prefaces a script with a different file extension,
such as blinker
.vlt
or
Normally,
when VLT starts up a
.rexx,
VLT runs the script as a REXX program.
blinker
with two @
REXX program,
VLT can’t exit until the script exits. If you issue the command
signs, like this:
@@SomeScript.vlt
then VLT runs the macro under ARexx instead of simply REXX, which means that VLT doesn’t
have to wait for the script to exit before exiting itself.
The disadvantage
is that the default
host for the macro will now be REXX rather than VLT, with no way for the script to find out
Since, however, you can pass arguments to
VLT’s port name. This is occasionally
inconvenient.
programs launched with either of the @ commands, you can get around this last problem.
First,
launch program A with a single @ sign, so that it knows who the default host is. Have program
A do the following:
/*
A.vlt
*/
vltport
= address0
“@@B. vlt
“vltport
exit
This launches program B with the correct VLT port name as an argument, so that it can still send
messages to the correct host without
requiring VLT to stick around until program B is finished
running.
You might ask: why have VLT launch the program rather than ARexx?
The reasons
is that VLT, unlike ARexx, has a particular
search order for .vlt scripts. The way program A
works, B.vlt
will be found if it is in VLT’s search path for ARexx scripts.
M ixing
.
VLT
and ARexx
Up to now, the programming
language known as ARexx has only been peripherally
discussed.
It is important
to establish that ARexx, unlike the VLT script language, is not a built-in feature
of a single program,
but a completely
self-sufficient
programming
language with a great deal
of flexibility
and power. There are several sources which give a detailed explanation
of how to
use ARexx:
if you’re a 1.3 user, refer to the ARexx Manual by W. Hawes, the IBM System
and the IBM System
Product Interpreter
User’s Guide (releases 1 and 2, No. SC23-0375-O),
Product Interpreter
Reference, (releases 1 and 2, No. SC23-0374-O);
if you’re a 2.0 user, refer
to the ARexx section of Using The System Software, a manual which came with your copy of
71
the operating
system. In this manual, we will assume that you know the basics of ARexx use
and focus on the ARexx features that make it possible to mix VLT script commands and ARexx
commands within ARexx programs.
We will then discuss certain VLT script commands which
are specifically
intended for use within ARexx programs and can only be called from within an
ARexx environment.
Note: Before reading this section, we recommend that you become familiar
with ARexx.
The
ARexx
Address
Command
ARexx has a special command, the Address command, which allows it to send commands to
other programs.
This command is invoked by typing Address and then the name of the program
to which you want commands sent. To send commands to VLT, you type Address VLT. Once
it sees Address VLT in the program, ARexx enters a mode wherein ARexx interprets as much
of a line of the program
as it can, without
aborting
the program when it sees an unfamiliar
command.
Instead, whenever a line contains commands that ARexx doesn’t recognize, it will
send the interpreted
line to VLT as a separate schedule. VLT will then execute these commands.
Of course, if VLT doesn’t recognize a command either, the schedule containing the command will
be aborted and VLT will put up an error message.
Sometimes ARexx will think that a VLT command or symbol is an ARexx command or
symbol and try to interpret
it accordingly.
This can result in your macro making mistakes or
returning
error messages. If you want to be certain that nothing in a particular
command or
group of commands
is interpreted
by ARexx before being sent to VLT, surround
each line of
commands with ARexx string delimiters (double quotes or single quotes). Once an Address VLT
command is issued, anything between quotes is sent directly to VLT.
In an ARexx macro, just typing Address VLT and continuing
your program on a new
When typing commands from WShell, however, you must preface Address VLT
with a double quote. Furthermore,
whenever you type a series of commands on the same line
as the Address VLT command, be sure to follow the Address VLT command with a semicolon.
Otherwise,
only the command immediately
following
the Address VLT command will be sent to
VLT. Finally, when you run an ARexx macro from VLT, it is not necessary to put in the Address
VLT at all, since ARexx will automatically
know where to send the commands.
In fact, this last
feature is frequently useful, since VLT’s port name may not be VLT if you’ve started the program
up under a different name.
.Note:
line is suficient.
The
Fault
Command
and the RC variable
When, during the running of an ARexx macro, a timeout
Error codes are numbers; each number corresponds
returned:
ARexx, the variable known as the RC variable stores the error
or error occurs, an error code is
to a particular
type of error. In
code.
When VLT script commands are sent from ARexx to VLT and something goes wrong, VLT
will return an error code to ARexx’s RC variable. VLT has 29 error codes (0 to 28); these error
codes in no way correspond to the error codes returned by errors in ARexx macros. The VLT
script command fault,
when given a number from 0 to 28, assigns to the variable VLT . Error a
textual error message corresponding
to that particular
error code. Fault can be called with a
* Although
an error code is returned when a timeout occurs, a timeout is not considered an
error and therefore does not cause a VLT script to abort. Remember, all other errors will
cause VLT scripts to spontaneously
abort. ARexx macros are aborted by VLT errors unless
the ARexx command ON FAILURE
is used.
72
number as its argument-for
instance, fault
Timeout-or
it can be called with the ARexx
1 would result, in VLT.Error
RC variable as its argument.
containing
the word
You must issue the fault command from either WShell or an ARexx macro, using the Address
Let’s take a look at an example to see how it works. When the program below is
run, VLT returns the message Timeout.
VLT command.
/*
/*
An ARexx macro that
shows how the
RC variable
can be used together.
Address
fault
+/
command and the
*/
VLT
delay
1
fault
RC
say VLT.Error
Upon seeing Address VLT, ARexx knew that it should send all unfamiliar
commands
to
VLT. First, the unfamiliar
command delay
1 was sent to VLT. VLT ran a schedule with only
that command in it. The schedule timed out, and the ARexx standard error code RC was set
to 1. Then ARexx read the command fault
RC and changed RC to 1 before sending the line
to VLT. VLT, upon receiving the command fault
1, put the error message belonging to error
1, Timeout,
in the special VLT variable VLT.Error.
VLT then informed ARexx of VLT.Error’s
existence, location, and contents. ARexx then executed the last command, say VLT.Error,
and
printed the word Timeout on the screen.
Using
the RC
Variable
with
Timeouts
Using the RC variable with the fault
command is very advantageous when you are debugging
a macro/script
and want to understand
the error codes that VLT is returning
to you. As it so
happens, the RC variable by itself is extremely useful when you are dealing with timed commands
and want to know if the command has timed out.
Suppose
WShell
we want
1) “Address
VLT wait
to wait
for the host to send the string
Ready.
Well,
we can just
type in
‘Ready’
What if, however, the host was broken and the word Ready never appeared?
In that case,
you would be up the creek, because WShell would just sit there and nothing short of cancelling
everything
from the menu or from another script would cure it. Now suppose we decide that the
string Ready should come within the next three and a half seconds, and that if it does not the
host is surely kaputt. We can then use the timeout feature of wait to create the following ARexx
macro.
/* simple.rexx
Address
VLT
program
*/
“wait ’Ready ’ 3.5”
if RC=I then do
say “Host must have croaked”
exit 20
end
say “Okay,
exit 0
I guess we’re
ready”
73
The exit
20 and exit
0 commands
are ARexx commands,
not VLT script commands,
which is why they have numerical arguments.
As a matter of fact, the only VLT script command
in the entire macro is the wait
“Ready” 3.5 command, so the macro may require a bit of
explanation.
The macro waits for three-and-a-half
seconds; if the string “Ready” is received
within that time, the if. . . then do section is skipped entirely and the macro goes directly to
If the wait command times out, however,
the say “Okay,
I guess we’re ready” command.
VLT returns an error code of one to ARexx, who stores it in the RC variable. Since RC=l,
the
if . . .then do clause is obeyed; “Host must have croaked” is displayed on your screen and the
macro immediately exits, returning an ARexx error code of 20 to the caller.
The
Extract
Command
Color settings, programs associated with function keys, program options, outstanding
schedules, etc., are stored in fields. If you want to know the contents of one of these fields while you are
working in ARexx, then you use the extract
command.
With extract
you can either extract
the contents of a single field from VLT or the contents of all fields at once. In particular,
you
can extract the line that is currently on the screen at the vertical location of the cursor, and also
the current, “search” line in the review buffer.
Combine this with the movecursor
command,
and you can read every line on the screen from ARexx. Also extractable
are the current x and y
coordinates of the cursor-you
can thus put the cursor back to where it was. The stem variable
that receives all the extract values is always called VLT.; VLT.ansicolor,
for example, stores the
extracted value for the ANSICOLOR
field.
The number
of fields that
can be extracted
is stored
in the variable
VLT.fields,
while
the
names of all the fields that can be extracted are stored in an array with the stem VLT.fields.;
VLT.f ields. 1, for instance, stores the name ANSICOLOR.
Some fields have subfields.
For
intance, VLT.color.0
stores the RGB setting for color 0, VLT.color.1
the RGB setting
1, etc., while VLT.color
itself stores the number of different colors that VLT can use.
for color
The sample program which follows, an ARexx program which extracts all the color fields and
prints their contents to the screen, demonstrates
the use of extract
command.
If you want a more
comprehensive
demonstration
of the extract
command’s powers, refer to the extractt
est. rexx
program that comes with VLT, an ARexx program that extracts all the VLT fields it possibly
can. By studying
the program and running through the output it generates, you should get a
pretty good picture of the extract
command’s
range, which includes the programs associated
with all function keys, the settings for all program options, all outstanding
schedules, etc..
/**
*
*
Extract
the color fields
from VLT
*
**/
address VLT ’extract ’ /* This is the *only* command in this
* that is sent to VLT*/
- 1
do .j = 0 to VLT.color
b= color”. ‘1j
say overlay(b,
copies(”
program
/* VLT.color
is # of subfields
*/
/* b will be co1or.j
*/
‘0 30)) ” = ” VLT.b
/* prints
contents
of VLT.b to screen
74
*/
end
The
RX Command
The rx command is a VLT script command that tells VLT to submit a specific command
to ARexx?
If the rx command is issued with the synchronous
option specified, the program
will wait until the ARexx command is completed before continuing.
You will find that the rx
command is useful with traps, such as the on trap, when you want the on command string to
be an ARexx command.
For example, the command on “Ready” address
MYPORT ready won’t
work, even if issued from ARexx using the Address
VLT command.
This is because the entire
command is sent to VLT to be executed.
VLT will set up the on trap, but will not be able to
recognize the command string, since it is an ARexx command.
Since the entire on command has
already been established as a VLT script command, VLT doesn’t know to return the second half
of the command--the
command string--to
ARexx to execute. Instead, VLT will return an error
message and abort the script. On the other hand, if you issue the commands
Address
VLT;
everything
to ARexx
‘on
“Ready”
rx
{address
will work, because VLT
to be executed.
HYPORT ready};
will see the rx command
delay
10’
and send the command
string
back
Unlike th_e extract
and fault
commands,
the rx command
can be invoked from within
VLT as well as from within ARexx.
Within
VLT, the rx command is primarily
useful when
programming
the user menu or keyboard functions because it lets you program these functions
in ARexx.
Delimiters
and Delays:
Keeping
an ARexx-sent
On Command
Alive
An on trap lasts only as long as the schedule that set it up. Normally,
this isn’t a problem,
since the schedule will end after the on command has outlived its usefulness. When an on trap
is created from ARexx, however, you run into a problem. An on command, sent from ARexx via
the Address
VLT command, is received by VLT as a one-line schedule. The only command the
schedule contains is the on command itself, so the schedule sets up the on trap and promptly
expires. Since the on trap always dies with the schedule, the on trap dies too-much
too fast to
receive the trap string that it was supposed to be waiting for. There is, however, a nice, sneaky
way around this difficulty.
Let’s take another look at the set of sample commands we used when
discussing the rx command.
Address
VLT;
‘on
“Ready”
rx
{address
HYPORT ready};
delay
IO’
You’ve probably
noticed the delay
10 command issued just after the on command.
You
may have also noticed that the pair of commands on “Ready” rx {address
MYPORT ready};
delay
10 are surrounded
by single quotes: ARexx string delimiters.
The delay command and
these delimiters
comprise the solution to the problem.
As both the on command and the delay
command are surrounded
by the delimiters, ARexx sends them to VLT without interpreting
them
and sends them to VLT as a single schedule. The schedule now has two commands in it: the
on command and the delay
10 command.
Until the ten-second delay occasioned by the delay
command times out, the schedule will still be alive-and
so will the on trap.
* Not to be confused
with
the RX cli
command
75
that
comes with
ARexx.
The
Wedge Command
By issuing the command
wedge keystrokes
Currently,
you can only WEDGEkeystrokes.
(portname),
you tell VLT to wedge all keystrokes and send them as packets to the port that you
have named. UEDGIRG keystrokes means that all keystrokes-everything
typed by the user-are
intercepted
by VLT and sent to your program before being acted on. This means that you can
write a program to intercept
certain keystrokes and change them into different keystrokes before
sending them back to VLT and your host. When is this useful. 7 Well, suppose there’s a character
on your keyboard
that your host misinterprets
as a logoff command.
You might want to make
sure that you could never type that character
by mistake.
To do this, you would WEDGEall
keystrokes,
have a program
check the incoming
keystrokes for the logoff character,
and then, if
the logoff character was found, send something
else to VLT in the logoff character’s
place.
When a keystroke is intercepted
and sent, as a packet to a specified port, it is sent. in the
where code and qualifier numbers
( c h aracter),
form KEYSTROKE
(code) (qualifier)
(iaddress)
indicate which key was pressed and whether a ctrl, shift, or alt key was pressed in conjunction
with it. The character
specification
is simply the character
associated with the key, while the
iaddress specification
keeps a history of previous keystrokes.
The iaddress specification
was added
as of VLT version 5.034; the change is, unfortunately,
non-compatible
with previous versions, so
must
when you switch to version 5.034, any programs
you have which use the WEDGEcommand
be modified
to deal with the iaddress specification.
On the next page is a sample
altered using the WEDGEcommand.
ARexx macro 30 WEDGEkeystrokes.
program which shows how keystrokes
Note that, since you are using ports,
can be intercepted
and
you will want to use an
I
I
/**
*
*
*
**/
Example
program
to
intercept
mp = openport(WEDGEPORT)
/*
* tells
**/
address
all
VLT to
intercept
VLT "wedge keystrokes
keystrokes.
opens a port
keystrokes
*/
and send them to WEDGEPORT
WEDGEPORT"
/*
*
for packets (each keystroke
is a
Loop until
quitflag
is 1, waiting
*
packet)
*/
do forever
= I then leave
if quitflag
t = waitpkt(WEDGEPORT)
/*
*
We got a number of packets.
Loop over all of them, sifting
out "null"s
76
*/
do if
= I
=
getpkt(WEDGEPORT)
P
if c2d(p) = 0 then leave
line = getarg(p)
/*
*
*
*/
It
Got a line.
parse it out.
parse
/*
*
*
*
*/
var
if
is of the form:
line
KEYSTROKE code qualifier
command code qua1 iaddr
char
iaddress
character,
.
handle this one
If we got an "a", quit.
If a "b", say that we'll
ourselves
by replying
a 0 error return
and replace it with a capital
Otherwise return
a 1.
if
if
= I
char = 'a' then quitflag
char = 'b' then do
t= reply(p.
0)
if (char = 'bJ) then address VLT "send
end
else
t = replycp,
1)
end
end
77
(C);
emit
(Cl;"
C!
Quick Reference Section
Some Conventions
We now turn to a description
of all the script commands.
In this description,
we will use
the following
conventions.
Abbreviations:
The capitalized
letters (unless indicated
otherwise)
indicate the minimum
number of characters that need to be specified. Usually, commands less than 6 characters in length need to
be specified fully, whereas with longer commands
a suitable abbreviation
is used.
Timeouts
{hh:mm:ss.xx}:
Timeouts
are specified in hours, minutes, seconds and hundredths
of seconds.
Units not
required need not be specified, i.e., the single digit “1” means one second, whereas “l:OO”
means one minute, etc.
VLT Action
Strings
{(string)
1 -(command)}:
A VLT action string is either a string that is sent to the host after ARP style escapes are
parsed, or a keyscript character followed by one or more VLT script commands.
ARP:
Some commands,
such ss send and emit, have a text string as their argument.
Most of the
time, you can use ARP escape sequences to insert special characters in such strings.
See
Appendix
E for a description
of ARP escape sequences.
{{ON
1 YES ) 1) 11 {OFF
I NO 1 0) II TOGGLE
}:
You’ll see this argument description
many times next to a main command in the list of VLT
script commands below. What this means is that typing the main command plus ‘On,’ ‘Yes,’
or ‘1’ will tell VLT to turn the option specified by the main command on, while typing the
main command plus ‘Off,’ ‘No,’ or ‘0,’ will tell VLT to turn that option off. Typing the main
command plus Toggle will allow you to toggle the option specified by the main command to
its opposite state.
The Script
Commands
The following
list is for quick reference; all entries will tell you what the command
does as
briefly as possible. Those commands which correspond to menu options discussed earlier will not
be discussed in detail, but the names are nearly identical,
so you should be able to go back and
review the detailed explanation
of the option/command.
@ (Name
of VLT/ARexx
script
file):
Can be used to execute . scp files as VLT native scripts, or to launch . vlt and . rexx scripts
as ARexx programs.
This command was described in more detail earlier in this chapter.
ACTivate
{VtlOO
I Tektronix
I Next}:
Brings either the VT100 screen, the Tektronix
screen, or the next screen in the screen list to
the front,. If the VT100 screen is not open, and Activate
VtlOO or Activate
Tektronix
is
received, the screen will be opened.
ANSicolormode
{{ON
I YES I 1) II {OFF
I NO I 0) II TOGGLE
}:
Switches ANSI color mode on or off. In ANSI color mode, color escape sequences for foreground and background
colors are recognized.
78
APPlicationcursor
{{ON
1 YES 1 1) 11 {OFF
1 NO I 0) II TOGGLE
}:
Switches Application
Cursor mode on or off. Using the APPlicationcursor
script command
is the same as selecting the Application
Cursor option on the text window’s Operations
Menu.
AUToscreentoback
{{ON
I YES I 1) II {OFF
I NO I 0) II TOGGLE
}:
Switches Automatic
Screen-to-back
mode on or off. When set to be on, this option causes
the screen to be put behind all other screens when a file transfer starts, with the file transfer
status window appearing
on the Workbench.
Otherwise,
the status window remains on
VLT’s screen, and VLT’s screen remains where it is.
BAUD
(baudrate)
MIDI
(new-value):
Lets you select a new data transmission
speed. Valid values are 110, 300, 1200, 2400, 4800,
9600, 19200, 38400, 57600, and Midi.
The Midi setting is programmable;
by issuing the
command baud midi
(new-value),
where new-value is the serial speed you would like to
use, you can equate the Midi setting with any baud rate, no matter how unusual.
For
instance, you could set Midi to the 600 bps rate used by X10 controllers,
or, if you wanted to
work at a faster rate than 57600, to 115400 bps. Midi is set by default to be 31250 bps. Note
that the new Midi value is not saved in the configuration
file and is not extractable
using
the extract
command.
Midi’s programmability
is provided strictly for peculiar situations.
BEEP:
Causes a beep. When a “Beep function” has been set, this function is executed. Otherwise,
when the volume is set to 0, the screen will flash. If the volume is not zero, the built-in beep
is sounded.
BEEPFunction
(beep function):
Lets you specify the command
to be executed in place of sounding the VLT bell.
The
.command
is a standard
VLT action string.
A common action string is -rx “address
‘PingServer
J beep’ ‘, which causes the beep command to be sent to the PingServer.
See
the documentation
for the PingServer program.
BREAK:
Sends a break signal to the host.
BREAKTime
(break
time):
Sets the time (in microseconds)
that the break signal lasts. The default is 75000.
BUFfersize
(size):
Sets the size of the serial buffer; the default is 2048 bytes, the lower limit is 128 bytes, and
the upper limit is 8192 bytes.
CANcel
{ALL
I ( script
name)
(cancelflag)}:
Cancels a specified script, or all scripts except the current one if all is specified. If a script
needs to be run without
interference
from other scripts, a cancel
may be placed as the
first command in a script. Script names are determined
by their first label. Therefore,
it is
recommended
to specify the name of the script in the form of a label at the beginning
of
the script.
When two scripts of the same name are present, the first script found will be
cancelled.
.
If cancel is called with a scriptname
and cancelflag specified, and if the script to be cancelled was run from an ARexx context, then, when the script is cancelled, the ARexx context
will now have a value assigned to VLT. CANCELFLAG equal to the cancelflag that you specified. This allows you to use scripts which sit around indefinitely
and can be cancelled by
various other scripts.
By using the cancelflag, you can then tell which program cancelled
the indefinitely
running script. For an example of how the cancelflag is used, see the script
VLTPhoneDial
. rexx.
79
CAPture
(file name):
Captures the session to a file with the specified file name. This script command is the same
as the Capture
Session option of the text screen’s VLT Menu.
CAPture
RAW
{{ON
I YES ] 1) I( {OFF
] NO ] 0) I] TOGGLE
}:
Select the capture mode.
With “raw” mode on, all characters are captured
as received,
including
carriage returns, line feeds and nulls. Otherwise,
nulls are stripped out, and files
are stored with linefeeds as line delimiters,
according to Amiga standards.
CAPture
{SUSPEND
] RESUME
] FLUSH
] OFF}:
Capture
Suspend and Capture
Resume suspend or resume capturing to the current capture
file. Capture
Flush causes the current buffer to be flushed to the capture file. Capture
Off
causes the current capture file to be closed.
CD (directory
specification):
Changes the directory out of which VLT is operating according to your specification.
CHeckserialerror
{ SERialdevicebusy
( BAUdratemismatch
] LINEerror
] PARityerror
] BUFferoverflow
] NODsr
] BREakreceived
] ON ] OFF
] DECimal
(error
mask)}:
Tells VLT to check for various errors. Any number of the options may be used in the same
call. Each option specified will be switched by default to the ON state; to turn an option
off, preface it by the OFF option. You can use the ON and OFF switches several times in
the same command, for example:
Ch S_er Off
Bau On Line
Par
Off
Buf
Once you’ve used the OFF switch, all options specified will be switched OFF until you
.use the ON switch again, at which point all options specified will be switched ON. The DECimal option can be used in conjunction
with the extract
command for checkserialerror.
The extract
command returns a bit mask of the current state of each option. A bit mask
in the identical format can be used to set the options in the checkserialerror
command
using the DECimal option.
CLEAR
[ CLOSE
]:
Clear the VT100 screen. If the CLOSE option is specified, the screen or window will also be
closed (see ACTivate).
COLOR
(color register)
(color value)
[(pen assignment)...]:
Sets a certain color register to a particular
RGB value. For example, color 2 FFF sets color
2 to white. The three heradecimal
digits specify Red, Green and Blue respectively;
F means
as possible’ while 0 means ‘no R/G/B
at all.’
‘as much R/G/B
When running with a custom screen in AmigaDOS
2.0, the specified color may also be
assigned to any of the following 8 pens: DETail, BLOck, TEXt, SHIne, SHAdow, HIFILL,
HIFILLText,
BACkground.
These assignments only affect VLT when the screen has four or
more colors. You must close VLT’s screen and reopen it in order to see the full effect of these
assignments.
The Shine and Shadow assignments are also used to determine shadowing of
all gadgets VLT uses. Since these assignments are not protected in any way, it is up to the
user to be very careful: system gadgets and window borders may seem to disappear if certain
pen assignments are made. In order to get the same colors and settings that are in effect on
the Workbench,
run the following script:
‘#
#
Set
VLT’s
custom
#
COLOR 0 AAA DETAIL
screen
up for
WB colors.
BACKGROUND
80
COLOR 1 000
COLOR 2 FFF
COLOR 3 57A
CLEAR CLOSE
ACTIVATE VT
To get pretty
#
#
Set
VLT’s
BLOCK TEXT SHADOW HIFILLTEXT
MIKE
HIFILL
good looking
custom
shadowing
screen
up for
on VLT’s
default
screen using VLT’s
default
colors, use
8 colors.
#
COLOR 0 000 DETAIL BACKGROUKD HIFILLTEXT
COLOR I 078 BLOCK TEXT
COLOR 2 A00 HIFILL
COLOR 3 090
COLOR 4 C6A
COLOR 5 EQO
COLOR 6 056 SHADOW
COLOR 7 999 SHIKE
CLEAR CLOSE
ACTIVATE VT
As it turns out, these settings also work pretty well in 4 colors, although the shine pen now
effectively will be color 3, and the shadow pen color 2. As said before, for a two-color screen
these settings have no effect.
COLOR
REQuest:
Causes the VLT color requester to open on VLT’s screen. The command will only return
when the user has completed his color selection.
CO’LUmns
(number
of columns):
Sets the number of columns to be displayed on the screen. If the number is larger than the
number that fits on the current screen size, the font may be changed to a smaller size.
CONFiguration
SAVE
[(filename)]:
Allows you to save VLT’s configuration,
as do the Save Configuration/Save
Configuration As options in the VLT Menu.
The configuration
file will be saved according to VLT’s
VLT’s
Method
of Searching
Paths).
If
path search methods (see Getting
Started:
the filename is not specified, the file will be saved over the last read preferences file. If the
filename is specified, the configuration
file will be saved with that name; if no directory
is
specified for this file, the path will be searched for the file. If VLT still can’t find the specified
file, it will create that file in the current directory.
CONTinue:
Tells VLT to continue a script that is currently
in a “pause,” “delay,” or “wait” state. Execution of the script is resumed at the script command following the pause, delay, or wait
command.
The COKTinue command can also be used with the name of another schedule as an argument.
This ability to continue one schedule from inside another allows you to synchronize
schedules. For example, consider two schedules, schedule A and schedule B. Schedule A consists
of the following commands:
#
#
ScheduleA.
#
@ScheduleB.
pause
scp
scp
81
...
# miscellaneous
while
Schedule
commands
B looks like this:
#
# ScheduleB. scp
#
. . . # miscellaneous
commands
continue
A
exit
quiet
After executing
Schedule B, Schedule A would normally
continue without
any regard to
Schedule B’s further behavior, but since A encounters the pause command, it waits. Meanwhile, Schedule B executes what it needs to execute, then uses the continue
A command,
which breaks A out of the “pause” state and allows it to execute the rest of its commands.
While Schedule A continues to execute, Schedule B exits.
CONSole
{Open
1 Close 1 Specification
(console
string)
] Height
(height)}:
Specified with open, opens the console window; with close, closes the console window. The
specification
suboption
lets you specify the console string, while the height suboption
lets you specify the amount of space left between the bottom of the text above the console
window and the bottom of the screen.
In order to implement
this command,
the old COBSolewindowadjust
was deleted. If you
don’t want VLT to change the text display just because there is a console, then specify a
console height of 0. The console height that you set with this command
does not actually
affect the size of the console windowit only specifies how much room to leave at the
bottom for a console (or whatever else). The default is 55 pixels.
CURsorheight
(height):
If the height specified is larger than eight, the cursor
Specifies the height of the cursor.
height will adapt to any font changes.
CUStomscreen
{{ON
1 YES ] 1) II {OFF
] NO ] 0) II TOGGLE
}:
When set to be on, Customscreenopens
VLT on its own custom screen. When CUStomscreen
is not on, VLT opens on the Workbench.
DELAY
(timeout):
Causes the script to pause for the specified amount of time.
DESTructivebackspace
{{ON
I YES I 1) II {OFF
I NO I 0) I] TOGGLE
}:
When DESTructivebackspace
is set to be on, the backspace key causes the cursor to erase
text as it moves backwards.
DISPLAYCrascrlf
{ON I OFF}:
Behaves just like the Display
CR as CR/LF
option of the Communications
Menu.
DISPLAYLfascrlf
{ON
I OFF}:
Behaves just like the Display
LF as CR/LF
option of the Communications
Menu.
DSR (number)
(device
status
report
string):
Chooses the primary
(number = 1) or secondary (number = 2) device status report string.
The string is a standard VLT action string.
ECHO
{{ON
I YES I 1) II {OFF
I NO I 0) II TOGGLE
}:
Lets you switch echo on or off.
ECHOLinefeeds
{{ON
I YES I 1) II {OFF
I NO I 0) II TOGGLE
}:
When on, the ECHOLinefeedk option causes linefeeds to be echoed to the screen as well as
carriage returns, when the return key is pressed in local echo mode.
EMIT
[ RAW
] (character
string):
Tells VLT to display a character string on the screen at the current cursor position.
If the
raw option is specified, the string is not parsed for ARP style escape sequences.
82
EXIT
[ {VLT
I [Quiet]
(next script)}]:
Lets you exit the current script, or quit out of VLT entirely if VLT is specified. When exiting
a script, a message is displayed to indicate that the script has terminated,
unless the quiet
option is specified. If a next script
is specified, that script will then be executed.
EXTRact
[ (field name)
1:
This command is available from ARexx only. It extracts information
from VLT in the form
of the VLT. stem variable. If no field is specified, all fields are extracted.
See the section on
the extract
command earlier in this chapter.
FAULT
(error
number):
This command is available only from ARexx: it reads the error number specified and puts
the corresponding
text explanation
in the variable VLT. Error.
All VLT commands set the
RC (error code number)
variable in an ARexx script to a code depending
on whether a
command was successful or not. One may call the Fault command with RC as an argument
to find out what the error code meant.
FIFO
{{ON
I YES I 1) II {OFF
I NO IO} II TOGGLE
}:
Behaves just like the menu option Fifo Pipes in the VLT
Menu.
FILE
{SENd
( RECeive
I GET}
[(file name)]:
Lets you send or receive the file with the specified file name to or from the host using the
currently
active transfer protocol.
FONT
(fontname):
Used to change VLT’s font. The font will still have to pass VLT’s notorious test of existing
in both an 8 point and an 11 point tall size. The width must be 8 point and the font must
be monospaced.
Function
(key number)
(command):
.Set function key indicated by the key number to a command.
Key numbers are in the range
1 to 128, where
01 - 10 are the regular unshifted function keys;
11 - 20 are the shifted function keys;
21 - 30 are the ctrl-ed function keys;
31 - 40 are the alt-ed function keys;
41 - 50 are the menu items right-Amiga
1 through 0;
51 - 80 are the screen gadgets;
81 - 90 are the alt-ed keypad keys 0 - 9;
91 & 115 are the alt-ed and shift-alt-ed
keypad Enter
92 & 116 are the alt-ed and shift-alt-ed
keypad 93 & 117 are the alt-ed and shift-alt-ed
keypad (
94 & 118 are the alt-ed and shift-alt-ed
keypad )
95 & 119 are the alt-ed and shift-alt-ed
keypad /
96 & 120 are the alt-ed and shift-alt-ed
keypad *
97 & 121 are the alt-ed and shift-alt-ed
98 & 122 are the alt-ed and shift-alt-ed
99 & 123 are the alt-ed and shift-alt-ed
100 & 124 are the alt-ed and shift-alt-ed
101 & 125 are the alt-ed and shift-alt-ed
102 & 126 are the alt-ed.and
shift-alt-ed
103 & 127 are the alt-ed and shift-alt-ed
* Only true if the HelpKeyLF
character.
option
keypad + or Help;*
keypad .
up arrow;
down arrow;
right arrow;
left arrow;
Delete;
hasn’t
83
been used to set the Help key to the linefeed
104 & 128 are the alt-ed and shift-alt-ed
Help;
105 - 114 are the shift-alt-ed
keypad keys 0 - 9.
The command takes the usual form of a VLT-action-string.
GOT0
(label-name):
Tells VLT to goto a specified label ( a name with a colon after it) and execute all the
commands after that label. The label name should be specified without
the trailing colon
when used with the goto command,
even though, when used as a label elsewhere in the
program, it must have the trailing colon.
GRAphicslock
{{ON
I YES I 1) II {OFF
I NO I 0) II TOGGLE
}:
Switches graphics lock on or off. When on, special characters from the host will not be
able to switch you from the text screen to the graphics screen. Otherwise,
certain control
characters and escape sequences can change VLT’s mode to the graphics mode. This script
command corresponds to the Lock Graphics
command found in the Graphics
Menu
of
the text screen and in the Control
Menu of the graphics screen.
HANDshake
{None
I Xon/xoff
I ‘I-wire}
[{Xon/xoff
I 7-wire
I cts/rts}]:
Lets you specify the handshake mode for the serial port. In case both Xon/Xoff
and 7Wire
In addition,
the keyword CTS/RTS
can be
are desired, both options may be specified.
substituted
for the 7Wire option.
HANGup:
Causes a “hangup.”
This is accomplished
by dropping the DTR signal on the serial port
for a period of 1 second. Notice that most modems can be set to ignore the DTR status,
and that -three-wire
cables do not usually convey this signal to the modem.
If this option
does not work, you may have to send a special command sequence to your modem, such as
“+ + +” followed by a delay and “ATH” in the case of Hayes compatible
modems.
HELpkeylf
{{ON’]
YES I 1) II {OFF
I NO I 0) II TOGGLE
}:
When you turn HELpkeylf
on using this script command,
the help key transmits
the line
feed character (ctrl-J) to the host. Otherwise,
the help key transmits
the sequence (esc)O 1
(lower case L) when in application
keypad mode.
string)
[else (command
string)]:
IF [NOT]
(acceptable
condition)
( command
of high-level
This command is now comparable
to the if. . . then flow control statements
programming
languages.
The IF recognizes a specific set of conditions
listed later in the
chapter; it also recognizes their negatives, specified using the not option.
If the condition
is met, the command string included afterwards is executed as if a schedule
command was
used. If the condition is not met, nothing happens and no error message is returned, unless
you have specified another course of action using an else clause. This command is especially
useful when you want to program keys to behave differently
in Alphanumeric
(VTlOO) and
Graphics (Tektronix)
mode.
The commands
execute on the same schedule that the if command
was called from, so
you can include goto’s that refer to labels outside the if’s command
string, as well as
exit
commands,
and have them work correctly.
By contrast with earlier versions of the
if command,
all the commands within the if statement
execute synchronously
with the
schedule in which the if appears. For example:
if VT100 (emit
“Avalon” ; delay
I; emit “Arthur”)
; emit “done”
If VLT is currently
in VTlOO.mode,
then Avalon will appear, followed, after a delay of one
second, by Arthur;
done will appear immediately
afterwards.
In previous versions, because
the commands within the if were executed asynchronously,
Avalon would appear, followed
immediately
by done, and Arthur
would appear a second later.
INTerlace
{{ON
I YES I 1) II {OFF
I NO I 0) II TOGGLE
}:
Lets you switch interlace on or off, for custom screens.
84
KERmit
BYE:
Sends a ‘Bye’ message to host, if the Kermit
protocol is currently
selected.
KERmit
DOWncase
{{ON
I YES I 1) II {OFF
I NO I 0) II TOGGLE
}:
Calling this option with either the YES, ON, or 1 subcommand
causes the names of received
files to be converted to lower case.
KERmit
FINish:
Behaves like KEBmit BYE, except that it does not log you off the host.
KERmit
PACKetsize
(packet
size):
Sets maximum
packet size to be used for Kermit
transfers.
KERmit
MODE
{Hostserver
I Sendreceive}:
Lets you select Kermit’s
transfer mode; your choices are “host is server” or regular send/receive.
KEY Map (keymap
name):
See the corresponding
menu option for more
Lets you select a different special keymap.
details.
KEYRepeat
{{ON
I YES I 1) II {OFF
I NO I 0) II TOGGLE
}:
Lets you switch key repeat mode on or off. When key repeat is on, any key pressed and held
will send characters repeatedly.
When not set, keys will never repeat.
KEYScriptcharacter
(ASCII
character
number):
By default, this is the ANSI character tilde, -,
Allows you to select the keyscript character.
ASCII number 126. Since many scripts assume the keyscript character to be a tilde, it is
usually unwise to change it.
LINES
(number
of lines):
Changes the number of lines to be displayed on the screen to the number indicated.
If
necessary/possible,
the font will be changed to a smaller or larger size.
L~CAL{{ON
IYES
Ii)
11{OFF
I NO IO} II TOGGLE}:
Sets VLT to operate in local
mode, which means that characters typed on the keyboard
are not sent on to the host. Note that text sent by other means does get sent to the host
(i.e. text sent from the console, pasted from the Review Buffer, or sent from scripts).
MENU
(menunum)
(itemnum)
[(subnum)]:
Executes specified menu item as if it had been selected from the main window’s menus. Note
that when counting items, the count starts from zero and the dashed separation bars used
in the menus must be counted.
MESsage
(message):
Posts a message using VLT’s message window. The ‘\’ character may be used to cause line
feeds. When the (message) is not specified, the current message window is closed.
(option
flag):
MISCFlags
{add I remove}
HISCFlags
allows you to set minor VLT options using the option flags listed below. Adding
sets an option flag to be on, while removing sets an option flag to be off. There is also a
program included with VLT, SetHiscFlags,
which allows you to set these flags using a very
comfortable
graphical user interface. See Appendix
F for details.
_
ALPhaonmainscreen:
VT100 screen, rather
When added, causes Tektronix
than on the Graphics screen.
AUToactivate:
When added, causes the VLT
finishes uploading or downloading
files.
DISplayoff:
When
INActivemessages:
active.
added, prevents
When
added,
alpha
text
to appear
screen to pop back to the front
new data from
being shown on VLT’s
causes message windows
85
mode
after
on the
VLT
screen.
to come up inactive
instead
of
HOEscapescripts:
NOLocalprint:
Appendix
C).
When
When
added,
added,
HOHessages:
When added,
file transfer status window.
nullifies
switches
prevents
the escape key’s ability
off the capability
VLT
from
for automatic
displaying
NOOundevunit:
When added, turns off the support
dard for arbitrating
access to serial devices.
to abort
scripts.
local
message windows,
for Chris
Wichura’s
printing
(see
including
the
OwnDevUnit
stan-
PADdedclips:
When added, sets the VLT review buffer up to pad files saved to the clipboard
so that all clip files (in accordance with IFF specs) contain an even number of characters.
Padding of clipboard files disagrees with some editors, so the option is by default off.
SERialshared:
When added, causes VLT to open the serial port in shared mode. You must
reopen the serial port before this takes effect, either by selecting the Reset menu option or
Hangup
option or by issuing the HANGup script command.
TBRNOAnsicolors:
When added, causes VLT to support
mode, as long as n is in the range between 30 and 37.
TBHNOBoundary:
When
added,
prevents
panel outlines
(csi)
n m sequences
from being
in Tektronix
drawn.
TBHNOPointer:
Affects the display of cross hairs in Tektronix
mode. Normally,
when cross
hairs are being displayed, the mouse pointer changes to a target box on the graphics screen.
When TEI[NOPointer
is added, only the cross hairs are displayed.
UNBuf f eredcapture:
When added, capture to a file is unbuffered.
ful when capturing
to strange devices; see The User Interface:
.section on Fifo’support
for more details.
This is occasionally
useText Screen
Menus’s
VTlOOtoprow:
When added, forces the top four keys of the numeric keypad to send VT100
sequences under all circumstances.
MISCFlags
(number):
The old MISCFlags
interface, for reasons of compatibility,
is supported
in addition
to the
newer interface discussed in the previous entries. The old-style HISCFlags
assigns a number
to each flag; any of these bitflags is set to be off by a value of zero; moreover, all of these
flags are by default off. To set a bitflag to be on, add the number specified below after the
HISCFlags
command.
PADdedclips
DISplayoff
NOMessages
SERialshared
TEKNOPointer
UNBufferedcapture
NOLocalprint
ALPhaonmainscreen
NOOwndevunit
TEKNOAnsicolors
INActivemessages
AUToactivate
TEKNOBoundary
VTlOOtoprow
-
1
2
4
8
16
32
64
256
512
1024
2048
4096
8192
16384
86
NOEscapescripts
-
32768
In order to set more than one bitflag to be on, add the numbers which set the two flags
to be on and include the result after the MISCFlags
command.
For example, to set Bit 0
and 1 to be on, type 3 after the MISCFlags
command.
To set Bits 0, 1, and 2 to be on,
type 7 after the l4ISCFlags
command.
To set Bits 1, 2, and 4 to be on, type 22 after the
HISCFlags
command.
Et cetera. To reset a bitflag to off, add up the current values of the
other bitflags and include that number after the HISCFlags
command.
MOUsesupport
{{ON
I YES
I 1) II {OFF
I NO I 0) II TOGGLE
}[shift]
[ctrl]
[alt]
[selectup]
[selectdown]
(program
string):
When specified as on, the left mouse button without
shift, ctrl, or alt keys is set to auto
for both mouse button clicks and releases (selectdown and selectup).
By default, when you
use this command, no qualifiers are specified and selectdown is implied. The program string
must start with a - to be interpreted
as a script command, with the keyword auto being the
one exception.
Since the command is basically the same as the menu option, see The User
Interface:
Text Screen Menus
for more details.
MOVecursor
(xl) (yl)
[(x2)] [(y2)]:
are specified.
Moves the location of the cursor to (x, y) w h en only the first two coordinates
(1, 1) is the upper left-hand corner. The maximum
values are determined
by the displayed
number of lines and columns. Notice that this command does not notify the host of the new
cursor location.
When at least the first three coordinates are specified, this command applies to the secondary
cursor. The second set of coordinates
are row and column specifications,
either in absolute
screen coordinates
or relative to the text cursor; you indicate which you want used by
prefacing the coordinate
with either ABS or REL. The coordinates
can also be specified as
MOUSE, in which case that coordinate
is set to the current X or Y position of the mouse,
depending on which coordinate
you specified in this way. For example, the command
move rel 0 mouse 12 mouse
would display the secondary cursor with the top/left
corner positioned at the column of the
edge would be at the current
current text cursor (rel 0) and at line 12. The bottom/right
mouse position.
Note that the coordinates are sorted appropriately
to disallow negative-sized
cursors. To see this command in action, check the scripts in NeatStuff.
scp (see Appendix
9
NUMerickeypad
{{ON
I YES I 1) )I {OFF
I NO ] 0) II TOGGLE
}:
Switches numeric keypad mode on or off. When set, the keypad transmits
the characters
as displayed on the key caps. Otherwise,
the keypad transmits
standard
VT100 escape
sequences.
ON (character
string)
(command):
Waits until the specified character string is received and then performs the specified command. Only a single command may be specified. On traps remain in force until the context
they belong to expires. If another on trap is specified with the same character string, the new
on command supersedes the old one; if an on command is specified with the same character
string but an empty command string, the trap will be removed.
PARity
(parity
specification):
Selects the parity to be used for serial port communications.
Valid values are given by a
sequence of three characters:
the number of data bits (7 or S), the parity mode (N, M, S, E
or 0), and the number of stop bits (1 or 2), e.g. 7El or 8Nl. Alternatively,
the following
shortcuts may be used: None (8Nl), Mark (7Ml),
Space (7Sl), Even (7El) or Odd (701).
87
PASte
{CLIP
I FILE
(filename)
I STRING
(string)
I CANcel}
[AUTO]
[PREfix
(string)]
[DELays
(line-delay)
[(character
delay)]]:
Complicated
command which the Paste Menu uses to accomplish its operations.
Requires
being used with a loop to actually paste something; described in more detail, along with use
of subcommands,
earlier in this chapter.
PAUse:
Halts execution at this point in the script and waits for a continue
or goto.
PRELoadgraphics
{{ON
I YES I 1) I] {OFF
I NO I 0) I] TOGGLE
}:
When ON, causes VLT to open the graphics screen on startup.
When not set, VLT only
opens the graphics screen when needed.
PREScroll
(number
of lines):
Sets the maximum
number of lines to be prescrolled.
If the currently available data indicates
that the screen needs to be scrolled a number of times, all scrolls up to the maximum
number
set with this command will be performed at once. This increases scrolling speed.
PROGrammode
{{ON
I YES I 1) II {OFF
I NO IO} II TOGGLE
}:
Switches program mode on or off.
REFresh:
Refreshes the text on the screen. Sometimes useful when running on the Workbench
screen.
RENdermode
{Quick
I Color
I Normal}:
Sets the rendering
mode.
“Quick” means that all text will be rendered in monochrome
mode, but very quickly, whereas “color” means that all text attributes
will be converted
to different colors, and also ANSI color sequences are recognized to an extent.
See also
“ansicolormode.”
In “Normal”
mode, bold text will be displayed in a different color, but all
VT100 text attributes
are displayed as intended.
REView
(review
command)
[(argument)]:
‘Executes a review buffer command.
All commands consist of a single character, and some of
them allow an argument.
There may be white space between the command and the argument
but there doesn’t have to be. The allowed commands and arguments are shown in the table
at the end of this chapter.
REXxportname
(name):
Changes the name of VLT’s ARexx port to the specified name. This command can only be
used if no outstanding
ARexx scripts are around.
RX [ SYNChronous
] (ARexx
command):
If the synchronous
option is specified,
Submits the specified ARexx command to ARexx.
the command is executed synchronously:
the program will wait until the ARexx command
has completed before continuing.
SCHedule
(commands):
Creates a new context and starts executing the specified commands in that context. Multiple
commands need to be separated by semicolons.
SCHedule
FUNCTION
(key number):
Similar to schedule;
can be used to execute the contents of a function key.
SCREENDepth
(depth):
Sets the depth of the screen. Values from 1 to 3 are allowed.
SCREENGadgets
{{ON
I YES I 1) II {OFF
] NO I 0) II TOGGLE
}:
Switches screen gadgets on or off. When on, the standard screen displays 30 gadgets at the
bottom, all of which are programmable.
The display will be adjusted to fit the set number
of lines in the remaining area.
SEND
[ RAW
] (character
string):
Sends a string of characters to the host. If raw is specified as an option, the string is not
parsed for ARP style escape sequences, but by default it is.
88
SENDLinefeeds
{{ON
I YES I 1) II {OFF
I NO I 0) II TOGGLE
}:
When ON, this option causes linefeeds to be transmitted
in addition
to carriage returns,
whenever the return key is pressed.
SERialdevice
{(device)
[ (unit)
] I none}:
Selects a different serial device to be used. Optionally,
select the unit number to be used. If
the unit number is not specified, the previous unit number is assumed. If the none option is
specified, the current serial device is closed.
SHIfttabesctab
{{ON
I YES I 1) II {OFF
I NO I 0) II TOGGLE
}:
When this option is ON, the TAB key transmits
(esc) (tab) to the host when the shift key
is pressed at the same time. Some hosts interpret
this sequence as “back tab.” When not
set, the shifted TAB key transmits just (tab).
STRipbit
{{ON
I YES I 1) II {OFF
I NO I 0) II TOGGLE
}:
Switches stripping
of the high-order
bit of data coming in through the serial port on or off.
This is only useful with parity settings that have 8 data bits.
SWApbackspacedelete
{{ON
I YES I 1) II {OFF
I NO I 0) II TOGGLE
}:
When ON, this option swaps the functions of the backspace and delete keys. This option is
useful to VAX users.
(itemnum)
(subnum):
TEKtronix
MENU
( menunum)
Executes the specified menu item as if it had been selected from the Tektronix
window menus.
Note that when counting items, the counting starts at zero and the dashed separation bars
in the menus must be counted also.
TEKtronix
PAN
[xl [yl [x2 [y2]]]]:
Using the arguments, specify a starting and ending point. The TEK PAN command will cause
the ending point to wind up in the starting point’s original location.
If x2 and/or y2 are
missing, they are set to equal xl and/or yl. If xl and/or yl are missing, they are set to
zero. The coordinates
are in pixels, so beware!
TEKtronix
PRINT
{MAXimum
I SMALL
I MEDIUM
I FULL
I LARGE}:
Behaves like the Print
Bitmap
menu option of the Graphics screen’s Image
Menu;
lets
you print the image currently
displayed on your graphics screen using a printer attached to
your Amiga. Each option allows you to print the picture in a different size: the maxiumum
size, small size (one-third
page), medium size (two-thirds
page), large size, or full page size
(FULL and LARGE are the same option, really).
TEKtronix
SAVEas
{ILBM
(filename)
I Postscript
(filename)
I BINary
[(filename)]
I COMmand
(filename)}:
Corresponds
to the various save commands in the Image
Menu.
The ILBM option corresponds to the Save Bitmap
As IFF File option. The Postscript
option corresponds to
The BINary option corresponds
to the Save As
the Save as PostScript
menu option.
New File and Save As Current
File options: if a file is not specified, the current display
is saved to a file opened in a previous attempt, overwriting
that file’s contents. The COHmand
option corresponds to the Save As Script
Commands
option.
TEKtronix
ZOOM
[xl [yl [x2 [y2]]]]:
The coordinates
specify, in pixels, the upper left and lower right corner of the area to be
zoomed in on. If x2 and/or y2 are missing, they are set to equal xl and/or yl. If xl and/or
yl are missing, they are set to zero. If the size of the box is zero, as it would be if ZOOM
were called without
any arguments,
the action will be to zoom to full size (in other words,
to unzoom the picture).
TEKtronix
.....
There are several other TEKtronix
script commands available. Since they are rather arcane,
we won’t discuss them here, but you can find out what they are by saving a graphics file as
script commands.
To do this, use the Save As Script
Commands
option of the Image
89
Menu
(see The User Interface:
Graphics
Screen Menus).
TITlebar
{{ON
I YES I 1) II {OFF
I NO I 0) II TOGGLE
}:
When this is switched on, VLT’s custom screen will display a titlebar on both the alphanutake the title bar height into
meric screen and the Tektronix
screen. VLT will correctly
account when calculating
where to display text.
TRACE
(flags) (command-delay):
When (flags) is set to a non-zero value, certain tracing options are switched on. When
(command-delay)
is non-zero, a delay is inserted after each line of trace output.
The delay
is in ticks, i.e. 50 ticks is one second. The flags variable consists of a mask: bit 0 enables
tracing of every line in the script, bit 1 enables tracing of all traps (i.e. ons, waits and
traps).
Also, little tick marks are displayed on the screen at or near the words that caused
the trap. Bit 2 causes the output to be displayed in VLT’s Console window (if it is open) and
bit 3 causes the output to be appended to the file VLT.log in the current default directory.
The file is closed after each addition, so that in case of crash the file most often is preserved.
Example:
trace 15 20 causes both script line tracing, trap tracing, and the output is sent
to both the console (if it is open) and to the log file. There will be a .4 second delay after
script may cause
each script line and each trap line. Note: if you suspect that a particular
a crash, be warned that logging to VLT.log may be hazardous to your hard disk. Better set
your default to rad:, and use DiskSalv to recover the file from rad: if rad: doesn’t recover by
itself. If a script causes a crash, be sure to report the problem.
TRANsfer
Mode
{image
I text}:
In text mode, files are assumed to be text
Selects image or text mode for file transfers.
Also, ctrl-Z’s in the file may be used as an
files, and-end-of-line
sequences are converted.
end-of-file indication.
TRANsfer
Protocol
{External
I Kermit
I Xmodem}:
Selects the transfer protocol:
one of Kermit,
XMODEM
or External.
In case of external
protocols, use XPR Select to determine which external protocol is to be used.
TRAP
(trap-operation):
This command was discussed in detail earlier.
VOLume
(volume):
Sets the volume of the beep to be used. When zero, the screen is flashed instead.
When
positive, the usual VT100 beep is sounded. when negative, a higher-pitched
shorter beep is
used. This is, however, superseded by any BEEPFunction setting.
WAIT
(character
string)
[(timeout)]:
Waits until the specified character string is received from the host, or, if specified, until the
timeout period has expired. If this is the last command before returning
to a REXX process,
the return code will reflect that a timeout ocurred. Wait traps with timeout are equivalent
except that contrary to on traps, the
to “on (character string) continue; delay (timeout);”
The character string is parsed for ARP style
wait trap is only valid for one occurrence.
escape sequences.
WEDGE
(item)
(port
name):
If the specified port name exists,
Currently
only one item can be wedged: KEYStrokes.
a REXX message will be sent to that port of the form: KEYSTROKE (code) (qualifier)
(iaddress)
(character)
where the code and qualifier numbers are the key code and lowest
order 8 qualifier bits of the key pressed by the user. Iaddress keeps a history of all keystrokes,
while the character
is the translation
of code and qualifier using the current default keymap.
If no translation
is available, this field will be absent. Note, that the special case where the
see
space bar was pressed will look the same. For an example of the use of this function
earlier in this chapter.
90
WINDOW
(leftedge)
(topedge)
(width)
(height)
I OPEN
I CLOSE:
Called with any of the first four arguments,
allows you to size VLT’s main window.
All
arguments are optional.
Specifying 0 for width and/or height will cause the window to open
to the right and/or bottom edge of the physical display. Missing arguments default to 0, but
the arguments must be given in the order specified above, so, for example, you cannot omit
(leftedge) if you wish to specify (topedge).
VLT will check to see if the dimensions given are
feasible, but only if the main window is already open. If the window size is set while the
window is closed, subsequent opening of the window may not work if the sizes are too large;
VLT will try to open the window again, probably with the standard 640 by 200 sizes. The
size is remembered
if you close and then reopen the window, or if you switch to a custom
screen and then back to the Workbench
during the same session.
Called with the open subcommand,
this command activates VLT’s VT100 screen, but has
this
no effect if the VT100 screen is already active. Called with the close subcommand,
command closes down VLT’s screen without
clearing it. When the window is reopened, the
text that used to be there will still be there.
WORkbenchcolors
{{ON
I YES I 1) II {OFF
I NO I 0) II TOGGLE
}:
When this option is ON, uses the Workbench
colors rather than the saved custom screen
colors. Note that this command does not change the pen assignments (see the COLORcommand).
WRAP
{{ON
I YES I 1) II {OFF
I NO I 0) II TOGGLE
}:
Switches wrapping of long lines on or off. When set, lines are broken at the current maximum
column number and the remainder
is displayed on the next line. When off, lines are not
wrapped,
and the cursor remains at the maximum
column accesible while overwriting
the
last character with all following characters according to VT100 standard.
XMOdemmode
{iK
I 128 I CHecksum
I CRC}:
Options not specified will be carried over from the
Sets up to two XMODEM
options.
previous setting.
XPR
INIT
(init string):
Sends the specified initialization
string to the current protocol.
See the documentation
of
the protocol.
NOTE: It used to be the protocol had to be set using the External
option, but
since all protocols are effectively external these days, this requirement
was relaxed. It is up
to you, however, to make sure the correct protocol is currently loaded.
XPR
SELect
(external
protocol):
Notice, that this command does not set the current
Selects a different external protocol.
transfer protocol -see
TRANsfer Protocol.
Conditions
The if
Recognized
command
I
recognizes
by the
a large number
Table
of possible
conditions,
of IF Conditions
Tektronix
True if VLT
is in Tektronix
VT100
True if VLT
is in VT100
Echo
Command
IF
mode.
91
turned
are listed
I
mode.
True if Local Echo is currently
which
on.
below.
Table
of IF Conditions
(co&).
NUMerickeypad
True
if the keypad
is currently
in numeric
APPlicationcursor
True
if the cursor
3WApbackspacedelete
True
if the backspace
HELpkeylf
True
if the Help key is set to send a linefeed.
SHIfttabesc
True
if the
keys are currently
Shift-Tab
mode.
in application
mode.
and delete keys are swapped.
sends
both
a tab
and
an escape
character.
True if VLT
LOCal
is in local
mode,
i.e. keystrokes
are not sent
to the host.
ECHOLinefeeds
SENDLinefeeds
True
if the return
turn
and linefeed.
True
if the return
turn
and linefeed.
True if VLT
CLIP
key, when
pressed,
ethos
a carriage
re-
key, when
pressed,
sends a carriage
re-
currently
has something
SECONDcursor
True
if the secondary
cursor
SELECTdown
True
if the left mouse
button
The Review
in its clipboard
is currently
buffer.
displayed.
is currently
pressed
down.
Command
The VLT script command
review
is used to manipulate
the history buffer from the Console
or from a script. There are a variety of single-character
subcommands,
which, appended to the
basic review command,
allow you to manipulate
the history buffer and review window in a variety
of ways. Some of these subcommands
allow or require an argument,
some do not. A table of
subcommands,
arguments,
and the subcommands’
purposes is therefore included on the following
pages. Note: Most of the commands
in this table are available in the menus of the review bufler
window.
Table
of Review
Subcommands
Argument
Meaning
A
(filename)
Save selected
B
(size)
Command
Set buffer
Clear
C
SD,1
lines to filename
size to (size) bytes
review
buffer
Select,
Deselect,
Invert
all lines
WV
S
Select,
Deselect,
Invert
Search
S,D,I
T
Select, Deselect,
Invert
from search line to
top
92
line only
Review
Subcommands,
Argument
:ommand
Meaning
B
S,D,I
cont.
Select, Deselect,
Invert
from search line tc
bottom
(lines)
J
Jump
relative
to search
lines.
Negative
line
numbers
by
(lines)
jump
towarda
top
(line)
K
Jump
relative
line;
Negative
to (line)
from
numbers
tom; -1 is bottom
0 is toI
from
hot
line
F
(string)
Search from top Forward
R
(string)
Search
from
top.
count
bottom
for (string).
in
Reverse
for
(string).
G
Repeat
search Forward.
T
Repeat
search Reverse.
H
-
Search from
(string)
last search position
Forwarc
for (string).
k
Search
(string)
from
last
search
position
in Re,
verse for (string).
M
UL, UP, T, DL, DP, B, LC, LP, LM,
RP, RM
RC,
Move: Up Line, Up page, to Top, DOWI
Line, Down page, to Bottom,
left Char
Left
Page,
Right
to left
Margin,
Page, to Right
N
Append
0
Open window
P
New page
Q
Update
window
Append
to specified
V
(filename)
Char
Margin.
to file
Resave to current
W
Rigth
file
file (overwrites
existing
file)
X
If previous
(Nanie)
ronment
line.
command
variable
Save to Clipboard
93
to current
Else erase the environment
(name).
z
successful,
(name)
set envisearcl
variablt
5
Troubleshooting
\
Troubleshooting
This section discusses solutions to some of the more common problems, mistakes, questions,
etc. that you may encounter while using VLT. They are listed here so that you do not have to go
hunting through the entire manual for your particular
problem; there is, however, no guarantee
that your problem will be in here, as we are not omniscient,
so you may have to do some hunting
anyway....
Syntactical
Questions,
Tricks,
and Bloopers
Ql.
Whenever I invoke the beep command or expect a beep, I get a message window telling me
that srx is not a valid command.
My Beep Volume
is set to call a script. What do I do?
Al.
This is a pitfall for those users who wrote scripts in VLT’s old scripting
language.
As of
version 4.846, the srx command is defunct. Just go into program mode, select Beep Volume,
and change srx to rx (for more on the rx command,
see Writing
Scripts)
92.
Traps
A2.
Yes, well...that
comes through
93.
How do you send control
A3.
To send control
Q4.
Can I have multiple
A4.
Yes, you can, but watch
Q5.
If I don’t
place.
A5.
Yes, scripts can become spaghetti code like you’ve never seen if you don’t cancel out-of-date
ons. Make it a point of style not to leave on traps hanging around unnecessarily.
(This goes
for trap commands
too).
don’t
work
when I funnel
text
happens to be true.
Fifo Pipes bypasses
to the screen through
Fifo
Pipes!
There’s nothing you can do about
the trap checking code.
it, since text
that
characters?
characters,
use ARP
sequences:
+E *N *R +X01 etc. See Appendix
E.
ons?
out for spaghetti
cancel out-of-date
on statements
code (see next question).
as I go along,
my script
starts
going
all over the
QS. How do you cancel an on?
A6.
By specifying
the same on with
exiting the current schedule.
Q7. I’m having trouble with
a script) to call a script
an empty
command-on
“foe”
I’ “, for example-or
making the quotes work. How do you program
when the quoting has to be like this....
97
BEEPFunction
by
(from
beepf
“-rx
“address
and that doesn’t
just don’t nest.
A7.
work?
‘PingServer’
BEEP” ”
It all gets misinterpreted,
because the two levels of double
quotes
If you take advantage of VLT’s ability to interpret
various types of brackets and parentheses
as well as quotes, you won’t have a problem.
Anything
that’s interpreted
by VLT can be
quoted in 6 or 7 ways using parentheses, braces, etc.; moreover, all these symbols nest. On
the other hand, what goes to ARexx must have single or double quotes around it, while what
goes to the shell must have double quotes. ARexx also understands
double single quotes and
double double quotes, which will be translated,
respectively,
to a single quote and a double
quote. Remember that each level of interpretation
eats one level of quotes.
As for using BEEPFunction...To
use this command from the menu, select Program
Mode
as Function
Keys/Menus,
then select Beep Volume
and enter the string as follows:
-rx “addxess
‘PingServer’
beep”.
To use the command from a script, you’ll need one
more level of quotes, but since these will be interpreted
by VLT you can use, for example,
parentheses:
beepfunc
(-rx
“address
‘PingServer’
beep”)
You need the parentheses to tell VLT that you want both -rx and “add. . . beep” to be part
of the beepfunction.
By the way: since rx is also a VLT command, its argument can also
use parentheses or braces, such that
beepfunc
[-rx
{address
is also fine, or even
.‘beepfunc
(-rx
(address
‘PingServer’
beep}]
‘PingServer’
beep))
since all these brackets nest. With
when you really need them.
these bracketing
conventions
you can save the quotes for
QS. When I try to program
the User Menu
with taglines, it doesn’t work: first, no tagline
appears, and second, it sometimes decides that the tagline is part of the command!
What
am I doing wrong? Here’s my command syntax:
*send
A8.
“gone”
#
Gone#
Well, your problem is that second # sign. When you type a one-line command string into
the programming
requester, VLT looks for the last # sign and decides that what follows is
the comment/tagline.
It looks at the # after the Gone, sees nothing after it, assumes the
tagline is empty, and, if your ‘command’ is the name of a script file assumes the preceding
# Gone is part of the command.
Don’t follow the tagline with another #.
Q9. I have been trying
add (host
........
......
quit:
beep
exit
Trap
to work with
shut)
traps.
(hangup;
Everything
goto
quit)
98
I have tried so far works except
this line.
The script
executes fine except for the goto, which returns with a Script
error
in line
0
Label does not exist.
I can add a command after the goto, such as BEEP,
and it will get executed, but not the goto. I have tried all kinds of quoting to no avail. If
you substitute
the EXIT for the goto the script will not exit.
-not
A9.
found-
The problem is that the trap command can’t do a goto to what it considers “outside” its
domain of influence.
The (hangup;
goto quit)
in the trap command is a little script all
by itself. This little script knows nothing about labels in the main script. The best way to
fix it in this case would be something like:
Oki (host shut) goto
.................
.........
hangupquit:
h=wup
beep
exit
&lo.
What’s
wrong
with
RX JJsendJ"Jl
AlO.
hangupquit
this line?
Ispace(date('n',date('i')-2),O)i
I'*R"'
worked in versions of VLT prior to version 4.846 because VLT had
The line RX ) ‘etc....
this funny system of allowing two quotes (either J ’ or ” “) in front of a line to indicate that
all the rest was part of the argument.
This is no longer allowed. To fix your line with the
see the
minimal amount of pain, replace the J J with )), or I], or }}. For more information,
‘explanation
of the Universal
Quote at the beginning of the Writing
Scripts
chapter.
Programming
Problems
the User Menu entries. 7 I tried editing the VTPref s . dat
line and editing it yields a VLT that hangs. What do
Qll.
What’s the right way to manipulate
file, but it’s a long, tightly-formatted
I do?
All.
First, the right way to manipulate
the User Menu is to use Program
Mode.
Switch it on
and select the user menu item that you wish to program. A requester will appear....for
further
detail, see The User Interface:
Text Screen Menus.
Second, you now have a problem.
The VTPref s . dat file has a special format and when you tried to edit it, you reformatted
it completely.
VLT will certainly
be quite upset with this.... Delete the VTPref s . dat file
completely, open VLT (yes, VLT can open without a VTPref s . dat file), set your parameters,
and select Save Configuration.
Now you have a properly formatted
VTPref s . dat file again.
Q12.
The idea of native VLT and ARexx scripts in parallel is for historical reasons, isn’t it? With
the addition of the trap facility, is there any reason I shouldn’t use ARexx scripts exclusively?
A12.
There’s indeed no reason to use VLT native scripts if you prefer ARexx ones, although you
may find some operations are slightly more difficult to accomplish from ARexx. On the other
hand, there are operations you can only do from ARexx, so it balances out.
99
Q13.
Usually, when I use the @ @ command, I can get everything
to work, but if the file I want to
execute lives in ram:, or if the filename has spaces in it, VLT returns an error message.
A13.
Due to a technical problem with the AREXX
name of your script file, or the directory/device
Q14.
I defined a short script that just blinked the cursor and bound it to m 1. Now, when I hit
m 1 a few dozen times, the cursor goes wild and VLT’s response gets jerky.
A14.
It is definitely
true that VLT gets jerky when you have a few dozen scripts running
Have you tried Abort
All Scripts?
You probably shouldn’t have that many scripts
at the same time.
Directory
port, you cannot use the @ @ command if the
in which it lives, has one or more spaces?
around.
running
Dilemmas
915.
Whenever I start up VLT from the CLI, I would like its default directory to be the directory
I’m currently
in. In my case, however, VLT always comes up in sys : exam/pie.
How do I
fix this?
A15.
You have probably saved your configuration
after explicitly
changing your current directory
To fix it, select Change
Directory
again,
using the Change
Directory
menu option.
remove ali text from the string gadget of the requester, and click on Okay. Then select Save
Configuration.
&IS.
When I’m receiving a file using Kermit,
What if I want it to go elsewhere?
A16.
Before you start the transfer, change VLT’s default directory using the Change
Directory
option. Make the new default directory the directory where you want the file to go.
it always
goes to my current
You can also set the download path using Kermit’s
External
xprkermit
environment
variable (see the documentation
which
default
Options
requester or the
comes with xprkermit).
Q17.
How do I get VLT to reuse the color/screen/etc
settings I set up? It saves them
creates a file) in S: , but the next time I load VLT it’s back to the old settings.
A17.
You saved your setting using Save Configuration,
right?
directory?
Well, the S: directory does not have a particularly
path; if, when you start VLT up from scratch, there is a VTPref
directory, VLT will use the settings there. So, if you want the
to be used, make sure that there isn’t a VTPref s .dat file in
VLT’s search path (see Getting
Started:
VLT’s
Method
goes for using VTPref s . dat files in all lower-priority
directories.
* In this context,
AREXX
stands for asynchronous
100
REXX,
directory.
(at least it
And saved them to the S:
high priority
in VLT’s search
s . dat file in a higher priority
settings in your S: directory
any directory
ahead of S: in
of Searching
Paths).
This
not AmigaREXX.
Data
Flow
Difficulties
Ql8.
I can’t get m
H to work
for hanging
up! The menu option
A18.
You should check the dots on your modem to
indeed the menu Hangup function
won’t work,
modem to recognize DTR, if you can. Another
a cable that doesn’t have the DTR line hooked
Q19.
I followed the instructions,
What’s wrong?
A19.
File transfers are tricky things. Very often the problem is that somewhere between the Amiga
and the host, some piece of hardware (like a terminal multiplexer
or an overly smart modem)
is not transmitting
all data exactly as the Amiga or the host sent it. These problems
can
range from flow control problems to parity translations
and usually have to be resolved on
a case-by-case basis. Talk to your host’s system manager.
Q20.
Sometimes
when I’m logged on I get this burst of noise, after which VLT becomes really
sluggish. It takes a second or so for every character I type to appear on the screen and I get
this message requester saying “Temporarily
unable to send data. Waiting....”
The requester
also has two gadgets, RETRY
and RESET.
Sometimes the requester goes away by itself. If
I click on RETRY,
then sometimes everything
is just fine, but other times the requester just
reappears.
Clicking on RESET usually solves the problem but occasionally
I lose data, and
sometimes I get logged off.
A20.
This happens occasionally
when you are using the Xon/Xoff
handshaking
mode. In that
mode, flow control is performed
to keep both VLT’s and the host’s buffers from overflowing.
An Xoff signal from the host tells the Amiga to stop sending data over the line, whereas an
Xon tells the Amiga to start sending again, and vice versa. Sometimes
on noisy lines the
noise will look to VLT like an Xoff character.
VLT can’t tell whether an Xoff came from
line noise or the host, so the next time you try to send something
to the host, VLT will
sit and wait until the host sends an Xon. Only, since the host never sent the Xoff, it also
won’t ever send the Xon. In principle,
the Amiga is now dead, waiting patiently
forever for
the Xon which will never come. With lesser terminal
programs the only way to recover is
Whenever
you try to send data to
to reboot.
VLT, however, tries to be a little smarter.
the host, it looks at how much data it is supposed to send, and at the current transmission
speed (baud rate). It calculates from this how long it should take to send the data, adds a
margin for error, and then starts a timer. Next, it sends the data off to the host; usually this
will be accomplished
well before the timer times out, and everything’s
hunky dory. When,
however, the Amiga has received an Xoff character (for whatever reason) VLT won’t really
be able to send anything
and the timer will time out while VLT is still trying to send the
data. If this happens, VLT will store the data and add any new data you’ve meanwhile
tried to send, and try to send the whole bunch again. If it still fails, it puts up the message
requester “Temporarily
unable to send data. Waiting.....”
If you wait, and if the Xoff was
indeed sent by the host or modem, the serial port may become unstuck by itself and the
requester will go away. If you click on RETRY,
then the timer will be restarted,
and if the
In both of these cases, you are relying on
device is still stuck, the requester will reappear.
the serial device to unstick itself. If you click on RESET, VLT will reset the serial port, and
the serial port then effectively
will have forgotten
that it ever received an Xoff. However,
but no matter
what
101
does not work
either.
see if it is set to ignore DTR. If it is, then
since it relies on the DTR signal. Set your
possible cause of this problem:
are you using
up?
I do, file transfers
to the host don’t
work.
you may lose data, even though the data that you were about to send should be sent again
after the reset. Moreover, line noise can go both ways. In such a case, it may well be that
the connection is broken because of it; this is why you are sometimes logged off of the host.
Conversely, when a connection to the host is broken (for whatever reason-including
telling
the host to log you off) the act of disconnecting
sometimes causes a lot of line noise, resulting
in the same problem.
If you run into this a lot, and if you usually run at low baud rates
(2400 or so) you may try to run with Handshaking
set to None. While in that case no flow
control is performed,
it is also fairly unlikely that a lot of data will stack up, so you may not
need flow control. At higher baud rates, however, it does become more likely that you could
lose some data without flow control. In that case, try to use CTS/RTS
handshaking,
since
it often avoids problems that show up with Xon/Xo#.
Q21.
I don’t
A21.
There are several programs that, when run at the same time as VLT, cause VLT to drop
not VLT, are causing the problem.
characters from the data it receives. These programs,
Suspect programs are those that mess with the way the Amiga multitasks
or that try to
monitor the tasks in the system (although not all of these programs cause difficulties).
There
are also some hard disk controllers
whose software causes problems, in which case data loss
usually occurs only during hard disk activity.
Q22.
When I log off BIX I am getting a burst of noise that has already more than once opened
up the graphics screen. This is kind of disconcerting.
Is there a way to filter or block that
sort of thing?
A22.
Set your graphics lock on by selecting the menu option Graphics
Lock and you won’t be
thrown onto the graphics screen anymore. If you never use graphics anyway, you might also
want to consider using VLTjr instead, since it saves memory space.
Review
know what’s
wrong,
Buffer
buffer
but when VLT
receives data,
Riddles
Q23.
The review
A23.
One likely reason: you didn’t copy review.
library
have problems if you’ve just installed a new version
out of memory.
Old versions of revieu.library,
them, frequently
confuse VLT. A surefire method of
over the new library versions, then reboot.
Incidentally,
this library.
review
it loses characters.
doesn’t
work.
VLT
says it can’t find it!
to VLT:
of VLT,
floating
flushing
if you don’t want to use the review buffer,
buffer
clipboard
support
libs (or libs :). You may also
since you need to flush libraries
around where VLT might find
libraries is to delete them, copy
you can save memory
seems to cause complaints
Q24.
VLT’s
A24:
Your problem has to do with the fact that a good many applications
don’t obey IFF file
specifications
and therefore have trouble with “even-padded
clips.” As a result, VLT has
been set to do things the “wrong” way so as to agree with the majority
of applications.
If
your application
insists on even-padded clips, can give it indigestion.
To solve this difficulty,
102
from
by not installing
other
applications.
use either the nISCflaga
script command
(see Writing
Scripts:
Quick
Reference
or the SetHiscFlags
macro included
Section,
see Appendix
F).
with
VLT
Q25.
I don’t understand-is
the review buffer’s size really limited
to 8192 bytes?
It doesn’t
make much sense, but whenever I try to adjust it using the Buffer
Size option in the
Communications
Menu,
VLT won’t let me enter a larger number.
A25.
No, the review buffer’s size is not limited to 8192 bytes; you’ve been adjusting
the wrong
buffer. The Communication
Menu option adjusts the buffer VLT uses for the serial device
itself. To adjust the review buffer, you need to use the Buffer
Size option found in the
review window’s menus.
M iscellaneous
Musings
Q26.
When I type beyond
structive
Backspace,
erase that character.
the last column displayed on my screen, then backspace using DeI get a dangling character at the EOL. No matter what I do, I can’t
A26.
Uh, well...ever heard the saying “It’s not a bug, it’s a feature?”
is part of VT100 emulation
arcanum.
One way to avoid that
with WRAP mode on. You could also switch off Destructive
Q27.’ How do you run VLT
with
low memory?
(512K,
More seriously, this problem
dangling character is to run
Backspace.
for example)
A27.
First, don’t use review.library;
delete it. Second, use VLT Jr., not VLT. Third, use VLT
on the Workbench
screen, not on its own screen, or use a custom screen with a small number
of colors (2 or 4) and no interlacing.
Q28.
Whenever
wrong?
A28.
When you open VLT on the Workbench,
extra room is taken up by the borders of the VLT
window. This means that the number of columns (each column has a width of one character)
that fit using a certain font on the Workbench may not be the same as the number of columns
that fit on a custom screen. To squeeze in as many columns as possible, VLT uses the small
font. If this bothers you, reduce the number of columns to be displayed using the Number
of Columns
option of the Screen Menu, or increase the overscan for your Workbench
(see
your Amiga documentation).
Q29.
A Console problem:
Unable to open:
A29.
If you’re an AmigaDOS
1.3 user, your console window relies on either Bill Hawes’s ConMan
version 1.3 or his WShell2.0.
Without
ConMan or WShell2.0,
you won’t be able to open the
console window
on VLT’s custom screen. Under AmigaDOS
2.04, you can use the console
handler that comes with the system, so if you’re having difficulties,
your problem comes
from a different source. When you use the 2.0 console handler instead of ConMan, VLT isn’t
I open VLT
on the Workbench
screen, all the text is shown in a tiny font.
whenever I select Open
Console,
con:S*/Q/345/640/55/VLTConsole/c.
I get this
error
message:
What’s
Menu -
happy with the S* in the console string.
con:0/346/640/SS/VLTConsole/CLose.
menus that
you mentioned
use the following
earlier?
console string:
Where
A30.
You’re an AmigaDOS
1.3 user, right? Or a 2.0 user who doesn’t have WShell 2.0? For the
console menus to work, you need both the 2.0 operating system and WShell 2.0.
931.
How do I reopen
A31.
The first method is to rerun VLT. This causes VLT to reopen the screen and put up the
famous message “But I’m already here!“. You can also send VLT an ARexx message such
as window open or activate
vtlO0.
VLT’s
Window
you should
Q30.
.&32.
are the Console
Instead,
I can’t find them.
main screen once I’ve closed it?
When I doubleclick
on the phonebook’s
file requester,
the directory
requester opens, the drawer gadget isn’t
respond to my hitting return. What’s wrong?
nothing happens!
Moreover,
activated,
and the requester
when
won’t
A32.
At the moment, there are a few moths and spiders in the ASL file and directory
requesters.
When used in multiple
select mode, the file requester can’t tell the difference between a
So when you double-click
on an entry, the
double-cljck
and two separate single clicks.
file requester thinks that you have selected and then de-selected the entry.
Rather than
doubleclicking,
click on Okay after selecting files. As for the directory
requester, you have
Hopefully
these bugs will be fixed in the next
to click on Okay instead of hitting return.
version of the operating system.
Q33.
I want to use a different
crash. What can I do?
A33.
There’s not much that you can do. While there are several file requester replacements
in
the public domain, VLT does not support them. When you use them, you do so at your
own risk; while VLT doesn’t do anything to make these requester replacements
fail, it isn’t
specially equipped to deal with them either, and there may very well be problems.
Q34.
I’m an AmigaDOS
look.
A34.
Your problem is caused by a mismatch between the color assignments and the actual color
values. You can set VLT up so that it uses your color settings and still has proper “shine”
and “shadow” colors: see CustomColors.
scp or WorkbenchColors.
scp for examples.
Q35.
I use a “sunmouse” program ‘which causes windows to be activated when the mouse pointer
is within the boundaries of that window, but since VLT puts up busy pointers in the main
window, my requester windows won’t stay active.
A35.
It is for this reason that we don’t recommend using “sunmouse” style programs.
many other programs, isn’t really designed to work with that type of mouse.
set of file requesters,
2.0 user, but I’m having
104
but
trouble
using
getting
them
VLT
sometimes
causes VLT
to use the version
to
2.0 3D
VLT,
like
Q36.
VLT says that it can’t find rexx: , or VTPref s .dat, or TekPref s .dat, or any of the xprlibraries.
Yet when I looked in the directory, they were all there! What’s wrong?
A36.
Have you made VLT resident, or are you starting VLT from a Workbench
menu using an
old version of ToolManager?
AmigaDOS
2.0 has a new feature, the progdir
: assign, which
assigns progdir:
locally, within VLT, to the directory containing the VLT executable.
VLT
depends on this assignment to find all sorts of files. When VLT is resident, or when you are
working with old versions of ToolManager,
the progdir:
assignment doesn’t get made and
VLT has serious problems.
Try assigning VLT: to your VLT directory;
this should make it
possible for VLT to find those files.
Q37.
VLT isn’t paying attention
when I program the function keys; it accepts the programs just
fine, but when I use the function keys, VLT sends funny Amiga sequences instead of using
my programs.
Could the special keymap support be buggy? I set my special keymap to a
Denmark keymap, and most of the keys work just fine, but I can’t think of anything else it
could be.
A37.
Your use (or abuse) of the Special
Keymap
option is definitely
the culprit.
Don’t set the
VLT special keymap to that of your country! The special keymap is supposed to consist of
null entries, except for those few keys that you want to change. When you set the special
keymap to a standard
keymap, such as USAl,
the rather weird function
key settings in
the special keymap override VLT’s normal treatment
of all keys, treatment
which includes
checking for function
keys that you might have programmed.
So use the special keymap
only to set those keys you really need to change. Incidentally,
in order to create a special
keymap, use a keymap editing program, such as KeyMapEd.
Q38.
Why
A38.
The font VLT uses must have both an 8 and an 11 pixel tall version. For example, in order for
you to use a font called SubtleBlue,
there must be a directory called fonts : SubtleBlue,
and
files called fonts:SubtleBlue.font,
fonts:SubtleBlue/8,
and fonts:SubtleBlue/ii.
Furthermore,
these fonts must both be 8 pixels wide and monospaced.
Under 2.04, only
fonts that show up in the font requester are acceptable to VLT. Some day, this restriction
may be lifted.
Q39.
How can I get VLT
A39.
Assign
Q40.
I’m having
A40.
Consider what happens:
someone tries to call the modem of a system running VLT and
FifoBBS.
The modem sometimes sends “RING”
to VLT and VLT thinks someone hit a
return.
As a result, FifoBBS.sends
the Username:
prompt out through the modem.
Very
often this aborts the connection right there, since modems typically
abort the connection
process if data is sent before a connection is established.
But even if the connection
isn’t
aborted, you have a problem, since, if the connection is not established yet, modems usually
echo the data that you send them. So the entire Username:
banner text is sent back to
FifoBBS, which interprets
this as a person trying to log on. As you can see, this interferes
are there so many fonts that
TekStore:
VLT
won’t
use?
to put the files it creates during
to the device or directory
real trouble
making
FifoBBS
TekCapture
I want them
to be?
where you want the files to be stored.
work in “remote”
105
where
mode.
massively with the real logon process. So you’ll probably want to set your modem to not
report “RING” messages and to not echo data when you’re running FifoBBS. Most modems
are capable of being set this way. NOTE: the newest FifoBBS tries to ignore RING messages
during the logon sequence.
Q41.
When
open.
I try
to invoke
a twenty-sixth
session of VLT
A41.
Well, VLT can’t open more than twenty-five
simultaneous
sessions using the --I option.
If
you want to open a twenty-sixth
session, use the +I option and give the last session a name
of your own devising. Frankly, though, it’s surprising you have enough memory to run that
many sessions of VLT-is
there any reason for having twenty-five sessions of VLT running
simultaneously?
106
using the --I
option,
VLT
refuses to
I
:
6
Appendices
Appendix A
The file requester
Using
the Requester
The file requester
will look something
grdphmen.
mramhmen.
~raphmen.
rough.
du
roush.scalecon
urauer
Every Amiga
tory/subdir/subdir/.
files like
below.
sCaleCOn
i
du i
10s
m
File
I
like the picture
I
1 1 Disks
OK
filename
1 1 Parent
I I Cancel
1
consists of two parts: first, the path which specifies the device:direc. ./ that a file resides in, and second, the file’s name:
Hence, there are
SYS:DEVS/KEYMAPS/USAi
or
SYS:BOBLES/KIJIGIiTS/IVAIiHOE
In the first case the path is SYS:DEVS/KEYMAPS and the filename is USAI. In the second
path is SYS:IJOBLES/KBIGHTS and the filename is IVANHOE. The two rectangular
string
at the bottom of the file requester allow you to specify the path and filename of a given
string gadget wherein you type the path designation
is labelled drawer;
in this case,
case the
gadgets
file. The
drawer
refers to the file’s entire path, although this same term is used differently
in other contexts!
The
second string gadget, into which the file’s name is typed, is labelled file.
If you click on the
drawer gadget with your mouse, you can specify the path of a file you want to create, or give
VLT the path of an already existing file. If you now hit the return key, the names of all the files
already stored in that path will appear in the region above the drawer and file gadgets. If there
* subdir=subdirectory
t Usually, the terms
drawer
and directory
are basically
109
synonymous.
are a sizeable number of files in this directory
then it will take a few moments for the names of
all files to be loaded. If there are many files, not all names will be visible at once; however, you
can view them all by scrolling through the list of names. You scroll through the list using the
scroll bar at the right hand side of the requester, which works like a rectangular
knob sliding in
a track. To use it, place your mouse over the rectangular
knob, hold down the left mouse button
(this grabs the knob) and slide your mouse up or down. As you do this, the list of file names in
the directory
will be sorted alphabetically
and will scroll past. The up and down arrow gadgets
beneath the scroll bar allow you to scroll in smaller increments than the scroll bar does; the up
arrow gadget moves you backwards in the list while the down arrow gadget moves you forward.
Instead of typing the desired filename into the file gadget, you can take a shortcut;
namely,
move your mouse cursor over the filename you wish to select and click your left mouse button
once. The name will automatically
appear in the file gadget. Then, to indicate that you have
made your choice, click on the OK gadget or hit the RETURN
key. The arrow keys provide
another possible shortcut;
if you have clicked on the file gadget, the up and down arrow keys
allow you to scroll through filenames, with the currently
selected filename appearing in the file
gadget.
If the file you are dealing with has a very long filename,
SYS: documents/essays/
english/caxtonessay
. tex, for instance, you may not be able to remember the device, directory,
and subdirectories
that make up the file’s pathname, or drawer. In such cases, you may want to
scroll through a list of directories or subdirectories
instead of a list of files. To do this, type the
name of the device (such as SYS:) into the drawer gadget and hit return. A list will appear in the
region above the drawer and file gadgets. This list will probably contain some filenames, but it
will also contain names that are preceded by the highlighted
letters (drw).
Names prefaced by
(drw)
are names of directories or subdirectories.
When you click on a name that starts with the
highlighted
letters (drw),
this directory specification
will appear in the drawer gadget. Another
list will appear, this one of files and subdirectories
within the directory
you selected.
Now, what about scrolling through device names. 7 (Devices have names which finish in a
colon, that is, names like SYS:, DFO: , DFl:, RAM:, VDO: , etc. Some devices are partitions
on
your hard disk, others are floppy drives, still others are fake or “logical” devices you yourself
have created).
Well, this has to be accomplished
in a slightly different way. Position the mouse
cursor over the body of the requester and click on the right mouse button, or click on the Disks
gadget, which you will find at the bottom of the requester. The names of all devices, both real
and logical, will appear.
We’ve discussed using the file requester in reverse: that is, we started with scrolling through
filenames, then went on to scrolling through directories
and subdirectories,
and then went to
scrolling through device names. When you actually use the file requester, you will probably go in
the opposite order, first scrolling through devices, then directories
and subdirectories,
and then
finally through filenames. Going through these various stages is like peeling away the layers of an
onion until you find the file you are looking for. Sometimes, you will choose the wrong directory
or subdirectory.
Clicking on the Parent
gadget-one
of the rectangular
gadgets at the bottom
of the requester-will
get back the list of files that lie outside this directory.
First the directory
name will revert to the name of the parent directory and then the list of filenames in the parent
directory will be redisplayed.
The fourth button at the bottom
on the cancel gadget, the file requester
the entire process.
of the requester is the CANCEL
gadget. When you click
disappears without doing anything,
allowing you to abort
Last (and likely the least), is the small gadget in the right bottom
gadget which looks like a small triangle.
If you grab this gadget with
110
corner of the requester, the
your mouse, you can resize
the requester
(between some minimum
and maximum
sizes) by moving your mouse around.
Moving your mouse upwards shrinks the requester vertically,
moving your mouse downwards
expands the requester vertically, moving your mouse to the left shrinks the requester horizontally,
and moving your mouse to the right expands the requester horizontally.
Finally, the Amiga allows you to pull
device. For example, if you type
a trick
and assign whole
path
names to a “logical”
ASSIGH REXX: SYS:REXX
inside a CL1 or put it in your startup-sequence,
other device names when you click on Disks,
directories to find a specific file.
File Requester
rexx:
along with the
the depths of various
Menus
The ASL file requester has a single
various options are described below.
The Control
the requester will display
saving you from plumbing
menu
associated
with
it, the Control
Menu.
The
Menu
Last
The Last Name
option scrolls the filename in
Name
the file gadget up one; that is, it takes the preceding file in the list,
before the currently
selected file, and puts this preceding file in the
file gadget ingtead. If no file is currently
selected, this option puts
the first file in the list in the file gadget.
Ne.xt
The Next
Name option scrolls the filename in
Name
the file gadget down one; that is, it looks at the currently
selected
file, takes the next file in the list, and puts it in the file gadget
instead. If no file is currently
selected, this option puts the first file
in the list in the file gadget.
OK
Okay
The OK
gadget.
Disks
option
The Disks
is exactly
option
equivalent
is exactly
to the file requester’s
equivalent
to the file requester’s
Control
Last Name
mL
Next
m
Name
OR
N
mo
Disks
IZID
Parent
mp
Cancel
E!lc
Disks
gadget.
Parent
The Parent
option
is exactly
equivalent
to the file requester’s
Parent
gadget.
Cancel
The Cancel
option
is exactly
equivalent
to the file requester’s
Cancel
gadget.
Special Notes
1. Under AmigaDOS
2.0, VLT also uses a directory
requester (used to specify default paths
and directories)
and a multiple-select
file requester (used in the phonebook facility).
If you
understand
how the file requester works, you shouldn’t
have any trouble using the other
requesters.
2. Under AmigaDOS
1.3, VLT uses the ARP file requester. This requester is a little different
in behavior, but enough of the preceding discussion applies that you should be able to figure
it out.
111
Appendix B
Parity
When you transfer information
electronically
between computers,
errors are sometimes introduced
into the file in transit.
To make file transfers more accurate, various error-checking
schemes have been developed in which the computer on the receiving end checks the information
that it has received for errors before accepting more information.
Parity is an outmoded
method
of error checking that is nevertheless still used by several hosts: some IBM mainframes,
for instance, still insist on 7El parity.
In order to comprehend
what parity error checking does, you
need a rudimentary
understanding
of how information
is transferred
between computers.
Bits,
Bytes,
and Nybbles
When computers send information
to one another, they break the information
up into packages known as bytes. Bytes represent characters, symbols, etc. Each byte is broken up into eight
bits; every half-byte,
or four bits, is known as a nybble. A bit has only two possible settings:
On
or Off.
If you look more closely at the nature of bits and bytes, you will realize that every byte
is essentially
an eight-digit
binary number,
while every bit is a digit of that number.
When
information
is sent without
using parity, all eight bits of the byte are transmitting
information;
that is, all eight bits are used to determine
what the byte “means.”
When parity is used, only
seven bits are used’to transmit
information,
while the eighth bit-the
‘parity bit’-is
used for
parity error checking. What follows is a diagram of a byte with a parity bit.
Byte
Parity
Diagram
7
6543310
l
l
Bit
Actually,
parity is sometimes in transmitted
are used for transmitting
information.
eee**e
Information
Bits
in a separate
ninth
bit, in which
case eight bits
Even Parity
In even parity, there must be an even number of total On bits in each byte sent. After
the sending computer
reads the first seven bits of a byte and counts up the number of On
information
bits, the computer then sets the parity bit so as to make the total number of On bits
even. Therefore,
if there are an even number of On information
bits, then the parity bit is set
to be Off, but if there are an odd number of On information
bits, the parity bit is set to be On.
For instance, the byte 01011011 has an odd number of On bits, so the last bit will be changed
to an On bit before the byte is sent. The computer
at the other end will therefore receive this
byte! ~11011011. After the byte is verified, the parity bit is stripped off and the first seven bits
are read.
112
When the receiving computer gets a byte, it will count up the number of On bits. If it sees
an even number of On bits, then everything
is okay and it will let the sending computer
send
the next byte. If it sees an odd number of On bits, however, the receiving computer knows that
there is an error. When this happens, the receiving computer will either ignore the error or give
the sending computer a message complaining
that one of the bytes received had a mistake in it.
Odd Parity
Odd parity is based upon the exact same principle as even parity, except that the setting of
the parity bit is chosen so as to make the number of On bits in every byte odd instead of even.
Mark
and Space Parities
Mark and space parities are actually not very useful for error checking. They are even more
outmoded than the even and odd parities and, despite the fact that VLT supports the mark and
space parities, you will rarely have occasion to use them. Mark parity always sets the parity bit
to be On, while space parity always sets the parity bit to be Off. There is a simple reason why
these parities make such poor error checkers when compared to the even and odd parities-an
error only occasionally
changes the setting of the parity bit, while an error will usually change
the total number of On or Off bits in a byte.
Stop Bit%
.After a byte is sent, either one or two stop bits will be sent as well. Stop bits are blank bits
which do not belong to a byte. They merely indicate that one byte has ended and another byte
is about to begin.
Parity
Abbreviations
You will use the submenu generated by the Parity
option of the Communications
Menu
to select which parity you are going to use. The various parities are indicated by abbreviations.
Each abbreviation
consists of three characters-a
number, a letter, and another number.
The
lefthand number stands for the number of bits that are being used to transmit
information.
For
no-parity
options, this number will be eight; for most parity options, this number will be seven;
for the parity options which transmit
parity through a ninth bit, this number will be eight. The
letter in the middle stands for the type of parity being used: N stands for Normal, or no parity, E
stands for even parity, 0 stands for odd parity, M stands for mark parity, and S stands for space
parity. The number on the right represents the number of stop bits being used: one or two. So,
for instance, to choose the parity used by the SLAC IBM mainframe,
you would select the 7El
parity, which uses seven information
bits, even parity, and one stop bit.
113
Appendix C
VLT’s Emulations
Introduction
This appendix briefly describes the VT100 and Tektronix
emulations
implemented
in VLT.
When in VT100 mode, VLT recognizes a large subset of the standard
VTlOO-style
escape sequences. Some of these escape sequences, however, are handled in a somewhat
different way. In
addition, there are some sequences that a regular VT100 does not recognize. We will discuss these
differences and additions later in this appendix.
VLT also features full Tektronix
4010/4014 emulation as found, for example, in the DEC VT240 terminal,
as well as almost complete Tektronix
4105 emulation
and some features found in the Tektronix
4107. A fairly complete description
of
all graphics escape sequences for the Tektronix
emulation
can be found in Appendix
D.
VLT’s
modes
VLT has two “supermodes”:
Alphanumeric
and Graphic, also called VT100 and Tektronix.
In Alphanumeric
supermode
the program behaves as a VT100 ASCII terminal,
in Graphic supermode the program emulates a Tektronix
graphics terminal.
Usually, each supermode
has its
own window, such that the text in one does not affect the graphics display in the other. There
is also, however, an.option
to display text and graphics on the same screen. When the terminal
is in Alphanumeric
supermode,
the window usually contains text and the program responds to
standard VT100 escape sequences. In Graphic supermode the associated window usually contains
graphical displays, and the program responds to Tektronix
control sequences.
When in graphics supermode
an escape sequence is not recognized,
it is handed to the
VT100 escape parser to be evaluated as a VT100 escape sequence. The converse is not true:
when in VT100 supermode,
unrecognized
escape sequences are ignored, they are not passed to
the Tektronix
escape parser. This means, in particular,
that the programmer
must switch VLT
to Tektronix
mode before
sending any Tektronix
sequences.
Sequences
The following
WC)
W)
(ESC) (SUB)
(CSI) ? 38 h
(CSI) ? 38 1
(ESC) ” 0 g
Here, (CSI)
related
sequences
Switches
Switches
Switches
Switches
Switches
to the Tektronix
switch
between
VT100
emulation
and Tektronix
emulation
modes.
to Tektronix
emulation
and clears the Tektronix
screen.
to Tektronix
emulation
and enters GIN mode.
to Tektronix
emulation
without
clearing the Tektronix
screen.
back to VT100 emulation.
back to VT100 emulation.
is the sequence
(ESC)
[ or, when in eight-bit
mode,
the character
hex 9B.
In 4105/4107 emulation
mode the following single character sequences are recognized:
(US),
(GS), (FS), and (CAN).
The (US), (GS), and (FS) sequences cause VLT to switch to Tektronix
(ESC)%!O causes VLT
mode, while (CAN) causes VLT to switch to VT100 mode. In addition,
makes VLT switch to VT100 mode (see Appendix
to switch to Tektronix
mode while (ESC)%!l
D for more about these sequences).
114
Two more escape sequences are used in Tektronix
mode to switch between “light” and “dark”
vectors. They are mentioned here because they are recognized and handled by the VT100 escape
parser.
Draw
Draw
(ESC)/Od
(ESC)/ld
light vectors
dark vectors
with current attributes.
(erasing previously
drawn
graphics).
One other graphics related sequence is recognized:
(ESC)#!O.
This sequence requests a report on VLT’s current emulation mode. The response to this request is a sequence of 6 characters:
%!OOl(CR) if th e current mode is VT100 and %!OOO(CR) if the current mode is Tektronix.
Differences
compared
to standard
VT100
In the case of a regular VTlOO, the sequences (CSI)lp and (CSI)Op switch one of the keyboard
LEDs on and off. Since the Amiga does not have a set of keyboard LEDs, this function switches
the highlighting
status of the on-screen INS gadget on or off (when the on-screen PF-key gadgets
are being displayed).
Normally, the sequences (CSI) PO; . . .; P,,m are used on VTlOO’s to change the current mode
of graphic rendition
(e.g. boldface, italic, reverse video). If the Color option of the Rendering
Mode
menu item is selected, however, these sequences are associated instead with colors 1
through 5 of the current screen palette.
It is recommended
that a 3-bitplane
custom screen be
used in this mode, although this works with a Workbench
window as well (though some color
information
is lost).
The assignments
P,
0
4
1
7
5
are as follows:
Color mode operation:
Use color 1
Use color 2
Use color 3
Use color 4
Use color 5
Normal operation:
Normal attributes
Underlined
Bold
Reverse video
Italic
Additional
escape sequences
Some additional
sequences of the type (CSI) PO; . . .; P,,m
the color selection for text display and work only if the Color
item is selected. The following values of P,, are recognized:
ptl
30
31
32
33
34
35
36
37
Color mode
Change text
Change text
Change text
Change text
Change text
Change text
Change text
Change text
operation
to color
to color
to color
to color
to color
to color
to color
to color
If the Color
option
recognize some additional
are recognized.
They affect only
option of the Rendition
menu
effect:
0
1
2
3
4,
5
6
7
is selected and the ANSI
ANSI sequences:
115
Color
option
is selected,
then
VLT
will
Color mode
Change text
Change text
Change text
Change text
Change text
Change text
Change text
Change text
p,
40
41
42
43
44
45
46
47
operation
backfill
backfill
backfill
backfill
backfill
backfill
backfill
backfill
to
to
to
to
to
to
to
to
effect:
color
color
color
color
color
color
color
color
0 (background)
1
2
3
4
5
6
7
If the Color option is selected but the ANSI
sequences are used for the following purposes:
Pll
Color mode operation
Set normal rendition,
Set normal rendition,
40
41
Color
option
is not selected,
two of the ANSI
effect:
color 1, restore saved mode
color 1, save mode, set color mode on
The latter two sequences allow you, while using the terminal
in Quick
rendition
mode, to
temporarily
switch to Color rendition and then return to the saved settings. These two sequences
are not ANSI compatible,
but are used at SLAC by the IBM mainframe.
There are two escape sequences which let you set the number of lines on the screen. One
since it represents the
sequence has the form (CSI)Pl;
P2; P3; Pdp, where only P4 is significant,
number of lines that the screen should be set to. The second sequence has the form (CSI)? 9;
Pzp, where PI is the number of columns and P2 the number of rows.
All incoming characters
The VT220 escape sequences (CSI)5i and (CSI)4 i are also supported.
The
between these two sequences are redirected to prt : , in accordance with the VT220 standard.
display is not updated during that time. The feature is cancelled by the Clear
Screen option
of the Screen
Menu
and by any option that closes the serial device.
Control sequences that start with the characters (ESC)” are intercepted
order to provide support for applications
that expect a Modgraph
terminal.
not effective, but will also not cause visible traces on the display.
Sending
commands
to VLT
from
and disposed of in
Such sequences are
the host
An escape sequence was introduced
to allow the host to send a script command
by VLT. Together with VLT’s rx script command, this allows the host to execute
on the Amiga. The syntax is:
(start-of-VLT-command)
(SystemPassWord)
(VLT
command)
to be executed
ARexx scripts
(end-of-VLT-command)
where
(start-of-VLT-command)
(end-of-VLT-command)
(SystemPassWord)
(VLT command)
=
=
=
=
(CSI)?Slh
or (CSI)?Sl;P,h
(CSI)?911 or (CSI)?Sl;PJ
current value of environment
a valid VLT script command
variable
“SystemPassWord”
In the first escape sequence, the variable P, represents an optional size: if the size is specified,
the command buffer will be allocated at either the specified size or 256 bytes, whichever is larger.
The variable Pd in the second escape sequence is also optional and specifies a destination
for the
116
command.
Currently,
VLT action string.
An example
would
only destination
0 is supported:
the command
is directly
interpreted
as a
be:
(ESC)[?SlhMyAmigaPassword-
rx “address
command
‘WLens
100 100 VLT”‘(ESC)[?911
Upon receipt of this string from the host, the sequence of events in VLT would be as follows. VLT
would enter “command
capture” mode after receiving the h of the escape sequence. It would
then store every incoming
printable
ASCII character
(with the maximum
determined
by the
buffer size) in a buffer until it received the (ESC) c h aracter of the end-of-command
sequence; it
would then compare the first part of the string with the current value of the environment
variable
SystemPassWord
on the Amiga, and would, if the two matched, execute the rest of the string as
a standard VLT command.
In the particular
case mentioned
above, VLT would find the tilde,
which indicates that the received string is indeed a VLT script command; it would then send the
command “address
command ‘WLens 100 100 VLT )I’ to ARexx, which, if WLens is installed,
would open the WLens window on VLT’s screen. The requirement
of the SystemPassWord
is
for security reasons. Obviously, someone with ill intent, working on a not-too-secure
mainframe,
could send you a command to reformat your hard disk. So, if the password does not match the
current value of the environment
variable called SystemPassWord,
you will get a notice on your
screen saying that a command was sent to you; the notice will also show the first part of that
command.
If you do not have a SystemPassWord,
any command sent from the host will always
fail this way. -
Device
Status
Reports
and Device
Control
String
VLT supports two answer-back strings, DSR 1 and 2 (DSR: Device Status Report).
These
are programmable
by means of a script command called DSR. DSR 1 is VLT’s response to the
sequence (CSI)c from the host, and the default is: (ESC)[1;7c.
DSR 2 is VLT’s response to
the (VT200)
sequence (CSI)>c
and defaults to (ESC)[>l;lO;Oc.
In order to program the device
control string, the DSR script command should be used as in the following example:
DSR
The DSR string
is stored
1 “*E[1;2;7c”
as part of the configuration
file.
The Device Control String (DCS) is recognized by VLT as (ESC) P. VLT doesn’t actually do
anything with the device control string. In effect, all serial input is thrown away until the sequence
is interrupted,
either by a (CAN) character or another (ESC) character.
In the latter case, the
device control string is terminated
and the beginning of a new escape sequence is signalled.
If
that escape sequence is (ESC)\, the device control string is just terminated.
117
Appendix D
Tektronix Programmer’s
Manual
Overview
VLT’s Tektronix
emulator
consists of two parts: a Tektronix
4010/14 emulator
and a Tektronix 4105 emulator.
Generally, both emulations
are in effect at the same time, but the Tektronix
4105 emulation
and and several associated features can be suppressed with a menu option.
VLT’s Tektronix
4010/14 emulation
supports alpha and vector graphics modes, as well as
point-plot,
incremental
plot and Graphic INput (GIN) mode. In alpha mode the program behaves
as a dumb ASCII terminal
and allows the display of alphanumeric
text (please note that this
mode is not the same as the VT100 Alphanumeric
supermode).
In vector mode the program interprets incoming data from the serial port as (x,y) coordinates
of vectors and moves the “pen” to the location (x, y) ( w h en the pen is up) or draws a line from the
current position to (x, y) (when the pen is down). Vectors can be light or dark. Light vectors can
have normal or high intensity
and a full set of patterns is provided.
VLT supports the extended
variable-length
vector-mode
protocol of the Tektronix
4014 and 4100 series of terminals
for a
maximum
resolution
of 4096 x 4096 pixels.
Point-plot
mode (also called marker mode) operates the same way as vector mode does,
with the exception
that all incoming
(x,y) coordinates
are marked on the screen by a dot. In
incremental
plot mode incoming data are interpreted
as single pixel movements of the pen in any
of the 8 possible directions.
A line is drawn or continued if the pen is currently
down and a move
is executed if the pen is currently
up.
In GIN mode, VLT displays a graphic cursor (cross hair) and enters a bypass mode; in this
mode, VLT ignores all data from the host and intercepts
all keyboard keys. In GIN mode, the
graphic cursor can be moved with the mouse or the arrow keys. To exit GIN mode, you type an
alphanumeric
character or press the select button of the mouse. VLT then sends a report to the
host, consisting of the character that was typed (or, in case the left mouse button was pressed,
its currently
selected character)
and the current (x,y) p osition of the graphic cursor, followed by
an end-of-report
sequence.
In the Tektronix
4105 emulation,
almost all of the Tektronix
4105 escape sequences are
supported,
with some obvious extensions to Tektronix
4107. About the only unsupported
feature
is the “dialog area” and all commands
associated with it. A few highlights
of the supported
features: area fills (panels) including
all 16 Tek-style textures and 125 dithering
patterns; scaled
and rotated (90/180/270
degrees) fonts using strokefont libraries; almost full support of Tek-style
“pixel operations”
(bitmaps);
and full support for the abovementioned
features in the PostScript
output.
Pictures are captured and can be saved to disk and reviewed later. They
IFF bitmap files or sent to the printer as screen dumps. They can also be stored
PostScript
files and sent to the printer as such. The zoom and pan features allow
any part of the screen while retaining
the full resolution
inherent in the graphics
to the terminal.
This appendix describes the command sequences that the Tektronix
when they are received from the host. In the first section the sequences
118
can be saved as
as encapsulated
enlargement
of
primitives
sent
emulator will respond to
are described that change
the supermode.
The ensuing sections describe, respectively,
the sequences that are recognized in
alpha mode, vector and point-plot
mode, incremental
plot mode and GIN mode. A section about
the supported
Tektronix
4105 sequences follows. The final section describes the various reports
to the host.
In the following sections most control characters will be referred to by their ASCII
Therefore,
a table of these control characters and their numerical equivalents is included.
Sequences
that
name.
change supermode
The sequences that switch between VT100 and Tektronix
emulation
modes were already
In the interest of completeness,
we nevertheless
repeat
mentioned
in the previous appendix.
them here. In Tektronix
4010/14 emulation
mode the folowing sequences are effective.
WC) WY
Switches
Switches
Switches
Switches
(CSI) ? 38 h
(CSI) ? 38 1
(ESC) ” 0 g
Here, (CSI)
is the sequence
to Tektronix
emulation
and clears the Tektronix
screen.
to Tektronix
emulation without
clearing the Tektronix
screen.
back to VT100 emulation.
back to VT100 emulation.
(ESC)
[ or, when in eight-bit
mode, the character
hex 9B.
When 4105/4107 is selected from the Tek Emulation
item of the Operation
Menu, several
additional
control characters and escape sequences, when received in VT100 mode, will change
the supermode on reception from the host. When received in Tektronix
mode, they only switch
between the various graphics modes. A list follows:
(CAN)
(6
(US)
(ESC)%!O
(ESC)%!l
Exit Graphic, enter Alphanumeric
supermode.
(Only recognized in alpha mode).
Enter Graphic supermode in point-plot
mode.
Enter Graphic supermode in vector mode.
Enter Graphic supermode in incremental
plot mode.
Enter Graphic supermode in alpha mode.
Switch to Tektronix
supermode.
Switch to Alphanumeric
supermode.
There is an Operation
Menu
option, Switch
Screens,
which allows you to determine
whether a given escape sequence will cause VLT to switch both modes and screens or only
modes. This menu option has an entire set of suboptions,
with each suboption
representing
a
specific escape sequence. A list of these correspondences
follows here.
Text to Graphics:
Select Code
Erase Screen
Enter GIN
DEC enter 401X
FS, GS, RS, US
Graphics to Text:
Select Code
DEC exit 401X
Special ANSI
Cancel
(ESC)%!O
WC) (W
(ESC)(SUB)
(CSI)?38h
W
(GS) (RS) 6’s)
(ESC)%!l
(CSI)?381
(ESC)“Og
(CAN)
119
Alpha
mode
Once the emulation
is in alpha mode it will print incoming
printable
characters
to the
graphics window.
If the screen is interlaced,
a 80 column by 35 line format will be used. While
it is true that the Tektronix
4010/14 standard
calls for 74 columns, Tektronix
4105 calls for
80, hence VLT uses the latter.
If the screen is not interlaced
only 24 lines can be displayed.
The emulation
faithfully
mimics the two-column
mode of 4010/14 compatible
terminals:
when
the bottom of the screen is reached, the left margin is changed to the center of the screen and
printout
resumes at the top of the screen obeying the new margin. When a line extends beyond
the virtual graphics screen it is wrapped around to the next line.
In addition
are recognized.
WC)
(ESC)
(ESC)
(ESC)
WL)
(ESC)
VW
WC)
(HT)
(ESC)
w
[FRY)
(ESC)
(VT)
(ESC)
WC)
(ESC)
(CAN)
(ESC)
(ESC)
W)
WC)
(w
WC)
0-w
WC)
W)
(DEL)
(ESC)
(ESC)
(ESC)
(ESC)
WC)
(ESC)
(ESC)
(ESC)
to the printable
characters,
the following
control
Introduce
escape sequence.
Same as (ESC).
Same as (ESC).
Set bypass and return terminal status!
Ring bell (flash screen).
(BEL)
Ring bell (flash screen).
Move one space left.
Move
one space left.
(‘3s)
Move right to next tab stop.
(HT)
- M ove right to next tab stop.
Move one line down and return to left margin.
Same
as (ESC).
W)
Move to left margin.
(CR)
Same as (ESC).
Move one line up.
(VT)
Move one line up.
Erase and home.
W)
(ETB)
Make copy?
Switch to Alphanumeric
supermode
(VTlOO).
(CAN)
Set bypass condition.
(SUB)
Set GIN mode and bypass condition.
Set point-plot
mode.
Set point-plot
mode.
W)
Set vector mode?
Set vector mode?
W)
Set incremental
plot mode.
Set
incremental
plot
mode.
VW
Move one space right.
Same as (BS).
(DEL)
Same as (ESC).
Select largest character size?
8
Select large character size?
9
Select small character size?
:
Select
smallest charactersize?
;
Same as (ESC) 82
0
Same as (ESC) 9?
1
Same as (ESC) :?
2
(NUL)
(ESC)
(ENQ)
120
characters
and escape sequences
(ESC)
Same as (ESC)
3
;?
Notes:
1.
For a description
of the report
to the host see the section
2.
These sequences are not currently
3.
After vector mode is entered,
quent vectors will be drawn.
on reports
to the host.
implemented.
a move will be executed
to the vector
that
follows.
In addition, while this is not strictly in accordance with the VT240 documentation,
mode line-style sequences (see next section) are also recognized in alpha mode.
Vector
and point-plot
(marker)
All subsevector-
mode
In both vector and point-plot
mode, the emulation
will interpret
incoming printable
charAfter entering vector mode, the “pen” moves to the first vector
acters as (x,y) coordinates.
In the case
encountered
(the pen is “up”). All subsequent vectors are drawn (with pen “down”).
of point-plot
mode all vectors are marked with a dot.
Before discussing the encoding scheme of (x,y) pairs, it should be noted that the emulation
works internally
with a 4096 x 4096 pixel coordinate
system as required for the Tektronix
4100
series of graphics terminals.
The following protocol for transfer of (x,y) coordinates
is, however,
completely backwards compatible
with the older 4000 series and their internal coordinate system
of 1024 x 1024 pixels: when the application
running on the host assumes a 4000 series terminal,
the emulation
simply puts the two lowest-order
bits of each coordinate
to zero.
The encoding
scheme of (x,y)
(x,Y>
Each item enclosed
(HiY)
(Extra)
(LOY)
(HiX)
(LOX)
Bit
Bit
Bit
Bit
Bit
Bit
Bit
Bit
Bit
Bit
Bit
Bit
Bit
Bit
Bit
Bit
Bit
pairs is syntactically
= [(W I [[& W I
in () on the right
described
by:
by) [(HiX)ll(Lox)
hand side represents
an ASCII
character:
0 through 4: most significant
5 bits of y coordinate.
5 and 6: “01” (Tag bits).
7: parity.
0 and 1: least significant
2 bits of x coordinate.
2 and 3: least significant
2 bits of y coordinate.
4: unused.
5 and 6: “11” (Tag bits).
7: parity.
0 through 4: intermediate
5 bits of y coordinate.
5 and 6: “11” (Tag bits).
7: parity.
0 through 4: most significant
5 bits of x coordinate.
5 and 6: “01” (Tag bits).
7: parity.
0 through 4: intermediate
5 bits of x coordinate.
5 and 6: “10” (Tag bits).
7: parity.
In the syntactical
expression
the previous (x,y) sequence.
above, an item enclosed in [ ] may be omitted
For example, an applications
program running
121
if it is the same as in
on the host assuming
a 4000
(LOX)
(LoY)
be left
series terminal
would send (HiY), (LoY), (HiX) and (LOX) but not (Extra).
Note that
always needs to be sent. Notice also, that if either (Extra)
or (HiX) or both are sent,
must be sent. To put it differently:
sending (HiY) is always optional, but (LoY) can only
out if neither (Extra) nor (HiX) are to be sent. Again, (LOX) must always be sent.
In addition
to these printable
quences are recognized.
characters,
the following
control
characters
and escape se-
Introduce
escape sequence.
Introduce
escape sequence.
Set bypass and return terminal status!
Ring bell (flash screen).
WL)
Ignored.
w
Introduce
escape sequence.
WC)
um
Set alpha mode?
(CR)
Erase and home.
WC)
(W
(ESC) (ETB)
Make copy?
(ESC) (CAN)
Set bypass condition.
(ESC) (SUB)
Set GIN mode and bypass condition.
Set point-plot
mode.
PS)
Set
point-plot
mode.
WC)
(W
Set vector mode?
W)
(ESC) (GS) _ Set vector mode?
Set incremental
plot mode.
VW
Set incremental
plot mode.
WC)
VW
Set .alpha mode.
(US)
Set alpha mode.
PC)
(US)
(ESC) (DEL)
Introduce
escape sequence.
Set normal vector, pattern:
1111111111111111
(ESC) ’
(ESC) a
Set normal vector, pattern:
1010101010101010
(ESC) b
Set normal vector, pattern:
1111101011111010
Set normal vector, pattern:
1110111011101110
(ESC) c
Set normal vector, pattern:
1111110011111100
(ESC) d
(ESC) e
Set normal vector, pattern:
1111111101010101
(ESC) f
Set normal vector, pattern:
1111111100111100
Set normal vector, pattern:
1111000011110000
WC)
I!?
Set bold vector, pattern:
1111111111111111
(ESC) h
(ESC) i
Set bold vector, pattern:
1010101010101010
Set
bold
vector,
pattern:
1111101011111010
WC)
j
(ESC) k
Set bold vector, pattern:
1110111011101110
(ESC) 1
Set bold vector, pattern:
1111110011111100
(ESC) m
Set bold vector, pattern:
1111111101010101
(ESC) n
Set bold vector, pattern:
1111111100111100
(ESC) o
Set bold vector, pattern:
1111000011110000
Low Y coordinate?
(ESC) ?
WC)
(ESC)
(ESC)
(NUL)
(ENQ)
Notes:
1:
For a description
of the report
2.
In 4105/4107
3.
This sequence is not currently
emulation
(CR)
to the host see the section
on reports
is i g nored in vector/marker
mode.
implemented.
122
to the host.
4.
After vector mode is entered,
quent vectors will be drawn.
5.
This escape sequence is recognized
that some hosts cannot send.
Alpha
a move will be executed
to the vector
in vector mode as a replacement
that follows.
All subse-
for the (DEL)
character
In addition,
while this is not strictly
in accordance with the VT240 documentation,
mode character-set
selection sequences are recognized (though ignored).
Incremental
Plot
the
mode
In incremental
plot (marker) mode the following control and escape sequences are recognized,
as well as some printable
characters.
It should be noted that the marker type can be selected
using a Tektronix
4105 sequence. The default marker is, however, a single dot.
WC)
(ESC)
(ESC)
(ESC)
(NUL)
(EN&)
(BEL)
I3
(ESC)
lLF)
(CR)
WC)
(ESC)
(ESC)
(ESC)
(ESC)
(W
(ETB)(CAN)
(ESC)
(SUB)
W)
WC)
W)
WC)
(US)
PS)
KW
K’
P
D
E
A
I
H
J
B
F
w)
Introduce
escape sequence.
I n t ro d uce escape sequence.
Set bypass and return terminal status?
Ring bell (flash screen).
Introduce
escape sequence.
Set alpha mode and move to left margin?
I n t ro d uce escape sequence.
Enter alpha mode, erase and home.
Make copy?
Set bypass condition.
Introduce
escape sequence.
Set GIN mode and bypass condition.
Set point-plot
mode.
Set point-plot
mode.
Set vector mode?
Set vector mode?
Set alpha mode.
Set alpha mode.
Turn beam off (pen up).
Turn beam on (pen down).
Move up (north).5
Move up, right (northeast).5
Move right (east).5
Move down, right (southeast).5
Move down (south).5
Move down, left (southwest).5
Move left (west).5
Move up, left (northwest).5
Notes:
.
1.
For a description
of the report
2.
In 4105/4107
emulation
(CR)
tronix 4100 series terminals.
3.
This sequence is not currently
4.
After vector mode is entered,
quent vectors will be drawn.
to the host see the section
is ignored
in incremental
on reports
to the host.
mode for compatibility
with
Tek-
implemented.
a move will be executed
123
to the vector
that
follows.
All subse-
5.
These commands
move the pen one (Tektronix)
pixel.
The actual amount of movement
therefore depends on whether a 1024x1024 or a 4096x4096 coordinate
system is used. This
is controlled
by the Operation
Menu item Incremental
Mode
Step.
G IN
mode
When the Graphics INput (GIN) mode is set, VLT enters bypass mode. This means that
keyboard and mouse actions are handled internally
by the emulation
and usually sent on to the
host in a different form.
GIN mode (and the accompanying
bypass condition)
can be exited
transparently
to the host by selecting the Switch
Graphic
Cursor
Off item of the Cursor
Menu,
but is usually terminated
by a report to the host. A report is sent to the host when any
alphanumeric
character is entered from the keyboard, or when the left mouse button is pressed.
For a description
of the report see the section on reports to the host.
During
any bypass condition,
!;;A W Q )
WL)
;;;p' @EL)
WC) W)
g;
(HT)
W G ) (CR)
WC) W)
(ESC)
(ESC)
(ETB)
(CAN)
y$)
(SUB)
WC)
(US)
the following
escape and control
sequences are recognized:
Set bypass and return terminal status?
Clear Bypass.?
Clear bypass and ring bell (flash screen).
Clear bypass and ring bell (flash screen).
Clear bypass.?
Clear bypass and introduce escape sequence.
Clear bypass.?
Clear bypass.?
Clear bypass.?
Clear bypass and introduce escape sequence.
Clear bypass, enter alpha mode, erase and home.
Make copy?
Set bypass condition.
Set GIN mode and bypass condition.
Clear bypass and set alpha mode.
Clear bypass and set alpha mode.
Notes:
1.
For a description
2.
In 4105/4107
emulation
mode, these sequences only clear bypass mode. In 4010/14
emulation mode, however, they also switch the graphics mode to Alpha, and perform the same
actions they would perform in Alpha mode.
3.
This sequence is not currently
Tektronix
.
of the report
to the host see the section
on reports
to the host.
implemented.
4105/4107
When 4105/4107
is selected from the Emulation
menu item of the Operation
Menu,
some control and escape sequences are recognized that otherwise
are not.
The category of
supermode-changing
control sequences was already discussed in a prior section; those that generate reports will be discussed in the next section.
Also supported
are (csi) P,,m sequences, with n in the range from 30 to 37. These sequences
are exactly the same as their VT100 counterparts
(see Appendix
C: Additional
escape sequences).
This feature can be turned off using a I4ISCFlags command (see Writing
Scripts:
Quick Reference
Section).
124
We will not describe all Tektronix
4105 commands in detail. Many of them have parameters
and defaults, and in order to use them properly it is necessary to consult the documentation
that
is available from Tektronix.
We will limit ourselves to giving a list of supported
commands, with
some remarks where necessary, followed by some more detail on frequently
used sequences (see
also Tektronix
4105 reports
later in this appendix).
(ESC)
(ESC)
(ESC)
(ESC)
(ESC)
(ESC)
(ESC)
(ESC)
(ESC)
(ESC)
(ESC)
(ESC)
(ESC)
(ESC)
(ESC)
(ESC)
(ESC)
(ESC)
KC
ID
IE
KI
LE
LF
LG
LH
LP
LT
MC
MG
ML
MM
MN
MP
MR
MT
(Cancel)
(Disable GIN mode)
(Enable GIN mode)
(Ignore-Deletes)
IEd ove Y)
(Draw)
(Draw-Marker)
(Begin-Panel-Boundary)
(Graphic-Text)
Graphic text is always drawn using a stroke font.
Amiga text font, except in zoom or pan mode.
(Set-Graphtext-Size)
4107 extension: since graphic
(Set-Graphics-A
(Set-Line-Index)
4107 extension:
Alpha
text is drawn using a stroke font, all sizes are allowed.
rea-Writing-Mode)
colors 8 through
15 are supported.
(Se&Marker-Type)
Markers are drawn using a stroke font and don’t exactly
In the PostScript
output they match better.
(Set-Character-Path)
(Select-Fill-Pattern)
4107 extension: colors 8 through
(Set-Graphtext-Rotation)
Conform 4105 standard,
(Set-Text-Index)
4107 extension:
mode text uses the default
15 are supported
match
(patterns
the Tektronix
-8 through
ones.
-15)
only 0, 90, 180, and 270 degrees are supported.
colors 8 through
15 are supported.
(ESC)
(ESC)
MV
NU
(Set-Line-Style)
(Set-Bypass-Cancel-Character)
This character can also be set using a menu option.
(ESC)
NT
(Set-EOL-String)
This string can also be set using a menu option.
(ESC)
(ESC)
(ESC)
(ESC)
(ESC)
(ESC)
RA
RH
RL
RP
RR
RS
(Set-View-Attributes)
(Set-Pixel-Beam-Position)
~I$mtlengtWh-~te)
ri e
as er
(Rectangle-Fill)
(Set-Pixel-Viewport)
4107/Amiga
extension:
the full range of addressable
window/screen
is available.
125
pixels available
in the current
(ESC)
(ESC)
(Begin-Pixel-Operations)
(Set-Window)
Only windows that preserve the aspect ratio are allowed.
preserve the aspect ratio are resealed until they do.
RU
RW
(ESC)
(ESC)
(ESC)
Windows
(Pixel-Copy)
Only straight
copies are supported.
Copies where the second source
coordinate
is/are smaller than the first will be performed
after sorting
nates.
RX
(Set-Surface-Color-Map)
4107 extension: Surface
TG
-1
is supported,
as well as colors 8 through
(Set-Color-Mode)
4107 extension.
RGB, HLS and CMY color coordinate
both in setting color maps as in color reports.
TM
The following
don’t
x and/or y
the coordi-
15.
are all supported,
two sequences are also recognized.
Draw
Draw
(ESC)/Od
(ESC)/ld
systems
that
light vectors
dark vectors
with current attributes.
(erasing previously
drawn
For some of the more frequently
used commands
graphics).
we will now give a little
more detail.
(ESC)LT(string)
Display the Tektronix
4100-series character string (string) at
the current position.
A 4100-series character string starts with a Tektronix
4100series integer (explained
below) indicating
the length of the
string followed by the string itself as printable
ASCII characters.
(ESC)ML(index)
Switch
integer
(ESC)MV(pattern)
Switch to pattern (pattern).
(pattern) is a Tektronix
4100 series
style integer. The line patterns are the same as those in vector
mode (see there), in the same sequence. The pattern number
is in the range -15 through 124.
(ESC)TG(surface)(colormap)
Change the color values. Hues, lightnesses and intensities of the
new colors are specified in (colormap).
The (surface) number
has to be the integer ‘l’, and the (colormap)
is a standard 4100series array of integers in the sequence (color-index),
(hue),
(lightness),
(saturation),
(next-color-index)
(. . .), as explained
below.
(ESC)WLO
Private sequence. When this sequence
will open a new capture file.
Tektronix
4100-series
The encoding
standard
to color (index); (index) is a Tektronix
in the range 0 through 15.
4100 series style
is sent, the emulation
integers
scheme of a standard
Tektronix
4100-series
by:
(i) = [(HiI)
[(HiI)]]
126
(LoI)
integer
is syntactically
described
Each item enclosed
(HiI)
Bit
Bit
Bit
Bit
Bit
Bit
Bit
(W
in () on the right
hand side represents
an ASCII
character:
0 through 5: most significant
6 bits of integer.
6: “1” (Tag bit).
7: parity.
0 through 3: least significant 4 bits of integer.
4: sign bit. When set, the integer is positive.
5 and 6: “01” (Tag bits).
7: parity.
In the syntactical
expression above, an item enclosed in [ ] may be omitted if the significant
bits
are 0. When two (HiI) values are specified, the first one gives the bits 10 through
15 of the
resulting integer, the second one bits 4 through 9, and the (LoI) value bits 0 through 3. If only
one (HiI) value is specified, it determines bits 4 through 9. If only a (LoI) value is specified, the
resulting integer takes the value specified in the bits 0 through 3. (LoI) must always be sent, and
its bit 4 determines the sign of the integer.
Notice, that with this convention,
the ASCII characters ‘0’ through ‘9’.
Tektronix
4100
A Tektronix
series
integer
is syntactically
= (number-of-elements)
It is simply a list of N integers
also encoded as an integer.
Tektronix
integers
0 through
9 happen
to coincide
with
arrays
4100 series array of integers
(array)
Reports
the positive
encoded
as explained
described
as:
(int) (. . .) (int)
above, preceded
with
the number
N,
to the host
4010/14
reports
There are several ways in which the host can request a report from the emulation.
details depend on the nature of the request and on the current graphics mode.
The
While the terminal is in alpha mode, receiving (ESC) (EN&) from the host causes automatic
transmission
of the terminal
status byte, the (x,y) position of the lower left-hand
corner of the
alpha (block) cursor, and the end-of-report
sequence.
When the terminal
is in vector, marker or incremental
plot mode, (ESC)
transmission
of the terminal
status byte, the current (x,y) position of the beam
end-of-report
sequence.
(EN&)
causes
(pen), and the
During GIN mode, (ESC) (EN&) 1ea d s t o t ransmission of the (x,y) position of the graphic
The emulation
exits GIN mode and returns to alpha
cursor and the end-of-report
sequence.
mode.
Also during GIN mode, entering a character on the keyboard or pressing the left mouse
button causes transmission
of the entered character (or, in case the mouse button was pressed,
the currently selected character associated with the mouse-see
the Mouse
Report
Character
127
item of the Operation
sequence.
item,
Menu),
the (x,y)
position
In the default case, where the 4010 subitem
the report has the following appearance:
of the graphic
cursor,
is selected from the GIN
and the end-of-report
Report
Style
menu
(Status)
Bit 0: always “1”.
Bit 1: “0” if left margin is at left, “1” if at center of screen.
Bit 2 and 3: “00”: mode is point plot.
“01”: mode is alpha.
“10”: mode is vector.
“11”: mode is other.
Bit 7: parity. This byte is sent first.
Bit 0 through 4: most significant
5 bits of x coordinate.
(HiX)
Bit 5 and 6: “01”.
Bit 7: parity.
Bit
0 through 4: least significant
5 bits of x coordinate.
(LOX)
Bit 5 and 6: “01”.
Bit 7: parity.
Bit 0 through 4: most significant
5 bits of y coordinate.
(HiY)
Bit 5 and 6: “01”.
Bit 7: parity.
Bit 0 through 4: least significant
5 bits of y coordinate.
Pa
Bit5 and 6: “01”.
Bit 7: parity.
End-of-report
sequence.
If the Extended
is selected, the report
subitem
appears
of the GIN
as:
Report
Style
menu item of the Operation
Menu
(Status)
(HiY)
Same as above.
Bit 0 through 4: most significant
5 bits of y coordinate.
Bit 5 and 6: “01”.
Bit 7: parity.
(Extra)
Bit 0 and 1: least significant
2 bits of x coordinate.
Bit 2 and 3: least significant
2 bits of y coordinate.
Bit 4: unused.
Bit 5 and 6: “01”.
Bit 7: parity.
Bit
0 through 4: intermediate
5 bits of y coordinate.
(LOY)
Bit 5 and 6: “01”.
Bit 7: parity.
Bit 0 through 4: most significant
5 bits of x coordinate.
(HiX)
Bit 5 and 6: “01”.
Bit 7: parity.
Bit 0 through 4: intermediate
5 bits of x coordinate.
(LOX)
Bit 5 and 6: “01”.
Bit 7: parity.
End-of-report
sequence.
The end-of-report
it is either non-existent,
sequence is, in either of the above cases, the same. In 4010/14 mode,
a single (CR), or a (CR) (EOT) se q uence, depending on the currently
128
selected sub-item of the Report
EOL String
menu item. In 4105/4107 mode,
that submenu are allowed, including allowing the host to specify the EOL string.
Tektronix
4105
mode some other
sequences are recognized
that
cause a report
to
(Report-Terminal-Settings)
All unsupported
reports will return a single 0 report.
Supported
?T, ?M. They are briefly described in the following paragraphs.
(ESC)IQTF
(ESC)IQTG
in
reports
In 4105/4107
emulation
be sent to the host.
WC) IQ
all options
Request
Request
for report
for report
of the current
of the current
reports
are: TF,
TG,
%!,
text color map.
vector color map.
VLT only maintains
one color map, so the reports for the two options above are the same
except for the first two letters.
The report has the following
syntax:
TG (or TF) (number
1, and
of surfaces) (report-integer
array) (CR), where (number of surfaces) is the report-integer
(integer array) has the structure
(color O)(surface number)(color
1) (color 2) (. . .) (color 7). The
(surface number) is the report-integer
-1, and the (color n) are three-report-integer
sequences
describing
hue, lightness and saturation
of color n. The length of the array is therefore 25
(specified as the first number in the array).
A report-integer
in this context is always a threecharacter sequence which is dineren from a regular Tektronix
integer, see later.
(ESC)IQ%!
Request
for report
of the current
terminal
This sequence has the same effect as the (Report
(ESC)IQ?T
Request
for report
of the Tektronix
mode.
Syntax
model
Mode)
Request
for report
of available
later.
number.
This sequence causes the report ?T, followed by the number
integer, to be sent, along with the usual EOL sequence.
(ESC)IQ?M
sequence listed
4105 in the form of a Tektronix
memory.
This sequence causes the report ?M to be sent, followed by the number of 18byte blocks of
available memory, followed by the size of the largest contiguous block (again in 16-byte units) in
the form of two Tektronix
integers, plus the usual EOL sequence.
WC) KQ
(Report-Errors)
Only a single error is kept track of, and only the last occurrence.
The report consists of
the two letters indicating
the sequence causing the error, a two-digit
error code, and (in the case
of VLT) the digits 0 (severity)
and 1 (occurred once). The most likely error code is 00: not
implemented.
Only a few commands can generate other error conditions.
(ESC)
#!O
(Report-Syntax-Mode)
129
This is a request for a report on which emulation
mode VLT is currently
in. The response
to this report is a sequence of characters:
%!OOl if the current mode is VTlOO, and %!OOO if the
current mode is Tektronix.
The sequence is followed by the current EOL string.
Tektronix
The
standard
4100-series
report
integers
encoding scheme of a Tektronix
4100-series
integer and is syntactically
described by:
(i) = (HiIl)
Each item enclosed
(HiIl)
(Hi12)
P4
in () on the right
(HiIP)
report
integer
is different
from
that
of a
(LoI)
hand side represents
an ASCII
character:
Most significant
6 bits of integer plus 32.
Bit 7: parity.
Middle 6 bits of integer plus 32.
Bit 7: parity.
Least significant
4 bits of integer.
Bit 4: sign bit. When set, the integer is positive.
Bit 7: parity.
Notice, that all three parts of the integer are always sent. Notice also that decoding consists of
subtracting
32 from the first two characters, shifting the first by 6, adding the second, shifting
the result by 4, and adding the third after masking out the sign bit. If the sign bit is set, the
sign of the result is positive.
Table of ASCII
The following
control
characters
is a table of the first
33 ASCII
dec.
hex.
act.
0
0
0
1
2
3
4
5
6
7
8
9
10
11
12
13
14
15
1
2
3
4
5
6
7
8
9
A
B
C
D
E
F
1
2
3
4
5
6
7
10
11
12
13
14
15
16
17
characters.
name
130
(ctrl)
equivalent
(ctrl)
(ctrl)
(ctrl)
(ctrl)
(ctrl)
(ctrl)
(ctrl)
(ctrl)
(ctrl)
(ctrl)
(ctrl)
(ctrl)
(ctrl)
(ctrl)
(ctrl)
(ctrl)
@
A
B
C
D
E
F
G
H
I
J
K
L
M
N
0
16
17
18
19
20
21
22
23
24
25
26
27
28
29
30
31
32
10
11
12
13
14
15
16
17
18
19
1A
1B
1c
1D
1E
1F
20
20
21
22
23
24
25
26
27
30
31
32
33
34
35
36
37
40
(ctrl)
P
W)
(ctrl)
(ctrl)
(ctrl)
(ctrl)
(ctrl)
(ctrl)
(ctrl)
(ctrl)
(ctrl)
Q
R
S
T
U
V
W
X
Y
Z
(W
(CW
[
\
W) 1
(ctrl) ^
(ctrl) _
space.
131
Appendix E
ARP Escape Sequences
This appendix documents
ARP escape sequences; that is, escape sequences parsed using the
ARP escape parser. ARP escape sequences, as observed before, are supported
by VLT; they can
be especially useful when you are programming
VLT menu options to send material
to the host.
The Escape
Character
and SET ESCAPE
comand.
All ARP escape sequences must be preceded by the escape character,
which, by default,
is the *. You can, however, choose a different escape character using the ARP command
SET
ESCAPE
= (value), which you issue from WShell or ARPShell.
Escape
Sequences
The escape sequences
recognized
*N -
new line
*T -
horizontal
*V -
vertical
+B -
backspace
*R -
carriage
*F -
form
+E -
escape (ascii 27 decimal)
*Xnn
-
by ARP
are as follows:
tab
tab
return
feed
the character
represented
by the hexadecimal
132
value nn.
Appendix F
There are a number of programs,
written
in ARexx, which either provide VLT with extra
facilities or modify VLT in some way. Some of these “extras” are included with the VLT distribution and are consequently
documented
in this appendix.
In order to function,
most of these
“extras” require rexxarplib.
library
version 3.0 or later (available in a separate archive on a
BBS near you).
In addition,
some features, such as multiple-select
file requesters,
only work
under AmigaDOS
2.0. If you are working under AmigaDOS
1.3, you must have ARexx for these
programs to work at all (see the Introduction).
The ARexx
Phonebook
facility
A phonebook
facility,
written
in ARexx,
VLT, the script called VLTPhoneBook.
vlt (you
menu to run this script). The phonebook
will,
with several gadgets will appear in one corner
Select VLT
is included with VLT. To use it, first run, from
may want, later on, to program a function key or
for the most part, install itself, and a small panel
of the screen, with the following
options:
PhoneBook
Create PhoneBook
Entry
Modify Phonebook
Entry
Delete PhoneBook
Entry
Show PhoneBook
Entry
.Select
Entries
to Dial
Start Dialing Sequence
Resume Dialing Sequence
Cancel Dialing Sequence
Click on the first option,
Select
VLT PhoneBook,
before trying to use any of the other
options.
A directory
requester will appear, asking you if you want to assign the logical device
name VLTPhoneBook:
to a particular
location.
Say that you do and assign it to the phonebook
directory
that you created during installation.
Once this is accomplished,
you can create entries,
modify them, delete them, and view them. You can invoke these options multiple
times, which
means that you could have several entries open for viewing and several entries in the process of
creation open at the same time.
How
to Create
A Phonebook
Entry
When you click on the Create
Entry.
. . gadget, a new panel will appear, as shown on the
following
page. This panel follows the standard
entry format for the phonebook
facility.
The
lame, Address,
and City gadgets are fairly self-explanatory,
since they simply provide space
for the information
you would put in an ordinary
phonebook
entry. Some of the other gadgets,
however, contain default settings that need explanation.
First, the ATDT setting in the Phone
lumber gadget is the standard attention
sequence for most hosts; if your host requires a different
attention
sequence, you’ll want to change this. In any case, you’ll need to add a phone number
after the ATDT sequence. The Modem Speed, set by default at 9600 baud, should be replaced by
the real baud rate of your modem. ATZ, the default Modern Init
entry, is the standard initializing
string for Hayes style modems, and the parity, set by default to be 8Ni, should be reset if necessary
to the parity required by the host being dialed (see Appendix
B). The next two entries, Predial
Cmds and Postdial
Cmds, should contain any commands
you wish to be issued before or after
133
I
VLT dials the specified host, while the last entry, Notes, allows you to jot down an explanatory
note about the entry. For instance, if you were creating an entry meant to dial BIX, you might
type into Notes “This is my BIX account,” or something to that effect. Click on the Okay gadget
to add the entry to your list; a file requester will pop up, allowing you to specify the filename
under which the entry will be saved. To abort the process and get rid of the entry panel, click
on the Cancel gadget.
Name
:
I
Address
city
:
J
etc.:
Phone
Number:
Modem
Speed:
Predial
R-l-D-r
19600
Cmds:
Postdial
Cmds:
Notes:
1
How
Modem
Init:
R-l’2
8Nl
Parity:
1
J
J
Okay
I
1
to Select
1 Cancel
Entries
to Dial
and Dial
[
Them
Once you have created entries (some sample entries are included with the distribution)
you
can select them for dialing using a multiple select file requester. Since the file requester is multiple
select: you can select more than one entry to be dialed; a list of entries to be dialed will be created
and stored for later reference. When you’ve selected an entry or entries, you can click on Start
Dialing
Sequence.
The facility
dials the first entry in the list of entries to be dialed, then
tries to establish a connection
with whatever is on the other end. If it succeeds, the facility will
wait, allowing you to work with whatever host you have just dialed. Once you have finished your
session with a host, you can select Resume
Dialing
Sequence
to go on to the next entry in the
list. If, on the other hand, the facility fails to make a connection,
it will continue on to the next
entry on the list and try all entries until a connection
is established.
The looping will continue
until the facility has successfully made all connections
on the list once, or until you click on the
Abort
Dialing
Sequence
button.
A note of caution for the user: make sure that
are copied to somewhere on VLT’s search path.
The NeatStuf
all the VLTPhone* .vlt
and
. rexx
f Script
The script NeatStuff.
scp comes with VLT and resides in the scp directory.
things, it programs
the mouse to provide cut and paste facilities.
To see how
* Warning:
programs
the multiple
select feature
works
only under
134
AmigaDOS
2.0.
Among other
it works, run
NeatStuff.
scp (if you are using the VTpref s . dat file that came with this version, then you don’t
have to run MeatStuff.
scp). NeatStuff
programs the mouse to have the following features:
1. If you click the left mouse button
highlighted
area, it gets rid of it.
by itself,
normally
it does nothing,
but
if there
is a
2. If you click on the left mouse button while holding down the shift key, VLT sends enough
mouse moves to the host to get the cursor to the place where you clicked. This doesn’t work
with all hosts.
3. If you click on the left mouse button while holding down the ctrl key, you can drag out an
area, that, when you let go, is put into the clipboard.
The area stays highlighted.
If you
want to get rid of it, just click the mouse without
holding down ctrl. If you want to select
another area, just click and drag again, while the ctrl key is down.
4. If you click on the left mouse button while holding
area already highlighted,
then the highlighted
text
loses its highlighting.
down either alt key, and if there is an
is sent to the serial port and the area
5. If you click on a word in the display while holding down the shift and control keys, the word
will be highlighted
and put in the clipboard.
If you want a different word, just click again
while shift and ctrl are still down.
6. If you click with the left mouse button while holding down the shift and alt keys, VLT
up a window displaying the column and row of the point where you clicked.
puts
7. The mouse button plus control and alt keys provides an option for BIX users: click on a
conference/topic
combination
on BIX (like “microsoft/other”),
and VLT will resign the topic
for you.
8:Clicking
with the left mouse button while holding down the shift, control, and alt keys is
especially useful when combined with the shift-ctrl-left-mouse
option. Suppose you wanted
to enter a combination
of words on the command line, without
typing them in (they are
already in various places on the screen). Now usually you want these words to be spaced
apart with a number of spaces. What you do is this: use Shift-ctrl
left-mouse to highlight
the first word. Now also press the alt key and click the left mouse button on the command
line where you want the word to appear. Spaces will be sent until the cursor is in the column
where you clicked (minimum
one space), and then the word will be sent as well. Repeat for
the other words.
In addition,
you will find that NeatStuff
has changed your ALT and SHIFT-ALT
cursor
keys and a few keypad keys. First, when you hold down ALT and use the cursor keys, a second
cursor will appear, which you can move around using the ALT cursor keys. When you also hold
down the shift key, you can increase the size of the cursor by using the right arrow and down
arrow buttons, and decrease the size of the cursor by using the left arrow and up arrow buttons.
To get rid of the second cursor if it is currently
up there, just hit alt, or shift-alt plus the period
key on the keypad. To paste the current clipboard contents to the screen, you can use either alt
plus the Enter key on the keypad, or shift-alt with Enter, or the menu options in the Paste menu.
Alt-Enter
will allow you to edit the lines before they get sent. Second, when you hit the keypad
0 button with ALT, the area currently
spanned by the cursor is clipped out and put into the
clipboard.
The area will stay highlighted.
Had you also held down the shift key while pressing
the. keypad 0, the cursor would have disappeared after clipping.
Technical note: Alt and shift-alt keypad keys used to only perform the preprogrammed
Now, alt and shift-al2
tions if the keypad mode was Application
(i.e. not Numeric).
do nothing if they are not programmed
(or redefined in the special keymap, see The User
135
funckeypad
Inter-
face: Text Screen
function
no matter
Menus),
but if they are programmed,
they will perform
if the keypad is in numeric or application
mode.
their preprogrammed
Finally, the NeatStuff.
scp program will also have programmed
part of the User Menu.
You might want to check out these programs and change them if you prefer. If you want to keep
all of these programs around indefinitely,
save your configuration
after running NeatStuff
and
you’ll never have to run it again.
If you would like to see how NeatStuff
directly at the NeatStuff.
scp code.
The SetMiscFlags
has programmed
all these keys and options,
look
Program
The ARexx program SetHiscFlags
. vlt allows you to set the l4ISCFlags options mentioned
in the Quick
Reference
Section
of Chapter 4. SetMiscFlags
. vlt is meant to be run from
inside VLT; to run it, go to the Script
Menu
and select the ARexx
Macro
option.
When
VLT brings up a file requester, find and select SetHiscFlags
.vlt, then hit return. A panel will
appear at the bottom of the screen, with a plethora of gadgets in addition to two buttons, Use
and Cancel.
Each gadget has a description
of the Miscflag that gadget controls, such as Pad
clips
to clipboard
or Do not update
screen.
Clicking on the gadget toggles the Miscflag on
and off, when the gadget is highlighted,
it’s selected and Miscflag is turned on; when the gadget
is not highlighted,
the Miscflag is turned off. At any one time, you can change as many settings
as you like.
When everything
has been arranged to your
bottom of the panel. The new Miscflag settings will
(in order to have VLT remember these settings after
option).
If you want to get rid of the panel without
Cancel button.
136
satisfaction,
click on the Use button at the
be put into use and the panel will disappear
it shuts down, use the Save Configuration
using the new Miscflags settings, click on the
7
Index
Index
A
serial.
See serial,
directory
requester.
tory
DTR,
101
Alphanumeric.
See VT100
archives,
9
vlt5p576.lha,
9
vltj576.lha,
9
ARexx,
5, 11, 17, 35, 36, 42, 64, 71, 79,
83, 88, 98, 117, 133, 136
18, 100
port,
rexxarplib,
11
scripts,
35, 36, 42, 49, 64, 99, 116
ARexx Commands
Address,
72
ARP,
3, 10, 49, 50, 78, 97, 111, 132
arp.library,
10
device
See requester,
direc-
E
echo,
82
cr/lf,
41
local,
30, 82, 91
remote,
30
erase masking,
60
error checking
parity.
See parity
serial device,
30
XMODEM,
34
error codes,
72, 73, 83. See also RC
variable
escape sequences
ARP,
78, 132
Tektronix,
114, 115, 118
VTlOO,
86, 87, 114, 116
B
baud rate,
28, 79, 101, 102, 133
beep,
40, 41. See also Beep Volume,
BEEPFunction
break signal,
30, 31
C
F
clipboard,
31, 46, 70, 86, 92, 102, 135
color lock,
59
color masking,
59, 60
color options requester.
See requester,
color options
color registers,
57 to 60
color remapping,
58, 59
configuration
files,
28
TekPrefs.dat,
18, 55, 56
VTPrefs.dat,
17, 18, 28, 99, 100
ConMan,
10, 11, 45, 103
console
CNC:,
11, 45
CON:,
11, 45
handler,
10, 11, 45, 103
menus,
10, 45, 104
window,
10, 11, 27, 44, 45, 82, 103
Fifo capture,
44
Fifo Pipes,
10, 43, 44, 97
local,
43. See also VLTL
remote,
43. See also VLTR
fifo-handler,
10, 43
fifo.library,
43
FifoBBS,
10, 44, 105, 106
file requester.
See requester, file
file transfer,
10, 32, 35, 36, 79, 86, 90,
101, 112
binary,
34
buffered,
44
multi-file,
35
status window,
35
text,
35
unbuffered,
44
file transfer protocol,
4, 5, 15, 32, 33, 83,
90
ASCII,
10, 33
CISQuickB,
10, 33
I3
device
logical,
9
139
Jmodem,
10
Kermit,
4, 5, 10, 32, 90, 100
XMODEM,
4, 5, 10, 32, 91
YMODEM,
5, 10, 33
ZMODEM,
5, 10, 33
file transfer protocol,
external,
3, 4, 10,
33, 34, 90, 91
flow-control
buffer,
31
fonts,
38, 103, 105
duplex stroke,
56
keypad
application,
136
numeric,
3, 40, 41, 46, 86, 87, 92, 135,
136
keyscript character,
63, 85
T
L
labels,
63, 65, 67, 68, 79, 84, 99
lha,
9
qualifiers,
9
loops
infinite,
67, 68
pasting,
70
timed,
67
G
GIN mode,
54, 114, 118, 123, 124, 127
graphics,
29
fonts,
46
mode,
1, 43. See also Tektronix,
emulation
screen,
37, 42, 43
graphics cursor,
52, 55
cross hairs,
52, 54, 118
graphics lock-, 84, 102
M
Menu Options
Abort All Scripts,
36, 100
About,
28
Adjust Display,
55
Application
Cursor,
40
ARexx Macro,
35, 136
Auto-Screen
to Back,
41
Baud,
29
Baud Rate Mismatch,
30
Beep Volume,
42, 49, 97, 98
Break Received,
30
Buffer Overflow,
30
Buffer Size,
103
Bypass Cancel Character,
54, 55
Cancel Paste,
31
Capture Session,
27, 44, 80
Change Directory,
27, 100
Clear Screen,
37, 52, 116
Close Device,
28
Close Screen,
39, 53
Color Options,
53, 58
CR Key: Echo CR/LF,
41
CR Key: Send CR/LF,
41
Cursor Height,
39
Destructive
Backspace,
103
Destructive
BS,
41
Display CR as CR/LF,
41, 82
Display Cross Hair + XY,
52
Display Cross Hair Only,
52
Display LF as CR/LF,
41, 43, 82
Edit/Paste
Clipboard,
31
Edit/Paste
File,
31
H
handshaking,
3, 29, 84
7Wire,
29, 84
7Wire/X,
29
CTS/RTS,
84, 102
None,
29, 102
Xon/Xoff,
29, 84, 101, 102
history buffer.
See review buffer
hosts
IBMs,
3, 30, 34, 35, 40, 46, 50, 112
page-oriented,
46, 47
VAXes,
3, 5, 29, 33, 40, 46, 89
I
initialization
files,
configuration
17, 19, 28.
files
See also
K
key repeat,
40
keymap
default,
39
editor,
39, 105
special,
4, 39, 85, 105, 135
standard,
105
140
Save As New File,
89
Save as PostScript,
89
Save As Script Commands,
51, 89
Save Bitmap as IFF File,
51, 89
Save Configuration,
28, 46, 81, 99, 100,
136
Save Configuration
As,
28, 81
Save Tek Configuration,
56
Save Tek Configuration
As,
56
Save To Current File,
51
Save To New File,
51
Save/Print
as PostScript,
51
Screen to Back,
37, 49, 50, 52
Screen Type,
38, 59
Scrolling Speed,
39
Search,
48
Select Colors,
38, 58, 59
Select Device,
28
Select Fonts,
38
Select No. of Colors,
53
Select Pan Area,
52
Select Screen Type,
37, 53
Select Unit,
28
Send Break,
30,49, 50
Send File,
32, 33, 35
Serial Device Busy,
30
Set Break Time,
31
Set Buffer Size,
31
Set Character
Delay,
31
Set Default Parameters,
56
Set Line Delay,
32
Set Line Prefix,
32
Shift-Tab
= ESC TAB,
41
Special Keymap,
4, 39, 105
Strip 8th Bit,
30
Swap BS< - >Delete,
40
Switch Graphic Cursor Off,
52, 124
Switch Graphic Cursor On,
52
Switch Screens,
56, 119
Tek Emulation,
53, 119
To Graphics,
42, 53
Use Duplex Stroke Font,
56
View History,
27, 45
VLT Script,
35, 64
Wrap,
40
XMODEM
Options,
33, 34
multiple-select
file requester.
See re-
Emulation,
124
End Capture,
27
Error Checking,
29
Exit,
28
External,
91
External
Options,
34
Fifo Pipes,
27, 41, 43, 83
File Transfer Mode,
34
Function Key Gadgets,
41
GIN Report Style,
54, 128
Graphics Lock,
43, 102
Handshake,
29
Hangup,
86
Help Key = LF,
41
HelpKeyLF,
83
Incremental
Mode Step,
55, 124
Kermit Options,
33
Key Repeat,
40
Line Error,
30
Load From Archive,
43, 51
Lock Graphics,
42, 57, 84
Maximum
Size,
51
Mouse Report Character,
55, 127
Mouse Support,
41, 49, 50
New Page,
46; 47
No DSR,
30
Number of Colors,
38
Number of Columns,
38, 103
Number of Lines,
38
Numeric Keypad,
40
Open Console,
27, 44, 45, 49, 103
Parity,
29, 113
Parity Error,
30
Paste,
46
Paste from Clipboard,
31
Paste from File,
31
Print Bitmap,
51, 89
Program Mode,
4, 28, 42, 45, 49, 98,
99
Protocol,
33
Quit Archive,
51
Receive File,
32, 33, 35
Refresh Screen,
37
Remove All Traps,
36
Rendering Mode,
39
Report EOL String,
54, 129
Reset,
30, 86
Reset Zoom/Pan,
52
Return To Alpha-Numeric,
57
Save As Current File,
89
141
quester,
multiple-select
file
review menu options
Append,
47
Append To,
46, 47
Buffer Size, 47, 103
Clear,
46
Column Left,
48
Column Right,
48
Deselect All,
47
End of Buffer,
48
Invert Selection,
47
Left Margin,
48
Line Down,
48
Line Up,
48
New Page,
47
Page Down,
48
Page Left,
48
Page Right,
48
Page Up,
48
Repeat Forward,
48
Right Margin,
48
Save, 46
Save As, 46, 47
Save to Clipboard,
46
Search,
48
Search Forward,
48
Search Reverse,
48
Select All,
47
Top of Buffer,
48
review.library,
12, 13, 102, 103
REXX,
71,90
N
NeatStuff,
87, 134 to 136
numeric keypad.
See keypad,
numeric
P
packet size,
34
palette requester.
See requester, palette
parity,
3, 29, 30, 87, 89, 112, 133
even,
29, 112, 113
mark,
29, 30, 113
odd,
29, 113
space,
29, 113
paste,
135
14, 28, 109, 111
path,
path search,
100
phonebook,
10, 11, 104, 133
PingServer,
42
PostScript,
-51, 118, 125
progdir:,
14, 105
Program Mode.
See also Menu Options,
Program Mode
Function Keys/Menus,
49
Menu Shortcuts,
49
off,
49
Provector,
51
R
S
RC variable,
72, 73, 83
Repeat Forward,
48
Repeat Reverse,
48
requester,
27
color options,
57, 58
directory,
27, 104, 111, 133
file,
3, 14, 33, 35, 51, 64, 104, 109
font,
38
menus,
111
multiple-select
file,
111
palette,
38, 53, 59
resident,
9
resident program,
12
review buffer,
31, 45, 85, 86, 88, 92, 102,
103
display window,
46 to 48
menus,
92, 103
schedules,
64
cancelling,
64, 65
expiration
of, 65
script
uninterruptable,
65
Script Commands
@, 66, 71, 78
@@, 71
ACTivate,
78
activate vt100,
104
ANSicolormode,
78
APPlicationcursor,
79
AUToscreentoback,
79
BAUD,
79
BEEP,
79, 97, 99
BEEPFunction,
42, 79, 90, 97, 98
BREAK,
79
142
-
BREAKTime,
79
BUFfersize,
79
cancel,
65, 67, 68, 79
CAPture,
80
CAPture
RAW,
80
CD,
80
CHeckserialerror,
80
CLEAR,
80
COLOR,
80, 91
COLOR REQuest,
81
COLUmns,
81
CONFiguration
SAVE,
81
CONSole,
82
CONSolewindowadjust,
82
CONTinue,
81, 88
CURsorheight,
82
CUStomscreen,
82
delay,
66, 67, 75, 81, 82
DESTructivebackspace,
82
DISPLAYCrascrlf,
82
DISPLAYLfascrlf,
82
DSR,
82ECHO,
82
ECHOLinefeeds,
82
emit,
66, 78, 82
exit,
66, 83, 84
extract,
74, 75, 80, 83
fault,
72, 73, 75, 83
FIFO,
83
FILE,
83
FONT,
83
Function,
83
goto,
64, 66, 88, 99
GRAphicslock,
84
HANDshake,
84
HANGup,
84, 86
HELpkeylf,
84
if, 70, 84, 91
INTerlace,
84
KERmit
BYE,
85
KERmit
DOWncase,
85
KERmit
FINish,
85
KERmit
MODE,
85
KERmit
PACKetsize,
85
KEYMap,
85
KEYRepeat,
85
KEYScriptcharacter,
85
LINES,
85
LOCAL,
85
MENU,
85
MESsage,
85
MISCFlags,
44, 85, 124, 136
MOUsesupport,
87
movecursor,
74, 87
NUMerickeypad,
87
ON,
87
PARity,
87
paste,
66, 70, 88
pause,
81, 82, 88
PRELoadgraphics,
88
PREScroll,
88
PROGrammode,
88
REFresh,
88
RENdermode,
88
REView,
88, 92
REXxportname,
88
rx,
42, 75, 88, 97 to 99
schedule,
63, 64, 66, 88
SCHedule FUNCTION,
88
SCREENDepth,
88
SCREENGadgets,
88
send,
66, 78, 88
SENDLinefeeds,
89
SERialdevice,
89
SHIfttabesctab,
89
STRipbitS,
89
SWApbackspacedelete,
89
TEKNOPointer,
86
TEKtronix
. . . . . 89
TEKtronix
MENU,
89
TEKtronix
PAN,
89
TEKtronix
PRINT,
89
TEKtronix
SAVEas,
89
TEKtronix
ZOOM,
89
TITlebar,
90
TRACE,
90
TRANsfer
Mode,
90
TRANsfer
Protocol,
90, 91
TRAP,
90
VOLume,
90
WAIT,
90
WEDGE,
76, 90
WINDOW,
91
window open,
104
WORkbenchcolors,
91
WRAP,
91
XMOdemmode,
91
XPR INIT,
91
XPR Select,
90, 91
143
script comments,
63
scripts,
11, 14, 35
ARexx.
See ARexx, scripts
uninterruptable,
65
search path,
35, 71, 134. See also path
search
serial
device,
17, 18, 28, 101, 103
port,
3, 17, 18, 25, 28, 29, 43, 44, 84,
86, 101, 135
port unit number,
17, 18, 28, 89
server mode,
33
SetMiscFlags,
85, 103, 136
VT100
configuration
files.
See configuration
files, VTPrefs.dat
emulation,
3, 18, 56, 84, 91, 103, 114,
115, 118, 130
escape sequences.
See escape sequences, VT100
mode.
See VTlOO, emulation
screen,
78, 85, 91
w
word wrap,
40
Workbench,
9, 10, 12, 38
WShell,
10, 11, 45, 64, 72, 73, 103, 104,
132
T
Tektronix
configuration
files.
See configuration
files, TekPrefs.dat
emulation,
4, 18, 52, 86, 91, 114, 115,
118, 124, 130
escape sequences.
See escape sequences, Tektronix
files,
43
mode.
See Tektronix,
emulation
screen,
78, 85
text,
85
timed loop.
See loops, timed
Tool Types,
20, 21
traps,
36, 66, 68, 97 to 99
cancelling,
68
on,
36, 68, 75, 87, 90, 97, 99. See also
Script Commands,
ON
trap,
36, 68, 69, 90, 97, 99. See also
Script Commands,
trap
wait,
36, 68, 73, 81, 90. See also Script
Commands,
wait
trembling
extremities
. See Handshaking
X
XPR,
3, 4,
transfer
libraries,
requester,
xprascii,
xprkermit,
xprquickb,
xprxmodem,
xprzmodem,
Z
zoom,
U
unit number.
See serial, port unit
universal quote,
63
User Menu,
42
number
V
VLTL,
VLTR.
43
43
144
-
10, 12, 16, 33. See also file
protocol, external
16
16
10, 33
33, 100
33
33
33
52, 56