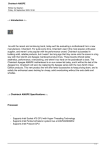
1
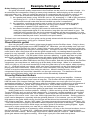
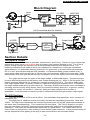
5. 2K 12 K 8K 3.5K 6.5 10K 15K 3K 250 750 2K 4K 50 0 1K 70 100 80 160 300 500 12 5 20 0 40 0 DocDerr KHz BAD! D o c Mix De 5 6 -2 0 2 -2 0 2 -2 0 2 4 7 7 5 5 53 -5 -5 -5 8 8 7 7 7 7 -7 -7 -7 -10 10 -10 10 -10 10 9 9 10 LF -14 dB +14 MF -14 dB +14 HF -14 dB +14 1 0(Blend)10 IN 4 5 6 3 2 10 1 3 6 9 12 16 20 26 Multi-purpose Tone Doctor… and an Acoustic Musician’s Solution in the digital age. Page 1 2 2 3 4-6 7-8 9 10 11 12 13 13 14 15 Item INDEX Features & Specs What Is the DocDerr? Using for the First Time The Jumpers on the PC Board. Example Settings of the DocDerr Recall Sheet Example Settings (Continued) Block Diagram & Section Details The Compressor Wiring the DocDerr DocDerr Pet Tricks & Troubleshooting Stereo Operation Customer Comments Warranty (Rear Cover) Empirical Labs - Technology for the Artist Technology for the Artist BACK TO TABLE OF CONTENTS Features � � � � � � � � � � � � � � � Super low noise line input, or instrument preamp, with famous Empirical Labs compression. Six digitally controlled analog sections of processing. Incredibly dense processing module available for the API 500 series format. Four sections of Equalization – One High Pass and 3 parametric bands. Empirical Labs first compressor for the API 500 format. It is an aggressive compressor that follows the EQ, tailored to acoustic instruments, and plucked attacks, but good on just about anything. A must try on vocals and bass! Complex compressor envelope generator. Fast, yet musically saturates at high gain reduction. Program dependant release. Saturation circuitry that scrunches the highs and allows hotter levels like tape. Uses filtering combined with germanium clip circuitry to soften loud high frequencies. Mix control to allow user to blend an un-compressed EQ’d signal back in with the compressed saturated signal. When on 0, only the EQ’d signal is put out. Adapter is provided for free, allowing a guitar, bass, etc to be plugged straight into the rear of your API powered rack. DC Coupled Input and Outputs. Selectable single ended or differential output. Differential out adds 6dB gain. Traditional and digitally controlled analog combined in new topology. A “BAD!” Hard Clip Indicator lights – A “Bad” Clip LED that lets user know he is within 1dB of hard clipping. It monitors most every section for internal clipping. Highest quality Components. All metal film and Roederstein resistors in the audio path - top quality components, most being high temperature military spec parts. NOTE: With all the processing, the DocDerr draws slightly more current than the API 500 spec, but has worked perfectly in all racks tested. Six have been tested in the API Lunchbox and other racks, without overloading the power supply. User modifiable elements, including the Compressor. Lots of future options! Three year unlimited warranty. Built and calibrated in USA. Specs ♦ ♦ Frequency Response is 3 Hz to 180 kHz on eq section (-3dB points). Dynamic Range - 120 dB from maximum output (.5%THD soft clipping) to ♦ Distortion Ranges between .0006% and 12% at 1KHz, depending on mode ♦ ♦ DC coupled Input and Outputs, - High quality audio caps used internally. Input Impedance is 120K Ohm, Instrument In Mode. 20K input impedance ♦ ♦ ♦ Maximum Input before hard clipping - +22dBm, “ Line In” mode. Maximum Output - +28dBm (Mix = 0). Output impedance is 75 ohms. Compressor Dynamics Time Constants - Attack time is about 1mS. Release ♦ ♦ minimum output. Noise floor with Mix on 0 is typically – 91dBu. and settings. in balanced Line in mode. .2 sec, program dependant, fixed internally. Power Consumption – 4 Watts max. 2 Watts typical with 16Volt power supplies. Shipping Weight - 1.3lbs. Empirical Labs - Something Old, Something New 1 BACK TO TABLE OF CONTENTS What is the DocDerr? It’s all about TONE. The DocDerr is a digitally controlled Preamp, EQ, Compressor and Saturator module good not only for general use, but can single handedly bring incredible tone to any source, even electrified acoustic instruments. It offers unprecedented amounts of processing and musicality in an API 500 compatible module. With a mini-computer inside (Microcontroller), one controls 4 analog EQ sections, and a new dynamic section capable of chopping brittle edges and digital transients with its compressor and saturation circuits. The DocDerr module is the first Empirical Labs compressor available in the API 500 series format, and a super-utilitarian processor. DocDerr's Six Section Types: 1) 2) 3) 4) 5) 6) Low Noise Preamp section, capable of unity, or 16dB of “instrument” gain. A selectable High pass filter to cut annoying sub frequencies out. Three bands of top performance parametric EQ. A dynamic section that offers renowned Empirical Labs compression at an unprecedented price, in a 500 series format module. This aggressive compressor has a large “knee”, and is tuned to minimize nasty distortion. A live instrumentalist has access to classic compression. A tape emulation type circuit that softens the high frequencies, and soft clips, allowing more RMS level to fit in the same peak level. It’s louder! A mixer that allows the user to blend the uncompressed EQ’s signal with the compressed & saturated signal. Using the DocDerr for the first time The DocDerr is an incredibly deep and powerful little tone-enhancing module. Lets dive in. Operating Levels – First, before even installing the DocDerr in a rack, make sure the DocDerr has the input gain jumper set properly for your use. There are two primary ways to hook up the DocDerr: 1) As an instrument preamp with front-end gain, 2) As a line level device/processor. The INPUT GAIN Jumper allows you to select one of these modes and is located towards the middle rear of the board. If you are plugging a guitar or bass directly into it, for instance, it should be set towards the rear for INST mode. For louder balanced LINE IN level signals, it should be towards the front. See page 3 for a diagram of the Jumpers. The Factory default is LINE IN. (Not unity gain). In INSTRUMENT IN, the gain increases to 16dB of front end, high impedance amplification. Use INST jumper setting for an instrument such as your acoustic guitar with built in pickups. Install in your rack. If your rack has only XLR, use the supplied adapter cable to go from your guitar to the XLR input of your rack. The output can go directly to powered speakers or a mixer, etc. First time users should learn the EQ first. Turn the Compressor MIX knob to 0 (No compression, just EQ) and adjust the EQ controls till you get the creamy sound you want. Select the frequencies by pushing the buttons, and set boost and cut with the knobs. Holding a button for 1 sec will cycle backwards. There are 7 frequency selections for each band. When two LEDs light, you read the frequency below and between the two LEDs. If you hear thumps or low rumble, engage the HP circuit by pressing two buttons at once, the LF and the MF switches. You can cycle through the available high pass frequencies by repeatedly pressing these two buttons. Often the two main problem areas with acoustic instrument tone are low mids and high mids. Pulling out woofy frequencies between 250 – 500 can make the instrument sound brighter and fuller. If upper mids pop out, you can pull 1K – 8K with the midrange or high frequencies. Piezo or ceraminc pickups often have too much energy in the 4KHz area. The DocDerr compressor can help smooth out gain loss from EQ dips, making a case for touching up your EQ while compression is engaged. Now lets setup the compressor. Turn the MIX knob on the right to 10 (100% compressor) and adjust the INPUT Knob until you feel the sustain and evenness of our compression starts to please you. We worked very hard on this compressor to make it aggressive, yet not unpleasantly distort, as fast as it is. A live musician may want to maintain his really hard attacks by turning the mix back from 10, mixing in the dry uncompressed signal. This will let the really loud passages come thru over the compressed, sustained level. Live, you may have feedback problems with an acoustic instrument. This often limits the amount of compression one can put on. One can try to pull out the feedback frequencies with EQ, but often the player will have to ride his volume down at fade-outs. For line level situations, such as while mixing or on a synthesizer, one would move the Gain Jumper to the Line Level position (towards the front). This cuts the gain back by 16dB to 0 gain, 2 BACK TO TABLE OF CONTENTS and turns the input into a balanced amplifier, allowing the DocDerr to handle very hot signals without clipping, and the module becomes a great mix or line level tracking processor. 3 Pin Jumper Settings S/N ________ U2 8 U7 5 4 U9 U3 PreOut U1 DocDerr R3 Empirical Labs 5/20 c 2011 11 16 U17 13 U12 18 DI 16dB 50V U14 28 U19 27 29 FBW 25 Dif Input Gain Line Inst +16 Det HP FBW 150Hz HP Differential Out Dif out Single Ended Above is a diagram pointing out the 3 user selectable jumpers, affecting audio and compressor detector. All jumpers are shipped in the left (front) position, which is factory default. INPUT GAIN JUMPER - For direct instrument inputs, such as an acoustic guitar, one would set the INPUT GAIN Jumper to the right (NOT as shown). This provides 16 dB of single ended gain when input pin 3 is shorted to ground, as a normal guitar cable would do. This gain is usually enough to bring up electric instruments to line level, while still providing a margin of safety for certain active instruments. It will help the MIX control also, making the dry level closer to the compressed level, so sweeping between them won’t be so radical. For line level signals, keep jumper to the left (front). DETECTOR HP JUMPER - This jumper allows the user to optionally roll off low frequencies going to the detector of the compressor. When in the right (rear) position, this filtering keeps the compressor from responding as much to the low frequencies, which often have great power, therefore sometimes getting over-compressed, subjectively speaking. However, since the compressor is so versatile, it’s usually preferable to tame the subs as well, by sending a full bandwidth (FBW) signal to the compressors detector (jumper to the left as shown). DIFFERENTIAL OUT JUMPER – Changes output configuration. This jumper sets the XLR output pin 3 to either balanced ground, or the inverted phase of what’s on pin 2 of the output XLR. It is set to the left, differential mode, from the factory, adding 6 dB more gain. Setting the jumper to the right (towards the rear) disconnects the amplifier on pin 3, decreasing the output gain by 6dB. Multi-Button Controls: Lastly, to get started you should learn three special button combinations. Pressing two buttons at once will cycle through the following parameters: HP Frequency - Press LF and MF to change HP Frequency from Off, 70Hz, and 100Hz. Mid PEQ BW - Press MF and HF to change Mid band Q (bandwidth). LED indicates narrow Q. Disable Compressor - Press LF and HF to disable/enable compressor. 3 BACK TO TABLE OF CONTENTS Example Settings Disabling the compression can be done with software by pushing the LF and HF buttons simultaneously, allowing the DocDerr to behave almost as a tape-like saturation/distortion box. The HP DocDerr provides a new level of processing powerrespond in a single 500sub module. Originally A Det jumper on the PCB can make the compressor lessAPI to low frequencies. theDocDerr main target user was the live who traditionally a thin, out-of-control sound The is shipped in FBW (fullperformer bandwidth) mode, with thehas jumper towards the front, whichfrom is his/her guitar or other acoustic instrument. ButMoving like most products, theposition versatility of usually preferable, especially bass instruments. theEmpirical DET HP Labs jumper to the rear rolls the DocDerr makes it useful on practically any source. Also, because of the no-compromise build off below 150Hz to the compressor detector, and can help prevent LF pumping for midrange sources quality ofand the acoustic DocDerr,instruments. it is an excellent processor/preamp well. We willasstart example like vocals It is studio sometimes useful for bussascompression well.ourThe HP settings on Acoustic especially with built in pickups. EQ filter often preventsguitar, pumping also, asthose it filters out subs in the audio path before the compressor sees them. See P3. Acoustic Guitar & Plucked Instruments – Acoustic instruments are extremely The Saturator sensitive to tone alteration. Mic selection and placement, along with a good instrument is your first The saturation circuit follows the compressor, and tends high frequency peaks that get resource during performing or tracking. It’s always besttotocatch try getting the source to sound right through, softlyProcessing. flattening them out. player It wasshould largelyalso tailored to simulate thesound characteristics of the tape WITHOUT A good be sensitive to the he gets off saturation. Germanium used tostrings. more smoothly round the peaks produce instrument, and adjustsemiconductors how and where are he hits the However, we have stuffedtoenough lower order harmonics. Wemodule use special filter circuits to the shape how different frequencies are soft processing into this little that combined with eq on the instrument, you should be able to clipped. This saturator always in the paththat of the signal.If When mix control get a first class sound,circuit eveniswith an instrument hascompressor poor basic tone. you arethe tracking is (recording set to 0 (dry), saturator are both out endless of the path and notthe affect output the the source for theand firstcompressor time), the user will find ways to do alter tonethe with the signal. The saturator will addcan lotsbe of adjusted harmonics frequencies, and soften DocDerr. The output level uptoorlow down 6dB for recording withhigh the frequencies. output jumper. AsLets mentioned above, pressing the LF and HFinbuttons willsince toggle theare compressor off and on, look at acoustic instruments with built pickups, they the most common for live allowing you to use just the germanium saturation circuit with no compression. tape-like! performances. Internal pickups are very non-ideal transducers. First they are Very usually partially, or completely inside the instruments, some place your ear never is. They pick up hardly any “wood” of The Mix Control an acoustic instrument. Secondly, the transducers have a frequency response all over the place, and This is a clean mixing circuit that allows the user to blend the EQ’d uncompressed signal with the the best a designer can hope for is a transducer’s frequency response to compliment the EQ’d, compressed and saturated signal, and has incredible phase alignment through 20KHz. This instruments. Often the guitar designer will provide basic EQ for the built in transducer to help simple circuit gives the user incredible flexibility in how the compressor/saturator is used. As already improve the basic tone. The DocDerr’s built in EQ will enable the user to work on frequencies in a mentioned, the user can sometimes put lots of compression on a signal, and mix it back under the way not possible with the built in instruments tone controls. Combining both the instrument’s dry signal and get a natural full sound, with dynamics, and lots of sustain. There will be a slight level onboard eq with the DocDerr’s 4 section EQ gives the instrumentalist great tone shaping power. drop in the middle of the Mix knob range, partially because the compressed signal sustains notes The EQ selection and the compressor was tailored for “electrified” acoustic instruments. The tremendously, but the uncompressed peaks are attenuated. Once you back down from 10 on the most common problems are midrange frequencies that pop out during different types of playing, and Mix, the loud sustained level will drop quickly, but you may have a very nice natural dynamic sound. over dynamic instruments without sustain. The compressor fixes the over-dynamics and lack of Conversely, you will also notice a quick change in the loudness and sustain, when you nudge the sustain and “size”, while the EQ can do wonders for the basic tone. mix control above 0. The mix control is heavily dependant on the input signal’s level. There are lots The player & engineer will find that often what works for a solo instrument can be disastrous on of marks on the Mix control to aid in recalling settings, especially between 8 - 10. an instrument in the mix with other instruments. Low frequency Boominess, a common problem, can be fixed with a gentle bass roll off using the Low PEQ, or with the steeper high pass sections. Again, while mixing, its best to EQ the instrument “in the mix” to make it fit tonally. While soloing, there is oftenare a tendency thicken it up,and which will translate when combined with the bass and There two mainto ways to setup wire the input ofto a muddiness rack with the DocDerr module installed. other instruments. pass ended filter is input EXTREMELY open upguitar frequencies 120Hz 1) “Instrument In”The withhigh a single (usually auseful monotostandard cable) below and 16dB of forgain, other instruments. The 70Hz filter will leave all the fundamental frequencies of an acoustic guitar intact, but In” getwhich rid of thumps body rumbling. It is especially useful for the solo 2) “Line is lower and gainlow andfrequency can be differential. guitarist who wants a BIG sound, without rumble. The 100Hz filter is still out of the way of most fundamentals, cuts GAIN down on the size of the sound,rear making it useful ensemble playing. There is an but INPUT jumper located in guitar the middle of the board in that can be switched On records, when an acoustic is part of a band, engineers willjumper often cut higher the frequencies up the between two positions, Instrument In (Inst) and Line In. This changes mode which around 120 –works, 150, preventing mixes. One can use LF to parametric section input amplifier changing “muddy” it from asounding high impedance amplifier withthe gain, a lower impedance alone, or input combined with the achieve with the DocDerr. differential amplifier withHP notogain. Sothis before installing your module, set this jumper to the The tone and body of an acoustic guitar is in the 160 to 500Hz range. Too much in this range proper position. andMost the instrument sounds dark and while too little can make it thin. Sometimes it’s API 500 compatible racks do“wooly”, NOT have a 1/4” guitar jack input, so we supply a female necessary to boost at close frequencies here.guitar Get used the this dropadapter in levelwill when you 1/4” jack adapter that AND goes cut to male XLR. Plugging adown standard cabletointo work cut frequencies in this range. Sometimes cutting one mid frequency generously can fix a whole perfectly for “Instrument In” mode. The guitar cable will short the sleeve to ring, shorting the ring (pin guitar its easy to get fooled when A/Bing it with thetoorignal. with the compressor can 3 on the tone, XLR) yet to ground. When the Input Gain jumper is set the rear Eq’ing in “INSTRUMENT IN” mode, prevent the misleading level16dB drop.ofOne use the midrange with narrow Q (press MF and HF this will result in a very clean highcan impedance gain. buttons to narrow this Q or bandwidth), surgicallydifferential, pull 500Hzand or higher frequencies out. 400 – As shipped from factory, the output istobalanced 6dB louder than the alternate 1KHzended is often a good pointThe to cut frequencies to brighten and fill thetolows It is above most single output setting. single ended mode, with the jumper the and rear,highs. has balanced fundamental frequencies, butany below the frequencies that (See help the cut thru a mix. impedance, which can prevent output wiring problems P3).instrument For recording youinwill usually guitars have honky midrange the more 1 – 8KHz when the player is playing use theMany balanced differential mode as it hasin6dB gain range, and willespecially hit the recorder with a better hard (loud). Try pulling 6dBended at 1-4KHz with the midrange wide bandwidth, see if that signal. If too loud, use single mode. When using the EQ, differential out mode,and don’t short anymakes of guitarXLR rounder. this(usually sounds Pin dull,3)trytomoving frequency lower or perhaps you need thethe Active outputIfpins ground.theLet the unused pin(1KHz?), 3 “float” (stay to pull a couple different points at say 1Khz and 4-8Khz. Sometimes pulling as high as 10Khz will unconnected). Separate amplifier drives each of these pins, so grounding one of them will short the smooth the tone without dulling. upper midrange on acoustic changes drastically associated amplifier out. So in the The Dif Out mode, if you only use pin instruments 2 on your output cable, leave on howWhen the instrument played, and even the or guitar uses using open the strings, or ended finger pindepending 3 unconnected. going to aissingle ended patchifbay otherpart device, single frettedsetting strings. Eq’ingtowards an acoustic with a pickup is asome seriesguesswork of compromises. Don’t forget jumper (jumper rear) instrument will work just fine, and take out of wiring. to use the tone controls on the instrument itself,12 for more eq power. 4 Wiring the DocDerr BACK TO TABLE OF CONTENTS Example ExampleSettings Settings24 Guitar Settings (cont’d) Percussion On guitar, the studio quality compressor in the DocDerr can be used in a number of ways. It is Drums and percussion are sources that often need liberal amounts of processing. We will touch an extremely fast compressor, helping to tame pointy transients, while bringing up the sustain on briefly on a few tricks for common percussion issues. each and every note. One can control the amount of compression with the volume control on his Kick Drum EQ – Woofy kick drums can often be fixed with lots of 220 – 400Hz pulled out. It is not instrument. There are at least three different ways to use this limiter/compressor, on a guitar: uncommon to get a great sound just pulling 6 – 12 dB of 300 – 400 Hz out. Set the LF parametric 1) As a gentle peak tamer, using 100% Mix (mix on 10), averaging 3 – 6 dB of gain reduction, EQ for –9dB at 400Hz to start. The level will drop dramatically with this EQ since there’s usually but putting on 10 – 12 B of compression on the loudest percussive passages. The speed tons of power in this frequency range, but usually, the overall tone will be much better. To add and smooth knee will make this almost inaudible as actual “compression”. attack, add 5Khz – 8Khz with one of the upper two PEQ (parametric EQ) bands. Check your kick 2) As a smasher, crushing strumming parts to make it fit into an ensemble at a nearly drum on several speakers! constant level, and bringing up solo lines so every note is heard. 12 to 20dB of Snare – Snares often need some top and bottom. This again hints at possibly pulling a generous compression on peaks is quite usable here. 100% Mix. amount of a mid frequency to bring the low and high frequencies out. Try pulling frequencies 3) As a natural sustainer, using the MIX control to enhance the uncompressed DRY level, between 350 – 1.5KHz. This often sounds very natural but again, always EQ drums in the mix with letting the compressed signal fill in the sustains, long after the main attack is gone. The the other drum mics on. Soloing while EQing is dangerous, especially on drums where many mics peaks will still come thru but low level notes and sustains will be more present. You can can interact with each other. If you still need some snap and sizzle in the high frequencies, try +5 @ use lots of compression here if you want (12 – 20dB), keeping the compressed level quite 8KHz. Watch out for high hat and cymbal bleed since this is a common problem. Adding thud and a bit lower than the peak levels, and still sound quite natural. body to the snare is usually done in the 100 – 200Hz range. Try +2dB @ 150Hz (100 – 200) and The andHigh character of the yoursnare guitaratcan be100Hz greatlycan enhanced with up thisthe studio quality tunebasic fromtone there. passing 70 or often clean low end and help the Empirical giving you a “finished” sound. kick drumLabs due compressor, to phase problems. Analog tape was always a big help in getting a fat, punchy, natural snare. If the guitar snare has a plastic edge and needs sustain, experiment with the Clean Electric compressor/saturator. mixdown, DocDerr can smack and sustain. One can get great, In clean electricthe guitar tonescompressor plugging into thebring DocDerr alone. Going in direct, However, wethe urge youjumper to record drums without IN. compression, at least keep a copy theand you will need input set the to INSTRUMENT Otherwise,oryou will probably use aofmic uncompressed track on tape (DAW). Compressing while tracking will increase bleed andofpossibly preamp, setting the DocDerr for Line In. Again if this is a solo guitar, you can leave much the low make it tricky gate orjust trigger samples later on.pass. RoomThe or ambient mics frequencies in, to perhaps using the 70Hz High tone is in theare 160a–possible 500 Hz exception. range but as Percussion tambourines, can often treated some compression while noted, that issuch also as a range that can congos, make theetc guitar soundbe muffly, sowith treating these frequencies recording without much risk. properly is very important. If a guitar sounds thin and lifeless, sometimes boosting a little in that Mixes Buss - For aren't the jargon... A “BUSS” is usually a pair of range and&pulling outEQing 4k – 12K will those make who it fuller andused moretopleasing. A guitar amp has very little channels that preof mixed stereo on them. Leftand & Right outputs of above 10K,(2) and anhave excess theseinstruments frequenciesorwill makemusic a guitar sound The “tinkly” unnatural. yourThe CD compressor (music) player couldgreatest be considered a 2 channel buss. In clean the recording studio, itHarsh is more is your tool for getting album quality electric guitars. often applied to the final left20dB and right channel mix,ofor tosustain, something drumsthe mixed plucked transients are often above the body the andsuch with as its all fastthe attack, DocDerr down to 2 tracks (a "submix"). instead or processing 12 channels to move the compressor can even these out,Now, and bring up of all riding the body of the strings. When in at anonce ensemble, drumsmix up(Mix and on down, to work to with two. 100% 10) you can only workhave wonderfully help the guitar take up a nice space, without jumping with natural, mixes orwhile submixes is overall “dullness”can or lack of high end clarity. out. 6A– common 12 dB willproblem sound very even more compression be quite tasteful when Use the high band centered at 10 –When 15KHz. Alternately, someone lows or want low mids canthe clarify playing with other instruments. used on a solo cutting instrument, may to use Mix a mix. The 250 – 600Hz is a common target. Pulling out frequencies between 250a–very 600Hz can often control to keep the range compression from being too obvious. Mixed in behind the dry, clear up a whole the itlow end andrun high end come outamp. in a pleasing way. If will there are compressed signalmix, canmaking sound like has been through a tube The harmonics add vocalsand present, out for losing their pleasant and body. Often mid frequencies will pile crunch soundwatch less sterile, while the sustain will warmth be dramatically enhanced. up between 1 – 5Khz. Our ears are most sensitive to this range and one can often pull 1 – 3 dB with Crunchy Distorted Guitars a parametric band (-1.5@4K) after high frequencies have been boosted. Mastering mixes is almost You will usually need a microphone and mic preamp when using a real amplifier. However, always an art of compromise. software tube amp emulators have come a long way. The DocDerr will then probably be used in The compressor can be extremely useful for adding excitement to mixes or busses. Because LINE IN mode (See Jumper Settings), since it will probably have too much gain for a mic pre or the compressor is so fast, you will either use the DocDerr compressor as a peak limiter (1-3dB), or workstation preceding it. Because distortion adds an incredible range of harmonics, and because of use the mix control to add in a little compressed signal to the dry signal, bringing up details and the interaction between a guitar, amp, speaker and mic, really drastic frequency spikes and sustain, helping fit the mix together and sound more finished. When using the MIX, you can resonances are common on guitar tracks. They can make or break the track… and they can also sometimes apply 6 – 10dB (or more) of compression blended under the dry signal. Don’t forget you make EQing very tricky. So spend time getting a great basic tone without processing. can disable the compressor and just use the tape-like saturation, which helps integrate frequencies, Muffly guitars are a common problem. Adding 3 – 8KHz can bring out the “STING” and clarity. filling in cracks and increasing the apparent volume. Too much though, and you end up with a buzzy tone. Conversely, another method to get rid of the “muffles” is to pull frequencies from 150 to 500Hz. Often there are frequencies below 80 – 140Hz LIVE SOUND Thepass DocDerr expected to findSoloing prolific use in in that just turn into mudREINFORCEMENT in a mix. Here, the 100Hz –high filter is can do wonders. guitars soundcan reinforcement systems for many Thepresent! unit is built militaryyou gear, extremely strong mixes be dangerous, especially with reasons. the guitarist If forlike instance, use the 100Hz with pass manyon connections doubled up, making it extremely road worthy. The lettering quite large High the guitar while soloing, the fullness will be thinned out somewhat, andisthe guitarist compared many mixerbut eqs, it easyThe to read in tones dim light, the knobs aremuffly carefully isn’t going totowant that… themaking “Mix” might! warm are and the same as the area, 160 for repeatable settings. And of course, extreme versatility in and multitude tonal –calibrated 500, and sometimes it helps to add AND subtractthe adjacent frequencies that range. ofSometimes contained should allowcan thehelp sound engineers handlegetting most any problem he aprocessors midrange boost in thewithin 500 toit,2KHz range a guitar fill outtowithout brighter. Again, encounters in his except day to day on ears the road. there are no rules whatlife your tell you while listening in the mix. Direct boxlimiting – The guitars high performance preamp in the DocDerrnot was meant to be a stagebut on Band is an extremely useful technique, only on the lowused end as above, preamp. Since performance most instruments output signal they to noise, guitar,tighter, bass, the high end also.itsTry rolling off 5exceeds – 12KHz on electric guitars and often, will sound synths,and andoften drumwarmer. machinesSet willthe allhigh come out band cleanto and fat, with adding quieter, PEQ 10KHz andthe pullDocDerr it down 4 – 6dBlittle andnoise. see if the guitar gets warmer and tighter sounding. Often there’s just pick noise and hiss up there. 59 BACK TO TABLE OF CONTENTS Example Settings 3 Sometimes the guitar just needs a touch of fatness without losing attack, don’t forget that cutting a high mid (1- 4KHz) can sometimes take out a nasty honk and let the body in the lower frequencies pop out. Crunchy guitars, which are full of harmonics, are notoriously sensitive to tonal changes. You can often notice a 1 dB boost or cut on an electric guitar much easier than you could on a vocal, drum or other instrument. Analog tape was always a big help with vocals and electric guitars because it clipped all the pointy peaks and saturated when the high frequencies piled up. One can try just the saturator in the DocDerr by disabling the compressor (press LF and HF). Bass – Bass is a difficult instrument to get “right in the mix”. The DocDerr has many ways to help round out and make it cut through in a mix. First, if a low bass tone is too pure and sine-wave-like, it will "fall off" on small speakers. By this we mean it will not be audible because most of the bass frequencies are below the range of the speakers. Try bringing out 700 to 2KHz with a mid PEQ Band. These will accentuate the upper harmonics that will reproduce on small speakers. Sometimes pulling out frequencies around 300Hz will bring out the low end and high end on a bass and give that frequency range more room in a mix for the guitars vocals, etc. But pulling out too much 200 – 400Hz can give you a hollow sound that has no warmth on small speakers. Also, the DocDerr compressor can add “tubey” harmonics to cut on small speakers. The more compression the more harmonics. Use the Mix control to tame the compressor. The compressor will tame the clacky attacks and lengthen the sustain. It is not uncommon in this digital age to have too many sub frequencies on a bass track. Try the 70Hz High pass, you will be able to raise the bass level in a mix, giving it clarity and leaving the sub freqs to the bass drum. Boosting low freqs on an EQ before a compressor lets the compressor grab the eq points and control them. Often accentuating around 100Hz will give the bass plenty of bottom. Conversely, if you are boosting EQ after the compressor, those new frequencies will be there to stay. An EQ following the DocDerr’s EQ and Compression will give any engineer enough tools to get a great sound no matter what he started with. Sometimes there aren’t a lot of important frequencies on the bass above 4KHz, Try pulling out a wide band at 4 KHz or above to cut clack, hiss, excessive pick noise etc. I have seen engineers “band limit” the top and bottom end of the bass to approximately 60Hz through 4 KHz, letting the rest of the tracks fill in above and below this band. Vocals – It’s most important to pick the right mic, the right distance and the right angle for the singer. The most expensive mic isn’t always the best mic for a person’s voice. Also, sometimes the mic that needs the least EQ isn’t the best mic either. And moving a person a couple inches in and out from the mic can make all the difference in the world. EQing - Don’t overly brighten! Of course, a certain amount of high boost is frequently required. But, often harsh sibilant frequencies suddenly pop out making a perfectly good vocal become this scratchy, hissy annoying squawk. Try setting up the compressor first, while adjusting the EQ, as it keeps level changes from fooling you. Pulling some woofy or pointy lower mids can bring out the body and high frequencies without exaggerating the spit, S’es, and high frequency resonances in a voice. There is a danger in removing the body in the 150 – 300 range so keep your ears alert when working these frequencies. A dB or two may be enough. Try pulling freqs from 2K to 4kHz out to smooth and bring out the low and top end, and get rid of harsh “honk”. The DocDerr compressor is magic on vocals, and brings a great modern sound to them. It brings the body up but will also bring out the honk, breaths and sibilants (sibilants are the annoying S’es, T’s K’s that have a high frequency transient nature). Try our DerrEsser to tame these artifacts. Keyboards – Obviously in this sampled age, this covers a lot of sounds, and Acoustic Pianos are a whole subject unto themselves. We can give some quick generalizations here. First, don’t forget to properly set the Instrument In jumper. If the level of the keyboard is low, set to instrument in. However, modern synths can usually work fine at LINE In levels. Either way, the DocDerr makes a great DI box. Treatment depends on the final setting, I.E. Solo keyboards, or as part of a larger ensemble. Getting a big full sound is usually the goal of solo keyboards pieces, unlike ensemble playing. In ensemble playing, high passing is often useful, especially if there are potential conflicts in the low end between the synth and bass parts. In the latter case, the DocDerr high pass will prove invaluable for removing the mud that can occur from a left hand/bass conflict. Try 100Hz High Pass setting here. Synths often have “plucky” top ends. One can band limit the top end up there, or try the Compressor/Saturator to control the peaks. Sometimes string sounds have a midrange grit to them and using a PEQ (Parametric Equalizer), one can pull out 800 – 4KHz (start at 2KHz) and get a silkier sound that sits in the back and lets the guitars and vocals have that upper midrange area. Rolling off top end can help get rid of the buzz of a synth part. Cutting freqs on one track, gives room for them elsewhere. 6 BACK TO TABLE OF CONTENTS Percussion Example Settings 4 Drums and percussion are sources that often need liberal amounts of processing. We will touch briefly on a few tricks for common percussion issues. Kick Drum EQ – Woofy kick drums can often be fixed with lots of 220 – 400Hz pulled out. It is not uncommon to get a great sound just pulling 6 – 12 dB of 300 – 400 Hz out. Set the LF parametric EQ for –9dB at 400Hz to start. The level will drop dramatically with this EQ since there’s usually tons of power in this frequency range, but usually, the overall tone will be much better. To add attack, add 5Khz – 8Khz with one of the upper two PEQ (parametric EQ) bands. Check your kick drum on several speakers! Snare – Snares often need some top and bottom. This again hints at possibly pulling a generous amount of a mid frequency to bring the low and high frequencies out. Try pulling frequencies between 350 – 1.5KHz. This often sounds very natural but again, always EQ drums in the mix with the other drum mics on. Soloing while EQing is dangerous, especially on drums where many mics can interact with each other. If you still need some snap and sizzle in the high frequencies, try +5 @ 8KHz. Watch out for high hat and cymbal bleed since this is a common problem. Adding thud and body to the snare is usually done in the 100 – 200Hz range. Try +2dB @ 150Hz (100 – 200) and tune from there. High passing the snare at 70 or 100Hz can often clean up the low end and help the kick drum due to phase problems. Analog tape was always a big help in getting a fat, punchy, natural snare. If the snare has a plastic edge and needs sustain, experiment with the compressor/saturator. In mixdown, the DocDerr compressor can bring smack and sustain. However, we urge you to record the drums without compression, or at least keep a copy of the uncompressed track on tape (DAW). Compressing while tracking will increase bleed and possibly make it tricky to gate or trigger samples later on. Room or ambient mics are a possible exception. Percussion such as tambourines, congos, etc can often be treated with some compression while recording without much risk. Mixes & Buss EQing - For those who aren't used to the jargon... A “BUSS” is usually a pair of channels (2) that have pre mixed instruments or stereo music on them. The Left & Right outputs of your CD (music) player could be considered a 2 channel buss. In the recording studio, it is more often applied to the final left and right channel mix, or to something such as all the drums mixed down to 2 tracks (a "submix"). Now, instead of riding or processing 12 channels at once to move the drums up and down, you only have to work with two. A common problem with mixes or submixes is overall “dullness” or lack of high end clarity. Use the high band centered at 10 – 15KHz. Alternately, cutting some lows or low mids can clarify a mix. The 250 – 600Hz range is a common target. Pulling out frequencies between 250 – 600Hz can often clear up a whole mix, making the low end and high end come out in a pleasing way. If there are vocals present, watch out for losing their pleasant warmth and body. Often mid frequencies will pile up between 1 – 5Khz. Our ears are most sensitive to this range and one can often pull 1 – 3 dB with a parametric band (-1.5@4K) after high frequencies have been boosted. Mastering mixes is almost always an art of compromise. The compressor can be extremely useful for adding excitement to mixes or busses. Because the compressor is so fast, you will either use the DocDerr compressor as a peak limiter (1-3dB), or use the mix control to add in a little compressed signal to the dry signal, bringing up details and sustain, helping fit the mix together and sound more finished. When using the MIX, you can sometimes apply 6 – 10dB (or more) of compression blended under the dry signal. Don’t forget you can disable the compressor and just use the tape-like saturation, which helps integrate frequencies, filling in cracks and increasing the apparent volume. LIVE SOUND REINFORCEMENT – The DocDerr is expected to find prolific use in sound reinforcement systems for many reasons. The unit is built like military gear, extremely strong with many connections doubled up, making it extremely road worthy. The lettering is quite large compared to many mixer eqs, making it easy to read in dim light, and the knobs are carefully calibrated for repeatable settings. And of course, the extreme versatility and multitude of tonal processors contained within it, should allow the sound engineers to handle most any problem he encounters in his day to day life on the road. Direct box – The high performance preamp in the DocDerr was meant to be used as a stage preamp. Since its performance exceeds most instruments output signal to noise, guitar, bass, synths, and drum machines will all come out clean and fat, with the DocDerr adding little noise. 9 BACK TO TABLE OF CONTENTS Block Diagram 1 Input Amp 2 LF PEQ 3 MID PEQ HP Filter Balanced In Dig Control Dig Control (Tip) (I/O Connectors Not On Module) Unbal Dry Output Amp HI PEQ Input (Drive) Compressor HF Saturation Circuit Mix Compressed Dig Control 1 2 3 Balanced Out Section Details The Input & Output The input has two modes of operation, Instrument In, and Line In. There is a 3 pin Jumper that selects this, and is set to Line In Mode from the factory (see Jumper Settings on p3). The “Line In” jumper setting changes the DocDerr into an electronically balanced line receiver circuit. It is relatively insensitive to all kinds of wiring, be it balanced or unbalanced. If using an unbalanced signal however, it is preferable that the unused pin 3 is grounded, or at least not left unconnected. Pin 2 is “Hot” and complies with the AES standard. In Instrument Mode (jumper towards rear), a mono guitar cable shorts out XLR pin 3 (Phone ring), and produces 16dB of very clean gain. 16dB was selected as a safe gain that will not clip, but produce a line level signal out of most instruments. The output section has the option to be single ended, or differential output. The select jumper is set to differential mode from the factory (see Jumper Settings on p3). When in Dif Out mode, the jumper produces differential out, applying an inverted signal to XLR pin 3. The gain is 6dB louder over single ended mode. However, if there is a chance of clipping an amplifier, mixer, or whatever, the single ended mode will be a safer way to go. The single ended mode has the other advantage of not being sensitive to any wiring issues, since one cannot accidently short pin 3 to ground, causing an amplifier to “dump” current into it. However, when recording straight into a recorder or workstation, it may be better to keep the jumper in differential mode and get a hotter output signal. The EQ Sections There are 4 sections of EQ in the DocDerr. One selectable High pass filter, and 3 sections of parametric EQ. The High pass is 18dB per octave (3rd order) and has two selectable frequencies, 70Hz and 100Hz. The High Pass frequencies are selected by pressing the LF and MF parametric switches at the same time (simultaneously). This is noted on the front panel. The 70Hz is largely to cut subs from the instrument caused by “instrument body resonances” and pick or hand noise against the instrument. It will leave the fundamental frequencies of a guitar alone. The 100Hz filter cuts out more of the sub frequencies, often making a more realistic guitar response. It also prevents some of the low frequencies from getting in the way of other instruments in an ensemble (band). 10 BACK TO TABLE OF CONTENTS Section Details (cont’d) There are three bands of parametric EQ, whose frequencies are selected by the three switches. The seven frequencies for each band are labeled above and below the LEDs. When two LEDs are on in the frequency select section, the frequency is notated below and between those two LEDs. This allows us to indicate 7 frequencies with 4 LEDs. This PEQ’s (Parametric EQ) performance is very high and based on Empirical Labs Lil FrEQ circuitry. The plot above shows the actual curve shapes of the three parametric EQ sections at full boost & cut. Each band is capable of 14dB of boost and cut, making the full range of the boost cut knobs quite useful. The mid band has its two Q (bandwidth) shapes shown, centered here on 2KHz. The most touchy place on the knobs is at the extremes, where the marks on the front panel get close together. Marks on knobs are 1dB apart. Notice the frequency response of the EQ section goes beyond 200KHz, something that digital processors cannot do. The Mid band has the widest default Bandwidth (BW) but is switchable to a narrower band for cutting problem spots or feedback. The Q of this band is switched by pressing the MF and HF switches at the same time. With each dual button press, the Q will cycle back and forth between wide and narrow. This is also noted on the front panel, and indicated by an LED with a narrow Q graphic above it. See plot above. Great EQ section for great big wide ol’ scoops (cuts). The frequency selection was originally tailored for acoustic instruments, especially acoustic guitar. Often internal acoustic instrument pickups will have midrange resonances that need to be tamed by generous cuts at the problem frequencies. Therefore, we offer the greatest frequency selection in the midrange area. The Compressor The INPUT KNOB is the compressor’s main control (not counting the MIX control), which affects how much compression, is put on a source. The INPUT Knob follows the EQ, and drives signal into the compressor, scrunching the dynamics and peaks into an increasingly narrow range. The time constants and the curve of the compressor were selected to be as aggressive as possible without crackly unmusical distortion. The ratio is about 5:1 but has a huge 5dB knee. With an attack under 1mS, it could be considered a “limiter”. It has been compared to an LN1176. Above about 8 – 10dB of compression there will be saturation caused by fast time constants working on each peak of the waveform. We think it sounds very “tubey”, with nice harmonics added at high gain reduction… but, it IS a form of distortion, and it will get more prevalent with more gain reduction. Many of the classic old compressors from the 60’s and 70’s were valued for this fat distortion. One can tame any saturation by turning down the input knob, thereby turning down the compression, OR, by adjusting the MIX control to include more of the uncompressed (dry) signal in the output. When using the MIX control, the user may find they can put on tons of compression (up to 20dB), and still get a very natural sounding instrument or voice. By judiciously mixing the compressed signal under the dry signal, the sustain and note detail will come out without feeling squashed. Modern mixdown engineers use this “blend” technique all the time, but have to split the signal going to a compressor and then return it to submix the dry and compressed signal on their mixing console. For the first time, the common live instrumentalist can use this advanced compression technique just by turning a knob. 11 BACK TO TABLE OF CONTENTS Disabling the compression can be done with software by pushing the LF and HF buttons simultaneously, allowing the DocDerr to behave almost as a tape-like saturation/distortion box. A Det HP jumper on the PCB can make the compressor respond less to low sub frequencies. The DocDerr is shipped in FBW (full bandwidth) mode, with the jumper towards the front, which is usually preferable, especially bass instruments. Moving the DET HP jumper to the rear position rolls off below 150Hz to the compressor detector, and can help prevent LF pumping for midrange sources like vocals and acoustic instruments. It is sometimes useful for buss compression as well. The HP EQ filter often prevents pumping also, as it filters out subs in the audio path before the compressor sees them. See P3. The Saturator The saturation circuit follows the compressor, and tends to catch high frequency peaks that get through, softly flattening them out. It was largely tailored to simulate the characteristics of tape saturation. Germanium semiconductors are used to more smoothly round the peaks to produce lower order harmonics. We use special filter circuits to shape how different frequencies are soft clipped. This saturator circuit is always in the path of the compressor signal. When the mix control is set to 0 (dry), the saturator and compressor are both out of the path and do not affect the output signal. The saturator will add lots of harmonics to low frequencies, and soften high frequencies. As mentioned above, pressing the LF and HF buttons will toggle the compressor off and on, allowing you to use just the germanium saturation circuit with no compression. Very tape-like! The Mix Control This is a clean mixing circuit that allows the user to blend the EQ’d uncompressed signal with the EQ’d, compressed and saturated signal, and has incredible phase alignment through 20KHz. This simple circuit gives the user incredible flexibility in how the compressor/saturator is used. As already mentioned, the user can sometimes put lots of compression on a signal, and mix it back under the dry signal and get a natural full sound, with dynamics, and lots of sustain. There will be a slight level drop in the middle of the Mix knob range, partially because the compressed signal sustains notes tremendously, but the uncompressed peaks are attenuated. Once you back down from 10 on the Mix, the loud sustained level will drop quickly, but you may have a very nice natural dynamic sound. Conversely, you will also notice a quick change in the loudness and sustain, when you nudge the mix control above 0. The mix control is heavily dependant on the input signal’s level. There are lots of marks on the Mix control to aid in recalling settings, especially between 8 - 10. Wiring the DocDerr There are two main ways to setup and wire the input of a rack with the DocDerr module installed. 1) “Instrument In” with a single ended input (usually a mono standard guitar cable) and 16dB of gain, 2) “Line In” which is lower gain and can be differential. There is an INPUT GAIN jumper located in the middle rear of the board that can be switched between two positions, Instrument In (Inst) and Line In. This jumper changes the mode which the input amplifier works, changing it from a high impedance amplifier with gain, to a lower impedance differential input amplifier with no gain. So before installing your module, set this jumper to the proper position. Most API 500 compatible racks do NOT have a 1/4” guitar jack input, so we supply a female 1/4” jack adapter that goes to male XLR. Plugging a standard guitar cable into this adapter will work perfectly for “Instrument In” mode. The guitar cable will short the sleeve to ring, shorting the ring (pin 3 on the XLR) to ground. When the Input Gain jumper is set to the rear in “INSTRUMENT IN” mode, this will result in a very clean 16dB of high impedance gain. As shipped from factory, the output is balanced differential, and 6dB louder than the alternate single ended output setting. The single ended mode, with the jumper to the rear, has balanced impedance, which can prevent any output wiring problems (See P3). For recording you will usually use the balanced differential mode as it has 6dB more gain and will hit the recorder with a better signal. If too loud, use single ended mode. When using the differential out mode, don’t short any of the Active XLR output pins (usually Pin 3) to ground. Let the unused pin 3 “float” (stay unconnected). Separate amplifier drives each of these pins, so grounding one of them will short the associated amplifier out. So in the Dif Out mode, if you only use pin 2 on your output cable, leave pin 3 unconnected. When going to a single ended patch bay or other device, using the single ended jumper setting (jumper towards rear) will work just fine, and take some guesswork out of wiring. 12 BACK TO TABLE OF CONTENTS 1) 2) 3) 4) 5) 6) 7) Holding an EQ button for 1 second will make it move backwards to previous frequency. Tape Emulator – There is a unique soft clipper in the DocDerr that can be used heavily by disabling the compressor. Press the two outside buttons (LF and HF) to toggle the compressor on and off. Then turn Mix 100% and adjust saturation with input knob. Hi Shelf EQ from Parametric – Tune HF PEQ to Max Freq(15KHz), and use as shelf EQ. Decreasing output Level – A jumper on the right/rear side of the module (as you face the front) can be moved to the rear position to lower the output level by 6 dB. From the factory the output is true differential, and the levels usually better suit recording directly into a DAW. If going to –10dBu devices, move the jumper towards the rear to lower level and prevent clipping. Factory Default - If you want to set all the jumpers back to their factory default, move them all to the front position. DAW parallel processor – The DocDerr’s Mix control can prevent frustration by being used as a processor in a workstation, allowing parallel processing without delay alignment issues. EL500 Rack – This single height, 2 space rack works great with the DocDerr module. It has a preamp built in, so you don’t have to move DocDerr jumpers to use as instrument preamp. Stereo Operation & 5.1 Surround Use. The user needs to enable linking of two units on the power supplied rack, if available. Pin 6 on the EDAC card connector needs to be connected between the modules that will be linked. Once the pins are linked (connected), two units will have the compression locked together, and no image shifting will occur. The user would usually match the other controls, especially the input drive, and the MIX control. Different EQing between channels can sometimes be useful. On some power supplied racks, the manufacturer provided a place to jumper “link” pads together with a soldering iron. Empirical Labs EL500 has a dedicated front panel button that allows the users to link two units together. The EL500 also has an instrument input on the front that can be setup with gain so the module itself can be operated in LINE input mode, which is differential. Troubleshooting Compressor quits working – You may have inadvertently hit the two outside buttons (LF and HF switches) simultaneously, which disables the compressor in software. Press both buttons simultaneously again, to enable compression. Clip BAD! light comes on but unit shouldn’t be near clipping. Check that the Input Jumper is correct for the source (Instrument or Line In). If you are coming in at Line level, say from a workstation or recorder, the input jumper should be towards the front (Line Level) or you will most likely clip the input stage of the DocDerr. If an EQ section is at full boost or cut, you could be clipping that section, and must lower the input into the unit. Many potential “clip” points are monitored in the unit. If your instrument is clipping the input, turn down your instruments volume. Distorted or Thin output - If there is any un-musical distortion, check your Gain Jumper position, and for hard clipping. If the bad light is coming on, lower the signal going to the DocDerr. For hot line levels, set Input Gain Jumper towards front (Line In), since it not only adds lots of gain, but can unbalance an input from a transformer, ruining the frequency response. Hum – Unit may be too close to power transformer. Move to slot farther away from supply. Due to its higher current draw, the DocDerr can tax some power supplies. Pull out an adjacent module and check again to see if hum goes away with lower current. If it does, contact Empirical Labs. Unit seems noisy - If you are compressing a lot, or boosting frequencies on a noisy signal, the noise could be accentuated. Try turning down the input gain and see if noise from the compression gain goes away. If so, noise is coming from before the unit, and being amplified by the compressor. Unit forgets where it was when power was shut off – Wait 6 seconds before turning it off after changing setting. There is a 6 second delay to lengthen the lifetime of the non-volatile RAM to long after we are gone. If it still loses its memory, contact factory for warranty support. No sign of life - Check power cord for firm connection to powered rack, and that the card is firmly seated in connector. If still no life, check the fuse on the rack. If fuse is OK, ensure Voltage select switch is set to current wall outlet voltage (115, 230 VAC). If unit keeps blowing fuses, and there is not another module being used, it is best to return it to the factory for servicing. 13 BACK TO TABLE OF CONTENTS Our Valued Customer Comments Comments About the DISTRESSOR "Every once in a while a product comes along with "classic" written all over it. And in a certain sense of the word, this product actually is a classic already." Mix Magazine “Dear Empirical, I’m an LA based producer and an owner of a Distressor. The unit is really awesome! I've used it on guitars, bass, room mics, vocals it works great on everything. I've used it on records I've made with Beck, U2, Etta James, Hole and lots of others. All The Best, Joe Chicarelli” “Distressors: I can't get over HOW GREAT they sound. On everything. It's truly the best compressor made today.” Greg Wells (Katy Perry, Pink, Jesse McCartney, Natasha Bedingfield) “After buying a Distressor I had an epiphany. Having used software plug-ins for years I often didn’t hear or understand the affects of various controls. After getting my Distressor, and using it and hearing the obvious affects of the attack and release controls, I was able to go back and use the Plug-ins with a new understanding.” (Email) "One piece of gear I definitely recommend is a compressor called the Distressor. It's really great for just about everything and if you had to use just one compressor you could probably get away with just using that." Mitchell Froom “I sold a couple of 1176's and have replaced them with the Distressors, which do a great job of emulating the 1176's. Michael Wagener “(Ozzy Osbourne, Extreme, Metallica) “In General, I really like where Dave Derr’s ear leads him; one of pro audios truly independent thinkers, I’m a huge fan of the box (the Distressor), I use it for bringing up the “goosh” on ambient sources, and for saturating snares, toms, and kicks.” George Massenburg “For those who have come to love and depend on the sound of the Distressor, the new British Mode turns it into a new fun loving animal. At the flick of a switch, the Distressor becomes more aggressive and stressful on any instrument you desire. Dave Derr should win the "(explicative)" award for coming up with such a nice but nasty box.” Michael Brauer (Cold Play, John Mayer, Aretha Franklin, Paul McCartney) Comments About the FATSO Jr “In a word, the FATSO is a very good answer to what a lot of people loathe about digital recording. It smoothes out the sharp, brittle edges to exactly the extent you choose, and fills in the hairline cracks just right. I use one on almost every mix I do. I could easily use one and possibly two more.” George Massenburg “People used to have to hunt for old, expensive gear to get the kind of sounds that the FATSO gives me.” Ed Cherney (Lenny Kravitz, Dave Mathews, Eric Clapton, The Wallflowers, Goo Goo Dolls, Jackson Brown, Bonnie Raitt, Stones, etc.) Best new Signal Processor-EQ AES Awards - "Empirical Labs Fatso took this category, despite the introduction of a variety of cool new processors. Who can resist the best aspects of analog tape combined with great compression" EQ Magazine "The winner of the highly -coveted, "I'm going to write you a check right after the show award was picked up by Empirical Labs for its FATSO processor." Craig Anderton 14 Rev 3.33 BACK TO TABLE OF CONTENTS DocDerr Warranty and Factory Service This Empirical Labs Inc. product is covered by a limited warranty covering full parts and labor for 3 years from the purchase date. The warranty is only effective if the owner has returned his or her warranty card. See warranty card for further details. Should problems arise, call Empirical Labs at 973 541 9447 or contact us from our website 1 below, to obtain an RA number (Return Authorization). Pack the unit up well , with a note explaining the problem and return to Empirical Labs for repair. Include your name, address, phone number, and the date of purchase, and RA number. Send the unit with freight prepaid to the address below: Empirical Labs (Repairs) 41 N. Beverwyck Rd. Lake Hiawatha, NJ. 07034 We can also be reached on the Web at www.empiricallabs.com by selecting “CONTACT” and then “Techsupport” to email repair requests or information to Empirical Labs. The repaired unit will be returned to you via UPS Ground at our expense. 1) Pack the unit in original carton if possible. Otherwise, pack with bubble wrap and/or foam in a thick corrugated box. Shipping people are absolutely brutal to large packages and you must take every precaution against constant dropping, throwing, and crushing. We are not liable for products damaged during shipping. Other Empirical Labs Products: 1) 2) 3) 4) 5) 6) 7) 8) Distressor EL8 - Classic Knee Compressor. Used on thousands of major records! Distressor EL8X - The original Distressor on Steroids. Brit Mode and Image Link added. Fatso Jr & UBK Fatso – Two channels of Full Analog Tape Simulation and Optimization Lil FrEQ – An EQ with 8 Sections of unparalleled tonal contouring. DerrEsser – Smooth De-Essing and High frequency limiting. EL500 – API 500 Series Compatible 2 space powered rack. Amazing with the DocDerr! Mike-E – Digitally Controlled Mic Preamp with our unique CompSat dynamics section. UA Fatso Plugin – Our first software offering. Real analog musicality. Upgrades There are elements inside the DocDerr that were designed to be "modifiable". The compressor circuit has provided for many alternate ratios and time constants. Although we cannot guarantee it at this time, Empirical Labs may release information and hardware options that will allow owners to alter the EQ Frequencies, and compressor parameters of their DocDerr. If you have sent in a properly filled out warranty card, we will keep you apprised of these developments. Do not attempt to modify or make adjustments to your DocDerr until you have notified Empirical Labs and been sent the necessary information. Any sign of internal adjustment by the user will void your warranty, with the exception of changing the Jumpers, detailed in manual. Technology for the for Artist Technology the Artist