1
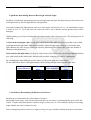
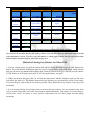
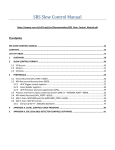
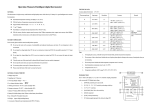
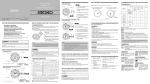
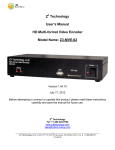
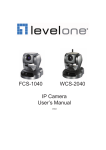
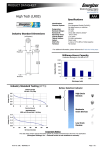
http://www.emenon.com
mennon Grey Cards And Color Balance
Copyright: mennon
A Grey Card has the use of supporting the white balance function of Digital Cameras and Digital Video
Cameras, recording and accurately revivificating the true color of the image. That is related with the special
feature of the color temperature of grey card.
The Color Film is designed on the basis of color temperature differences. There’re many types of film, such
as daylight-type, tungsten-type etc.. DCs and DVs can adjust the different color temperatures through their
white balance function. During photographing, the color in scene will be reverted as long as you’ve made
the color temperature balance. Therefore, to get the true color in video and film production, it’s necessary to
understand the relation that between the color temperature and grey (white) balance. That’s so-called color
balance.
The color temperature is specialized to measure different colors from the ray. Generally speaking, it is the
process of color changing as an absolute black-body reaches to a certain temperature. For instance, to warm
up an absolute black-body under the vacuum condition (f.i.The process of striking an iron) from absolute
zero. As the temperature rises, the black-body will glitter with different lights. At 3200°C the light appears
to be light orange, and at 5600°C the light is nearly white. The higher the temperature rises, the lighter the
color light will be. According to the color changing, the color components of the ray can be clarified.
The way to measure the color temperature had been invented by physicist Kelvin in 19th century. He had a
series of methods in color temperature measurement. The exact standard of measurement is based on the
wavelength from a blackbody radiator. The unit of color temperature is the symbol K, which is defined from
the first letter of Kelvin. The common iodine tungsten lamp has standard 3200k, and the sunlight at noon is
5600k (they are white balancing standards for tungsten and daylight). Hint: the Color temperature K ≠
temperature °C)
So what’s the relation between the color temperature and grey card (neutral gray) in digital photography? In
photography field 5500k is regarded by experts as professional standard color temperature, meanwhile it is
also an ideal white light. But exactly speaking, the white light will only be true white light when the three
primary colors reach to R:G:B=1:1:1. In another word, to vividly express the true color of nature, the light
must be balanced and neutral (18 grey). The three-basis color must be absolute balanced to express the
real color. Based on this principle, neutral grey is not only a standard for CCD to get and process colors, but
also a color-correcting standard for Photoshop. The neutral grey plays an important role in color field and
digital photography. No neutral grey, no true color. And all colors are determined by neutral grey.
1
http://www.emenon.com
For this, to know the principle of neutral grey and correctly use grey card in digital photography are very
important. Owing to the highly demand in professional fields like advertising, printing and exhibition, all
pictures need to be further adjusted after producing. That is not only a complicated and meticulous work,
also requires the editor to have professional skills and sensitive senses to color. It will be a good beginning
for further adjustment work if we can get a picture with fewer defects. Although Photoshop can make up for
defected pictures, with superfluous adjustment it also has the possibility to cause color and detail losing.
Thus, it’s always necessary to get high quality pictures as much as possible during photographing. We
advise that the photographers should better to use a grey card to control the color in the beginning of
photographing for half effort and double results.
Direction for Use:
1. Directly measure the color info. from the grey card with a photometer or a digital camera.
2. Photograph a part of grey card on the same picture with the scene/subject together.
3. Photograph the grey card with full-frame, so that it can be a “digital grey card”.
You must use the same light to photograph the pictures that were mentioned above. And there should not be
any shadow or strong reflection on the grey card. With the recorded neutral grey, use the related tools in
Photoshop to achieve the purpose of color revivification.
For more details, please turn to “Mennon Grey Card User Manual.doc”.
Remember the following principles during color correcting for pictures:
(1) Color-bias will NOT only exist in some certain colors on the picture, thus, all colors should be adjusted.
(2) When a picture has potential color-bias, the part of light tints should be examined first.
(3) As 18% neutral grey is the most accurate color, it should be first considered to use in the color-bias
correcting.
(4) The color complements should also be adjusted as much as possible during the color correcting.
(5) Depends on the exact needs of the picture, HLS mode is needed sometimes.
2
http://www.emenon.com
mennon Grey Card and Digital Photography
Copyright: mennon
Mennon grey card (Standard pack) is a specialized grey card for digital photography. It designed based on
ISO standard and combined with customers’ preference of colors. An early grey card was only used for
measuring the exposure value, which might have produced a light difference during measuring the color
temperature that mostly appeared to be a cold color. To revert vivid color back in scene, based on 18% grey,
mennon grey card has contained traces of color element that is more suitable for digital photography. That
makes mennon grey card work effectively in balancing color temperature.
In digital photography there’re several methods in controlling color balance. In general you either use WB
function of your digital camera, or edit the picture in the later period production by using Photoshop or
some related softwares. But the easiest way to adjust color balance is to use an 18% grey card directly!
Modern digital cameras offer several white balance functions that are enough to meet the needs of normal
use. However, the CCD sensor could not 100% revert to the true color of the image especially under a
complex light condition since it hasn’t obtained the same ability in color balancing compare with the human
eye. That because the light in scene goes beyond the default setting of CCD. When the light in scene is too
dark, too bright or the light changes suddenly, the color temperature will be changed that will make the
color go out of balance. Such as people often photographed grey snow from white snow scene. That’s why
professional photographers would like to use a grey card to set manual white balance or grey balance for the
subject/scene.
Normally digital images need to be adjusted in computer in the later period production. This work is a
professional technique because of the complicated process of adjusting color balance. For instance, by using
the Curves Tool of Photoshop to adjust the color balance is a good way. During adjusting you first should
adjust R.G.B curve to correct color casts from different directions, but the calculation is too complicated to
work efficiently. R.G.B curve adjustment is actually a process which corrects the grey balance. Once grey
balance is determined, other colors will also be balanced.
To use a grey card during digital photographing is a fastest way to achieve image color balance. If you
control the color balance appropriately before photographing, then the image correcting in the later period
will be very easy. Otherwise it’ll be hard to fully revert an image which is out of color balance. During the
later period correcting, the less correction you make, the less image damage will be caused. The essential of
using grey card in color correcting is to enhance the efficiency of work and reduce the possibility of color
damage.
1
http://www.emenon.com
Using grey card in photographing:
Put the grey card on the place in which the subject is and be sure that the light (natural light or artificial
light) is from the same direction with the digital camera. Set your camera in manual white balance mode.
Use AEL function to measure the reflected light on grey card (grey surface), as the same time the distance
between the camera and grey card should be kept in about 15cm away. Re-composition and re-photograph
after the value has been fixed. Then you must get the true color of present scene.
To photograph a subject which seem to be far, such as the scenery, the long-range view, the beach and the
snow scene, you can directly aim the digital camera at the grey card (grey surface) to measure the grey
balance. But the light on grey card must come from the same direction with on the object’s.
Attention, the color which is measured by grey card, is the true color of the present scene. If the color is
measured under the natural light, it must be the color temperature of natural light; if the color is measured
under the artificial light, then it’ll be the color temperature of artificial light. In a word, with a grey card, the
scene will be reverted to its PRESENT color but the present color temperature won’t be changed. It’s also
convenient to help you add light atmosphere or even mood to your works in case that you want to express
colorful artificial lights and morning or evening glow.
Using grey card in dark room:
A series of color differences on pictures might be produced during photographing due to the different lights
and color temperatures in scene. So it is a necessary work for photographers to adjust pictures with
softwares ( f.i., Photoshop), though it is very complicated to do well.
Now the grey card brings you a new idea to solve this problem. You need to do these things: 1) Photograph
a grey card on one of pictures (Picture A). 2) Use another grey card to measure present white balance value
in scene. 3) Photograph your subject. 4) After photographing, download the pictures to your computer. 5)
Use Eyedroppe Tool of Photoshop to pick up the color value from Picture A which contains the grey card.
6) It’ll be perfect to obtain the same color effect with Picture A by using the Replace Color tool (You can
apply the same setting to all other images). Other softwares have their own methods to accomplish the same
thing.
In this way you find the advantage is that you can ignore the color balance of other pictures during
photographing. The only thing you need to care about is just to compose and photograph carefully.
2
http://www.emenon.com
Digital Grey Card:
To make a digital grey card, you need to photograph a normal one and save its picture into your computer.
During photographing a grey card, you should set your camera in manual white balance mode. keep an
appropriate distance meanwhile photographing the grey card full-framedly with perpendicular the camera to
grey card to form a 30° angle with the sunlight, grey card and camera. There should not be any shadow on
the grey card. The ideal light condition to photograph grey card is under natural light, at a partly cloudy
noon.
3
http://www.emenon.com
mennon Grey Card Manual
1. Introduction of mennon Grey Card
An excellent picture is produced with the precise exposure. If the light in scene is excessively bright or
dark, exposure deviation might be produced.
Mennon grey card can balance all mixed lights to be 18% neutral grey. With a photometer you’ll get precise
exposure value by means of recording the light that was reflected from the grey card. (Mennon grey card
can measure the exposure value through the exposure photometer, the TTL SLR camera and the digital
camera etc.)
A 18% mennon grey card not only have the use of measuring the camera exposure value, also be able to
adjust color balance and revert the color truly and perfectly by controlling the grey balance in digital
photography.
Mennon grey card is a guarantee for photographing high-quality pictures, is a necessary assistant for
photographers!
2. How To Use mennon Grey Card
In digital photographing
refer to “Mennon Grey Card and Digital Photography”
Exposure Value Determining
Set the photometer in measuring reflected light mode (take off the white light-transmittable shade). You
should use mennon gray card in the same light as your subject for getting a precise exposure value.
The distance between the lens and the grey card should be at least 15cm longer, to prevent the lighter ray or
shadow from causing influence during measuring.
When you photography indoor, you should use the grey card in front of the subject as close as possible
1
http://www.emenon.com
while turning the grey surface of the grey card slowly to form a certain included-angle and angle-ofelevation among the grey card, camera and light source.
The included angle between the subject and light source generally should be a 30° 45°Isosceles triangle.
The grey card should directly face to the camera and the main light where is at 1/3 of the included angle that
is formed by the camera and the main light.
How you place the light: Usually the side light should be more closer to the light axis of the camera (f.i.,
See the picture below).
aim
main light
mennon grey card
1 3
camera
side light
Under the natural light you can measure values that either use the grey card on where the subject is, or on
where the camera is, as long as you make sure that the light intensity on the grey card is the same as on the
subject.
If you shoot on a cloudy day or under a low-light environment, you can use the light from the sky or
portable outer-scene light or reflector as light source to help you in measuring the exposure value.
For a precise exposure value, sometimes you need to appropriately adjust the diaphragm or speed value,
depends on the different condition of scenes. That demands an experienced photographer.
If the color of subject is dark, you should increase 1-1/2 diaphragm for increasing layers on dark coating of
the subject, and vice versa.
You do not need to adjust the subject if it is in normal contrast ratio. We suggest photographers only to use
bracket exposure in cause that you are under back light or the contrast ratio is very extreme.
2
http://www.emenon.com
Light Ratio Determining Between Main Light And Side Light:
Definition of light ratio determining between main light and side light: the light intensity ratio between the
main light mixes up the side light and the side light alone.
In normal condition the light intensity ratio on a color picture will not be over 3:1; on a black/white picture
it won’t be over 5:1. Up to this ratio, the color tone will be out of balance and the picture layers will be
damaged.
With mennon grey card you can determine the light intensity ratio of present scene. The using steps are as
following:
A. Record the main light value: use the grey card in front of the subject as close as possible, turn on both
main light and side light (black light is not included). Adjust the light angle of the grey card to the main
light. Measure the value on grey card by an exposure photometer. Record the value as the max number is
showing on the photometer.
B: Record the side light value: use the grey card in front of the subject, turn off the main light and turn the
grey card exactly to the camera lens. Measure and record the value on grey card by a photometer.
By calculating the class-difference of two values, you’ll get the light ratio of the scene.
On this table below, there’re the light intensity ratios of using full light and using side light alone.
Exposure
Class-difference
2 3
1
11 3
12 3
2
21 3
Light
Exposure
Class-difference
Ratio
1.5 : 1
2:1
2.5 : 1
3:1
4:1
5:1
22 3
3
31 3
32 3
4
5
Light
Ratio
6:1
8:1
10 : 1
13 : 1
16 : 1
32 : 1
Color Balance Determining and Density (for Printers)
Mennon grey can determine the color balance of pictures.
Photograph a part of grey card with the subject together on one picture (or photograph the grey card in full
frame). Compare the printed picture with the real grey card by eyes or a color analyzer, then you can simply
judge whether the color is balanced or not.
Take a transparent positive picture or a negative picture for grey card that will help the printer to determine
3
http://www.emenon.com
the best color balance and density. The image of grey card is referable as a standard for color printing.
Grey card photographing is a process that is equal to record the light color in scene. Different light colors
will directly cause different results in color printing.
To express an absolute grey value is a hard job for most of color films. That’s why to balance colors
between pale pink and neutral color are hard to achieve. If you make grey color a little bit lighter than
neutral colors in printing, you’ll get color balance for all pictures.
The image of grey card is the best neutral referential object for measuring the density. It helps to determine
the color and the density of black/white negatives, color negatives, positive pictures and printed pictures by
eyes and by the color densitometer.
Exposure of Near Shooting And Exposure of Reprint Photograph determining
Put the grey card on the same horizontal with the subject which will be reprinted. Set the film speed of the
photometer and the camera to the same level as the negative’s. Measure the exposure value along the
direction of camera optical axis.
If the distance between the subject and the camera is less than 8 times of the focus distance of lens, you
should increase the exposure value. But that is not necessary if you use a TTL camera.
Formula:
2
Effective diaphragm f=f (M+1) or exposure factor = (M+1)
Picture size
M=
f = scale value of lens diaphragm
Subject size
How to use the exposure factor: exposure factor × calculated exposure time
White Balance Determining
Generally most video cameras have automatic white balance function which can manage to photograph in
most of scenes. However, under a complex mixed light, this function cannot really keep the color from
being out of balance.
4
http://www.emenon.com
The white surface of mennon grey card can reflex about 90% of incident lights. For a more precise color,
you just need to measure the white surface by using manual white balance function.
Set the video camera in a corresponding white balance mode (indoor or outdoor) with the present scene.
Aim the video camera at the white surface of the grey card, and then push WB button to record this value.
You can apply the same method on digital video cameras and film cameras which have manual WB
function.
Examination of The Photometer of Camera
Mennon grey card can examine whether the value that recorded by camera photometer is correct. During
examining, make sure that your photometer is fine, and the examination should be done in the same light
condition.
Set the photometer in measuring reflected light mode (take off the white light-transmittable shade). Set a
random speed value for the photometer (f.i., 1/60 s). Face the photometer to the grey surface of the grey
card, and then measure and record the diaphragm value.
Set the speed value of the camera to 1/60 s. Measure the value from the grey surface of the grey card. If the
diaphragm value that the camera gets is the same with the photometer’s, then the camera light measuring
system is fine.
Notice: the allowed difference that the camera measured should not be more than 1/3 diaphragm with the
value that is measured by the photometer. Otherwise, it might cause an incorrect exposure.
3. Tips of mennon grey card in usage
Mennon grey card is made of high density composite paper-based material. There’s a special coating
covered on the grey card which has the use of controlling the reflection ratio. When use it, be careful that it
will not be folded, and keep it from the water, sharp stuffs, splotch and sweat.
If there’s a light splotch or sweat on the grey card, use a piece of chamois to wipe them up. A very light
notch will not influence the reflection ratio of grey card.
5
http://www.emenon.com
Practical Use of mennon Grey Card (In DCs)
Copyright: mennon
Nowadays, there’re several white-balance (WB) functions exist inside most of digital cameras, which are
made for the purpose of color temperature adjustment and color balancing. The CCD/CMOS image sensor
of digital camera is a device which is similar with the human eye. It gets the color balance through digital
data that are processed by CPU. However, compare with the human eye, the sensitivity of the image sensor
(CCD/CMOS) is much worse. Digital image is often affected by temperature and sensitivity, once the color
temperature is changed in scene or the light source is out of the WB range, the color of image will be out of
balance.
There is a best way to achieve color balance under complex color temperature – if you use the manual white
balance mode and measure the grey balance in scene by using mennon grey card. We just take Nikon D70S
(which has a great market share) as an example to simply analyze the using principle between Nikon D70S
and mennon grey card. There’re almost the same working principles for other brands.
Nikon D70S has set the range of automatic white balance between about 3500K- 8000K as default. Within
this range you nearly will get accurate colors. But why not ABUSOLUTE accuracy? That because the
ability of CCD has not yet managed to revert color back as the color temperature changes. The CCD just
imitates a similar color temperature of scene by using several color temperature vales which were set in
advance in the camera.
The color temperature can reach the good effect of 3000K-6000K. Take Nikon D70S as an example, if the
color temperature in scene is lower than 3000k, the camera may set a higher temperature to make the image
colder. And if the temperature is higher than 6000K, the camera may give a lower temperature to make the
image warmer. Because when CCD image sensor is close to the maximum of measuring range, the precise
value of measuring will be reduced a lot.
At a sunny day morning (around 10am), the actual color temperature in scene will be about 4300K. In an
usual condition the WB should be set to “Sunny” mode, meanwhile the corresponding color temperature
which is set automatically by camera will be 5200K ( you can also turn “sunny” mode to 4800k by fine
adjusting function. ) Even so, there are still 500K difference in temperature between the camera and the
actual scene. In this condition, the color temperature of the camera is higher and the image will appear to be
a little bit colder, and vice versa.
The Changes of Color Temperature In Different Conditions
&
WB Setting for Nikon D70S
1
http://www.emenon.com
Natural light
Light
Temp.
Artificial Light
Light
Temp.
Nikon D70S
WB
Corresponding
Temp.
Conditions Changing
Conditions Changing
Setting
Sun
2000K Candle light
1850K Incandescent
Rise/Set
Light
Sun rose
3500K Incandescent
2500K Fluorescent
Light (40W)
Light
2 hours
10:00am
4300K Incandescent
2900K
Sunny
Light (100W)
2:00pm
4300K Fluorescent
3200K
Photoflash
Light (RGB)
At noon
5600K Fluorescent
4500K
Cloudy
Light
(Sunny)
Cloudy
Mostly
Cloudy
In Shadow
6000K
Photoflash
5400K
In shadow
3000K
4200K
5200K
5400K
6000K
8000K
7000K
9000K
Note: the relative data is originally from Kodak and Nikon.
You will find from the table that the WB setting of Nikon D70S still has some light differences with the actual
color temperature. For that, if you try to get color balance, it will be a good solution that you use manual white
balance mode to measure the grey value from the grey card.
Methods of Setting Grey Balance for Nikon D70S
1. Turn the camera power on. Spin the camera knob while holding WB until you get to PRE. Release the
button. Press and hold the WB button again for several seconds until it makes PRE blink, which informs
that you can start to set manual white balance mode. Point the camera at the grey card and press the shutter.
If "Gd" flashes on LCD you're successful. If "nG" (not good) flashes, try again.
2. When you measure the grey value, be sure that the light source and the irradiation angle are the same
with where the subject is. The distance between the lens and the grey card should be at least 15cm longer.
Try to shot the grey card in full screen as full as possible. There should not be any shadow on the grey card
meanwhile.
3. It is not related with the focus length when you measure the grey balance. You can switch the auto focus
(AF) to manual focus (MF), and set the focus length to unlimited distance. That purpose is to make the grey
card be more “mild”. It’s better to close exposure compensation for fear that it might interrupt during
measuring.
2
http://www.emenon.com
Technical Features of mennon Grey Card
Copyright: mennon
18% grey is used in the grey card as a base color. Both grey and white surfaces of the grey card have their
own function. Whatever you used in film or digital photography, an 18% grey card can control expose value
and balance the color so that it helps to revert the color truly and perfectly by measuring the exposure value,
white/grey balance value and color temperature.
A grey card had been invented based on the optical principle and the characteristic of photosensitive film.
The camera exposure value is in direct ratio with the logarithm of characteristic curve. Characteristic curve
shows two important features of photosensitive material (they are: contrast factor and exposure latitude),
and it is in coordinate with the sense of human sight in reflection to the colors in ray. When color changes as
geometric progression, its density will change as arithmetic progression. If we try to get a series of density
values like 1:2:3:4:5……, the exposure value will be increased like 1:2:4:8:16….. always in multiple.
If we set the reflection ratio to 100% (as maximum) and decrease progressively as common ratio of 2, we’ll
get the density value of full-level diaphragm: 100, 50, 25, 12.5, 6.25, 3.125…… if the reflection ratio
decrease progressively as square root of 2, we’ll get the density value of half-level diaphragm: 100, 70.71,
50.35, 36.25, 17.68, 12.5, 8.84, 6.25, 4.42, 3.125…… Actually those values are just different grey values in
different grades. We take it that the standard exposure value is 17.68, then those values beside it will be its
exposure latitude.
Look at those density values above, from number 100 to 3.125, the ratio is 32:1. The exposure latitude in
this ratio is exactly included in the photosensitive range among in color negative, black/white negative,
color reversal film and CCD. We’ll see that 17.68 is just right in the middle of those series of numbers.
Thus, it will be excellent and precise to take 17.68 (approximation of 18%) as a base value, which controls
the exposure value, photographic density and color balance.
In manufacturing of photosensitive products, 18% grey had become a standard in theory because of its
special characteristic. 18% grey as a foundation used in the photographic sensitivity of the film, the
exposure value of exposure photometer, CCD and CMOS sensors.
Reflectivity of the Light Spectrum of mennon Grey Card
The light wavelength diagram below is in unit of nanometer, with it you see the reflectance density of
mennon grey card.
1
http://www.emenon.com
reflectance %
reflectance density
100
0
White Surface
90
80
70
60
50
40
30
20
10
0
400
Grey Surface
500
600
700
light wavelength in unit of nanometer
mennon Grey Card Technique Data
Product Function: use of measuring the exposure value, color balance, light ratio…
Actual Reflectivity: about 17.8% on grey surface and 92% on white surface
Deviation of Light Measuring: ≤1/8 diaphragm
Deviation of Reflectivity: 2%
Material of Product: high density composite paper-based material
Size: 8×10”, 6×8”, 4×6”
Pack: standard, hardback
2
.05
.10
.15
.22
.30
.40
.52
.70
1.00
∞