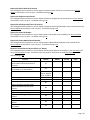
1
ExitCare® Administrator Manual Version 7.9.1.7 Elsevier’s ExitCare 651-379-0483 Main 800-694-6669 Toll Free Extension 2 for Tech Support Email: [email protected] http://exitcare.com/ Copyright © 2015, Elsevier’s ExitCare ExitCare® Administrator Manual Version 7.9.1.7 Copyright © 2015 Elsevier’s ExitCare All rights reserved. No parts of this work may be reproduced in any form or by any means - graphic, electronic, or mechanical, including photocopying, recording, taping, or information storage and retrieval systems - without the written permission of the publisher. Products other than ExitCare that are referred to in this document may be either trademarks and/or registered trademarks of the respective owners. The publisher and the author make no claim to these trademarks. The publisher and the author assume no responsibility for errors or omissions, or for damages resulting from the use of information contained in this document or from the use of programs and source code that may accompany it. In no event shall the publisher and the author be liable for any loss of profit or any other commercial damage caused or alleged to have been caused directly or indirectly by this document. Page | 1 Table of Contents Welcome .......................................................................................................................................................4 Program Overview .........................................................................................................................................4 ExitCare Training ............................................................................................................................................4 Formatting Used in this Manual......................................................................................................................4 Your Feedback ...............................................................................................................................................4 Admin Login...................................................................................................................................................5 Help/Options Group.......................................................................................................................................6 Options ................................................................................................................................................................... 6 Change Password ................................................................................................................................................... 6 Help ........................................................................................................................................................................ 6 About...................................................................................................................................................................... 6 Check for Updates .................................................................................................................................................. 6 Options System..............................................................................................................................................7 Settings .........................................................................................................................................................7 Introduction ........................................................................................................................................................... 7 Settings: Attending Caregiver System ................................................................................................................... 8 Settings: Email System .......................................................................................................................................... 8 Settings: ExitMeds ................................................................................................................................................. 9 Settings: Export System....................................................................................................................................... 12 Settings: Faxing System ....................................................................................................................................... 12 Settings: Follow-up System ................................................................................................................................. 13 Settings: General Settings ................................................................................................................................... 14 Settings: Patient Lookup System ......................................................................................................................... 16 Settings: Print System ......................................................................................................................................... 19 Settings: User Interface (UI) ................................................................................................................................ 22 Settings: Workstation-Connection Information.................................................................................................. 24 Settings: Workstation-Printing ............................................................................................................................ 25 Logged in User Settings ................................................................................................................................26 User Settings ........................................................................................................................................................ 26 Security Settings ..........................................................................................................................................26 Security Settings: Security Settings: Security Settings: Security Settings: Settings ................................................................................................................................... 27 Security Groups ...................................................................................................................... 29 Users ....................................................................................................................................... 30 Audit Log ................................................................................................................................ 33 Answer/Question System.............................................................................................................................34 Answer/Question System: Answer/Question System: Answer/Question System: Answer/Question System: Answers/Questions .................................................................................................. 34 Document Level Answers ......................................................................................... 36 Question Level Answers ........................................................................................... 36 Follow-Up Times ...................................................................................................... 37 Page | 2 Table of Contents, continued Database System .........................................................................................................................................38 Database System: Database System: Database System: Database System: Database System: Broadcast Messages .............................................................................................................. 38 Departments.......................................................................................................................... 39 Facilities ................................................................................................................................. 39 Purge System ......................................................................................................................... 40 Update Authorizations .......................................................................................................... 40 Doctor System .............................................................................................................................................41 Doctor System: Attending Caregivers and Follow-up Caregivers ....................................................................... 41 Document System ........................................................................................................................................43 Document System: Additional Note Phrases ...................................................................................................... 43 Document System: Document Level Additional Notes ....................................................................................... 44 Document System: Document Categories .......................................................................................................... 44 Document System: Required Documents ........................................................................................................... 47 Document System: Macros ................................................................................................................................. 48 Document System: Documents........................................................................................................................... 49 Excuse Form Link Manager .................................................................................................................................. 51 Prescription System .....................................................................................................................................52 Prescription System: Prescription System: Prescription System: Prescription System: Prescription System: Prescription System: Prescription System: Prescription System: Prescription System: Directions .......................................................................................................................... 52 Dosages ............................................................................................................................. 52 Frequencies ....................................................................................................................... 53 Instruction Phrases ........................................................................................................... 54 Drug Aliases ....................................................................................................................... 54 Custom Drug Database ..................................................................................................... 55 Custom Allergies ............................................................................................................... 56 Pharmacies ........................................................................................................................ 57 Pick Prescription Form ...................................................................................................... 58 Report System .............................................................................................................................................59 Report System: Report System: Report System: Report System: Report System: Document Reports..................................................................................................................... 59 ExitMeds Reports....................................................................................................................... 59 MU-Stage 1: Electronic Copy of Discharge Instructions ............................................................ 60 MU-Stage 2: Patient-Specific Education Resources .................................................................. 62 Diagnosis Report........................................................................................................................ 63 Credits .........................................................................................................................................................64 Page | 3 Welcome Elsevier’s ExitCare offers Patient Education Solutions, including the ExitCare® Discharge Information System and the ExitMeds™ Prescription Writing and Drug Information Systems! If You Need Further Assistance You can access the ExitCare in-program user manual by clicking Help/Options in the sidebar and then Help; or find it online at http://exitcare.com/support/training/. Visit our Resource Center at http://elsevierresources.com/exitcare/ to view and download resources. For further help, including how to access our online in-service videos, please contact us at [email protected] or 800-694-6669, extension 2. Program Overview The ExitCare software is quick and easy to use, yet comprehensive in what it offers clinicians. Program features include the ability to automatically import patient information; the freedom to add custom information to patient education documents; and a full electronic archive that preserves all patient information printed. We strongly recommend learning and using the program fully. This approach provides the clinical facility with the best results both for the patient and for the management of this information. ExitCare Training Elsevier’s ExitCare offers live, web-based training to reinforce overviews, including webinars on Basic, Super User, Administrator, and specialized topics. In-service videos can be viewed online. On-site classes are available for purchase. For more information, please contact [email protected] or 800-694-6669, extension 2. Formatting Used in this Manual The pattern generally used for formatting in this manual is as follows: Boldface: Click referenced item Underline: Other important items or areas on a screen Italics: Notes, certain titles, and emphasis in text In addition, a wide left-hand margin is provided for those who wish to put this document in a three-ring binder. Your Feedback We value your feedback. If you have requests for additional document titles, questions, or suggestions for improvement to the program, please contact us at [email protected] or 800-694-6669, ext. 2. Page | 4 Admin Login Within the sidebar, Admin Login is located under the General group. Here you can log in as an Administrator. If you only have the default setting of administrators and generic users, this icon will be enabled. Note that as soon as you have added your first ExitCare user, Admin Login is automatically deactivated, and the security system is activated. All users will then need to sign in with a user name and password, and the generic user option will not be available. (But, also see the information below on “Disable Security System” under Security Settings | Security Settings: Settings | General Tab.) Administrators have access to all options, so the number of people granted administrator access should be limited. When you first install ExitCare, there is an Administrator level security setup in place. This security level will always exist. The user name is AdministratorEC, and the Master Login password at first install is exitcare. You can access this security level by clicking Admin Login on the sidebar, and then typing in the password. (Note that passwords are always case sensitive.) For security and HIPAA compliance purposes, it is your responsibility to immediately change the Master Login password. To change the password: 1. Under Help/Options on the sidebar, click Options. 2. Click Security Settings, then Settings. 3. Click the Master Login tab. 4. Change the Master Password; retype the password in the next field. 5. Click Save when done. Remember to record and store the new password in a safe location. There is no “back door” to get you into a secured ExitCare; we are unable to log you in if you lose your password. In addition, if you are going to be assigning user IDs, we recommend that immediately after changing the Master Login password, the Administrator establish his or her own personal login ID and password, with an Administrator setting. For instructions, please see the section below titled Adding a Single New User under Security Settings: Users. If you need general login assistance, please contact us at [email protected] or 800-694-6669, ext. 2. Page | 5 Help/Options Group The Help/Options group contains a variety of features: Options This is the gateway to many Administrator functions, which will be discussed in the Options System section below. Change Password If users are given the rights to change their own passwords, this feature will be active. Help Help opens an in-program user manual with an extensive searchable database. About About opens a window showing program and database versions, expiration dates, and copyright information about ExitCare. There are five information screens in this section: About (product name, version, etc.) Database Information (location of databases in system, names and dates of database files, etc.) License Information (ExitCare/ExitMeds/etc. modules that have been licensed, and their corresponding expiration dates) Check for Updates ExitCare provides a method to download updates through the Internet. If the Internet is relatively open on a PC workstation that is running the ExitCare program, a notice of an available update is displayed at the bottom of the ExitCare screen. If the Internet is not relatively open, the program can be updated through the Check for Updates choice in the Help/Options group. Important notes: There is an ExitCare security setting that dictates whether or not a particular ExitCare user can perform updates. It can be found, for example, on the Help/Options | Options | Security Settings | Security Groups screen, once a security group has been made. The setting is the second setting under the ExitCare Settings tab. Page | 6 The update process is one of both downloading and running the update. Once an update is downloaded, it will automatically run, so don't download it until you are ready to run the update immediately after the download completes. You only need to run the update from one workstation. All the other workstations running ExitCare will be automatically updated. When ExitCare is running the downloaded update, one of the first things that occur is that all other connected ExitCare workstations will show an ExitCare "auto log off" message indicating that ExitCare will automatically shut down in the indicated short time frame. Users cannot run ExitCare while it is being updated, but they can run it while the download of the update is occurring. Therefore, before you download and run the update, be sure that all ExitCare users are aware of the downtime required for the actual updating process. The length of time it takes the update to finish depends on the size of the update, the speed of the computer running the update, and perhaps other local network considerations, but generally is less than one-half hour. The length of time to download the update depends on the size of the update, the speed of the connection, and the bandwidth available at the time of the download. Options System Under Help/Options, click Options to be brought to the nine groups of functions which can be used for ExitCare security, customization, and maintenance. The nine groups are listed at the bottom left of the screen. Each group’s sections are displayed in the top left as each group title is clicked. The Settings group is displayed automatically after clicking on Options. Click on each section to activate its screen. Settings Introduction The Settings group allows authorized users to establish settings for many parameters in ExitCare. Please click Attending Caregiver System under the Settings group heading before reading the following. The following two paragraphs apply to all except the last two sections under the Settings group: In the main table, features are listed in light yellow rows and their respective, default, settings are listed below, in the column labeled Predefined. To use the default settings, there is no need to choose a setting in the Global, Facility, or Department columns. The default settings can be overridden in these three columns (and in the Logged in User Settings section). Before changing settings in the Department column: first, from the drop-down lists at the top of the screen, choose the facility and the department with which you wish to work. Before changing settings in the Facility column, first choose the appropriate facility from the Facility drop-down list. To change Global column settings, there is no need to make selections from either the Facility or the Department drop-down lists. You must also click the Save settings button to save the setting for each screen before you go to another screen, or before you change to another department or facility. From one computer, you can establish settings for each of these sections throughout your facility. Page | 7 The Settings system is a hierarchical system: ExitCare will use the lowest level setting available. If a user has established a setting, it will override any department, facility, global, or predefined setting. If there is no user setting, but there is a department setting, it will override any facility or global setting, and so on. The term “Global” is relevant when more than one facility shares the same ExitCare database. If it is a single facility, “Facility” and “Global” are in essence identical settings; however, if there is a value at both levels then the Facility setting will override the Global setting. Once you have established settings for a particular facility or department, you can copy the settings to another facility or department by clicking on the Copy Settings button. A table is provided at the end of each section below to record your settings for easy reference. Settings: Attending Caregiver System Select the facility and department with which you wish to work at the top of the screen before making any changes. Click the Save settings button before changing screens, departments, or facilities. Clear Primary Caregiver info when clicking New Patient This option determines whether or not to clear out the Primary Attending Caregiver when a user clicks on New Patient on the sidebar or on the disk icon on the Current Patient screen. The same physician may complete the discharge paperwork on several consecutive patients, so allowing the same caregiver to be pre-filled for the next patient can save time. The default is to not clear the field, so if you want this data field to be cleared, change the setting to Yes at the level you desire. Use the following Attending Caregiver phrase This option determines the label on the top of the patient’s printed instructions for the person providing the primary care for the patient. The default is “Attending Caregiver,” but there are others should you prefer another choice. Feature Clear Primary Caregiver info when clicking New Patient Use the following Attending Caregiver phrase Default Global Facility Dept. No Attending Caregiver Settings: Email System Select the facility and department with which you wish to work at the top of the screen before making any changes. Click the Save settings button before changing screens, departments, or facilities. Email Script to Pharmacy This option determines if the Email Script to Pharmacy box is pre-checked on the General Print Settings screen. No means the box will not be checked when the user clicks on Print/Fax/Email, and Yes means the box will automatically be checked. Users will always be able to change the setting on the General Print Settings screen; you are just setting the default. Email Signature Page to Follow-up This option determines if the Email Patient Signature Page to Follow-up Caregivers box is pre-checked on the General Print Settings screen. No means the box will not be checked when the user clicks on Print/Fax/Email, and Yes means the box will automatically be checked. Users will always be able to change the setting on the General Print Settings screen; you are just setting the default. Page | 8 Include the Patient Name in the email subject line This option determines if the patient’s name appears in the email subject line when documents are emailed to the patient or the follow-up caregiver(s), or when scripts are emailed to a pharmacy. Yes or no answer; the default is no. Notice to include with email This is the legal disclaimer notice that will be printed on the email message sent to the pharmacy, follow-up doctor, or to the patient (if the latter option is chosen on the General Print Settings screen). The email will state it is from your facility, and will be addressed to the follow-up caregiver. You can either accept the ExitCare disclaimer, or have your legal department modify the words to their liking. When emailing, how would you like to send the email? (Global setting only) You have the choice of using Microsoft® Outlook® messaging software (or another MAPI-compliant email application) that may be installed on each individual workstation; or, after the ExitCare Communication Server (ECCS) is installed, you can you can utilize your existing email server to send emails from ExitCare. ExitCare's email functionality is SMTP-based, provided through ECCS, negating the need for MAPI-compliant software. For additional details, please see the ECCS manual on your ExitCare DVD, or contact us at [email protected] or 800-694-6669, ext. 2. . Feature Email Script to Pharmacy Email Signature Page to Follow-up Include the Patient Name in the email subject line Notice to include with email When emailing, how would you like to send the email (Global setting only) Default No No No DISCLAIMER:… Use local… Global Facility Dept. Settings: ExitMeds Select the facility and department with which you wish to work at the top of the screen before making any changes. Click the Save settings button before changing screens, departments, or facilities. Allow the use of Drug Interactions This option determines whether or not to enable the licensed use of the Drug Interaction system, which checks for drug interactions and allergies. The default setting is to enable the system, so if you want to turn it off for a specific department, first specify the department at the top of the screen, and change the department level setting to No. Always import drugs from drug import system If your facility uses an HL7 interface to import medication data into ExitCare, you will need to choose if you want any new drug data to automatically update the patient record in ExitCare, or if you want to decide, drug by drug, which medications to document in ExitCare. The default setting of No is to ask about each drug as it is available to be imported into ExitCare. Change the setting to Yes if you want to automatically update the ExitCare patient record with all the drugs listed in the HL7 record. If you change the setting to Yes, the New Drug Data Found window will not be shown whenever there are drugs that are available to be imported for a patient. Instead, the drugs will automatically be added to the patient’s records. Page | 9 Default Drug Information Sheet Font Size This sets the default font size for printing drug information sheets. You can change the default size on this screen, and you can always change it for specific patients on the Language/Size setting screen. Default Drug Information Sheet Print Count This sets the default print quantity for drug information sheets. This number can also be changed for specific patients on the main Print/Fax/Email screen under the General Print Settings tab. Default Script Print Copy This sets the number of prescriptions to be printed. This number can also be changed for specific patients on the General Print Settings screen. Drug Summary Default Number of Copies This determines the default number of copies of the Drug Summary page printed. This number can also be changed for specific patients on the General Print Settings screen. (The Drug Summary is the one-page sheet showing which medications are to be stopped, the new meds, and the continue-to-take-medications. This is commonly referred to as Medication Reconciliation.) How should the date print on the scripts? This is where you set the date format that is printed on the scripts. Make sure you check your State requirements and specify a date format that conforms. Ignore command line switch to lock down ExitMeds If the /lem command line switch is present and the setting is “No,” a user will be unable to add new drugs or modify existing drugs under the Drugs tab. If the /lem command line switch is present and the setting is “Yes,” the drugs tab will operate normally (although rights can be set in users’ Security settings to restrict access to parts of ExitMeds). Medication Schedule Default Number of Copies This feature sets the number of copies of the Patient Medication Schedule. This number can also be changed for specific patients on the General Print Settings screen. Notice to print on Drug Summary Due to the importance of Medication Reconciliation, some sites want to include a legal notice on the Drug Summary Page. If your site wants to include one, enter it here. No default is provided. Notice to print on Patient Medication Schedule This feature allows a custom notice or disclaimer to be printed on the bottom of the Patient Medication Schedule. No default is provided. Number of Scripts per Page This sets the number of prescriptions to print per page. Many sites print one prescription per page, but ExitCare is capable of printing two per page on either a normal sized paper or on security paper. For dedicated script roll printers, the setting needs to be at the default of one. This is the only place to change this setting; it cannot be changed on the General Print Settings screen. Pick when to print DEA number If the DEA number for a prescribing physician is loaded in their profile, you can choose to print the number on all, none, or only controlled substance (narcotic) scripts. The default is to print the DEA number just on narcotic scripts, but you can change the setting here if you wish. This is the only place to change this setting; it cannot be changed on the General Print Settings screen. Page | 10 Please select the lowest severity level that must be verified before printing can be done If the drug interactions feature is licensed: when ExitCare finds drug interactions, they are graded from 1 (severe) to 4 (minor). The default is to display and require a decision on all interactions, but it can be changed here. Note that if ExitCare does not recognize a drug, it will display “Unknown Drug Name – Unable to check for interactions” in the Severity column, and will treat it as a drug that needs approval even when the option of “4 – Minor” is chosen. Pre-Select "Include Drug Information Sheet" when adding a drug to patient This selection determines whether or not a drug information sheet is automatically included when a new prescription is prepared. The setting just determines whether or not the check box to add a Drug Information Sheet is pre-checked when entering in a medication on the New Script screen by manually filling in the fields for Drug Form/Dose, Strength, etc. Drug defaults provided by ExitCare or custom drug defaults saved without a drug information sheet will not automatically include a drug information sheet when this option is selected. Require the Drug Allergy section to be completed This setting determines whether or not patient drug allergy information should be entered on the Current Patient screen. If the default is changed to Yes, ExitCare requires either the entry of drug allergy information or that the box is checked stating that the patient has no allergies. Show number of pages needed for scripts before printing This setting determines whether or not the box on the General Print Settings screen is pre-checked that notifies the user of the number of script pages needed for the current print job. For sites that use one printer for both scripts and documents, and special script paper is hand-loaded for the scripts of each print job, then selecting Yes will pre-check the box, and the user will not need to remember to check the box on the General Print Settings screen. You can always check or uncheck the box on the General Print Settings screen if you need to change the default setting for a specific print job. Feature Allow the use of Drug Interactions Always import drugs from drug import system Default Drug Information Sheet Font Size Default Drug Information Sheet Print Count Default Script Print Copy Drug Summary Default Number of Copies How should the date print on the scripts? Ignore command line switch to lock down ExitMeds Medication Schedule Default Number of Copies Notice to print on Drug Summary Notice to print on Patient Medication Schedule Number of Scripts per Page Default Yes Global Facility Dept. No 9 point 1 1 1 mm/dd/yyyy No 1 no default no default 2 Page | 11 ExitMeds Settings Table, continued Feature Pick when to print DEA number Please select the lowest severity level that must be verified before printing can be done Pre-Select "Include Drug Information Sheet" when adding a drug to patient Require the Drug Allergy section to be completed Show number of pages needed for scripts before printing Default Only print DEA number on controlled substances Global Facility Dept. All interactions must be checked No No No Settings: Export System This screen is not in use at this time and can be disregarded until further notice. Settings: Faxing System Select the facility and department with which you wish to work at the top of the screen before making any changes. Click the Save settings button before changing screens, departments, or facilities. Elsevier’s ExitCare has written, and included at no extra charge, software called the ExitCare Communication Server (ECCS) which uses the features of Microsoft® Fax for sending prescriptions to pharmacies and patient signature pages to follow-up caregivers. For additional details, please see the ECCS manual on your ExitCare DVD. Fax Script to Pharmacy This option determines if the Fax Script to Pharmacy box is pre-checked on the General Print Settings screen. No means the box will not be checked when the user clicks on Print/Fax/Email, and Yes means the box will automatically be checked. Users will always be able to change the setting on the General Print Settings screen; you are setting the default here. Fax Signature Page to Follow-up This option determines if the Fax Patient Signature Page to Follow-up Caregivers box is pre-checked on the General Print Settings screen. No means the box will not be checked when the user clicks on Print/Fax/Email, and Yes means the box will automatically be checked. Users will always be able to change the setting on the General Print Settings screen; you are setting the default here. Include patient name on fax cover page This setting determines if the patient’s name will appear on the fax cover page when the Signature Page is faxed to the follow-up caregiver(s). Yes or no answer; No is the default. Page | 12 Notice to print on faxes This setting is the legal disclaimer notice that will be printed on the cover sheet for each fax sent. The fax will state it is from your facility, and will be addressed to the follow-up caregiver. You can either accept the ExitCare disclaimer, or have your legal department modify the words to their liking. Feature Fax Script to Pharmacy Fax Signature Page to Follow-up Include patient name on fax cover page Notice to print on faxes Default No No No DISCLAIMER:… Global Facility Dept. Settings: Follow-up System Select the facility and department with which you wish to work at the top of the screen before making any changes. Click the Save settings button before changing screens, departments, or facilities. Allow the user to edit the follow-up doctor's email address on the patient information screen This option determines whether or not users are allowed to edit the above-stated information on the Patient Information screen. You can grant users the rights to modify incorrect doctor information in the main database, so it is permanently fixed, rather than fixing it for just the current patient. If you take away the ability to modify this data on the patient information screen, we recommend that users have access to the physician database to make the permanent changes; this is established in the Security Settings group. Allow the user to edit the follow-up doctor's fax number on the patient information screen This option determines whether or not users are allowed to edit the above-stated information on the Patient Information screen. You can grant users the rights to modify incorrect doctor information in the main database, so it is permanently fixed, rather than fixing it for just the current patient. If you take away the ability to modify this data on the patient information screen, we recommend that users have access to the physician database to make the permanent changes; this is established in the Security Settings group. Default Follow-up Time This setting determines whether or not to display a default follow-up time for the follow-up caregiver visit. While there is no default supplied, the list of available options can be viewed. The Administrator can set the default value here from the options presented. Show the Follow-up Appointment Schedule Button This option determines whether or not the Schedule an appointment button is shown on the screen where the follow-up caregiver and follow-up time are chosen. If this button is selected, it allows the user to document the date and time of the patient’s scheduled appointment. Note that this does not connect to outside providers' schedules, but only allows for this information to be easily selected and printed on the patients' forms. Feature Allow the user to edit the follow-up doctor's email address on the patient information screen Allow the user to edit the follow-up doctor's fax number on the patient information screen Default Follow-up Time Show the Follow-up Appointment Schedule Button Default Global Facility Dept. Yes Yes none No Page | 13 Settings: General Settings Select the facility and department with which you wish to work at the top of the screen before making any changes. Click the Save settings button before changing screens, departments, or facilities. Automatically log out the user out of ExitCare after how many minutes of inactivity? This setting determines how quickly ExitCare will log out users if there is no activity. This setting is important if physicians who are authorized to print scripts fail to log out, and another unauthorized person could print scripts. The default is 15 minutes; you can change it to a setting of your choice. If you never want to auto log out a user, change the setting to 0 (zero). Check for web updates even if a user is not allowed to run web updates This setting permits turning off ExitCare’s web update checking for users who are not allowed to run updates. If No is chosen for this, the check for web updates setting, then for users who are not allowed to run updates, ExitCare will not check for an update when they log in. However, when users who are allowed to run updates log in, ExitCare will check for an update. If Yes is chosen for this setting, then ExitCare will check for updates when all users log in, whether or not they are permitted to run web updates. For users that are not allowed to run web updates, a setting of No will not display a notice that a web update is available to them. A setting of Yes will display the update notice to them. For those that are allowed to run web updates, they will see the web update notice whether the setting is No or Yes. In a separate setting--the “Allowed to download and run web updates” security checkbox--users can be given or denied permission to download and run web updates. One location of this checkbox is Options| Security Settings| Security Groups | ExitCare Settings tab. Default Additional Note Format This feature allows the setting of the default format (font type, color, size, etc.) for additional notes. The default is Times New Roman, 11 point normal font. Default Category for Pick Document List This option allows the selection of a default category (e.g., All Documents, Cardiology, Pediatrics, etc.) to display when navigating to the Choose Titles | Document by Category screen. The program default is for the All Documents category to show. Default Search Type This allows the selection of a default search type on the search screen within the program. The choices are Begins With or Contains, and the program default is Begins With. How many days before your license expires should the message show? The ExitCare license must be renewed on an annual basis. By default, 60 days before license expiration, a notice in red appears at the bottom of the screen advising all users that the license must be renewed. This feature allows the setting of the number of days that the "license will soon expire" message will show before expiration. The minimum warning period is 15 days, to make certain the necessary people can process the renewal before the license expires. Require the Admission Date to be entered This setting determines whether or not to require the patient's admission date to be entered on the Current Patient screen before a user can print. The default setting is No. Page | 14 Require the Date of Birth to be entered This setting determines whether or not to require the patient’s date of birth to be entered on the Current Patient screen before a user can print. The default setting is No. Require the Diagnosis to be entered This setting determines whether or not to require the patient's diagnosis to be entered on the Current Patient screen before a user can print. The default setting is No. Require the Discharge Date/Time to be entered This setting determines whether or not to require the patient's discharge date and/or time to be entered on the Current Patient screen before a user can print. The default setting is No. Require the Patient ID Number This setting determines whether or not to require patient’s ID number to be entered on the Current Patient screen before a user can print. The default setting is No. Require the Patient Medical Record Number This setting determines whether or not to require patient’s Medical Record Number to be entered on the Current Patient screen before a user can print. The default setting is No. Show the “Save Patient to Recent Patient List” Button This setting determines whether or not the button with the green diskette icon displays in the Last Name field on the Current Patient screen. (The button saves the patient’s information to the Recent Patients list.) The default setting is Yes. Feature Automatically log out the user out of ExitCare after how many minutes of inactivity? Check for web updates even if a user is not allowed to run web updates Default Additional Note Format Default Category for Pick Document List Default Search Type How many days before your license expires should the message show? Require the Admission Date to be entered Require the Date of Birth to be entered Require the Diagnosis to be entered Require the Discharge Date/Time to be entered Require the Patient ID Number Require the Patient Medical Record Number Show the “Save Patient to Recent Patient List” Button Default Global Facility Dept. 15 Yes Times New Roman, Regular style, 11 point All Documents Begins with 60 No No No No No No Yes Page | 15 Settings: Patient Lookup System Select the facility and department with which you wish to work at the top of the screen before making any changes. Click the Save settings button before changing screens, departments, or facilities. For customers whose computer systems transmit patient information into ExitCare (via an HL7 interface or otherwise), the Patient Lookup screen displays records for both patients available for import and recent patients. The Patient Lookup screen gives users one place to search for both records ready to import (also referred to below as “HL7 records”), and records that that have been recently saved in ExitCare (“Recent Patient records”). Automatically refresh the patient lookup list after how many minutes? This setting determines how often ExitCare checks with the import server to see if any new records (both records ready to be imported, and recent patients) are available on the Patient Lookup screen. The default setting is 30 minutes, which works for most emergency departments. Many inpatient units can go longer. Refreshing does slow down the software but it is important to ensure all available patients are listed on the screen. Delete HL7 records which have not been used in how many minutes? (NOTE: Applies to DEPARTMENT level only) To keep the data manageable, you can tell ExitCare to remove records available to be imported if the record has not been used after a specified period of time. The program default is 14,400 minutes (10 days). Delete recent patients out of the database which have not been changed for how many days? (This is a facility only setting) This setting determines how long an inactive Recent Patient record is kept before it is deleted from the system. The default is seven days, operating on the assumption that if a Recent Patient record has not been accessed in seven days, then most likely the patient has been discharged. Keeping the size of the Recent Patients list manageable can be helpful to the staff trying to find a Recent Patient record. Since this is the master time when the records are deleted, it can only be set at the global or facility level. The default is seven days. Department Import Filter Code(s) (NOTE: Applies to DEPARTMENT level only) This setting allows you to filter the list of patients by department, if there is a department code in the import data. You can specify one or more codes in this box. For example, if the current department wanted to see all patients with department codes of ABC and DEF, you would enter both codes, separated by a comma but no spaces. Entering values here filters the data so only those patients relevant for the current department will be seen on the Patient Lookup screen. Do not show recent patients that are older than how many minutes? This setting allows you to hide (but not delete) Recent Patient records after a set amount of time. These records will be hidden from view until such time as they are deleted. The time at which they are deleted is determined by the setting labeled, Delete recent patients out of the database…, discussed above. The default value is 1440 minutes (24 hours). Should the Patient Lookup screen automatically do a search when it shows? This setting determines whether or not the Patient Lookup screen will automatically perform a search of all four fields (First Name, Last Name, Patient ID, and Medical Record Number) with all wildcard characters for that workstation’s department only, and display the results when the screen displays. If it does the search, the list is automatically refreshed when doing the search. The default is No. Page | 16 Use Patient Record Locking System (This is a facility only setting) The Patient Record Locking System provides a way to handle two or more users accessing the same patient record at the same time. This system serves as a gate keeping function, preventing two user requests from creating a data entry "collision." The default is Yes. If Yes is Chosen as the Setting: Ownership of a patient record is by default given to the first user. If a second user requests the same patient record from the Patient Lookup screen, the second user will receive an informational pop-up which prompts them with a choice: Take Ownership or Close. The pop up will also display the first user's name and other relevant information, as shown to the right: If the second user clicks "Take Ownership" and that user has the proper security*, then ExitCare will give to the new owner the patient's record from the recent patient list. The "taken" record will not contain any new information added by the user from whom the record was taken. ExitCare will mark the new user as having ownership of the record, and an audit event called "Recent Patient Take Ownership" will also be entered in the audit log. If the second user clicks "Take Ownership" and that user does not have proper security*, then ExitCare will display a pop up security override box, displayed to the left, where another user can enter their login and password to approve the "Take Ownership." *A security setting exists under, for example, Options | Settings | Security Groups | ExitCare Settings tab | History System, called "Allowed to Take Ownership of a Recent Patient record that is in use." ExitCare checks every several seconds to ensure that the user continues to have ownership of the record. If the user loses ownership because someone else took over ownership, then the user will see this pop up window: Page | 17 Note: Taking ownership of the record is a one-time, one-way process for each record and two users. The record cannot be taken back and forth between two users. If No is Chosen as the Setting for the Patient Record Locking System: When one user (the "first user") makes a change to a record that a second user begins working on, and the first user saves the changes, and then the second user saves changes to the record, the pop up window to the left will display to the second user: If the second user (who receives the pop up window) chooses the "Overwrite Patient Record" option, this will delete the record that was saved by the first user and save the record that was being worked on by the second user. Use the patient lookup system This setting allows users to use or hide the Patient Lookup system. If No is chosen, the Patient Lookup tab, located under the Patient Information tab, will not display. The default is Yes. When using an HL7 Record, how would you like to handle the Diagnosis information? This setting determines what to do with diagnosis information in the import record. The default is to always use the data from the import record. You can also choose to never use the diagnosis data from the import record; or only use the diagnosis data from the import record if the diagnosis data is not blank. When using an HL7 Record, how would you like to handle the Primary Attending Caregiver information? This setting determines what to do with attending caregiver information in the import record. When data is imported from a registration system, sometimes the attending or admitting physician data is correct, sometimes it is not. If the data is generally correct, and you always want to use the new data from the import record, that is the default and you do not need to make any changes. You can also choose to never use the caregiver data from the import record; or only use the caregiver data from the import record if the diagnosis data is not blank. When using an HL7 Record, how would you like to handle the Primary Followup Caregiver information? This setting determines what to do with follow-up caregiver information in the import record. If you always want to use the new data from the import record, that is the default and you do not need to make any changes. You can also choose to never use the caregiver data from the import record; or only use the caregiver data from the import record if the diagnosis data is not blank. Which search field should be the default when opening the patient lookup screen? This setting determines which field will be selected as the default field to begin typing in when opening the patient lookup screen. The default is First Name. The table for this section is on the next page. Page | 18 Feature Automatically refresh the patient lookup list after how many minutes? Delete HL7 records which have not been used in how many minutes? (NOTE: Applies to DEPARTMENT level only) Delete recent patients out of the database which have not been changed for how many days? (This is a facility only setting) Department Import Filter Code(s) (NOTE: Applies to DEPARTMENT level only) Do not show recent patients that are older than how many minutes? Should the Patient Lookup screen automatically do a search when it shows? Use Patient Record Locking System (This is a facility only setting) Use the patient lookup system When using an HL7 Record, how would you like to handle the Diagnosis information? When using an HL7 Record, how would you like to handle the Primary Attending Caregiver information? When using an HL7 Record, how would you like to handle the Primary Followup Caregiver information? Which search field should be the default when opening the patient looking screen? Default Global Facility Dept. 30 14400 (10 days) 7 none 1440 No Yes Yes Always use the Diagnosis from the import (even if it is blank) Always use the Primary Attending Caregiver from the import (even if it is blank) Always use the Follow-up Caregiver from the import (even if it is blank) First Name Settings: Print System Select the facility and department with which you wish to work at the top of the screen before making any changes. Click the Save settings button before changing screens, departments, or facilities. In addition to print settings established in the sections below, many print settings can be changed for individual patients on the General Print Settings screen or Language/Size screen. Custom footer to add to the bottom of each page This option allows the addition of a custom footer to the bottom of each page, such as a bar code to facilitate the optical scanning of documents into the patient record. There is no default for this setting. Page | 19 Default DI Print Count This sets the default number of copies for the patient discharge instructions (DIs). Since the Patient Signature Page is designed to meet the documentation requirements for the patient chart, the default for the DIs is set at one. The user can always change the print quantity on the General Print Settings screen. The default is 1. Default Forms Print Count This sets the default print quantity for forms, such as the work or school release form. If the patient needs multiple copies for two jobs, or a job and going to school, the user can change the print quantity on the General Print Settings screen. The default is 1. Default Main Print Font Size The standard font size for most patients is set at 12 point font. For visually impaired patients, the user can increase the font size up to 24 point font on the Language/Size screen, but you can change the default font size here. The program default is 12 point. Default Patient Summary Page Print Copy The Patient Summary Page is a one-page document that summarizes follow-up providers, prescriptions, and other information. The default is 1. Default Print Language This sets the default print language for documents. If a different option is needed on a per-patient basis, it can be changed on the Language/Size screen. The default is English. Default Signature Page Print Copy The Patient Signature Page is designed to be a one-page summary of all documents given to the patient. It is signed by the patient and is for the chart. Some sites want to give a copy to the patient, so if your facility desires this service, you can increase the default print quantity. The default is 1. Footer - Print date in footer This setting determines whether or not the date is printed in the footer of each page on patient documents. The default is Yes. Footer - Print page numbers in footer This setting determines whether or not the page number is printed in the footer of each page on patient documents. The default is Yes. Footer - Print time in footer This setting determines whether or not the time is printed in the footer of each page on patient documents. The default is Yes. Header - Print patient id # in the header This setting determines whether or not the patient ID number is printed in the header of each page on patient documents. The default is Yes. Header - Print patient medical record # in the header This setting determines whether or not the patient medical record number is printed in the header of each page on patient documents. The default is Yes. Header - Print the patient's name in the header This setting determines whether or not the patient’s name is printed in the header of each page on patient documents. The default is Yes. Page | 20 Only print controlled scripts to script printer This setting determines whether or not the associated checkbox is checked on the General Print Settings screen under the Prescription Printer section. The checkbox is labeled “Only print controlled scripts to script printer, noncontrolled will print in the regular print job.” Checking this box will cause prescriptions for controlled drugs to be printed on the designated prescription printer; it will also cause all other prescriptions (i.e., for noncontrolled drugs) to be printed at the printer listed at the top of the right-hand column (the "Main" printer). The user always has the option to check or uncheck the box on the General Print Settings screen. The default is No. Print 'Reprint' watermark in archive When documents are printed from the archive, some sites want it clearly documented that the new copies are reprints, not the originals. If you want a watermark of “Reprint” on any copies printed from the archive, change the default setting to Yes. Print as a single document Some patients require more than one patient education document. The default is to print multiple documents with the facility header printing only on the first page. If you would like each topic to start on its own page, change the default setting to No. Print Patient Comprehension Questions If you have purchased the optional Patient Comprehension Questions, you can select whether or not to precheck the box to print the questions. (Many emergency departments do not use the questions on most patients, whereas many inpatient units do.) The default is Yes. Print questions with blank answers on the signature page On our Form – Excuse from Work, School, or Physical Activity, for example, if the excuse form is only applicable for work, and you do not check the box for being excused school or restricted physical activity, keeping the default answer here of Yes would list, on the Signature Page, all three options with the words “checked” after work and “unchecked” after school and physical activity. If you change the setting to No, you would only document that you checked the box for work; any fields not filled in or checked would not be listed. Print user id on the signature page On the Patient Signature Page, for HIPAA, by default we document the name and ID number of the user that was logged in when a particular document was created. If you plan on giving the patient a copy of this form, you may choose not to include the ID number of the logged in user. The default is Yes. Print user name on signature page As mentioned above, on the Patient Signature Page, for HIPAA, by default we document the name and ID number of the user that was logged in when a particular document was created. If you plan on giving the patient a copy of this form, you may choose not to include the name of the logged in user. The default is Yes. When printing in a language other than English, print the Documents in English also If Yes is chosen as the setting, then a check box is automatically filled in on the Language/Size screen and on the General Print Settings screen to print documents in English that are also being printed in a non-English language. The user always has the option to check or uncheck the boxes. The default is No. When printing in a language other than English, print the Forms in English also If Yes is chosen as the setting, then a check box is automatically filled in on the Language/Size screen and on the General Print Settings screen to print forms in English that are also being printed in a non-English language. The user always has the option to check or uncheck the boxes. The default is No. The table for this section is on the next page. Page | 21 Feature Custom footer to add to the bottom of each page Default DI Print Count Default Forms Print Count Default Main Print Font Size Default Patient Summary Page Print Copy Default Print Language Default Signature Page Print Copy Footer - Print date in footer Footer - Print page numbers in footer Footer - Print time in footer Header - Print patient id # in the header Header - Print patient medical record # in the header Header - Print the patient's name in the header Only print controlled scripts to script printer Print 'Reprint' watermark in archive Print as a single document Print Patient Comprehension Questions Print questions with blank answers on the signature page Print user id on the signature page Print user name on signature page When printing in a language other than English, print the Documents in English also When printing in a language other than English, print the Forms in English also Default Global Facility Dept. None 1 1 12 point 1 English 1 Yes Yes Yes Yes Yes Yes No No Yes Yes Yes Yes Yes No No Settings: User Interface (UI) Select the facility and department with which you wish to work at the top of the screen before making any changes. Click the Save settings button before changing screens, departments, or facilities. "Case for..." settings In the first 22 settings, you can set the case for their respective fields on the Current Patient screen. The default is free text, in which the case of the text displays exactly as it is typed. Additional options are all lowercase; ALL UPPERCASE; and Proper Case, in which, as in the remaining text of this sentence, The First Letter Of Each Word Is Capitalized. Hide Shortcuts on the Choose Titles Screen This lets you determine if shortcuts display on the Choose Titles screen, under the Document by Category tab. If Yes is chosen as the setting, the Hide Shortcuts check box in the toolbar on the Choose Titles screen is automatically checked, and the shortcuts will not display under the Document by Category tab. The Hide Shortcuts check box can be unchecked by any user. Page | 22 The next three settings for the User Interface group determine whether or not to display, on the Current Patient screen, the primary attending caregiver’s DEA number, NPI number, and the State ID number. Some computers can be in very public locations, and some consider these numbers to be confidential. If you change the default setting to No, then the corresponding number will be replaced on the screen with asterisks instead of the actual values. Note that, depending on the setting established in the ExitMeds section, ExitCare will print the actual DEA number, rather than the asterisks, on the prescriptions. Show doctor DEA number on Patient Information Screen This setting determines whether or not the doctor’s DEA number is displayed on the Current Patient screen. The default is Yes. Show doctor NPI number on Patient Information Screen This setting determines whether or not the doctor’s NPI number is displayed on the Current Patient screen. The default is Yes. Show doctor State ID number on Patient Information Screen This setting determines whether or not the doctor’s State ID number is displayed on the Current Patient screen. The default is Yes. Show the Admission Date and Discharge Date/Time Fields on the Patient Information Screen This setting determines if the Admission Date and Discharge Date/Time fields appear on the Current Patient screen. The default is Yes. Starting Screen – Please pick which screen shows when the program first starts and when the “New Patient” button is pressed. There are three choices: Choose Title Screen; Current Patient Tab; and Patient Lookup. The default is Current Patient Tab. Feature Case for oversight caregiver Case for oversight caregiver DEA Case for oversight caregiver NPI Case for oversight caregiver State ID Case for patient address Case for patient city Case for patient first name Case for patient ID Case for patient last name Case for patient medical record number Case for patient state Case for primary caregiver Case for primary caregiver DEA Case for primary caregiver NPI Case for primary caregiver State ID Case for primary followup address Case for primary followup caregiver Case for primary followup city Case for primary followup clinic name Case for primary followup state Case for primary followup time Default Free Text… Free Text… Free Text… Free Text… Free Text… Free Text… Free Text… Free Text… Free Text… Free Text… Free Text… Free Text… Free Text… Free Text… Free Text… Free Text… Free Text… Free Text… Free Text… Free Text… Free Text… Global Facility Dept. Page | 23 User Interface Settings Table, continued Feature Case for responsible adult Hide Shortcuts on the Choose Title Screen Show doctor DEA number on Patient Information Screen Show doctor NPI number on Patient Information Screen Show doctor State ID number on Patient Information Screen Show the Admission Date and Discharge Date/Time Fields on the Patient Information Screen Starting Screen – Please pick which screen shows when the program first starts and when the “New Patient” button is pressed. Default Free Text… Global Facility Dept. Yes Yes Yes Yes Yes Current Patient Tab Settings: Workstation-Connection Information The settings on this screen are first established in a pop up window the first time ExitCare is launched on a workstation. On subsequent launches of ExitCare, this screen is used for making changes to the workstation connection information. This section must be set up on each workstation; it is not possible to set up other workstations from a single computer. It is recommended that an IT professional work with these settings. Workstation Location Information The uppermost area of the screen is where you establish the facility and department where this workstation is located. The department you set here is important due to the number of settings that are department specific. For example, if defaults are established for the ED, but this workstation is set to Fast Track, then you will not see the defaults established for the ED. Database Connection Information The settings in the center section of this screen should only be set up or modified by Information Systems professionals. Setting 1 tells ExitCare the name and therefore location of the SQL server. Setting 2 sets up the authentication type. Setting 3 tells ExitCare the name of the database to use. For more information on these three settings, please contact ExitCare Technical Support at 800-694-6669, extension 2. Once the information is filled in, you may click the Test Connection button to test the connection. Click the Save button to save your changes. SQL Server Name Authentication Type Database Name Feature Setting Page | 24 Settings: Workstation-Printing This screen is for setting up the printers that are displayed on the General Print Settings screen. This screen is workstation specific, and must be set up at each workstation, since printers are workstation specific. ExitCare can only print to printers defined to this workstation; however, one of the choices in the drop-down list is to use the default printer for that workstation. Main Printer Settings Under Default Printer to print to: select the printer for all documents, except for any prescriptions you choose not to be printed on this printer. You can also change the print margins, but increasing the margins from the defaults may cause the print job to take up more pages than necessary. Prescription Printer Settings (If ExitMeds is licensed) Under Printer to print scripts to: select the prescriptions printer. If appropriate, select a separate, dedicated prescription printer or set up a print driver that directed this part of the print job to a second paper tray of the main printer (above), if your printer has this capability. Note that a setting under Settings | Print System labeled "Only print controlled scripts to script printer" allows the Administrator to automatically route the printing of scripts for controlled drugs to the script printer, and all other scripts to the main printer. This section also allows for the setting of script printer margins. In addition, you can set the number of lines to print between prescriptions when more than one prescription is printed per page. When parts of the prescription are required to be pre-printed on the paper stock, the alignment of the second script can be challenging. By trial and error you can add or subtract extra lines so that the information is properly lined up with the blanks on the paper. The default is one line. Some prescription formats require prescriptions to be printed in landscape rather than the default portrait mode. Check the Print script in landscape mode box if applicable. Click the Save button to save your changes. Feature Main Printer: Default Main Printer Top Margin Main Printer Bottom Margin Main Printer Left Margin Main Printer Right Margin Script Printer: Default Setting Feature Script Printer Top Margin Script Printer Bottom Margin Script Printer Left Margin Script Printer Right Margin # of Lines Between Scripts Print script in landscape mode Setting Page | 25 Logged in User Settings On the User Settings screen, users can choose settings that apply just to themselves for four features in ExitCare. This screen is available only if users have been set up in the Security System in ExitCare. The choices on this screen (except blank choices) will override default or administrative global, facility, or department settings that have been made for the respective features elsewhere in the Options System. Administrators cannot set User Settings screen choices for other users. User Settings Default Category for Pick Document List The setting for this feature determines which category displays first when Choose Titles is selected on the sidebar and when using the Document by Category tab. If users are given permission to create custom categories, choosing the default category can be important. Default Print Language This sets the default language when a user chooses documents. This could be useful if the current user wants to only work with no field documents, or if the majority of the patients have a language other than English as their primary language. Start with Which Screen The third setting allows users to choose which screen displays when the program starts and when the New Patient icon is selected. There are three options from which to choose: Choose Titles Screen; Current Patient Tab; and Patient Lookup. Default Search Type Two choices are provided: “Begins with” and “Contains.” The latter provides for a broader search. The choices affect all search boxes that have these two settings as options. Security Settings The Security Settings group is where you establish security settings for all ExitCare users. Access to the entire Security Settings system should be restricted to Administrators ONLY. ExitCare provides security “out of the box”, plus the ability to set up user accounts by individual, department, facility, etc. When you first install ExitCare, there is an Administrator level security setup in place. This security level will always exist. The user name is AdministratorEC, and the Master Login password upon first install is “exitcare” (lowercase, and the quote marks are not included in the password). You may access this security level by clicking on the Admin Login list choice on the sidebar, and then keying in the password. Login IDs are case sensitive unless you check the box to make them case insensitive. Passwords are ALWAYS case-sensitive. For security and HIPAA compliance purposes, it is your responsibility to immediately change the Master Login password to something else of your choosing. Don’t forget it – there are no easy back doors to get you into a secured ExitCare. See the section on Security Settings: Settings below for where to change the password. If you will be assigning individual user Login IDs, we also recommend that immediately after changing the Master Login password, the Administrator establish his or her own personal login ID and password, with an Administrator setting. For instructions, please see the section below titled Adding a Single New User under Page | 26 Security Settings: Users. Please note that if you establish a user with his or her own personal login ID and password (whether as an Administrator or a regular user), every other ExitCare user will also need a login ID and password. If you need general login assistance, contact us at [email protected] or 800-694-6669, ext. 2. Security Settings: Settings At the top of this section’s screen, first choose the facility you are working with when multiple facilities have access to ExitCare from the same server. General Tab Disable Security System: If checked (security disabled), the software is restored to its initial configuration of two types of users: administrator and a generic user. Login Only: If checked, requires all users to log in, but gives all users the security profile established on the Generic Security Profile tab. By requiring a log in, ExitCare can now track usage by user to such sensitive areas as the patient archive and to prescription writing. Audit User Logins/Invalid Login Attempts: If checked, ExitCare will track the log in of every user and any unsuccessful log in attempts. Disable user after failed login: If checked, ExitCare disables a user account after a set number of failed logins. The first numeric box in the area below the checkboxes sets the number of login attempts before disabling user login. Logins are case insensitive: If checked, user login IDs will be case insensitive. Note that passwords are always case sensitive. Number of login tries before disabling login: This is activated when the Disable user after failed login box is checked. Here you can specify the number of incorrect attempts that will be allowed before the user login ID is disabled. Days before password expires warning should show: If passwords will be set to expire, this option sets the number of days prior to password expiration that the user is notified that they need to change their password. Ensure the value is high enough to account for vacations. Minimum password length: This option sets the minimum number of characters in a password. Number of saved passwords per user: This sets the number of previously saved passwords that ExitCare should store. User passwords expire every X days: This sets how often passwords expire. Add/Delete Domain: This is used to manage domain names when using the Windows® Authentication feature. Windows® Authentication allows users to sign onto ExitCare using their Microsoft® Windows® operating system user name and password. Because of this, no passwords are stored in ExitCare and if users change their Microsoft® Windows® operating system password, they do NOT need to change a password in ExitCare. If there is only a single domain for all users, most often this box can remain blank. Page | 27 Master Login Tab This screen is where you change the password for the Administrator login. When you first install ExitCare, there is an Administrator level security setup in place. This security level will always exist. The user name is AdministratorEC, and the Master Login password at first install is exitcare. You can access this security level by clicking Admin Login on the sidebar, and then typing in the password. (Note that passwords are always case sensitive.) For security and HIPAA compliance purposes, it is your responsibility to immediately change the Master Login password to something else of your choosing. To change the password: 1. Change the Master Password; retype the password in the next field. 2. Click Save when done. Remember to record and store the new password in a safe location. In addition, if you are going to be assigning individual user IDs, we recommend that immediately after changing the Master Login password, the Administrator establish his or her own personal login ID and password, with an Administrator setting. For instructions, please refer to the section below titled Adding a Single New User under Security Settings: Users. Generic Security Profile Tab If you are not using individual user logins, or you are requiring logins but are assigning all users an identical security profile, this is where you establish the profile for the “Generic User”. A check mark in a box activates that feature, and no check mark means the feature is inactive. Please see the ExitCare Security Settings Manual for guidance on the actions of the checkboxes. Also keep in mind that the profile here is for a generic user only. It is recommended that each user have his or her own log in ID and password. You can then establish access to each area by user, or by user groups. ExitCare Settings Tab: Under this tab, the two most sensitive areas that the Generic User should NOT have access to are: under the Database System, “Allowed to access purge system;” and under the Maintenance System, “Allowed Access to Security System.” From a HIPAA perspective, you may wish to restrict access to the History System, especially the Patient Archive. ExitMeds Settings Tab: Here you may wish to restrict access by generic users to the Fax/Email System and/or the Print System. Archive Settings Tab: If you have more than one facility using the same server, you may wish to restrict access to some sites for the generic users. Page | 28 Security Settings: Security Groups If you will be assigning an identical security profile to multiple users, this is where to set up the profile for each group. Creating and Setting Up a Security Group 1. Click the Add New Group button. Type in the name of the group. If your server covers more than one facility, you can specify if this profile is for all facilities, or will apply to only one facility. Click OK. 2. Select the group from the drop-down list under Security Group Name. 3. Click the Edit Security button on the top right. 4. Create the profile for this group. A check mark in a box activates that feature, and no check mark means the feature is inactive. Please see the ExitCare Security Settings Manual for guidance on the actions of the checkboxes. a. ExitCare Settings Tab: As in the Security Settings | Settings | Generic Security Profile | ExitCare Settings tab, the two most sensitive areas under this tab are: under the Database System, “Allowed to access purge system;” and under the Maintenance System, “Allowed Access to Security System.” You may also wish to restrict access to the User System. From a HIPAA perspective, you may wish to restrict access to the History System, especially the Patient Archive. b. ExitMeds Settings Tab: If a group should be restricted from accessing the Prescription Print System, this is the screen to make certain these options are not checked. c. Archive Settings Tab: This is where you can select which facilities this group of users can view in the archive. If you have more than one facility using the same server, you may wish to restrict access to some sites for one or more groups. 5. Click the Save Changes button after completing work on each group. Note that the Security Group will change to the first alphabetical listing after clicking the Save Changes button. Additional features: Edit Group Name: This button allows you to edit the name of the group. Edit Security: Allows you to edit the profile of what is allowed or not allowed for a group. Delete Group: Allows you to delete a group. Copy Group: If you are setting up a new group that will have a profile similar to a group that has already been created, you can copy the profile settings from the current group to another new group that you will specify after clicking the Copy Group button. Remember to click the Save Changes button after completing work on each group. Note that the Security Group shown in the drop-down list will change to the first alphabetical listing after clicking the Save Changes button. Page | 29 Security Settings: Users The Users section allows you to set up individual security profiles, assign individual users to groups, import lists of users, audit user activity, reset user passwords, and more. The imported list of users should include the following fields, as these fields are required to have data mapped in step eight below: login ID; first name; last name; password; password is permanent (T/F); allowed to change password (T/F); use Windows® Authentication (T/F); and, force password change upon next login (T/F). You must use the words “true” or “false” when filling in the spreadsheet; they are not case sensitive. Also note that if using Windows® Authentication (true), you still need to include a password in the Password column in order for the import process to work. For a template for importing users, contact us at [email protected] or 800-694-6669, ext. 2. Importing a List of Users 1. After a security group has been created, in the upper left area of the screen click on Users. 2. Select the facility with which you wish to work near the top of the screen. This action displays currently listed users for that facility, but, unlike the first several sections of the Settings group, does not determine the facility to which the users are assigned. The Select Datalevel window in step 5 below is used for determining the facilities to which users will be assigned. 3. Click Import Users in the upper left area of the screen. 4. In the subsequent User import window, select the security group to which the imported users will belong. Click OK. 5. In the Select Datalevel window, choose if these newly imported users will be at all facilities or a specific facility. Click OK. 6. On the File Format dialog box: if you have a saved specification (see step 10 below), click Specifications and load it; you may need to edit loaded data on this and subsequent dialog boxes. Otherwise, choose the format of the file to be imported. Click Next. The import system cannot process *.xlsx files. 7. On the File Name dialog box, click the ellipsis button (with the three dots) and browse to the file that contains the data you will be importing. Once the file is selected (by double-clicking, for example), click Next on the File Name dialog box. 8. In the Data Formats dialog box, enter the first and last rows of the actual data to be imported, excluding headers, etc. This will prevent errors such as blank lines from displaying in your ExitCare data table. Enter the row with field names, and choose to show the file header. We cannot speak to each customer's situation, but it is likely that you will not need to change settings or entries in the "Dates, Times and Numbers" section. Make changes or leave the settings as appropriate for your facility. Click Next. 9. The File preview dialog box shows how the specifications you stated are causing the data to look. If the columns are not correct, click on the Back button and correct any data format issues. If the columns are correct, click the top of each column to specify the correct column title so that ExitCare knows where to place the data within the user list. For example, if the first column contains login IDs: by clicking on the top of that column and selecting LoginID, ExitCare knows this is the login ID for the user. Repeat this process to identify all columns of data. Click Next when done. Note: One of the fields is “ForcePasswordChange (True/False).” A setting of True will force the user to change their password on their next login. This very important feature facilitates the setting of one’s own password by users and will save the Administrator time. Page | 30 10. The Data preview dialog box allows you to preview the data. If necessary, you can click on the Back button to make adjustments on previous screens. You can save the import specifications you have set up thus far by clicking on the "Specifications..." button, clicking the Save button, and giving the setup a name in the Import Specification field. In the future, you can reload that specification setup for more importing. Click OK to close the Import Specification pop up window. When complete, click Next on the Data Preview dialog box. 11. On the Summary window click on Execute, then Yes, and the import process will begin. When complete, you will see all the names within the user matrix. Reset User Password 1. Select the facility with which you wish to work near the top of the screen. 2. Highlight a user by clicking once on their row of information. 3. Click on Reset Highlighted User’s Password at the top of the screen. 4. Enter a password in both fields within the Change Password window. To require the user to create a new password immediately after logging in with the reset password, check the Force Password change on next login box. Click OK when done. Adding a Single New User 1. To display currently active users for a specific facility, choose that facility from the drop-down list near the top of the screen. The facilities at which the user is allowed to log in is determined in step 6 below. 2. Click the Add button to bring up the screen to establish the general information for the user being created. The four mandatory fields on this form are First Name, Last Name, Login ID, and Password. 3. In the Login Information box, fill in the Login ID the user will use. The login ID may or may not be case sensitive, depending on the setting established on the Security Settings | Settings screen. If the user name is identical to the user name in the Microsoft® Windows® operating system, and the user wants to use the same password, click on Use Windows® Authentication. When this is checked, all the password fields are grayed out since the password is maintained by the Windows® operating system instead of ExitCare. If you will be setting up a unique ExitCare password for this user, click on Use Built-in Authentication. 4. If applicable, type in the password and re-enter the password. Note that passwords are always case sensitive. Check or leave empty the next three check boxes in the Password section of the screen. When checked, the function is activated. a. The first checkbox allows users to change their own passwords. b. The second checkbox sets the user password as permanent. c. The third checkbox will force the user to change their password on their next login. This very important feature facilitates setting one’s own passwords by users. 5. A computer name entered in the Computer Name box will restrict the user that single computer. 6. If you are part of a multi-facility group, you can specify whether the user has rights at all facilities, or just one specific named facility. 7. If the user wants to be automatically listed as the primary attending caregiver whenever they are logged in, check the relevant box in the User Information section of the screen. ExitCare will pull the data from this form to fill in the Primary Attending Caregiver information on the Patient Information screen. If you want DEA, State ID, and/or NPI numbers to print on prescriptions, be certain to add them in the associated fields. Page | 31 If the user is a Nurse Practitioner or Physician Assistant, and if state law requires another physician be documented as an Oversight Caregiver, check the Oversight Required box. 8. User Type settings: a. In the User Type section you can set some general security settings. If you will be setting a specific profile for a user click on the Assign security rights individually button. Next, go to the User Rights tab to select what rights this user will have access to. The process of doing this and the most sensitive areas have been previously discussed above. Please see the ExitCare Security Settings Manual for guidance on the actions of the checkboxes. b. If the user is part of an established user group that you have set up in the previous section, select the Use security group option and choose the correct group for their security. c. If you select Administrator, the user will have access to all areas of ExitCare. d. If the user can only view the archive, check the View Archive Only box. 9. If the user is temporary, and you wish to establish a date for this login ID to expire, in the Account expires section click the On button and select the expiration date. 10. Remember to click the Save and Close button after you have completed the profile for each user. If you do not click on Save and Close, the data will NOT be saved. 11. The central tab on the top, User Rights, is used when you are establishing rights for one user at a time. Please see step 4 under Security Settings: Security Groups above for suggestions. If the user was set as part of a group, this tab is not available. 12. The Audit Log tab can show a history of certain events. The first option is to load the entire log, regardless of date, or you can specify a date range. ExitCare audits 44 different events. You can load all events, or specify events by checking the boxes next to the events for which you want to see the audit log. When these parameters are set, click the Find button. You can print the report, change the view, export to a spreadsheet, or perform other options by clicking the icons on the left side of the screen above the yellow Drag a column header here… bar. Note that this screen accesses the audit log for only the single user selected on the main Users screen. If you want an audit log of all users, please see the instructions below for Security Settings: Audit Log. 13. If you have chosen to track individual user logon history, the Last Logon box at the bottom of the screen will show you the last time that a user, who has been highlighted on the main Users screen, logged into ExitCare. Deactivating Users Under the Active Items tab, choose the facility for which you wish to display active users. Select the users to be deactivated. Click Deactivate. In the Select Datalevel window, select the facility level to which this action applies. Click Yes, then OK. Reactivating Users Select the Deactivated Items tab. Select users to be reactivated. Click Reactivate, click Yes, then OK. Editing User Data Under the Active Items tab, choose the facility for which you wish to display active users. Highlight (click once on) a row of data for a user. Click Edit Highlighted. Make desired changes, and click Save and Close. Save Layout You can rearrange the column headers in the user list data table and then click on the Save Layout button. Page | 32 Security Settings: Audit Log The Audit Log screen is used for creating an audit log for all users. Currently 44 events are available for auditing: 1. 2. 3. 4. 5. 6. 7. 8. 9. 10. 11. 12. 13. 14. 15. 16. 17. 18. 19. 20. 21. 22. 23. 24. 25. 26. 27. 28. 29. 30. 31. 32. 33. 34. 35. 36. 37. 38. 39. 40. 41. 42. 43. 44. Archive - Print. Archive - Print Job Saved Archive - Record Created Archive - Search. Archive - Search Results Exported (includes search results exported as spreadsheet or HTML) Archive - Search Results Printed Archive - Viewing Data Audit Log - Search Audit Log - Search results exported (includes search results exported as spreadsheet or HTML) Audit Log - Search Results Printed Authorized to Print Multiple Scripts with same Drug (authorized action to print multiple scripts of the same type for one patient (i.e., which user printed a patient information set with two drugs of the same name both listed as “active” in the Drug Status column, i.e., “New,” “Continue Taking,” or “Changed To”) Drug Allergies - Grid Exported (includes grid exported as spreadsheet or HTML) Drug Allergies - Grid Printed Drug History - Grid Exported (includes grid exported as spreadsheet or HTML) Drug History - Grid Printed Drug History - Search Drug Interaction - Grid Exported (includes grid exported as spreadsheet or HTML) Drug Interaction - Grid Printed Drug Summary - Grid Exported (includes grid exported as spreadsheet or HTML) Drug Summary - Grid Printed Invalid Approve Drug Interaction/Allergies Override Invalid Login Attempt Invalid Script Override Login Invalid Take Ownership Override Login Password Reset Patient Restored Patient Search Patient Take Ownership - Override Print job created Purge Audit Log Purge Script Archive Purged Patient Archive Recent patient record created Recent patient record modified Recent Patient Take Ownership Report - MU1 Search (gives information on reports generated on the Report System | MU-Stage 1: Electronic Copy of Discharge Instructions screen) Report - MU1 Search Results Exported (includes search results exported as spreadsheet or HTML) Report - MU1 Search Results Printed Report - MU2 Search Report - MU2 Search Results Exported (includes search results exported as spreadsheet or HTML) Report - MU2 Search Results Printed Script Override Login User Logged In User Logged Out Page | 33 Time frame for audit log In this section of the screen you can search the entire database or specify a specific date range. Audit Events to load This section allows you to search all events, or specify the events you wish to search. Search which facility If more than one facility uses the software, you can search the data for all facilities, or specific facilities by checking the boxes next to the names of the facilities you wish to search. Additional information: Once displayed, the data can be filtered by clicking on the right side of the column headers and making a selection from the drop-down list; sorted by clicking the column headers; and grouped by dragging the headers into the dark yellow bar above the column headers. The data can be printed and exported by selecting the relevant icon in the tool bar above the yellow Drag a column header here… bar. Answer/Question System The Answer/Question System is where you can work with questions and answers that appear in documents. Examples include creating custom questions and answers, and setting default answers for questions. You can also work with follow-up times that appear on discharge instructions. Answer/Question System: Answers/Questions On the Answers/Questions screen you can: create new questions and answers which you can then add to one or multiple ExitCare documents or to user-created documents; add answers to questions you create or to ExitCare questions; edit user-created questions and answers; and deactivate and reactivate user-created and ExitCare answers. Creating Questions 1. Click the Add Question button on the upper right. 2. Enter your question in the Question: field. Select the Question Type from the drop-down list below it. Please see the section below on Question Types for a description of each. Click Save. Note that all questions added are, when used in documents, globally visible, i.e., visible to all facilities and departments. Question Types ExitCare has seven Question Types that you can use to create custom documents. Below are descriptions of each as they appear in the Questions tab of the document in which they are inserted. Checkbox: Creates a checkbox which can be checked or left unchecked. Date: Creates a drop-down calendar from which a date can be selected. Drop Down: Creates a drop-down list from which user-created answers can be selected. Page | 34 Quick Pick: Creates a box in which user-created answers can be selected from buttons or from a dropdown list. Temp: Creates a box in which user-created temperatures can be selected from buttons or from a dropdown window. TextBox: Creates a textbox in which text can be entered. Today's Date: Creates a field in which today’s date is automatically entered. Creating Answers (for Drop Down, Quick Pick, and Temp Questions) 1. Highlight the question in the top half of the screen. 2. In the lower half of the screen, choose the facility and department for which you wish to see the answers that are currently available for that facility and department. Note that the Select Datalevel window in step 4 will be used to choose which facilities and departments will display the newly-added answers. 3. In the lower half of the screen, click the Add button. 4. One at a time, enter the answers in the text box within the Select Datalevel window. Make your selections for facility, department, or current user; then click OK. 5. Repeat steps 1-4 until all answers are entered. Note: To quickly find the questions you created, click once in the space directly under the “User Defined” column header. Your questions will then be listed under the “Question” column header. Editing Questions (user-created questions only) In the top half of the screen, locate and highlight (click once) the question to be edited. Click the Edit Highlighted Question button. Make your changes to the question, and click Save. Editing Answers (user-created answers only) In the top half of the screen, locate and highlight (click once) the question that has one or more answers to be edited. In the lower half of the screen, choose the facility and department for which you wish to display currently-available answers. Highlight the answer to be edited. Click the Edit Highlighted button in the lower half of screen. Make changes to the answer. Make your selections for where this edit applies: facility, department, or current user; then click OK. Deactivating Answers (ExitCare- or user-created) In the top half of the screen, locate and highlight (click once on) the question with the answers to be deactivated. In the lower half of the screen, choose the facility and department for which you wish to display currently-available answers. Select the answer to be deactivated. Click the Deactivate button. Make your selections for where the deactivation applies: facility, department, or current user; click Yes, then OK. Reactivating Answers (ExitCare- or user-created) In the top half of the screen, locate and highlight the question with the answers to be reactivated. In the lower half of the screen, click the Deactivated Items tab. Select the answer to be reactivated. Click the Reactivate button. In the Confirmation window click Yes, then OK in the next window. Page | 35 Answer/Question System: Document Level Answers The Document Level Answers screen allows you to select or create default answers for specific documents so that the answers are displayed automatically when the title is chosen. 1. Locate a document name by typing it in the space under the Document Name heading (where it says Click here to define a filter) at the top of the screen; or click on any document name and begin typing. 2. Highlight the document name by clicking on it once. If the document has questions, they will display in the lower half of the screen. 3. Highlight the question for which you wish to set a default answer. 4. Using the drop-down lists near the bottom of the screen, specify the facility and department for which you wish to set and view default answers. 5. Select from the drop-down menu, or type in, a default answer for a specific facility, for a specific department, and/or for the currently logged in user. Note that user answers override department answers, and department answers override facility answers. 6. Click the Save button. Additional information: The selected/created answer will be displayed automatically when the specified document is added to the patient’s records or printed. Note that this answer is specific to the document, even if the same question appears in a different document. For guidance on creating a default answer for a specific question regardless of the document that the question is in, please see Answer/Question System: Question Level Answers. For guidance on creating custom questions and answers please see Answer/Question System: Answers/Questions. For guidance on adding custom questions and answers to documents, please see Document System: Documents. Answer/Question System: Question Level Answers The Question Level Answers screen allows you to choose or create a default answer that will appear automatically for a given question, regardless of the document in which the question is placed. 1. Locate the question by using the scroll bar on the right side of the screen. 2. Highlight the question by clicking on it once. 3. Using the drop-down lists near the bottom of the screen, specify the facility and department for which you wish to set and view default answers. Page | 36 4. Select from the drop-down menu, or type in, a default answer for a specific facility, for a specific department, and/or for the currently logged in user. Note that user answers override department answers, and department answers override facility answers. 5. Click the Save button. Additional information: For guidance on selecting or creating default answers for specific documents so that the answers are displayed automatically whenever a specific title is chosen, please see Answer/Question System: Document Level Answers. For guidance on creating custom questions and answers please see Answer/Question System: Answers/Questions. For guidance on adding custom questions and answers to documents, please see Document System: Documents. Answer/Question System: Follow-Up Times The Follow-up Times screen allows you to create a new follow-up time that can be chosen on your default follow-up time list. When you refer the patient for follow-up you specify both the person they are to see, as well as how soon they should see this person. If you want to add a follow-up alternative not found in ExitCare, this is where to add your custom timeframe. Adding a Follow-Up Time 1. Near the top of the screen, choose a facility and department for which you wish to see the follow-up times currently available for that facility and department. Note that the Select Datalevel window in step 3 will be used to choose which facility and department will display the newly-added times. 2. Click the Add button, and type in the new follow-up time. 3. Make your selections for facility, department, or current user. This determines which facilities and departments will display the newly-added times. Click OK. Editing Follow-Up Times (user-created only) Near the top of the screen, choose the facility and department for which you wish to see the follow-up times currently available for that facility and department. Highlight the follow-up time and click Edit Highlighted. Make edits; make your selections for facility, department, or current user; click OK. (ExitCare follow-up times cannot be edited.) Deactivating a Follow-up Time (ExitCare- or user-created) Choose the facility and department for which you wish to see the follow-up times currently available. Select the follow-up time and click Deactivate. Make your selections for facility, department, or current user; click Yes, then OK. Reactivating a Follow-Up Time (ExitCare- or user-created) Click the Deactivated Items tab; select the follow-up time; click Reactivate; click Yes, then OK. Page | 37 Database System The Database System allows authorized users to: Send broadcast messages to ExitCare users; modify departments in the program and used for settings (e.g., add a new department called “MedSurg 3”); remove facilities in the program and used for settings; purge records; and, update authorizations files. Database System: Broadcast Messages This screen allows authorized users to prepare broadcast messages to announce updates, modifications, etc. The messages apply to all users in all facilities. Creating a New Message 1. In the Messaging group at the top of the screen, click the New button. 2. In the Message Details section at the bottom of the screen, enter the appropriate information and details in the fields, and select the start and stop dates and times. 3. Click the Save button. Editing a Saved Message 1. Click on a message under the Messages section to highlight that message. 2. In the Messaging group at the top of the screen, click the Edit button. 3. Make your desired edits to the message in the Message Details section at the bottom of the screen. 4. Click the Save button. Deleting a Saved Message 1. Click on a message under the Messages section to highlight that message. 2. Click the Delete button in the Messaging group at the top of the screen. Previewing a Saved Message 1. Click on a message under the Messages section to highlight that message. 2. Click the Preview button in the Messaging group at the top of the screen. Additional information: Users who log in can click the checkbox labeled “Don’t show me this message again,” appearing on the message. ExitCare checks for messages and displays them approximately 10 seconds after the main screen shows for the first time. If ExitCare is running while the message is saved, and if the saving occurs during the message’s active display period, the message will display approximately 10 seconds after having been saved. Messages can be sorted by clicking on the column headers, or grouped by dragging a column header into the area above the headers labeled “Drag a column header here…” Page | 38 Database System: Departments This section allows you to modify facility departments displayed in ExitCare. Departments are used throughout ExitCare to establish settings and set defaults. Each computer must be assigned a department so ExitCare knows what settings to apply. You can edit the department names that came with ExitCare, or add new departments to fit your needs. Adding a New Department 1. Near the top of the screen, choose the facility for which you wish to display currently listed departments. 2. Click the Add button. 3. Type in the new department name in the Add New Department window. Select a radio button under the new name and if relevant, select a facility/group from the drop-down list. Click OK. 4. The new department name should now be showing on the list. It will also be available on all screens where you can establish department level settings or defaults. Editing a Department (ExitCare- or user-created) Near the top of the screen, choose the facility for which you wish to display currently listed departments. Highlight a department, click the Edit Highlighted button, change the name, choose the facilities to which the change applies, and click the OK button to save it to the list. Deactivating Departments (ExitCare- or user-created) Choose the facility for which you wish to display currently listed departments. Select the department names you wish to deactivate. Click the Deactivate button. In the Select Datalevel window, choose the facilities to which the deactivation applies, and click Yes. Click OK in the Deactivate Item(s) window. Reactivating Departments (ExitCare- or user-created) Click on the Deactivated Items tab to see the list of deactivated departments. Select the departments you wish to reactivate, and click on Reactivate. Confirm your decision by selecting Yes in the Confirmation window, and then OK in the Reactivate Item(s) window. Database System: Facilities This screen lists all the facilities in the ExitCare authorization file and allows you to check which facilities you do not wish to see in any list in which you can choose the facility. Examples include the Select Datalevel pop-up windows, the "Currently working with" facility lists, and the Options | Security Settings | Security Groups | Archive Settings tab. This can be useful when multiple facilities are combined in one authorization file and, after a period of time (for example) one of the facilities needs to be removed from the list, but not from the database itself. To hide a facility, check the box under the Hide column next to the facility name, and click the Save button. To display the facility again, uncheck the box and click the Save button. Page | 39 Database System: Purge System The Purge System screen allows you to delete certain historical records stored by ExitCare. ExitCare automatically archives certain data: Patient Archive: documents printed for a patient Script Archive: prescription information imported and/or printed for a patient Audit Log: audit log information (auditing user activities) Information can be purged (deleted) or kept, based on a user-selected date. Information before that date will be purged. NOTE that this purged information is not saved to another location. Each time a document is printed, ExitCare saves an exact duplicate in its archives for reference. The archive of printed documents can be useful in medical or legal issues for several years, and for printing reports of most common diagnoses, so make certain you really want to permanently delete records from the archive. Purging the patient archive records also removes data from the MU-Stage 1: ECDI screen, some data* from the MUStage 2: PSER screen, and data from the Diagnosis Report screen. To purge, click Delete from patient archive. ExitCare also maintains a list of every “New RX” and “Take as previously directed” drug printed. This data can be useful if a patient returns at a later date: on the Drugs | Drug History tab, you can easily review these drugs and use them for the current visit. In addition, this data is used in the Report System to print reports of medications, which could be used to identify improper script writing habits. If you wish to delete records from the script archive, select the Delete from script archive button. Purging the script archive will remove records from the Drug History tab and from the Options | Report System | ExitMeds Reports screen. ExitCare logs certain events over time. This data is important to prove HIPAA compliance and help determine certain kinds of abuse. If you wish to delete records from the audit log, select the Delete from audit log option. For installations with more than one site, you may choose to delete records only from selected sites. Check the box or boxes next to each site from which to delete the records. Select the appropriate options/date and click on the Start Purge button. The purge routine will delete all records before the date specified in the Purge entries before this date calendar. *Record this date, as the Numerator data before the purge date will be removed from the MU-Stage 2: PSER screen. Database System: Update Authorizations In this section you can update authorization files. The authorization file controls what documents are available, what languages are available, whether the prescription writing system is available, what date the system usage time will expire, and what appear as facility header and footer customizations. Updating an Authorization File 1. When you click on Update Authorizations, a window will appear so you can browse to and select new authorization files received from ExitCare. 2. Within the window, locate your new authorization file and click Open. 3. ExitCare will now load your new authorization file. ExitCare will force a restart when a new authorization file is loaded. Click OK to restart the program. Page | 40 Doctor System The Doctor System is where you add doctors to your caregivers lists, edit the profiles of existing caregivers, and deactivate and reactivate caregivers. You can add physicians to your caregivers list by either adding them one by one, or by importing an existing list. ExitCare is very flexible on the formats it can import, but it is important to create a database with all the necessary columns. Please contact us at [email protected] or 800-6946669, extension 2 for a sample template to organize your data before beginning this process. The data used for Primary Attending Caregivers are: First Name; Last Name; Title; Clinic Name; Specialty; DEA number; NPI number, State ID number, and whether oversight is required (and only the first five data types if not printing prescriptions). For Follow-up Caregivers, please provide the first five items above plus address, phone number, fax number, and email address. A “Misc” (miscellaneous) field is also available if needed. There are no required fields for either type of physician when importing a list. Doctor System: Attending Caregivers and Follow-up Caregivers Since working with each caregiver list (Attending Caregivers and Follow-up Caregivers) is nearly identical, the following instructions apply to both lists. Adding an Individual Physician 1. Near the top of the screen, choose the facility and department to display the caregivers that are currently available to users in that facility and department. 2. Click the Add button, and then fill in the relevant information. Only the First Name and Last Name fields are required. 3. Once you are done, click the Save button and choose if the new caregiver will be for one or all facilities, one or all departments, or just the current user. Click OK. The physician information will now display on the Caregiver list. Importing a List of Physicians 1. Please see the second paragraph under the Doctor System heading above for the data used for the two types of caregivers. There are no required fields for either type of caregiver when importing a list. 2. Near the top of the screen, choose the facility and department to display the caregivers that are currently available to users in that facility and department. 3. If you haven’t done so already, decide if you want to delete the current caregiver list before importing the new list. The other choice is to append the data to be imported to the current list. 4. Click on the Import button. 5. You will now see a Select Datalevel dialog box asking you to choose the facility and department to which this list will be available, or if it is only for the current user. This allows you to have unique physician lists for specific departments. Once you have made your selections, click OK. 6. On the Import Mode dialog box, choose Append or Copy. “Copy” will delete existing data in the previouslyselected data level in step 5 before adding the new data. Page | 41 7. On the File Format dialog box: if you have a saved specification (see step 11 below), click Specifications and load it; you may need to edit loaded data on this and subsequent dialog boxes. Otherwise, choose the format of the file to be imported. The import system cannot process *.xlsx files. Click Next. 8. You will now see the File Name dialog box. Click on the ellipsis button (with the three dots), and browse to the file that contains the data you will be importing. Once the file is selected (by double-clicking, for example), click Next on the File Name dialog box. 9. In the Data Formats dialog box, enter the first and last rows of the actual data to be imported, excluding headers, etc. This will prevent errors such as blank lines from displaying in your ExitCare data table. Enter the row with field names, and choose to show the file header. We cannot speak to each customer's situation, but it is likely that you will not need to change settings or entries in the "Dates, Times and Numbers" section. Make changes or leave the settings as appropriate for your facility. Click Next. 10. The File preview dialog box shows how the specifications you stated are causing the data to look. If the columns are not correct, click on the Back button and correct any data format issues. If the columns are correct, click the top of each column to specify the correct column title so that ExitCare knows where to place the data within the caregiver list. For example, if the first column contains first names: by clicking on the top of that column and selecting FirstName, ExitCare knows this is the first name of the caregiver. Repeat this process to identify all columns of data. Click Next when done. 11. The Data preview dialog box allows you to check your data before importing. If necessary, you can click on the Back button to make adjustments on previous screens. You can save the import specifications you have set up thus far by clicking on the "Specifications..." button, clicking the Save button, and giving the setup a name in the Import Specification field. In the future, you can reload that specification setup for more importing. Click OK to close the Import Specification pop up window. When complete, click Next on the Data Preview dialog box. 12. On the Summary dialog box click on Execute, and Yes, and the import process will begin. When complete, you will see all the names within the caregiver grid. Editing Caregiver Data Near the top of the screen, choose the facility and department to display the caregivers that are currently available to users in that facility and department. Highlight the row of data you wish to edit, and click the Edit Highlighted button. Make your changes and click Save. Choose whether the changes will be for one or all facilities, one or all departments, or just the current user. Click OK. Deactivating a Caregiver Near the top of the screen, choose the facility and department to display the caregivers that are currently available to users in that facility and department. Check the box to the left of the name that you want to deactivate, and click the Deactivate button. Choose whether the changes will be for one or all facilities, one or all departments, or just the current user. Click Yes, then OK. Reactivating a Caregiver Click on the Deactivated Items tab. Select (place a check in the checkbox next to) the doctors you wish to reactivate. Click the Reactivate button. In the Question window, click Yes. Then click OK. Also note that you can easily sort the names by any of the columns to group the data in a more convenient format. For example, if you wanted to see the list sorted by specialty, simply click on the title of that row. You can also click and drag the columns to rearrange them. When done, click on Save Layout. Page | 42 Document System The Document section is where you can add custom additional note phrases; attach note phrases to documents; create and modify categories and shortcuts; set up required documents; work with macros; and edit and create new, custom documents. Document System: Additional Note Phrases Routinely used additional note phrases can be saved to the ExitCare additional note library. This will allow for selection of notes that can be quickly added to the bottom of most patient education (discharge instruction) documents. Use this feature to save time and eliminate the need for manual entry of common note phrases. Adding an Additional Note Phrase 1. Near the top of the screen, choose a facility and department to display the note titles available to users at the selected facility and department. 2. Click the Add button. 3. At the top of the page, enter a title or description for the new note. If it is short enough (50 characters or less), the title can be identical to the note. 4. Type in your note in the large field below. Note the extensive word processing capabilities indicated by the buttons at the top of the note field. 5. If you wish to add the note to every document, check the Add to every document box. 6. Click Save. 7. Make your selections for facility, department, or current user. Click OK. Editing an Additional Note Phrase Near the top of the screen, choose a facility and department to display the note titles available to users at the selected facility and department. Highlight the title for the note; click Edit Highlighted; make edits; click Save; select facility, department, or user settings; click OK, then OK again. Deactivating an Additional Note Phrase Near the top of the screen, choose a facility and department to display the note titles available to users at the selected facility and department. Select next to the note’s title; click Deactivate; select facility, department, or user settings; click Yes, then OK. Reactivating an Additional Note Phrase Click the Deactivated Items tab; select the Note Phrase; click Reactivate; click Yes, then OK. Additional information: In the “front” of the program, you can also add notes by clicking on the Lookup Notes button on the Questions tab after selecting a document. Next, click the Edit Notes button. That will bring you to a screen similar to what appears on the Document System | Additional Note Phrases screen. Additional notes or phrases created and saved by either method will be available by clicking on the Lookup Notes button in the Additional Notes section under the Questions tab for a selected document. Page | 43 For those sites with multiple language needs, consider a numbering scheme for your notes. For example, note number 101E is the note in English, 101S is the identical note in Spanish, and 101P is the identical note in Portuguese. This type of numbering system allows you add notes or phrases to the bottom of documents and only have them translated once. Since the foreign language characters are not available on this screen, it is best to create the translated phrases in a word processing program, and simply copy and paste the text into this window. Document System: Document Level Additional Notes Once an additional note phrase has been saved to the ExitCare additional note library, you can attach the note phrase to a specific title. This provides an easy way to add on required additional information related to patient care to a specific title. Use this feature to save time and eliminate the need for manual entry of common note phrases. 1. The additional note phrase needs to be created first. If needed, please see the section above, Document System: Additional Note Phrases. 2. On the Document Level Additional Notes screen, note that the screen shows three work sections. Locate the document in the Document Name (topmost) section and click on the title. The title will then be highlighted. 3. Select the Additional Note phrase(s) from the middle section by clicking in the check box. 4. Click the Add to selected document button (right side – mid screen). 5. In the Select Datalevel window, make your selections for facility, department, or current user. 6. Click OK. The titles for additional notes attached to the highlighted document will display in the lower section of the screen. By choosing the facility and department, you can view which attached notes are available to users at the selected facilities and departments. Deactivating a Document Level Additional Note Phrase To remove an additional note phrase from a title, highlight the document from which you wish to remove the note phrase. In the lower section of the screen, you can choose a facility and department first, if you wish, to see which attached notes are available to users at that facility and department. Check the box next to the additional note phrase caption. Click the Deactivate button and select the level(s) to which this applies. Click Yes, and OK. Reactivating an Additional Note Phrase Highlight any document in the top part of the screen. Click the Deactivated Items tab, select the note phrase caption, and click Reactivate, Yes, and OK. The additional note phrase will appear again on the document to which it was originally attached. Document System: Document Categories In this section you can manage the document categories that appear along the left-hand margin in the Title List window. Use this section, for example, to create a category containing frequently used titles for your department team members. This will save time searching for titles within the extensive ExitCare title library. Page | 44 Adding a New Document Category 1. Near the top of the screen, choose a facility and department to display the categories currently available to users in that facility and department when on the Choose Titles screen. 2. Click the Add button. 3. Enter the new category name in the Select Datalevel window. 4. Make your selections for facility, department, or current user, and click OK. The newly-created category will display in the section in the top half of the screen and in the yellow-highlighted “Category viewing:” area. 5. Click the Edit Highlighted button. 6. On the next screen, in the left column titled Document Name, place checkmarks in boxes next to the document names that you wish to be in the category. 7. Click the Move Right button. Use the Move Left button to remove a title from the category list. 8. Click the Save button when you are done. Copying (“Cloning”) and Editing a Document Category Documents cannot be added to or removed from categories created by ExitCare. The only way to modify an ExitCare category is to copy (“clone”) and edit it. 1. Near the top of the screen, choose a facility and department to display the categories currently available to users in that facility and department when on the Choose Titles screen. 2. In the upper part of the screen, highlight the category you want to modify. 3. Click the Clone Highlighted button. 4. Enter a name for the new (cloned) category. 5. Select the level to which this new category name applies (facility, department, or current user), and click OK. 6. The newly-created category will display in the section in the top half of the screen and in the yellowhighlighted “Category viewing:” area. Now that this is a user-defined category, you can add or remove documents in the category. 7. Click the Edit Highlighted button. On the next screen, the documents in your newly-cloned category will appear in the right-hand column titled Documents in this Category. 8. In the right-hand column, place checkmarks in the boxes next to the document names that you wish to remove, and click the Move Left button. 9. For documents you wish to add from the left-hand column, place checkmarks in the boxes next to the document names, and click the Move Right button. 10. Click the Save button when you are done. Page | 45 Editing the Document List in a Category (user-created only) Near the top of the screen, choose a facility and department to display the categories currently available to users in that facility and department when on the Choose Titles screen. Highlight (click once on) the category; click Edit Highlighted; select the documents to add or subtract; click Move Right or Move Left; then Save. Deactivating a Document Category (ExitCare- or user-created) Near the top of the screen, choose a facility and department to display the categories currently available to users in that facility and department when on the Choose Titles screen. In the upper part of the screen, check the box for the category that you want to deactivate. Click on Deactivate. In the Select Datalevel window, make your selections for facility, department, or current user. Click Yes, and OK. Reactivating a Document Category (ExitCare- or user-created) Click the Deactivated Items tab. Check the box of the category to be reactivated, and click Reactivate. Click Yes, and OK. Document System: Shortcuts Shortcuts are alternative titles, synonyms, or aliases for a document. This function can make it easier for users to find titles and to provide a way to customize title lists to local naming customs. It also allows documents to be grouped together to facilitate the quick retrieval of document “care sets.” In other words, you can link multiple document titles to one shortcut name Adding a Shortcut 1. Near the top of the screen, choose a facility and department to display the shortcuts currently available to users in that facility and department when on the Choose Titles screen. 2. Click the Add button. 3. Type in the name of the new shortcut. 4. Make your selections for facility, department, or current user. Click OK. 5. Note that the new shortcut is displayed in the Shortcut Name box in the lower part of the screen. 6. In the Documents Available column, select the document(s) to which you will attach the shortcut. 7. Click Move Right. 8. Click Save. Your shortcut has been created. Additional information: Shortcut example: ExitCare provides a shortcut called NOS (Nosebleeds), Epistaxis for the document title Nosebleed. ExitCare-provided shortcuts will display on the main title list showing the shortcut title name followed by an asterisk (e.g., NOS (Nosebleeds), Epistaxis*). You can create a shortcut and connect it to multiple documents. For example, you can create a document set shortcut called MVC (Motor Vehicle Collision) and connect it to titles such as Head Injuries, Child; Laceration Care; Abdominal Pain; and other related titles. Page | 46 A user-created shortcut will display on the main title list showing the shortcut title name followed by two asterisks, e.g., MVC (Motor Vehicle Collision)**. As is true with most tables in ExitCare, clicking on the top of any column heading sorts the data by that heading, so you can easily see the shortcuts that are unique to your facility. Editing Shortcuts (user-created only) Near the top of the screen, choose a facility and department to display the shortcuts currently available to users in that facility and department when on the Choose Titles screen. Locate the user-created shortcut (the quickest way is to click twice on the Applies to: column.) Highlight it, and click Edit Highlighted. Edit the name if you wish, and select facility, department, or user settings; click OK. Next, add or subtract documents from the shortcut by checking the boxes next to the title names in either column, and then clicking Move Right or Move Left as appropriate. Click Save when done. Note that ExitCare shortcuts cannot be edited. Deactivating a Shortcut (ExitCare- or user-created) Choose a facility and department to display the shortcuts currently available to users in that facility and department when on the Choose Titles screen. Select the shortcut; click Deactivate; select facility, department, or user settings; click Yes, then OK. Reactivating a Shortcut (ExitCare- or user-created) Click the Deactivated Items tab; select the shortcut; click Reactivate; click Yes, then OK. Document System: Required Documents The Required Documents screen allows facilities to automatically include documents the first time documents are selected on the Choose Titles screen for a patient. Examples include a one-page handout with clinic addresses and phone numbers, a legal disclaimer document, or a custom document for your facility. Setting Required Documents 1. In the lower part of the screen, choose a facility and department to display the required document(s) currently active for that facility and department. 2. The top half of the screen displays the list of all available documents, including ExitCare and user-created documents. Check the box next to the document or documents of your choice. 3. Click the Add button in the lower part of the screen. 4. Select the levels to which this action applies, then click OK. Additional information: In order for the required documents to be included in the patient records, at least one other document must be manually selected from the Choose Titles screen. The required documents do not display check marks in their boxes on the Choose Titles screen. The required documents are added to a new patient record only the first time documents are selected from the Choose Titles screen. Deactivating Required Documents (ExitCare- or user-created) To stop documents from being automatically attached to patient records: Choose a facility and department in the lower part of the screen to display active Required Documents for that facility and department. Check the Page | 47 box next to the document name in the lower part of the screen and click Deactivate. Select the levels to which this action applies. Click Yes, and OK. Reactivating Required Documents (ExitCare- or user-created) To restore deactivated documents to be included again as required documents, click on the Deactivated Items tab. Check the box next to the document you wish to reactivate, and then click the Reactivate button. Click Yes, and OK. Document System: Macros The Macro System is a powerful tool that provides you with the ability to create complete sets of information, which could include educational documents (with or without pre-filled information), prescriptions, excuse forms, languages, and any special notes. Macros can greatly reduce the time it takes to generate a set of documents and prescriptions. This screen allows you to edit the name or the data level of availability of macros that have already been created. It also allows the deactivation or reactivation of macros. The specifics of creating, editing, and loading macros are covered in detail in the Basic User Manual and the Super User Manual. Editing Macro Name or Availability 1. Near the top of the screen, choose a facility and department to display the macros currently available to users in that facility and department. 2. Highlight (click once on) the macro to be edited. 3. Click the Edit Highlighted button. 4. Make changes to the name or to the facility, department, or current user settings. Click OK. Deactivating a Macro 1. Choose a facility and department to display the macros currently available to users in that facility and department. 2. Place a check mark next to the macro to be deactivated. 3. Click the Deactivate button. 4. Make your selections for facility, department, or current user. Click the Yes button to deactivate the macro. Click OK on the information dialog box. The deactivated macro is now stored on the Deactivated Items tab and can be reactivated at any time in the future if needed. Reactivating a Macro 1. Click the Deactivated Items tab. Place a check mark next to the macro to be reactivated. 2. Click the Reactivate button. 3. Click Yes, then OK. The reactivated macro will now display on the Active Items tab. Page | 48 Document System: Documents ExitCare allows users to add, copy, edit, deactivate, and reactivate documents. You can create custom documents utilizing many built-in word processing features and a large selection of graphics. For additional assistance, please see the ExitCare Word Processor Manual. Previewing Documents Near the top of the page, choose a facility and department to display documents visible to users on the Choose Titles screen at that facility and department. Highlight a document row and click Preview Highlighted. Creating Custom Documents: Adding a New Document You can create new, custom documents from scratch. 1. Near the top of the screen, choose a facility and department to display the documents visible to users in that facility and department when viewing the Choose Titles screen. 2. Click the Add button. 3. In the window, enter a name for the new document. (This document name will display in the list of titles within the ExitCare library with “%%” after the name. In addition, this name does not have to be the same as the title that you put on the document itself.) Click OK. 4. Add your text and graphics. Below are tips for utilizing some of the capabilities on this screen: a. Within the new document, key in your own title and subtitle if you wish. b. This window offers most common word processing tools (bold, font size, alignment, copy, paste, create table, styles, etc.). Styles used in ExitCare documents (title and subtitle styles, bullet styles, heading styles) are available via the styles buttons in the tool bar above the document. "Tool tips" show what most of the buttons are for when the cursor is placed over them. You may also insert graphics (using the tool bar button showing a cactus). Tables can also be created in these documents. c. You can import your own text by using the import button directly under the English tab provided the document is in RTF format. In addition, you can copy and paste text directly into the document. For best results, use text that is minimally formatted (no bolding, italicizing, etc.). You can also type in text. d. The Insert Field button allows you to add ExitCare-provided or user-created fields to the document. See the section below titled “Adding Fields to Documents” for further, important, information. e. Use the Set Document Sections button to identify which document sections to include, such as facility header and footer, etc. 5. If the document is a “Form:” Check the This document is a form box. The document will always be printed on its own page and will never be combined with other documents. It will also categorize your new document as a Form on the Print/Fax/Email page. 6. Save the document, selecting the levels from the window. 7. You may now add a translation of your custom document by clicking the Add Translation button and selecting a language. The text you add to this document must be previously translated before adding it to your custom ExitCare document. Save your new translation before closing. Creating Custom Documents: Copying (Cloning) and Editing ExitCare Documents Documents provided by Elsevier’s ExitCare cannot be edited directly; they must be cloned, and then the clone is edited. Also note that if an existing ExitCare document is modified, future quarterly updates will apply only to the Elsevier’s ExitCare-provided title and will not be applied to the copied and edited version. Page | 49 1. Near the top of the screen, choose a facility and department to display the documents visible to users in that facility and department when viewing the Choose Titles screen. 2. Highlight a document name (do not put a check in the box next to its title), and then click the Clone Highlighted button. 3. Note the text in the Clone Document dialog box. Regarding item 2, the original, retained metadata includes: CPT, ICD10, ICD9, PCS, SNOMED, and LOINC codes; and gender, age, and diagnosis data. It will also be noted on the Patient Signature Page that the document has been modified/created by the facility. Also note that there is no maintenance by Elsevier of retained metadata to support the cloned document. Click OK. 4. Enter a name for the cloned document. Note that this document name will display in the list of titles within the ExitCare library with “%%” after the name. Click OK. 5. Add your text and graphics. Below are tips for utilizing some of the capabilities on this screen: a. Within the new document, key in your own title and subtitle if you wish. b. This window offers most common word processing tools (bold, font size, alignment, copy, paste, create table, styles, etc.). Styles used in ExitCare documents (title and subtitle styles, bullet styles, heading styles) are available via the styles buttons in the tool bar above the document. "Tool tips" show what the buttons are for when the cursor is placed over them. You may also insert graphics (using the tool bar button showing a cactus). Tables can also be created in these documents. c. You can import your own text by using the import button directly under the English tab provided the document is in RTF format. In addition, you can copy and paste text directly into the document. For best results, use text that is minimally formatted (no bolding, italicizing, etc.). You can also type in text. d. The Insert Field button in the toolbar allows you to add ExitCare-provided or user-created fields into the document for users to respond to under the document’s Questions tab. See the section below titled “Adding Fields to Documents” for further, important, information. e. Use the Set Document Sections button to identify which document sections to include, such as facility header and footer, etc. 6. If the document is a “Form:” Check the This document is a form box. The document will always be printed on its own page and will never be combined with other documents. It will also categorize your new document as a Form on the Print/Fax/Email page. 7. Save the document, selecting the facility or department levels in the Select Datalevel window. 8. You may now add a translation of your custom document by clicking the Add Translation button and selecting a language. The text you add to this document must be previously translated before adding it to your custom ExitCare document. Save your new translation before closing. Adding Fields to Documents Adding a field to a document is a two-step process: 1) adding the field for the user to use; and 2) adding relevant text for the patient to read. 1. Place your cursor where you wish to insert the field. 2. Click Insert Field in the top line of the menu bar above the main text area. 3. Find and highlight your desired field (question) in the Pick Question window; then click Add. The inserted field will appear on this in this format: <<xn>>, where “x” stands for text and “n” stands for numbers; “<<time01>>” is an example. However, when it appears in the “front” end of the program, it will appear Page | 50 under the document’s Questions tab, which ExitCare users see, with the wording that exists in the Pick Question window, along with any associated answers. 4. As noted above, the text of the inserted field on the Pick Question window does not display in the document for the patient to see; it is for the ExitCare user to see. Therefore, you will need to manually add text, either in front of the field, or after the field, or both, for the patient to read. Enter text, which may be a statement, rather than a question, that will be relevant to the patient when they see the answer chosen by the ExitCare user when using this field. To see examples of how fields are used in ExitCare documents, you may wish to examine several documents with fields. One is shown below, where <<time01>> is the inserted field. The question that the user answers for the “<<time01>>” field is, “For how many hours should the patient try a clear liquid diet? Deactivating a Document (ExitCare- or user-created) Near the top of the screen, choose a facility and department to display the documents visible to users in that facility and department when viewing the Choose Titles screen. Select the document from under the Active Items tab, and click the Deactivate button. In the Select Datalevel window, make your selections for facility, department, or current user. Click Yes, then OK. Reactivating a Document (ExitCare- or user-created) Click the Deactivated Items tab, and select the document. Click the Reactivate button; then click Yes, then OK. Renaming a Document (user-created only) Near the top of the screen, choose a facility and department to display the documents visible to users in that facility and department when viewing the Choose Titles screen. Highlight the document under the Active Items tab. Click the Rename Highlighted button. Enter the new name in the pop up window. Click OK, then OK. The renaming will apply globally to all facilities and all departments. Document System: Excuse Form Link Manager The Excuse Form Link Manager permits the linking of a custom-made excuse form, or any document, to the Add Excuse Form button in the sidebar menu. After linking to the new form, when users click the Add Excuse Form button, the new form will be added under the Documents tab. 1. First, create your custom-made excuse form. See the Document System sections above on copying and editing, or adding documents, along with the ExitCare’s Word Processor manual for guidance. 2. Next, on the Excuse Form Link Manager screen, choose at which level to make the new excuse form available: Globally, Facility-wide, etc. Make any necessary selections of Facility or Department from the relevant drop down lists. 3. Click the arrow on the appropriate Document to load drop down list. 4. Find your desired document in the list and click OK. 5. Click the Save button. Page | 51 Prescription System If ExitMeds is licensed, the Prescription System is used for modifying or establishing parts of the drug/medication system. Any changes that are made to the drug information in the following sections will not be reflected in the Drug Information Sheets. Prescription System: Directions The Directions screen is where the directions for prescriptions can be added, edited (when user created), deactivated, and reactivated. Adding a New Direction 1. Near the top of the screen, choose a facility and department to display the directions currently available to users in that facility and department when on the New Script screen. 2. Click the Add button. 3. In the Select Datalevel window, type in the new drug direction. Make your selections for facility, department, or current user. Click OK. Editing a Drug Direction (user-created only) Near the top of the screen, choose a facility and department to display the directions currently available to users in that facility and department when on the New Script screen. Highlight a row of direction data and then click the Edit Highlighted button. Make changes to the direction. Make your selections for facility, department, or current user, and then click OK. Deactivating a Drug Direction (ExitCare- or user-created) Near the top of the screen, choose a facility and department to display the directions currently available to users in that facility and department when on the New Script screen. Select the direction to be deactivated, and click the Deactivate button. In the Select Datalevel window, make your selections for facility, department, or current user. Click Yes, then OK. Reactivating a Deactivated Direction (ExitCare- or user-created) Click the Deactivated Items tab at the top. Check the box next to the direction to be reactivated, and click on the Reactivate button. Click Yes on the Confirmation window, then OK. Prescription System: Dosages The Dosages section is used for managing the choices that are available as dosages for each form of medication. Adding a New Dosage 1. At the top of the screen, choose the drug form by highlighting the selection. Any existing dosages for that form will display on the bottom of the screen. 2. Under the Active Items tab near the left center of the main screen, choose a facility and department to display the dosages currently available to users in that facility and department when they are on the New Script screen. 3. Click the Add button. Page | 52 4. Type in the new dosage, and make your selections for facility, department, or current user. Click OK. Your new dosage will now appear on the list and will be available in the prescription system. Editing a Dosage (user-created only) Choose the drug form by highlighting the selection at the top of the screen. Under the Active Items tab in the left center area of the screen, choose a facility and department to display the dosages that are currently available to users on the New Script screen. Any dosages for that drug form will display in the lower half of the screen. Highlight a user-created dosage in the bottom half of the screen and click the Edit Highlighted button. Make changes to the dosage. Make your selections for facility, department, or current user, and then click OK. Deactivating a Dosage (ExitCare- or user-created) Choose the drug form by highlighting the selection at the top of the screen. Under the Active Items tab in the left center area of the screen, choose a facility and department to display the dosages that are currently available to users on the New Script screen. Any dosages for that form will display in the lower half of the screen. Select the dosage(s). Click the Deactivate button. In the Select Datalevel window, make your selections for facility, department, or current user. Click Yes, and then OK in the subsequent Deactivate Item(s) window. Reactivating a Dosage (ExitCare- or user-created) Click the Deactivated Items tab. Select a dosage. Click the Reactivate button. Click Yes on the Confirmation window and then OK in the subsequent Reactivate Item(s) window. Prescription System: Frequencies The Frequencies section is used for managing the choices that are available as frequencies for each form of medication. Adding a New Frequency 1. Near the top of the screen, choose a facility and department to display the dosages currently available to users in that facility and department when they are on the New Script screen. 2. Click the Add button. 3. In the Select Datalevel window, enter the new frequency. Make your selections for facility, department, or current user. Click OK. Editing a Frequency (user-created only) Near the top of the screen, choose a facility and department to display the list of frequencies currently available to users at that facility and department when they are on the New Script screen. Highlight a row of user-created frequency data and then click the Edit Highlighted button. Make your selections for facility, department, or current user within the Select Datalevel window and then click OK. Deactivating a Frequency (ExitCare- or user-created) Near the top of the screen, choose a facility and department to display the list of frequencies currently available to users at that facility and department when they are on the New Script screen. Select the frequency to be deactivated, and click the Deactivate button. In the Select Datalevel window, make your selections for facility, department, or current user. Click Yes, then OK. Reactivating a Frequency (ExitCare- or user-created) Click the Deactivated Items tab at the top. Select the drug frequency to be reactivated, and click the Reactivate button. Click Yes on the Confirmation window, then click OK. Page | 53 Prescription System: Instruction Phrases This section is used for managing the choices of instruction phrases that are available to add when documenting a prescription. Additional instruction phrases also appear on the patient’s Drug Summary sheet, so any note added to a prescription will be on the patient’s documentation in plain text. Adding a New Instruction Phrase 1. Near the top of the screen, choose a facility and department to display the titles for instruction phrases currently available to users in that facility and department when they are on the New Script screen. 2. Click the Add button. 3. Type in a short description (i.e., a title) for the new instruction phrase. 4. Click in the area below and type the complete note. Click Save when done. 5. In the Select Datalevel window, make your selections for facility, department, or current user. Click OK. Your new phrase will now appear on the Instructions Lookup library of notes and be available to you in the prescription system. Editing an Instruction Phrase (user-created only) Near the top of the screen, choose a facility and department to display the titles for instruction phrases currently available to users in that facility and department when they are on the New Script screen. Highlight the row of the instruction phrase to be edited and then click the Edit Highlighted button. Make the changes and click on the Save button. In the Select Datalevel window, make your selections for facility, department, or current user. Click OK, and then OK again in the subsequent ExitCare window. Deactivating an Instruction Phrase (ExitCare- or user-created) Near the top of the screen, choose a facility and department to display the titles for instruction phrases currently available to users in that facility and department when they are on the New Script screen. Select the instruction phrase to be deactivated, and click the Deactivate button. In the Select Datalevel window, make your selections for facility, department, or current user. Click Yes, then OK. Reactivating an Instruction Phrase (ExitCare- or user-created) Click the Deactivated Items tab at the top of the screen. Select the instruction phrase to be reactivated, and click the Reactivate button. Click Yes on the Confirmation window, then click OK. Prescription System: Drug Aliases This screen allows you to see, edit, or remove the connections that have been made by users when a drug name was passed to ExitCare from another system, but ExitCare did not find an exact match in its drug database. For example, the registration system may have sent a misspelled version of penicillin as part of a patient record documenting a patient drug allergy. When the patient record is imported, a pop up window displays over the Current Patient screen allowing the user to make a connection between the unrecognized item and an appropriate entry in the ExitCare database. Please see the figures below. Page | 54 Unknown Allergy Drug Name Pop Up Window – Top and Bottom Sections Please see Elsevier’s ExitCare Basic User Manual for instructions on how to make this initial connection. Once connected*, the next time this misspelled version of penicillin is passed to ExitCare, ExitCare will automatically select the drug chosen previously by the afore-mentioned user. *The user must check the box labeled “Save for future automatic linking” for the drug alias link to display on the Drug aliases screen, and for ExitCare to recognize the item in the future. If the box is not checked, that connection will be a one-time event for that patient. Editing a Drug Alias Connection If an improper connection has been made, it can be modified on this screen. To do so, at the top of the screen first choose the facility (if you are part of a multi-facility group) with which you wish to work (i.e., to make appropriate new settings or to view existing settings). In the Drug alias/Link to Drug Name paired list, identify the pairing you wish to modify. Click the drop-down arrow to the right of the drug you wish to change. On the Available Drugs pop up search window, search for the new drug; and if it is found, highlight it (click once on it) in the list, and click OK. Note that several strength and form options may be associated with one drug name. In those cases, if an appropriate match is found, it is sufficient to select any drug from the list of drugs as long as the chosen drug has the same active ingredients as the drug allergy in the Drug alias column. When all connection modifications have been made, click the Save button. In the future, the "outside" drug data that comes across with the names under the Drug alias column will automatically link to the selected drug from the ExitCare list on the right side of the screen (under the Link to Drug Name column). Removing a Drug Alias Connection Click the black “X” to the left of the Drug alias name, and click Yes on the confirmation pop up window titled Question. ExitCare will no longer associate the Drug alias name with the drug name in its database. The next time the drug alias name comes into ExitCare, the user will see the Unknown Allergy Drug Name pop up window similar to that displayed above. Prescription System: Custom Drug Database The Custom Drug Database screen is where you can add drugs that cannot be found in the ExitCare “ALL DRUGS” list on the New Script tab. Before adding a new drug, however, please contact us at [email protected] or 800-694-6669, extension 2 for assistance. We can help with search techniques and tips for looking for alternate names of an existing drug. Note that drugs added by users on this screen cannot be checked for interactions, since the database has no way of knowing the elements that make up the manually-entered drug. Adding a Custom Drug 1. Click the Add Drug button. Page | 55 2. In the Custom Drug dialog box, type in the name, strength, and form of the drug. 3. Choose the correct options for drug name type; drug type, DEA class; and drug form type. 4. Click the Save button. The new drug will appear in the Custom Drugs list and will appear in the ALL DRUGS list on the New Scripts screen. All new entries made in this system will be available globally, that is, across all facilities and all departments. If you want to add dosages, forms, frequencies, etc. to this drug, you can do so on the New Script screen, and then save that item as a drug default. For more information on creating drug defaults please see the ExitCare Basic User Manual or the Super User Manual. Please note that even if a custom drug "XYZ" is added on this screen, and if a custom allergy for the same drug "XYZ" is added on the Custom Allergies screen, ExitCare does not perform any drug interaction and allergy checking. ExitCare does not check drug interactions nor allergies on custom items. Editing a Custom Drug To edit a user-created custom drug, highlight (click once on) the drug, then click the Edit Drug button. In the Custom Drug dialog box, make your desired edits, and click the Save button to save the change. Deactivating a Custom Drug To deactivate a drug, highlight the drug, click the Deactivate Drug button. Note that the drug will be immediately removed from the screen--ExitCare will not ask you to confirm your choice--and users cannot reactivate the drug. However, the drug can be added again by means of the Add Drug button. Prescription System: Custom Allergies When you add a new allergy to the list on this screen, it will display in the Drug Allergies list available on the Current Patient Screen. Note that allergies added on this screen will not be checked against any drugs in ExitCare's Drug Interaction and Allergy checking system (if licensed); they will be for reference only. Also note that even if a custom drug allergy "XYZ" is added on this screen, and the same drug "XYZ" is added on the Custom Drug Database screen, ExitCare does not perform any drug interaction and allergy checking. ExitCare does not check drug interactions nor allergies on custom items. Also note that all new entries made in this system will be available Globally, that is, across all facilities and all departments. Adding a Custom Allergy 1. Click the Add Allergy button. 2. In the Add custom allergy dialog box, type in the allergy name. 3. Click the OK button. The new item will appear on the Custom Allergies screen and in the Drug Allergies list available on the Current Patient screen. Page | 56 Editing a Custom Allergy To edit a custom allergy, highlight (click once on) the allergy, then click the Edit Allergy button. In the Edit custom allergy pop up window, make your desired edits, and click the OK button to save the change. Deactivating a Custom Allergy To deactivate a custom allergy, highlight it, and click the Deactivate Allergy button. Note that the item will be immediately removed from the screen--ExitCare will not ask you to confirm your choice--and users cannot reactivate the allergy. However, the allergy can be added again by means of the Add Allergy button. Prescription System: Pharmacies The Pharmacies section is where you can manage the list of pharmacies that may receive faxes or emails from your facility. You can add pharmacies to your list by either adding them one by one, or by importing a list. ExitCare is very flexible on the formats it can import, but it is important to create a database with all the necessary columns. Please contact us at [email protected] or 800-694-6669, extension 2 for a sample template to organize your data before beginning this process. Adding a Single Pharmacy 1. Near the top of the page, choose a facility and department to display the pharmacies currently visible to users in that facility and department when the users are faxing or emailing prescriptions. 2. Click on the Add button, and then fill in the relevant information. 3. Click the Save button and choose if the new pharmacy is to be available for one or all facilities, one or all departments, or just the current user. Click OK. Importing a List of Pharmacies 1. Near the top of the page, choose a facility and department to display the pharmacies currently visible to users in that facility and department when the users are faxing or emailing prescriptions. 2. Decide if you want to delete the current pharmacy list before importing the new list. The other choice is to append the data to be imported to the current list. 3. Click the Import button. 4. Make your selections for facility, department, or current user. Click OK. 5. On the Import Mode dialog box, choose Append or Copy. “Copy” will delete existing data in the previouslyselected data level in step 5 before adding the new data. 6. On the File Format dialog box: if you have a saved specification (see step 10 below), click Specifications and load it; you may need to edit loaded data on this and subsequent dialog boxes. Otherwise, choose the format of the file to be imported. Click Next. The import system cannot process *.xlsx files. 7. On the File Name dialog box, click on the ellipsis button (with the three dots), and browse to the file that contains the data you will be importing. Once the file is selected (by double-clicking, for example), click Next on the File Name dialog box. Page | 57 8. In the Data Formats dialog box, enter the first and last rows of the actual data to be imported, excluding headers, etc. This will prevent errors such as blank lines from displaying in your ExitCare data table. Enter the row with field names, and choose to show the file header. We cannot speak to each customer's situation, but it is likely that you will not need to change settings or entries in the "Dates, Times and Numbers" section. Make changes or leave the settings as appropriate for your facility. Click Next . 9. The File preview dialog box shows how the specifications you stated are causing the data to look. If the columns are not correct, click on the Back button and correct any data format issues. If the columns are correct, click the top of each column to specify the correct column title so that ExitCare knows where to place the data within the caregiver list. For example, if the first column contains pharmacy names: by clicking on the top of that column and selecting PharmacyName, ExitCare knows this is the name of the pharmacy. Repeat this process to identify all columns of data. Click Next when done. 10. The Data preview dialog box allows you to preview the data. If necessary, you can click on the Back button to make adjustments on previous screens. You can save the import specifications you have set up thus far by clicking on the "Specifications..." button, clicking the Save button, and giving the setup a name in the Import Specification field. In the future, you can reload that specification setup for more importing. Click OK to close the Import Specification pop up window. When complete, click Next on the Data Preview window. 11. On the Summary dialog box click on Execute, and Yes, and the import process will begin. When complete, you will see all the names within the pharmacy matrix. Editing Pharmacy Data Choose a facility and department to display the pharmacies currently visible to users in that facility and department when the users are faxing or emailing prescriptions. Highlight the row of data you wish to edit, and click the Edit Highlighted button. Make your changes and click on Save. Choose whether the changes will be for one or all facilities, one or all departments, or just the current user. Click OK. Deactivating a Pharmacy Choose a facility and department to display the pharmacies currently visible to users in that facility and department when the users are faxing or emailing prescriptions. Check the box to the left of the pharmacy that you want to deactivate, and click the Deactivate button. Choose whether the changes will be for one or all facilities, one or all departments, or just the current user. Click Yes, then OK. Reactivating a Pharmacy Click the Deactivated Items tab. Select (place a check in the checkbox next to) the pharmacy you wish to reactivate. Click the Reactivate button. In the Confirmation window, click Yes. Then click OK. Also note that you can easily sort the names by any of the columns to group the data in a more convenient format. You can also click and drag the columns to rearrange them. When done, click on Save Layout. Prescription System: Pick Prescription Form This section allows you to select the prescription form for your facility. Selecting a Prescription Form 1. In the topmost drop-down list, choose a facility for which you wish to select a prescription form. 2. On the left side of the main part of the screen, choose the prescription form you wish to use for controlled drugs. Page | 58 3. On the right side of the screen, choose the prescription form you wish to use for non-controlled drugs. 4. Once you have selected the prescription forms you want to use for your facility click the Save button, then OK. The ExitCare-supplied default script is a generic form which is left justified/aligned on a page, which works in many clinical situations. Since printers used for prescriptions can vary from computer to computer, you may need to adjust the prescription margin settings within the Workstation Printing section of the general Settings group. Report System The Report System allows you to create usage reports for certain items. Report System: Document Reports With this screen you can create reports showing the number of print jobs of document titles. Creating Document Reports 1. Specify the date range you want for the report. 2. Make any desired selections in the Facility, Department, and User Selection sections. ExitCare displays only the facilities, departments, and users with data. 3. Click on Run Report. The lower half of the screen will display a list of documents and the number of print jobs for each (which may or may not equal the number of individual copies printed), based on the criteria you specified. The report may also include some forms. In order for a document or form to display on this screen, it must have been made part of a patient archive record. You can filter the lists using the Document or Count drop-down filter arrows. The icons in the center-left of the screen are for page setup; print preview; printing, and exporting to a spreadsheet, respectively. Report System: ExitMeds Reports On this screen you can create reports of print jobs containing drugs of certain statuses and their associated drug information sheets. Drugs listed in this report are those that were designated on the Drugs | Drug Summary screen with a status of New, Take as previously directed, and Changed. The drug information sheets in the report are those that were added by checking the Include Drug Information Sheet check box found on the Drugs | New Script screen and the Drugs | Drug Summary screen. The report does not include drug information sheets Page | 59 added by means of the Drug Information Sheets Without Scripts feature on the Drugs | Drug Summary screen, nor does it include those printed by means of the Print Drug Sheet icon in the ExitMeds group in the sidebar. Creating ExitMeds Reports 1. Specify the date range you want for the report. 2. Make any desired selections in the Facility, Department, and User Selection sections. ExitCare displays only the facilities, departments, or caregivers with data. The Caregivers listed are the Primary Attending Caregivers displayed on the Current Patient screen. 3. Click on Run Report. A table will display showing the number of print jobs containing each drug listed (given it had a status listed above), along with the number of print jobs containing the associated drug information sheet, based on the criteria you specified. The number of print jobs may or may not equal the number of individual items printed. A difference would occur, for example, if multiple drug information sheets for a drug were printed in one print job. You can change the display of the results by filtering the lists using the drop-down filter arrows in the four columns. The icons in the center-left of the screen are for page setup; print preview; printing, and exporting to a spreadsheet, respectively. Report System: MU-Stage 1: Electronic Copy of Discharge Instructions ExitCare’s recording and reporting system stores data that can be used to calculate the following Meaningful Use Core Measure: “More than 50% of all patients who are discharged from an eligible hospital, critical access hospital’s inpatient department or emergency department and who request an electronic copy of their discharge instructions are provided it.” Numerator Denominator # of patients in the denominator who receive an electronic copy of their discharge instructions # of patients who request an electronic copy of their discharge instructions On this screen, a user can create reports for Meaningful Use – Electronic Copy of Discharge Instructions (ECDI) attestation. The report provides a list of patients within the specified time frame and the electronic document status. Users will need to enter data from the report into a formula, provided below, to determine their facility's percentage. Creating Meaningful Use - ECDI Reports 1. Specify the date range in the Date Option section. 2. Make any desired selections in the Facility, Department, and User Selection sections. Note that ExitCare only displays the facilities, departments, or users with data. 3. Click Run Report. Results will display in the lower half of the screen. You can arrange the results by filtering the lists using the column heading drop-down filter arrows, and by dragging a column header to the yellow bar in the center of the screen. Using the icons in the center-left of the screen you can print the report, or export it to a spreadsheet if you want to further analyze the data. Page | 60 The following page provides more background information and instructions on how to use the data generated in the report. On the General Print Settings screen, users can select from a list (pictured to the right) of six choices pertaining to the generation of an electronic copy of discharge instructions. Data from this list is recorded and the data can be displayed on the MU-Stage 1: ECDI screen. A sample report is pictured below. The six columns on the right of the table below correspond to the six choices on the drop-down list on the General Print Settings screen. Column f represents the patients who did not request electronic copies of documents g represents the total number of rows generated in the reporting period The formula is: (a + b + c + d) (g – f) x 100 = Measure (calculated as a percentage) where a, b, c, d, and f are the number of True data points in their respective columns. Page | 61 To use the formula: 1. Add the number of True data points in columns a, b, c, and d. In our example, this number is 3. 2. Count the total number of rows in the table (g). In our example, g = 7. 3. Subtract from g the number of True data points in column f. In our example, f = 3, so the denominator is 4. 4. Divide the numerator by the denominator to arrive at a decimal number; multiply that decimal by 100. In our example, the percentage is [(3 ÷ 4) x 100], or 75%. For patients who have more than one print job per visit: Only the data for the last print job is recorded on the MU-Stage1: ECDI screen. A “visit” is defined as a stay that generates a patient record with a unique Patient ID number, MR Number, first name, and/or last name. Also note that purging patient archive records will remove patient records from the table on the MU-Stage 1: Electronic Copy of Discharge Instructions screen. Report System: MU-Stage 2: Patient-Specific Education Resources The MU-Stage 2: Patient-Specific Education Resources screen displays the percentage of patients that received ExitCare patient-specific education resources. This facilitates attestation to the following meaningful use core measure: "Patient-specific education resources identified by Certified EHR Technology are provided to patients for more than 10 percent of all unique patients with office visits seen by the EP during the EHR reporting period." Please refer to CMS documentation for further definition and specificity related to this core measure. Related Background Information: Your EHR may import a patient’s diagnosis through an HL7 interface or a command line. If the EHR imports a diagnosis via a taxonomy code, such as SNOMED or ICD, the diagnosis will display on the Choose Title(s) screen. In order for documents to support the Patient-Specific Education Resources Core Measure for Meaningful Use Stage 2, the documents must be: 1) selected under the abovementioned diagnoses with a corresponding coding standard on the Choose Title(s) screen, and 2) printed. When both of those conditions are met, the patient's record will display on this screen with "True" in the column titled "Received Patient-Specific Education Resource." If the patient's record displays on the Current Patient screen and one or both of the conditions above are not met, the patient's record will display on the MU-Stage 2: Patient-Specific Education Resources screen with a value of "False." The number of "True" records is displayed in the Numerator field on this screen, and the total number of records is in the Denominator field. You can choose the date range* (see Note below), in addition to the facility, department, and caregiver that provided treatment. Select the search criteria and click the Run Report button. The numerator and denominator values are displayed, and the Measure % field shows the percentage of patients that received patient-specific education resources based upon the selected search criteria. You can arrange the results in the lower part of the screen by filtering the lists using the column heading dropdown filter arrows, and by dragging a column header to the yellow bar in the center of the screen. Using the icons in the center-left of the screen you can print the report, or export it to a spreadsheet if you want to further analyze the data. Page | 62 For patients who have more than one print job per visit: Only the data for the last print job is recorded on the MU- Stage 2: Patient-Specific Education Resources screen. A “visit” is defined as a stay that generates a patient record with a unique Patient ID number, MR Number, first name, and/or last name. *Note that purging patient archive records will purge numerator data, but not denominator data, from the MUStage 2: Patient-Specific Education Resources screen. Therefore, take care to set the date range appropriately after having purged the archives. Please see page 40. Please contact us at [email protected] or at 800-694-6669, extension 2 if you have questions regarding the ExitCare program. Please contact CMS or Meaningful Use experts within your healthcare institution if you have questions regarding attestation requirements for Stage 2 Meaningful Use Core Measures. Report System: Diagnosis Report The Diagnosis Report screen allows you to generate a report showing the diagnoses assigned to patients. You can generate a report showing all assigned diagnoses (the default setting), or you can first select diagnoses from the Diagnosis Selection section. Click Run Report to generate a table in the lower part of the screen. The Diagnosis Selection section displays all diagnoses for all patients for whom records have been printed, whether or not documents related to the diagnoses were selected and then printed. This section allows you to generate a report on diagnoses of your choice. Find and select the diagnoses, then click the Run Report button. The Diagnosis Selection list and the Diagnoses cells in the table below it show diagnoses that were: imported, whether code- or text-based, with the patient's record manually selected by the ExitCare user from the Patient Diagnosis list on the Current Patient screen manually typed by the user on the Custom Diagnosis pop up window If no diagnoses were imported, selected, or typed in for a patient, the Diagnoses cell in the lower part of the screen will be blank. In order for a patient row of data to display in the table on the lower part of this screen, when working with the patient's record in the "front" end of the program, it is required to print using the Print/Fax/Email screen. The report displays, within each Diagnoses cell, all diagnoses that were assigned to a patient at the time of printing, whether or not documents related to the diagnoses were selected and then printed. Click a Diagnoses cell to see all the diagnoses for a patient. You can further increase the size of the expanded cell by grabbing the upper- or lower-left corner of an open Diagnoses cell and dragging it. Page | 63 An entry in a Diagnoses cell stating "Unknown Description ..." will display if an EHR imports an ICD-9, ICD-10, ICD-11, CPT, LOINC, or SNOMED diagnosis code that is not in the ExitCare database. In addition, these diagnoses will not display under the Documents by Diagnosis tab on the Choose Title(s) screen. The icons above the yellow-orange bar are for page setup; print preview; printing; and exporting to a spreadsheet. Except for the Diagnoses column, click the column headers to sort the data by that column. Click the drop-down arrow on the right of the header to select a filter. Drag and drop a column header into the yellow-orange bar to group by that column. For patients who have more than one print job per visit: Once a diagnosis--whether imported by an EHR or manually selected or typed in by a user--is added to a patient's record, the diagnosis will display on the Diagnosis Report after a print job is done, even if it is removed later during that same visit. A “visit” is defined as a stay that generates a patient record with a unique Patient ID number, MR Number, first name, and/or last name. Note that purging patient archive records will purge data from the Diagnosis Selection section, and from the grid in the lower half of the screen. Also see the section in the Basic User Manual about using the Diagnosis Filter on the Patient Archive screen. Credits Microsoft, Outlook, and Windows are either registered trademarks or trademarks of Microsoft Corporation in the United States and/or other countries. Page | 64