1
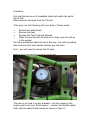
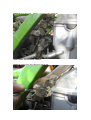
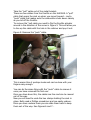
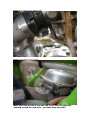
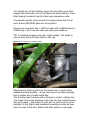
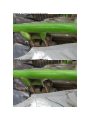
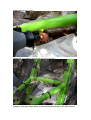
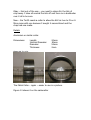
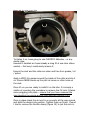
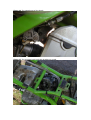
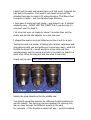
KLX 300 Maintenance Guides from www.klxzone.co.uk
Date: March 2003
Guide 10 : Fitting a Mikuni TM33-8012 Carb to the KLX
Important: Please read carefully
This guide is not intended to replace the User’s Manual – rather it
is a pictorial guide to carrying out maintenance on the KLX300 and
does not necessarily represent the Kawasaki approved methods.
You should therefore realise that you use this guide at your own
risk and neither www.klxzone.co.uk or the author will accept any
responsibility for damage or injury caused as a direct or indirect
result of using this guide.
You use it at your own risk.
There being no Haynes or equivalent manual available for the
KLX300 and the official workshop manual costing around £60 I
thought it may be useful for others to use if they have not carried
out such tasks on their bike before.
This may seem a bit like a “dummys guide” as I have taken
pictures at almost every point. If you find it too tedious then
simply skip past the easy or obvious bits. I wanted to make it as
foolproof as possible and a picture is worth a thousand words.
Tony Saunders
Information
One of the modifications you can make to the KLX300R / 250R is
the replacement of the standard CV carburettor with a slide or
“pumper” carb such as the Mikuni TM33-8012.
This carburettor is a popular modification because it provides an
instant power increase and rids the bike of the annoying “lag”
between twisting the throttle and the build of the vacuum required
to lift the slide.
For UK riders it also means an end to the dreaded “carb icing”
problem that plagues the KLX when the temperature drops below
about 5 degrees and the air is slightly damp. (In the UK this
means most of the time between the end of October and the end
of March!
The jetting of the Carburettor on the KLX is covered in a separate
article. This one is aimed at the installation of the Mikuni TM338012 and the necessary work needed to make it fit.
It is not a definitive guide – but should serve useful for those of
you, like me that don’t do this sort of thing very often ☺
Any mechanics out there that have any suggestions regarding my
methods, please let me know.
Useful Internet Web Links:
http://www.allensperformance.co.uk
http://www.mikunioz.com
http://www.motionpro.com
http://www.racespec.co.uk
Bike Information:
Kawasaki KLX300R 2002 Model.
Tools Required:
•
•
•
•
•
•
•
•
•
•
•
•
•
•
Stanley Knife
10mm Socket
8mm Socket
Ratchet
Cutters
Dremel rotating tool with grinding bit
Phillips and Flat head screwdrivers
10mm thin spanner
Snipe Nose Pliers
Tie-wraps
Bog roll or clean rags or tissues
Chemtec adhesive or silicon sealant.
Paddock Stand (or an old crate)
An old paint roller tray or similar to keep all the bits in.
NOTE: I have not replaced the throttle in this article – but used
the stock KLX throttle and cable.
I will cover the addition of a new throttle in a separate article – for
the simple reason that I didn’t have one when I did the conversion
☺
ENSURE you have read my Carb Jetting article prior to installing.
The carb cannot be jetted on the bike!!!
VERY IMPORTANT: CHECK you have a metal collar that fits on the
new carb inlet BEFORE starting. See page 12
Figure 1: The Mikuni TM33-8012 33mm Carburettor. Note the “pumper” mechanism
actuated by the throttle during the first ¼ turn that delivers a squirt of fuel, boosting the
initial response tremendously.
Procedure:
First put the bike up on it’s paddock stand and switch the petrol
tap to OFF.
Disconnect the fuel pipe from the CV carb.
Then carry out the following with your 8mm / 10mm socket.
•
•
•
•
Remove the Side Panels
Remove the Seat
Remove the Fuel Tank and Shrouds
Clean the area around the carb so no stray crap can end up
in the engine!
Put them somewhere safe and out of the way. You will be grinding
later and you don’t want sparks landing near the tank!
First – you will need to remove the CV carb:
Figure 2: The CV carb visible after removing the seat and tank.
The carb is not held in by any brackets – but the clamps to the
engine and the air box. First however – remove the throttle cables.
Start with the cable bracket screw as shown in Figure 3
Figure 3: Undo the screw – watch it , it’s a bit monkey metal-ish!
Now undo the throttle cables…
Figure 4: Undoing the “pull” cable from the throttle
Take the “pull” cable out of the metal bracket.
There are two cables from the throttle on the KLX300R. A “pull”
cable that opens the carb up when you move forward – and a
“push” cable that makes sure the carburettor shuts down cleanly
as you let off the throttle.
To remove the “pull cable you need to flip the throttle actuator
around in the direction of the arrow in Figure 5. This will allow you
to line up the cable with the hole in the retainer and pop it out.
Figure 5: Remove the “push” cable.
This is easier than it perhaps looks and can be done with your
fingers easy enough.
You can do the same thing with the “push” cable to remove it
once you have removed the first one.
Once you have done this, the cables are free and can be moved
out of the way.
Now you will need to undo the two clamps holding the carb in
place. Both need a Phillips screwdriver and are easily undone.
Once you have undone them you can slide them back to keep
them out of the way. See Figures 6 and 7…
Figure 6: The Clamp on the Engine intake.
Figure 7: The clamp on the air boot.
Make sure that no bits of crap fall into the air boot or engine by
cleaning around the carb area – you have been warned!!!
You should pull off the breather pipes (the two clear ones) then
wriggle the carburettor out of the frame and place safely in a box
after tipping the petrol from the float bowl somewhere safe.
You should carefully clean around the engine intake and the air
boot. Ensure NOTHING gets into the engine!!!
Wonce you have done this – stuff the holes with CLEAN tissues or
CLEAN rags – don’t use the ones you wipe your hands on.
TIP: I sometimes smear mine with a light grease. This tends to
pick up stray bits and sticks them to the rag.
Figure 8: The tissues in the engine intake.
Now spread a clean rag all over the whole area. I used a thick
padded envelope actually – as we now have to do some grinding
and it creates lots of small metal bits.
The Grinding must be done with a Dremel or similar rotating tool.
You simply cannot get anything much else into the confined space.
Get yours ready – but check the next pics to see the bit to grind –
basically it’s the Right-hand headstock mounting bracket as seen
from the rear of the bike. Before and After shots on next page…
Figure 9: The headstock bracket BEFORE Grinding
Figure 9: The headstock bracket BEFORE Grinding
Figure 11: Using the Dremel
Figure 12: The Headstock Bracket from the back of the bike…
A picture is worth a thousand words – hence why I’ve put a lot in. It’s NOT
going to have any major affect on the structural strength of the bike’s frame.
Okay – that out of the way – you need to clean ALL the bits of
crap away. I blew all around the bits off and then ran a dustbuster
over it all to be sure.
Now – the Tm33 needs a collar to allow the KLX air box to fit on it.
Mine came with one because I bought it second-hand and the
chap had one made.
Details
Aluminium or similar collar.
Dimensions:
Length:
Internal Diameter:
Diameter:
Thickness:
20mm
50mm
54mm
2mm
Figure 13: The collar
The Metal Collar – again – easier to see in a picture.
Figure 14 shows it on the carburettor
Figure 14: The collar on the TM33
To fasten it on I was going to use CHEMTEC Adhesive – or any
similar glue.
However I decided as it was already a snug fit ot use clear silicon
sealant – that way I could easily remove it.
Ensure the carb and the collar are clean and free from grease / oil
/ petrol.
Apply a VERY thin smear around the inside of the collar and slip it
on. Ensure NONE blocks up the pilot air screw or other holes on
the carb.
Once it’s on you are ready to install it on the bike. It is simply a
matter of reversing the procedure to remove the CV carb. It takes
some wriggling into place – ensure that you have removed the
rags blocking the engine and air boot BEFORE putting it on!!
Once in place check the air boot is on properly all the way around
and slide the clamps into position. Tighten them up firmly. I found
I had to remove the throttle clamp (Figure 15) to put the carb in.
Figure 15: The throttle clamp removed
This makes the job of installing MUCH easier.
Once you have it in place you can re-attach the throttle mounting
plate and connect the “pull” cable of the throttle to the carb
throttle actuator as shown in Figure 16. I found that the stock
throttle wasn’t very brilliant and would recommend a replacement
one – such as a MotionPro throttle or Gunner Gasser.
I may alter the bracket in Figure 15 later – but for now will suffer
with the stock throttle.
you will need to tie-wrap the “push” cable out of the way as it is
somewhat redundant.
Reattach the breathers – you may need to re-route them if you
have done the carb-breather mod. Ensure they don’t touch the hot
exhaust header pipe. Similarly with the idle adjuster – I ran mine
over to the same side as the choke to prevent it touching the
exhaust.
Figure 16: The reattachment of the throttle
Figure 17: The completed carb install with breathers re-routed.
I didn’t put the seat and panels back on at this point. I slipped the
fuel tank into position. You need to cut about an inch off the
standard fuel pipe to make it fit without kinking. The Mikuni fuel
connector is wider – but the standard pipe fits okay.
I then gave it some fuel and choke – and kicked it up. It started
relatively easy – DON’T USE THE THROTTLE if you can help it –
you don’t want to flood it.
I let mine tick over on choke for about 3 minutes then cut the
choke and set the idle adjuster to a nice tick-over.
I slipped the seat on and got kitted up to take it out for a spin.
Tuning the carb is a matter of taking your ratchet, extension and
plug spanner with you and getting on a nice long road – wind the
throttle to about full – bomb along for a few mins and then
simultaneously cut the engine and pull in the clutch to coast to a
quick stop. Whip the plug out and see what it looks like:
Check out the site: http://www.lafishmag.com/CarbTuning.html
Ideally the plug should be like the middle one.
You should repeat the exercise for different throttle positions to
see the results. This way you can see whether it’s running rich /
lean or okay through the different circuits in the carb
For example – if the throttle is about half way – you’ll be looking
at the Needle Jet and Jet Needle – at ¾ to full – the Main Jet etc.
(See my carb jetting article)
I found the stock settings fine:
They were:
Main jet
Pilot jet
Needle
Fuel screw
142.5
45
3rd clip
1 turn out
I run mine at altitudes of 600 – 2000 feet in the UK in our temperate
climate.
Since running it there are no “flat spots” - although I may give the
pilot air screw a quarter turn leaner as it sometimes pops coasting
down hill on 0- ¼ throttle… not sure yet.
Once you are satisfied – fasten the tank / seat and panels back on
and give it a blast somewhere – see what you think!
Combined with a header mod – my KLX is now a different baike –
much more gutsy!
Love it ☺
If you find this of use – let me know at www.klxzone.co.uk
Particularly if you have better suggestions for jetting / testing. I’m
not a mechanic remember ☺
--------------------------------------------------------------------------------Job’s a fish!