1
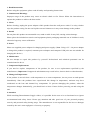
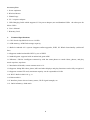
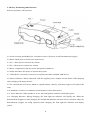
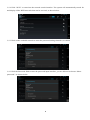
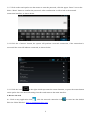
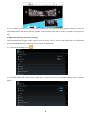
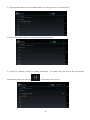
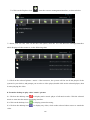
Bēm Wireless Entertainment Goggles
Your dedicated private-screen TV
Instructions
Model: BM0100
Dear Entertainment Goggles User:
Thank you for purchasing the Bēm Wireless Entertainment Goggles! We sincerely hope that our products
can bring you convenience and happiness! To make better use of Entertainment Goggles, please read the
instructions carefully and keep them handy for future reference.
1. Read Instructions
Before using the equipment, please read all safety and operating instructions.
2. Cautions and Warnings
Improper usage of the product may cause an electric shock or fire. Please follow the instructions to
operate the product to achieve the best results.
3. Clean
Before cleaning, unplug the power adapter of this product from the wall power outlet. Use a dry cloth to
wipe the product casing. Do not use liquid or aerosol cleaners as it may cause damage to the product.
4. Install
Do not place this product on an unstable cart, stand or table. It may fall, causing serious damage.
Please place the included accessories and equipment plastic packaging materials out of children’s reach,
otherwise bags may cause suffocation.
5. Power
Please use supplied power adapter for charging and power supply. (Note: Using a 5V / 2A power adapter
to charge this product is required, common power adapters and computer USB jacks are not suitable for
charging this device)
6. Maintenance
Do not attempt to repair this product by yourself. Professional and technical personnel can be
commissioned to do so.
7. Component Replacement
If you need to replace components of the product, be sure to use replacements specified by the
manufacturer. (Important: Unapproved substitutions may result in fire, electric shock or other hazards.)
8. Change in Temperature
If the product is moved from a cold temperature to a warm temperature, do not power on and operate
immediately. Since the products have experienced this change in temperature, moisture may have
condensed on the lens and internal key components. To prevent damaging the product, when the
temperature changes dramatically, you should wait at least 2 hours before powering on and using the
unit.
9.Attention
While watching Entertainment Goggle videos, it is possible for the user to be so fascinated as to ignore
environmental and safety issues. Please pay attention and take good care of your personal property
security and personal safety during usage. The manufacturer is not responsible for the loss or damages
caused by the user's own negligence of security or property.
1
Accessory List
1. In-ear earphones
2. Wireless Mouse
3. Flannel bags
4. 5V / 2A power adapter
5. USB Charging Cable which supports 5V/2A power adapter (one end Standard USB,the other port for
Micro USB)
6. User’s Manual
7. Warranty Card
1.
Technical Specifications
1.1 CPU: Rock chip RK3188 4-core 1.6GHz
1.2 1GB memory, 4GB Flash storage capacity
1.3 Built-in Android 4.2.2 system: Supports online upgrades, WIFI, PC Whole functionality (online/off
line)
1.4 Supports authorized mobile IPTV by use of WIFI.
1.5 Android game: supports built-in authorized game APK
1.6 Miracast / DLNA: intelligent connectivity with the smart phone to watch videos, photos, and play
music anytime, anywhere.
1.7 Resolution 854x480, screen contrast ratio 16: 9
1.8 Supports 1080p HD video, photo, MP3 and other displays and play functions can be fully recognized
1.9 Supports external TF card, maximum capacity can be expanded to 32GB
1.10 Wi-Fi: Built-in 802.11b / g / n
1.11 Bluetooth 4.0
1.12 Interface picture shows: battery status, Wi-Fi signal strength, etc.
1.13. Built-in Battery: 4000 mAh
2
2. The Key Positioning and Functions:
Each key position is shown below:
2.1 Power: Pressing and holding for 4 seconds or more will power on/off Entertainment Goggles
2.2 Home: Short press to return to the main screen
2.3 Vol +: Short press to increase the volume
2.4 Vol -: Short press to reduce the volume
2.5 Reset: Compulsorily stop the system and perform shutdown
2.6 Touch Pad: Move the mouse to operate the System
2.7. USB (Host): can connect a mouse or a keyboard and other standard USB devices
2.8 Micro-USB Port: When connected with the supplied power adapter and the Micro USB charging
cable charging will charge the unit
2.9 TF: external SD card can be added to expand memory capacity, maximum support 32G (Micro SD
card)
2.10 Earphone: Connect to a standard 3.5mm headset or other audio device
2.11 Power Indicator: When product is in use, the front light bar indicator will display green;
2.12 Charging Indicator: During Charging, the front light bar indicator will display red. When the
Entertainment Goggles are fully charged, the red light bar indicator will turn off. In a situation where the
Entertainment Goggles are being operated while charging, the front light bar indicator will display
yellow.
3
3. Function Operation
3.1 Touch Pad Operation
(1) Selection on the Touch Pad: to perform the selection, slide the cursor up and down, left and right, to
move the cursor to the selected symbolic icon or words. Then click on the cursor or the selected
symbolic icon on the touch pad surface.
(2) Page Turning on the Touch Pad : Double-click on the middle of the touch pad screen, after the
second touch keep the finger pressed on the screen, then slide up or down to switch to the next or the last
interface .
(3) Close the Multi-view window: When set to a small window, double-click on the touch pad, after the
second touch hold on for 2 seconds until the Close icon appears, and then click the Close icon
3.2 Mouse Operation
(1) The left mouse button function: Click the left mouse button to confirm
(2) The right mouse button functions: Click the right mouse button to return to another interface
(3) The middle mouse button functions: slide the middle button up and down for page turning
3.3 Power on
Press and hold the Power Button for 4 seconds and the system will start. 3 seconds later the indicating
animation will display, as shown below
About 15 seconds later the main screen interface is shown, the following image will appear
4
3.4 Shutdown
Press and hold the Power Button for 4 seconds, the system enters the shutdown process, which will be
indicated on the screen.
3.5 WIFI connection
3.5.1 Online surfing by connecting the USB (Host) port with the mouse (recommended), or by operating
on the touch pad screen.
3.5.2 Select “Settings” on the main screen interface by sliding operation on the touch pad or by using the
mouse
3.5.3 Slide the WIFI “Off / On” to “On” to open WIFI function. When WIFI is turned on, the WIFI
switch will display blue, as shown below
5
3.5.4 Click “Wi-Fi” to enter into the network search interface. The system will automatically search for
and display all the WIFI networks that can be received, as shown below
3.5.5 Click on the workable network to enter the password settings interface, as shown
3.5.6 Click the Password field to enter the password input interface, you are allowed to choose “Show
password”. As shown below
6
3.5.7 Click on the touch pad or use the mouse to enter the password, click the upper “Done” icon or the
below “Done” button to confirm the password. After confirmation it will switch to the network
connection interface, as shown below
3.5.8 Click the “Connect” button, the system will perform a network connection, if the connection is
successful the icon will indicate connected, as shown below
3.5.9 Click the icon
on the right which represents the return function, or press the return button
on the pad to leave the network settings interface and return to the main interface.
4. Browse the web
4.1 Click on any application icon
, click the network connection icon
Web site “Bēm Wireless” http://www.Bemwireless.com.
7
, to enter into the default
4.2 To connect to another site, click on the address bar and enter into the keyboard interface, enter the
full domain name and then click GO graphic on the bottom right corner of the keyboard to navigate the
site.
5. Bluetooth Pairing connection settings
The Entertainment Goggles audio signal, such as music, can be sent to and displayed on a Bluetooth
speaker/Earphone/Headset which has been paired via Bluetooth.
5.1 Click on the Settings icon
5.2 Click the Bluetooth switch on the right side, if in the open state, the button displays blue, as shown
below
8
5.3 Click on Bluetooth to enter the Bluetooth device search interface, as shown below
5.4 Click on the device name to enter pairing operating interface
5.5 Click the “Pairing” button for pairing connection.
paired please make sure the icon
To ensure that your device has successfully
is listed next to the device.
9
6. Mobile Phone Screen Function
This function is only limited to Android phones.
The Entertainment Goggles and Android phones be simultaneously connected to the same WIFI network.
Click on the icon
to enter application management interface, click on the icon “Wi-Fi Display”,
and then click on the symbol of the Android phone name. After following these steps the Mobile Phone
Screen Function is turned on. The displaying contents of the Android phone can be simultaneously
displayed on the Entertainment Goggles screen.
7. From the Explorer Play Pictures/Music/Video
7.1 Click on the desktop icon
, enter the whole application interface, as shown below
10
7.2 Click on the Explorer icon
, enter the resource management interface, as shown below
7.3 Insert your TF card, click on the SD Card option, enter the TF Card Resource Manager interface
which displays all the resources, as the following chart
7.4 Click on the selected picture / music / video resources, the system will list out all the players of the
system for your choice, and prompt you to select a video player, double-click on the selected player, then
it starts playing the video.
8. From the desktop to play video / music / picture
8.1 Click on the desktop icon
to display native music player of all music tracks. Click the selected
music to enter into the music displaying interface.
8.2 Click on the desktop icon
to display picture browsing.
8.3 Click on the desktop icon
to display any video, click on the selected video source to watch the
video
11
9. Electrical Performance Specifications:
Standby Current: 1mA
Power Consumption: 5W
Power On: 23 seconds
Shutdown Duration: 4 seconds
Wi-Fi Distance: 164 feet
Bluetooth transmission distance: 40 Feet
Battery charging time: 5 Hours (Powered off)
Total Weight: 1 lb.
10. Technical Specifications:
a. Product performance
Project: Parameters Index
Operating Voltage: 5V
Storage Temperature: 14 ° F ~ 140 ° F
Operating Temperature: 32 ° F ~ 104 ° F
Music play time: 5 Hours
Video play time: 4 Hours
Standby time: 8 Hours
b. System Physical Specifications
Name:
Specification Description
CPU: Rockchip, RK3188 Cortex-A94 core 1.6GHz
GPU: Mail-400 MP 3D GPU, support OpenGL ES2.0 and 1.1
MEMORY: DDRIII 1GB
FLASH: MLC 4GB
Network: Supports IEEE802.11b / g / n
Bluetooth: Supports Bluetooth V4.0 + EDR
Interface:
Micro USB: Support USB Client mode, support for USB charging (5V / 2A)
A type USB: USB 2.0 Host mode, can connect external mouse, keyboard, USB disk and other USB
devices
T / F card: Support SD3.0 / MMC ver4.41, maximum support 32G
12
Headphone jack: 3.5MM stereo headphone output jack for connecting an external headphone or speakers
Button /Key:
Power: Press the power button for about 4 seconds to power on / off
Vol +/-: Volume +/- adjust the volume
HOME: Press the HOME key to return to the main interface
Reset button: Press the reset button, forcibly stop the system and shut down
Input Devices: Single-point capacitive touch panel
Indicator: Bright bar, when charging the indicator will turn red.
Battery: Lithium-ion polymer battery, 3.7V / 4000mAh
Dimensions: 8.21” (L) x 6.93” (W) x 3.62” (H) In.
c. Software Configuration
Operating System:
Android 4.2.2 kernel 3.0.36+
Language: Support for multiple languages, the default is "English"
Input Method: Built-in Android keyboard LatinIME, Google Pinyin PinyinIME
UI: Bēm custom UI
Flash: Support Adobe FLASH10.1
Video Format: Support for MPEG-1, MPEG-2, MPEG-4, H.263, H.264, AVS, VC-1, RV, VP6 / VP8,
MVC format PM4, RMVB, MKV, VOB, AVI, part of WMV video formats need third-party software
Audio Format: Supports MP3, MIDI, WAV, AAC, PCM, AMR, WMA format
Image Formats: Supports JPG, BMP, GIF, PNG format
System Software:
Browser: Google Chrome
E-mail: Gmail
Calendar: Calendar
Clock: DeskClock
Calculator: Calculator
Music: Music
Gallery: Gallery2
Search: GoogleQuickSearchBox
Download Manager: DownloadProvider
Settings: Rksettings
Video player: RkVideoPlayer
APK Installer: RkApkinstaller
Task Manager: Taskmanager
File Browser: RkExplorer
13
Frequently Asked Questions
Video Output
No image is displayed or shows no signal
(1) Please check to see if this product is under normal start-up;
(2) Charge the battery;
Screen color cast or flashing
(1)
If using battery power, please charge the battery
Device connection
USB control device does not work
(1) Check to see if the "Connect to PC" is enabled, if so please cancel this option;
(2) Reconnect the USB device;
Network connection
Fail to find a router
(1) Please check the router wireless feature is turned on, search by using a mobile phone and check
whether it can receive the router's signal;
(2) Check whether the SSID broadcast function of the router is turned on, if SSID broadcasting is not
turned on, you can not receive the router's signal;
Unable to connect to the router, you can not automatically obtain an IP address
(1) Please check to see if the password is entered correctly;
(2) Check whether the router's DHCP is working normally, if DHCP is not open, turn on the routers
automatically assign IP (DHCP) function;
(3) Check whether the router MAC address filtering is turned on, if the router has turned on MAC
address filtering, you need to enter the Wi-Fi MAC address into the router MAC address column
Table, or turn off the router's MAC address filtering.
If you encounter problems during usage, refer to this chapter to perform a simple maintenance and
treatment, if still unresolved, or exist other problems, please call the telephone counseling service Bēm
for consultation, our staff will work with you to troubleshoot.
14
More Info
For questions, comments or to purchase more bēm wireless products go to: bemwireless.com
You can also follow us at:
facebook.com/bemwireless
twitter.com/bemwirelessco
youtube.com/bemwireless
Please call 855-839-8616 if you have any questions or issues
For information on your product’s warranty go to: bemwireless.com/support
FCC Statement
1. This device complies with Part 15 of the FCC Rules. Operation is subject to the
following two conditions:
• This device may not cause harmful interference.
• This device must accept any interference received, including interference that may cause undesired
operation.
2. Changes or modifications not expressly approved by the party responsible for compliance could void
the user’s authority to operate the equipment.
NOTE: This equipment has been tested and found to comply with the limits fora Class B digital device,
pursuant to Part 15 of the FCC Rules. These limits are designed to provide reasonable protection against
harmful interference in a residential installation. This equipment generates uses and can radiate radio
frequency energy and, if not installed and used in accordance with the instructions, may cause harmful
interference to radio communications. However, there is no guarantee that interference will not occur in
a particular installation. If this equipment does cause harmful interference to radio or television reception,
which can be determined by turning the equipment off and on, the user is encouraged to try to correct the
interference by one or more of the following measures:
• Reorient or relocate the receiving antenna.
• Increase the separation between the equipment and receiver.
• Connect the equipment into an outlet on a circuit different from that to which the receiver is connected.
• Consult the dealer or an experienced radio/TV technician for help
15
FCC Radiation Exposure Statement
This equipment complies with FCC radiation exposure limits set forth for an uncontrolled environment.
This equipment should be installed and operated with minimum distance 20cm between the radiator &
your body.
Safety Instructions
This product is specially designed based on the full attention to safety; in order to make sure the
accident-free operation, please abide the guidelines listed below:
• Always position the unit on a stable and level surface. Unstable surface can
cause the unit to topple and fall, resulting in possible damage or injury
• Do not drop, unpack, open, beat, curve, prink and burn the unit
• Avoid using the unit nearby basins or sinks where it may come in contact with
water
• Do not place any ware with full water on the top of the unit, such as vase, glass, pot, and please avoid
placing candle on the item surface as well
• Protect the using of the unit from any overheating devices (such as radiator, heating installation,
cooking stove or other heating devices)
• Regardless of what reasons cause the unit damage, please ask for the maintenance personnel to repair
• If you want to do the cleaning, please turn off the unit and unplug the power cable from the outlet first
• Set the volume properly to prevent injury to the unit and your personal health.
Correct Disposal of this product: This marking indicates that this product should not be disposed with
other household wastes throughout the EU. To prevent possible harm to the environment or human health
from uncontrolled waste disposal, recycle it responsibly to promote the sustainable reuse of material
resources. To return your used device, please use the return and collection systems or contact the retailer
where the product was purchased. They can take this product for environmental safe recycling
WARNING:
• The battery (battery or batteries or battery pack) shall not be exposed to excessive heat such as sunshine,
fi re or the like.
• No naked flame sources, such as lighted candles, should be placed on the apparatus.
• CAUTION: Danger of explosion if battery is incorrectly replaced. Replace only with the same or
equivalent type.
16
bēm wireless
http://bemwireless.com/
bēm wireless LLC.
1725 Kilkenny Ct.
Woodstock, IL. USA
Made in China