1
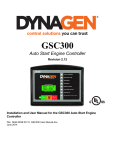
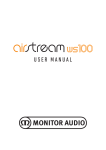
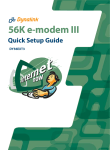
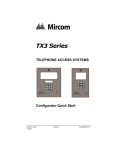
DynaLink Remote
Genset Monitoring
Dial-up / Cellular Companion
Installation and User Manual – Revision 1.1
Full Version File: MAN-0082R1.1, DynaLink User Manual.doc
February 2011
This Manual
This manual covers the use of the WS200 cellular modem feature and the
WS100 external RS232 modem feature.
For more information on the WS100/WS200 refer to the main DynaLink user
manual: MAN-0082.
You are required to use Ethernet to initially setup the WS100/WS200. Refer to
the DynaLink User Manual (MAN-0082). Once everything is working over
Ethernet then refer to this document.
Table of Contents
1.
Cellular Communications .................................................................................... 3
1.1
Cellular GPRS Setup ....................................................................................... 4
1.2
Cellular GMS Setup ......................................................................................... 4
2.
3.
Cellular GMS / Dial-up Modem Setup............................................................... 5
2.1
Outgoing Communications (Alarms, Logs) .................................................. 5
2.2
Setting up Remote Access ............................................................................. 5
2.3
Logging on to the DynaLink Device Remotely ............................................ 7
Tested Modems with the WS100....................................................................... 8
2 of 8
1. Cellular Communications
If you do not have Ethernet at your site you can use a cellular modem (either
GMS or GPRS) to allow DynaLink to send alarms/logs and to access DynaLink
from netbiter.net.
1. Obtain a SIM card from a cellular provider. This needs to be a data SIM
card.
2. Insert SIM card into WS200 or the external modem if you are using the
WS100.
3. Go to Setup>Modem. Click the modem info button to see if SIM card is
working. First check the Signal Strength indicator at the bottom to ensure
there is sufficient signal strength for communications.
If you are getting SIM_ERROR and “Unknown” for the Pin Status and
Network status, try reopening the window a couple of times. If reopening
the window does not work check that there is a SIM card inserted in the
WS200 and that it is inserted correctly.
If no information is given for Manufacturer, Model, Revision, or IMEI the
WS200 may be defective. Try opening and closing the window several
times to see if the information appears. If the information is still not being
displayed, contact Dynagen for further information.
Figure 1 – Modem Info window is accessed by clicking on the modem info button in the
Modem Menu. SIM card is working but not registered on cellular network.
Figure 2 – SIM card registered on cellular network.
3 of 8
4. Check that the SIM card is registered on the network by checking the
Network status field.
(Optional) Test the SIM card by entering a number of a cellular phone that
has texting capabilities in the Test SMS box. SMS refers to Short
Message Service otherwise known as text messaging.
5. Setup the GMS or GPRS as outlined in the sections below.
1.1 Cellular GPRS Setup
For GPRS you will need a data SIM card to allow DynaLink to send alarms and
logs. Viewing GSC400 parameters also requires the www.netbiter.net service.
For outgoing connections (sending of alarms, logs, and the optional
www.netbiter.net service) do the following:
1. Enter APN, username, and password under “Dial-up / GPRS Settings”.
2. Set the Connection trigger to “Always” if using the www.Netbiter.net
service. If the connection trigger is set to “Always” you must set the
Ping timer. The ping timer is used to send a few bytes of data to
netbiter.net to keep the connection alive and the interval required varies
depending on the cellular carrier.
3. After saving the settings it will ask you to reboot. Click the reboot button,
wait two minutes, and the web browser should show the login screen
again. Login.
To setup Netbiter.net do the following:
1. Go to Setup>Netbiter.net in the DynaLink menu and enable Netbiter.net,
then enter the activation code that came with your device. Click save
settings. If successful “Connected to server” should appear under
“Netbiter.net status” after a few minutes.
2. Create an account on www.netbiter.net. You will need the Device ID and
activation code that came with the DynaLink package. Refer to section 4
of the DynaLink User Manual (MAN-0083) for information setting up and
using the netbiter.net account.
1.2 Cellular GMS Setup
See the next section below.
4 of 8
2. Cellular GMS / Dial-up Modem Setup
This section will explain how to:
1. WS100: Setup external RS232 Dial-up modem.
2. WS200: Setup the internal GSM cellular modem.
3. WS100/200: Access DynaLink on a remote PC using a dial-up modem.
GMS users are billed for the time that they are connected (not for the data they
receive and send). For this reason it is not recommended to use GMS for the
(optional) www.netbiter.net service. If using GMS for the configuration of the
DynaLink device the DynaLink webpage may load slowly.
2.1 Outgoing Communications (Alarms, Logs)
Outgoing access requires dial-up internet service from an ISP.
For outgoing connections (sending of alarms, logs, and www.netbiter.net service)
do the following:
1. For WS100 only enter the BAUD rate and type of the external modem.
2. Enter the phone number, user name, and password.
a. For GMS use the phone number, username and password for the
SIM card.
b. For a Dial-up modem, use the phone number, username, and
password given by your dial-up ISP.
3. After saving the settings it will ask you to reboot. Click the reboot button,
wait two minutes, and the web browser should show the login screen
again. Login.
To access the DynaLink device on a remote computer, a modem to DynaLink
connection is required. To do this the remote computer must have a dial-up
modem and the DynaLink connected to an external modem (in the case of the
WS100) or using the internal cellular modem (in the case of the WS200). Follow
the below steps to setup this.
2.2 Setting up Remote Access
(Optional) The below steps are only necessary if you want to access DynaLink
on a remote computer.
Only the WS200 has GSM cellular capability. Only the WS100 can interface with
an external dial-up modem (via RS-232).
1. Configure the Dial-in section in the Setup>Modem page of the DynaLink.
5 of 8
a. The Local IP Address refers to the address of the DynaLink
device. Any IP address can be entered here (it is customary to use
10.200.1.1).
b. The Remote IP Address refers to the address of the computer
where you want to access DynaLink. Any IP address can be
entered here with the following rules:
i. It can not be the same as the “Local IP Address” above.
ii. The first three numbers must be the same as the “Local IP
Address” (e.g. if the Local IP Address is 10.200.1.1, the
“Remote IP Address must be 10.200.1.X where X is any
number from 2 to 250).
c. Enter a username and password for the dial up connection. You
can pick any username or password. You will use these in setting
up the remote computer.
2. Creating a dial-up connection to the DynaLink Device on a Remote PC
For Windows XP do the following:
(Vista / 7 users see below)
a.
b.
c.
d.
e.
f.
g.
h.
i.
j.
k.
Go to the Start Menu and select Control Panel
Go to Network Connections
Click New Connection Wizard
The “Welcome to New Connection Wizard” window will appear.
Click Next
Select Connect to the Internet, and click Next
Select Setup my connection manually, and click Next
Select Connect using a dial-up modem
Enter a name for your connection, and click Next
Enter the phone number for the modem attached to the DynaLink,
and click Next
i. For GMS, this is the phone number for your SIM card.
ii. For an analog modem, this is the phone number of the
telephone line the modem is connected to.
Select who should be allowed to use this connection, click Next
In the next page:
i. Enter the User name that was set in the DynaLink (Dial-in
section on the Setup>modem page)
ii. Enter the Password that was set in the DynaLink (Dial-in
section on the Setup>modem page)
iii. Confirm the password.
iv. Uncheck the checkboxes, if this isn't the primary Internet
connection
6 of 8
v. Click Next
l. Check the check box to add a shortcut to your desktop
m. Click Finish
For Windows Vista / 7 do the following:
1.
2.
3.
4.
5.
6.
Click Start
Click Control Panel
Click the Network and Internet icon
Click the Network and Sharing Center icon.
Click Set up a connection or network
A new window will pop up asking you to choose the connection option.
Click Set up a dial-up connection then click Next
7. In the next page:
a. Enter the phone number for the modem attached to the DynaLink,
and click Next
i. For GMS, this is the phone number for your SIM card.
ii. For an analog modem, this is the phone number of the
telephone line the modem is connected to.
b. Enter the User name that was set in the DynaLink (Dial-in section
on the Setup>modem page)
c. Enter the Password that was set in the DynaLink (Dial-in section
on the Setup>modem page)
d. If you want all users with access to your computer to be able to
access DynaLink check the box beside “Allow other people to use
this connection.”
e. Click Connect (in the next screen you will be given option to skip
connection).
8. Windows will attempt to connect to DynaLink. If you don’t want to
connect at this time, click Skip.
9. The next screen tells you how to connect next time (Click the Start button,
Click Connect to, Click on the connection you just created). Click Close.
2.3 Logging on to the DynaLink Device Remotely
To access the DynaLink web interface:
1. Click on the dial-up shortcut on your desktop you created above and click
connect. Wait until a connection is established.
2. Then use Firefox or Internet Explorer and enter the IP address you
entered in the WS100 “Local IP Address” field and press enter. The
DynaLink interface should appear.
7 of 8
3. Tested Modems with the WS100
In general all modems that support the Hayes AT command set (i.e. Hays
compatible) will work with the WS100. You must ensure the modem has a
RS232 interface which most do.
The following two modems were tested at Dynagen and found to work with the
WS100 out of the box:
1. Hays Accura – Model 15328 from Zoom Telephonics Inc.
2. TRENDnet TFM-560X
8 of 8