1
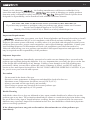
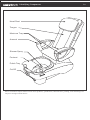
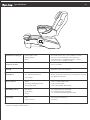
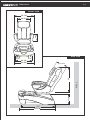
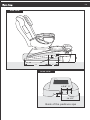
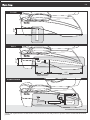
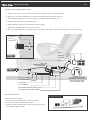
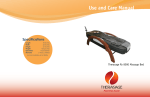
AK Products Inc.
Whirlpool Pedicure Spa Manual
©2014 by Salontechspa. All Rights Reserved.
Printed in USA.
P.1
Thank you for choosing
, the leading manufacturer well known worldwide for its
innovation and design in pedicure spas.
takes pride in bringing you quality products
that meet today’s demand for safety and service. The
Whirlpool Pedicure Spa has been
designed for dependability, and to benefit all with a health conscious clientele.
PLEASE TAKE TIME TO READ THIS MANUAL THOROUGHLY BEFORE USE.
If you have any questions or problems with your pedicure spa, please contact our Customer
Service and Technical Support at 516-932-8888,
Monday thru Friday 9AM-6PM, or Email us at [email protected]
Important Requirements
requires that you contact your local, licensed plumber and licensed electrician to install
your new spa. Installation MUST be in compliance with all local and state building codes. Your
Pedicure spa cannot operate efficiently or safely unless it is provided with adequate electrical power,
sufficient water pressure, proper water temperature, and required drainage capabilities. Contact your
local building inspector for information and local code compliance procedure that need to be
followed when having your new pedicure spa installed. Subsequent inspections and approvals that
may be required are the responsibility of the purchaser.
Shipment Inspection
Examine the components immediately upon arrival to make sure no damages have occurred to the
pedicure spa and chair during the shipment. It is very important that you notify the driver on the face
of the freight bill or bill lading of any damage. Failure to note damage on the bill of lading may
prevent any claims you may have against the carrier. If damage is found, you MUST notify the
carrier at once and request an inspection. DO NOT DISCARD THE SHIPPING CARTON. If you
do, you do so at your own risk and expense.
Precaution
- Do not stand in the basin of the spa.
- Excessive water temperature is dangerous and should be checked before use.
- Maximum water Temperature should not exceed 150°F (65°C).
- Always enter and exit the spa slowly and carefully.
- Never bring or operate any electrical device near pedicure spa.
- The unit has a weight capacity of 250 pounds.
Health Warning
Individuals whose feet or legs are inflamed or have open wounds should not be allowed to use the
pedicure spa at any time. The technician should advise clients to consult their physician before using
the spa if there is any sign of fungal infection, swelling, fracture, or persistent pain. In some cases
diabetics may experience improved circulation in their feet, but should first consult their physician
prior to receiving a pedicure.
If the client experiences any pain or discomfort, discontinue the use of the pedicure spa
immediately.
Important Considerations
P.2
Electrical Service
A 110V, 60HZ, 15AMP GFCI protected ground must be used to supply power to each indivisual
pedicure spa. And the main circuit breaker MUST be at 25AMP for maximum of two unit.
Water Supply
All plumbing connections must conform to local codes.
Water supply to the spa should be provided with adequate water pressure and water temperature.
-Water pressure
To fill the basin correctly up to level, Normal water pressure should be between 30 to 80 P.S.I.
-Water temperature
The hot water supply temperature must not exceed 140°. Adjust your hot water accordingly. For hot
and cold water supply fittings and drain fittings location, see below diagram. Carefully connect the
water supply line to the appropriate fittings located on the rear of the pedicure spa.
Backflow Preventive Device
All pedicure spas are pre-installed with Dual Back flow Preventive Device for the following state:
CA, AZ, NV, OR, WA, and NE. This Device is optional, therefore yot need to order seperately.
Salontech does not guarantee the quality of this device.
Specification
Backflow preventive device for faucet: Vacuum breaker comply with ANSI / NSF - 61 - 2000,
ASMB A112.18.1 - 2000,
ASSE1014 and CSA standard - B125.98
ANSI / ASME A112.18.3M (performance requirements for backflow preventive device
and systems in plumbing fixture fittings) is applicable to plumbing fixture fittings with
outlets not protected by an air gap. Included in the possible range of applications are
fittings with hose connected outlets, fitting with pull out spout, hand held showers,
shampoo fittings and deck mounted fittings.
ASME A112.18.3M is now referenced in ASME A112.18.1M (plumbing fixture fittings)
and CSA B125. Backflow preventive devices are listed to both standards with the
Canadian Standard Association, IAPMO and UL.
ANSI - American National Institute. ASME - American Society of Mechanical Engineers.
CSA - Canadian Standard Association.
APMO - International Association of Plumbing and Mechanical Officials. UL Underwriters Laboratory.
Drain Facilities
The pedicure spa drain must meet local plumbing codes. Check valve for Drain (not
provided) Must be installed by a licensed
plumber.
Plumbing Connections
1-1/2" PVC Drain Outlet
3/8" PIP Cold Water Supply Inlet
3/8" Hot Water Supply Inlet
Back of the pedicure spa
Identifying Components
P.3
Head Rest
Tongue
Manicure Tray
Armrest
Shower Spray
Footrest
Polish Tray
On/Off
Due to continuous improvements on all of our products, specification, characteristics, packing, color and design are
subject to change without notice.
Specifications
Dimension & Weight
SpaJoy(Base Unit)
SpaJoy(Chair)
Stool
P.4
29 3/4"W x 54 1/4"L x 14 1/4"H Wt. 165Lbs
22"W x 34 1/2"L(Incline), 50"L(Recline)
x 44"H(Incline), 34"H(Recline)Wt. 125Lbs
19"W x 19"L x 22"HWt. 13Lbs
Capacity of Tub
4.25 US Gallon
Switch
On/Off Air Activated Switch
JJT Impeller Motor Jets
Hydro Therapeutic Motor Jet with Impeller System
Air Control
Air Induction System
Power Source
Motor
Discharge Pump(Optional)
Massage System
115V 1.2Amp 60Hz 55W
115V 32Amp 60Hz
110V-120V 60Hz 90W 5Amp
Plumbing Source
Hot Water
Cold Water
Drain
1/2 inch(Fitting pre-installed)
1/2 inch(Fitting pre-installed)
1-1/2 inch(see Plumbing Instruction)
Warranty
Unit
Optional Item
One Year(see Warranty)
180 Days
Whirlpool
Due to continuous improvements on all of our products, specification, characteristics, packing, color and design are
subject to change without notice.
Dimension
P.5
FRONT VIEW
30 1/2"
15"
24 1/2"
SIDE VIEW
25 1/4"
29 3/4"
14 1/4"
WALL
41"
14 1/2"
51"
54 1/4"
P.6
5.5"
SIDE VIEW
37"
6"
REAR VIEW
3"
4 5/8" 3"
14 1/2"
Back of the pedicure spa
P.7
INSTALLATIONSPECIFICATONSSUMMARY
!
Warning: Failure to comply with federal, state or local codes and ordinances will result in warranty
being null and void.
As stated, the pedicure spa installation must comply with all plumbing and electrical codes. A licensed plumber and
licensed electrician must complete the applicable connections of the pedicure spa.
Location And Support
Select a level location. The floor structure beneath the pedicure spa must be capable of supporting the occupied pedicure spa.
For the seat back to full recline, the pedicure spa base must be mounted 22 inches from the wall as shown below:
How to use adjustable footrest
Fig 1
Fig 2
Place left hand on the back of the footrest and gently pull up toward the front as shown fig2.
Fig 3
15 3/4"
30°
WALL
Place right hand on the front of the footrest and gently pull up
for desired height and use locking lever to secure the footrest.
22"
! Minimum space from the wall
Due to continuous improvements on all of our products, specification, characteristics, packing, color and design are
subject to change without notice.
P.8
5 1/2"
FLOOR
5 1/2"
WALL
6"
Adjustable P-trap
and Connector
37"
1.5" PVC Drain Pipe
POWER DRAIN
Discharge
Pump
See Detailed Installation Page
NOTE: The requirement for vacuum breaker varies from state to state and province to province. Please consult with the licensed
plumber.
Massage System
P.9
Important Safety Instructions
!
Warning: To reduce risk of burns, fire, electric shock or injury: READALLINSTRUCTIONSBEFOREUSE;
burns will result from improper use; please be careful handling this product.
Close supervision is necessary when unit is used by, on , or near children and the disabled. Use this unit only for its
intended use as described in this manual. Do not use any attachments not recommended by MFG.
- Keep the cord away from heated and wet surfaces.
- Do not use outdoors.
- Do not operate where aerosol products are being used or where oxygen is being administered.
- Never operate If it has a damaged cord or plug, or dropped in the water. To disconnect, press power button to turn off,
then remove the plug from the outlet.
- Allow 30 minutes break time between operations.
- Do not place any heavy object on the chair and do not let children play with it.
- The maximum weight capacity for the massage chair is 250lbs.
Your massage chair is simple to operate using the handheld controller included with your chair.
Before you use your chair, we recommend that you familiarize yourself with the remote control and the basic massage
functions.
Due to continuous improvements on all of our products, specification, characteristics, packing, color and design are
subject to change without notice.
Massage Chair Remote Control Instruction
P.10
Controller Operate
Button
Adjust Massage Balls
To start or stop massage of the upper body, the button
does not work when the massage system is at its
position of recovery.
Three modes of timing:10 mins, 20 mins, 30 mins.
TIMING
TIMING
UPPER BODY
KNEAD
NECK
SHOULDER
PRESS
FLAP
KNEAD
& FLAP
UPPER BODY
KNOCK
BACK
STRETCHING
BACK
WAIST
NECK
SHOULDER
MANUAL
MODE
AUTO
Adopt the various tactics to carry on automatic massage
to different position of the uppper part of the body. The
massage position covers the whole upper part of the body.
SPEED
WIDTH
To carrying on automatic massage around the neck,
shoulder mainly.
Carry on automatic massage around the waist mainly.
BACK
WAIST
Method of Usage
Function
Button
KNEAD
FLAP
Method
KNEAD
& FLAP
Display Status
Adjust Massage Balls
Speed, Strength
Speed, Width, Strength
Speed, Strength
Speed, Width, Strength
PRESS
Speed, Width, Strength
KNOCK
Speed
SPEED
5 Speed options available
Width
WIDTH
3 Width options available
Upper body(overall) trip massage.
Backrest
Stretch
BACK
STRETCHING
Small area(partial) trip massage.
Fixed position(fixed) massage.
P.11
Maintenance
Manufacturer requires that the pedicure spa be thoroughly cleaned at the end of the day in following manner.
Daily
1. Remove the jet cover(fig 1). All debris trapped on or behind the cover must be removed. The jet cover must be free of
debris.
2. Before placing the jet cover, the cover must be immersed with EPA-registered disinfectant.
3. Flush out the whirlpool with low foaming detergent and warm water for 10 minutes.
4. With fresh water, EPA-registered cleanser for run the no pipe motor for 5 minutes.
5. Rinse with fresh water.
Weekly
1. Fill the basin with hot water up to its level.
2. Add 3 to 4 table spoons of a low foaming agent.
3. Run whirlpool for 5 minutes.
4. Stop whirlpool and sit for 5 to 7 minutes.
5. Open air control and whirlpool for 5 minutes.
6. Drain completely.
7. Fill the basin with warm water up to its level.
8. Apply EPA-registered disinfectant according to its direction.
9. Run whirlpool for 5 minutes.
10. Drain completely.
11. Wipe out excessive water with soft cloth.
12. Repeat step 7 to 10, if necessary.
double locking covers cleaning instruction(suggested by manufacturer)
1. Gently turn the cover counter clock-wise to remove. (Shown fig.1)
This will expose the entire water chamber.
2 Use antibacterial soap or a solution of 3% hydrogen peroxide to wipe the inner chamber.
Warning: DO NOT use chlorine or chlorinated products (such as diluted bleach) as this will damage the
plastic, chrome cover and VOID your warranty.
JJT Motor Cover
C
LO
EN
Fig. 1
SE
OP
!
Luraco Motor Cover
Discharge Pump
P.12
Discharge Pump Installation Instruction
1. Make a hole (size 1-3/8”) for the on/off switch as shown Fig1. Pre drill required.
2. Place 1/8” clear hose into the rear of the switch and on/off switch into the hole.
3. The discharge pump kit is made to fit into the pedicure unit as shown inFig2.
4. Connect EZconnector to the drain elbow.
5. Plug discharge pump outlet into black 2 minute timer.
6. Plug black 2 minute timer into the wall outlet.
7. It is very important that tip of white tube remain above the water level with one big loop as shown in Fig3.
Wall of Base
Fastener
On/Off Switch
Outlet
Fig.1
2 Min Timer
Base
Clear Tube
Electrical Cord
Fig. 3
White tube must
have the loop
Fig.1
Discharge
Pump
1-1/4" Drain Elbow
*Loop to Connect Main
Drain (Must have the loop
before the main drain
to prevent AIRLOCK)
1-1/4" EZ Connector
1" PVC Pipe
3/4" x 1 Adapter
Pre Assembled Discharge Pump ( Fig. 2)
1/2" Check Valve (Provided by MFG)
Operation Instruction
Discharge Pump Kit
*Please DO NOT run dry
1. Turn to open the drain plug -wait 2 seconds.
2. Press on/off switch to activate the timer.
3. After the water has drained out from the basin. Press the
on/off switch again to stop.
LIMITEDWARRANTY
manufactures Whirlpool Pedicure Spa with the highest standards for quality materials, with ULlisted
components and highest workmanship for duration of the warranty period. Duration begins on the date of purchase by
the customer (end-user). Each customer is responsible for maintaining the proof of purchase (invoice) to initiate the
warranty. The customer MUST send in warranty card in the manual booklet. Read and fill out (warranty form) carefully
and return to
within 15 daysfrom purchase.
Warranty Period
All components: One (1) year from date of shipment.
All optional items: 180 days from date of shipment.
If
receives defective product notice during the applicable warranty period,
shall either
repair or replace the defective parts at Salontechspa’s option. Replacement product (part) may be either new or
equivalent in performance. NO CONSEQUENTIAL, INCIDENTAL, OR CONTINGENT DAMAGE WILL BE
ALLOWED WHATSOEVER. This warranty is null and void if the spa is removed from its place of initial installation,
or is not in accordance with federal, state or local codes and ordinances. Furthermore, this warranty does not apply if the
spa has been subject to misapplication, improper installation or maintenance, negligence, improper cleaning, refurbished
or tampered with in any way or other circumstances beyond Salontechspa’s control.
authorized
’s warranty is valid in only within the continental 48 U.S. The warranty may be available from any
service facility where the product is distributed by Salontechspa or by an authorized distributor
.
Not Covered
1. Damage to motor and/or motor parts due to obstruction in plumbing, etc.
2. Staining, fading or discoloration of surface due to exposure and/or the use of harmful cleaning substance or chemical.
3. Staining, fading or discoloration caused by improper or poor water additives not related to maintenance of proper water.
4. Malfunctions or damage caused by improper installation; including NOTmeeting local and state plumbing, electrical,
and building codes.
5. Staining, fading or discoloration of the leather chair and urethane footrest.
6. Damage resulting from standing in basin.
7. Freight damage, misuse, neglect, accident, natural disaster, and abuse.
8. Unauthorized repairs.
Should service be required for any reason or any question on our product/s, please contact
AK Products Inc.
Technical Support
90Alpha Plaza Hicksville, NY 11801
T: 516-932-8888F: 516-932-8880
E-mail: [email protected] / www.salontechspa.com
No distributor or other person has any authority to bind
to change or add this warranty or its products.
is not responsible for such warranties or representations.
Due to continuous improvements on all of our products, specification, characteristics, packing, color and design are
subject to change without notice.
AK Products Inc.
Whirlpool Pedicure Spa
Serial Number:
Order Number:
Installed by
:
AK Products Inc.
90 Alpha Plaza Hicksville, NY 11801
Tel. 516-932-8888 / 877-725-6683
Fax. 516-932-8880
www.Salontechspa.com