1
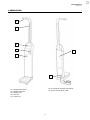
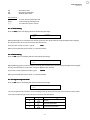
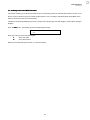
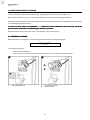
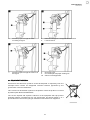
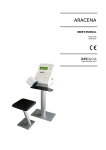
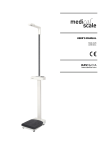
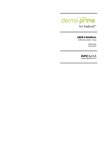
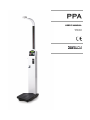
USER’S MANUAL
MA02-02/A
11/06/2012
www.davicia.com
USER’S MANUAL
MA02-02/A
INDICE
Página
2
1. DESCRIPTION
2. INSTALLATION
2.1. Location and setting
2.2. Startup
3
3
3
3. OPERATION
3.1. Prices
3.2. Weight and height
3.2.1. Using the baby scale accessory
3.3. Printed results
4
4
4
4
4
4. SETUP
4.1. Programming
4.1.1. Time setting
4.1.2. Date setting
4.1.3. Programming the ticket
4.1.4. Accounting receipt
4.1.5. Reset
4.1.6. Logotype setting
4.1.7. Programming the price
4.1.8. Ideal weight chart activation
4.1.9. Height setting
4.1.10. Baby scale activation
4.1.11. Calories chart activation
4.1.12. Calorie expenditures chart activation
4.1.13. Body mass index (BMI) activation
5
5
6
6
6
7
7
7
8
8
8
9
9
9
10
5. MAINTENANCE AND CLEANING
5.1. Paper roll change
5.2. Equipment disposal
11
11
12
1
USER’S MANUAL
MA02-02/A
1. DESCRIPTION
1
2
3
4
6
5
7
(1)
(2)
(3)
(4)
(5)
(6) Access door for paper roll change
(7) Power switch, fuses, cable
Height meter sensor
Height meter arm
Display LCD
Coin slot
Ticket tray
2
USER’S MANUAL
MA02-02/A
2. INSTALLATION
PPA scale comes factory configured according to the voltage of each country and is ready for operation
immediately after unpacking.
Connect the device to the power supply via the power supply cable. It is necessary that the outlet is provided with
grounding. Adapters should not be used without grounding.
2.1. LOCATION AND SETTING
Set the equipment in a place flat and level, where it is perfectly supported. This last point is of vital importance to
proper operation.
Make sure that within a radius of 70 cm around the equipment there is no interference that might affect the
measurement of height.
2.2. STARTUP
o
o
o
o
o
o
Connect the equipment to the power supply.
Check that no objects are placed on the platform of the equipment.
Actuate the switch on the bottom.
At this point the equipment will perform the process of self-test.
Step away from the equipment to not interfere in the process of auto-zero of the systems of weight and
height.
If the process of self-test completes successfully, the screen displays the price of the service and the current
time.
3
USER’S MANUAL
MA02-02/A
3. OPERATION
After the equipment startup appears the home screen. This means that the scale has done the calibration
successfully and is ready for use.
1 COIN 0,20 €
o 12:16 01.01.05
Home screen
3.1. PRICES
On the top line we have information on price of the service (see 4.1.7. Programming the price) and on the bottom
line we have the Zero information, and Date.
Upon reaching the programmed price by inserting coins or using a chip card, the service is activated automatically
without pressing any key.
3.2. WEIGHT AND HEIGHT
Before starting the measurement, appear on-screen instructions for the correct posture we must take (step up
to the platform, stand straight). After a few seconds, the measurement is carried out automatically.
IMPORTANT: By failure to follow directions, the measurement result could be altered.
At the end of the measurement, the result values are displayed.
68,200 kg
1,71 m
3.2.1. Using the baby scale accessory
Preparation and precautions
o
o
o
Raise the cradle of the baby scale
Before placing the baby in the cradle, press it with your hand to ensure that it has been blocked
While weighing the baby, watch his movements to prevent him falling from the cradle
Measurement
To weigh the baby, use the measurement option "Weight and height" as you would with an adult. The equipment
detects that it is a weight below 15 kg, understands that we are weighing a baby then:
o
o
o
o
The divisions are 10 g
Only measures the weight, does not measure the height
Overrides the process of measuring the body fat
Gives us a baby scale ticket
The baby scale ticket contains a table of weights according to age and complexions ranging from 0 to 24 months
old and is divided into 3 sizes: small, medium and large. It is divided by sex and always shows the 3 months which
correspond to the weight of our baby.
3.3. PRINTED RESULTS
Upon completion of the selected measurements, the equipment automatically prints a receipt with the obtained
results including the recommended values for each measurement performed.
4
USER’S MANUAL
MA02-02/A
4. SETUP
4.1
4.1. PROGRAMMING
Programming keyboard connector
In order to do any programming, open the door at the rear (with the allen key provided) and connect the keyboard
(see Figure 1).
Important! The keyboard
keyboard MUST be connected to the scale with the machine off.
Once the keyboard is connected, turn on the scale and when the advertising appears, press the [Inicio] key to
start programming. The following message will appear on the screen:
OPTION MENU
This indicates that the PPA is ready for the programming option.
The options available are the following:
Code
Description
PH
PF
PT
PA
PC
PB
PI
PP
SL
SI
SH
MB
Program the time.
Program the date.
Program the ticket.
Program the screen.
Accounting receipt.
Clear the RAM memory.
Program language.
Program the price.
Set Logotype
Set Ideal weight
Set Height
Mode Baby-scale
5
USER’S MANUAL
MA02-02/A
SC
SG
SM
Set Calorie chart
Set Calories expended
Set Body Mass Index
Key operation
[INICIO]
[ESC]
[↵]
To enter the programming mode.
To exit the programming mode.
To confirm the option. <Enter>
4.1.1.
4.1.1. Time setting
Enter the PH option. The display will show the following message:
TIME:
PH>
[hhmm]
Where [hhmm] gives you the format for entering the new time. Enter the data using the alphanumeric keypad,
first the hours (in a 24-hour clock format), then the minutes.
So if you want to enter 3.15 p.m., type in:
1535
When you have finished, press <Enter> to confirm the data.
4.1
4.1.2. Date setting
Enter the PF option. The display will show the following message:
DATE:
PF>
[ddmmyy]
Where [ddmmyy] gives you the format for entering the new date. Enter the data using the alphanumeric keypad:
the day, month and year, in this order, using two digits for each of them.
If you want to enter 23rd March 2005, type in:
230305
When you have finished, press <Enter> to confirm the data.
4.1
4.1.3. Programming the ticket
Enter the PT option. The display will show the following message:
TICKET(line):
PT>
You can programme up to 25 lines, 4 in the heading at the top of the ticket and 21 in the lower part of the ticket:
You have four kinds of type to choose from as shown in the table below:
Code
Sample
Character Type
0
Normal
1
Vertically expanded
2
Horizontally expanded
6
USER’S MANUAL
MA02-02/A
3
Doubly expanded
1. Press the [P][T] keys to program the ticket, then confirm this option by pressing the [ ↵ ] key.
The screen will display the following message:
TICKET:(LINE)
2.
Enter the line number you wish to program ([1][2][3] or [4] ) and then confirm with the [ ↵ ] key.
The selected line will appear on the right of the screen and the desired text can be entered on the
keyboard.
3.
By default the characters are in normal mode. To enter text in a different mode, after pressing the line
number, press the key corresponding to the desired option ([F1] to [F3] keys, see the Key table).
This information will be displayed at the beginning of the line, e.g. [F2] = 2>
4.
Enter the respective text in the selected line and press [ ↵ ] to confirm the information; the text will be
saved in memory.
5.
To continue programming the other lines on the ticket, repeat the process from Step 1.
Press [ESC] to exit from programming mode.
4.1.4. Accounting receipt
Enter the PC option. The display will show the following message:
CONTABILIDAD
Then press the [ ↵ ] key; the PPA will issue three receipts with the quantity of coins entered to date (partial
collection and cumulative collection) and zero the partial counter.
Press [ESC] to exit from programming mode.
4.1
4.1.5. Reset
This option initializes to zero the total and partial counters and puts all programmable fields to their default values
(time, date, screen advertising, ticket, etc..).
Enter the PB option. The display will show the following message:
CLEAR RAM MEMORY
PB>
To access this option, we will enter through the keyboard, thecode [0][0][0][0] and we will validate with key [ ↵ ].
Press [ESC] to exit from programming mode.
4.1
4.1.6. Logotype activation
This option allows you to activate or de-activate the logo appearing at the top of the ticket.
Enter the option SL option. The display will show the following message:
LOGO: [1=ON,0=OFF]
SL>
7
USER’S MANUAL
MA02-02/A
Enter the code you want using the keypad:
1
logo activated
0
logo deactivated
When you have finished, press <Enter> to confirm the data.
4.1
4.1.7. Programming
Programming the price
This option allows you to programme the price. Enter the PP option. The display will show the following message:
PRICE
PP>
Use the keyboard to enter the desired amount and confirm with the [ ↵ ] key.
If you want the scale to work without coins, enter a price of 0.
4.1.8. Ideal weight chart activation
This option allows you to activate or de-activate the ideal weight table appearing on the ticket.
Enter the option SI option. The display will show the following message:
[1=ON,0=OFF]
SI>
Enter the code you want using the keypad:
1
Chart activated
0
Chart deactivated
When you have finished, press <Enter> to confirm the data.
4.1
4.1.9. Height setting
Enter the option SH option. The display will show the following message:
HEIGHT
SH>
[***]
We introduce the value of the "reference height" in cm and press the button <START>.to confirm
We can increase or decrease a few centimeters the value of height. PPA has a value stored in memory that
henceforth we will call, reference height.
The reference height is the value measured in centimeters from the height measuring sensor (transmitter receiver round shape located in the case of height rod) to the base of the platform.
For proper adjustment we must accurately determine the value of the reference height, measured with the aid of
a tape.
Note: If you want the equipment to measure one centimeter plus or less, just increase or decrease the value of
the reference height.
8
USER’S MANUAL
MA02-02/A
4.1
4.1.10.
10. Baby scale activation
This option allows you to activate or de-activate the baby scales module.
Select the MB option. The display will show the following message:
[1=ON,0=OFF]
MB>
Enter the code you want using the keypad:
1
Baby scale activated
0
Baby scale deactivated
When you have finished, press <Enter> to confirm the data.
Remember, this option being enabled, whenever PPA detects a weight below 15 kg, understands that we are
weighing a baby then:
o
o
o
o
The divisions are 10g.
Only measures weight, it does not measure height.
Overrides the process of measuring the body fat.
Doen’t print a ticket for baby scale.
4.1
4.1.11.
11. Calories chart activation
This option allows you to activate or de-activate the calories table printed on the ticket.
Enter the SC option. The display will show the following message:
[1=ON,0=OFF]
SC>
Enter the code you want using the keypad:
1
Chart activated
0
Chart deactivated
When you have finished, press <Enter> to confirm the data.
4.1
4.1.12.
12. Calorie expenditures chart activation
This option allows you to activate or de-activate the calorie expenditure table printed on the ticket.
Enter the SG option. The display will show the following message:
[1=ON,0=OFF]
SG>
Enter the code you want using the keypad:
1
Chart activated
0
Chart deactivated
When you have finished, press <Enter> to confirm the data.
9
USER’S MANUAL
MA02-02/A
4.1
4.1.13.
13. Body mass
mass index (BMI) activation
This option enables you to determine whether the corresponding value from the Body Mass Index is shown or not.
Doctors reckon whether a person's weight is appropriate or not according to their Body Mass Index (BMI), which
reflects the amount of fat stored in the body.
The BMI is calculated by dividing the person's weight in kilos by the square of their height in metres. BMI = Weight /
Height2
Enter the SM option. The display will show the following message:
IMC:
SM>
[1=ON,0=OFF]
Enter the code you want using the keypad:
1
Chart activated
0
Chart deactivated
When you have finished, press <Enter> to confirm the data.
10
USER’S MANUAL
MA02-02/A
5. MAINTENANCE AND CLEANING
The only maintenance that can be performed by unqualified personnel is the change of paper roll.
Do not perform repairs on your own. In case of breakdown contact the Technical Support Service.
If the power cable is damaged, it must be replaced by the Technical Support Service or qualified personnel in order
to avoid dangerous malfunctioning.
To ensure accurate results, the equipment PPA requires an annual maintenance check that only authorized
personnel from the Davi & Cia Technical Support Service can perform.
Clean the unit using only a soft cloth. Do not use gasoline or any similar solvent.
5.1
5.1. PAPER ROLL CHANGE
When the PPA runs out of paper, it stops working and the following message is displayed:
OUT OF ORDER
PRINTER
To change the paper roll:
o
o
1.
Switch off the equipment
Open the door to access the printer (see 1. Description - #6), the printer is inside at the top.
Place the paper roll
2.
3.
Lift the cutter cover
Raise the lever
11
USER’S MANUAL
MA02-02/A
4.
Insert the paper through the roller
according to Figure
5.
6.
Make sure the paper is straight and in the centre
Lower the lever
7.
Insert the paper through the cutter as in
the Figure
8.
9.
10.
Close the cover
Cut off the piece of paper sticking out
Switch on the equipment
5.2
5.2. EQUIPMENT DISPOSAL
All electrical and electronic products should be disposed of separately from the
municipal waste stream via designated collection facilities appointed by the
government or the local authorities.
This crossed-out wheeled bin symbol on the product means the product is covered
by the European Directive 2002/96/EC.
The correct disposal and separate collection of the equipment will help prevent
potential negative consequences for the environment and human health. It is a
precondition for reuse and recycling of used electrical and electronic equipment.
12
USER’S MANUAL
MA02-02/A
This manual and other support documents are available on the web
www.davicia.com
C/ Murcia, 35 Nave G Pol.industrial Can Calderón.
E 08830 Sant Boi de Llobregat. Barcelona. Spain
Tel. +34 93 654 32 32
Fax. +34 93 654 16 62
13
[email protected]
www.davicia.com