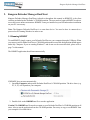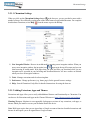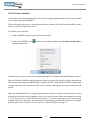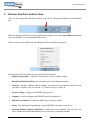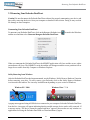
1
Kanguru Defender DualTrust
User Manual
Copyright 2013, All Rights Reserved.
Model no: KDFDT
Notices and Information
Notices and Information
Please be aware of the following points before using your Kanguru Defender DualTrust
Copyright © 2013 Kanguru Solutions. All rights reserved.
Word, Windows XP®, Windows Vista®, Windows 7® and Windows 8® are registered trademarks
of Microsoft Inc. ChromeTM is a registered trademarks of Google Inc. Chromimum is licensed under
Creative Commons Attribution 3.0 Licenses. All other brands or product names are trademarks of their
respective companies or organizations.
Kanguru Solutions will not be held responsible for any illegal use of this product nor any losses incurred
while using this product. The user is solely responsible for the copyright laws, and is fully responsible
for any illegal actions taken.
Customer Service
To obtain service or technical support for your system, please contact Kanguru Solutions Technical
Support Department at 508-376-4245, or visit www.Kanguru.com for web support.
Legal notice
In no event shall Kanguru Solutions’ liability exceed the price paid for the product from direct, indirect,
special, incidental, or consequential software, or its documentation. Kanguru Solutions offers no refunds
for its products. Kanguru Solutions makes no warranty or representation, expressed, implied, or statutory,
with respect to its products or the contents or use of this documentation and all accompanying software,
and specifically disclaims its quality, performance, merchantability, or fitness for any particular purpose.
Kanguru Solutions reserves the right to revise or update its products, software, or documentation without
obligation to notify any individual or entity.
Export Law Compliance
Regardless of any disclosure made to Kanguru Solutions pertaining to the ultimate destination of the
specific Kanguru product, you warrant that you will not export, directly or indirectly, any Kanguru
product without first obtaining the approval of Kanguru Solutions and the appropriate export license from
the Department of Commerce or other agency of the United States Government. Kanguru Solutions has
a wide range of products and each product family has different license requirements relative to exports.
Defragmenting Flash Memory Warning
Do not attempt to defragment your Kanguru Defender DualTrust flash drive. Flash memory does not
need to be defragmented and does not gain any performance by doing so. Defragmenting your flash
drive can actually degrade the flash memory which may reduce the drive’s total capacity and lifespan.
2
Table of Contents
Table of Contents
1. Introduction............................................................................................................4
1.1 System Requirements........................................................................................5
1.2 Technical Specifications....................................................................................5
2. Kanguru Defender Manager DualTrust..............................................................6
2.1 Running KDMDT..............................................................................................6
2.2 The Setup Wizard..............................................................................................8
2.2.1 Selecting a Setup Language......................................................................8
2.2.2 Activating On-board Antivirus Protection (Optional)...............................9
2.2.3 Setting a Password....................................................................................10
2.2.4 Resetting from the Setup Wizard..............................................................11
2.3 The Virtual Keyboard........................................................................................12
2.4 Logging into KDMDT.......................................................................................13
2.5 Secure Browsing................................................................................................14
2.5.1 Using Chromium.......................................................................................15
2.5.1.1 Chromium Settings.......................................................................16
2.5.1.2 Adding Extensions, Apps and Themes..........................................16
2.5.2 Closing the Secure, Online Environment..................................................17
2.6 The Secure Partition..........................................................................................18
3. Defender DualTrust Taskbar Menu.....................................................................19
3.1 On-board Antivirus............................................................................................20
3.1.1 The Onboard Antivirus console................................................................21
3.1.2 License......................................................................................................22
3.2 Removing Your Defender DualTrust.................................................................23
4. Warranty and Technical Support........................................................................24
3
Introduction
1. Introduction
The Kanguru Defender DualTrustTM provides secure online access with hardware encrypted storage.
Designed for consumer use, it offers top notch security features such as 256-bit hardware encryption and
onboard anti-virus. The core feature is the ability to browse the web in a secure and safe environment
that is separate from the host computer.
• Secure Online Access – The backbone of the Defender DualTrust is its secure web browsing
environment which is completely isolated from your local operating system. The browsing
environment is validated and reset at each startup to ensure it is always clean and safe to use.
• 256-bit Hardware Encryption – The Defender DualTrust’s hardware encryption provides top tier
performance unmatched by software encryption solutions. In addition, on chip password matching
means that the encryption can’t be circumvented; ensuring your data’s security. All Defender
DualTrust secure browsing data is encrypted and secure.
• Onboard Anti-Virus (optional) – Every Kanguru Defender DualTrust comes with an optional
subscription to BitDefender Anti-Virus. Built right into the drive, this feature prevents the Kanguru
Defender DualTrust from being used as a vehicle for transporting viruses and malware. The antivirus can also be used to scan files and folders on the host computer(s); in effect becoming a
portable anti-virus solution for every PC you work on.
Features
√√ Secure online access and web browsing
√√ 256-bit AES hardware encryption (100% encrypted)
√√ On-board anti-virus powered by BitDefender (optional)
√√ Requires NO admin privileges
√√ Simple driverless setup
√√ Write protect switch
√√ Multiple colors available (Black, Red, Yellow, Green, Blue, Tan)
√√ HIPAA, SOX and GLB Compliant
√√ TAA Compliant
√√ Custom printing/engraving available
Package Contents
Please check the contents of the package you received. If any of the parts listed below are missing, please
contact Kanguru Solutions (508-376-4245) and you will be shipped replacement parts immediately.
• Kanguru Defender DualTrust USB Flash Drive
• Registration Form
• Lanyard - Caution! The through-hole at the bottom of the drive is designed for use with the
provided lanyard only.
4
Technical Specifications
1.1 System Requirements
•
•
•
•
1 Available USB port (USB 2.0 Recommended)
2GB of RAM
1GHz internal CPU or faster
Operating Systems (32 and 64 bit compatible):
○○ Windows XP, Windows Server 2003, Windows Server 2008, Windows Vista, Windows 7,
Windows 8
1.2 Technical Specifications
General Specifications
Interface
USB 2.0 (USB 1.1 compatible)
Encryption Features
256-bit AES (CBC mode) hardware encrypted
Write Cycles
10,000 write cycles / block
Memory Type
Solid State MLC NAND flash
Data Retention
10 years or more
Operating Temp
0°C – 70°C
Humidity Range
20% - 90%
Shock Resistance
1000G Max
Vibration
15G Peak to Peak Max
8GB Defender DualTrust Specifications
Data Transfer Rate
Read: 20 - 33 MB/s
Write: 10 - 13 MB/s
Capacity
8GB (7GB user accessible secure storage)
Weight
10g
Dimensions
64mm x 18.5mm x 9mm
Power (Read)
Max Read: 5 VDC @ 122mA
Power (Write)
Max Write: 5 VDC @ 182mA
5
Kanguru Defender Manager DualTrust
2. Kanguru Defender Manager DualTrust
Kanguru Defender Manager DualTrust (referred to throughout this manual as KDMDT) is the client
software preloaded on the Defender’s CD-ROM partition. The user needs to login to KDMDT in order to
access the secure online environment. KDMDT comes pre-installed on your Defender and no installation
on your PC is necessary.
Note: The Kanguru Defender DualTrust is a warm boot device. You need to have it connected to a
powered on PC running Windows in order to run.
2.1 Running KDMDT
To run KDMDT, simply connect your Defender DualTrust to your computer through a USB port. When
you connect your Defender DualTrust, a CD-ROM partition and a removable disk partition should appear
under My Computer. If you are running Windows 7 and do not see the removable disk, please refer to
page 7 in this manual.
The KDMDT application should start automatically.
If KDMDT does not start automatically:
1. Open My Computer and open the Defender DualTrust’s CD-ROM partition. The drive letter (e.g.
D:, E:, F:) will depend on your computer.
2. Double-click on the KDMDT.exe file to run the application.
Caution! The KDMDT.exe file needs to remain on your Defender DualTrust’s CD-ROM partition at all
times. Always run the application from the CD-ROM partition. Do not try to copy or run KDMDT from
your computer’s local hard drive.
6
Attention Windows 7 Users
Attention Windows 7 Users
Windows 7 users may not see the removable disk partition until they have logged into KDMDT (see
section 2.4 Logging into KDMDT on page 13 for more information). This is normal.
If you are using the Defender DualTrust with the Windows 7 operating system and for any reason need
to see the removable disk before you log into KDMDT, you will need to configure Window’s Folder and
Search Options. Note: This is user preference only. There is no need to configure Windows in order to
use your Defender.
1. From My Computer, click on the Organize menu and then select Folder and search options.
2. The Folder Options window appears. Click on the View tab and then scroll down to the option for
‘Hidden Files and Folders’. Select Show hidden files, folders, and drives.
3. Click on the OK button to finish configuring Windows. The removable disk is now visible before
you log into KDMDT.
7
The Setup Wizard / Selecting a Setup Language
2.2 The Setup Wizard
When you start KDMDT for the first time you will be greeted by the Setup Wizard. Follow the Setup
Wizard instructions to create a login password for KDMDT.
Note: Before you can set a KDMDT password and properly use the secure browser, the manual write
protect switch must be set to the unlock position (towards the USB connector).
2.2.1 Selecting a Setup Language
The default language for the Setup Wizard is English. To run the Setup Wizard in a different language:
1. From the Welcome screen, click on the Language selection menu. A list of available languages will
appear in a drop down menu. Select your desired language from the drop down menu. The Setup
Wizard will switch to the new language.
2. Click on the Next button to continue to the next step.
8
Activating On-board Antivirus Protection
2.2.2 Activating On-board Antivirus Protection (Optional)
KDMDT will automatically check if your device has a valid antivirus license key. The drive will need
to be connected to a computer with internet access in order to register for on-board antivirus protection.
If your Defender does not already have a valid antivirus license key, then you must fill out the following
registration form with the required information and then click on the Apply button in order to activate
antivirus protection.
Click on the Skip button if you do not wish to activate antivirus protection. IMPORTANT! If you
decide to skip activating your antivirus now, you will not be able to activate it in the future without first
resetting your drive to the factory default setting.
Click on the Next button to continue with creating your login password.
9
Setting a Password
2.2.3 Setting a Password
Your password is used to login to your Defender DualTrust’s secure partition after you have completed
the Setup Wizard. To create your login password from the Set Password screen:
1. Enter your password in the Password field. For security reasons, it is recommended that you
incorporate letters, numbers and symbols to achieve maximum security.
The Password Info window will inform you if there are any password requirements. It updates in
real time. Disregard the messages in the Password Info box until you have finished entering your
password into both the Password and Confirm Password fields.
2. Enter the same password in the Confirm Password field for verification. If the passwords you
entered into both fields match then you will receive a notification in the Password Info box.
3. Click on the Apply button to set your password. Once the password has been set you will see the
following message in the Password Info box:
4. Click the Next button. KDMDT will automatically configure the security parameters and complete
the setup process.
10
Resetting from the Setup Wizard
2.2.4 Resetting from the Setup Wizard
If you experience any problems while running the Setup Wizard, you may have to perform a device reset
before you can complete the setup process.
Caution! Performing the reset function will format the device’s secure encrypted partition. All data
stored on the secure partition will be lost. All secure browser data, including bookmarks, downloads,
configuration, etc., will also be erased.
To perform a device reset from the Setup Wizard:
1. From anywhere in the Setup Wizard, click on the Prev button until you return to the Start Screen.
2. On the Welcome Screen you will see a Reset button at the bottom of the window. Click on the
Reset button.
3. A dialog box appears asking you to confirm the reset. Click on Yes to reset your device to the
factory default settings.
After the device has been reset to the factory default setting, the Setup Wizard will run again.
11
The Virtual Keyboard
2.3 The Virtual Keyboard
The virtual keyboard feature can be accessed whenever you enter your KDMDT login password. It
can be used when entering your password to prevent keylogging applications from recording your key
strokes.
To use the virtual keyboard to enter your password:
1. From the Set Password screen click on VK button. It is located near the bottom right of the Confirm
Password field.
2. The virtual keyboard will appear below the Setup Wizard window. Click on the keys on the virtual
keyboard using your mouse cursor to enter your password.
3. Click on the VK button again to close the virtual keyboard.
Note: You can click on the Shuffle key on the bottom right corner of the virtual keyboard to randomize
the virtual keyboard’s layout. Shuffling the keyboard layout prevents mouse tracking software from
spying your password.
12
Logging into KDMDT
2.4 Logging into KDMDT
After you have completed the Setup Wizard, anytime you run KDMDT you will be required to login
using your security password. You need to provide the correct security password in order to access the
Defender DualTrust’s secure partition.
When the login screen appears:
1. Enter your password in the Password field.
2. Click on the Login button.
Caution! If you enter your password incorrectly too many times in a row (seven is the default setting
but it may be different depending on your setup), for security purposes any data stored on the secure
partition will be erased. All secure browser data, including bookmarks, downloads, configuration, etc.,
will also be erased. You will be issued an on screen warning when you have one attempt remaining, to
prevent accidental erasure. To cancel the login process, click on the Cancel button. Unplugging and then
reinserting your drive or manually running KDMDT again will bring the login window back.
Once you have successfully logged in to KDMDT, the secure partition will be accessible through My
Computer or Windows Explorer and the DualTrust secure browser will launch.
Caution! Once you have logged into KDMDT, you should never disconnect your device without first
closing KDMDT properly by clicking the taskbar icon and selecting Unmount Kanguru Defender as
described in section 3.2 Removing Your Defender DualTrust on page 23.
Resetting from the Login Screen
In the event you have forgotten your password, you can use the Reset to Factory Default function to
reset your password. Caution! Using the Reset to Factory Default function will format and wipe all
data off the device! All data on the device will be lost! All secure browser data, including bookmarks,
downloads, configuration, etc., will also be erased.
To reset your Defender DualTrust to the factory default:
1. Start KDMDT.
2. When the login screen appears, click on the Reset button.
3. When you are prompted to confirm the reset, click on the Yes button.
4. When your password and data stored on the secure partition have been erased, click on the OK
button to complete the reset.
13
Resetting from the Login Screen
2.5 Secure Browsing
Once you have logged into KDMDT, the DualTrust secure, online environment will launch. The
Chromium web browser will run within the secure, online environment. This creates a secure, sandbox
environment that is completely isolated from the host computer.
Although the secure, online environment will ensure that no data is saved on the host computer, there
are some restrictions to what you can do within the secure browser.
Secure Browsing Restrictions
• Since the secure, online environment is isolated from the host computer, certain functions that
are done within Chromium will not work outside of the environment (e.g. copying a URL from
Chromium and pasting it into a Word document open on the host computer will not work).
• You cannot print documents directly from Chromium. This will not work because the secure
environment does not recognize any hardware devices that are connected to the host computer.
• Content saved from Chromium can only be stored directly to the Defender DualTrust’s secure
partition. It cannot be saved to the host computer’s internal hard drive or any connected storage
devices.
• The write protect switch should remain in the unlocked position while using the secure browser. If
the write protect switch is in the locked position, changes to the secure browser settings, bookmarks
and downloads will not be saved.
14
Using Chromium
2.5.1 Using Chromium
The Chromium web browser is based on the Google Chrome web browser and operates in a similar
fashion. By default, your homepage is set to www.Kanguru.com.
Below is a description of the main elements of Chromium.
2
5
3
6
4
1
1. Navigation buttons
page.
7
: Navigate Back one page, Forward one page or Reload the current
2. Close tab : Close the current tab. If there are no other tabs or windows open within the browser
when you close the tab, then the DualTrust secure environment will automatically close.
3. New tab
: Open a new tab in the current window.
4. URL address bar : Enter the website’s URL here.
5. Close window
: Close the current window. If there are no other windows open when you close
the window, then the DualTrust secure environment will automatically close.
6. Bookmark
: Click on the star to bookmark the current page for future reference.
7. Chromium settings
: Customize and control how Chromium works.
15
Chromium Settings
2.5.1.1 Chromium Settings
When you click on the Chromium Settings button
in the browser, you are provided a menu with a
number of items. We will briefly explain some of the main features found within the menu. For complete
from the menu or press the F1 key.
details about Chromium, select Help
1
2
3
4
1. New Incognito Window : Browse in stealth mode by opening a new incognito window. When you
appears in the top-left corner and you can
open a new incognito window, the incognito icon
start browsing in stealth mode. Web pages that you open and files you download while you are
incognito aren’t recorded in your browsing and download histories. All new cookies are deleted
when you close all incognito windows.
2. Tools : Manage extensions and clear browsing data.
3. Preferences : Change preferences (e.g. home page) for the general browser settings.
4. Help : Search Chromium’s help files for detailed instructions for using the browser.
2.5.1.2 Adding Extensions, Apps and Themes
Extensions and Apps allow you to easily add additional features and functionality to Chromium. You
can browse for Extensions and Apps on the Chrome Webstore at: https://chrome.google.com/webstore
Warning! Kanguru Solutions is not responsible for damage or misuse of any extensions, web apps, or
themes which you install or run on your Defender DualTrust device.
Note: Web Apps require that you are signed into a Google account to function. Installed extensions and
themes do not require you to be signed into a Google account.
16
Closing the Secure, Online Environment
2.5.2 Closing the Secure, Online Environment
To close the secure, online environment, simply close all open tabs or windows. Once all windows and
tabs are closed, the secure, online environment will shut down.
Note: If you try to close the virtual machine running the DualTrust secure, online environment while the
Chromium browser is still open, then a dialog box will appear asking you to confirm that you want to
close the virtual machine. Click OK to close the secure, online environment.
Once the secure, online environment has been closed you will receive a dialog box asking whether you
want to also close the DualTrust’s secure storage area. Click on Yes to unmount the Defender DualTrust’s
encrypted partition and close KDMDT. Click on No to keep KDMDT running and the encrypted partition
will remain mounted and accessible.
Note: If you clicked No, then the Defender DualTrust’s encrypted partition will remain mounted and
accessible even after the secure, online environment closes. The secure, online environment can then
be re-launched at any time from the DualTrust Taskbar menu (see Chapter 3. Defender DualTrust
Taskbar Menu on page 19). To unmount the DualTrust’s encrypted partition, please refer to section
3.2 Removing Your Defender DualTrust on page 23.
17
The Secure Partition
2.6 The Secure Partition
A key feature of the Defender DualTrust is the secure, encrypted partition that only becomes available
once you have logged into KDMDT.
The root directory in the secure, encrypted partition also contains a link to the Downloads folder, where
items saved from Chromium are saved.
To open the secure partition:
1. Login to KDMDT to gain access to the secure partition.
2. Click on the KDMDT icon
from the popup menu.
located in the taskbar and then select Explore Security Drive
Alternatively, you can access the secure partition through My Computer or through Windows Explorer.
Since the Defender DualTrust employs hardware based encryption you are able to simply drag and drop
files onto the drive using the standard Windows Explorer interface. The Defender DualTrust automatically
encrypts your data as it is transferred to the secure partition, ensuring that your data remains safe and
private.
Note: The Defender DualTrust’s encrypted partition may remain accessible even after the secure, online
environment has been closed, depending on how you close the secure, online environment (see section
2.5.2 Closing the Secure, Online Environment on page 17). In order to prevent access to the encrypted
partition you need to unmount it. For instructions on unmounting your Defender DualTrust’s encrypted
partition, please refer to section 3.2 Removing Your Defender DualTrust on page 23.
18
On-board Antivirus
3. Defender DualTrust Taskbar Menu
After you have logged into Defender DualTrust, you will see a Kanguru Defender icon in the taskbar
area.
Note: The Kanguru Defender icon may be hidden in the taskbar. Click on the Show hidden icons button
next to the taskbar to reveal any hidden taskbar icons.
When you click on the taskbar icon, the Defender DualTrust taskbar menu appears.
The Defender DualTrust taskbar menu contains the following items:
• Explore Security Drive : Open the secure partition in a new explorer window.
• Re-launch Defender DualTrust : Re-launch the secure, browsing environment.
• Antivirus : Disable or Enable realtime scanning. Access the on-board antivirus console to scan
your device, a path or a file. See section 3.1 On-board Antivirus on page 20.
• Security Settings : Change your KDMDT login password.
• Language : Select the language the KDMDT menus are displayed in.
• Defender User Manual : Download a digital copy of this user manual.
• About : View information regarding the version of KDMDT currently on your device.
• Unmount Defender Manager DualTrust : Unmount the secure partition. This will close any
secure, online environments and disable access to the device’s encrypted partition.
19
On-board Antivirus
3.1 On-board Antivirus
Note: If you didn’t activate antivirus during the Setup Wizard, you will have to reset your drive to the
factory settings and enable Antivirus before you can use the antivirus functionality.
You must register your device with Kanguru Solutions in order to take advantage of the Defender
DualTrust’s on-board antivirus functions (see section 2.2.2 Activating On-board Antivirus Protection
(Optional) on page 9). Once your on-board antivirus has been activated, real-time virus scanning is
automatically enabled whenever you log into your device.
Note: Updates for the latest the virus definitions are downloaded automatically when the device is
connected to a computer with internet access. If you disconnect the device before the latest update has
finished downloading, it will save your place and continue the download the next time it is connected to
a computer with internet access.
Caution! Virus definitions are stored in the ‘System’ folder on the secure partition. If these files are
deleted, they will be automatically re-downloaded. If the device is reset to the factory default, these files
will be deleted and will need to be re-downloaded. Do not delete the ‘System’ folder or save any data
besides virus definitions to it.
20
The Onboard Antivirus Console
3.1.1 The Onboard Antivirus console
You can access the onboard antivirus console to scan your device, a path or a file. To open the antivirus
console:
1. Click on the Kanguru Defender icon
located in the Windows taskbar area.
2. Select Antivirus from the popup menu and then click on Configuration from the submenu.
The antivirus console appears. The antivirus console allows you to scan the Defender DualTrust device,
a path on your computer or an individual file for known viruses and malware.
To scan for known viruses and malware:
1. Click on the Scan Device, Scan Path, or Scan File tab at the top of the antivirus console.
2. Click on the Start Scan button to begin scanning.
3. Once the scan has started:
○○ Click on the Pause Scan button to pause the scan process. Click on the Resume Scan button to
resume the scan.
○○ Click on the Stop Scan button to cancel the scan process.
4. The scan results will appear in the Scan Results section.
5. Click on the View Scan Log button to view a log of the previous scan.
6. Click on the OK button to close the antivirus console.
21
License
3.1.2 License
The antivirus console allows you to manage your antivirus license.
To check your antivirus license:
1. Click on the Kanguru Defender icon
located in the Windows taskbar area.
2. Select Antivirus from the popup menu and then click on Configuration from the submenu. The
antivirus console appears.
3. Click on the License tab at the top of the antivirus console.
4. Click on the Licenses button to see your current antivirus license key.
If you need to renew your license key:
1. Click on the Renew Licenses Online button to obtain a valid license key for your antivirus.
2. Enter your license key in the New License Key field.
3. Check off the option for Enable real time scanning to enable realtime scanning of your Defender .
4. Click on the Apply button to apply your license key.
5. Click on the OK button to close the antivirus console.
22
Removing Your Defender DualTrust
3.2 Removing Your Defender DualTrust
Caution! Do not disconnect the Defender DualTrust without first properly unmounting your device and
then safely removing the device from your computer as detailed in this section. Doing so may result in
file damage or data corruption.
Unmounting Your Defender DualTrust
To unmount your Defender DualTrust, click on the Kanguru Defender icon
taskbar area and then select Unmount Kanguru Defender DualTrust.
located in the Windows
When you unmount the Defender DualTrust, the KDMDT application will close and the secure, online
environment will close. The KDMDT icon in the taskbar will disappear and the secure partition will no
longer be accessible from My Computer or Windows Explorer.
Safely Removing from Windows
After the Defender DualTrust has been unmounted, use the Windows ‘Safely Remove Hardware’ function
before removing your drive. To safely remove your Defender, click on the Safely Remove Hardware
icon located in the taskbar. The icon may look different depending on your version of Windows.
Windows XP / 2000
Windows Vista / 7 / 8
A popup menu appears listing all USB devices connected to your computer. Select the Defender DualTrust
from the list. A message will appear indicating that the portable storage device can be safely removed. If
a message saying “The device cannot be stopped right now” appears, please make sure any windows or
applications accessing the Defender DualTrust are closed and then try again.
23
Warranty and Technical Support
4. Warranty and Technical Support
This product carries a 1-year warranty from the date of purchase. Kanguru Solutions is not responsible
for any damages incurred in the shipping process. Any claims for loss or damage must be made to the
carrier directly. Claims for shipping errors should be reported to Kanguru Solutions within three (3)
working days or receipt of merchandise.
If you experience any problems using your Kanguru Defender DualTrust or have any technical questions
regarding any of our products, please call our technical support department. Our tech support is free and
available Monday thru Friday, 9am to 5pm EST.
Call 1-508-376-4245 or
Visit our website at www.Kanguru.com
24
Kanguru Solutions
1360 Main Street
Millis, MA 02054
www.kanguru.com
01.11.13 v1.0 © 2013 Kanguru Solutions
Legal terms and conditions available at www.kanguru.com. Please review and agree before use. Thank you.