1
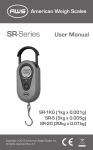
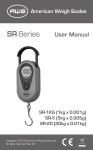
American Weigh Scales, Inc.
SR-Series
Digital Hanging Scale
lb
HOLD
4
B
4
LB
2
x 0.0
SR-1 (1000x1g)
SR-5 (11x0.01lb)
SR-20 (44x0.02lb)
L
User Manual
SR-Series Manual
Thank you for purchasing the American Weigh SRSeries digital pocket scale. Please read all operating
instructions carefully before use. Scales are precision
instruments and should always be handled with proper
care. To ensure years of reliable service, keep these
simple tips in mind:
• Do not exceed the scales maximum capacity.
Overloading your scale can permanently damage it!
• Avoid exposure to extreme heat or cold. Scales
perform best at normal room temperature. If
temperatures have changed dramatically, recalibration
may be necessary.
• Allow your scale to warm up for 30-60 seconds
before performing calibration (if available).
• Store your scale in a clean, dry location. Dust, dirt,
and moisture can accumulate on the weighing sensors
and electronics causing innacuracy or malfunction.
• Avoid using your scale in close proximity to strong
radio wave emitting devices such as computers, cash
registers, and cordless phones.
• Hold the hanging scale steady when obtaining weight
measurements.
• Gently apply all items to be weighed. Do not drop
items onto the weighing hook.
• Avoid dropping your scale. The warranty does not
cover damage due to rough treatment or overload.
I. SCALE OPERATION
Hold the scale steady when weighing.
1. Press the [
] key.
2. If you would like to change the weighing unit,
continue to tap the [
] key while the display starts up
(while 8888 is still displayed). Skip this step otherwise.
2. Wait until “0.00” or “0” is displayed.
3. Place the object(s) on the weighing hook.
4. When the weight is stable, the red light will turn on,
and HOLD will be displayed below the weight.
5. Remove the object(s) from the hook and tap the
[
] key to re-zero the scale.
6. To turn the scale off, press and hold the [
] key.
II. TARE WEIGHING
1. Turn on the scale as described above.
2. Place a container on the scale hook and wait for it
to stabilize (HOLD will be displayed).
3. Tap the [
] button. “0.00” or “0” will be displayed.
4. You can now add items to the container or tray to
obtain just the weight of the contents.
5. When the container is removed, a negative number
will be displayed. Press [
] again to zero the scale.
III. CALIBRATION
This scale has come pre-calibrated at the factory. Only
re-calibrate if you are experiencing trouble weighing.
SR-1 uses a 1000g calibration weight
SR-5 uses a 1000g calibration weight
SR-20 uses a 5000g calibration weight
1. Turn the scale OFF.
2. Remove the battery cover and locate the calibration
switch to the left of the battery compartment.
3. Switch it to the up position.
4. Press the [
] button to turn the scale on. A
random number will be displayed.
5. Tap the [
] button once more and the display will
flash “CAL” folowed by the required cal. weight.
6. Hang a the required weight on the scale’s hook,
keeping the scale as steady as possible.
7. The display will show “PASS” and then return to
normal weighing mode.
8. Flip the calibration switch to the down position and
replace the battery cover.
9. Press and hold the [
] key to turn the scale off.
IV. TROUBLESHOOTING
The primary reasons for inaccuracy or malfunction
are low batteries, incorrect calibration, overload or
operating on an unstable surface. Please keep this in
mind and maintain and operate your scale properly.
This scale is a precise instrument and must be
handled with the utmost care and caution.
[Display] Elimination of errors
[Lo] Change the batteries.
[OUE2] Recalibrate the scale as shown above.
[EEEE] You are overloading the scale. Remove the
excessive load immediately!
Specifications
Model
Capacity
Resolution
Weighing Units
Calibration Weight (not Included)
Scale Dimensions (inches)
Power
Warranty
SR-1
SR-5
20kg / 44lb
SR-20
kg, lb
0.01kg / 0.02lb
5000g (5kg)
5kg / 11lb
kg, lb
0.005kg / 0.01lb
1000g (1kg)
1g / 0.05oz
g, oz
1000g / 35.30oz
1000g (1kg)
4.0 x 2.3 x 0.7”
2 x AAA Batteries (included)
10 Year Warranty