1
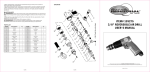
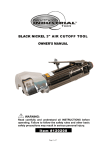
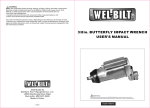
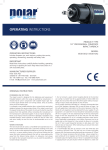
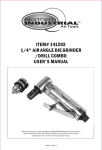
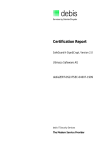
Air Tools
ITEM# 1421202
3" AIR CUTOFF TOOL
USER'S MANUAL
Read carefully and understand RULES FOR SAFE OPERATION and instructions
before operating. Failure to follow the safety rules and other basic safety
precautions may result in serious personal injury.
Made in China
For technical questions and replacement parts, please call 1-800-222-5381.
Thank you very much for choosing a NORTHERN TOOL + EQUIPMENT CO., Product!
For future reference, please complete the owner's record below:
Model: _______________ Purchase Date: _______________
Save the receipt, warranty and these instructions. It is important that you read the
entire instruction sheet to become familiar with this product before you begin using it.
This product is designed for certain applications only. Northern Tool + Equipment
strongly recommends that this product is not modified and/or used for any
application other than that for which it was designed. If you have any questions relative
to a particular application, DO NOT use the product until you have first contacted
Northern Tool + Equipment to determine if it can or should be performed on the product.
Before using this product, please read the following instructions carefully.
Technical Specifications
Item
Description
Item
Free Speed
20, 000 RPM
Max. air pressure
Description
90 PSI
Air Consumption
4 CFM
Accessories
Hex Wrench, key
Air Inlet Diameter
1/4"- 18NPT
Cutting wheel
Not included
Min. Hose Size
3/8"
SAVE THIS MANUAL
You will need this manual for the safety warnings and precautions, assembly, operating,
inspection, maintenance and cleaning procedures, parts list and assembly diagram.
Keep this manual and invoice in a safe and dry place for future reference.
! WARNING!
Some dust created by power sanding, sawing, grinding and other construction activities
contains chemicals known to cause cancer, birth defects, or other reproductive harm.
Some examples off these chemicals are:
Lead from lead-based paints
Crystalline silica form bricks, cement and other masonry products
Arsenic and chromium from chemically treated lumber
Your risk from these exposures varies, depending now how often you do this type of work.
To reduce your exposure to these chemicals: work in a well-ventilated area, and use
approved personal protective equipment, such as dust masks that are specially designed
to filter out microscopic particles.
WARNINGS AND SAFETY RULES
1 .Wear proper clothing. Always use ANSI-approved safety impact goggles when
assembling or using this cutoff tool. Wear long sleeved shirts, long pants and
hard-toed shoes. Take off any loose fitting jewelry and keep long hair covered
to prevent being caught in moving parts.
2. Wear proper breathing protection. Remember that a " dust mask " is not a breathing
respirator. Use a respirator that uses charcoal filters for the best protection.
3. Keep work area clean and well lighted. A dim and/or cluttered work area invites
personal injury.
4. Keep children and pets away from work areas. Children can be a distraction and
should be supervised by an adult when near the work area. Never allow children to
play with this product even if it is turned off.
5. Store idle tools properly. Keep this cutoff tool out of the reach of children.
1 of 4
6. Do not use the cutoff tool if under the influence of alcohol or prescription drugs.
Doing so may cause damage to the tool, or personal injury. Do not use this or any
tool if you are tired. Use common sense at all times.
7. Check for damaged parts. Before using this cutoff tool, carefully check for any
parts that may be missing or damaged and any other conditions that may affect
the operation of this tool. Replace or repair damaged and worn parts immediately
using only qualified repair facility.
8. Always use the proper tools. This cutoff tool was designed for a specific task. Do
not alter this tool, or use it for a purpose for which it was not intended.
9. Be careful when connecting/disconnecting air supply. It is recommended to use
quick-disconnects (not included) rather than screw-on air connections.
10. Use compressed air only. Clean, dry regulated compressed air at 90 PSI. Never
use oxygen, carbon dioxide, combustible gases, or any other bottled gas as a power
source for this tool.
11. Always disconnect air supply when this tool is not being used.
12. Take caution as some woods contain preservatives such as copper chromium
arsenate (CCA) which can be toxic. When cutting these materials, extra care
should be taken to avoid inhalation and minimize skin contact.
13. 3" Cutting wheel: Only use a standard 3" cutting disc (rated at 20,000 RPM or
greater) with this air high speed cutter. Never use any other type of disc, blade
or cutter on this air tool. This may cause the tool to operate incorrectly.
NOTE: The warnings, cautions, and instructions discussed in this instruction manual
cannot cover all possible conditions and situations that may occur. It must be
understood by the operator that common sense and caution are factors that
cannot be built into this product but must be supplied by the operator.
NOTE: READ ALL INSTRUCTIONS BEFORE USING THIS PRODUCT
SET UP
Fig. 1
NOTE: If you are not using an automatic oiler system, before operation, add a few drops
of Pneumatic Tool Oil to the airline connection. Add a few drops more after hour
of continual use.
1. You will need to prepare a 1/4" air connector (not included) to connect to the air
inlet on the cutoff tool. First, wrap the 1/4" air connector with pipe thread seal
tape (not included) before threading it into the inlet. Connect the 3/8" ID air source
hose (not included) to a quick-disconnect coupler (not included) and then to the
cutoff tool.
2. Set the air pressure on your compressor to 90 PSI. Do not exceed the recommended
air pressure of 90 PSI.
3. Check the air connection for leaks.
4. Disconnect from the air hose until next instructed to reconnect.
2 of 4
ASSEMBLY
The only assembly required is the mounting of a cutting wheel.
!
WARNING!
The cutter must be disconnected from the air supply when changing the cutting wheel.
After disconnecting the air supply, squeeze the trigger to make sure no air remains in
the unit.
1. Place a wrench (#36) on the flats of the spindle (#29) to hold it in place.
2. Using the key (#37), loosen and remove the locking nut (#32) and the washer (#34).
3. Remove and replace the cutting wheel (not included) (#33).
4. Replace the locking nut (#32) and the washer (#34). Tighten the locking nut (#32)
while holding the spindle (#29) in place with a wrench.
OPERATION
! WARNING!
Always check the cutting wheel for possible wear. Do not use a worn, torn, or defective
cutting wheel.
!
WARNING!
Position the high speed cutoff tool so that the attached guard is in position between
you and the work piece to protect you from flying debris.
!
WARNING!
Guard must always be attached to high speed cutoff tool.
1. Check the cutting wheel for wear. Replace if necessary.
2. Set the compressor to 90 PSI. Do not exceed 90 PSI.
3. Connect the cutoff tool to the air hose as explained.
4. Using both hands to grip the cutoff tool, gently squeeze down on the trigger. Allow
the tool to run for a few seconds before approaching the work piece.
5. Let the cutoff tool do the work. Do not apply force on the workpiece.
6. When finished, release the trigger.
7. Disconnect the air hose.
8. Gently squeeze down on the trigger to release any air that might still remain in the
tool.
MAINTENANCE
! WARNING!
Always disconnect the air supply before attempting any maintenance.
After disconnecting the air supply, squeeze the trigger to make sure no air remains in
the unit.
1. After each use, wipe down the cutoff tool with a lint-free cloth. Do not use solvents
or harsh detergents to clean the tool.
2. Make sure the air inlet is clean of dirt, grease, or debis.
3. Check the condition of the cutting wheel before each use. Replace if necessary.
3 of 4
Diagram
Part No.
Description
Qty.
Part No.
Description
Qty.
1
Housing
1
20
Pin
1
2
Valve Bushing
1
21
Rotor
1
3
Trigger
1
22
Rotor Blade
4
4
Lever
1
23
Cylinder
1
5
Spring
1
24
Washer
1
6
Pin
1
25
Washer
1
7
Pin
1
26
Front Plate
1
8
O-ring
1
27
Steel Ball
1
9
O-ring
1
28
Bearing
1
10
Valve Stem
1
29
Work Spindle
1
11
Spring
1
30
Retainer
1
12
Air Regulator
1
31
Guard
1
13
O-ring
1
32
Locking Nut
1
14
O-ring
1
33
Cutting Wheel
1
15
Valve Plug
1
34
Washer
1
16
Muffler cover
1
35
Screw
1
17
Air Inlet
1
36
Wrench
1
18
Bearing
1
37
Key
1
19
End Plate
2
4 of 4