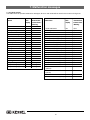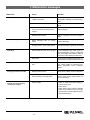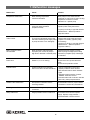
1
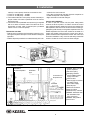
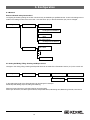
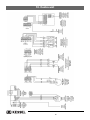
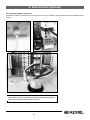
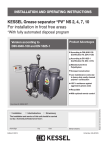
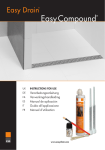
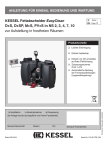
INSTALLATION AND OPERATING INSTRUCTIONS KESSEL Grease separator “PV” NS 2, 4, 7, 10 For installation in frost free areas *With fully automated disposal program Version according to DIN 4040-100 and EN 1825-1 Product Advantages According to DIN 4040-100 (Certification Nr. Z54.6-128) According to EN 1825-1 (Certification Nr. Z54.1-474) Manufactured from Polyethylene Compact construction Low maintenance costs due to heavy-duty, easily cleaned polymer construction 100 % resistance against aggressive grease acids Recyclable With optional remote control Installation Inbetriebnahme Subject to technical amendments Fig. shows Nr. 93004.00/P1 Einweisung The installation and service of this unit should be carried out by a licensed professional servicer : Name/Sign Edition 05/2011 City Date Stamp Company Id-Number. 010-616 1. Safety Instructions Dear Customer, Before the KESSEL Euro Separator Version PV is installed and placed in operation please carefully read and follow all of the instructions contained in this Installation, Maintenance and User’s Manual. Upon delivery of the Euro Separator please thoroughly inspect the separator to make sure that it has not been damaged during shipping. In case damage has occurred to the separator, please follow the instructions listed in the Guarantee section of this user’s manual. H By installation, use, maintenance and repair of this unit please follow all appropriate DIN / VDE /DVGW safety precautions and accident prevention guidelines. Also please follow any local safety precautions and accident prevention guidelines established in your area. Please note that the unit is designed to receive kitchen waste water with a maximum temperature of 60 degrees Celsius (140 degrees F). Temperatures higher than 60 degrees Celsius could damage the unit. Do not stand or place excessive weight on the separator. During disposal / emptying of a Type PV separator, a step ladder should be used to help gain access to the openings on the top of the separator. NO SMOKING! Smoking must not be permitted near the separator during use, maintenance and repair of the unit due to the potential build up of methane / biogas. SLIPPERY WHEN WET! Take caution when standing / walking near the separator. During disposal, cleaning and maintenance the surrounding area can become extremely slippery due to spilled water / grease / fat. SEPARATOR AREA REGULATIONS: ❏ No access of the separator for unauthorized personnel ❏ No storage of food / groceries / provisions (for hygienic reasons) is allowed in the same area/room as the separator. ❏ The location of the separator should be chosen carefully as to allow sufficient access for maintenance, inspection, repair and disposal of the separator. ❏ The wastewater in a grease separator can contain bacteria. After coming in contact with wastewater or the separator itself, it is important to wash, clean and disinfect all skin which has been contaminated. Change and wash clothes properly that have come in contact with the contaminated wastewater. These safety measures are to be made aware to anyone who operates, maintains or services this product. 2 Table of Contents 1. General 1.1 1.2 1.3 1.4 Application................................................................ Application area ...................................................... Separator description ............................................... Table of article numbers .......................................... Page Page Page Page 4 4 4 4 2. Installation 2.1 2.2 2.3 2.4 2.5 General .................................................................... Set-up....................................................................... Electrical Installations............................................... Installation example ................................................ Dimensioned drawings............................................. Page Page Page Page Page 5 5 6 6 7 3. Setting up 3.1 3.2 3.3 Setting up for operation............................................ Page Initial Instructions .................................................... Page What to do................................................................ Page 8 8 8 4. Operation / Disposal 4.1 4.2 4.3 4.4 4.5 4.6 Manually automated disposal................................... First disposal ............................................................ Disposal intervals..................................................... Disposal procedure – fully automated...................... Starting the disposal................................................. Re-Programming...................................................... 8 8 8 8 9 9 5. Disposal steps grease separator 5.1 5.2 Grease separator acc. to DIN 4040.......................... Page 10 Grease separator acc. to EN 1825........................... Page 11 6. Konfiguration 6.1 6.2 General .................................................................... Page 13 Setting the Mixing, Filling, Cleaning and Disposal times Page 13 7. Malfunction messages Page Page Page Page Page Page ................................................................................. Page 14 8. Control Unit .............................................................................................. Page 16 9. SonicControl (Optional) 9.1 9.2 9.3 9.4 9.5 9.6 9.7 9.8 9.9 9.10 9.11 9.12 9.13 9.14 9.15 9.16 9.17 9.18 10. Accessories / Replacement parts 10.1 10.2 10.3 Safety instructions ................................................... General ..................................................................... Installation ................................................................ SonicControl Sensor Installation .............................. Installation example ................................................. Remote Alarm .......................................................... Shortening the sensor cable length.......................... Potential free contact ............................................... Installation / Cables connections.............................. Commissioning......................................................... Inspection and Maintenance .................................... Events display (only in logbook)............................... Malfunctions display................................................. General malfunctions ............................................... System errors........................................................... Techical data ............................................................ Replacement parts and accessories ........................ Declaration od conformity ........................................ Page Page Page Page Page Page Page Page Page Page Page Page Page Page Page Page Page Page 19 19 19 20 21 23 23 23 23 24 24 25 25 26 27 27 27 28 Remote Control ........................................................ Page 29 Sampling chamber ................................................... Page 29 Aqualift F lifting station ............................................. Page 29 11. Maintenance .............................................................................................. Page 31 12. Warranty .............................................................................................. Page 31 13. Declaration of Conformity .............................................................................................. Page 32 14. Separator characteristics .............................................................................................. Page 33 15. . Important contacts/info .............................................................................................. Page 34 3 1. General 1.1 Application Wastewater containing oils and greases from animal or plant origin are not allowed to be drained into public wastewater systems and into public waters due to the fact that in a cooled state the oils and greases coat interior drainage pipes causing blockages as well as reducing the drainage capacity of the pipes. In additional, after short periods of time the decomposing greases and oils build up acids which can lead to odour nuisances as well as corroding drainage pipes and building materials. The developing grease layer on water surfaces also decreases the ability for required oxygen to enter the water in public watershed areas as well as public wastewater treatment facilities. Also, DIN 1986 Part I required the separation and removal of these damaging wastes. Due to these reasons, grease separators are required for installation as well as the separator contents being properly disposed. The temperature in the grease separator should be as low as possible. A temperature increase of 10 deg Celsius inside the temperature reduces the separator efficiency by 50%. Most national and local regulations limit the allowable wastewater temperature which exits a building – the German regulations limits the temperature to 35 deg Celsius. 1.2 Application area Grease separators are to be installed in all wastewater drainage pipes which could contain oils / greases. The separator will remove the fats, oils and sludge from the wastewater. Disposal of a KESSEL PV fully automated grease separator is basically odour free since the disposal, cleaning and refilling of the separator is done without the need to open the separator’s covers. The disposal vehicle connects its disposal pipe to a permanently installed pressure disposal line from the grease separator which should be located in an easy accessible location (exterior wall of the building for example). The separated oils, greases and sludges are pumped directly into the grease separator. This eliminates the unhygienic process of the truck’s disposal hose being brought into the area of the building which contains the grease separator. 1.3 Separator description The KESSEL PV Fully Automated Grease Separator consists of a grease separator with integrated sludge trap. Separators built according to DIN 4040 offer a sludge trap which isolated from the grease separation area by a wall. Grease separators manufactured according to EN 1825 do not have the separator sludge trap meaning that all oils, greases and sludge are separated out of the wastewater stream in one area. The separator body is manufactured from polyethylene. The separator is equipped with one pump with a macerator assembly. The separators are equipped with twin odour tight access covers. The polyethylene interior walls of the separator require no extra protective coatings. For important technical information concerning this separator please see the shield located on the separator itself – this information is also located in this User's Manual. Delivery contents of a PV grease separator are: - separator body - a refilling system for cold and warm water - a pump for cleaning and disposing of the separator - an actuator valve for controlling the cleaning/disposal process - two solenoid valves - a control unit - a maintenance contract - an inspection window located on the body of the separator. Optional: - SonicControl grease sensor - Remote control for remote operation of the disposal process 1.4 Table of article numbers accord. DIN 4040 Article number accord. EN 1825 Article number NS (l/sec) Pump left Pump right NS (l/sec) Pump left Pump right 2 93222.50 / P1 93222.00 / P1 2 93002.50 / P1 93002.00 / P1 4 93224.50 /P1 93224.00 / P1 4 93004.50 /P1 93004.00 / P1 7 93227.50 / P1 93227.00 / P1 7 93007.50 / P1 93007.00 / P1 10 93210.50 / P1 93210.00 / P1 10 93010.50 / P1 93010.00 / P1 Pump left = operation side in flow direction left Pump right = operation side in flow direction right 4 2. Installation 2.1 General The separator is to be installed in a dry, frost free room / area on a smooth, solid and level surface. This is especially important due to the electronic equipment accompanied with the separator. Based on the size of the grease separator it can be equipped with the following pumps (custom separators may be equipped with custom pumps). 2.6 kW Pump With 400 V, 50 Hz, IP 68 protection rating (0.3 Bar for 24 hours) 4.0 kW Pump With 400 V, 50 Hz, IP 68 protection rating (0.3 Bar for 24 hours) Customized systems Pump specifications for customized systems will be supplied with the manual for the custom separator. 2.2 Set-up / Installation 1. DIN 4040 / EN 1825 and EN 12056 regulations must be folAuslegungskriterien Fettabscheiderpumpe 2,6 kW 4,0 kW lowed during installation! 2. The entire system must be installed completely level. 3. The pump (included in the delivery) is to be placed and securedto the floor with the included fastening bolts. In order to dampen pump vibrations be sure to place the included rubber matts under each of the pumps. 4. The disposal pressure pipe is to be connected to the included flange on the end of the separator's disposal pipe stub (flange connection is DN65, PN 10 DIN 2501, holediameter 145mm). The Storz B coupling (with R 2 1/2 inch inside threads) supplied with the system should be installed to the end of the disposal pipe where the disposal truck will connect its suction hose. Vibration dampeners should be used when installing the disposal pipe to prevent vibrations from transferring to the building during disposal. The disposal pipe should be laid with a slight slope back toward the separator. 5 5. The remote control should be installed near the Storz B coupling, if possible - above the coupling. 6. In order to protect the coupling and the remote control from unauthorized access, it is advised that both of these items be contained in a lockable protective enclosure (not included with the delivery). Recommended enclosure dimensions (width - 400 mm, height - 600 mm, depth - 250 mm). 7. The two included 1 inch solenoid valves (for the cold water refill and the warm water rinsing) must be installed perfectly level (please see included installation guide). The magnet system should be installed upwards – this prevents materials from settling in the system should could lead to a shortened lifespan. The cold and warm water supply pipes should be flushed clean after installation (follow included installation manual) 8. Follow DIN 1988, DVGW as well as local installation codes when connected the cold water refill and the warm water rinsing pipes. Installation of KESSEL refill funnel (included with shipment): - Connect warm and cold water supply pipes with each other as a T connection. The outlet of the T connection should be threaded to the R1 inch inner threads of the KESSEL refill funnel. 9. The cold water supply pipe is the refilling system and the warm water supply pipe is the cleaning / rinsing connection 10 The inlet and outlet drainage pipes should be connected to the grease separator. If SML cast iron drainage piping is used according to DIN 19522 then steel inner support rings should be used on the inlet and the outlet of the separator (which are available as accessories). If other drainage piping material is being used then standard rubber connection couplings (FERNCO type couplings) should be used. 11 According to DIN EN 1825-2, the grease separator as well as the inlet and outlet drainage pipes must be properly ventilated. The main inlet pipe to a grease separator should be directly ventilated to the roof of the building. An additional ventilation pipe should be installed near the inlet of the grease separator in the case that the main inlet pipe is longer than 10 meters and offers no ventilation for this 10 meters. All secondary drainage pipes 5meters or longer which enter the main inlet pipe should also be separately ventilated. 2.3 Electrical Installations All electrical connections and work should be handled by a professional, licensed electrician. 1. The pump, actuator valve and solenoid valves should be connected to the control unit following the connection instructions located inside the control unit. The connection 2. Installation cable (5 x 4mm square) should be connected on-site. --> Fuse: for 2.6 kW pump – 16 AMP --> Fuse: for 4.0 kW pump – 20 AMP 2. The rotational direction of the pump must be checked (improper rotation will cause operational noise as well as decrease pump. 3. The remote control (available as an accessory) is supplied with a 15 meter connection cable. The cable can be replaced with a longer cable if required (use a protected cable LiYCY 3 x 0.34 mm square) Please take care that: - That the user's manual and all operating instructions concerning the separator are kept in a safe location nearby the separator. - That the disposal procedure is conducted exactly as it is de- scribed in the user's manual. - Only allow professional licensed disposal companies to handle the disposal of the separator. Right reserved for technical changes. Control unit installation: In order to open the control unit, the power safety switch must be set at the 0 position. In order to mount the control unit a drilling template, dowels and screws are required. For DIN separators, the control unit can be mounted on a PE (polyethylene) plate directly on the grease separator itself. For EURO separators the control unit should be mounted on a nearby wall. Cables running from the control unit to the separator should be laid in a protective conduit. The control unit should be installed in a dry, frost free and easily accessible location. Protect the control unit from direct sunlight. 2.4 Installation example Ventialtion Grease Separator Ventilation pipe Connection for disposal truck Sidewalk a b Connection to public sewer Wastewater which collects below backwater level (ground level) should be pumped into the public sewer with an appropriate wastewater lifting station 6 KESSEL NS 4 ‘E+S’ PV grease separator Storz-B coupling Sampling chamber Cold and Warm water supply connection Closure valve Water supply connection a cold water supply b warm water supply Disposal pipe Electrical connection Solenoid valves Sediment trap / collector KESSEL basement drain with backwater flaps (The ‘Universal’) KESSEL lifting station Control unit 2. Installation 2.5 Dimensioned drawing 2.5.1 Grease separator acc. to DIN 4040 Inlet Outlet Sludge trap Grease trap Quick-release covers Inspection window Two way valve Actuator valve Cleaning jets Cleaning water stream Pump with closure Warm water connection (rinsing) and cold water connection (refilling with fresh water) Control unit Disposal pipe connection alle Maße in mm NS (l/sec) DN 2 4 7 10 100 100 150 150 Einbringmaße axb b a 1700 2250 3180 3600 680 920 1150 1350 b1 h h1 h2 h3 1080 1320 1550 1750 1455 1455 1455 1455 1030 1030 1030 1030 1100 1100 1100 1100 1180 1180 1180 1180 Separator volumes sludge chamber Separator 570 l 220 l 1070 l 430 l 1870 l 720 l 2480 l 1052 l Weight approx 240 kg 290 kg 400 kg 440 kg 2.5.2 Grease separator acc. to EN 1825 OD = Outer Dimension b1 = wide all in mm NS (l/sec) DN/OD a NS 2 NS 4 NS 7 NS 10 100/110 100/110 150/160 150/160 1030 1500 1600 2430 Einbringmaße l x b 1250 1810 1850 2700 670 730 990 990 7 7 b1 h1 h2 h3 950 1000 1220 1220 930 930 1130 1130 1000 1000 1200 1200 1310 1310 1560 1560 Separator volumes sludge chamber Separator 200 l 400 l 700 l 1000 l 212 l 354 l 567 l 794 l Grease storage 106 l 177 l 302 l 423 l 3. Setting up 3.1 Setting up for operation Prior to placing the separator into operation, please make sure that: the separator is clean and the interior is free from any objects which may have been placed inside during shipping or installation. the separator is completely filled with clean cold water. Completely filling the separator is complete when water begins to drain from the outlet. check to separator tank to make sure that it is fully watertight, that no damage during shipping or installation has occurred and that all pipe connection have been properly made and are watertight. 3.2 Initial Instructions Placing the separator into full operation is normally handled by a licensed tradesman although upon request can be handled by a KESSEL representative. 1. The following personnel should be on hand when the initial instructions for placing the separator into operation are given: Building facilities manager Contracted plumber / tradesman Also recommended to be in attendance: Building maintenance workers Contracted disposal company Grease separator operator 2. Preparation of commissioning instructions: All plumbing connections must be made Separator must be completely filled with water The disposal truck / company must be on-site 3. Instructions: Information concerning the proper disposal of the separator Instruction on control unit operation Operational test Instructions on how often separator disposal should take place 4. Hand-over of installation and operating manual to owner / building facilities personnel 5. After the commissioning is completed, the separator should be returned to operation, this requires that the separator is completely filled with cold water. 6. Fill out the commissioning documentation report / log 3.3 Handover Certificate 4. Operation 4.1 Operation The control unit offer fully automated disposal which can be activated by Start / Stop button (5) on the control unit. The same button can also be used to stop the process during the automatic disposal. The alarm button (3) can be used to confirm / silence an alarm. The current operating status is displayed by the LED 1, alarms / malfunctions are displayed by LED 2, and the pump operation is displayed by LED 4. The digital display (6) can be operated / navigated by used the up and down buttons as well as the escape (ESC) and OK buttons (buttons 7). Please follow the operating instructions (8). The control unit should be completely disconnected from power before any work is done on the control unit (9)(see safety instructions) ➀ ➁ ➂ ➃ ➄ ➈ ➇ Operation LED Alarm LED Alarm button Pump operation LED Start / Stop Display Navigation buttons up, down, escape and ok Operational manual Disconnect control unit from power source before any work is done. Fully automated operation The KESSEL PV fully automated grease separator consists of a control unit with fully automated control, operational panel and digital display as well as an optional remote control (Protection Class IP 54). The disposal program / software for this separator has already been installed into the control unit at the factory. If the control unit is changed or replaced please keep this in mind and contact KESSEL if required. The control unit is capable of the following settings: Fully automated: The disposal steps being operating automatically when the Start button is pressed followed by the pressing of the OK button ➆➅ 8 4. Operation Manual operation: The disposal steps can also be operated manually under the display heading ‘Maintenance’ – ‘Manual Operation’ – Operational conditions, disposal steps and malfunctions are displayed on the control unit and the remote control. The mixing, rinsing and disposal times can be changed in parameter 3.1 on the digital display. 0 Systeminfo 4.2 Grease separator disposal function / steps Disposal of the grease separator can take place in the automatic or manual modes. • Turn on the control unit with the main power switch • Changing from manual to automatic mode can be done at any time! In the case that during automatic disposal that the control unit is changed to manual mode, the automated disposal will be stopped. • The mixing, rinsing and disposal times have been set at the factory. On-site conditions may vary and require these times to be changed which can be done using the control unit. 1 Informations 2 Maintenance 2.1 Manual operation 3 Settings 2.2 Automatic operation 2.3 SDS 2.4 Maintenance 2.5 Free Switching RemoteControl Without SonicControl-Option ohne SonicControl Option im Ñ Leerlaufì 0. Systeminfo Datum 13.10.10 Uhrzeit 11:32:55 Fettabscheider DIN 4040 NS 2 2 Pumpen 2,6kW OK Fehler/Ereignis mit SonicControl-Option SonicControl Option im Ñ Leerlaufì With 0. ESC Systeminfo Datum 13.10.10 Uhrzeit 11:32:55 Fettabscheider DIN 4040 NS 2 Schicht-Dicke 4 cm Temperatur 22 ∞ C Fehler/Ereignis Men¸ 1. Informationen 1.1 OK Wartung Einstellungen ESC 1.1.1 Informationen Betriebsstunden Logbuch Steuerungstyp Wartungstermin Akt. Messwerte 9 OK ESC Betriebsstunden Gesamtlaufzeit Laufzeit Pumpe Anl‰ ufe Pumpe Netzausfall OK 1.1.1 Gesamtlaufz eit 00001,0h ESC 5. Disposal The first disposal should take place approximately 2-3 weeks afer the separator has been placed into operation. Disposal intervals According to DIN EN 1825-2 the separator should be disposed / emptied every 14 days but at a minimum every month. The grease layer thickness can be monitored by the new SonicControl automated grease layer measurement system or by the use of the included inspection window. Attention: Timely disposing of the grease separator contents is required to assure proper grease separator operation. Due to this, the disposal should be handled by a licensed disposal company placed under contract to empty the separator on a regular basis. During disposal, no wastewater should enter the separator. Disposal of the grease separator in fully automatic mode Requirement – all grease separator covers must be securely closed 1. Connect the disposal truck to the end of the separator’s disposal pipe 2. To begin disposal, press the Start button and then the OK button on the control unit. On the control unit’s digital display, the individual disposal steps are displayed 3. If a remote control is installed, the disposal can also be started with the remote control – however, prior to doing this the control unit must be un-locked by the main control unit by going to the ‘Maintenance’ – ‘Remote control activation’ setting (2.5.1). The automatic disposal can also be activated here by pressing the OK button. 4. Begin the automated disposal by pressing the ‘START/STOP’ button on the control unit or the remote control 5. The automatic disposal program begins operation. The current step of the disposal process is displayed on the digital display of the control unit and the remote control. 6. In the case that the disposal truck needs to be changed during the automated disposal process, press the ‘START/STOP’ button - remove disposal hose from first truck - connect disposal hose of new truck - press the ‘START/STOP’ button on the control unit to continue the disposal process 7. When step 13 (final refill) is displayed on the control unit or the remote control, the disposal truck can disconnect the disposal hose and leave. Step 13 is the final refill step and the grease separator will automatically fill itself and turn off when full – the presence of the disposal truck is no longer required. The grease separator can also be operated from the remote control. Go to Menu 2 (Maintenance). Here the activation of the remote control can be made. - Here you have the option of activating the remote control for a specific period of time. - The remote control can also be permanently activated Disposal of the grease separator in manual mode Requirement – all grease separator covers must be securely closed 1. Connect the disposal truck to the end of the separator’s disposal pipe 2. To being the manual disposal process go to Menu 2.1 Maintenance – 2.2.1 Manual Operation and confirm the desired disposal step by pressing the OK button. ON the display the chosen disposal step can be followed. 3. If a remote control is installed, the disposal can also be started with the remote control – however, prior to doing this the control unit must be un-locked by the main control unit by going to the ‘Maintenance’ – ‘Remote control activation’ setting (2.5.1). The automatic disposal can also be activated here by pressing the OK button. 4. Begin the automated disposal by pressing the ‘START/STOP’ button on the control unit or the remote control 5. The disposal step begins operation. The current step of the disposal process is displayed on the digital display of the control unit and the remote control. 6. In the case that the disposal truck needs to be changed during the automated disposal process, press the ‘START/STOP’ button - remove disposal hose from first truck - connect disposal hose of new truck - press the ‘START/STOP’ button on the control unit to continue the disposal process 7. When step 13 (final refill) is displayed on the control unit or the remote control, the disposal truck can disconnect the disposal hose and leave. Step 13 is the final refill step and the grease separator will automatically fill itself and turn off when full – the presence of the disposal truck is no longer required. 10 11 Valve setting (set automatic) 100 90 30 60 60 30 “Leeren” (empty) “Spülen” (rinse) “Spülen” (rinse) “Leeren” (empty) “Leeren” (empty) empty fill rinse empty fill 9 10 11 12 13 420 30 90 500 60 100 140 60 100 140 60 160 140 300 200 80 1000 60 180 200 60 180 200 60 240 200 360 360 120 NS 7 NS 10 on off off on off on off off off on on off off on ein off off off off on off off off off off on off off off off on on off off off off on on on Pump Valve warm Valve cold water water Completely refill separator (to outlet level) Until pump dry runs Until pump dry runs Refill water level by approx 25 cm Until pump dry runs Refill water level by approx 25 cm Until pump dry runs Refill water level by approx 25 cm Reduce water level by approx 30 cm Info Time settings can also be customized depending on pumping height, temperature or water pressures. Flow rate through a DN 25 solenoid valve is 23 m3/hour. 300 30 60 “Spülen” (rinse) rinse 8 100 100 “Spülen” (rinse) 7 30 120 fill empty 6 120 “Mischen” (mix) 100 180 180 60 NS 4 30 mix 5 100 “Mischen” (mix) 120 120 40 NS 2 Pump running time in seconds “Leeren” (empty) fill “Leeren” (empty) empty 3 4 “Mischen” (mix) mix partial empty “Leeren” (empty) Function 2 1 Program step 5.1 For separators with Fully Automated disposal Separators NS 2, NS 4, NS 7 and NS 10 acc. to DIN 4040 5. Disposal steps grease separator acc. to. DIN 4040 12 Valve setting (set automatic) 30 30 “Leeren” (empty) “Leeren” (empty) Empty Füllen 12 13 360 60 100 140 60 100 140 60 160 140 180 200 50 600 60 180 200 60 180 200 60 240 200 220 360 80 off on on off on off on off off on off on off on off on off off off off off off off off off on on off off off off on off off off off on on on Completely refill separator (to outlet level) Until pump dry runs Until pump dry runs Refill water level by approx 25 cm Until pump dry runs Refill water level by approx 25 cm Until pump dry runs Refill water level by approx 25 cm Reduce water level by approx 30 cm Info Time settings can also be customized depending on pumping height, temperature or water pressures. Flow rate through a DN 25 solenoid valve is 23 m3/hour. 260 90 60 “Spülen” (rinse) Spülen 11 200 100 60 “Spülen” (rinse) Füllen 10 30 Empty 30 90 100 30 120 100 130 180 40 NS 4 9 “Leeren” (empty) 60 “Spülen” (rinse) Spülen 8 100 7 “Spülen” (rinse) Empty 6 Füllen 120 “Mischen” (mix) Mischen 5 30 100 “Mischen” (mix) Füllen 4 “Leeren” (empty) 90 “Leeren” (empty) Empty 3 120 “Mischen” (mix) 30 NS 2 Pump Valve warm Valve cold water water NS 7 NS 10 Pump running time in seconds Mischen partial empty “Leeren” (empty) Function 2 1 Program step 5.2 For separators with Fully Automated disposal Separators NS 2, NS 4, NS 7 and NS 10 acc. to EN 1825 5. Disposal for grease separator acc. to. EN 1825 6. Konfiguration 6.1 General Please follow all safety instructions! Configuring and making setting the control unit should only be handled by a qualified servicer. Control unit settings can be made in the ‘Settings’ mode of the control unit – here the ‘Norm’ (3.5) or the ‘Nominal Size’ (3.6) can be changed. 3 Settings 3.5.1 DIN 4040 3.5. Norm 3.5.2 DIN Underground installation 3.5.3 Euro-Norm 1825 3.5.4 Euro-Norm Underground installation 3.6 Nominal Size 3.6.1 NS 2 3.6.8 NS 30 6.2 Setting the Mixing, Filling, Cleaning and Disposal times Changes to the mixing, filling, cleaning and disposal times can be made in the ‘Parameter’ section (3.1) in the control unit 3 Settings Access Code 3.1. Parameter 3.1.1 Partial Disposal 3.1.1 Value in seconds 3.1.13 Filling 3.1.13 Value in seconds In this setting the length of the disposal steps can be changed for example: Partial disposal, Mixing, Disposal, Filling and Cleaning With SonicControl Accessory also the following can be changed: Alarm layer thickness, Pre-alarm layer thickness, Temperature alarm, Measuring start, Measuring intervals, Level check 13 7. Malfunction messages 7.1 Log book entries This table shows the possible malfunction messages, all errors and results will be stored in the control unit’s log book. Result LED display First initialization Install unit Factory settings Acute alarm confirm Parameters changed Exp. Parameters changed Manual operation Automated operation Read logbook Confirm malfunctions Change number of pumps Change norm Change nominal size Save USB Send SMS Disposal discontinued No No No No No No No No No No No No No No No No Message Relay switching 1 Yes Relay switching 2 (optional) Yes Relay switching 3 (optional) Yes Potential free contact Fault’ / ‘Warning’ No No No No No No No No No No No No No No No No Warning Warning Warning Malfunction LED display Potential free contact ‘Fault’ ‘Warning’ Phase malfunction Rotating field malfunction Communication malfunction Motor protection 1 Motor protection 2 (optional) Motor protection 2 (optional) Over current P 1 Over current P 2 (optional) Over current P 3 (optional) Under current P 1 Under current P 2 (optional) Under current P 3 (optional) Temperature error P 1 Temperature error P 2 (optional) Temperature error P 3 (optional) Relay malfunction P 1 Relay malfunction P 2 (optional) Relay malfunction P 3 (optional) Max. run time exceeded P 1 Max. run time exceeded P 2 (optional) Max. run time exceeded P 3 (optional) Actuator valve error 1 Actuator valve error 2 (optional) Yes Yes Yes Yes Yes Yes Yes Yes Yes Yes Yes Yes Yes Yes Yes Yes Yes Yes Yes Yes Error Error Error Error Error Error Error Error Error Error Error Error Error Error Error Error Error Error Error Error Yes Error Yes Yes Error Error 14 7. Malfunction messages Malfunction Cause Solution Pumps do not start Motor protection switch has activated – Motor is blocked Remove pump, and remove any debris / blockage in impeller or pump housing area Motor does not run smoothly Contact KESSEL Customer Service for repair 1 or 2 phases do not have power Control unit shuts off due to power surges Check power supply and fuses – contact power company Rotating field incorrect Switch 2 phases from the incoming cable Pump damaged due to foreign object Check pump for damage and repair / replace if necessary Foreign object in pump rotating area Remove foreign object, check pump for damage and repair / replace if necessary Pump suddenly starts Bad odour Grease separator body is not air tight Check ventilation, inlet, outlet, pump outlet and separator covers to make sure they are air tight. Add 2 liters of water to re-fill inlet in case P-trap has dried out. Pump leak Check pump for damage and repair / replace if necessary (via Customer Service) Pungent odour Pump(s) running too hot / overloaded Check pump and impeller for easy rotation, check system for switching problems (especially motor protection switch) Pumping performance too low Rotating field incorrect Swap power cables (control unit alarm) Pump rotating in wrong direction Check pump power supply cables for proper connection Power outage - Check to make sure power supply to control unit is intact - Check fuses - Check power supply cable for damage - Check micro-fuses in control unit (only replace with fuses with identical operating characteristics) Control unit not functioning (no displays or lights) 15 7. Malfunction messages Malfunction Cause Solution Temperature malfunction Motor winding temperature switch has activated Allow pump to cool, alarm must be confirmed on control unit. If motor winding temperature continues to cause malfunctions – replace pump Over current The maximum allowable pump power has been exceeded (impeller blocked) Remove blockage in impeller (follow safety instructions Let pump run shortly in opposite direction (‘Maintenance’ – ‘Manual operation’ – ‘Opposite rotation’ Under current The minimum allowable pump power Check power supply cable and repair has been reached (power supply cable / replace if necessary (replace pump to pump has been cut or damaged) if necessary) Let pump run shortly in opposite direction (‘Maintenance’ – ‘Manual operation’ – ‘Opposite rotation’) Motor protection switch has activated Motor protection switch has been Check that current supply is correct. improperly set. Current to pump to Remove pump blockage (follow safety high due to defective or blocked pump. instructions). Replace pump if damaged or defective Phase error Phase L1, L2 or L3 missing Check control unit, power cable and fuses Check current protection switch Activation limit System protection has activated due to more than 100.000 activations - Can be confirmed on control unit - System protection allows another 1000 activation before alarm activates again - Replace system protection (contact KESSEL Customer Service - Activation alarm will continue to activate after every 1000 pump activations Actuator valve malfunction End position of actuator valve is not being reached Check actuator valve for proper rotation / movement – remove any obstructions Rotating field malfunction Incorrect rotating field at power connection Swap two phases of power supply Relay malfunction Surge protection does not switch off Disconnect control unit from power supply. Replace surge protector – contact KESSEL customer service 16 8. Control Unit 8.1 Control unit and description of operation panel The type plate is on the right outside of the control unit. Fig. 1 Control unit description: Control unit identification code Control unit article number Voltage and frequency Amperage Protection class Control unit serial number Control unit replacement number Danger symbol Electrical protection class CE symbol Disposal symbol (do not dispose in normal trash) Hardware status code Outputs Potential free contact • Change-over contact, center contact • Closing contact, Opening contact • max. 42 VAC / 0,5 Amp Optional: remote alarm Connection option (Article Number 20162) for a remotely installed audible alarm 17 FA PV 260 363-322 (363-402) Fig. 2 12. Contro unit 18 9. SonicControl (Optional) 9.1 Safety instructions Dear Customer, Before installing and placing the SonicControl into operation, please read and follow all instructions in the user’s and operational manual! First check that the system has arrived undamaged. In case damage has occurred during shipping, please follow the instructions in the ‘Guarantee’ section of this manual (Section 12). 1. Safety instructions: All local and international safety regulations as well as all related DIN and VDE regulations should be followed when installing, operating, maintaining or servicing this system! Before placing the system into operation, a qualified professional should insure that all safety measures are in place. Fault current and ground must meet the local power supply regulations. The SonicControl should not be installed in areas that are explosion hazards. The system operated on electrical current. Not following all local and international safety measures could result in significant damage to the system, injury to the operator or someone nearby as well the possibility of a fatal accident. fessional is signed. 9.2 General Dear Customer, The power supply to the SonicControl should be disconnect before any work is begun. It is important to insure that the power supply cable to the SonicControl is in perfect operating condition. If the cable is damage or defective – DO NOT connect the cable to a power source. If the system is in operation and it is determined that the cable is damaged or defective, immediately disconnect the SonicControl from its power source. VDE 0100 regulations must be followed. The control unit should not be installed in any area / room that are explosion hazards. KESSEL thanks you for choosing this product. Before leaving the factory this system has gone through very strict quality control inspections. Please check that the system is complete and that no damaged occurred during shipping. In case damage has occurred during shipping, please follow the instructions in the ‘Guarantee’ section of this manual (Section 12). This Installation and Operating manual contains valuable information and instructions for the proper installation, operation, maintenance and repair of this product. Prior to doing any work with this system, this entire manual should be thoroughly read and followed. In order to insure that the system operates appropriately, it should be regularly inspected and maintained. We recommend that a service contract with a licensed pro- 9.3 Installation Installation of sensor and sensor support ➊ ➋ ➌ ➍ Place drilling template on the outside of the grease separator’s outlet system and drill two 4mm holes through only the top 2 holes in the template Now place the drilling template on the inside of the grease separator’s outlet system and secure through the two holes with the two screws. Connect the top and bottom portions of the sensor holder and screw the two clips onto the sensor holder Connect sensor holder to grease separator’s outlet system with the screws at secure with a torgue of 1 Nm. Clip SonicControl into the two clips (see page 10) 19 Sensor holder – upper section Sensor holder – lower section Screw 60x30 Torx screw 40x12 Torx screw 50x20 Pipe clip Sensor holder, drilling template, screw caps Outlet system wall SonicControl sensorl 9. SonicControl (Optional) 9.4 SonicControl Sensor Installation Above ground Freie Aufstellung Artikel EURO "G" 93002 93004 93007 93010 EURO "D" 93002.00 / D1 93004.00 / D1 93007.00 / D1 93010.00 / D1 EURO "DS" 93002.50 und .00 / DS1 93004.50 und .00 / DS1 93007.50 und .00/ DS1 93010.50 und .00 / DS1 EURO E+S "M" 93002.50 und .00 / M1 93004.50 und .00 / M1 93007.50 und .00 / M1 93010.50 und .00 / M1 EURO E+S "PV" 93002.50 und .00 / P1 93004.50 und .00 / P1 93007.50 und .00 / P1 93010.50 und .00 / P1 DIN 4040 "G" rund 98201 98202 DIN 4040 "D" rund 98201.00/D1 98202.00/D1 NS Distance Oberkannte between top Abstand of lower"Finger" sensor zu ‘finunterer ger’ to base ofAuslauf separaUnterkannte tor outlet (waterline) (Wasserlinie) 2 4 7 10 50 cm 50 cm 50 cm 50 cm Bohrlöcher in Bohrschablone obere beiden Bohrlöcher obere beiden Bohrlöcher obere beiden Bohrlöcher obere beiden Bohrlöcher obere beiden Bohrlöcher 2 4 7 10 50 cm 50 cm 50 cm 50 cm 2 4 7 10 Holes to use on drilling template Alarm level = = Recommend Prealarm Maximum sludge layer empfohlenes VorAlarmniveau max level in cm (2/3 in of cm max thickness in cm (50% of alarmniveau max.grease layer thickness layer thickness) (= 2/3 des max. Fettschichttotal sludge trap volume) in cm in cm Speichervolumens) dicke 23 24 27 24 15 16 18 16 20 25 30 27 obere beiden Bohrlöcher obere beiden Bohrlöcher obere beiden Bohrlöcher obere beiden Bohrlöcher 23 24 27 24 15 16 18 16 20 25 30 27 50 cm 50 cm 50 cm 50 cm obere beiden Bohrlöcher obere beiden Bohrlöcher obere beiden Bohrlöcher obere beiden Bohrlöcher 23 24 27 24 15 16 18 16 20 25 30 27 2 4 7 10 50 cm 50 cm 50 cm 50 cm obere beiden Bohrlöcher obere beiden Bohrlöcher obere beiden Bohrlöcher obere beiden Bohrlöcher 23 24 27 24 15 16 18 16 20 25 30 27 2 4 7 10 50 cm 50 cm 50 cm 50 cm obere beiden Bohrlöcher obere beiden Bohrlöcher obere beiden Bohrlöcher obere beiden Bohrlöcher 23 24 27 24 15 16 18 16 20 25 30 27 1 2 58 cm 58 cm obere beiden Bohrlöcher obere beiden Bohrlöcher 16 16 11 11 46 54 1 2 58 cm 58 cm obere beiden Bohrlöcher obere beiden Bohrlöcher 16 16 11 11 14 23 11 15 27 23 23 32 31 46 54 54 Underground installation Euro ‘G’ 93001 / 80 / 120 B und D 93002 / 80 / 120 B und D 93004 / 80 / 120 B und D 93007 / 120 B und D 93010 / 120 B und D 93015 / 120 B und D 93020 / 120 B und D DIN 4040 "G" 98201 / 00 / 80 / 120 B und D 98202 / 00 / 80 / 120 B und D 98204 / 00 / 80 / 120 B und D E 1 2 4 7 10 15 20 50 cm 50 cm 50 cm 48 cm 48 cm 56 cm 56 cm obere beiden Bohrlöcher obere beiden Bohrlöcher obere beiden Bohrlöcher untere beiden Bohrlöcher untere beiden Bohrlöcher untere beiden Bohrlöcher untere beiden Bohrlöcher 17 17 17 17 17 17 17 11 11 11 11 11 11 11 1 2 4 58 cm 58 cm 58 cm untere beiden Bohrlöcher untere beiden Bohrlöcher untere beiden Bohrlöcher 16 16 16 11 11 11 F For separators not listed on the above table, please contact KESSEL Customer Service at +49 8456 27462. Note: Before placing a grease separator into operation it should be first completely filled with clean cold water – then check again the installation height which may change slightly due to the water pressure! 20 9. SonicControl (Optional) 9.5 Installation example Grease Separator < NS 15 Container wall < = 10 mm Drilling ø 19 mm Cable screw connection* Grease Separator > NS 15 Sensor cable Container wall > = 10 mm Cable screw connection* Thread PG 11 Illustration shows a Euro Norm NS 2 above ground grease separator Make sure SoncControl cable is not in tension – should be loose. Also make sure cable is clear (not below or above) any of the SonicControl sensors. 21 * to avoid odor nuisances draw cable screw connection close. The sensor should be installed at a 60 degree angle to make sure than the separator’s internal support rod is not near the SonicControl sensors. 9. SonicControl (Optional) The included stickers are to notify the disposal company of which separator access hole should be opened and used for disposal of the grease separator. Do not used the access hole which contains the SonicControl to empty the grease separator – the disposal truck’s hose could damage or dislodge the SonicControl. For above ground grease separators, the sticker should be placed on the exterior of the separator near the access cover that should not be used. Note: inform the disposal company when a SonicControl sensor is installed in a grease separator. 9.6 Remote Alarm The remote alarm (Article Number 20162) should be used when an audible alarm is desired in a different area than where the grease separator’s control unit is installed. 9.7 Shortening the sensor cable length The SonicControl cable can be shortened if necessary. Please note that the cable connection jacks are for use with cables with a maximum crossectional area of 1.5 square mm – do not use cables with a large area. 9.8 Potential free contact The potential free contact can be used to transfer a warning signal to a BMS (Building Management System). (Max connection of 42 V / 0.5 Amp). 22 9. SonicControl (Optional) 9.9 Installation / Cables connections The cables should be connected to the control unit as shown in the installation manual. Please use the included M16 cable screws IMPORTANT: After all cables have been connected, they should be secured with tie-wraps. The sonic control cable should not be laid separately from the power cable in order to avoid electrical interference. 23 9. SonicControl (Optional) Cable extensions – watertight (IP 68) The SonicControl is supplied with 10 meter cables. If required this can be extended on site to a max total length of 30 meters. With a total length of over 30 meters, a reliable operation of the SonicControl can no longer be guaranteed as inductive disturbances effect the sensor. Fig.1 Fig. 1: connect bare cables with compression connectors fig.2 Fig. 2: Enclose connection in appropriate watertight encloser and seal both sides Fig.3 Fig. 3: Fill enclosure with plastic resin Fig.4 Fig. 4: View of completed connection Individual parts available upon request 2 Note: Follow all VDE 0100 regulations when extending the cable. The control unit must not be installed in areas which are at risk of explosion. If the cable is to be laid with other cables – the SonicControl cable should be wrapped with a shielded jacket to prevent interference. 9.10 Commissioning In order to activate the SonicControl, KESSEL Customer service must be contacted 9.11 Inspection and Maintenance The sensor must be cleaned on a regular basis. During every disposal of the grease separator, the SonicControl probe should be cleaned with warm or hot water. If a pressure washer is used – spray at a distance of at least 30cm. The sensor does not need to be removed to be cleaned. • If the SonicControl is installed in a KESSEL PV fully automated separator, cleaning of the probe does not need to be done during every disposal. With a PV separator, the SonicControl should be cleaned during every service / maintenance of the separator. 24 9. SonicControl (Optional) Please follow all safety instructions in Section 1. 9.12 Events display (only in logbook) Event Cause Remediation measures Type of system changed Type of system was changed Maintenance Maintenance dates have been entered Manual operation Manual operation has been set Confirm audible alarm Audible alarm has been confirmed Malfunction confirmed Malfunction has been confirmed Factory settings Re-set to factory settings Sensor entry 01-08 Sensor problems Contact Customer Service 9.13 Malfunctions display Malfunction display Malfunction type Cause Remediation measures Pre-Alarm layer thickness Blinking (Alarm) Grease layer level has also been reached (see Section 3.3) Check grease layer thickness and contact disposal company if required No calm phase detected Blinking (Alarm) Measurement taking place during kitchen operation wastewater entering grease separator results in inaccurate measurements. Check measurement times in Parameter section of control unit and re-set if required Grease layer alarm Audible alarm and blinking alarm Maximum grease layer thickness reached (also see section 3.3) Dispose grease separator contents Temperature alarm Audible alarm and blinking alarm Wastewater temperature entering grease separator too high Reduce wastewater temperature entering grease separator Communication error Audible alarm and blinking alarm Error in modem reception Step 1 – check reception Step 2 if not reception is available then use of modem is not possible. If reception is available then replace modem Sensor error 01-08 Audible alarm and blinking alarm Sensor problems Contact KESSEL Customer Service 25 9. SonicControl (Optional) 9.14 General malfunctions First attempt to resolve the problem. If the problem can not be solved place the main switch to the ‘0’ setting and then press the alarm button for a minimum of 5 seconds. This will confirm the malfunction and enter the data into the logbook (this will not however solve the problem). Malfunction Deviation between grease layer seen in inspection window (if available) and SonicControl grease layer reading Error Inaccurate SonicControl measurement Cause Improper installation of SonicControl sensor Improper initialization of SonicControl Remedial measures Check type of separator and assure SonicControl setting is correct Newly calibrate the sensor Dirt or debris on SonicControl sensor Check position and installation of SonicControl probe Sensors are not in proper position and are not able to sense accurately Set type of grease Type of grease separator or size/model improperly set Clean sensor probes 9.15 System errors Malfunction Cause Remedial measures Odour nuisance Cable entrance point into grease separator is not air tight Check conduit entrance for tightness – repair if necessary Water in grease separator area Cable entrance point into grease separator is not water tight Check conduit entrance for tightness – repair if necessary 9.16 Techical data Inputs Sensor input Sensor input SonicControl 26 9. SonicControl (Optional) 9.17 Replacement parts and accessories DN/OD 50 ➁ ➀ innen aussen Order Number 11. Ultrasonic sensor 395-004 2. Conduit entrance system 9178221 27 9. SonicControl (Optional) 395-004 28 10. Accessories / Replacement parts Adding accessories to a system is in general not a problem. We would kindly ask you to contact the KESSEL Customer Service Department for information concerning this. 10.1 Remote Control (Article Number 916601) The remote control can be directly connected to the main control unit. The remote controls allows complete grease separator operation (during disposal) from a remote location (normally the same location where the disposal truck connects its disposal hose to the grease separator disposal pipe). The remote controls cable length is 10 meters which can be extended to a maximum length of 100 meters. 10.2 Sampling chamber DN 100/150 KESSEL offers a wide range of sampling chambers for above ground and underground installation. The sampling chambers are odour tight. The sampling chamber allows an accurate sample of the treated wastewater to be taken without the release of annoying odours. The samples can be used for testing purposes – for example DIN 38409. Prior to taking a sample, the interior of the sampling chamber should be cleaned. There are no uniform regulations requiring the installation of a sampling chamber but it is required by DIN 1986 Part I. Please follow local guidelines and regulations in your area. Type Art. Nr. Drainage horizontally 915 871 Drainage vertically 915 870 10.3 Aqualift F lifting station KESSEL offers a wide range of lifting station with different for use prior or after a grease separator. Please note that only twin pump lifting stations are recommended for use with grease separators in order to assure continuous operation. 29 Nominal activity Electrical Connection NS Art. Nr. 1,1 kW 400 V DS (3-phase) DN 100 28 659 2,2 kW 400 V DS (3-phase) DN 100 28 631 10. Accessories / Replacement parts 10.5 Replacement parts / Accessories for maintenance and general inspection Article Order Nr. For KESSEL DIN 4040 grease separators • Separator access cover 630 mm diameter • Gasket for access cover 630 mm diameter • Quick release clamp for access cover 630 mm diameter 916901 917201 917001 For KESSEL EN 1825 grease separators • Separator access cover 420 mm diameter • Gasket for access cover 420 mm diameter • Quick release clamp for access cover 420 mm diameter 916904 917204 917004 For all KESSEL grease separators • 2.6 kW disposal pump with macerating system (for NS 2-7 separators) • 4.0 kW disposal pump with macerating system (for NS 10 separators) • Control unit PV 260 • Control unit PV 400 • General grease separator inspection (from KESSEL Customer Service) • Operational log book for grease separator • Watertightness test 245-401 245-402 363-402 363-412 917411 917409 917417 30 11. Maintenance / General Inspection Please follow all safety instructions! 11.1 Maintenance The grease separator should be inspected once per year. Along with the inspection, the following point should also be conducted: - Inspection of the interior walls of the grease separator - Inspection of all electrical parts and connection (if separator model has electrical equipment) - Any work done on the separator should be entered into the separator’s logbook - Condition of electrical parts (if separator has electrical equipment) - Check for proper grease separator ventilation - Check log book for completeness and accuracy - Confirmation that separator has been properly and timely disposed - Check for availability and completeness of all paperwork and certifications The inspection report should list any defects or problems with the separator which should immediately be repaired or brought into the operating condition. Mechanical parts such as pumps, valves, inspection windows, and closure valves should be inspected and maintained twice per year. 11.2 General Inspection Before placing the separator into service and every 5 years thereafter, the separator should undergo a general inspection. The inspection should take place after the separator has been emptied and cleaned. The following points should be checked during this inspection: Calculation of separator system - General condition and watertightness of grease separator - Conditions of internal walls of grease separator 12. Warranty 1. In the case that a KESSEL product is defective, KESSEL has the option of repairing or replacing the product. If the product remains defective after the second attempt to repair or replace the product or it is economically unfeasible to repair or replace the product, the customer has the right to cancel the order / contract or reduce payment accordingly. KESSEL must be notified immediately in writing of defects in a product. In the case that the defect is not visible or difficult to detect, KESSEL must be notified immediately in writing of the defect as soon as it is discovered. If the product is repaired or replaced, the newly repaired or replaced product shall receive a new warranty identical to that which the original (defective) product was granted. The term defective product refers only to the product or part needing repair or replacement and not necessarily to the entire product or unit. KESSEL products are warranted for a period of 24 month. This warranty period begins on the day the product is shipped form KESSEL to its customer. The warranty only applies to newly manufactured products. Additional information can be found in section 377 of the HGB. 31 In addition to the standard warranty, KESSEL offers an additional 20 year warranty on the polymer bodies of class I / II fuel separators, grease separators, inspection chambers, wastewater treatment systems and rainwater storage tanks. This additional warranty applies to the watertightness, usability and structural soundness of the product. A requirement of this additional warranty is that the product is properly installed and operated in accordance with the valid installation and user's manual as well as the corresponding norms / regulations. 2. Wear and tear on a product will not be considered a defect. Problems with products resulting from improper installation, handling or maintenance will also not be considered a defect. Note: Only the manufacturer may open sealed components or screw connections. Otherwise, the warranty may become null and void 01.06.2010 2004/108/EG 2004/108/EG 2004/108/EG 32 33 Date Name of examiner This unit has been checked for watertightness to be sure that it is fully operational before leaving the factory. Description 2 Description 1 Density Volume Dimensions EN/Approval Ref.No./Material/Weight Mat.-No./Order-No./Prod. Date Mat.-Description 14. Separator characteristics 15. Important contacts / Info Separator Type: __________________________________________________________ Day / Hour __________________________________________________________ Project description /Building services supervisor __________________________________________________________ Address __________________________________________________________ Telephone / Fax __________________________________________________________ Builder __________________________________________________________ Address __________________________________________________________ Telephone / Fax __________________________________________________________ Planner __________________________________________________________ Address __________________________________________________________ Telephone / Fax __________________________________________________________ Contracted plumbing company __________________________________________________________ Address __________________________________________________________ Telephone / Fax __________________________________________________________ KESSEL-Commissions no.: System operator /owner __________________________________________________________ Address __________________________________________________________ Telephone / Fax __________________________________________________________ User __________________________________________________________ Address __________________________________________________________ Telephone / Fax __________________________________________________________ Person of delivery __________________________________________________________ Other remarks __________________________________________________________ The system operator, and those responsible, were present during the commissioning of this system. ____________________________ Place and date ____________________________ Signature owner ____________________________ Signature user 34 15. Important contacts / Info Handover certificate (copy for the company carrying out the installation) ❏ The initial operation and instruction was carried out in the presence of the person authorised to perform the acceptance and the system operator. ❏ The system operator/person authorised to perform the acceptance was informed about the obligation to service the product according to the enclosed operating instructions. ❏ Initial operation and instruction were not carried out. The client/ person responsible for initial operation was handed the following components and/or product components Initial operation and instruction is being carried out by (company, address, contact, phone) The exact coordination of the dates for initial operation/instruction is being carried out by the system operator and person responsible for initial operation. Place, date Signature of person authorised to perform acceptance 35 Signature of system operator Signature of the company carrying out the installation work K Rückstauverschlüsse K Kleinkläranlagen K Backwater protection K Septic Systems K Hebeanlagen K Schächte K Lifting Stations and pumps K Inspection Chambers K Abläufe / Duschrinnen K Regenwassernutzung K Drains and shower channels K Rainwater Management K Abscheider Systems K-Fettabscheider Separators -Grease Separators -Öl-/ Benzin-/ -Oil-/ Fuel-/Coalescence Koaleszenzabscheider Separators -Stärkeabscheider -Starch Separators -Sinkstoffabscheider -Sediment Separators