1
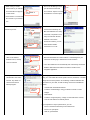
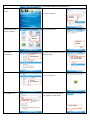
P i-Geo PRO USERS MANUAL How to connect your i-Geo PRO to your Pocket PC? Version Issue date Description A 14 Nov. 2005 Initial 1. Keep your i-Geo PRO powered Release on as well as keeping it in an Your Polstar i-Geo PRO GPS receiver uses world-class open place. The flashing Red technology to provide you with a GPS receiver with superior LED indicates that the GPS is performance to ensure the best possible reception wherever you functioning and the flashing go, from urban areas to highways to inner city streets. Blue LED indicates that the BT What’s in the box? is functioning. Make sure that your BT package includes the following: Click on the BT icon 2. Turn on the BT manager 3. Click “ new” to connect BT GPS Receiver x 1 Car Charger x 1 Li-ion battery x 1 Travel Charger x 1. Click “New” to connect BT Getting Started The Li-ION battery needs to be charged for at least 2 hours before being used for the first time. Simply place the battery into your i-Geo unit and plug the charger into your i-Geo PRO unit. 4. Select” Explore a BT device” item and click “Next” LED Indicators Red LED – GPS Operation Yellow LED – Low battery Blue LED – BT Click “Next” after selecting “Explore a BT device” Green LED – Battery Charging Power switch 5. Click “Tap here to choose a Red LED- LED ON: Position fixed. LED Flashing: Positioning device” Green LED-.LED ON: Charging batteries. LED OFF: Batteries fully charged or not charging Yellow LED- LED ON: Low power. Blue LED- Flashing once every second: Disconnected Flashing once every 2 seconds: Connected 3 Step Quick Start Guide for Pocket PC Users 1. Place fully charged batteries into receiver and turn it on. 2. Connect the BT GPS receiver to Pocket PC. 3. Enable GPS navigation in your Pocket PC. Click “Tap here to choose a device” 6. While waiting for the BT 11. Now in the BT Manager menu, device search, you will see you will see the POLSTAR the POLSTAR icon appear on the screen. Click” Connect” to link icon in the list. Tap the icon still Click” Polstar” to connect and select the Connect option. 7. Click” Polstar” to connect the BT receiver to your Pocket PC. 8. Enter the Passkey “0000” and then tap “Enter”. 12. When the BT device has been connected successfully, the Tape Passkey “0000” Blue LED will flash once every 2 seconds, compared to once every second when BT was unlinked. In the Active Connection window, you can check whether the BT Then Click “Enter” 9. Select BT available service “SPP” in the Service connection is on or off. 13.The Red LED will be turned on and lit continuously once your i-Geo PRO has determined its current location. If it is flashing then your Select “SPP” Selection menu, and tap i-Geo PRO is still trying to determine its current location. “next” to continue. 14. Your i-Geo PRO will now automatically and continuously receive the Then Click “Next” satellite’s GPS data and transfer to Pocket PC via BT for the navigation application. 10. Now you have successfully Operating Tips created a BT Connection Keep your i-Geo PRO still until the position is fixed, otherwise, it will take shortcut. Tap “Finish” to a longer time to fix the position. The following conditions will affect the close the Connection performance of your GPS, as well as taking more time to establish its Wizard program. location. Then Click “Finish” 1. Vehicles with solar-filmed windows. 2. Presence of tall buildings, using your GPS in tunnels or under bridges. 3. Bad weather 4. Presence of high frequency, voltage or other radio wave sources, such as base stations for mobile phones. If you experience a drop in performance, you can: 1. Move to another location/away from interferences 2. Move to an open place 3. Wait for good weather How to connect your i-Geo PRO to your Sybian-based Smartphone? 1. Under the main screen: 6. Press "Options" to add new device 2. Press the "menu" key and 7. Turn on your i-Geo PRO select before your phone begins "connect". searching for devices Choose “Connect” 3. Choose "BT": 8.You will find the “Polstar” icon Choose “BT” 4. Enable BT function 9. Select "POLSTAR": Enable BT “On” Choose “Polstar” 5. Move to next page for 10. Then key in the pass code pairing device "0000" Pass code “0000” 11. Choose "No". 16. Your Smart phone will search for your i-Geo PRO automatically, Once it is found and connected successfully, the Blue LED flash once every 2 seconds, compared to once every second when there were no connections established. Your i-Geo PRO has now been setup and can be used to receive 12. Once your i-Geo GPS data and transmit it to the PRO has been paired navigation software. with your phone, you will see this screen. 13. Start your Navigation software GPS 14. You can determine your BT GPS-Phone connection status by selecting the GPS status option in the navigation software 15. Execute "Show GPS status" and select "Other BT GPS": Choose “GPS Status” How to connect your i-Geo PRO to your Windows Mobile-based Smartphone? 1.Under the main 6. Press "Menu" to add new device. screen. 7. Choose "Devices". Choose “Devices “ 2. Press "Start" and 8. Then press "Menu". choose "Settings". Choose “Settings “ Choose “Manu “ 3. Choose 9. Power on i-Geo PRO first, before Choose “Connections “ "Connections". 4. Enter "BT" item. pressing "New". Turn on PBT-248, then choose “New “ The PDA phone will start searching for your i-Geo PRO. Choose “Connections “ 5. Enable BT “On”. 10. Once the "POLSTAR" button has appeared, choose "Next". Enable “On “ Choose “Next “ 11. Key in the Passkey "0000" 16. Select "Serial Port" and press "Done" Passkey “0000 “, Then choose “Next” After selecting Serial Port, choose “Done” 12. After pressing "Next", your 17. When successfully paired, PDA phone will display i-Geo you will see the screen on the PRO BT profile. right appear. 13. You will see the information 18. Press "Done" to assign on the right once your phone COM Ports has been successfully connected to your i-Geo PRO. Choose “COM Ports” 14. Please note that GPS data is NOT connected with i-Geo PRO at this moment! Your i-Geo PRO will work once the pairing process has been completed. 19. Following the on screen instruction Key in “Polstar” 15. Because i-Geo PRO uses 20. Choose "New Outgoing BT SPP profile, Port" from the Menu, this is you will see the following because i-Geo PRO sends option. Select “Serial Port” GPS data to your PDA phone Choose “New Outgoing port” 21. Select "POLSTAR" device 26. Navigation software will search available BT GPS receivers. Select “Polstar” 22. Choose COM6 and press 27. When your Navigation "Done" software has found the i-Geo PRO, choose it and press Choose “COM 6” “Establish connection”. Then Choose “Done” 23. COM port assignment has 28. Once the connection is been completed. established, the Blue LED will flash once every 2 seconds. After that, return to the navigation software’s main menu, select "GPS status" 24. Return to the main menu 29. You will see this and start your navigation information when the software navigation software can receive GPS data from i-Geo PRO. 25. Enable "GPS Navigation" Choose “POLSTAR” How to connect your i-Geo PRO to your computer/laptop? 1. Ensure that your BT connections have been correctly setup. 6. Windows will now search for your i-Geo PRO. Once found, Please refer to your computer’s user manual or BT you should see a device named Polstar appear in the list of documentation for more information on configuring BT settings for available devices. Select Polstar and press next. your computer. 2. Turn your i-Geo PRO on. 3.In Windows, click 7. Select the option “Use the passkey found in the documentation”. Start-Settings-Control Panel. Enter 0000 in the space next to the option. Double-click the BT Devices icon in the Control Panel. 4. In the Devices Tab under BT Devices, press Add. 5. Check the box “My device has been setup and can be found” 8. Windows will automatically configure your i-Geo PRO and and press Next. assign an Input and Output COM Port. The Outgoing Port will be used to connect your PC to your i-Geo PRO by your navigation software. Warning Procedure of Deletion: 1. When you want to delete paired i-Geo PRO in your PDA phone, the "COM Ports" MUST BE DELETED FIRST 2. Then delete BT device If you delete the device first, the COM port might be locked by PDA phone as well as COM port may not to be accessible again. Important: The BT functions of your i-Geo PRO will shut down after 3 minutes of inactivity between itself and the computer/PDA/smart phone to conserve power, but will continue to receive GPS signals and calculate its current position. To reactivate the BT functions, please restart your i-Geo PRO by turning the power off then on. Please recharge your batteries immediately when the yellow low battery LED indicator has been turned on. RISK OF EXPLOSION IF BATTERY IS REPLACED BY AN INCORRECT TYPE DISPOSE OF USED BATTERIES ACCORDING TO THE INSTRUCTIONS Batteries Do not charge the batteries in environments where temperatures exceed 45℃ or below 5℃. Do not leave the adapter connected to your i-Geo for prolonged periods of time once the batteries have been fully charged. You should remove the adaptor immediately once the Green LED has been turned off, which indicates that the batteries have been charged. Once the Yellow LED (low power indicator) has been turned on and the BT/GPS functions no longer functions, you should charge the batteries immediately or risk damage to the battery or affect the life of the battery. If the batteries are damaged as a result of improper use (no LEDs turned on when batteries are removed and reinstalled), turn off the power and repeat removing/reinstalling the batteries and the adaptors until the batteries begin to recharge. If the battery is unable to recharge after several attempts, the battery may be fully damaged and you should replace them immediately. Warnings and Precautions Warranty issue: Polstar offers a one-year warranty for all of its GPS solutions. Warning: Do not connect power to this product under poor satellite reception. If the product has been stored for a few weeks and the displayed date is incorrect, or you have traveled a long distance (greater than 500 miles) from where the unit was last used or you use the unit in areas with poor satellite visibility, then the unit may be looking for the wrong group of satellites, so there will be no satellite or too few satellite signals received for several minutes. You have to wait for 10 more minutes until the unit is forced to begin a cold start search, or you can down load PDA Tester from our website to manually force a cold start command at the power-up at http://www.polstargps.com/tech.htm. Warning: This product does not contain any user serviceable parts. Repairs should only be made by an authorized Polstar service center. Unauthorized repairs or modifications could result in permanent damage to the unit, and void your warranty. Warning: Use this product at your own risk. This product is designed to be used only as a navigational aid and must not used as sole means navigator for aircraft or for any purpose requiring precise measurement of location, direction or distance. Warning: The United States government operates The Global Positioning System (GPS), which is solely responsible for its accuracy and maintenance. The system is subjected to changes that could affect the accuracy and performance of all GPS equipment. The specifications of the product can be misinterpreted and become unsafe. Warning: If this product is used in combination with third parties’ mapping software installed on a PDA, it is very important that you understand the operation of your PDA prior to using this product. Please notice that all the mapping data may be inaccurate or may be incompatible with your PDA, which might cause error or malfunctions. Please consult your navigation software or PDA vendor first to resolve the problem before returning this product to Polstar. Warning: When using this product in vehicles; it’s the sole responsibility of the driver to install this product and/or PDA to a secure place so that it will not interfere with vehicle operating controls and safety device, obstruct the driver’s view, or cause personal injury in an event of an accident. It is also the sole responsibility of the driver to operate the vehicle in a safe manner. Do not operate PDAs or other devices while you are driving. This equipment complies with FCC radiation exposure limits set forth for an uncontrolled environment. End users must follow the specific operating instructions for satisfying RF exposure compliance. This transmitter must not be co-located or operating in conjunction with any other antenna or transmitter. Notice: Any changes or modification not expressly approved by the party responsible could void the user’s authority to operate the device. Disclaimer Polstar Technologies, Inc. takes no responsibility for any use of this product that may result in law violation and/or accidents leading to personal injuries and/or property damage. It is the user’s own responsibility to operate the product in a prudent manner that will comply with the law. Polstar will take no responsibility for the consequences caused by inaccurate satellite transmissions. The Government of the United States of America is solely responsible for the accuracy and maintenance of the GPS system. Limited Warranty This written warranty is the complete and final agreement between the original Purchaser and Polstar Technologies, Inc. 1. Manufacturer’s Warranty Polstar Technologies, Inc. (Polstar) warrants this entire product to be free from defects in materials or workmanship under normal use that is consistent with this user manual for a period of one year, beginning from the date of delivery/retail purchase. This warranty will only cover Polstar products that have been purchased directly from Polstar or any Polstar authorized retailer. This warranty only applies to the original Purchaser and will be deemed void by Polstar when the possession of the product is transferred to any subsequent owner(s). 2. Purchaser’s Remedy The Purchaser’s exclusive remedy under this warranty shall be limited to the repair or replacement of the product. This is at the discretion of Polstar and is free of charge for labor or parts. All warranty services must be made at Polstar, the place of purchase or any Polstar accredited service centers. 3. Purchaser’s Duties To obtain warranty services for a defective product, the Purchaser must return the product complete with the original parts and components, along with the original sales receipt as proof of purchase to the place of purchase or a Polstar accredited service center. The purchaser will be solely responsible for the costs involved in returning the product to Polstar, the place of purchase or a Polstar accredited service center, such as but are not limited to: insurance, packaging or transportation. 4. Exclusions of Warranty This warranty will not cover damage, defects or failures caused by the following: a. Unauthorized repairs, services and/or modifications made to the product. b. External causes, such as abuse, use of the product that is inconsistent with the instructions of this manual, accident, shipping, exposure to liquids or failure to acknowledge warnings in this user manual and the surroundings. c. Disasters or events such as but are not limited to war, accidents, fires, earthquakes, hurricanes and floods. d. Negligence by the Purchaser. e. Using the product outside the recommended operating conditions specified in the specifications of the product. Any service or modification performed on the product other than routine cleaning must be performed by a Polstar accredited technician, at a Polstar accredited service center or at the place of purchase. Failure to do so will void your warranty. 5. Exclusion of All Damages Polstar disclaims any liability of any kind for any damages, incidental or consequential whatsoever as a result from using this product to the Purchaser or any other person. By using this product, you hereby waive the damages stated in this Limited Warranty, which includes, but not limited to loss of profits, damages or expenses resulting from the use of the product. 6. Exceptions The legal rights stated in this Limited Warranty may differ from country to country. In countries that do not allow the exclusion or limitation of incidental or consequential damages, the limitation will not apply to you. In countries that do not allow limitations on implied warranty or how long an implied warranty lasts, the limitation will not apply to you. FCC Statement The changes or modifications not expressly approved by the party responsible for compliance could void the user's authority to operate the equipment. User Information This device complies with part 15 of FCC Rules. Operation is subject to the following two conditions: (1)This device may not cause harmful interference, and (2)This device must accept any interference received, including interference that may cause undesired operation. To comply with FCC RF exposure requirement, this device and its antenna must be not co-located or operating in the conjunction with any other antenna or transmitter. Property of Polstar Technologies, Inc. Subject to change without notice. All rights reserved. Other trademarks and trade names are those of their respective owners. Specifications Receiver Accuracy Acquisition Time Sensitivity Dynamics Navigation Update Rate BT Coordinate Datum Power Consumption Battery Life (Min) LED Indicator Operating Temperature Storage Temperature Humidity Dimension Antenna Type Tracking up to 20 satellite L1, 1575.42 MHz, C/A code Position: 2DRMS approximately 5m, WAAS support Velocity: 0.1m/s without SA imposed Time: ±1 s Cold Start: 42s (Average) Warm Start: 38s (Average) Hot Start: 1s (Minimum) Acquisition: -148dBm Tracking: -159 dBm Max Altitude: 18000m Max Velocity: 515m/s Max Acceleration: ±4g Once per second BT interface Baud Rate: 4800 bps NMMA 0183:GGA, GSV, GSA, RMC WGS 84 Typical (tracking): 135mA @ 3.3V. Rechargeable Li-ION battery: 12 hours Red: GPS Status Blue: BT Status Green: Charging Yellow: Low Power -10℃~+60℃ -40℃~+85℃ 5%~95% 74x43x28mm Built-in Patch Antenna