1
16x62 Robot User’s Manual
Introduction
Welcome to 16x62: Robot Programming Laboratory. This manual is your guide to the
Nomad Scout robots that you will be programming this semester. This guide details the
robot hardware, operation, communication, and user software.
Robot Hardware Description
Mechanical System
The Nomad Scout mobile base is a differential direct drive, non-holonomic system (can’t
go sideways) with zero gyro-radius (can turn on a dime). A dedicated 68332 board
performs all the hard work, with help from an hc6811 that controls the 16 sonars. The
base has a maximum translational speed of about 30 inches per second (approximately)
and a maximum rotational speed of 50 degrees per second.
Electrical System
Each robot uses two large and heavy sealed 12-volt batteries. We estimate the maximum
running time of a robot with fully charged batteries to be about 12 hours. This is based
on the fact that the processors use a total of only 500 milliamps. But the batteries are
sealed lead-acid batteries. If they are fully depleted (deep-cycled), they won’t last
through this semester. Avoid using a robot for more than six hours straight. The
batteries can last hundreds of shallow cycles. Do not remove the batteries from the
scouts and/or swap batteries between scouts. Ever.
The scout has a very nice feature: a built-in charging unit. To charge the scout, simply
plug it into the wall. There is one huge catch: THE ROBOT MUST BE ON FOR THE
CHARGING CIRCUIT TO WORK. This means no matter how long you leave it
plugged in, if the scout is off, charging will not happen. So, at night, when you tuck the
scouts in, leave them plugged in and on.
Like R2D2, the scouts communicate with you by beeping. When you plug them in (and
they’re on!), they will emit two short beeps. Then, if the batteries are half-full, you’ll
hear two long beeps. If the batteries are totally full, you’ll hear 4 short beeps. If you
hear a continuous beep during operation, that’s the low battery warning beep. Plug
the robot in (don’t turn it off!!!) immediately.
Of course, the Toshiba notebook housed on top of the robot runs off its own battery (or
ac adaptor). The Toshiba battery only lasts about 3 hours. In a cruel twist of fate, the
Toshiba batteries are Lithium, which means deep-cycling them is good! One really nice
feature of the Toshiba’s is, if you close the lid, the monitor turns off (after a high-pitched
1
squeal) but your program keeps running! To preserve your notebook battery, close the
lid whenever you don’t need to see what’s on the screen This makes a huge difference
to the battery’s discharge rate. Also, whenever you and your robot aren't moving, plug
that portable into the wall. There are extension cords for this purpose awaiting you in the
Lab. Important points to remember: ALWAYS leave the portables in the Lab overnight
(they really, really don’t want to go home with you) .
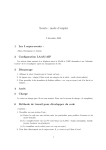
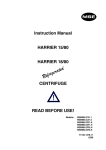
The Sonar System
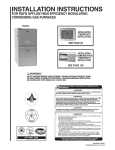
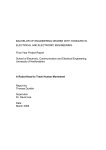
The round gold ‘coins’ are the robots’ only range sensors: sonars. These transducers
provide surprisingly accurate range information from 6 inches to 255 inches. Each
Polaroid Tranducer has a beam width of about 25 degrees, although there may be
variation in this beam width, or half cone, from sonar to sonar. A single sonar unit
works as follows: The transducer emits a series of 16 pulses at a frequency of 49.4 KHZ.
The echo receiver circuitry is disabled, or "blanked," for about 1 millisecond during and
slightly beyond this emission phase so that the initial pulses are not detected as echoes.
This blanking has a serious effect at close ranges, known as double echo. If the robot is
closer than about 3 inches to an object, then the return echo from that object could occur
while the echo receiver circuitry is still blanking. Therefore, the object might appear to
be farther away than it actually is. Also, a sonar signal will bounce away instead of
returning if it hits a smooth object at a shallow angle of attack-- in effect, it can glance
off coherently. This will also result in the strike distance being larger than it should be.
1
0
22.5 deg.
15
14
2
13
3
12
4
11
5
6
10
7
8
transducer
9
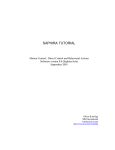
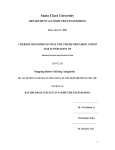
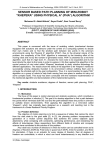
The Bumper System
The Scout’s bumpers are not great—so consider yourself warned. There are six discrete,
pressure-sensitive strips, arranged as in the following diagram.
0
1
5
2
4
3
2
The value of the bumper state communicates which bumpers depressed. The lowest
order bit represents the status of bumper 0 (0 for no contact, 1 for contact), and so on.
For example, the bumper state 0 means that the scout is touching nothing. Checking for
bumper state to be nonzero is about all you’ll need to do for at least the first 50% of
this course.
Hardware Failures
If you suspect a hardware problem, send email immediately to illah@cs. Always use
common sense. For instance, if the wheels of the robot are clicking violently or the robot
is smoking profusely, stop using it to avoid further damage until we take a look at it.
Robot Operation
Turning Robots On
Each robot has a grey push-power switch. Simply turn the robot on using this switch.
You’ll notice that when you turn the robot on, nothing dramatic happens. The sonars
won’t even begin echoing. But the small green power LED turns on. To turn on the
sonars and move the robot requires software “on” commands from the portable. That is
where the fun begins.
If the robot’s emitting a high-pitch squeal as it sits rammed into a wall, the motors are
being overdriven. Turn the robot off using the red push-switch, then stop your program
and debug away!
Moving the Robot Manually
You should never try to move the robot manually when the portable is sending motion
commands to it. Doing so will cause damage to the robot and possibly to you. To push
the robot around, stop sending commands to the robot and wait a few seconds to ensure
that the command has timed out. Another way to move the robot is to turn it off before
pushing, to ensure that the wheels are not locked. Pushing the robot around is perfectly
fine, but if you want to show off your muscle, you can even lift the robot. Please, don’t
lift the robot with the portable on top of it over long distances, then cause both to come
crashing down.
Now there is a solution to pushing the robot manually or lifting it: it’s called the joystick!
Just plug it in, turn the robot on, and away you go. Catch: when trying to use the
joystick, as a dead-man’s switch, you must be pushing down on one of the buttons beside
the joystick. It doesn’t matter which one.
3
Communication
The Setup
Each robot needs a portable as its brain. The robot and portable talk to one-another via
the serial-port on the left side or back side of the portable, and the port labeled “host” on
the robot. This means you must plug the serial plug from the robot “host” port into
the serial port on the portable. I guarantee you that, the second time you think the
robot’s broken, you actually just forgot to plug the serial ports together (the first time,
you forgot to turn it on).
On every portable, our class directory is "Robot User." Each group should create their
own folder within the Robot User folder. In your group's folder, you may do whatever
you want. Further down this manual, we tell you how to set up your own Symantec
Visual Cafe JAVA development environment in your folder. Do that. The development
environment that you create will include a source class called “RobotController.” This is
the code for the low level interface that allows the portable to talk to the robot. This
JAVA code actually calls a C dynamic link library (cscout.lib and cscout.dll) where the
goodies are really implemented. You can look at all the C side source code, if you care,
in the Robocode site off of Illah’s website.
Please remember to back up your work. Every laptop has a disk drive in its belly, and
you have received a team disk for this class. Java code doesn’t take up much room; thre
is no excuse for you to lose your code. Also, there is no guarantee that, from one work
session to the next, you’ll be able to use the same notebook. So you probably want your
code on disk anyway.
From You to the Robot: the simple version
The software section below will tell you how to create your robot development
environment in Visual Cafe. Once that is done, your most important command to the
robot is the function: setVel(leftwheel, rightwheel) . This function (like the several
other robot commands) sends a stream of characters via the serial port to the robot. This
stream of characters encodes your intended rotational velocities for the two wheels of the
robot, in tenths of inches per second. For instance, setVel(200,200), would mean, 'move
forward at 20 inches per second.' The range of velocity is an INTEGER between -300
and 300 (a negative velocity indicates backward movement). The indoor spaces are
very confined; thus, you should not specify velocities anywhere near 300 or -300 in
any case.
The behavior of the robot when it receives a command of the form
as follows (in this order):
1) Updates sonar and encoder values from the robot into
setVel()
is precisely
stateArray.
4
2) Begins executing, simultaneously, the specified wheel speeds.
3) Continues executing this motion until the robot receives a new
command of any kind or until the command times out. This timeout
defaults to the value: 2 second. However, you have the power to change this
default (to accomplish such feats, refer to the For Experts Only section of this
manual, which describes all available robot commands.
You need to use two other commands at a minimum. Please note-- you can use only the
four commands described in this section and will be able to complete all lab assignments
and even win the final contest. You do not need to look at the For Experts Only section
to do well in this course. I may be wrong.
The last two commands are the easiest to describe. To use the sonars, you’ll need to turn
them on. Do so by issuing the turnSonarsOn() command. To turn them off when they
get on your nerves, use the turnSonarsOff() command. This is a good idea in general
because it also saves battery power. When your program exits, it would be a good idea if
it automatically send a SonarsOff() command to the robot, but if the robot doesn’t
receive this command, you can turn off the sonars by physically powering down the
robot.
By the way, we are using a completely object-oriented environment. So, there is a class
called RobotController. Strictly speaking, the way you use the above commands is by
creating an instance of RobotController and calling it something like myDumbRobot.
Then, you tell the robot to move by typing in myDumbRobot.setVel(20,20). Et cetera.
From the Robot to You
When you issue a command to the robot, the State_Array slot in your instance of
RobotController is updated. The following is your guide to interpreting stateArray.
Note that we tell you more than you need to know for this class about this state vector.
In particular, you will probably use the sonar readings and the integrated
encoder/position readings, but you may never use the measured velocity readings or the
motor status reading. Interesting idea: you can use the motor velocity readings to see if
you're pushing against a wall or another robot!
NOTE: stateArray is an array of int’s, so you access its elements using the C-based
syntax, stateArray[index].
Return Value
5
The first element of the stateArray [0] is the C-side return value of the last executed
command. You can ignore this unless you’re a cool hacker.
Sonar Values - index 1 - 16
These are the 16 sonar sensor readings. Each element is an integer between 5 and 255,
where the integer is precisely the number of inches from the sonar transducer to the
object that caused an echo.
The sonars are arranged in a counterclockwise direction with the sensor in the twelve
o'clock position being index 1 (element 1 of the array) and the sensor at the one o'clock
direction of the robot being element 16 of the array.
Integrated Position Encoders - index 17 - 19
These provide the robot's idea of its position based upon its encoder values. 17 provides
position along the x-axis, 18 provides position along the y-axis, 19 provides the angle of
the robot with respect to their orientation when the robot was turned on. When you turn
the robot on, the encoders are all set to zero. That m eans that the robot resets its
Cartesian grid to be lined up with its current orientation, whatever that may be —with the
robot pointing straight up the X axis, with Theta = 0 .
As the robot moves, the encoders show the robot's position and orientation on that grid
using tenths of inches and tenths of degrees. The range of values for the robot’s encoded
angle is from 0 to 3599. X position and Y position can have positive or negative values,
depending on the quadrant that the robot is in within its make-believe Cartesian grid.
The x-axis is aligned with the 0 degree orientation -- if you think about this a bit, it
makes perfect sense.
There's an important reason why you shouldn't blindly trust your encoders: they are
subject to compounding error-- the wheels slip asymmetrically on the carpet. Once the
rotational encoder is off even a little, the entire x-y position will become more and more
inaccurate as the robot moves.
You’ll be accessing these elements often, and we wanted you not to have to remember
numbers like 17, 18 and 19. So we’ve made static constants for you: XPOS, YPOS and
THETA (among others). So, for instance, to check your robot’s angle, if your
RobotController instance is named RC, you’d type:
RC.stateArray[RC.THETA]
Wheel Velocities -- 20 and 21
These are the current translational velocities of the robot’s wheels. You probably will
never look at these, although it might be fun to look at them after issuing a command to
see how well the built-in PID motor controller matches the actual velocities to the ones
you requested. Again, we’ve defined constants for you: RVEL and LVEL.
6
Bumper Status -- 22
This is another really important sensor. The bumper status will be zero if none of the
bumpers are depressed. If any bumper is depressed, this will be nonzero. By the way,
there are really 6 separate bumpers on the robot, and each one can be on or off. And
from this one number you can figure out which are depressed and which aren’t. But
don’t you bother with that just yet.
User Software
You will be writing Java code in Symantec Visual Cafe Version ?.?. You need to create
your own project directory, which will include all the interface code that we have written
to enable your computer-robot communication.
To set up your own team directory, make a directory in C:\16x62 for your team,
then copy the directory, C:\16x62\SampleBot, into your directory.
WARNING: Copy these files, don’t move them!!! To select multiple files, hold down the
Ctrl key. To copy instead of moving, just use Ctrl-C and Ctrl-V rather than drag-anddrop. If you move the files and wreak havoc, we will make you brand new a fresh 9 volt
battery.
Now we are going to walk you through the code in SampleBot and lead you through a
tour of how to use this stuff. To do this tour properly, you need a robot and a portable
(duh).
WARNING Before you do this tour, it would do you well to go through our Java Primer
(and set up the brainless calculator). We will assume that you have already done that
when you do the following!
Let the Tour Begin
Let’s go to the SampleBot directory in your team’s directory. Look at the files. The
ones you care about, and what they are:
Applet1.java This is the java code for the outermost shell that we use. We
always wrap things in an applet so that, someday, you can put your code on the
web.
Cscout.dll, Cscout.lib This is the C code that we link to your program to enable
Java to talk to the robots via serial link.
7
Robot.java This is the sample code that we have written to control the robot.
When you write your own Robot.java, you will have the robot doing your own
things!
SampleBot.vep
project open.
This is the project file that you double-click on to get the
SonarConsole.java Simple code that allows you to draw a little graphic of the
sonar hits on the screen.
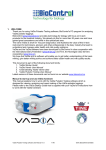
Okay. Now start up SampleBot in the development environment by double-clicking on
SampleBot.vep.
The project window at left shows the main ingredients: Applet1 is trivial,
RobotController is what we supply for talking to the robot, SonarConsole is what we
supply for drawing sonars and Robot is where you put your code.
Now double-click on Robot so we can show you key features of your coding
environment.
Robot - Form Designer shows you the layout of our sample Robot Java window. We’ve
put two buttons on this window and by looking at the code we’ve written for these two
buttons, you’ll learn just about everything you need to know to start hacking robotics.
Double click on the Form Designer, anywhere, to look at the source Java code.
As you can see, this is just a subclass of Frame. The extra global variable we added is a
RobotController, RC. In the constructor, after the auto-generated code, you will see that
we make this window visible, we instantiate RC to be a RobotController instance, and we
open the serial port of the portable so it can gab with the robot.
Now choose the button2’s MouseClick event code. This is the code that runs when you
hit the button, “Run Sonar Loop.” The interesting thing here is, first of all, that we
create an instance of the one other class we’re giving you: SonarConsole. This instance
literally pops up a little window in which the sonar values are drawn. The method,
DrawSonars() does the job, and takes as an argument the RobotController where
SonarConsole can find the stateArray (where the sonar values are stored).
So, this code opens up a sonar drawing window, turns on the sonars of the robot, then
goes into a loop, updating the stateArray each time, printing out the front sonar’s value to
the Messages window, and redrawing the sonars. In the meantime, it checks to see if the
bumper is in. If it is, the whole program exits (to show you how to use exit()). It also
waits half a second between subsequent cycles.
Connect up the portable to a robot and try this program out. Notice that in the Messages
box you can see the front sonar’s value printing out. Play with the sonars on the robot
(hear them clicking?) and try stopping the program with the bumper. Notice that the
8
sonars stop too. That’s because we were careful to turn them off in the program, right
before the System.exit(0) call.
Note: if you couldn’t have stopped the program with the bumper, the only way you could
have terminated it would have been with Ctrl+Alt+Del. It’s a pain, we know. The deal
is, this is truly a single-threaded machine—for simplicity and to ensure that your robot
control software gets plenty of processing cycles. So, once you’re running an infinite
loop, none of the other buttons on your program work any longer.
Now let’s look at the MouseClick code for button1 (“Run Sample Program”). Go ahead
and run this program—but make sure the robot has some space in front of and behind it,
and unplug the portable and robot from the wall. The robot’s looking at the values of the
front-most and rear-most sonars, and moving away slowly from whichever is shorter.
Hit the bumper and the loops stops, returning you to your “Robot” console. You can see
how the front and back sonar values are retrieved from stateArray. Done deal.
Goodies
There are actually quite a few goodies that we'll give you over the course of the quarter.
Some are edible, some are good functions to do cool things like get your robot to talk to
another robot (not so edible). So look for them!
9
For Robot Experts Only (not really)
The following is a complete description of all robot interface functions available to send
commands to the robot. They all update stateArray, identical to setVel. They are all
methods in RobotController.
int serialOpen()
Open the serial port of the portable so it can communicate with the robot.
int serialClose()
Close the serial port of the portable. Now why would you want to do this?
int turnSonarsOn()
Turns all 16 sonars on in some nice firing pattern and firing speed. Use this at first.
NOTE: this method actually just calls configureSonars() with delay of 4 and a simple
circular firing pattern for all the sonars. Literally just a call to configureSonars!
int turnSonarsOff()
Turn all the sonars off when they get annoying.
int GS()
Get the stateArray all updated. You do NOT need to call this function if you call any
other robot command function, since stateArray is updated when any robot
communication is performed.
int setVel(int leftVel, int rightVel)
Your bread-and-butter. Set the velocities of the left and right wheels, in tenths of inches
per second.
int killMotors()
This command is a much more graceful way of causing the robot to stop than setVel(0,
because the latter command causes the motors to freeze while killMotors simply cuts
off power and allows the robot to coast to a halt.
0)
int setAccel(int leftAccel, int rightAccel)
Configure the acceleration of the left and right wheels of the robot (make it the same
please!), in tenths of inches per second per second. Default is: about 100.
int configureSonars(int firingRate, int[] sonarOrder)
You can use this command to specify how long the robot should wait between firing
sonars and which sonars to fire and in which order. The firing rate is a number
specifying how many 4 millisecond intervals the robot should wait between firings. Set
it to a number between 2 and 254. Hint: use 4 or more. The sonarOrder is an array
containing exactly sixteen integers. The order of the numbers indicates the firing order.
If you want to fire only the front three sonars, sonarOrder would be
{0,1,15,255,0,0,0,0,0,0,0,0,0,0,0,0}. As you can now guess, after you put in all the
sonars you care about, put in a 255. Make sure the whole array is 16 long (buffer it with
zeroes). If you want just the back sonar to fire, here’s what you do:
int[] sonars = new int[16];
10
sonars[0] = 8;
sonars[1] = 255;
sonars[2] = 0;
sonars[3] = 0;
...
sonars[15] = 0;
configureSonars(4, sonars);
Note that the sonars’ numbers are 0 through 15. 0 is straight ahead, 15 is 1 o’clock.
Yes, I know, in State_Array, they’re index numbers 1 through 16. But the sonars’
actual numbers, for purposes of ordering them in ConfigureSonars, are 0 - 15.
Furthermore, note that if you call turnSonarsOn() after calling this method, then your
configuration will be clobbered. ConfigureSonars() actually causes the sonars to be
“on” when used right, so never call turnSonarsOn() afterwards!
int setTimeout(int timeout )
This command allows you to reset the amount of time after which a velocity command is
thrown away and the robot "limps" it if received no further communication. The default
is two seconds. Remember, the best way to override a velocity command is to simply
send another one! The parameter is an integer number of seconds. We believe if you set
timeout to be 0 then a command never times out. In terms of safety, that’s a bad idea!
11