1
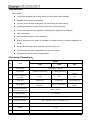
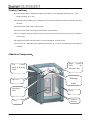
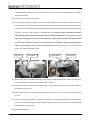
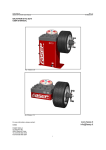
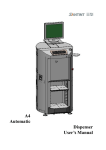
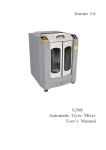
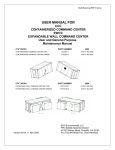
G36 Manual Clamping Gyroscopic Mixer User Manual Contents Contents.……………………………………………………………………………………………… 1 1 Introduction……………………………………………………………………………………… .2 2 Technical Parameters........................................................................................................2 3 Safety Cautions…………………………………………………………………………………..3 4 Machine Components………………………………………………………………………..3 5 Control Panel……………………………………………………………………………………..4 6 Installation………………………………………………………………………………………...4 7 C o n t ro l P a n e l B u t t o n s … … … … … … … … … … … … … … … … … … … … … … … … … .4 8 Mixing Range and Speed……………………………………………………………………….5 9 Testing and Operation…………………………………………………………………………..5 10 Warning Label.....................................................................................................................7 11 Maintenance........................................................................................................................ 7 12 Troubleshooting................................................................................................................. 8 13 Nameplate………………………………………………………………………………………….9 14 Circuit Diagram……………………………………………………………………………………10 G36 Version: V1.0.0 1/10 1 Introduction: G36 features: The door is equipped with viewing window for observation of the operation. Available door protection mechanism. Top door and tri-direction-sliding-door are user-friendly and space saving. Clamping mechanism is linked with the upper door for easy clamping. Pull-out lower plate for easy operation of loading cans. (Applicable to G36H/M). LCD control panel. Multi-functional buttons for easy operation. Built-in integrated circuit board is available for multiple choices of speeds (Applicable to G36H). Automatic positioning system provides protection for the can. Overall sealing structure is applicable to severe environment. Equipped with castors for easy transportation. 2 Technical Parameters: Model NO Item G36H 1 Power Supply 2 Motor Power 3 Power of Frequency G36M G36L 220V50Hz or 110V60Hz 0.75kw(Tri-phase Motor) 0.75kw(Single Phase) 0.75kw(Single Phase ) Converter 4 Lower Tray 5 Mixing Speed 6 0.75kw N/A N/A Pull-out Tray Pull-out Tray Non-Pull-Out Tray 125rpm/150rpm/ 200rpm(Manual Selection) Opening and Closing 150rpm(Fixed Speed) Speed) 80mm~420 mm Height of Clamping Plate 7 Mixing Ranges 8 Applicable Can Size 9 Mixing Time Range 10 Dimension 780×860×1050 mm(Width×Depth×Height) 11 Weight 230kg 12 Noise <70dB(A) G36 150rpm(Fixed 1L~20 L Can Diameter: 50~360mm Min:30 S Max:900 S Version: V1.0.0 Height: 90~400mm Time Span:30 S 2/10 3 Safety Cautions: 3.1 Power Supply: Refer to Nameplate. Voltage: rated voltage ±10%. Applicable temperature: 0ºC~55ºC. Relative humidity: 15%~90%. 3.2 Read this manual carefully prior to installation and/or operation. Children should never operate or play with the mixer. 3.3 Make sure the power outlet is well grounded. 3.4 Disconnect the mixer from the power socket before any maintenance. 3.5 Do not lengthen the power cable. Disconnect the power when the mixer will not be used for an extended period of time. 3.6 Adjust the feet and to level the machine. The castor should not touch the ground. 3.7 Do not use in a flammable and/or explosive environment. Do not use to mix flammable and/or explosive materials. 4 Machine Components: Right Control Panel & Warning Label Left Control Panel & Warning Label Warning Top Cover Label Unlocking Label Shell Viewing Window Tray G36 Version: V1.0.0 3/10 Notes: 1. Front loading label: The maximum mixing weight. Overloading is prohibited. 2. Left control panel & warning label: confirm all the can capacities to select the proper knob position prior to starting the mixer. 3. Right control panel & warning label: confirm the lower loading tray is fastened prior to starting the mixer. 4. Warning label: rotate the handle in line with the illustration. 5. Unlocking label: push the locking handle to the unlocking position to open the top cover and the viewing door. 6. Back warning label: disconnect the power supply prior to any maintenance. 5 Control Panel The above figures represent the G36H control panel. G36M/L have the same panels with the exception of the tri-position knob on the left control panel. 6 Installation: The mixer has been tested prior to leaving the factory. Please follow the steps below: 1. Open the carton, dismantle the feet plates, level the mixer onto the ground, and move it to the desired position. 2. Rotate the feet clockwise to land them. Adjust the feet to level the mixer. 3. Take out the clamping rotary plate; use the attached inner hexagon wrench to fix it onto the G36 upper door with 3 inner hexagon screws. Clamping Rotary Plate G36 Version: V1.0.0 4/10 7 Lower control panel buttons: Time - + ● Minimum and maximum mixing times are 30 and 900 seconds respectively, in 30 second intervals. ● The time knob can be rotated clockwise or anti-clockwise. ● The mixing time increases when the knob is rotated clockwise, beginning at 30 seconds until reaching the maximum time of 900 seconds. ● The mixing time decreases when the knob is rotated anticlockwise, beginning at 900 seconds until reaching the minimum time of 30 seconds. ● The defaulted mixing time is 180 seconds. ● After setting the mixing time, the default mixing time will be changed simultaneously. Start · Stop · Reset ● When the LCD shows [Ready], press the [Start] button to begin mixing. ● While the mixer is in operation, press the [Stop] button to end the mixing. ● When the Emergency Stop Button is pressed, release it, then press the [Reset] button. ● Note: This button is multi-functional for easy and reliable operation. Emergency Stop Button ● Press this button to stop the mixer in case of emergency. The LCD panel displays “Emergency Stop Button Pressed”. ● If the mixer is restarted, rotate the emergency stop button clockwise to be reset. Once the emergency stop button is released, press the [Reset] button to reset the mixer. Tri-Position-Button ● Select the knob position appropriate of the can volume being mixed. *Applicable to G36H* 8 Mixing Range and Speed Can Size High Speed 200r/min 1-5L √ G36M/L (Fixed speed) / G36H Medium Speed 150r/min Low Speed 125r/min Minimum Height: 90mm (Manual speed selection) 6-10L Notes √ √ 11-20L 9 Testing and Operation: 9.1 Connect the power supply then turn on the mixer. The LCD panel will then display “Wait” followed by “Ready”. In G36 Version: V1.0.0 5/10 the event the LCD panel displays “Emergency Stop Button Pressed”; rotate it clockwise to release it. Once the LCD panel displays “Ready”, the mixer is ready to be used. In the event the LCD panel displays “Press Reset”, follow the instructions. 9.2 Seal the can and fasten the can handle. 9.3 Push the locking handle of the upper door to the unlocked position. Push the upper door to open the viewing door thoroughly. As for G36H/M, lift the lower plate locking handle to unlock the lower plate and pull out the tray. Locate the can(s) in the center of the tray with the consideration of the can size and quantity. Push back the tray and lock it. For G36L, locate the can(s) in the center of the tray. Hold the handle and rotate the clamping plate clockwise. When the upper plate touches the can, rotate it another 60°for a 5L (1 gallon) can and 100°for the 18L (5 gallon) can. For the cans between 5L (1 gallon) to 18L (5 gallon), the rotation should be 60°to 100°. If several 5L (1 gallon) cans or smaller cans are mixed, the larger can setting should be used. (Set the proper pressure to avoid can deformation.) Close the viewing door. The LCD panel will display “Door Open” if improperly closed. Upper Door Locking Handle 锁定手柄 Clamping Handle Clamping Plate 9.4 Set the mixing time: The default mixing time is 180 seconds. Rotate the time knob to adjust the mixing time. The newly adjusted time will remain until another time is selected. 9.5 Mixing speed: Single speed only for the G36M/L. The mixing speed of the G36H can be selected manually in accordance to the can size. 9.6 Press “Start” for mixing. The LCD panel will display “Mixing in process”. You may press “Stop” to stop mixing at any time. 9.7 Press the “Emergency Stop Button” in case of any emergency. The mixer will stop after the mixing is finished and the LCD panel will display “Mixing Finished”. Open the viewing door and rotate the clamping plate anticlockwise to remove the can. 9.8 Repeat the foregoing 2-7. G36 Version: V1.0.0 6/10 10 Warning Label: 10.1 The handle should be unlocked to open or close the viewing door. 10.2 Seal the can properly. Fasten the can handle. 10.3 Make sure the can is clamped properly prior to closing the viewing door. Confirm before starting the mixer. 10.4 Press the “Emergency Stop Button” during mixing in case of any emergency. 10.5 The can should not be easy to be deformed. 10.6 The lower tray should be located properly. Make sure the tray is locked properly to avoid any issues. (Applicable to G36H/M). 10.7 P r e s s t h e “ E m e r g e n c y S t o p B u t t o n ” i f t h e m i xe r d o e s n ’ t w o r k o r r u n s t o o s l o w l y . T h e motor/frequency power might be damaged. 10.8 Pull the door to open it. It can also be opened it manually with a screwdriver, or you may press “Reset” and then open the door. 10.9 Only certified technicians should be allowed to dismantle the mixer. 10.10 The can should be centered and/or located symmetrically. 11 Maintenance: Regular maintenance should be done in order to keep the mixer in good working condition. Perform any maintenance only after disconnecting the power supply. (Only certified technicians should be allowed to dismantle the mixer). 11.1 Keep the inside clean. Clean off any paint on the guide screw and the guide rail. 11.2 Lubricate the guide screw and guide rail once every three months. 11.3 Lubricate the transmission system of the bevel gear once every six months. 11.4 Tension the belt once a year. G36 Version: V1.0.0 7/10 12 Troubleshooting Issue Cause Solution 1. No power. Check the socket/plug/switch. 2. Fuse/power wire is disconnected. Replace the fuse/power wire. 1. Motor issue. 1. Replace it. 2. AC contactor issue. 2. Replace it. 3. Interface plate issue. 3. Replace it. 4. Wedged belt is loose. 4. Tension it. 5. Frequency convertor issue. 5. Replace it. 6. Optocoupler for testing the off-issue. 6. Replace it. 1. Frequency convertor protection appears. 1. Turnoff the power supply and 2. Connection line for testing the frequency restart it after three minutes. Nothing displayed in LCD “Issue in operation system” “Frequency convertor protection” converter is disconnected. 1. The emergency stop button is pressed in. 2. Reconnect it. Release it. “Emergency Stop Button 2. Emergency stop button issue or the Unreleased” Replace or reconnect the wire. connection wire is disconnected/loose. 1. The door is not closed properly. Close the door properly. 2. Winding displacement plug is loose or the Fasten the plug or replace the “Door Open” connection wire is off. Noise and vibration increase. wire. 3. The sensitive switch doesn’t work. Adjust it. 1. The mixer is not leveled. Adjust the feet to level it. 2. Cans are not properly placed. Located them symmetrically. 3. Overloading. Decrease the loading weight. 1. The chain is broken. Replace it. No clamping when the clamping plate rotates. Contact your agent in case of any other issue(s)! G36 Version: V1.0.0 8/10 13 Nameplate Nameplate G36 Version: V1.0.0 9/10 14 Circuit Diagram Circuit Diagram G36 Version: V1.0.0 10/10 ZHENGZHOU SANHUA TECHNOLOGY & INDUSTRY CO., LTD. Postal Address: Xushui Industrial & Trading Park, Zhongyuan West Road, Zhengzhou City, Henan Province, P.R.China 450042 Tel.:+86 371 67857219 E -mail: [email protected] Fax:+86 371 67857319 http: //www.santint.com