1
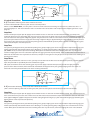
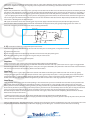
CB RPCP Pick
COMPLETE USER MANUAL
By Chris Belcher
CB RPCP
CB RPCP
The CB RPCP Pick
Tension
Bar
Picking
Stem
Thumbturn
Picking
Wire
Picking
Wire Tip
Collar
• IN KEYWAYS GAUGES: 8g, 7g or 5.5g
• FOR STANDARD CURTAIN LOCKS INCLUDING THE ERA FORTRESS
• THIS PICKSET COMES WITH 1 CB STANDARD WIRE + THUMBTURN AS THIS IS BY FAR THE MOST NEEDED
VERSION OF OUR WIRES
• MANUFACTURED BY BRITISH PRECISION ENGINEERS IN ENGLAND
• MADE WITH STEEL AND ALUMINIUM FOR THE THUMBTURN
• INCLUDED ARE THE BASIC INSTRUCTIONS
• ADVANCED WIRE TECHNOLOGY - REDUCING THE NUMBER OF WIRES NEEDED FOR DIFFERENT LOCKS
Technical:
We have designed a very simple looking tool which has the originality of a reversible pick for left and right mounted locks. Using
the approach of light-handed manipulation of the lock, you’ll even surprise yourself.
For those of you who are new to this type pf tool, enclosed are basic instructions to get you on your way.
Please work your way through and take your time understanding ‘our approach’ to really knowing what’s inside a lock. Know your
levers, and what the differences are, and you’ll soon be opening the locks.
2
CB RPCP
How to use the Left & Right Facility:
Although the Picking Stem is seperate to the Picking Wire, this is where this tool became the 1st Curtain Pick to have a Picking Wire
NOT integral to the Picking Stem. This allows for far more manoeuvrability with reaching under levers than ever before. Therefore,
it takes a little while for the user to get used to handling this tool if you have been used to using other tools. After some practise
the user should start to benefit from the freedom that the CB wire brings.
In the photo (above) you can see the ‘Drive Fin’ or ‘Lip’ along the whole length of the stem, next to the lip is a V cut away, the
Picking Wire sits in this V, as well as sitting in the V cutaway in the Collar, this is the basic position of the Wire sitting on the Stem.
The ‘Drive Fin’ or ‘Lip’ has been designed to rotate the curtain, however, in it’s design it adds strength to the stem. Along the Lip
are two small square notches; these are specifically designed for the use of this tool on the ERA Fortress lock (Though you’ll need
a CB F Wire + Thumbturn in addition to this kit)
In the photo (left), it can be seen that the Thumbturn is sitting
half way along the length of the Picking Wire, changing from
a left handed pick to a right handed pick.
To slide the Thumbturn along, slightly release the grip of
the two halves of the Tumbturn on themselves - this will
release the gripping tension on the picking wire and slide it
from either left or right. Remember to tighten the Tumbturn
once the picking tip sits comfortably at the recess of the
Thumbturn. Do not trap the picking tip within the main body
of the Thumbturn as this will distort the picking tip. This is the
same procedure when it comes to the Collar and Stem.
In the start position before turning the tool:
For a left hand mounted lock, the picking wire should be on the right side of the Lip.
For a right mounted lock, the picking wire should be on the left side of the Lip.
If you are working on a 5g keyway, you need to use the 5/5.5g tool, if on the 7g keyway, use the 7g tool etc
3
CB RPCP
Picking Method
The Golden Rule remains the same.
If you are new to the CB curtain picking range, please read the following notes regarding Basic Curtain Lever Lock
Picking see page 9 where you’ll find Tips and Hints for using the original CB Pocket Curtain Pick.
The method is the same.
Insert the picking wire, raise the picking wire up to the pick stem making sure that it seats on the correct side of the Lip / Drive Fin.
For the standard gauges, insert the picking stem until it stops.
If you are using the original CB picking wires from the original CB RPCP, you may need to bring the picking stem out to one gauge
size below the gauge of the keyway to allow the original wire to rotate properly. This procedure is also required for the original CB
F wire.
The New CB RPCP .Standard Wire
Those of you who are used to the original CB Wires, will note that there is a difference in the design of the new wires. This Standard wire will also pick the new Legge locks as well. Thereby making a saving of having to purchase the extra L wire. We anticipate
that some of you may still prefer the feel of the original CB pick, now that you are used to handling it. But that’s what tool design is
all about, making different tools for locksmiths with different preferences.
Basic Lever Lock picking
Index:
1] Picking Mortice Lever Locks That Have Curtains/Bolt-Throwers
2] Lever Recognition
Photos of Various Levers
Lever Breakdown
3] Three Logical Procedures
3.i] A Procedure of Picking Lever Locks With-out False Gates
3.ii] A Procedure of Picking a Lever Lock with V Notched False Gates
3.iii] A Procedure of Picking a Lock with Square False Gates
4] Tips for using the CB Reversible Pocket Curtain Pick
5] Help Guide: If all else fails: making an end-mill
______________________________________________________
Logical Picking
1] Picking Mortice Lever Locks That Have Curtains/Bolt-Throwers
How do you pick locks? Is it purely by trial and error or is it just guesswork?
I’d like you to try to forget some of the hit and miss techniques, and ask you to try and use a more logical approach. For instance,
when dealing with levers that have square false gates, if every lever has one true gate and one false gate, then there can only be
16 different permutations to try [4 to the power of 2], using this type of logic will give you a higher success rate in picking, there
are one or two locks such as the New Securefast range that have 25 different permutations. A lot of these permutations are not
useable. If you were to try each of the different permutations using the following procedures as opposed to using guesswork,
[which could mean as many as 4 to the power of 8 different permutations], it could take you quite a while to open your lock, so we
take some short cuts.
It is not absolutely necessary to know which manufacture of lock that you are working on, the only requirement that you need
to know is what type of lever that you are dealing with, does it have false notches, v or square, or none at all? I often come across
locks that are so badly corroded that it is difficult to distinguish which model of lock they are. Therefore do not panic – just follow
your logical procedures to get the lock open. If you build up this practical approach to picking, although it may take you a little
time to get used to, you’ll feel far more confident that whatever lock that you come across, you will be able to open it.
Do not worry about the time that it takes; after all, what is worse, taking 15 minutes or more to open an unidentifiable lock NDE or
drilling 6 holes trying to find the unknown position of gates? Practice will improve your times.
The following procedures can be adapted to suit whichever lock that you are working on for instance, some levers
which have V notches will behave like levers with square notches therefore that would be a good time to switch that
procedure to the square notch lever procedure etc.
4
2.] Lever Recognition
CB RPCP
Here are examples of 3 procedures for picking lever locks.
1 A Procedure of Picking Lever Locks With-out False Gates
2 A Procedure of Picking a Lever Lock with V Notched False Gates
3 A Procedure of Picking a Lever Lock with Square False Gates
______________________________________________
I generally place locks into 3 groups:
A] those with levers without false gates
B] and those whose levers which have V notched false gates [anti pick notch]
C] those whose levers have square false gates [false gate]
[Remember that false gates are classed in the same set as anti pick notches]
Generally, locks that have false gates follow these rules:
a high lift lever will have it’s false notch above the true gate and so the false notch will be the 1st to indicate, with the low lift lever
the false notch is generally below the true gate but there are one or two locks on the market which use false gates above and
below the true gate on both high and low lift levers.
However, the following procedures are not affected by this as it is a process of decoding to discover what the 1st gate
is, i.e.: true gate or false gate.
5
CB RPCP
Before progressing with these procedures, I’d like to take a quick look at:
True gate
A true gate is that gate which allows the bolt stump/fence to pass through and allow a lock to open.
False gate
Is an anti-pick device to try and fool the picker into believing that he has found the true gate.
Bolt Stump
Gating
Lever Spring
No False Gates
Pocket
Bar
Pivot
Eye
Belly
Square notched False Gate
These engage with the bolt stump/fence to deceive the picker and prevent any further movement of the lever.
Bolt Stump
Lever Spring
Gating
‘Square’ notched False Gate
Pocket
Bar
Pivot
Eye
Belly
V notched False Gate
These are to deceive the picker and prevent any further movement of the lever, in reality because of their shape, any
further pressure on the lever with the pick will cause the bolt stump/fence to disengage the anti-pick notch, and this
can also be felt as reverse pressure on the tension wrench, which is useful for the picker.
Bolt Stump
Lever Spring
Gating
‘V’ notched False Gate
Pocket
Bar
Pivot
Eye
Belly
High Lift
A high lift lever, as he name implies is a lever that is lifted high by the key to align its true gate with the bolt
stump/fence.
Low Lift
A low lift lever only travels a short distance to align its true gate with the bolt stump/fence.
6
NB: The above drawings are somewhat over-size to emphasize the differences.
Gating
CB RPCP
Bolt Stump
Lever Spring
No False Gates
Pivot
Eye
Pocket
Bar
Belly
3 Logical Procedures
3. i] A Procedure of Picking Lever Locks without False Gates.
A General Guide that WILL increase your success rate with practise.
What I call the ‘Golden Rule’ , is to only move a lever if it shows resistance to moving. Do not move any other lever. This - if
you stick rigidly to it - will ensure that the levers are moved in the correct order and will prevent the dropping of levers as you
progress.
Step One:
Use the tension part of your pick to apply pressure onto the levers via the talon and curtain/bolt-thrower and stump. The
maximum pressure here is that which will just cause one or more levers to show resistance to movement. Experience shows this
to be on most lever locks approx 100grams [approx 3oz] pressure on the end of a 7cm tension wrench. [You’ll have to adjust your
pressure if your tension wrench is longer.] Or the resting weight of 2 fingers. [try borrowing the digital kitchen scales to practise
the pressure] Any more pressure can make the picking process more difficult especially when it comes to locks with false gates.
Some locks do require a lot more pressure.
Step Two:
Feel your way through the lever pack with the picking wire, gently nudging each lever in the direction required to engage gate
with the post/stump, to determine which lever is binding or is resisting moving. Only nudge each lever a maximum of 1 mm
[40/1000ths inch] at a time to prevent over-lifting. When you have found the lever that is binding more than any other lever,
continue nudging this lever in the direction required to engage gate with the post/stump, 1mm at a time until it becomes free to
Move. Do not move this lever any further at this time, it maybe in a true gate or it may be just the shape of the lever allowing it to
become free to move.
Step Three:
Repeat this procedure for each lever in turn, you may have to return to the first levers to continue this process, and the lock will
open. This procedure is specifically for levers without false gates.
NB. If you cannot find a lever that is binding you may have to apply a little bit more pressure, but do not apply excessive
pressure. If this does not work, move backwards and forwards through the lever pack, gently nudging each lever 1mm at a
time until such times you do find the lever that is resisting movement.
Bolt Stump
Gating
‘Square’ notched False Gate
Lever Spring
Pivot
Eye
Pocket
Bar
Belly
3. ii] A Procedure of Picking a Lever Lock with V Notched False Gates.
[This is similar to picking a lock with no false gates, but you must use light tension for this principle to be successful.]
Step One:
Use the tension part of your pick to apply pressure onto the levers via the talon and bolt-thrower/stump. The maximum pressure
here is that which will just cause one or more levers to show resistance to movement. Experience shows this to be on most lever
locks approx 100grams [approx 3oz] pressure. Or the resting weight of 2 fingers. [try this method of weighing by borrowing the
digital kitchen scales to practise the pressure]
Step Two:
Feel your way through the lever pack with the picking wire, gently nudging each lever in the direction required to engage gate
with the post/stump, to determine which lever is binding or is resisting moving. Only nudge each lever a maximum of 1 mm at
a time. When you have found the lever that is binding more than any other lever, continue nudging this lever in the direction
7
CB RPCP
required to engage gate with the post/stump, 1mm at a time until it becomes free to move. Do not move this lever any further at
this time, it maybe in a true gate or it may be just the shape of the lever allowing it to become free to move.
Step Three:
Repeat this procedure for each lever in turn, you may have to return to the first levers to continue this process. Eventually the lock
will open or will move back a fraction and stop, here we obey the ‘Golden Rule’ again, because one or more levers is engaged in a
false gate, we now lift this lever by applying a little more pressure onto it with the pick wire, [remember – if the wire starts to flex
– you are applying too much tension], and, if you are not applying too much tension, the lever will move out of it’s false gate and
into it’s true gate. Too much tension will cause the lever to over-lift when it decides to move. Repeat this procedure for any other
lever which is binding then the lock will open.
NB. If you cannot find a lever that is binding you may have to apply a little bit more pressure, but do not apply excessive
pressure. If this does not work, move backwards and forwards through the lever pack, gently nudging each lever 1mm at a
time until such times you do find the lever that is resisting movement.
Bolt Stump
Lever Spring
Gating
‘V’ notched False Gate
Pocket
Bar
Pivot
Eye
Belly
3. iii] A Procedure of Picking a Lock with Square False Gates.
There are various ways of determining what sort of lever that you are dealing with, ie. High lift or low lift.
1] Impression the levers
2] For the more experienced: by feeling the bellies of each lever with your picking wire
3] Deliberately putting each lever into the 1st gate that you come across
The following procedure details the 3rd option.
Step One:
Nudge each lever in turn similar to the previous procedure obeying the ‘Golden Rule’.
[In this case instead of the lock opening, the bolt will move back a fraction and stop. ] Until each lever’s 1st gate is engaged with
the bolt stump / fence. It may be a false gate or it may be a true gate. Remember, only move the levers that most resist movement.
This ensures the correct order of picking. Make a note of the order.
Step Two:
When all levers are in a gate, apply a little more tension. This binds all the false gates. Now test each lever in turn, by gently
nudging or tapping them. If they feel solid, that will be a false gate. If they move, that is a true gate. Now you use the handle of
your picking wire as a pointer. Whilst touching the bellies of the levers, make a note of the angle indicated by your picking wire
thumb-turn. This is helpful when determining how far you will have to move a lever to get past its false gate.
Step Three:
Now you drop all the levers and restart the picking; in this instance we try to leave a low lift lever until the last, this prevents the
bolt stump moving back into a false gate. When you move a lever which has a true gate first, move that lever to it’s true gate.
When you move a lever which has a false gate first, you skip past that false gate. Remember that only light pressure is being used
for this to be possible. If you are using too much pressure, you will have to ease off the pressure so that you can skip past the false
gate. Carry on this procedure for all the levers and if the last lever to move was one that indicated a true gate first, then
the lock will open. If the last lever to move was one with a false gate, release the tension completely, but still maintain contact
between the stump and the levers.
i.e. When you move this lever you do not want the bolt to be moving towards the unlocked position.
[This is where the order of picking comes into play and if the order of picking is correct you will not drop any other lever.] This will
allow you to skip past the false gate.
Then re-apply pressure. - The lock should open. Locks that have false gates above and below the true gate, are treated in the same
way, but you have to be a little more careful when skipping past the false gate – too much tension will cause over-lifting.
8
CB RPCP
4] Here are some tips for using the Original CB Reversible Pocket Curtain Pick.
Tips using the Wire
The wire should arc over to the right on a right hand lock and over to the left on a left hand lock. At no time should the wire be
excessively twisted to move a lever. If you are doing this – you are using too much tension or using the wrong procedure on a
lever pack that has square false notches.
Tips using the ‘Lollipop’ Thumb-turn
The thumb-turn can be used as a pointer / guide as to how far you have lifted any given lever.
Tips using the Stem & Collar:
The stem is purely used to support the picking wire and allow you to apply tension to the bolt via the curtain / bolt thrower [by
use of the lip [tiny ridge] running down the length of the stem] The stem should pass right through the lock and its position is
only governed by how comfortable you feel with its position.
The ‘Golden Rule’
The ‘Golden Rule’ MUST be obeyed, that is, only move [nudge] those levers which do not want to move, this could be anywhere
within the lever pack, leave everything else alone. If you do this it is less likely that you’ll have levers dropping...... if none of the
levers bind then you move backwards and forwards in the lever pack just nudging each lever a little at a time and this will gradually move all the levers upwards and eventually one of the levers will start to bind, this then becomes your focus.
9
CB RPCP
If you Don’t Follow the Golden Rule
One of the most common problems that you will suffer if you do not follow the golden rule is that whenever you back
off the tension to move past a false gate, you will lose any lever that you have just set.
The CB
The CB ‘F’ Wire
Picking Method
The Golden Rule remains the same.
The CB ‘F’ Wire is designed to be used with the CB 5g
Reversible Pocket Curtain Pick and the New CB MG Pick
for use on the ERA Fortress range of locks.
The ‘curtain drive lip’ on the pick stem has been
machined at either end of the stem so that it does not
bind with the lock case. Care should be taken when
placing the pick in the keyway. Due to the construction
of the curtain, some resistance will be felt when
extracting the bolt because the wire is being, trapped
between the levers and the curtain. Although it is
possible to completely turn the curtain, it is best to retract the bolt only far enough to open the door, then remove pick by turning
the pick back in the locking direction.
With the CB MG Pick position the Picking Stem in the Curtain and test the Picking Wire, there are two possible
positions of the Stem, use the position that gives you the greatest freedom of movement. When using the lowest
position, it is possible to remove the Picking Stem when the lock has been picked and the Bolt partially retracted. This
prevents the Picking Wire getting trapped underneath the levers.
The picking technique of this lock does not require excessive force. Too much tension could cause you to break the
picking wire.
The ‘F’ Wire is fairly fine at each end, [the picking tips] to allow it to pass under the levers which all rest close to the curtain: Use
light tension – just enough to hold levers in place. When lock is picked, place picking tip under highest lift lever before fully
retracting the bolt, only retract bolt far enough to open the door. Try not to retract bolt fully as wire gets trapped under levers and
can get broken.
To work through the lock:
[i] apply medium pressure to the bolt work
[ii] navigate through the lever pack with the pick and gently touch the bottom of each lever without lifting it to find the binding
lever, each time a binding lever is found, move only those levers that show resistance, lift it gently by no more than 1mm each
time, you will start to feel slight clicks and hear these too as each gate engages.
[iii] navigate the Pick backwards and forwards through the lever pack nudging each lever [including those already in position]
until the 4th lever started to bind, and then repeat the procedure for the 5th.
[iv] picking this lock is basically the same as picking a 5 lever Union, but somewhat easier.
‘Tips’ : these are the business ends of the picking wires.
‘Lever’ : detainer.
‘Binding Lever’ : a lever which does not want to move.
‘Medium Pressure’ : use a digital scale to test your pressure, it should not be more than 200grams.
‘Nudge’ : smallest of movements only 1mm at a time.
10
CB RPCP
Tips for overcoming and working on the ERA Fortress
The reason why this lock is different:
It appears that ERA have gone to a lot of trouble to take on board all the different NDE tools which are available for
the locksmith.
Now:
• There is a type of side warding on which the curtain is supported
• The lever heights are different from any other ERA lock
• The lever bellies are the same height when taking readings from the front edge, although there is some variation at
the rear
• As far as I know to date there are no false gates above the true gates
• In the tests that I have done it’s almost impossible to over lift these levers so picking is relatively simple by just
moving each lever into position.
Components:
[1] Aluminium screw-to-gether Thumb-turn which holds the
[2] Spring Steel Wire Pick.[Single wire having Left & Right Picks]
[3] Reversible Stainless Steel Stem which sits in a
[4] Stainless Steel Collar. [For Left & Right use] The Stem has a
longitudal slot. At the edge of one side of the slot is a Lip. The Lip
engages with the lock Curtain.
[5] Screw-in Stainless Steel Tension Handle.
For Left & Right Hand Conversion: To convert the Stem from either
hand, slide the Collar to the opposite end of the stem. Slacken the two
halves of the Thumb-turn and slide the Thumb-turn to the opposite
end of the Wire Pick.
Notes: I have used this particular design of Curtain Pick for nearly 20
years. N.B. The size of the Tension Handle is to remind the user that
excessive force is NOT required.
A light hand using this tool is best. Undue force can damage the tool,
and we will not replace a tool which is damaged due to excessive
force.
This tool has been designed specifically for opening British Standard
Mortice Locks utilizing a 5 or 5.5 Guage key.
Statement:
I have opened all the major brands of locks with curtains using this
tool. There are one or two types of locks; such as the Chubb E Series,
which require a Modified Stem. The Modified Stem is a Special Order
Item at the moment.
Details:
Component Parts
REVERSIBLE PICK
TWO PART THUMB-TURN
STEM
COLLAR
TENSION HANDLE
Pick Set-Up View
PICK
STEM
TENSION HANDLE
COLLAR
THUMB-TURN
‘CB Curtain Lip’ : fine edge ‘proud’ to one side of cutout ‘v’ along length of stem
‘File Out Section’ : as the curtain is mounted on the side warding, the lip of the pick stem will prevent the pick from
turning without damaging the stem, by removing part of the lip, the stem and curtain are free to rotate.
‘Tips’ : these are the business ends of the picking wires.
‘Lever’ : detainer.
‘Binding Lever’ : a lever which does not want to move.
‘Medium Pressure’ : use a digital scale to test your pressure, it should not be more than 200grams.
‘Nudge’ : smallest of movements only 1mm at a time.
European Community Design Registration No. 000336540
FAQ’s:
Q) Sometimes, I can’t move the pick because the next lever is too low and blocking the Pick’s path.
A) To get past a low lever you must move the picking wire to the left or right depending on the direction of travel - this will put
the tip of the picking wire just underneath the belly of the lever, for example, if you are moving forward through the lever pack on
a right hand mounted lock, and you hit a low lift lever, you would lift the wire out of the ‘V’ of the collar, and over to the right, and
moving backwards you would move the wire to the left...
Q) If I loosen the tension to clear the lever, ‘there goes my set levers!’
A) This is because of incorrect order of picking, see the ‘Golden Rule’.
Q) I’m in trouble and don’t have a clue!
A) ok, when practicing on your work-bench, it’s very helpful to drill alignment, this is what I do with all the locks I use to show at
exhibitions, to explain and show exactly what is happening when
manipulating the wire through the lever pack. If you ever get stuck when practicing just contact me, I will always answer you.
11
CB RPCP
Q) I have been practicing furiously with the CB pick and have success with ERA Profit, new Viscount & Invincible locks but
this is only when I have impression the levers to determine the high & low lift ones. ‘Impression the levers’ is a good way
to go, but it can be confusing with such locks as with the ERA as some of the levers give a similar reading.
A) I refer you to this booklet it explains two other methods, page 7.
Q) I can’t seem to get a grasp of how you can tell a false gate to a true one by feel. Telling the difference between true &
false gates, in general, with V notched false gates there is a distinct difference in the amount of movement of the lever
when it is engaged in a false gate compared to that of a true gate, with the square false gates, it can be difficult to tell the
difference as quite often the false gate has the same dimensions as the true gate, in this case the decoding method gets
around that problem as explained in the booklet.
A) Can you check out page 7.
Q) I also have the same problem with the union BS locks. I understand the principle but can not seem to distinguish between false notches and true gates.
A) With locks like the BS Union and the Chubbs etc although the false gates look like V notches they behave like square notched
levers on occasions, in which case decoding them is the best answer. With the BS Union when you lift a high lift
lever to its true gate, you will get a distinctive double click.
Q) I don’t feel any reverse pressure when picking out of a false notch.
A) Only the Legge seems to have a true V notched gate, and if you are only using light tension, the lifting of a lever that is engaged
with a false gate will cause the bolt to move forward and this will be reflected back to your tension wrench, at this point, do not
relax tension just allow the tension wrench to push your hand back, this will disengage the false gate and most likely click straight
into the true gate. If you use too much tension to do this you
could possibly click straight past the true gate to the over lifted position.
4] If all else fails: Making an End-mill.
Making an End-mill
We advise to always use an end-mill / flat bottomed drill for the final cut through the lock-case to prevent damage to the bolt
stump and levers, and also reduce burring.
• If you are using a 5mm drill to open the lock and are facing hard plate, start drilling at your desired point and continue
until you have drilled through the hard plate and into the softer metal of the lock case then change to an end mill/flat bottomed
drill.
• A simple method of making en end-mill / flat bottom drill is as follows:
Fig.1
Fig.2
Fig.3
• To make an end mill from a spare or broken drill bit, grind the tip of the drill flat, ref Figure 1.
• Then using the side of the grinding wheel, grind each of the cutting edges of the drill Figure 2.
• Produce a rake / clearance angle Figure 3.
Note: As with any of our tools, we always advise after care, so remember to look after your tools and keep
them oiled, they then should last you quite a number of years. These tools are made of hardened steel and
need to be cared for, just as you would a screwdriver or file.
12