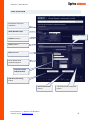
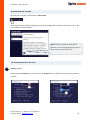
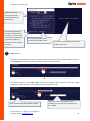
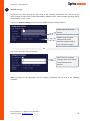
1
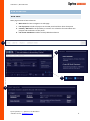
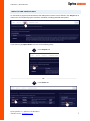
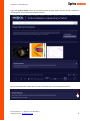
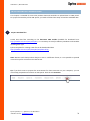
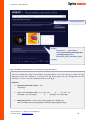
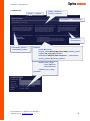
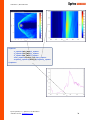
USER MANUAL | REGISTERED USER SHOCK VML Portal Date: 29th April 2014 © 2014 Sprinx Systems, a.s. USER MANUAL | REGISTERED USER CONTENTS INTRODUCTION ................................................................................................................................................ 3 PURPOSE OF THIS DOCUMENT .................................................................................................................................... 3 SW REQUIREMENTS................................................................................................................................................. 3 WEB INTERFACE ............................................................................................................................................... 4 MAIN PAGE ............................................................................................................................................................ 4 REGISTRATION AND LOG IN ........................................................................................................................................ 5 PROJECTS AND SIMULATIONS ..................................................................................................................................... 7 VISUALISATION WIZARD ................................................................................................................................ 10 BASIC OVERVIEW ................................................................................................................................................... 12 WORKING WITH HELPER .......................................................................................................................................... 13 VISUALIZATION STEP BY STEP .................................................................................................................................... 13 FAVOURITES ......................................................................................................................................................... 23 VISUALIZATION OUTPUTS .............................................................................................................................. 24 SINGLE TIME ......................................................................................................................................................... 24 TIME RANGE ......................................................................................................................................................... 26 DATA DOWNLOAD ................................................................................................................................................. 29 DATA UPLOAD & CONVERSIONS .................................................................................................................... 31 Sprinx Systems, a.s., Výchozí 6, 147 00 Praha 4 +420 251 014 211, [email protected] 2 USER MANUAL | REGISTERED USER INTRODUCTION PURPOSE OF THIS DOCUMENT This document is intended for users who want to use the web portal Virtual Mission Laboratory (hereinafter only VML). It includes instructions, use cases and describes all features of the portal from the viewpoint of a registered user. SW REQUIREMENTS For proper and full functionality of VML portal, you need to use a web browser with JavaScript and HTML5. Recommended web browsers: Mozilla Firefox (version 19 or higher) Chrome (version 25 or higher) Internet Explorer (version 10 or higher) Sprinx Systems, a.s., Výchozí 6, 147 00 Praha 4 +420 251 014 211, [email protected] 3 USER MANUAL | REGISTERED USER WEB INTERFACE MAIN PAGE Main page contains 4 basic elements: 1. Main menu for basic navigation on web page 2. List of projects includes all projects in the VML portal and their short description 3. Contact | RSS feed for the possibility to contact us or subscribe for news about new projects and simulations on the portal 4. List of new simulations includes 5 newly added simulations 1 2 3 4 Sprinx Systems, a.s., Výchozí 6, 147 00 Praha 4 +420 251 014 211, [email protected] 4 USER MANUAL | REGISTERED USER REGISTRATION AND LOG IN To log in you need to have a user account. User account is free and available for everyone. The procedure for registration is as follows. 1 2 Note: If you already have a user account, simply fill in your credentials (e-mail and password) and click the Log In button. In this case skip the following step. 3 Fill in information about you. When you finish click the Register button. Then you will be automatically logged in. Sprinx Systems, a.s., Výchozí 6, 147 00 Praha 4 +420 251 014 211, [email protected] 5 USER MANUAL | REGISTERED USER If your registration is successful main menu will change to the following form. Note: Some of the following procedures and figures are shown from the perspective of an unlogged user. They are the same for both unlogged and logged user. Sprinx Systems, a.s., Výchozí 6, 147 00 Praha 4 +420 251 014 211, [email protected] 6 USER MANUAL | REGISTERED USER PROJECTS AND SIMULATIONS An overview of projects and simulations that VML portal contains can be found in the Project tab in main menu. It includes all projects and their simulation including detailed descriptions. If you want to go project details, use one of the following ways: 1 From Projects tab Or 2 From Home tab Sprinx Systems, a.s., Výchozí 6, 147 00 Praha 4 +420 251 014 211, [email protected] 7 USER MANUAL | REGISTERED USER Page with project details shows all information about project, figures and list of their simulations including basic information and available products. For more detailed information about chosen simulation click on the drop down element. Sprinx Systems, a.s., Výchozí 6, 147 00 Praha 4 +420 251 014 211, [email protected] 8 USER MANUAL | REGISTERED USER Then you can find information about all available products, coordinate system, initial conditions and parameters of the simulation. There are also predefined wizard settings (simulation presets). Presets usually are interesting settings defined by administrator of the project. Sprinx Systems, a.s., Výchozí 6, 147 00 Praha 4 +420 251 014 211, [email protected] 9 USER MANUAL | REGISTERED USER VISUALISATION WIZARD There are 4 ways how to get into visualization wizard of the simulation: 1 From Home tab Or 2 From Projects tab Or 3 From Simulation list in the project details page Or Sprinx Systems, a.s., Výchozí 6, 147 00 Praha 4 +420 251 014 211, [email protected] 10 USER MANUAL | REGISTERED USER 4 From unrolled Simulation details in the project details page You can choose one of the simulation preset. Sprinx Systems, a.s., Výchozí 6, 147 00 Praha 4 +420 251 014 211, [email protected] 11 USER MANUAL | REGISTERED USER BASIC OVERVIEW Information about the simulation Allow/Disable helper Color bar settings Product selection Time selection Plane selection Three-dimensional situational picture Trajectory shape and parameters Queue for processing button Store in favourites button Sprinx Systems, a.s., Výchozí 6, 147 00 Praha 4 +420 251 014 211, [email protected] Two-dimensional situational picture 12 USER MANUAL | REGISTERED USER WORKING WITH HELPER For new users we highly recommend to allow helper. After clicking on the element help guide pops up with additional information and what to do in this step (similarly as shown below). Note: If there is a button in the helper window you can change settings by click on them or move to the next step. VISUALIZATION STEP BY STEP 1 Product selection Choose required product from the list. The term product means a physical quantity that you want to visualize. Sprinx Systems, a.s., Výchozí 6, 147 00 Praha 4 +420 251 014 211, [email protected] 13 USER MANUAL | REGISTERED USER Here you can see information about product and chosen parameters. This button applies the settings of this preset to all others. It means plane orientation, displacement, trajectory shape and parameters and color bar settings. 2 For removing product from visualization use this button. If you want to visualize more than one product, click here. Time selection Here you have 2 options. First one is to select only one time. Then all the products will be shown in this single time (static figure). Select time by moving with the time cursor. Or The second option is to set time range. Then all the products will be shown in this time range (animation). Select the time by moving start time and end time cursor. Selected time range and available samples Sprinx Systems, a.s., Výchozí 6, 147 00 Praha 4 +420 251 014 211, [email protected] If there are too many samples in the dataset you can choose to calculate every nth sample. 14 USER MANUAL | REGISTERED USER 3 Color bar settings In this step you select settings for color range of the resulting visualization. This means that you select a range of values that can be interpreted by different colors. Values outside this range will be interpreted by "outer" colors. You can use defaults setting that were set by the administrator of the simulation. Value range of the actual dataset Default range set by the administrator of the simulation (will be used in case of default settings) Or You can use your own color bar settings. Select color bar range by writing a value or by clicking on increase/decrease buttons. Note: The effect of this adjustment on the resulting visualization can be seen in the following examples. Sprinx Systems, a.s., Výchozí 6, 147 00 Praha 4 +420 251 014 211, [email protected] 15 USER MANUAL | REGISTERED USER Crop min: Crop max: 4 -3 3 Crop min: Crop max: -2 2 Crop min: Crop max: 0 10 Plane selection Note: This step is present only in case of three-dimensional simulation. Naturally, there is no plane selection in two-dimensional simulation. In this step you select parameters of the plane you want to visualize. There are 3 options of an orientation of the plane. First choose one of the following options – XY | XZ | YZ. Secondly select displacement of the plane in space. Displacement you can select by writing a value or by clicking on increase/decrease buttons. Sprinx Systems, a.s., Výchozí 6, 147 00 Praha 4 +420 251 014 211, [email protected] 16 USER MANUAL | REGISTERED USER For better imagination what you set up you can watch situational figures. Tip: Instead of sliders you can do left-click into the area and rotate it directly. Sprinx Systems, a.s., Výchozí 6, 147 00 Praha 4 +420 251 014 211, [email protected] Use sliders to rotate with the figure. 17 USER MANUAL | REGISTERED USER 5 Trajectory shape and parameters Wizard offers the opportunity to enter 4 different types of trajectory shape. Pick one of them and fill in trajectory parameters. Circle trajectory Parameters: Center X – coordinate X of the circle center Center Y – coordinate Y of the circle center Radius - size of the circle radius in simulation units Tip: Instead of writing values you can change the circle position by left-click & move. Tip: You can change radius of the circle by right-click & move. Trajectory parameters can be set by writing a value or by clicking on increase/decrease buttons. Sprinx Systems, a.s., Výchozí 6, 147 00 Praha 4 +420 251 014 211, [email protected] 18 USER MANUAL | REGISTERED USER Ellipse trajectory Parameters: Center X – coordinate X of the ellipse center Center Y – coordinate Y of the ellipse center Major Axis - size of diameter of the ellipse in x-direction (at 0° rotation) Minor Axis - size of diameter of the ellipse in y-direction (at 0° rotation) Rotation - rotation angle compared to the x-axis in degrees Tip: Instead of writing values you can change the ellipse position by left-click & move. Tip: You can change rotation of the ellipse by right-click & move. Trajectory parameters can be set by writing a value or by clicking on increase/decrease buttons. Sprinx Systems, a.s., Výchozí 6, 147 00 Praha 4 +420 251 014 211, [email protected] Use planet’s center – this option means that focus of the ellipse is placed in the center of the planet. Thus, the parameters Center X and Center Y will be calculated automatically. 19 USER MANUAL | REGISTERED USER Line trajectory Parameters: Start X – coordinate X of the line starting point Start Y – coordinate Y of the line starting point Rotation - rotation angle compared to the xaxis in degrees Length – distance between starting and ending points End X – coordinate X of the line ending point End Y – coordinate Y of the line ending point Tip: Instead of writing values you can change the line position by left-click & move. Tip: You can change rotation of the line by right-click & move. Trajectory parameters can be set by writing a value or by clicking on increase/decrease buttons. Option 1: Set coordinates of the starting point, rotation and length parameters. The coordinates of the ending point will be calculated automatically. Or Option 2: You can set coordinates of the ending point directly. Sprinx Systems, a.s., Výchozí 6, 147 00 Praha 4 +420 251 014 211, [email protected] 20 USER MANUAL | REGISTERED USER Custom trajectory Option 1: Enter the coordinates of points from which you want to create your path and click the connect button. Note: As a delimiter you can use anything. Wizard ignores non-numeric characters. Or Option 2: Enter the coordinates of points and click the dots button. Then it will be a special kind of visualization. The points will be taken as a single (stationary) trajectory. This kind of setting is used primarily in the case of comparing values at specified points in time. 6 Note: As a delimiter you can use anything. Wizard ignores non-numeric characters. Optional step - “Store in favourites“ Sprinx Systems, a.s., Výchozí 6, 147 00 Praha 4 +420 251 014 211, [email protected] 21 USER MANUAL | REGISTERED USER Wizard offers the option to save the current settings for later reopening. This is done by clicking on "Store in favorites" button. Then will pop up a window where you fill in the name of your item. 6 Final step – “Queue for processing“ If you are satisfied with your settings click the “Queue for processing” button. Then your job will be moved into the queue for processing. When your job is finished you'll see the visualization output. Sprinx Systems, a.s., Výchozí 6, 147 00 Praha 4 +420 251 014 211, [email protected] 22 USER MANUAL | REGISTERED USER FAVOURITES VML portal offers the option to reopen your stored wizard settings. This functionality is located in the Favourites tab. If you want to change the item name, click here and write new name. Click here to open this item in wizard or right-click to copy link address. Click here to delete this item If you want to share your favourite preset follow these steps: 1 Right-click on “Open in wizard“ 2 Choose the option “Copy link address“ 3 Paste link e.g. into the email message. Link address example: http://amalka.asu.cas.cz/esa/index.php/projects/10064/10059/1000171 Sprinx Systems, a.s., Výchozí 6, 147 00 Praha 4 +420 251 014 211, [email protected] 23 USER MANUAL | REGISTERED USER VISUALIZATION OUTPUTS SINGLE TIME Result settings (xml) is the output where you can find all selected settings in xml form. It is for information purposes. CDF file (cdf) is the output containing all the numerical values of selected plane in CDF file form. Plane data (txt) is the output containing all the numerical values of selected plane in textual form. Trajectory data (txt) is textual output that contains values of trajectory coordinates. Graph data (txt) is textual output that contains values collected along the trajectory. Color bar for the correct interpretation of the values in the figure Product name with units Trajectory has highlighted points at the start, ¼, ½ and ¾ of its length. Illustration of the planet The gray color indicates cross section the planet. Axis label with units The white color indicates contour the planet. Sprinx Systems, a.s., Výchozí 6, 147 00 Praha 4 +420 251 014 211, [email protected] 24 USER MANUAL | REGISTERED USER The graph shows the value measured along the chosen trajectory. The x-axis indicates the position of the trajectory. For example, a value of 0 indicates the beginning of the trajectory, 0.5 the middle and 1 its end. Position in the trajectory, range (0,1) Sprinx Systems, a.s., Výchozí 6, 147 00 Praha 4 +420 251 014 211, [email protected] 25 USER MANUAL | REGISTERED USER TIME RANGE The time range output is similar to the single time output. Description of output elements you can find in the previous chapter. Note: Outputs (plane data) in the CDF and textual file format are not listed because of their potential size. If you want to get the output in this format, please select option - single time (step 2). Time dependence data (txt) is the output containing values collected along the trajectory for in the whole time range. Actual simulation time Tip: You can use the slider to browse frames. Switch between animation in gif format and frame format. See the note bellow Pause the animation Next frame Previous frame Play the animation Note: There are two animation formats (gif and frame format). Gif format is here for the possibility saving animation. In that case use right-click and choose option “save image as”. Please note that switching between formats may take a few seconds. Sprinx Systems, a.s., Výchozí 6, 147 00 Praha 4 +420 251 014 211, [email protected] 26 USER MANUAL | REGISTERED USER Simulation time Position in the trajectory, range (0,1) Sprinx Systems, a.s., Výchozí 6, 147 00 Praha 4 +420 251 014 211, [email protected] 27 USER MANUAL | REGISTERED USER Time range visualization output example – case of custom “point” trajectory Point 1 (the blue one) and point 2 (the green one) Graph legend The graph shows the time evolution of the observed values at specified points in time. Sprinx Systems, a.s., Výchozí 6, 147 00 Praha 4 +420 251 014 211, [email protected] 28 USER MANUAL | REGISTERED USER DATA DOWNLOAD There are 2 ways how to download data results from visualization request. 1 Click the link above the visualization Note: For download click the right mouse button and choose option „save as“. Or 2 Download via SFTP account Every registered user has his own SFTP account. At this account you can find data results from your visualization requests for last 7 days. After successful registration you should receive an e-mail with your SFTP credentials. We highly recommend you to use some SFTP client (for example FileZilla). Sprinx Systems, a.s., Výchozí 6, 147 00 Praha 4 +420 251 014 211, [email protected] 29 USER MANUAL | REGISTERED USER Here fill in hostname that you have received via e-mail. (probably amalka.asu.cas.cz) Here fill in username that you have received via e-mail. Here fill in your password (the same you log in with) Service SFTP runs on port 22 Here you have a list of your visualization requests. If you have the incoming folder, you can use it as your working directory for data conversion or as a channel for sending data to the administrator. Sprinx Systems, a.s., Výchozí 6, 147 00 Praha 4 +420 251 014 211, [email protected] 30 USER MANUAL | REGISTERED USER DATA UPLOAD & CONVERSIONS This chapter is intended for users who produce data and would like to upload them to VML portal. For proper functionality of the VML portal, you need to follow these steps to load the modelled data. 1 Prepare CDF data files Create CDF data files according to the document VML Toolkit (available for download here: http://amalka.asu.cas.cz/esa/examples ). It is necessary to satisfy mandatory attributes and variables including their type. Python template for creating a CDF file can be downloaded here http://amalka.asu.cas.cz/esa/examples/template-cdf.py Note: Because each data producer keeps its data in a different format, it is not possible to provide universal script for conversion into CDF format. Tip: If you don’t want to prepare the environment for data conversion on your computer, you can use already prepared environment on VML portal. Click the tab Convertor. Sprinx Systems, a.s., Výchozí 6, 147 00 Praha 4 +420 251 014 211, [email protected] 31 USER MANUAL | REGISTERED USER For safety reasons you can work with files and directories in your /incoming directory only. You have full access to this directory. It means you can create files and directories here. For uploading data to the /incoming use your SFTP account (for more information please see the chapter Data Download). Important note: Please notice that all data on your SFTP account are periodically deleted. It means that all older than 10 days will be deleted. Copy&Paste your python script into the Code area List of your files (in /incoming directory) Tip: Click on the filename. It adds path to file into the code automatically. Press Start code when your code is ready to run Here you can see standard output (prints, errors, ...) Sprinx Systems, a.s., Výchozí 6, 147 00 Praha 4 +420 251 014 211, [email protected] 32 USER MANUAL | REGISTERED USER 2 Create project and simulation folders All projects should be located in separate folders. If you want create new project, create new folder /[project_ name] Simulations always are under the project as a subfolder. If you want to add new simulation to the project, create folder under the project /[project_name]/[simulation_name]. 3 Copy CDF files into the simulation folder Copy CDF data files into the simulation folder /[project_name]/[simulation_name]/... 4 Prepare configuration .xml files (project.xml, simulation.xml) XML files are used to specify various settings and enter the content that appears on the website. An example of project.xml is available on http://amalka.asu.cas.cz/esa/examples/XMLtemplates/project.xml An example of simulation.xml is available on http://amalka.asu.cas.cz/esa/examples/XMLtemplates/simulation.xml Content from XML files appears on the website in this way: project.xml <name> ... </name> <short_description>...</short_description> Sprinx Systems, a.s., Výchozí 6, 147 00 Praha 4 +420 251 014 211, [email protected] 33 USER MANUAL | REGISTERED USER <long_description>... </long_description> <image> <description> ... </description> <path>/esa/data/DB_simdata/[project _name]/figure.jpg</path> <thumbnail_path></thumbnail_path> </image> Tip: Use html for text adjustment in the element <long_description> There are enabled html tags in the element <long_description>. User can add tags to make the long description more clear. Because it is necessary to add these tags to the xml configuration file the characters "<" and ">" must be replaced with "& lt;" and "& gt;" Examples: End of line (instead of “enter”) - <br> “<br>“ Make some text bold or italics - <b>...text...</b> or <i>...text...</i> “<b>…text…</b>“ or “<i>…text…</i>“ Add link to the text - <a href="http://www.google.com">Google</a> “<a href="http://www.google.com" >Google</a>” Sprinx Systems, a.s., Výchozí 6, 147 00 Praha 4 +420 251 014 211, [email protected] 34 USER MANUAL | REGISTERED USER simulation.xml <name> ... </name> <initials_condition> ... </initials_condition> <description> ... </description> <parameters> ... </parameters> <coordinate_system> ... </coordinate_system> <product> <name>Bx</name> <display_name>B<sub>x</sub></display_name> <caption>$B_{x}/B_{0}$</caption> <description> Magnetic field component... </description> <parent_product>B</parent_product> <default_color_range> <min>-3.0</min> <max>3.0</max> </default_color_range> </product> Sprinx Systems, a.s., Výchozí 6, 147 00 Praha 4 +420 251 014 211, [email protected] 35 USER MANUAL | REGISTERED USER <captions> <x_caption>$X/R_{M}$</x_caption> <y_caption>$Y/R_{M}$</y_caption> <z_caption>$Z/R_{M}$</z_caption> <time_caption>$t\omega_{c}$</time_caption> <trajectory_caption>$\theta[-]$</trajectory_caption> </captions> Sprinx Systems, a.s., Výchozí 6, 147 00 Praha 4 +420 251 014 211, [email protected] 36 USER MANUAL | REGISTERED USER 5 Copy .xml files (project.xml, simulation.xml) to the project/simulation folders In every project folder must be project.xml and in every simulation folder must be simulation.xml. In another case project/simulation will be ignored by importer tool. Note: If you prepare project and simulation folders with CDF and xml files on your own computer, it is necessary to upload them via SFTP to your /incoming folder. How to use SFTP please see the chapter Data Download. You can upload other files too (figures and other files). Importer tool works with CDF files, project.xml and simulation.xml files only. 6 Contact the administrator Contact the administrator that your data is prepared and ready for import to the VML portal. For this purpose you can use link located on every page of VML. Important: In the message, please include your email with which you registered on the portal or your SFTP username. Sprinx Systems, a.s., Výchozí 6, 147 00 Praha 4 +420 251 014 211, [email protected] 37