1
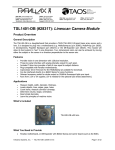
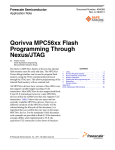
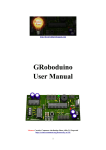
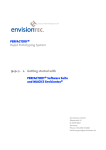
Sterowniki robotów - Projekt
Raport z budowy robota na zawody
The Freescale Cup 2012
Autorzy:
Przemysław Jankowski, Przemysław Kochański
Wrocław
2012
Table of contents:
1 Introduction
2
2 Mechanics
3
2.1
Chassis . . . . . . . . . . . . . . . . . . . . . . . . . . . . . . . . . . . . . .
3
2.2
Body . . . . . . . . . . . . . . . . . . . . . . . . . . . . . . . . . . . . . . .
4
2.3
Camera and headlights . . . . . . . . . . . . . . . . . . . . . . . . . . . . .
4
3 Electronics
4
3.1
MCU Board . . . . . . . . . . . . . . . . . . . . . . . . . . . . . . . . . . .
4
3.2
Bluetooth module . . . . . . . . . . . . . . . . . . . . . . . . . . . . . . . .
6
3.3
Motor Control Board . . . . . . . . . . . . . . . . . . . . . . . . . . . . . .
6
3.4
Monitoring the battery . . . . . . . . . . . . . . . . . . . . . . . . . . . . .
6
3.5
Encoders . . . . . . . . . . . . . . . . . . . . . . . . . . . . . . . . . . . . .
7
3.6
Camera . . . . . . . . . . . . . . . . . . . . . . . . . . . . . . . . . . . . .
7
3.7
Additional lighting . . . . . . . . . . . . . . . . . . . . . . . . . . . . . . .
8
3.8
Electrical noise suppression
. . . . . . . . . . . . . . . . . . . . . . . . . .
9
3.9
Power consumption . . . . . . . . . . . . . . . . . . . . . . . . . . . . . . .
9
4 Software
10
4.1
Following the line . . . . . . . . . . . . . . . . . . . . . . . . . . . . . . . . 10
4.2
Speed control system . . . . . . . . . . . . . . . . . . . . . . . . . . . . . . 10
4.3
Debuging . . . . . . . . . . . . . . . . . . . . . . . . . . . . . . . . . . . . 10
4.4
Differential control of motors . . . . . . . . . . . . . . . . . . . . . . . . . . 11
4.5
Automatic light calibration . . . . . . . . . . . . . . . . . . . . . . . . . . . 11
5 Summary
12
Bibliography
12
1
Team name: A whole lot of left handed space monkeys with razor-sharp teeth and
unpleasant attitude
Team members: Przemysław Kochański, Maciej Mucha, Przemysław Jankowski
Car’s name: Johnny
Figure 1: Johnny - the autonomous car
1
Introduction
Johnny is an autonomous, line following car, which was made for Freescale Cup 2012.
The goal of a robot during tournament is to ride along the black line towards the finishing
line in the shortest possible time. The obstacles like tunnels, elevations and unevenness
of the road may occur and the car has to be ready for them. Robot has to be completely
autonomous and has to stop after completing two laps. Johnny was built by three students
2
of Wroclaw University of Technology. The construction is based on parts provided by
Freescale.
2
Mechanics
Johnny is a simple model of a car. It has one driving axis (both rear wheels can be
controlled separately though thanks to two DC motors) and one turning axis. It consists
of 3 main sections - chassis, body and a grip holding camera and headlights.
2.1
Chassis
Mechanical design of the robot is based on stock plastic chassis provided by Freescale.
It is 285mm long and 160mm wide. There are two DC motors located at the rear section
of the chassis. They propel the wheels using simple gear system. On the middle of the
chassis a Ni-MH battery is situated ensuring that the center of mass is situated low. There
is also one servo located on the front section of the chassis, right behind the bumper. It
is responsible for turning front wheels.
Figure 2: Provided chassis
3
2.2
Body
A rectangular piece of plexiglass (185x130x3mm) has been added to hold the MCU
board and motor control board. All of these parts are the body of the car.
2.3
Camera and headlights
Camera is located 200mm above the ground. Two pieces of an office ruler, which are
attached to the chassis with screws hold it. The camera needs an extra light, which also
has been provided. A piece of PCB containing LEDs is attached to the rulers below the
camera. It is 280mm wide.
Figure 3: Headlights of the car
3
Electronics
Control circuit of the car is divided amongst two boards - both provided by Freescale.
3.1
MCU Board
The TRK-MPC5604b board was provided by Freescale and has not been modified in
any way. The board didn’t contain MAX232 driver/receiver, so on board Virtual Serial
Port was connected to processor’s SCI RXD/TXD and USB port was used to receive
serial transmission. Later, when bluetooth module was added, Virtual Serial Port was
redundant.
4
Figure 4: MCU board’s schematic, pin-outs and size
5
3.2
Bluetooth module
In order to better understand behavior of the car and to debug it easily a bluetooth
module has been used. It provided wireless communication between PC and microcontroller in distance around 10m. Written software allowed car’s speed and each PID regulator
term’s gain to be changed wirelessly using PC.
3.3
Motor Control Board
Motor Control Board (MCB), provided by freescale, includes two H-bridges MC33931,
two LM2940 5V regulators - one for servo supply and one for logic supply. The motor
control board has been modificated in order to allow braking. The IN1 pins of left and
right H-bridge were desoldered form the GND, lifted up and connected to MCU pins PA14
and PA15, which were set as output in order to enable braking by setting IN1 and IN2
High. Braking distance was decreased from over 3m to under 1m.
Figure 5: Modded MCB
3.4
Monitoring the battery
To monitor the battery a 1:2 voltage divider has been used. Divided voltage is measured
by analog-digital converter of the microcontroller.
6
3.5
Encoders
To achieve the same speed regardless of voltage on the discharging battery, an AS5040
magnetic rotary encoder was mounted near the each motor’s rotor. 2x6mm round magnets
were glued to each rotor in order to provide magnetic field rotation to the encoders
when driving. The software PID regulator controls the motors’ PWM to achieve the
desired rotational speed, which allowed to maintain the same performance of the software
regulator used to follow the line regardless of battery voltage.
Figure 6: Encoder’s connection diagram
3.6
Camera
The TSL1401R-LF camera, provided by Freescale, was used to determine the line position. It has the resolution of 128 x 1 pixels. By setting a CLK signal low and then
high, next pixel’s analog value (2-5V) is send to MCU’s ADC0. The more light each pixel
receives, the higher the voltage is. Process repeats until all pixels are read.
7
Figure 7: Mounted encoder’s PCB
3.7
Additional lighting
Extra light was required in order to achieve high contrast of area seen by the camera.
It has been provided by an array of 37 LEDs attached to the front of the car. Each LED
has a 20 degrees of lighting angle and consumes 30mA. LEDs are powered from 5V 2A
78s05 voltage regulator. Although adding the LEDs has increased the power consumption
by over 1.1A, camera’s exposure time could have been reduced over 6 times.
Figure 8: Headlights’ connection diagram
8
3.8
Electrical noise suppression
Due to poor design of Motor Control Board - especially analog camera signal and GDN
going through the same board as high motor current - AD0 signal from camera was
receving strong interference. In order to suppress it, two 100nF capacitors were added to
each motor. One side of each capacitor was soldered to one of the motor’s terminal and
other side was soldered to the motor’s case as shown on the picture below. Additional
100nF capacitor was added parallel between camera’s VCC and GND for further noise
filtering. Provided filters eliminated all electrical noise.
Figure 9: Noise reducing capacitors
3.9
Power consumption
Adding headlights to a car increased power consumption significantly. Every single
LED needs 30mA and there are 37 of them, so 1,1A current on 5V is needed. That makes
5,5W of power used only for LEDs. It makes the battery voltage decreasing quite fast.
Additionally the battery has been once discharged below the level of safety. The voltage
fell to under 5V, which reduced the battery capacity and resulted in even more rapid
discharge. Car’s engines and logic power consumption (without lights) when driving is
0,7A on 8V - that gives 5,6W. Total power consumption is about 11,1W.
9
4
Software
4.1
Following the line
A provided 1D camera is the only sensor installed. It allows robot to follow the line.
After acquiring data from the camera, a derivative is calculated. Then rising and falling
edges of the function are being found, the biggest represent the edges of the black line.
Every single pixel has its weight, which is a base of calculating error. Robot has a PD
regulator algorithm implemented, which calculates control. This causes appropriate front
axis inclination. By changing gains of proportional and differential terms (tuning the
regulator) and matching them to desired speed and route conditions stable line-following
can be achieved.
4.2
Speed control system
Installed encoders allowed precise speed control. PD speed regulator was needed in
order to achieve it. Signals from encoders are sent to MCU counter, and from there, as
negative feedback loop, to software PD regulator.
Figure 10: Speed control system
4.3
Debuging
A dedicated C# application has been developed in order to debug the robot’s algorithm
using PC. It receives data from car through bluetooth and shows such informations like
10
current error and regulator’s settings. It also allows to tune the regulator and change
robot’s speed on-line. This was not used during the tournament though because the robot
had to be completely autonomous.
Figure 11: Screenshot from the described application
4.4
Differential control of motors
In the first version of a car prototype both motors’ speeds were always equal and the
front axis inclination was the only way to turn. Since it was not sufficient at high speed an
improvement had to be developed. Present version of software allows robot to set different
speed on each motor which helps at sharp turns.
4.5
Automatic light calibration
Automatic software calibration which bases on current light level changes the camera
pixels integration time constantly. It allows the car to drive independently of external
light conditions and maximize frequency of line position measurements.
11
5
Summary
After a few weeks of work a well operating and fast robot has come to being. It is
able to follow the line accurately even on high speed, which proves the correctness of the
algorithm. Johnny managed to end the Freescale Cup 2012 on the third place. Although
some problems occurred, creating a robot provided the constructors a lot of satisfaction
and knowledge. The work on the robot isn’t over though. The next step is to increase its
speed even more and to create reliable body for the car in order to protect its components
and to improve its design.
Bibliography
[1] Francisco Ramirez Fuentes, Marco Trujillo, Cuauhtli Padilla, Rodrigo Mendoza, Using
Parallax TSL1401-DB Linescan Camera Module for line detection, Freescale Semiconductor, Document Number: MPC5604B, Rev. 0, 01/2011
[2] Freescale Semiconductor, The Freescale Cup 2011-2012 Season Rules EMEA, Release
date 03May2011
[3] Freescale Semiconductor, MC33931, 5.0 A Throttle Control H-bridge Document Number: MC33931, Rev. 2.0, 12/2008
[4] TAOS inc. TSL1401CL, 128 x 1 Linear Sensor Array With Hold, TAOS136 - July
2011
[5] The Freescale Cup wiki, http://thefreescalecup.wikidot.com/
[6] Freescale
Semiconductor,
MPC5604B/C
Microcontroller
Reference
Manual,
MPC5604BCRM, Rev. 8, 5 May 2011
[7] Freescale Semiconductor, MPC5500 & MPC5600 Simple Cookbook, AN2865, Rev. 4,
04/2010
[8] PE micro, TRK-MPC5604B EVB User Manual, 2010 P & E Microcomputer Systems
12