1
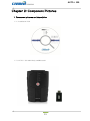
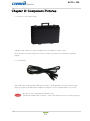
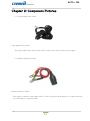
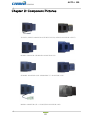
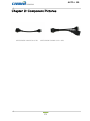
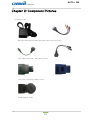
AUTO-i 300
User Manual
Ver. 141101A
CARMAN INTERNATIONAL CO., LTD.
1
AUTO-i 300
Table of Contents
Precautions For Use
Chapter 1: General
1. Product Feature..........................................................................................................................7
2.Product Specification................................................................................................................8
3. Component List..........................................................................................................9
4. Name and function of each part............................................................................................11
5. Power Supply..................................................................................................................14
Chapter 2: Component Pictures
1. Component pictures and description.......................................................................................15
Chapter 3: Menu Cofiguration
1. Before using the product....................................................................................................24
2. Menu Description..............................................................................................................25
3. Icons on Main Screen.............................................................................................................26
Chapter 4: Diagnosis Menu
1. How To Connect Diagnostic Connector and Select Diagnosis Program..............................27
Chapter 5: Vehicle Diagnosis
1. Diagnostic Trouble Codes...........................................................................................................31
2. Erase/Reset DTC .........................................................................................................................34
3. Parameter Data........................................................................................................................35
4. Actuator Test....................................................................................................................39
5. Resetting Adaptive Values.....................................................................................................42
6. Evap. Leakage Test..............................................................................................................43
7. PCM Lock(MEC) Setting..........................................................................................44
8. Misfire Delay Reason.............................................................................................................45
9. System Information..................................................................................................................46
2
AUTO-i 300
Table of Contents
Chapter 6: OBD-II/EOBD Diagnosis Menu
1. OBD-II/EOBD Overview............................................................................................................47
2. How To Connect Diagnostic Connector and Select Diagnosis Program..................48
3. Readiness Test...................................................................................................................49
4. Parameter Data........................................................................................................................50
5. Diagnostic Trouble codes.............................................................................................................51
6. Erase/Reset DTC.....................................................................................................................52
7. Monitoring test results............................................................................................................53
8. BI-Directional Control.............................................................................................................55
9. Vehicle Information................................................................................................................56
Chapter 7: Stored Data
1. Parameter Record..................................................................................................................57
2. Text Shot..............................................................................................................58
3. Image Shot..........................................................................................................................59
4. Print............................................................................................................................60
Chapter 8: Repair Information
1. Repair Information Menu..............................................................................................................61
2. Sorted By Parts...................................................................................................................62
3. Sorted By Troubles........................................................................................................66
4. Circuit Diagram.............................................................................................................................68
5. Parts Description..........................................................................................................................69
6. Parts Location..........................................................................................................................70
7. Repair Data...................................................................................................................................71
8. Web Manual................................................................................................................................72
Chapter 9: Configuration
1. System Configuration.............................................................................................................73
2. Graph Configuration...............................................................................................................75
3. System Info.........................................................................................................................76
4. User Info........................................................................................................................77
Installation of Bluetooth Driver.......................................................................................................78
FCC RULE...............................................................................................................................80
CE RULE............................................................................................................................81
3
AUTO-i 300
Precautions For Use
Safety Regulations
Precautions for use
The AUTO-i 300 described in this guide was manufactured for those who have
the basic knowledge required for its use.
Users should follow the safety instructions described in this manual for safe and
efficient use of the product.
Safety precaution symbols
Failure to adhere to the instructions of this symbol may result in
serious property damage or bodily injuries.
Failure to adhere to the instructions of this symbol may result in
slight property damage or bodily injuries.
This symbol appears when references or information are provided for
user’s convenience.
Copyright
The copyright for this guide is reserved to Carman International Co., Ltd.
Use of this guide, either wholly or partially, is prohibited without pre-approval of
Carman International Co., Ltd.
4
AUTO-i 300
Precautions For Use
Safety regulations for overall use are as follows.
Power source
Do not touch power cords with wet hands.
It may result in an electric shock.
Always use AC/DC POWER adaptor provided with this product.
Otherwise, it may result in an explosion or a fire.
Do not use the product under electrically unstable conditions.
It may result in damage to a power supply unit.
Push down the plug until it clips securely into place.
Otherwise, it may result in a fire.
Wireless Communication
Avoid high tension currents or electronic jamming.
It could be affected by external environment.
There is one set of Bluetooth Dongle for AUTO-i 300 mainbody, and PC
connection. Green-color LED displays the connection status of Bluetooth
Dongle connection to AUTO-i 300 mainbody. If Bluetooth dongle of mainbody is
connected to PC side or vice versa, it will damage each Bluetooth dongle.
Be cautious of wet-damage or loss of Bluetooth dongle.
5
AUTO-i 300
Precautions For Use
Usage
Do not drop the product.
It may cause damage to the product.
Do not put the product on a distributor.
Although manufactured to prevent interference of internal
electromagnetic wave, any strong interference beyond the setlimit
mayresult in damage to the product.
Do not attempt to repair, disassemble, or alter the product yourself.
It may cause damage to the product.
Avoid air-vent plugged by foreign substances. This may cause fire or damage
of product.
Upgrade
Never attempt to disassemble the power supply unit or adaptor.
It may cause damage to the product.
Storage and carriage
Avoid storage in a humid place.
It may cause damage to the product.
Use the carrier bag provided with this product when carrying.
It will protect the product from external impacts.
Long hour battery charging may cause shorten battery life or damage it.
Avoid battery charging over two (2) days.
6
AUTO-i 300
Chapter 1: General
1. Product Feature
AUTO-i 300 can detect malfunction in vehicle’s engine, automatic transmission,
ABS, air bag, immobilizer and other devices, confirm current data, and operate the
actuator through OBD-I, OBD-II, and MOBD communication.
Functions supported in AUTO-i 300
▶ Diagnoses Korean, Japanese and European vehicles.
- Support OBD-II/EOBD, MOBD
- Support CAN,SAE-J1850,ISO9141-2/KWP2000,J1587
▶Supports vehicle troubleshooting and current data search.
- You can diagnose vehicles with their sensors and switches, and save and reload
the current data.
▶Supports automatic actuator inspection.
- This function runs/stops the actuator and switches forcibly in order to check if the
corresponding active device is normal.
▶Maintenance is possible during operation since maintenance information
is provided.
▶As a PC-based device with an unlimited data storage space, it can easily
update the diagnostic program through internet.
▶You can change the sound effects and display unit of the AUTO-i 300.
▶Wireless communication provides more convenient vehicle diagnosis.
7
AUTO-i 300
Chapter 1: General
2. Product Specification
Item
Specifications
Windows XP, Windows VISTA, Windows7 (32bit),
OS
And Recommended
PC specification
Connecting Method
Window8 (32bit)
Over 1GHz processor, 1GB RAM, Hard Disc. Space
16GB, DirectX 9 Graphic
(WDDM 1.0 Driver)
Bluetooth
2.0
USB
USB 2.0 (Compliant)
Protocols:
- Dual CAN(2.0A,2.0B), Singlewire CAN
Protocol
- ISO914-2, KWP2000, J1850P, J1587
- K/L-line High Speed Serial, Flashing Code
- Ethernet
J2534
Support
OperatingTemperature
0~45℃(32~113℉)
Operating Voltage
-20~70℃(-4~158℉)
Please keep operating temperature to avoid shortening battery life or
abnormal voltage usage.
8
AUTO-i 300
Chapter 1: General
3. Component List
◈ Basic kit
NO
Part No.
Description
1
AY-ELPT-A300
AUTO-i 300 Main Body
2
CB-AYTP-0001
Power adapter (3.5A)
3
CB-CNHC-0004
Battery Extension Cable
4
CB-CYAT-0001
DLC Main Cable (16P 2M)
5
CB-CYAU-001A
USB Cable(B Type)
6
CB-CYTP-0004
AC/DC Power Cord
7
CB-CYVG-0006
Cigarette Lighter Power Cable
8
FE-MUDE-0047
AUTO-i 300 BluetoothDongle Set
9
LA-DQAU-A001
Installation DVD
10
LA-MCAU-E002
User Manual
11
PK-BGTT-0005
AUTO-i 300 Carrier Bag
NO
Part No.
Description
1
CB-AYHC-0018
KIA ADAPTOR 20P (BLUE)
2
CB-AYVG-0001
TOYOTA, LEXUS ADAPTOR (17P"R")
3
CB-AYVG-0002
TOYOTA, LEXUS ADAPTOR (17P"C")
4
CB-AYVG-0003
MAZDA ADAPTOR (6P + 1P)
5
CB-AYVG-0005
DAEWOO,GM ADAPTOR (12P)
6
CB-AYVG-0006
SSANGYONG ADAPTOR (14P)
7
CB-AYVG-0007
SSANGYONG ADAPTOR (20P)
8
CB-AYVG-0008
SAMSUNG / NISSAN ADAPTOR (14P)
9
CB-AYVG-0009
HONDA ADAPTOR (3P)
10
CB-AYVG-0010
MAZDA "C" ADAPTOR (17P)
11
CB-AYVG-0011
SUBARU ADAPTOR (16P-9P)
12
CB-AYVG-0012
HONDA ADAPTOR (5P)
13
CB-CYHC-0018
MITSUBISHI ADAPTOR (12P)
14
CB-CYVG-0007
MITSUBISHI CABLE (12P+16P)
◈ Asian kit
9
AUTO-i 300
Chapter 1: General
◈ European kit
NO
Part No.
Description
1
CA-PSA1-0002
PSA Cable (2P)
2
CB-AYHC-0016
Mercedes Benz Board (38P)
3
CB-AYVG-0013
BMW Adapter (20P)
4
CB-AYVG-0014
Opel Adapter (10P)
5
CB-CYHC-0022
Audi / VW Cable (2+2P)
6
CB-CYHC-0023
Mercedes Benz Cable (3 liners)
7
CN-T005-AM06
Fiat Cable (3P)
◈ USA/Australian kit
NO
Part No.
Description
1
CB-CYHC-0031
Ford Cable (20P)
2
CB-CYVG-0009
Holden Cable (6P)
10
AUTO-i 300
Chapter 1: General
4. Name and function of each part
Front View of Main Body
1) PWR LED: External power supply. (12V DC, DLC power supply)
2) BAT LED:Battery status. (Color-Status)
(Green-In Use, Orange-Charging, Red-Shortage,
Red Blinking-Warning battery dead)
3)DLC LED: Communication with a vehicle
4) USB LED : Communication with a USB port
5)Bluetooth LED : Bluetooth communication
6)Power Button : Used to turn the power of the main body on and off
* If you press power button excessively strong, it may cause power button inside.
11
AUTO-i 300
Chapter 1: General
Upper part of Main Body
1.DLC connector: It is for DLC communication cable to diagnose vehicles.
2.RS232: It connects to TPMS module for read sensor data and coding.
(New TPMS will be introduced in 2015)
Side of Mainbody
1.USB mini B: USB port for support J2534 communication
(Later, it will be supported on our website.)
2.J2534 power port: power port for J2534
12
AUTO-i 300
Chapter 1: General
Back of Main Body
1.Serial No. label
Bottom of Main Body
1.USB B TPYE: Connecting to PC for update..
2.Power connector: It is for a AC/DC power adaptor and a cigar jack..
3. Bluetooth dongle (Mainbody): If it is connected with its mainbody, Green-color LED is on.
- Do not connect this to PC side.
- Do not remove this from its mainbody. If Bluetooth communication does not work, please
push up Bluetooth dongle for connecting tightly.
13
AUTO-i 300
Chapter 1: General
5. Power Supply
Power can be supplied through the following 4 ways.
1. Cigarette Lighter Power Cable
Power is fed through the cigarette lighter power cable.
However, when the vehicle ignition switch is in the “OFF” position or upon starting
a vehicle, power is not supplied to the cigarette lighter socket.
2. Vehicle Battery
Power can be supplied through the cigar lighter cable after the red alligator clip of
battery extension cable is attached to the positive battery terminal (+), and
the black alligator clip to the negative battery terminal (-).
In this case, power can be supplied continuously regardless of the position of the
ignition switch or a startup situation of the vehicle.
(Be careful no to discharge the battery.)
Caution! Improper connection of (+) and (-) may cause damage to the
product.
3. DLC Communication Cable
Vehicles satisfying OBD-II communication protocol and 20PIN diagnostic connector
can directly receive a power supply through DLC communication cable without
a separate power supply unit.
4. AC/DC POWER Adapter
If AC/DC adapter is used as a power supply, the battery may be charged
automatically, and it may be also used as the power supply of the mainframe.
14
AUTO-i 300
Chapter 2: Component Pictures
1. Component pictures and description
1-1. Installation DVD
1-2. AUTO-i 300 Main Body andBluetooth
15
AUTO-i 300
Chapter 2: Component Pictures
1-3. AUTO-i 300 Carrier Bag
Adapters and cables for vehicle diagnosis are included in AUTO-i 300.
Store product in carrier bag if not in use in order to prevent loss and protect against
impact.
1-4. USB Cable
The USB cable connects the USB port of AUTO-i 300 and that of your PC and is used
when you want to download the diagnosis software or save captured files to your PC.
Be sure to use a dedicated USB cable only.
A dedicated USB cable of AUTO-i 300 is not allowed to use for other purpose.
16
AUTO-i 300
Chapter 2: Component Pictures
1-5. Cigar Light Power Cable
- Cigar Light Power Cable-
The Cigar Light Cable connects the AUTO-i 300 to the cigar jack for power supply.
1-6. Battery Extension Cable
- Battery Extension Cable-
This battery extension cable make AUTO-i 300 to get power from battery of a vehicle directly
by connecting to a cigarette cable.
17
AUTO-i 300
Chapter 2: Component Pictures
1-7. DLC Cable
DLC Cable
The DLC cable is also called the OBD-II cable. All vehicles released recently have built-in
OBD-II connectors compatible to the OBD-II specification.
It is possible to diagnose new model vehicles by directly connecting the DLC cable. It is not
necessary to connect any additional power source as power is feed through the diagnostic
connector.
Separate adapter is needed to diagnose old vehicles.
1-8. AC electrical power cord / adapter
AC electrical power cord / adapter
When you want to download the diagnosis program or search flight record, you can use
this AC/DC electrical power adapter to feed power.
Also, can charge the battery built in the product.
18
AUTO-i 300
Chapter 2: Component Pictures
1-9.DLC ADAPTER
The DLC Adapter is used to diagnose vehicles by connecting to the main connector. Do
check name of brand written on adapter before use since shape of DLC Adapters are
similar.
Some products of the same brand include more than one adapter. Therefore do check
form and number of pin of the diagnostic connector which is attached to the vehicle.
Some vehicles do not supply power through the diagnostic connector.
Do not connect any power supply if power can be supplied through the
diagnostic connector.
1) Asian kit
SAMSUNG / NISSAN ADAPTOR (14P)KIA ADAPTOR 20P (BLUE)
DAEWOO,GM ADAPTOR (12P)
SSANGYONG ADAPTOR (14P)
SSANGYONG ADAPTOR (20P)
19
AUTO-i 300
Chapter 2: Component Pictures
TOYOTA, LEXUS ADAPTOR (17P"R")TOYOTA, LEXUS ADAPTOR (17P"C")
HONDA ADAPTOR (3P)HONDA ADAPTOR (5P)
SUBARU ADAPTOR (16P-9P)MAZDA "C" ADAPTOR (17P)
MAZDA ADAPTOR (6P + 1P)NISSAN ADAPTOR (14P)
20
AUTO-i 300
Chapter 2: Component Pictures
MITSUBISHI ADAPTOR (12P)
MITSUBISHI CABLE (12P+16P)
21
AUTO-i 300
Chapter 2: Component Pictures
2) European kit
Mercedes Benz Board (38P) Mercedes Benz Cable (3 liners)
PSA Cable (2P) Audi / VW Cable (2+2P)
Fiat Cable (3P) Opel Adapter (10P)
BMW Adapter (20P)
22
AUTO-i 300
Chapter 2: Component Pictures
3) Usa/ Australian kit
Ford Cable (20P) Holden Cable (6P)
23
AUTO-i 300
Chapter 3: Menu Cofiguration
1. Before using the product
1-1.Confirm the power supply before using the product.
Note that power can be supplied through the vehicle’s diagnostic connector
if it is connected to the vehicle.
When power is not supplied through the vehicle diagnostic
connector, Connect cigar cable for power supply before
communicating with the vehicle. If voltage levels are not matched
between ECU and AUTO-i 300, it may disable communication
1-2.Before using the product, make sure to download the latest diagnostic program.
Before using the product, confirm whether the diagnostic program is compatible
with the option purchased.
Latest diagnostic data can be updated through our homepage(www.carmanit.com)
or confirmed through regional retailers.
24
AUTO-i 300
Chapter 3: Menu Cofiguration
2. Menu Description
This is the description for each menu displayed on the initial screen when AUTO-i 300is
program on.
01. OBD2/EOBD
- This menu is to diagnose and test some parts that are related with exhaust gas only if
user`s vehicle has OBD 2/EOBD
02. CAR, COMMERCIAL, BIKE
- This menu provides scanner's own functionality such as vehicle diagnosis, service data
search, actuator activation, etc.
- Depending on your option, you can perform diagnosis on Korean, Japanese, European,
Australian and USA vehicles.
03. DOWNLOAD
- In this menu, AUTO-i300 can connect to PC so that it can upgrade software and download
saved files etc. in AUTO-i 300 to PC.
04. UTILITY
- In this menu, you can check the system display unit, favorite maker setting, screen
setting, time setting and system information
05. REPAIR
- To use Repair Information, you should install “Repair Information” in the installation DVD.
- This function provides repair service information and wiring diagrams.
06. CONFIG
- This menu provides setting function of System Display Unit, Maker, Display, Time, and
System and User information.
25
AUTO-i 300
Chapter 3: MenuCofiguration
3. Icons on Main Screen
This is description of each menu displayed on the initial screen when AUTO-i 300 is program on.
1. Help: Provides User Manual.
2. Setting:
Selects “Autoselect Car Menu”, “Show DLC Message Box” function.
- If each function is selected, it becomes colorized.
* “Show DLC Message Box” will be available soon.
3. Text Shot: Saves the sensor data at specific time point.
4. Screen capture: Saves the image on the screen as image file (.bmp).
5. Home: Goes to main menu.
6. Exit: Exits this program.
26
AUTO-i 300
Chapter 4: Diagnosis Menu
1. How To Connect Diagnostic Connector and Select Diagnosis Program
1. Locate the diagnostic connector in the vehicle.
- Most vehicles released after year 2002 conform to the OBD-II Protocol and
have OBD-II diagnostic connectors.
- Most OBD-II vehicles have their diagnostic connectors on the section over the
brake pedal under the steering wheel.
- If an additional adaptor is required, the scanner display shows the type of the
necessary adaptor and the location of the diagnostic connector.
2. Use the DLC main cable to connect the vehicle's diagnostic connector and AUTO-i 300.
3. Turn on AUTO-i 300
- If power is not feed through the diagnostic connector and the AUTO-i 300
battery is not fully charged, you need to connect an additional power supply
(vehicle battery or cigarette lighter power cable, etc).
27
AUTO-i 300
Chapter 4: Diagnosis Menu
4.Select “CAR” menu.
5. Select vehicle maker to be diagnosed in diagnostic menu.
-Selection of vehicle maker-
28
AUTO-i 300
Chapter 4: Diagnosis Menu
6. Select vehicle in diagnostic menu.
7. Select the system to be diagnosed.
29
AUTO-i 300
Chapter 4: Diagnosis Menu
8. Select connector to be diagnosed in diagnostic menu.
30
AUTO-i 300
Chapter 5: Vehicle Diagnosis
1. Diagnostic Trouble Codes
- In this menu, it is possible to check for any malfunction of the selected vehicle system
through the communication with the ECU in the vehicle. As AUTO-i 300 displays
DTCs (Diagnostic Trouble Codes), you can easily check where malfunction occurs.
Also, the description for DTCs is displayed as well to help you service your vehicle.
In order to diagnose DTC correctly, please check the connection between
connector and AUTO-i 300. Please refer to Chapter4: Diagnosis menu and check
details such as Vehicle maker, model and displacement etc.
The help function may differ between vehicle makers.
- Diagnostic Trouble Codes-
Note - Items of Diagnostic Trouble Codes may differ from depending on makers and models.
1.If a car and a system are selected correctly in the Vehicle Diagnosis menu
and communication with vehicle is stable, the above picture will be shown.
31
AUTO-i 300
Chapter 5: Vehicle Diagnosis
If it does not show a menu like page 31 and shows "Communication Error" or does
not communicate stably, please check first status of the target car or connection of
cables.
2. The DTC search screen appears. Now, you can check current and old DTCs and
erase them.
- Old DTCs are not activated unless there is no corresponding fault history.
- Only detected DTC can be saved.
32
AUTO-i 300
Chapter 5: Vehicle Diagnosis
3. Click current DTC icon to confirm its content.
3-1. DTC - Press this button to check current DTCs.
- In the case of MIL type vehicle, you can check codes through the DTC list.
3-2. History DTC - Press this button to check old DTCs.
3-3. Erase DTC - Press this button to clear DTCs.
3-4. Freeze Frame - Press this button to check data at that moment of malfunction.
3-5. Detail - Press this button to display detailed information for DTCs.
33
AUTO-i 300
Chapter 5: Vehicle Diagnosis
2. Erase/Reset DTC
1. If you select a car and a system correctly on the menu and if communication with a car
works successfully, it shows the DIAG MENU like a picture below.
Press the ERASE/RESET DTC button.
- Erase/Reset DTC-
2. You can see "Yes" & "No" buttons. If you choose the YES button, the DTC is deleted. If
you choose the No button, it returns to previous step.
There are current and old DTCs. When trying to clear old DTCs, they
are cleared immediately and they are not set again. However, when trying to clear
current DTCs, they are cleared for a short period of time but they are activated
again. In this case, clear DTCs again after checking and repairing
malfunction parts for the corresponding DTCs.
34
AUTO-i 300
Chapter 5: Vehicle Diagnosis
3. Parameter Data
- In the PARAMETER DATA menu, the module can communicate with the vehicle ECU
to check data and control values of each sensor of the selected system and to check conditions
of various switches and actuators.
It is important to select the vehicle specifications correctly for accurate sensor
data measurement.
Make sure to set the vehicle displacement, manufacturedyear, fuel, etc.
correctly. The live data list can differ even with the same vehicle models.
-Parameter Data NOTE) The menu for Parameter data selection, shown in the above picture, can differ by
vehicle makers and models.
1.When selecting the correct vehicle model and system from the menu and communication
with the vehicle is properly established, the menu appears as the picture above.
Select Parameter DATA and press the ENTER key
If the message indicating a communication error is displayed instead
of the menu like the figure above or communication cannot be established,
check the vehicle condition and the connection status of the diagnostic
connector again..
35
AUTO-i 300
Chapter 5: Vehicle Diagnosis
2.The Live data list is displayed as shown in the below picture.
Graph Mode: Converts sensor data to graph for analyzing data stream.
- Maximum 32 item-selection available.
- Maximum eight (8) graphs on screen.
- To convert each sensor data to graph, you should select each item.
Flight Record Start: Saves sensor data.
Dual DTC: Displays selected DTC and its sensor data together.
Guide Info: For the system “Help” function supportive, you can see its helping information.
(Available year 2015)
Change Unit: Changes measure of sensor data.
1. Count: Number of selected sensor data item.
2. Position: Position of selected sensor data item. (1 from top)
3. Number of total item: Number of total items of sensor data.
36
AUTO-i 300
Chapter 5: Vehicle Diagnosis
- Graph Mode: This function is to check live data in graph forms for tendencyanalysis.
- Flight Record Start: Saves data of selected sensor data.
Maximum data saving time is one hour and it might be different up to the number of selected
data. (One hour after Flight Record Start, it stops automatically.)
37
AUTO-i 300
Chapter 5: Vehicle Diagnosis
- Dual DTC: Displays DTC and its sensor data.
Top half screen displays sensor data and bottom half screen displays its DTC.
38
AUTO-i 300
Chapter 5: Vehicle Diagnosis
4. Actuator Test
Actuator test is a function to diagnose abnormalities in the applicable product by forcefully
operating or stopping actuator and switches.
The support of Actuator test function depends on vehicle maker and vehicle type.
-Actuator Test-
1. If a car and a system are selected correctly in the Vehicle Diagnosis menu
and communication with vehicle is stable, the above picture will be shown
Select a Actuator Test.
39
AUTO-i 300
Chapter 5: Vehicle Diagnosis
2.The screen as below appears.
3.When pressing start key icon, Actuator test starts.
Before starting inspection, confirm operation conditions and inspect accordingly.
Actuator test time varies according to items.
40
AUTO-i 300
Chapter 5: Vehicle Diagnosis
4.When pressing stop key icon, Actuator test stops.Use this key to stop the inspection.
Inspection stops when pressing ESC key or arrow on the upper right of the screen.
Evaluation on Actuator test results is determined by operating
sounds of actuator and switches, and vehicle’s RPM change.
Therefore, Actuator test should be conducted in a quiet place
where surrounding noises are limited. See current data values.
If the applicable system does not support sensor, actuator, and dual
display, it supports only actuator operation items, not sensor items.
41
AUTO-i 300
Chapter 5: Vehicle Diagnosis
5. Resetting Adaptive Values
- The resetting adaptive values initiates ECU by clearing values of sets in ECU.
- The clearing learning values may be different depend on car makers and models.
42
AUTO-i 300
Chapter 5: Vehicle Diagnosis
6. Evap. Leakage Test
- Press this button to check if there is leakage from a oil tank.
43
AUTO-i 300
Chapter 5: Vehicle Diagnosis
7. PCM Lock(MEC) Setting
- This function is to prevent data or programs from adjustment.
- System information differs from depend on car makers and models.
44
AUTO-i 300
Chapter 5: Vehicle Diagnosis
8. Misfire Delay Reason
- This function is to check the number of misfire in each cylinders.
- System information differs from depend on car makers and models.
45
AUTO-i 300
Chapter 5: Vehicle Diagnosis
9. System Information
-System Information shows information related with system such as system model and software
version etc.
- System information differs from depend on car makers and models.
46
AUTO-i 300
Chapter 6: OBD-II/EOBD Diagnosis Menu
1. OBD-II/EOBD Overview
■ Purpose of OBD-II
- To diagnose causes of increased exhaust gas from the vehicle and the applicable
component and then illuminate a malfunction indicator light(MIL) to notify the need of
immediate and accurate repair.
■ OBD-II regulations
- If vehicle’s exhaust gas increases due to malfunction of any component, diagnose the
applicable component and causes and turn on MIL.
- Standard diagnostic device(GST) should be able to read malfunction description.
■ OBD-II regulations《major diagnostic items》
The warning light shall be on before the emission reaches 1.5 times of the permissible limit
due to any of the following troubles or performance degradation.
- Catalyst purification rate (this diagnosis is for HC emission only. This is being phased in
for 1.75 times of HC limit from TLEV), misfire, EGR System, O2 sensor and fuel system
secondary air system
- Diagnose all sensors and actuators used for controlling the engine to see if they function
properly as well as wirings for an open/short circuit.
- Diagnose the entire evaporation system to see if it leaks.
- Perform diagnosis when the PCV valve and the crankcase or the PCV valve and the
intake manifold are disconnected.
- Diagnose the thermostat when the coolant temperature fails to reach the specified
temperature where the diagnosis can be made to other items in a given time after
starting the engine.
47
AUTO-i 300
Chapter 6: OBD-II/EOBD Diagnosis Menu
2. How To Connect Diagnostic Connector and Select Diagnosis Program
(It is common to Korean, Japanese, European and USA vehicles)
1. Confirm the location of vehicle’s diagnostic connector.
1. Locate the diagnostic connector in the vehicle.
- Most OBD-II vehicles have their diagnostic connectors on the section over
the brake pedal under the steering wheel. (OBD-II Diagnostic connector location)
- Since vehicles without the OBD-II diagnostic connector do not conform to the
OBD-II/EOBD communication protocol, you can not use the OBD-II/EOBD vehicle
diagnosis function to them.
OBD-II Diagnostic connector location
2. Use the diagnosis cable to connect the vehicle's diagnostic connector and
AUTO-i 300
3. Turn on AUTO-i 300.
- As OBD-II vehicles feed power through the diagnostic connector to the
module, they do not need any additional power supply.
4. Click “OBD-II 16PIN CONNECTOR” button on the menu for diagnosis.
For vehicle diagnosis, always position the key to “Ignition ON”.
Power is not supplied to ECU at the “OFF” position, failing
communication with AUTO-i 300.
48
AUTO-i 300
Chapter 6: OBD-II/EOBD Diagnosis Menu
3. Readiness Test
The readiness test tries making communication with your vehicle to review general
items of ECU modules that response.
1. Once it communicates successfully with vehicle, the following menu is displayed. Please
click READINESS TEST function.
- Readiness Test -
If no menu like above is displayed or communication cannot be established, check
the vehicle condition and the connections status of the diagnostic connector again.
In addition, check if your vehicle supports OBD-II communication.
*Result
1. NOT CMPLTD: The test has not been completed.
- This appears when the test was not completed owing to the abnormal
ECU or sensor required to display the test result..
2. COMPLETED: The test has been completed.
3. NON APPLIC: The item is not applied to the tested vehicle.
49
AUTO-i 300
Chapter 6: OBD-II/EOBD Diagnosis Menu
4. Parameter Data
Current data item values specified in OBD-II regulations can be confirmed.
1. Once it communicates successfully with vehicle, click sensor data item as below.
- Parameter Data-
2. It displays selected sensor data as below, and you can check each data value
- OBD-II/EOBD Sensor Data -
50
AUTO-i 300
Chapter 6: OBD-II/EOBD Diagnosis Menu
5. Diagnostic Trouble codes
Press this button to check trouble code of current vehicle.
1. Once it communicates successfully with vehicle, click DTC item as below.
-Diagnostic Trouble codes2. It displays DTC as below, and it support DTC erase.
- DTC -
51
AUTO-i 300
Chapter 6: OBD-II/EOBD Diagnosis Menu
6.Erase/Reset DTC
1. Select a car model and system in the diagnosis menu. Then, if communication with the
vehicle is established successfully, the menu shown in Figure of Page49 appears.
Select the ERASE/RESET DTC button.
-Erase/Reset DTC-
2. If the “YES” button&“NO”button window are shown, Select the YES button to clear DTC or
select the NO button to return back to previous step.
52
AUTO-i 300
Chapter 6: OBD-II/EOBD Vehicle Diagnosis
7. Monitoring test results
This menu displays the monitoring test results while the vehicle is being normally operated.
- To test systems and units of different manufacturers, it is required to specify test
IDs and component IDs.
If there is no test item supported by the vehicle manufacturer, an error message will be
displayed.
1.Once it communicates successfully with vehicle, click the item of Monitoring Test Result as
below
- Monitoring Test Results -
53
AUTO-i 300
Chapter 6: OBD-II/EOBD Vehicle Diagnosis
2. It displays test result of each Monitoring Test item.
54
AUTO-i 300
Chapter 6: OBD-II/EOBD Vehicle Diagnosis
8.BI-Directional Control
- You can control and test functions related with OBD-II system.
-BI-Directional Control-
6-1. If communication wih the vehicle is established successfully, the menu above appears.
Select BI-DIRECTIONAL CONTROL.
If no menu like picture above is displayed or communication cannot be
established, check the vehicle condition and the connection status of the
diagnostic connector again.
In addition, check if your vehicle supports OBD-II communication..
55
AUTO-i 300
Chapter 6: OBD-II/EOBD Vehicle Diagnosis
9. Vehicle Information
A function to confirm information on the installed ECU in the vehicle, which is executable
only in ECU provided with module information.
1. Once it communicates successfully with vehicle, click vehicle information item as below.
- Vehicle Information –
2. It displays its ECU information as below.
56
AUTO-i 300
Chapter 7: Stored Data
1. Parameter Record
Afunction to view the saved vehicle’s service data for analyzing.
Rename: Changes file name on the list.
Delete: Deletes file on the list.
Data View: Views detail information of the selected file on the list.
Convert Excel: Converts to type of Excel file.
Attach: Attached the selected file to email to the Technical Support Team of Carman
International Co. Ltd.
57
AUTO-i 300
Chapter 7: Stored Data
2. Text Shot
- A function to view and compare the saved DTC and sensor data at specific time point for
analyzing
Compare: Compares selected two lists.
Print: Prints selected file.
58
AUTO-i 300
Chapter 7: Stored Data
3. Image Shot
- Displays saved image file.
Image View- Displays full screen.
59
AUTO-i 300
Chapter 7: Stored Data
4. Print
- It prints the Check List or selected file from the saved list through the connected printer.
Preview- Previews the prints.
Check List- Views and prints Check List.
60
AUTO-i 300
Chapter 8: Repair Information
1. Repair Information Menu
1.Sorted By Parts
Tips are provided for the desired component by 4 systems;
engine / engine(LPG) / ABS / suspension system.
2. Sorted By Troubles
Tips are provided for desired malfunction type by 4 systems;
engine / engine(LPG) / automatic transmission/ suspension system.
3. Circuit Diagram
You can search wiring diagram of the desired vehicle by maker.
4. Parts Description
You can search description of components of the desired vehicle by maker.
5. Parts Location
You can search location of components of the desired vehicle by maker.
6. Repair Data
You can search maintenance data of the desired vehicle by maker.
61
AUTO-i 300
Chapter 8: Repair Information
2.Sorted By Parts
- Menu by Component Type-
Click [Troubles] in menu window on the left.
☞ Tips for malfunction description of selected sensor and repair method.
- Troubles -
62
AUTO-i 300
Chapter 8: Repair Information
Click [Pictures of parts] in menu window on the left.
☞ Tips for picture of selected sensor
Click [Location of Parts] in menu window on the left.
☞ Tips for location of part of selected sensor
63
AUTO-i 300
Chapter 8: Repair Information
Click [Part Description] in menu window on the left.
☞ Tips for detailed principles and function of parts
-Part Description–
Click [Part Characteristics] in menu window on the left.
☞ Tips for characteristics of selected sensor.
-Part Characteristics–
64
AUTO-i 300
Chapter 8: Repair Information
Click [Principles Understanding] in menu window on the left.
☞ Tips for principles of parts.
-Principles Understanding -
: icon to move to next screen.
: icon to move to previous screen.
: icon to change the menu window on the left to full screen
or basic screen.
65
AUTO-i 300
Chapter 8: Repair Information
3.Sorted By Troubles
-Menu by Type of Malfunction-
Click [Cause of Problem] in menu window on the left.
☞ Tips for cause of malfunction
-Cause of Problem -
66
AUTO-i 300
Chapter 8: Repair Information
Click [Related Parts] in menu window on the left.
☞ Description of component related to malfunction.
-Related Parts–
Click [Analysis Method] in menu window on the left.
☞ Tips for analysis method for malfunction symptoms.
-Analysis Method–
67
AUTO-i 300
Chapter 8: Repair Information
4. Circuit Diagram
-Vehicle wiring diagrams menu -
If you “drag” the screen, the wiring diagram location changes.
-Vehicle wiring diagram–
: Screen can be adjusted to condensed / extended / full screen
with icons on the top of the screen.
68
AUTO-i 300
Chapter 8: Repair Information
5. Parts Description
- Part Description Menu–
Click the desired part in menu window on the left.
☞ Tips for parts description
- Part Description–
69
AUTO-i 300
Chapter 8: Repair Information
6. Parts Location
- Parts Location Menu –
Click the vehicle and model year to be confirmed in menu window on the left.
☞ Location will be confirmed by clicking the name of part in activated window on the right.
- Part Description –
70
AUTO-i 300
Chapter 8: Repair Information
7. Repair Data
- Maintenance Data Menu –
Click the vehicle and system to be confirmed in menu window on the left.
☞ Applied vehicle type, applied specification, function description, execution method, and
order of execution will appear in the window on the right.
- Part Description –
71
AUTO-i 300
Chapter 8: Repair Information
8. Web Manual
-Provides link to each maker’s service information site.
Motordata: Please refer to “MOTORDATA INSTALLATION MANUAL” file in your DVD.
72
AUTO-i 300
Chapter 9: Configuration
1. System Configuration
In this menu, you can change the display unit of data which are sent from a vehicle.
- The units of various information, such as speed, temperature, pressure, angle, air flow
can be checked and modified.
1)It is possible to change the display units all at once according to the region that
uses “Metric” or “Yard-Pound” system.
2) After changing the display unit, click the Save button to save your modification.
- SPEED : You can change between Km/h and MPH.
- TEMPERATURE : You can change between ℃ and ℉.
- PRESSURE : You can change among mbar, kPa, inHg and psi.
- ANGLE : You can change between ° and %.
- AIR FLOW : You can change between gm/s and lb/m.
73
AUTO-i 300
Chapter 9: Configuration
3) After setup of Language or Screen Size, please click to Save button.
-System Language: sets operating system language of PC program. 21 languages are available.
-Diag. Language: sets diagnostic language.
Diagnostic languages can be selected up to the installed diagnostic languages in internal
memory.
-Screen Size: sets screen size of program.
-Background Color: changes the background color.
-Select Device: selects diagnostic device.
-Communication Method: selects communication method of diagnostic module.
It selects Bluetooth or USB communication. It does not support simultaneous use of Bluetooth
and USB communication.
74
AUTO-i 300
Chapter 9: Configuration
2. Graph Configuration
You can set the display environment when confirming current data values with graph.
- Graph line, color or thickness of background screen
CH1~8: Channel can be changed to change graph color by channel for
total 8 channels that can be displayed on the screen.
Default 1: Standard default setup.
Default 2: Background color in Default 1 is white.
Save: After changing settings, save with [save] icon on the bottom of the screen so that
changed setting values can be displayed.
Cancel: Cancel setup.
Background: Background color can be changed to desired color.
Grid X: The color of the vertical axis of checkerboard pattern on the screen can be changed.
Grid Y: The color of the horizontal axis of checkerboard pattern on the screen can be changed.
Cursor: The color of the cursor appearing when the screen is touched can be changed to
confirm values at the specific point.
Line Width: Thickness of graph line can be adjusted.
75
AUTO-i 300
Chapter 9: Configuration
3. System Info.
Displays System Information and Program Information.
Before your upgrade, be sure to check your current application/diagnostic program information.
76
AUTO-i 300
Chapter 9: Configuration
4. User Info.
You can input your information or check system information.
4-1. User information is shown and you can edit and save information.
4-2. In order to change the information. please select a item to edit, click the edit button on
below bar and input information.
77
AUTO-i 300
Installation of Bluetooth Driver
* You are able to install all program of AUTO-i 300 in regular sequence with running the
provided DVD.
If you want to install only Bluetooth driver only, please follow installation procedure below.
1. Double click “AUTOi300Bt.exe” file.
2. If the Bluetooth dongle is connected to the computer, then remove it and click “Next” button.
3.Turn on AUTO-i 300 and connect Bluetooth dongle to the computer. Then, follow the
installation procedure as below.
78
AUTO-i 300
Installation of Bluetooth Driver
4. Installation is completed as below, please click “OK” button.
79
AUTO-i 300
FCC RULE
Manufacturer: Carman International Co., Ltd.
Model: AUTO-i 300
USA-Federal Communications Commission (FCC)
This device complies with part 15 of the FCC Rules. Operation is subject to the
following two conditions: (1) This device may not cause harmful interference, and (2)
this device must accept any interference received, including interference that may
cause undesired operation.
Model: CMIT-BT200
This equipment has been tested and found to comply with the limits for a Class B digital
device, pursuant to Part 15 of FCC Rules. These limits are designed to provide
reasonable protection against harmful interference in a residential installation. This
equipment generates, uses, and can radiate radio frequency energy. If not installed and
used in accordance with the instructions, it may cause harmful interference to radio
communications. However, there is no guarantee that interference will not occur in a
particular installation.
If this equipment does cause harmful interference to radio or television reception,
which can be determined by tuning the equipment off and on, the user is encouraged
to try and correct the interference by one or more of the following measures:
- Reorient or relocate the receiving antenna
- Increase the distance between the equipment and the receiver.
- Connect the equipment to outlet on a circuit different from that to which the receiver is
connected.
- Consult the dealer or an experienced radio/TV technician for help.
Any changes or modifications not expressly approved by the party responsible
for compliance could void the user’s authority to operate the equipment.
Caution: Exposure to Radio Frequency Radiation.
To comply with FCC RF exposure compliance requirements, for mobile
configurations, a separation distance of at least 20 cm must be maintained between
the antenna of this device and all persons. This device must not be co-located or
operating in conjunction with any other antenna or transmitter.
Made in Korea
80
AUTO-i 300
CE RULE
RF Exposure Warning : During operation, the user may keep a minimum seperation distance of
20 cm with the RF devices.
81