1
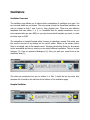
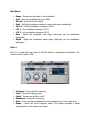
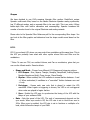
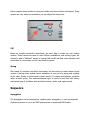
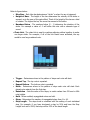
P URE S Y N T H P LAT I N UM
User Manual Version 1.0
!
!
!
!
!
!
!
!
!
!
!
!
!
!
!
Introduction
!
Pure Synth Platinum is one of the most sophisticated, and feature-rich hybrid
synthesizers ever made. The concept of “Pure Synth” denotes that with our synth you
have full access to the full waveforms and synthesis techniques available in order to
make your own sounds. The “Platinum” name denotes that this type of hybrid synth is
very rare and stands alone in a league of its own.
!
We don’t know of any other synth on the market that gives you this many synthesis
options:
!
!
1.
2.
3.
4.
5.
6.
7.
Sample based synthesis with the raw waveforms and disk streaming.
Analog Synth with PWM and Sync.
Wavetable Synth with PWM/Symmetry (1,700 Wavetables).
FM Synth.
SuperWave - Stack up to eight analog oscillators at once.
White Noise Generator.
Transient Synth - Responsible for adding the attack portion of any sound to add
with the rest of the other synthesis techniques.
8. Sub Oscillator.
9. Transient/Drum Oscillator.
Essentially, Pure Synth Platinum (PSP) is using 90% of all of the synthesis options
available in MachFive 3 and offering them to you in a very user friendly interface.
!
!
Navigation Overview
!
We designed PSP in a way that makes for easier navigation. We made a decision to
sacrifice a single page interface, because there are so many features, effects, and
options, it would have required very small graphics to fit on one screen. As a result, we
chose easy navigation and user friendliness over an eye sore single page option.
!
The menu item is architected in a top menu/sub menu way. For example, by selecting
Effects and Wavetable, the user will be editing the effects for Oscillator 2 which
happens to be a wavetable. Rather than just naming the sub menu oscillator 1-4, we
chose to use the actual name of the name of the oscillators.
!
UVI Workstation Features
!
As with any VST or synth, it is important to understand the nomenclature and
architecture of the ecosystem. Below are some important navigation and operational
notes with UVI and PSP:
!
•
•
•
!
Entering Values Manually - You are able to double click on any knob or slider
and enter the value manually. This allows you two methods of entering data.
Right Click Learn - You are able to right+click on any button, knob, or slider
and control it with your controller. After you right+click, move a knob or slider
from your controller keyboard and UVI Workstation will learn the CC MIDI value.
Note: You can restore any parameter to its original settings by right clicking and
selecting or holding Option and selecting.
***Please refer to the UVI Workstation User Manual for more information.
!
Navigation
!
Top Controls Menu
!
The top menu item chooses the section in which to edit:
• Oscillator Page allows you to edit the four different oscillators.
• Controls section allows you to edit the synth functions per the sub-menu.
• Reverb section edits the reverb, amp, and impulse verbs.
• Arp allows for independent arpeggiator control of the four oscillators.
• Master section gives independent control of the Mastering buss.
• Copy ENTIRE settings from one oscillator to another for easy layering and other
editing features.
!
!
!
!
!
!
Top Sub Menu
!
The sub menu controls which oscillator to edit. For example in the figure above, you
can see that the controls and the number 1 is selected. This denotes that the control
parameters for oscillator 1 are being edited.
!
Sub Category Options
!
Note: Anywhere you see a small white triangle, you can click the menu and choose a
sub menu category. For example, the AMP section also has the Pitch filter in the same
section. You will see the white arrow which denotes that there is a sub menu.
!
Preset System
!
We have designed an extensive preset system that allows you to choose pre-defined
presets for just about any synth section. For example, in the AMP section, you can
choose a piano oscillator and a piano AMP preset that will quickly give you an instant
piano AMP setting.
The other user presets are for you to be able to make your own presets. Due to the
limitations in the scripting, you are not able to change the name of the custom preset.
However, in order to update the custom preset do the following:
!
1.
2.
3.
4.
5.
6.
Adjust the parameters to your liking.
Hit the Copy button as defined by the C.
Choose a blank user preset.
You will now see a little disk drive icon.
Paste the parameters by hitting the P icon.
Now save to the preset by hitting the disk icon.
!
Global Copy/Paste
!
We have included a global copy and paste option to easily copy ALL of the oscillator
parameters including on/off states, effects, Arp settings, etc...This makes it easy to
layer two oscillators that you want to have the same settings. We do not offer a global
effects system, so this easy copy paste method would work well for this.
Oscillators
!
Oscillator Overview
!
The oscillator page allows you to select which combination of oscillators you want. You
can mix and match as you please. The only caveat is that the SuperWave oscillator can
only be loaded in slots 1 and 2 due to their physical size. There are also different
templates that have either 1, 2, 3, or 4 available slots for sample waveforms. As you
know samples take up more RAM, so you can choose which template you want, in order
to better save on RAM.
!
The navigation is straight forward when it comes to selecting a sound. First make sure
the sound is turned on by clicking on the on/off switch. Notice in the picture below,
there is a triangle next to the sample name. Triangles denote that there is a drop-down
option associated and here is where you can select different oscillators. There is a main
category (1); then an optional subcategory (2); then you pick your sound from in the
waveform area (3):
!
The slots are numbered from top to bottom 1-4. Slot 1 would be the top most slot;
whereas slot 4 would be the last slot at the bottom of the oscillators page.
!
Sample Oscillator
!
1. Start Phase - Determines the start position of the sample. Due to the streaming
function of UVI, this function is only to be used to adjust the attack time of the
sample and not to move the start position further into the sample.
2. Unison - This knob adjusts the detuning value per the voice number.
3. Voices - You can either drag your mouse across the voices line, or you can enter
the voices number in manually. Voices max at 8.
!
!
!
Analog Oscillator
!
1.
2.
3.
4.
5.
6.
7.
8.
Waveform - Choose the particular waveform oscillator.
Polarity - Change the polarity of the waveform.
Phase- You can adjust the phase, i.e. start position of the waveform.
PWM- Pulse will modulate the waveform.
Hardsync/Shift - Hardsync and shift the sync across the waveform.
Detune - Detune the oscillators based on the number of voices that are present.
Stereo - Stereo Spread.
Voices - Choose the number of voices that are played at the same time.
!
!
Wavetable Oscillator
!
The Wavetable oscillator provides classic wavetable synthesis.
1. Wavetable - Choose wavetable waveform.
2. Start Phase - Choose the starting point of the wavetable.
3. PWM/Symmetry - Pulse Width Modulation also known as Symmetry for a
wavetable.
4. Unison - Choose the number of voices the oscillator plays. (8 max)
5. Spread - Detune amount per the number of oscillators.
6. Stereo - Stereo Spread
7. Smooth Octaves - To avoid aliasing, each octave uses its own wavetable. When
Smooth Octaves is enabled, an aligned crossfade is performed between octaves; this
results in harmonics appearing and disappearing smoothly.
!
*** Note: When Smooth Octaves is disabled, only one octave wavetable is used. To
avoid aliasing, the octave with fewer harmonics is chosen. This is more CPU efficient,
but results in a timbre which is not as bright. If a pitch modulation is applied, that
covers more than one octave, you may hear harmonics appearing and disappearing as
you switch from one octave to the next.
!
FM - Frequency Modulation Oscillator
!
The FM oscillator is four operator frequency modulation synthesizer.
!
1. Choose the appropriate FM operator algorithm. You can look at the actual signal path
to determine the audio flow of the FM signals.
2. Select pre-defined FM presets.
3. Ratio and Level of FM operator A
4. Ratio and Level of FM operator B
5. Ratio and Level of FM operator C
6. Ratio and Level of FM operator D
7. Feedback signal - Use feedback and the operator Topology menu to further shape
the sound.
!
!
Transient/Drum synth Oscillator
!
The transient drum synthesizer is a very unique synthesis type that you don’t find in
many synths. When using these algorithms in a synth mode, it is best used when
adjusting the attack portion of a sound. When listening to a typical sampled sound, the
most important aspects to the raw sound are the attack and the sustain. So imagine,
taking a P5 raw sound, mixed with a pad. Then you use the transient synth engine to
add some bell, thud, wack, or tine type sound to it. What was a simple waveform can
now be changed into an EP just by adjusting the attack portions. This is what this
engine does.
!
When used as a drum synth, you can actually program analog type drum sounds using
the given waveforms.
!
!
!
1. OSC - The OSC section provides straight forward oscillator settings. Including basic
waveform (sine, triangle, saw, or pulse), oscillator frequency, simple two stage
attack/decay amplitude envelope, and pitch modulation with rate and depth controls.
2. Mix - Use the Mix control to blend the oscillator output with the noise generator,
which provides a standard low/high/band-pass filter, plus a two stage amplitude
envelope.
3. Noise - The Noise section provides a standard low/high/band-pass filter, plus a two
stage amplitude envelope.
4. Master - The Master section provides EQ, distortion, volume, and velocity sensitivity
controls for the oscillator amplitude, oscillator pitch modulation, and noise aptitude.
!
!
!
!
Noise Generator Oscillator
!
The noise oscillator generates eleven standard types of noises.
1. Noise Type - Type choices are Band, Sample and Hold, Static I, Static II, Violet,
Blue, White, Pink, and Brown.
2. Bandwidth/Rate/Density - Several noise types provide the following additional
parameters.
a. Band - Bandwidth
b. S&H - Rate
c. Static - Density
!
!
SuperWave Oscillator
!
SuperWave provides eight individual oscillators with their own set of controls. This
makes for a very “thick” oscillator tone with complete flexibility of each individual tone.
The individual waveforms can be selected from the drop-down. Four oscillators can be
displayed at one time; to switch between oscillators 1-4 and oscillators 5-8, click the
page toggle button as seen in the image below:
!
!
****Note: The SuperWave oscillator can only be present in oscillator slots 1-3.
!
!
Sub Oscillator
!
A dedicated sub-oscillator is included for sub-sonic boom and bass tones.
!
!
Controls Page
!
General
!
•
•
•
•
•
•
Volume - Controls the volume of the oscillator selected.
✓ Mute - Mute the oscillator sound.
✓ Solo - Solo the oscillator sound.
Pan - Adjusts the stereo panning field (left/right) of the oscillator.
Fine - Transposes the oscillator in cents (one-hundredth of a semitone), with a
range of +/- 100 cents.
Semitone - Controls the semitone settings. Because this setting offers
continuous pitch variation. It is best suited for pitch envelopes and other
continuous modulation and automation manipulations. For sample oscillators,
pitch adjustment may or may not affect the playback speed, depending on the
type of oscillator.
Pitch - Transposes the oscillator in stepped units of one semitone, with a range
of +/- 24 semitones. Because this setting is stepped, it is well-suited for
adjusting the default pitch (along with the fine tuning setting).
Layer - Adjust the velocity range for the oscillator. Range goes between 1...127
where 127 is the highest velocity.
✓ Lo Fade - low velocity range fade
•
•
✓ Hi Fade - high velocity range fade
Range - Adjust the key-range in which the keyboard is played. This is done by
MIDI learning the actual range of your keyboard. Select the high or low range
and notice the range blink. Select the low or high note on your MIDI controller to
set the range.
Octave - Sets the octave (+/- 12 tones). You can toggle select the octave
number by clicking it. It will toggle between +/- 1 (12 tones) and +/- 2 (24
tones).
!
!
AMP/Pitch
!
Remember what we said: Wherever you see a white downward facing triangle, you will
have another sub-menu option. The AMP section also toggles to control the pitch
envelope as well.
!
Envelopes provide a conventional 4-stage envelope in milliseconds.
!
•
•
•
•
Attack time
Decay time
Sustain time
Release time
!
Attack/Decay/Release Curve Knobs
!
In order to obtain better control of your AMP settings, we added an additional curve for
the attack, decay, and release. This will allow you to obtain better control over these
values.
!
Velocity Adjustments
!
•
•
Velocity Curve It allows you to adjust the response to MIDI note-on
velocities. Drag the curve vertically to change the curve shape. Option-Click to
return to the linear response.
Velocity Amount - It determines the degree to which MIDI note-on velocity
affects the maximum envelope value. For example, a value of 80% means that
the base value will be at least 20% and the velocity will affect the remaining
80%.
•
!
Velocity Sensitivity - It determines the velocity response on a continuous scale
that goes from linear to exponential to logarithmic.
***Note: Linear preset: By default, the AMP settings are logarithmic in nature, but there
will be times when you want the AMP to be linear. For example, for pads you may want
to use the Linear preset in order to gain a better attack time when a pad evolves.
!
!
!
Control
!
Play-mode
!
•
•
•
•
•
•
•
•
•
•
•
•
!
!
!
Polyphonic - Normal play mode with no portamento settings.
Poly Porta - Portamento mode for polyphonic notes played.
Mono Re-trigger - Mono mode, but re-triggers the note.
Mono Portamento 1 - Mono mode only triggers portamento when notes are
played legato.
Mono Portamento 2 - Mono mode and portamento is engaged per each note.
This is similar to what a pitch envelope would do.
Release - Changes the play mode to release. This is best used for EP, Piano, and
electro mechanical instruments to mimic the release notes for more detail.
Classic Mode - This is the default portamento mode and best used for synthesis
and synth oscillators.
Acoustic Mode - Best used with acoustic instruments. It allows a seamless glide
between note octaves without the pitch shifting affect you hear from Classic
Mode. This mode is best used with acoustic or real sound instruments.
Glide Time - Determines the glide time of the portamento play mode.
Fade - Determines the fade amount when using Acoustic Mode.
Delay - Delays the playing of notes in seconds. This is best used for a delay type
of effect.
Random - Randomly plays notes. The higher the value, the less likely the notes
are played randomly.
!
!
Mod Wheel
!
•
•
•
•
•
•
•
•
•
Shape - Determines the shape of the modulation.
Sync - Sync the modulation with your DAW.
Smooth - Smooths the LFO depth.
Pitch - Self pitch modulations similar to most synths pitch modulations.
Filter 1 - Link the modulation routings to Filter 1.
LFO 1 - Link modulation routings to LFO 1.
LFO 2 - Link modulation routings to LFO 2.
Rate - Adjust the modulation rate range (start/end) per the modulation
destination.
Depth - Adjust the modulation depth range (start/end) per the modulation
destination.
!
Filter 1
!
Filter 1 is a static filter that uses the UVI/M5 effects to manipulate the filtration. The
benefit is that it reduces CPU.
!
!
•
•
•
•
•
•
Category - Choose the filter category.
Type - Choose the category type.
Cutoff - Determines the filter cutoff.
Resonance - Resonance Frequency.
Drive - Drive and choose between the times sampling for a more organic feel.
Shape - Choose the cutoff frequency shape. The shapes represent a visual
representation of the actual cutoff shape.
!
Filter 2
!
Filter 2 is designed to be your super filter, where there are a ton of modulators to
choose from.
!
!
!
Amp
!
!
Adjust the AMP settings for the Filter section. The AMP is waiting for values from the
Cutoff and the Envelope Depth, in order to make the filter dynamic. Otherwise, with all
AMP settings set to 0, the Filter acts as a static filter or an EQ.
!
Modulators
!
•
•
•
•
•
•
Cutoff - Determines the cutoff frequency range per the cutoff Shape.
Resonance - Determines the amount of resonant filter.
Key Scale - Controls how the pitch of the note played affects the cutoff
frequency. A high key tracking value means that the lower you play on the
keyboard, the lower the cutoff scales. A low key tracking does the opposite.
Envelope Depth - Determines the envelope depth or how much the envelope
opens up. The knob is bipolar and can dial in negative and positive values.
Velocity - The bipolar velocity affects how much the cutoff value is modulated
per the velocity. The knob is bipolar and can dial in positive and negative values.
Drive (Sat/Clip) - A sort of overdrive effect on the filter. Turning this up literally
saturates the sound, making it thicker and harsher. When combined with
resonance, this can create a heavily distorted sound, similar to the effect of
running an electric guitar through an amp.
!
Shapes
!
We have decided to use UVI’s amazing Xpander filter section. MachFive’s unique
Xpander multi-mode filter, based on the classic Oberheim Xpander analog synthesizer,
has 37 different modes, each a separate filter in its own right. This is an order 4-Moog
ladder-style filter with built-in saturation and oversampling. Xpander broadens the
number of modes found in the original Oberheim and analog variants.
!
Please refer to the Xpander Filter Reference.pdf for the corresponding filter shape. You
can look at the filter graphic and determine how the shape would sound based on the
filter.
!
!
LFO 1
!
LFO 1 is your basic LFO where you can control two modulators at the same time. This is
the LFO you probably have used with other synths where Pitch and Filter are the
modulators.
!
***Note: To save on CPU, we omitted Volume, and Pan as modulators, given that you
can use the Vibrato and/or Tremelo effects.
!
•
•
Shape and Mode - Choose from different LFO Shapes and triggering options.
✓ LFO Shapes - Sine, Square, Triangle, RampUp, RampDown, Analog Square,
Random Sample and Hold, Chaos Lorenz, Chaos Rossler.
✓ Bipolar - When enabled, the LFO oscillates in normal fashion between -1 and
+1. When unchecked, it oscillates in a “one-sided” fashion between zero and
+1 only.
✓ Re-trigger - Causes each new note that is played to restart the LFO
waveform. When Legato re-triggering is chosen, the LFO is not re-triggered
when notes are played in legato fashion.
✓ Sync - Enable the LFO sync to synchronize the timing of the LFO with the
tempo of your software DAW.
Rate - Sets the speed of the LFO. The unit of measurement depends on the
sync mode. When sync mode is Off, the LFO rate is set in Hertz from zero to
20Hz. When sync is enabled, the LFO rate is set in fractions or multiples of a
beat, which follows the tempo of your DAW.
•
•
•
•
•
•
•
•
!
LFO 2
!
Pitch - Controls the amount of modulation that is applied to the pitch.
Filter 2 - Controls the amount of modulation that is applied to the Filter 2 cutoff.
Sens-Vel - Choose this option to modulate the velocity. Adjust the amount with
the knob.
Sens-AT - Choose this option to modulate the aftertouch. Adjust the amount
with the knob.
Depth - Determines the modulation depth of the modulation source.
Smooth - Smooths the LFO Depth
Delay - Determines when the LFO starts. The time goes between 0 and 10
seconds.
Rise - Allows the LFO to fades from zero to full amplitude.
LFO 2 is designed to be your modulation source for all things synthesis. We have
included many synthesis type modulators in order to better shape your sound.
!
!
!
•
•
•
•
Analog Synth - Modulate the Analog synth modulator Hard Sync amount or
PWM.
Wavetable - Modulate wavetable PWM.
FM - Modulate FM synth’s individual ratios or all ratios at once.
Superwave - Modulate the Superwave’s individual PWM or all of them at once.
Effects
!
One of the best features of PSP are their effects. M5/UVI has amazing effects and we
virtually used almost all of the effects from M5. The effects are broken up into sections
with their corresponding parameters:
!
1. Chorus FX
a. Analog Feel - This a type of chorusing effect that can mimic the sound of an
analog Pulse-Width-Modulation.
b. Chorus - This is the tradition chorus sound with added warmth.
c. Ensemble - Ensemble 505 is deeply inspired by the ensemble circuit found on the
Roland Paraphonic RS-505. Through examination of circuit schematics and
measurements taken on a working unit, the specific behavior of the BBD delay
lines, modulator shapes, and signal path found in the original have all been
!
faithfully reproduced. The result is a very smooth and “analogish” ensemble effect
that can be used with a wide variety of sounds, from raw synth waveforms to
voices, choirs and even drum loops.
2. Digital FX
a. Destructor - Bit crusher and down-sampler.
b. Ring Modulator - Mimics the classic ring modulation of classic analog synths.
c. Robotizer - Robotic type of effect.
3. Resonance FX
a. Auto-Wah - Auto-Wah with Rate and Depth adjustments.
b. Talkbox - Mimics the classic sound of a talkbox with different vowel choices.
4. Distortion FX
a. Analog Crunch - Adds a “crunchy” distortion type of effect with analog warmth
b. UVI Drive - Mimics a speaker drive and adds distortion. Best used for guitar
effects.
5. AMP FX
a. IR Amp Sim - A sundry of different custom guitar/bass IR amp sims.
b. Guitar Box - Guitar amp emulation with choice of mic types.
6. Delay FX
a. Fat Delay - Warmer delay.
b. Ping-Pong Delay - Classic EDM synth delay effect.
c. Tape Delay - Mimics the classic tape delay that is reminiscent to an echo.
7. Rotary Speaker FX - Mimics the rotary speaker of a classic B3 organ.
Pan/Volume FX
a. Autopan - Pan Modulation
b. Tremelo - Volume modulation
8. Stereo FX - Stereo imaging effect to widen the stereo field.
9. Modulation FX
a. Analog Flanger - Analog flanging effect reminiscent of classic effects pedals.
b. Cross Phaser - X-Phasing effect used in EDM music.
c. Flanger - Mimics the flanging effect of classic digital synths.
d. Phaser - Mimics the phasing effect of classic digital synths.
!
!
!
!
!
Reverb
!
You can only use one reverb type per oscillator. You can choose the different reverb
options by clicking in the reverb text area and choosing from the drop-down list.
!
!
SparkVerb™
!
SparkVerb™ is a highly advanced synthetic reverb that focuses on sound quality and
maximum control of essential parameters. What makes it unique? A feedback delay
network with modulated delays and three-band control of the decay rate. Plus, you get
explicit control of detune in cents. The result? Stratospheric choruses, resonant unisons,
and lush ambiances. An input diffusion stage helps increase short-term echo density,
which can be especially useful when applied to rhythmic material. SparkVerb is efficient
and versatile, with intuitive controls to quickly mold room size and shape. Browse
dozens of presets, and use them as a good starting point for your own creations.
!
Please refer to the documentation in your downloads for a complete user guide of the
SparkVerb™. You can also Click here for more info!
!
!
!
ASR-10/DP-4
!
One of our favorite reverbs we’ve ever heard were from the classic Ensoniq™ ASR-10
sampler. This reverb was taken from the classic DP 4 reverb effects processor. We were
able to capture these reverbs by using convolution and deconvolution techniques. These
reverbs are very warm and remember you can adjust the decay time.
!
!
VIP
!
Based on complex convolution techniques, we were able to create our own custom
reverbs. These reverbs are used for more effects, modulations, and echoing types. We
wanted to add a “different” aspect of reverbs that would add that extra character and
personality to your presets, so don’t be afraid to explore.
!
Spring
!
Also based on complex convolution techniques, we were able to create custom spring
reverbs. A spring reverb system uses a transducer at one end of a spring and a pickup
at the other. Similar to those used in plate reverbs. It creates and captures vibrations
within a metal spring. This electromechanical type of reverb is best used with electro
mechanical type of oscillators such as electric pianos, wurlis, and organ sounds.
!
Sequence
!
Arpeggiator
!
The Arpeggiator can be employed as a pattern gate, arpeggiator, or even an advanced
rhythmic processor for your live MIDI performance or sequenced MIDI tracks.
!
!
Refer to figure below:
• Blue Bars - Each blue bar determines a “strike” or when the arp is triggered.
• Height of Bars - The height of the bar determines the velocity of the strike or
amount, as in the case of the gate effect. Think of the height of the bar as a kind
of volume. The higher the bar, the more the amount of the strike.
• Numbers Below - The numbers below (0 - 1) determine the duration of the
strike. For example a value of .1 will strike the note with a staccato type of
sound.
• Chain Link - The chain link is used to combine adjoining strikes together to make
one larger strike. For example, if all of the link chains were activated, the arp
would be one long sustained note.
!
!
!
•
•
•
•
•
•
•
•
Trigger - Determines where in the pattern of steps each note will start.
Repeat Top - The top note is repeated.
Repeat Bottom - The bottom note is repeated.
Mode - Determines where in the pattern of steps each note will start. Each
played note restarts from the first step.
Resolution - Sets the value of the steps, in metric values from 32 bars to 64th
note triplets.
Hold - When enabled, arpeggiated notes are held.
Steps - Determines the number of arpeggiated steps from 1 to 16.
Step Length - The steps knob is combined with the setting of each individual
step. For example, if you have shortened a step by 50% and have the Step
Length knob set to 50%, that step will be 25% of the usual length.
•
•
•
•
!
!
Gate
!
Octaves - Determines how many octaves above or below the played notes will
be arpeggiated.
Strikes - Determines the number of times the note is triggered before moving
on to the next note.
Groove Amount - Determines the amount of groove or swing. This is similar to
most DAWs MIDI quantize swing setting.
Vel. Blend - Controls the depth of the steps’ velocity. At 0%, the full velocity
range is used; at 100%, a constant velocity is used (effectively making all steps
the same velocity, regardless of their individual values.
The gate is used to emulate the popular EDM style trance gating effect. Please note
that the gate function is very similar to an LFO, where the LFO modulates a modulator
per the steps. The height of the strikes determine the amount of the modulator.
!
Unlike a classic gate, PSP offers some additional modulator destinations for a very
unique effect: Volume, LFO 1 Depth, LFO 1, Rate, LFO 2 Depth, LFO 2, Rate.
!
!
!
•
•
Depth - Controls the depth of the modulator with positive and negative values.
Smooth - Smooths the Gate Depth.
***Please note that for non-volume modulator destinations, the appropriate LFO has to
be engaged in order to hear an audio change.
!
!
Master Section
!
•
•
•
!
8-Band EQ - An extensive 8-band EQ with the following frequencies
Compressor/Gate - High quality compressor and gate.
Master - Use the master section to bring everything to a level. It is a
combination of a limiter, compressor, and a leveler.
Resources/CPU Optimization
!
As with anything in life, there is always a limited amount of resources and you must be
careful with CPU. The good news is that you can create some pretty amazing sounds if
you are not too greedy (smiles).
!
Structure
!
First thing to know about UVI/MachFive is that the sample streaming is optimized pretty
amazingly. Close to 6,000 samples are streamed and can be pulled up, as if you owned
a hardware Rompler. In addition, the synthesis structure is fully optimized by a unique
method of dynamic switching between oscillators, by storing all synthesis on one
keygroup; as a result, UVI sees all of the synthesis as one keygroup, even though there
are thousands of wavetables. This amazing method saves on precious CPU.
!
Now here is where the CPU hits matter. Because there are so many modulation sources
such as Mod Wheel, LFO Filters, Envelopes, etc, all of these connections have to be
calculated beforehand. This contributes to the CPU spikes, especially when using four
oscillator layers with samples. We are not saying you cannot use four layers of
samples at once, but you will have to probably adjust your buffer settings.
!
Here are some important tips to reducing CPU:
!
1.
2.
3.
4.
5.
6.
Try to avoid running your buffer at 64. The combination of lower buffer and
modulation connections seems to raise CPU exponentially, conversely sitting around
128 and 256 reduces dramatically. 256 is Highly recommended.
When running 4-Sample Oscillators (minus keyswitch) try running your buffer
between 128 and preferably 256. Remember you can always bounce tracks to
audio as well to save CPU when sequencing.
Use velocity key-switching, rather than stacking 4-oscillators.
Try using a sample instead of a synth oscillator as synthesis adds more CPU. You
may be able to produce the same sound replacing the synth oscillator with an
equivalent sample.
Try using modulations, chorus’, and detuning techniques to fatten up a single
oscillator rather than adding a ton of voices to a synth oscillator.
Watch your polyphony! Make sure your playing technique matches the sound. For
example if you have a pad, then don’t play it like a piano. Those glissandos can
add polyphony.
7.
8.
Lead and bass sounds are fine using 4-Oscillators, when used in mono mode.
Using Windows can gain extraordinary results by turning off Enhance Intel®
Speed-step. OSX users can do this, but it is an enhanced feature and only should
be used for people that know what they are doing.
✴ Caution: Use this feature carefully. It’s only for advanced users!
9. MachFive’s effects are pretty low CPU, but as with most synths, LFO’s, and Filters
contributes more to CPU.
10. Muting an oscillator does not reduce CPU. If you are not using a layer, then turning
the layer off is the way to reduce CPU.
11. Please remember to play an instrument the way it should be played. For example,
it may not be too smart to use a Wavetable to make a 4-layer electric piano. That
now means you are going to have to play a synthesis oscillator like you would a
sample.
12. If you don’t need to use Filter 2 and all of it’s envelope and modulators, then
consider using the static Filter 1 as it uses much less CPU.
13. A mixture of Samples and Synthesis make for a good CPU friendly patch.
!
!
!
!
!
!