1
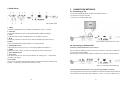
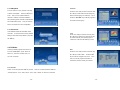
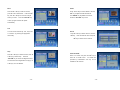
healing HSS852 Owners Manual: CONTENTS
1
INTRODUCTION
Your healing HSS852 is a Satellite Television and Radio receiver that includes a wide
1
range of useful functions.
INTRODUCTION-------------------------------------------------------------------------------1
Please make sure you read this manual before installing.
1.1 Safety Instructions-----------------------------------------------------------------------------------1
1.2 HSS852 Features include--------------------------------------------------------------------------2
2
YOUR RECEIVER-----------------------------------------------------------------------------3
1.1 Safety Instructions
DO NOT INSTALL YOUR RECEIVER:
2.1 Front Panel ---------------------------------------------------------------------------------------------3
•
In a closed or poorly ventilated cabinet;
2.2 Remote Control Battery Care --------------------------------------------------------------------3
•
Directly on top of or under any another equipment;
2.3 Remote Control Unit --------------------------------------------------------------------------------4
•
On a surface which might obstruct the ventilation slots.
2.4 Rear Panel ----------------------------------------------------------------------------------------------6
CONNECTION METHODS -----------------------------------------------------------------7
3
DO NOT EXPOSE THE RECEIVER OR ITS ACCESSORIES:
3.1 Connecting to TV-------------------------------------------------------------------------------------7
•
To direct sunlight or near any other equipment that generates heat;
3.2 Connecting to Satellite Dish----------------------------------------------------------------------7
•
To rain or intense moisture;
3.3 Connecting a USB key for firmware upgrade ----------------------------------------------8
•
To any shock which may cause permanent damage to your receiver;
MAIN MENU -------------------------------------------------------------------------------------9
•
To any magnetic objects, such as loudspeakers, transformers, etc.;
4.1 SET UP ---------------------------------------------------------------------------------------------------9
•
To intense vibration;
4.2 TV/Radio----------------------------------------------------------------------------------------------- 12
•
Never open the cover.
4.0
inside of the receiver. Your warranty will be void if the receiver has been opened.
4.3 USB Recorder and Media Player-------------------------------------------------------------- 16
5.0
OTHER OPERATIONS --------------------------------------------------------------------- 20
•
When the receiver is not used for a long period of time, you should unplug the power
cord from the wall socket.
5.1 Electronic Program Guide ---------------------------------------------------------------------- 20
5.2 Information banners ------------------------------------------------------------------------------ 21
High Voltage electrical hazards make it dangerous to touch the
•
Do not touch with wet hands or use if power lead is damaged, it may cause electric
shock.
5.3 Channel list------------------------------------------------------------------------------------------- 21
5.4 Selection of Audio Language ------------------------------------------------------------------ 22
•
Place the receiver in a well-ventilated environment that allows heat to dissipate.
5.6 Teletext------------------------------------------------------------------------------------------------- 22
•
When connecting cables, ensure that the receiver is disconnected from mains power.
5.6 Subtitles ----------------------------------------------------------------------------------------------- 22
•
Do not use your receiver in a humid environment.
Appendix 1: Trouble Shooting ------------------------------------------------------------------------- 23
Appendix 2: Specifications------------------------------------------------------------------------------ 24
Appendix 3: 12 Month Warranty ----------------------------------------------------------------------- 26
-1-
1.2 HSS852 Features include
2
YOUR RECEIVER
2.1 Front Panel
•
Receives from Satellite Digital Free-To-Air TV and Radio broadcasts.
•
Front panel LED display that can show channel number or time
•
USB2 recorder with timers and Time-Shift, supports most USB keys and HDD’s
•
Separate power switch to simplify re-boot and mains power disconnection.
•
Quick and easy to install
•
Excellent Audio & Video quality
•
4,000 channel 64 satellite memory capacity
•
User-friendly On Screen Display and Menu system
•
USB-2 Personal Video Recorder with really useful TimeShift function
1. STANDBY key
•
Signal Quality and Strength indicator bars
2. MENU key
Displays Main Menu or return to previous Menu.
•
Blind Search select Fast or Detailed
3. CH- / CH+ key
Moves cursor Up or Down in Menu state,
•
Network Channel Scan options Automatic and Manual
4. VOL-/VOL+ key
Increases or decreases Audio volume level in Non-Menu state.
5. OK key
Executes selected Menu item in the menu or confirms an input value.
6. USB2.0 slot
(on the side of receiver)
Figure 1. Front Panel
Switches the receiver between Standby and Operational states.
changes to previous or next program in Non-Menu state.
•
USB firmware upgrade and channel cloning
•
DiSEqC 1.0 and DiSEqC 1.2 LNBF switching protocol functions
•
Electronic Programme Guide (EPG) program information up to 7 days +
•
9 Recording Timers with 3 modes (daily, weekly, once) and sleep timer
Drive to Record or Play program material, play MultiMedia files or
•
Edit TV or Radio programme names
upgrade firmware.
•
Multi-Lingual Subtitling and Audio Track functions
•
Parental Lock function selectable by channel
•
Teletext via On Screen Display and Vertical Blanking Interval
•
Multi-lingual On Screen Menu system in: English, German,
changes setting values in specific Menu items.
Connect an external USB key or Hard Disk
2.2 Remote Control Battery Care
to ensure long life from your Remote Control Unit:
French, Italian, Spanish, Arabic, Persian, and Turkish
•
4 Favourite lists for groups of TV and Radio programmes
•
Last viewed channel resumes at start up
•
Calendar Calculator and Game (Gomoku) functions
1. Double check that the polarity indicators of batteries and RCU terminals correspond.
2. Do not mix new and old or different types of batteries together.
3. Never leave old or exhausted batteries in the remote control.
Accessories Included:
4. If storing your receiver for weeks or longer, remove the batteries from the RCU.
● 1 x User’s Manual
5. Only recharge NiMh etc. cells designed for this purpose, and on a purpose built charger.
● 1 x Remote Control Unit
6. Do not attempt to disassemble, short-circuit, heat or throw batteries into fire.
● 2 x Batteries (AAA type)
7. In the event electrolyte does leak from a battery inside the remote control, wipe away with
● 1 x RCA AV interconnect cable
a damp cloth, rinse the cloth thoroughly and insert new batteries.
•
-2-
Damage to your RCU from leaking battery electrolyte is not covered by Warranty.
-3-
2.3 Remote Control Unit
AUDIO key:
select from available languages and between
All features of your receiver can be accessed with the Remote Control Unit.
Stereo ((•)), Left-Mono ((• or Right-Mono •)).
Key:
Turns the receiver between On and Off,
Standby and Operational.
Key:
Mutes Audio output of the receiver.
EDIT key:
Engages Channel Manager display.
INFO key:
Shows tuned Program Information
MOSAIC key:
Shows 9 channels on screen simultaneously
TV/R key:
Toggle between TV or RADIO function mode
MENU key:
Shows the Main Menu and
exits to Normal viewing mode from any Menu
level.
EXIT key:
Exits Menu or Sub-Menu and cancels functions in
progress.
0 - 9 keys:
Selects channels by number and
provides number input to functions where required.
OK key:
Activates Menu Item highlighted on screen. Displays
Channel List for TV or Radio Mode
▲ ▼ keys:
Selects the Next or Previous program when menu is
off. Moves cursor Up or Down when in menu mode.
◄ ► keys:
Increases or decreases Audio volume level when
menu off. Changes setting values within a menu mode.
PAUSE key:
Time Shift, Multi Media or normal viewing Freeze and Resume
P- / P+ key:
Page Up or Down functions in menu list.
SAT key:
Lists satellite channels or programs, select All or by individual Satellite.
TEXT key:
Displays any Teletext on tuned channel.
SUB key:
Displays a list of subtitled languages the tuned channel supports.
RCL key:
Selects last channel viewed.
FAV key:
Switches Favorite channels mode ON or OFF.
EPG key:
Displays the Electronic Program Guide (EPG) when Menu mode is off.
ZOOM key:
Press sequentially to Zoom in on video through 3 modes.
Press ▲▼ or ◄► keys to move to the part of the screen you want to
see. Press ‘EXIT‘ to return to normal operation.
Recorder key functions:
key: Fast Reverse
key: Fast Forward
key: Last
key: Next
key: Pause (audio remains active with live program) use ‘PAUSE’ key for Time Shift
key: reserved for MediaPlayer functions.
key: Stop
key: Record for PVR and Multi Media Player
USB key (unmarked grey key on lower right of Remote Control Unit):
Press to view ‘My Recorder’ ‘Recorded List’ of saved recordings.
Press ▲▼ keys to select a recording.
Press ‘OK’ key to Play a selected recording.
Figure 2. Remote Control Unit
-4-
-5-
2.4 Rear Panel
3
CONNECTION METHODS
3.1 Connecting to TV
1. Connect the satellite signal from the LNB to the LNB IN connector.
2. Connect the TV using an AV cable.
3. Connect the TV using a SCART cable.
Figure 3.Rear Panel
1. LNB IN
Connect the digital signal from your LNBF at the satellite dish to this ‘F’ connector.
2. LOOP OUT
Provides the possibility to loop to an extra Satellite Receiver (digital or analogue).
3. TO TV
An RF output that connects to the Aerial input of any analogue TV receiver.
4. RF IN
Connects to a terrestrial TV aerial to mix the receivers Modulator signal with Off-Air TV.
Figure 4 Basic connection with a AV cable
5.VIDEO
Constant Composite Video (CVBS) output for TV’s etc. RCA female
6. AUDIO Right and Left
3.2 Connecting to Satellite Dish
Audio output for the audio input of your TV an external amplifier, RCA female x 2.
Connecting a fixed satellite dish to your receiver>
7. S/PDIF
Digital Audio output, Coaxial, connects to an external Audio Decoder, RCA female.
8. Power ON/OFF Switch
First, choose which satellite you want to receive your signals from, and have an installer aim
your dish at the required satellite.
Connect quality coax cable directly between the LNB and your receiver’s LNB IN connector.
9. Power Cord
Your receiver requires 100 - 240V AC (Auto selected), 50 - 60Hz @+/-5%.
Check before
connecting your receiver.
10. TV SCART
This connector provides a high standard of Video and Audio connectivity for Televisions and
Displays.
Connect using a SCART cable suited to your task.
Figure 5 Connecting a fixed satellite dish
Connecting multiple fixed dishes to your receiver using a DiSEqC 1.0 switch>
If you want programs from more than one satellite (For example from Optus D2 and Intelsat 8)
it is advisable to use fixed dishes and a DiSEqC 1.0 switch.
-6-
-7-
Have your Installer aim the
dishes at the requested satellites and connect the LNB's with coax cables to the IN
connectors of the DiSEqC 1.0 switch.
Connect the OUT connector of the DiSEqC 1.0
switch to the LNB IN connector at the back of your receiver.
4.0 MAIN MENU
All the important settings and features of your
receiver can be operated from the Main Menu.
The Main Menu consists of five sub-menus:
“SETUP”, “TV”, “RADIO” “MULTIMEDIA” and
“GAME”. Press the ‘MENU’ key (when menu is
off) and the MAIN MENU screen will appear.
4.1 SET UP
Figure 6. Connecting multiple fixed dishes using a DiSEqC 1.0 switch
From “MAIN MENU” press the ◄ or ►key until you have selected SETUP.
Menu options
are “Installation “, “TV Setup”, “Password”, “Advance Timer”, “SW Update” and “Set
•
Connecting a dish on a motorized positioner to your receiver
It is also possible to watch programs from multiple satellites is by mounting
Default”.
Press the ‘UP’ or ‘DOWN’ keys to make your selection and then the ‘OK’ key
to action.
a single dish to a motorized DiSEqC 1.2 positioner.
Have your Installer mount the dish to the positioner, set the correct angle of the elevation and
let him set the center point for your positioner.
Connect the LNB with a coax cable to the LNB IN connector of the positioner, and connect
the OUT connector of the positioner to the LNB IN connector at the back of your receiver.
4.1.1 Installation
From SET UP menu, press ▲ or ▼ keys to select
Installation.
Then press the ‘OK’ key to enter
Installation menu.
From here, you can select
“General Setting”, “MY DISH” or “TP MANAGER”.
General Setting
Figure 7. Connecting a dish on a motorized positioner to your receiver.
From this menu, you can select “OSD Language”,
“Audio Language”, “Subtitle Language”, “GMT
3.3 Connecting a USB key for firmware upgrade
usage”, “Time Zone”, “Set Date” and “Set Time”.
Plug the USB key into the USB port on the side of your receiver.
-8-
-9-
MY DISH
4.1.2 TV Setup
From this menu, when you change “Switch
From the “SET UP” menu, press the ▲ or ▼ keys
Type” to “DiSEqC1.0/1.1”, you can select
to select “TV Setup”.
“Toneburst” “On” or “Off”.
enter the “TV Setup” menu.
Press ▲ or ▼ keys
Press the ‘OK’ key to
From here you can
to select an LNB and press ‘OK’ to edit.
set “Screen Shape” (“4:3 LetterBox”, “4:3
Press the ‘RED’ key to start “Scan All”, the
PanScan”, “16:9 LetterBox” or “16:9 CentreCut”);
‘GREEN’ key to delete the satellite, ‘YELLOW’
“TV Mode” (*”PAL” recommended for A&NZ*
to delete all satellites or the ‘BLUE’ to “Scan”.
“Auto”, “PAL” or “NTSC”), “OSD Transparency”
(“1” through “8”), “Banner Display Time” (“1S”,
“3S”, “5S”, “10S”, “30S” or “Always”), “Video Output”: Composite “CVBS (+ RGB”, + YCbCr”
When you change “Switch Type” to
or S-Video”), “RF Out” “Audio mode” (“PAL BG” for A&NZ) and modulator “RF channel”
“DiSEqC1.2/USALS”, you can press the ‘RED’
(UHF ch’s “21” – “69” Australian).
key to set “Limit”, the ‘GREEN’ to set
“Location” or ‘YELLOW’ to set “LNB”.
4.1.3 Password
Press the ▲ or ▼ keys to select a position and
‘press the ‘OK’ key to edit.
Press the
From “SET UP” menu press ▲ or ▼ to select
“Password”, then press the ‘OK’ key to enter
‘GREEN’ key to “delete a satellite”, ‘YELLOW’
key to “delete all satellites” or ‘BLUE’ to
Password menu.
From here you can access
“Menu Lock” (“ON” or “OFF”), “Channel Lock”
“scan”.
(“ON” or “OFF”), “Censorship Lock” (“No Block”,
“Total Block” or “02 to 18”), or “Change
Password” (“NO”/”YES”).
TRANSPONDER MANAGER
Press the ◄ or ► keys to select a “Satellite”
you have already installed in “Installation”, “MY
DISH”.
Press the ▲ or ▼ keys to select
“Transponder Frequency”.
Then press the
‘RED’ key, to “add a Frequency”, the ‘GREEN’
to “delete a Frequency”, ‘YELLOW’ to “delete
all” or ‘BLUE’ to “Scan new transponders”.
- 10 -
4.1.4 Advance Timer
From “SET UP” menu, press the ▲ or ▼ keys to
select “Advance Timer” and press the ‘OK’ key
to enter.
Here you can add a timer event by
pressing the ‘RED’ key.
Select “Channel Type”,
“Channel No.”, “Channel Name”, “Start Date”
(Y/M/D), “Start Time”, “End Time”, “Mode” or
“Timer Mode”.
Press the ‘OK’ key to save.
- 11 -
4.1.5 SW Update
Favorites
From the “SET UP” menu, press ▲ or ▼ keys
Press the ▲ or ▼ key to select a channel, then
to select “SW Update”.
◄ or ► key to select the Favorites Heart icon.
enter.
Press the ‘OK’ key to
Here you can “Update software” /
Select a favorite group icon with keys ‘1’ to ‘8’.
firmware or “Backup” a favorite installation
Press the ‘YELLOW’ key to add the program to
setup including found channels and parameters
the chosen Favorite group.
with a USB memory stick.
Test your memory
stick in the receiver to ensure compatibility.
4.1.6 Set Default
CAUTION Set Default will also delete found
Lock
Press ▲ or ▼ keys to select a channel, press
◄ or ► keys to select Lock. Press the OK key
to lock the channel, press OK key again to
cancel lock. Press the YELLOW key to save.
channels! To reset receiver to Factory Default
settings, select “Set factory default?” and press
the ‘OK’ key.
4.2 TV/Radio
Listening to Radio programs is similar to TV.
Edit
From the “MAIN MENU”, press ◄ or ► to
Press the ▲ or ▼ key to select a channel, the
select “TV”, this menu consists of the “TV
◄ or ► key to select “Edit”.
List“ and “TV Guide”.
key to enter the “Program Info” menu.
Press the ‘OK’
From
here you can see program information or
rename the channel, should you so desire.
4.2.1 TV List
Select “TV List” and press the ‘OK’ key to enter.
Here you can add channels to different
“Favorite Groups”; “Lock”, “Edit”, “Move”, “Sort”, “Skip”, “Delete” or “Search” for channels.
- 12 -
- 13 -
Move
Delete
Press the ▲ or ▼ key to select a channel,
Press ◄ or ► keys to select “Delete”, then the
press ◄ or ► to select Move.
‘OK’ key to delete the selected channel.
Press the ‘OK’
key, then ▲ or ▼ keys to move the channel
The ‘GREEN’ key will delete all channels,
where you want it.
Press the ‘YELLOW’ key to save.
Press the ‘YELLOW’ key
to save, program number will update
automatically.
Sort
You can sort the channels by “A-Z”, ”Pay-Free”
Search
or “TP Desc.” by pressing the appropriate
Press ◄ or ► key to select “Search”, then the
colored key.
‘OK’ key.
Enter the channel name and press
‘OK’ key to search for this channel.
Skip
Press ▲ or ▼ keys to select a channel, then ◄
or ► keys to select “Skip”.
Press the
‘YELLOW’ key to confirm the skipped channel.
The channel is then skipped when tuning by ▲
or ▼ keys, but is not deleted.
- 14 -
4.2.2 TV Guide
Select “TV Guide” and press the ‘OK’ key to
enter the TV Guide menu.
TV Guides are
provided by broadcasters and may not be
available for all channels.
- 15 -
4.3 USB Recorder and
Media Player
Fast Rewind and
Fast Forward speed through a recording being played at
x 2, x 4, x 8, x 16 or x 32 times real time, depending on how many times you press the key.
To access these functions, a USB Hard
Disk Drive or USB key Storage Device is
required.
Pause: suspends replay of a recording.
Ensure Power Switch on the back of
Do not confuse with TimeShift ‘PAUSE’ key (between AUDIO and P- keys).
your receiver is switched to OFF before using
the USB connector at the side of the receiver.
4.3.2 Advance Timer Record
Most USB powered drives are supported
(supplied separately).
for Time Shift.
Please allow time for the receiver to check drive and select a portion
The larger the drive the longer this process may take.
From “SETUP” – “Advance Timer”; press the ‘OK’ key to enter “Advance Timer Event
schedule”.
Timer Mode must be set to Recording.
Press the ‘RED’ key to add an event.
Enter the info. requested navigating with ▲▼ and ◄ ► keys.
4.3.1 Recording and Playing Programs from USB Storage Device
Press the OK key to save
and your new event will be added to the Event schedule.
: Record key:
Press to Record the tuned program.
Press the ‘OK’ key to confirm a Default 2 hour
recording, or press the ◄ or ► keys to select a different record duration.
to confirm.
Press the ‘OK’ key
A One Button Recording shortcut is available and the Default Recording Period
can be defined by the user.
4.3.3 TimeShift
With a USB drive connected, your receiver can provide TimeShift that permits you to PAUSE
live TV whilst you take a phone call (or in AUTO to view material broadcast earlier).
A record indicator with elapsed time will show on the top left of
the screen for 8 seconds, or by pressing the ‘INFO’ key at any time.
To set up TimeShift, from “Main Menu” enter “MULTIMEDIA” – “My Recorder” – “Recording
Preferences”.
To Play recorded files: first press the ‘USB’ key to view “My Recorder” “Recorded List” of
saved recordings.
Press ▲ or ▼ keys to select a recording.
Press the ‘OK’ key to Play.
A file only partially played previously will offer the option of Playing from “position last viewed”.
File name, recording date and progress bar show in the top left of the screen (ceases after 8
seconds).
▲ and ▼ keys skip to Previous or Next file in “Recorded List”.
Program from the list, press the ‘RED’ “SAT (Del)” key and ‘OK’ to confirm.
Your receiver automatically reserves up to 5GB of HDD space for Time Shift,
depending on disk space available.
Set “Time Shift” to “Pause” to activate with ‘PAUSE’
key (between AUDIO and P- keys), or select “AUTO” to record TimeShift continuously.
“AUTO” may interrupt other RECORD functions.
N.B.
“One Button Recording” and “Default
Recording Period” settings are for manual recordings only.
To “Delete” a
To activate TimeShift press the ‘PAUSE’ key (between AUDIO and P- keys).
A “Pause”
indicator will appear in the top right corner of your screen and any activity indicator on your
The
key is reserved for MediaPlayer functions.
‘Stop’ key: stops Recording or in Play exits to “Recorded List”.
Press the ‘EXIT’ key to return to live TV or Radio mode.
USB drive will flash.
TimeShift records from this point until the 5GB reserved is full or you
Fast Forward to real time.
To Play press the ‘PAUSE’ key again.
shows time and distance into and total length of the Time Shift recording simultaneously
displays for 8 seconds, or when INFO or PLAY keys are pressed.
- 16 -
A Progress Bar that
- 17 -
Fast Forward and
Fast Rewind speed through Time Shift recordings at up to x 32 times real time,
4.3.4 My Record
This menu consists of three sub-menus; “Recorded
depending on how many times you press each key.
List” , “Recording Device” and
“Recording Preference”.
Recorded List
4.3.3 MediaPlayer
From here, you can view a list of or play a recording.
Press ▲▼ keys to select the program, and press the
This receiver includes a MediaPlayer that plays .mpg, .dat, or .vob (MPEG1 or MPEG2)
‘OK’ key to play.
and .avi (XviD MPEG4, MS ISO MPEG4 or MJPEG) Video; .jpg, .bmp or .gif
Recording Device
Pictures; .mp3, .ogg or .wma Audio file types from most USB storage devices.
Here you can view the recording device or format the
disk.
Recording Preference
From “MAIN MENU”, press ◄ or ► keys to select “MULTIMEDIA”.
This menu consists of
From here you can select Recording Preferences.
“My Album “, “My Music”, “My Movie” and “My Recorder”.
4.4 GAME
4.3.1 My Album
Select “My Album” and press the ‘OK’ key, then press the ‘BLUE’ key to choose your photo
folder, select a photo and press the ‘OK’ key to view.
From “MAIN MENU”, press ◄ or ► to select “GAME”.
Here you can play “Gomoku”, view the “Calendar” or
use the “Calculator”.
4.3.2 My Music
Select “My Music” and press the ‘OK’ key to enter, press ▲ or ▼ keys to choose a song,
press the ‘OK’ or ‘RED’ key to play, the ‘RED’ key to pause, ‘GREEN’ to
4.4.1 Gomoku
stop, ‘YELLOW’ to loop repeat and ‘BLUE’ key to fast forward.
Line up the balls against the computer.
Options include “Move First”, “Move Later”, “Human”;
“Easy” and “Normal”.
4.3.3 My Movie
Select “My Movie” and press the ‘OK’ key.
screen.
Select folder through Menu structure on left of
Use the the ▲ or ▼ keys to select a movie file.
selected file.
Press the ‘OK’ key to play
Press ▲▼ keys to play the previous or next movie, ◄► to change volume.
4.4.2 Calendar
View Calendars month by month from the year 1900
to 2100. Starts highlighting today.
the week you were born!
- 18 -
Find the day of
- 19 -
4.4.3 Calculator
5.2 Information banners
A handy calculator that is available at a moments
notice.
The basic Information banner displays
automatically every time you change channel.
It provides information about Current and Next
program times, Date and Time and Favourite
group.
5.0 OTHER OPERATIONS
Detailed information banners with EPG and
5.1 Electronic Program Guide
technical description of the tuned program are
EPG shows the program schedule for the tuned
displayed by pressing the INFO key twice and
channel.
EPG is provided by the broadcaster
and may not always be available.
three times.
With Menu off press EPG key, the EPG Menu will
appear. Screen is divided to 3 main parts: at left
Channel List, at right Program Schedule and
below a brief program description with program
start and end times.
5.3 Channel list
To show the list of Program channels found,
In channel list, use
keys to choose the channel.
Use
to switch between channel list and program schedule. In program schedule list:
Use
keys to choose program.
Use
Use ‘RED’ or ‘GREEN’ keys to select Previous or Next day of schedule.
Use
press the ‘OK’ key from normal viewing mode.
keys to switch between Channel List and Program Schedule.
or
keys to select a channel and
press ‘OK’ to switch to full screen normal
viewing mode.
Use the ‘YELLOW’ key to display detailed Program Information.
Use the ‘BLUE’ key to program Timer for selected programmes.
In program details: Use
keys to scroll through Program Information.
Press the ‘Exit’ key to return to the Program List.
- 20 -
- 21 -
5.4 Selection of Audio Language
Press the AUDIO key on your remote control.
keys to select the audio language
Use
from the list of those available. Use the
Appendix 1: Trouble Shooting
If the receiver does not work properly after making a visual inspection, please contact your
supplier.
keys to select sound mode between “LR” (Left +
Don't open the receiver cover, this may unnecessarily expose you and those
around you to danger of electrocution.
Right Stereo), “L”L (Left Mono) and “RR” (Right
Mono). Press ‘EXIT’ to confirm your selection
Symptom
Cause
and exit.
The
display
on
front panel does
5.5 MOSAIC (Nine picture view)
not light up.
The power cord is not plugged
in.
In normal viewing mode (menu off), press the
Wrong
MOSAIC key.
Audio/Video
Mosaic shows 9 programs on
screen, simultaneously.
No
picture
or
sound
Remedy
connection
output
the
Connect the Audio/ Video output
of
the
of the receiver to TV correctly.
receiver to TV.
Audio muting.
Press the Mute key
TV power off.
Turn TV on.
signal
In normal viewing mode press ‘TXT’ key.
Press▲▼ to move up or down from the
displayed page number.
tuner parameters.
Press any key to exit".
remote
control does not
The batteries are not inserted
properly or exhausted
In normal viewing mode press the ‘SUB’ key.
A list of available subtitle languages will display
keys to select language
and press the ‘OK’ key to confirm.
To disable
subtitles select “OFF” from the list of languages.
- 22 -
in
the
installation
spectrum analyzer and adjust your
Check
the
- 23 -
batteries
with
a
multi-tester, re insert or replace as
necessary.
5.6 Subtitles
Use
parameters
dish and lnb correctly.
The
work
on screen.
Correct the values of the tuner
Check the signal strength with a
Wrong direction of the dish
If the current program has no Teletext,
you’ll see the message“Teletext no data –
the cable, or connect the cable to
menu.
Press Number keys (‘0’ to ‘9’) to select page
directly.
Check the antenna cable, replace
the receiver tightly.
Incorrect values of some
No picture
plugged in to the wall outlet.
of
The receiver can’t receive the
5.6 Teletext
Check that the power cord is
Appendix 2: Specifications
Tuner
IF Input Frequency
950 to 2150MHz
Input Impedance
75Ω
Input level
-65dBm to -25dBm
LNB Power Supply
13 or 18V±0.5V, Max 500mA,
Waveform
QPSK
Symbol Rate
2 to 45 MS/s
Viterbi Rate
K=7,R=1/2, 2/3, 3/4, 5/6, 7/8, auto
Reed Solomon Decode
204, 188, T=8
Standard
ISO/IEC 13818-2 MPEG MP@ML
Video Aspect Ratio
4:3, 16:9 Pan & Scan, Letter box,
Video Decoder
Audio Decoder
CPU & Memory
Full Screen
.mp3, .ogg or .wma
Video
.mpg, .dat, or .vob (MPEG1 or
MPEG2) and .avi (XviD MPEG4,
MS ISO MPEG4 or MJPEG)
Modulator
Front Panel
File System
FAT32
Frequency Output
470 to 860MHz
TV System
PAL BG Australian 7MHz plan
PLL Channel
Ch.21—69, Adjustable
4-digit LED Indicator
Channel and Status Display
7 Keys
↑, ↓,←,→, Menu, OK, Standby
Resolution
720*576(PAL), 720*480(NTSC)
Infrared Remote Receiver
38KHz
Video Output Level
1.0Vp_p, 75 Ohm
LNB IN
F- Type Connector
Standard
ISO/IEC 11172 LAYER I&II
LOOP OUT
F- Type Connector
Output Mode
Left/Right, Stereo, Mono
RCA Output
3 RCA (Left/Right Audio, Video )
Sampling Frequency
32, 44.1, 48KHz
S/PDIF (Coaxial )
1 RCA (Digital Audio)
Modulator
RF IN
IEC169-2, Female
Modulator
TO TV
IEC169-2, Male
Audio Output
0.775 Vrms, Unbalanced
Connectors
SCART to TV
CVBS/RGB, Left/Right Audio
USB
USB2.0
Power Supply
90 – 250V AC, 50/60 Hz +/-5%
CPU
CT216S
Max. Power Consumption
≤ 8W
Flash Memory
2 MByte
Stand By
< 2W
SDRAM
16 MByte
Operating Temperature
0 to 55°C
Picture
.jpg, .bmp or .gif
Storage Temperature
-45to 65°C
Size (Lx W x H)
260 x 195 x 40mm
Weight
1.4KG
Recorder and
Media Player
Audio
- 24 -
General
- 25 -
Appendix 3: 12 Month Warranty
Subject to the conditions stated below, healing digital warrants your new receiver to be free of
defects in workmanship and materials for twelve months from date of purchase. For the
period of warranty healing digital's obligation includes labour and materials, but excludes
neglect, accident, abuse and transportation to and from healing digital's service station.
healing digital will not be liable for consequential loss or damage arising from any function of
the receiver. healing digital reserves the right to determine at its sole discretion fault cause.
In the event of a claim, proof of purchase in the form your Tax Invoice and this warranty slip
may be required. This warranty applies to the original purchaser only and is not transferable.
The benefits conferred by this warranty are in addition to rights provided under relevant State
or Federal legislation, but excludes any other expressed or implied warranty.
www.healingdigital.com
42 Brunel Rd, Seaford VIC 3198, Australia
errors and omissions excepted © 2010 www.healingdigital.com
- 26 -