1
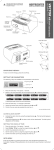
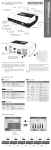
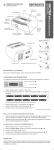
If the filter is polluted or in the display appears the message Change Filter the filter cassette must be changed. 1. 2. 3. 4. @ ;$ $*#!%(/!. Pull out sidewise the cassette for filter change. Take off the filter frame cover. Replace the filter cassette. Mount the filter frame cover onto the new filter cassette. Make sure the upper part (slit) and the filter cassette (pin) are in the correct position. Quality makes the Difference 1 Weekly cleaning of the therapy tube 1. Close the measuring tube tightly with the stoppers before cleaning. 2. Use mild soapy water for cleaning, thoroughly rinse with clear water, and let the tube dry in air. 3. Remove the two stoppers from the measuring tube after cleaning. To reset the filter counter, go to the Patient-Menu (press the key for approx. 1 second), then select Change Filter with the keys and . Press the key twice. Never operate the device without filter cassette. Only and exclusively use original HOFFRICHTER filter cassettes. Otherwise, the warranty for the respiratory therapy device will becomes invalid. CLEANING Daily cleaning of the mask 1. Disconnect the mask from the therapy tube. 2. Use mild soap water (don´t use other additives) for cleaning, thoroughly rinse with clear water and let the mask dry in air, protected for direct sunlight. 2 4 If water should stay in the measuring tube it could adulterate the pressure measuring or delay the control. Both could affect an optimal therapy. Weekly cleaning of the device 1. Disconnect the power plug from the socket. 2. Wipe the device with a cloth slightly moistened with soapy water. Then use a dry cloth to wipe the device dry. Cleaning the head gear Clean the head gear as required: 1. Disconnect the head gear from the mask. 2. Clean the head gear as described in the head gear manufacturer’s User’s manual. VECTOR et serie kurz-eng-0110-01 Art.-No.: 5000 0246 HOFFRICHTER GmbH Mettenheimer Str. 12 / 14 19061 Schwerin Germany Phone: +49 385 39925 - 0 Fax: +49 385 39925 - 25 E-Mail: [email protected] www.hoffrichter.de 1 2 3 4 5 6 7 8 9 10 11 12 13 14 Program keys Filter cassette Display Heater LED Info key Heater key Release button Measuring tube connection Therapy tube connection Contact socket for humidifier ON/OFF key Power connection RS232 interface Type label Short Manual CPAP - AUTO - BILEVEL - BILEVEL ST20 This document does not replace the User´s Manual. Observe the User´s manual! VECTOR et FILTER CHANGE USE OF THE DEVICE 1. Set up the device acc. to the setup instructions (see User´s Manual). 2 2. Connect the power supply with the device. 3. Connect the power cord with the power supply and plug the power plug into a socket. 4. The device displays a welcoming message, the software version and the current number of treatment hours. Thereafter, the display shows the date and time. • • Delete Filter Mask (only VECTOR et Auto) 5b Activate the alarm clock by using the key. The bell symbol appears. By using the key the alarm clock will be deactivated. The bell symbol disappears. SETTING THE WAKE-UP TIME 1. 2. 3. 4. 5. Press the key approx. 1 second. Select Wake Time by using the and keys. Confirm by pressing the key. Set the wake-up time by using the and keys. Confirm the wak-up e time by pressing the key. Ramp Mask Test Automatic 6 7. Put on the mask. If you have selected the automatic mode, the device will start on your first breath. In the manual mode, press the ON/OFF key to start the device. 10. Breathe deeply and calmly only through your nose. You can set the parameters of the device with the following three keys: = program key = program key = enter key Wake Time 6. Also connect the measuring tube to the measuring tube connection. 9. Place the tube such that it does not exert any pulling action on the mask while you are lying down. ALARM CLOCK ON/OFF 1. Press the key for approx. 1 second. 2. Change to the next parameter with the key in following sequence: 5a 5. Connect the therapy tube a) to the air outlet and b) to the mask. 8. The device will then run through the mask test for the time selected and at the pressure prescribed. You should now properly seat the mask in order to eliminate any potential leaks. SETTING THE PARAMETERS Brightness Date Time A flashing arrow shows the active parameter. 8+9 3. Press the key to change a parameter. 4. Adjust the wanted value with the and keys. 5. Confirm the new value by pressing the key. By pressing the info key i you get to the Info-Menu. Here all adjusted parameters can be recalled. Changes of these parameters can only be done by your physician or authorized dealer. HUMIDIFIER AquaDROP et (optional) If necessary, just click the humidifier onto the device. Remove it by pressing its release button. The heater levels are set in the heater menu. The selected heater level is displayed as in the display of the device while the humidifier heating is switched on. For more information please see your AquaDROP et - User`s manual.